There may be times when the Dell XR5610 platform has hardware issues.
iDRAC access is required for any troubleshooting on this platform.
Connection to the iDRAC interface allows virtual console access, access to the BIOS, and the ability to install GNOS remotely.
iDRAC access
The Integrated Dell Remote Access Controller (iDRAC) is designed for secure local and remote server management, and helps IT administrators to deploy, update and monitor. The location of the iDRAC port is shown below:
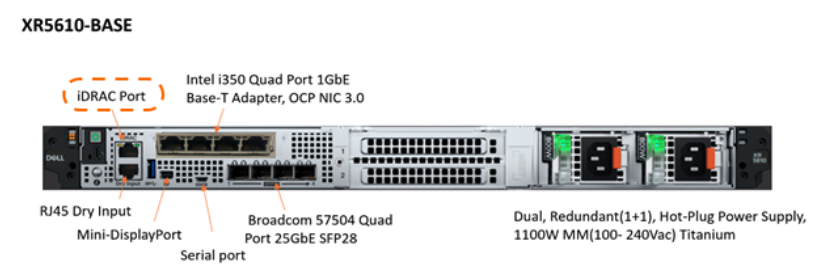
An IP address must be configured on the iDRAC port, which can then be used to access the iDRAC UI.
The home screen is shown below:
.png)
Remote Console Access Methods
The iDRAC interface can be used to access the console of the device. The console will have logging messages printed out it that give a view into what the device is doing upon bootup. The virtual console interface is also used during the GNOS installation process. A license is required to enable the full functionality of the Dell iDRAC virtual console. The "iDRAC Enterprise license” (or higher) unlocks features like virtual console access, virtual media, and out-of-band performance monitoring.
There are 2 ways to access the system console through iDRAC:
Serial Over LAN (SOL): Provides text-based console access over the network.
Virtual Console: Provides a full graphical console experience, accessed either by:
VNC
iDRAC Web Interface
Serial Over LAN (SOL)
This text-based method is done by enabling the “Serial over LAN” feature.
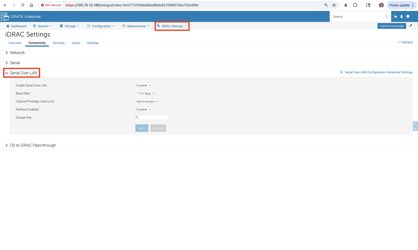
Go to the iDrac Settings —> Connectivity —> Serial Over LAN screen as shown below.
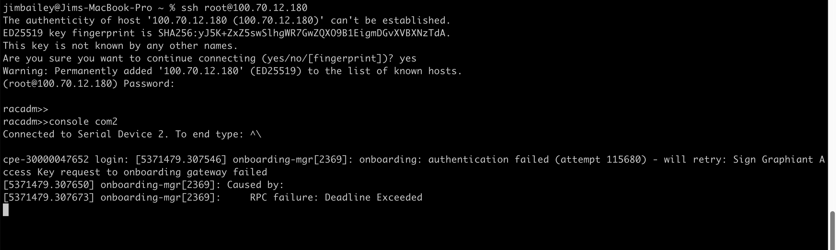
The console port is accessed via ssh to the iDrac IP address and running the command console com2.
This method will show all the log messages printed to the console.
Virtual Console
This graphical console experience can be accessed in two ways, VNC or iDRAC Web Interface.
VNC
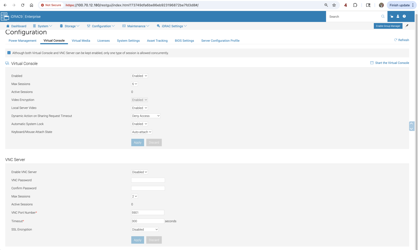
The VNC server can be configured via the ‘Configuration’ —> ‘Virtual Console’ screen as shown below.
The virtual console may not be getting the full log messages.
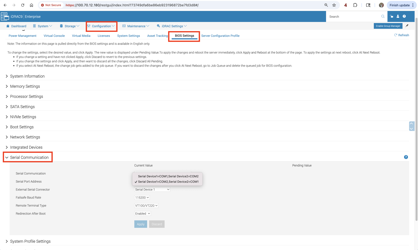
The ordering of the COM1 and COM2 ports will determine to what port the initial boot logs are printed.
The port can be changed via the ‘Configuration’ —> ‘BIOS Settings’ —> ‘Serial Communication’ screen as shown below.
iDRAC Web Interface
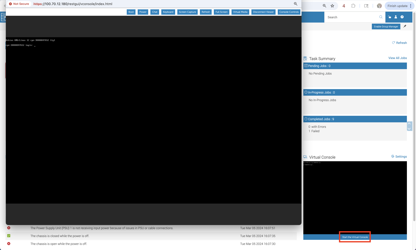
Click on ‘Start the Virtual Console’ at the lower right of the initial screen.
That action will spawn a new window with access to the device console as shown below.
Potential Platform Issues
There are a number of hardware issues that can happen on the Dell XR5610 platform.
The below sections will cover several of these issues, although at this time it is not a comprehensive list. This document will be updated as more issues are encountered.
Cooling
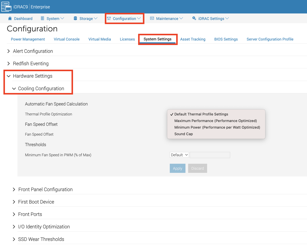
The Dell XR5610 platform often runs hot; the fan speed should be adjusted to provide more cooling for the device.
The fan speed can be adjusted under ‘Configuration’ —> ‘System Settings’ —> ‘Hardware Settings’ —> ‘Cooling Configuration’ screen.
The “Maximum Performance” configuration provides the most cooling for the device.
Part Replacement or Firmware Update
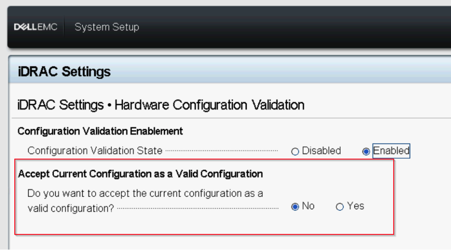
If there have been any changes in the system's hardware or firmware configuration, the hardware configuration may need to be updated.
The system will be unable to boot and the HWC8010/8011 error code may be displayed on the console.
Press F2 on POST to enter the setup menu.
Go to ‘iDRAC Settings’; select ‘Hardware Configuration Validation’.
Select ‘Yes’ to accept the current configuration as valid.
NIC Placement
NIC placement is very important on the Dell XR5610. The picture below shows the slot arrangement.
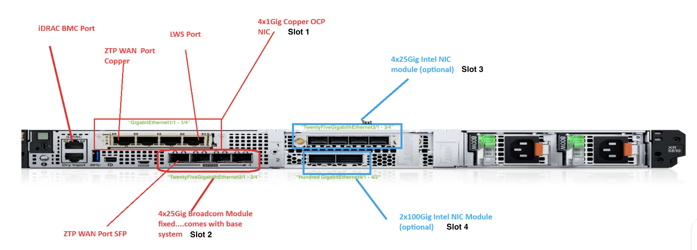
Slot 1 (OCP slot)
This is a MANDATORY card since the default onboarding and local web server ports are here.
Name | Vendor ID & Device ID | Notes | Naming |
1G Intel i350 Copper | 0x8086, 0x1521 | 1G copper ports, recommended. | GigabitEthernet1/X |
Slot 2 (Embedded NICs)
These are always BCM57504 NetXtreme-E (25G).
Name | Vendor ID & Device ID | Notes | Naming |
Broadcom NetXtreme E/S-Series | 0x14e4, 0x1751 | 10/25G Fibre SFP ports. | TwentyFiveGigabitEthernet2/X |
Slot 3 (Optional top right)
Name | Vendor ID & Device ID | Notes | Naming |
Intel Ethernet Controller E810-C for SFP | 0x8086, 0x1593 | 10/25G Fibre SFP ports. | TwentyFiveGigabitEthernet3/X |
Slot 4 (optional bottom right)
Name | Vendor ID & Device ID | Notes | Naming |
Intel Ethernet Controller E810-C for QSFP | 0x8086, 0x1592 | 10/25/100G Fibre SFP ports. Only 2 ports. | HundredGigabitEthernet4/X |
Parts replacement
The BIOS settings may need to be updated if parts have been replaced.
The iDRAC UI can be used to review and update the BIOS settings.
The BIOS settings can be found in the ‘Configuration’ —> ‘BIOS Settings’ screen as shown below.
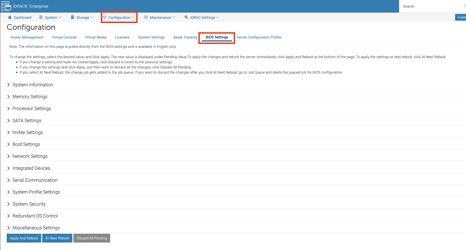
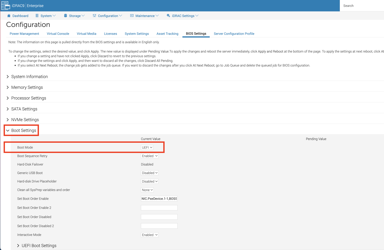
Key settings in the BIOS are the boot mode and the TPM mode.
Ensure that the boot mode is set to “UEFI”.
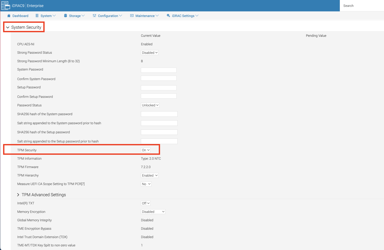
Also ensure that the “TPM Security” is “on”.
Remote GNOS install
The iDRAC UI can also be used to re-install GNOS on the device.
Go to the ‘Configuration’ —> ‘Virtual Media’ screen as shown below.
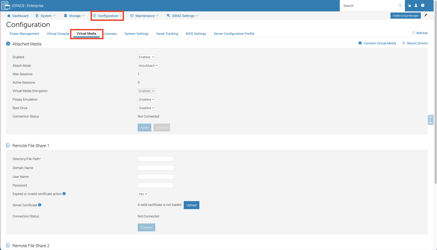
Click on ‘Connect Virtual Media’. This action will spawn a new window as shown below.
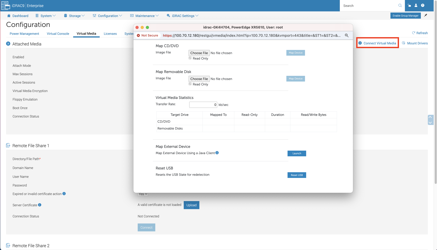
Choose the GNOS iso image to mount and re-boot the device.
The screen below will eventually come up.
Use the down arrow on the keyboard to select the option to ‘Autoinstall (wipe existing)’.
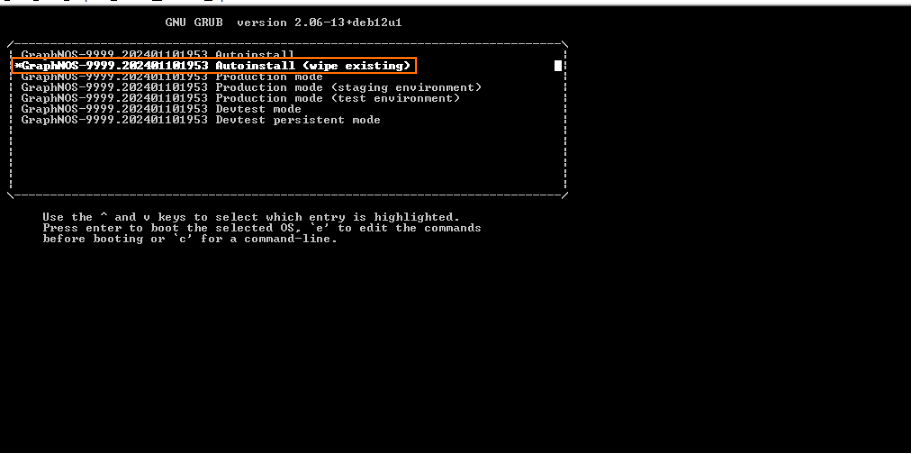
GNOS will install and reboot the device on the installed OS.
Ensure that you:
Unmount the iso image after the installation process completes and before the reboot.
Please Note:
Re-installing GNOS over the WAN/Internet can have issues.
The image download may not work if the connection is high latency or loss.
It is best to have the image as close to the site as possible when installing GNOS using this method.