Deploying a Hardware Edge Using Static WAN IP
What is Static IP?
A Static IP is a permanently fixed IP address, specifically reserved for the connection to a device, and by definition stays the same over time.
Static IPs allow the device to be easily referenced and located via reliable connection.
Setting Static WAN IP on the Graphiant Edge
Graphiant does not manufacture customized hardware. Graphiant certifies series of hardware families from various manufacturers as supported for network connectivity services.
Graphiant has three supported hardware options for connecting to the Graphiant Core:
Note:
Static WAN IP is set prior to a hardware Edge being onboarded into a network.
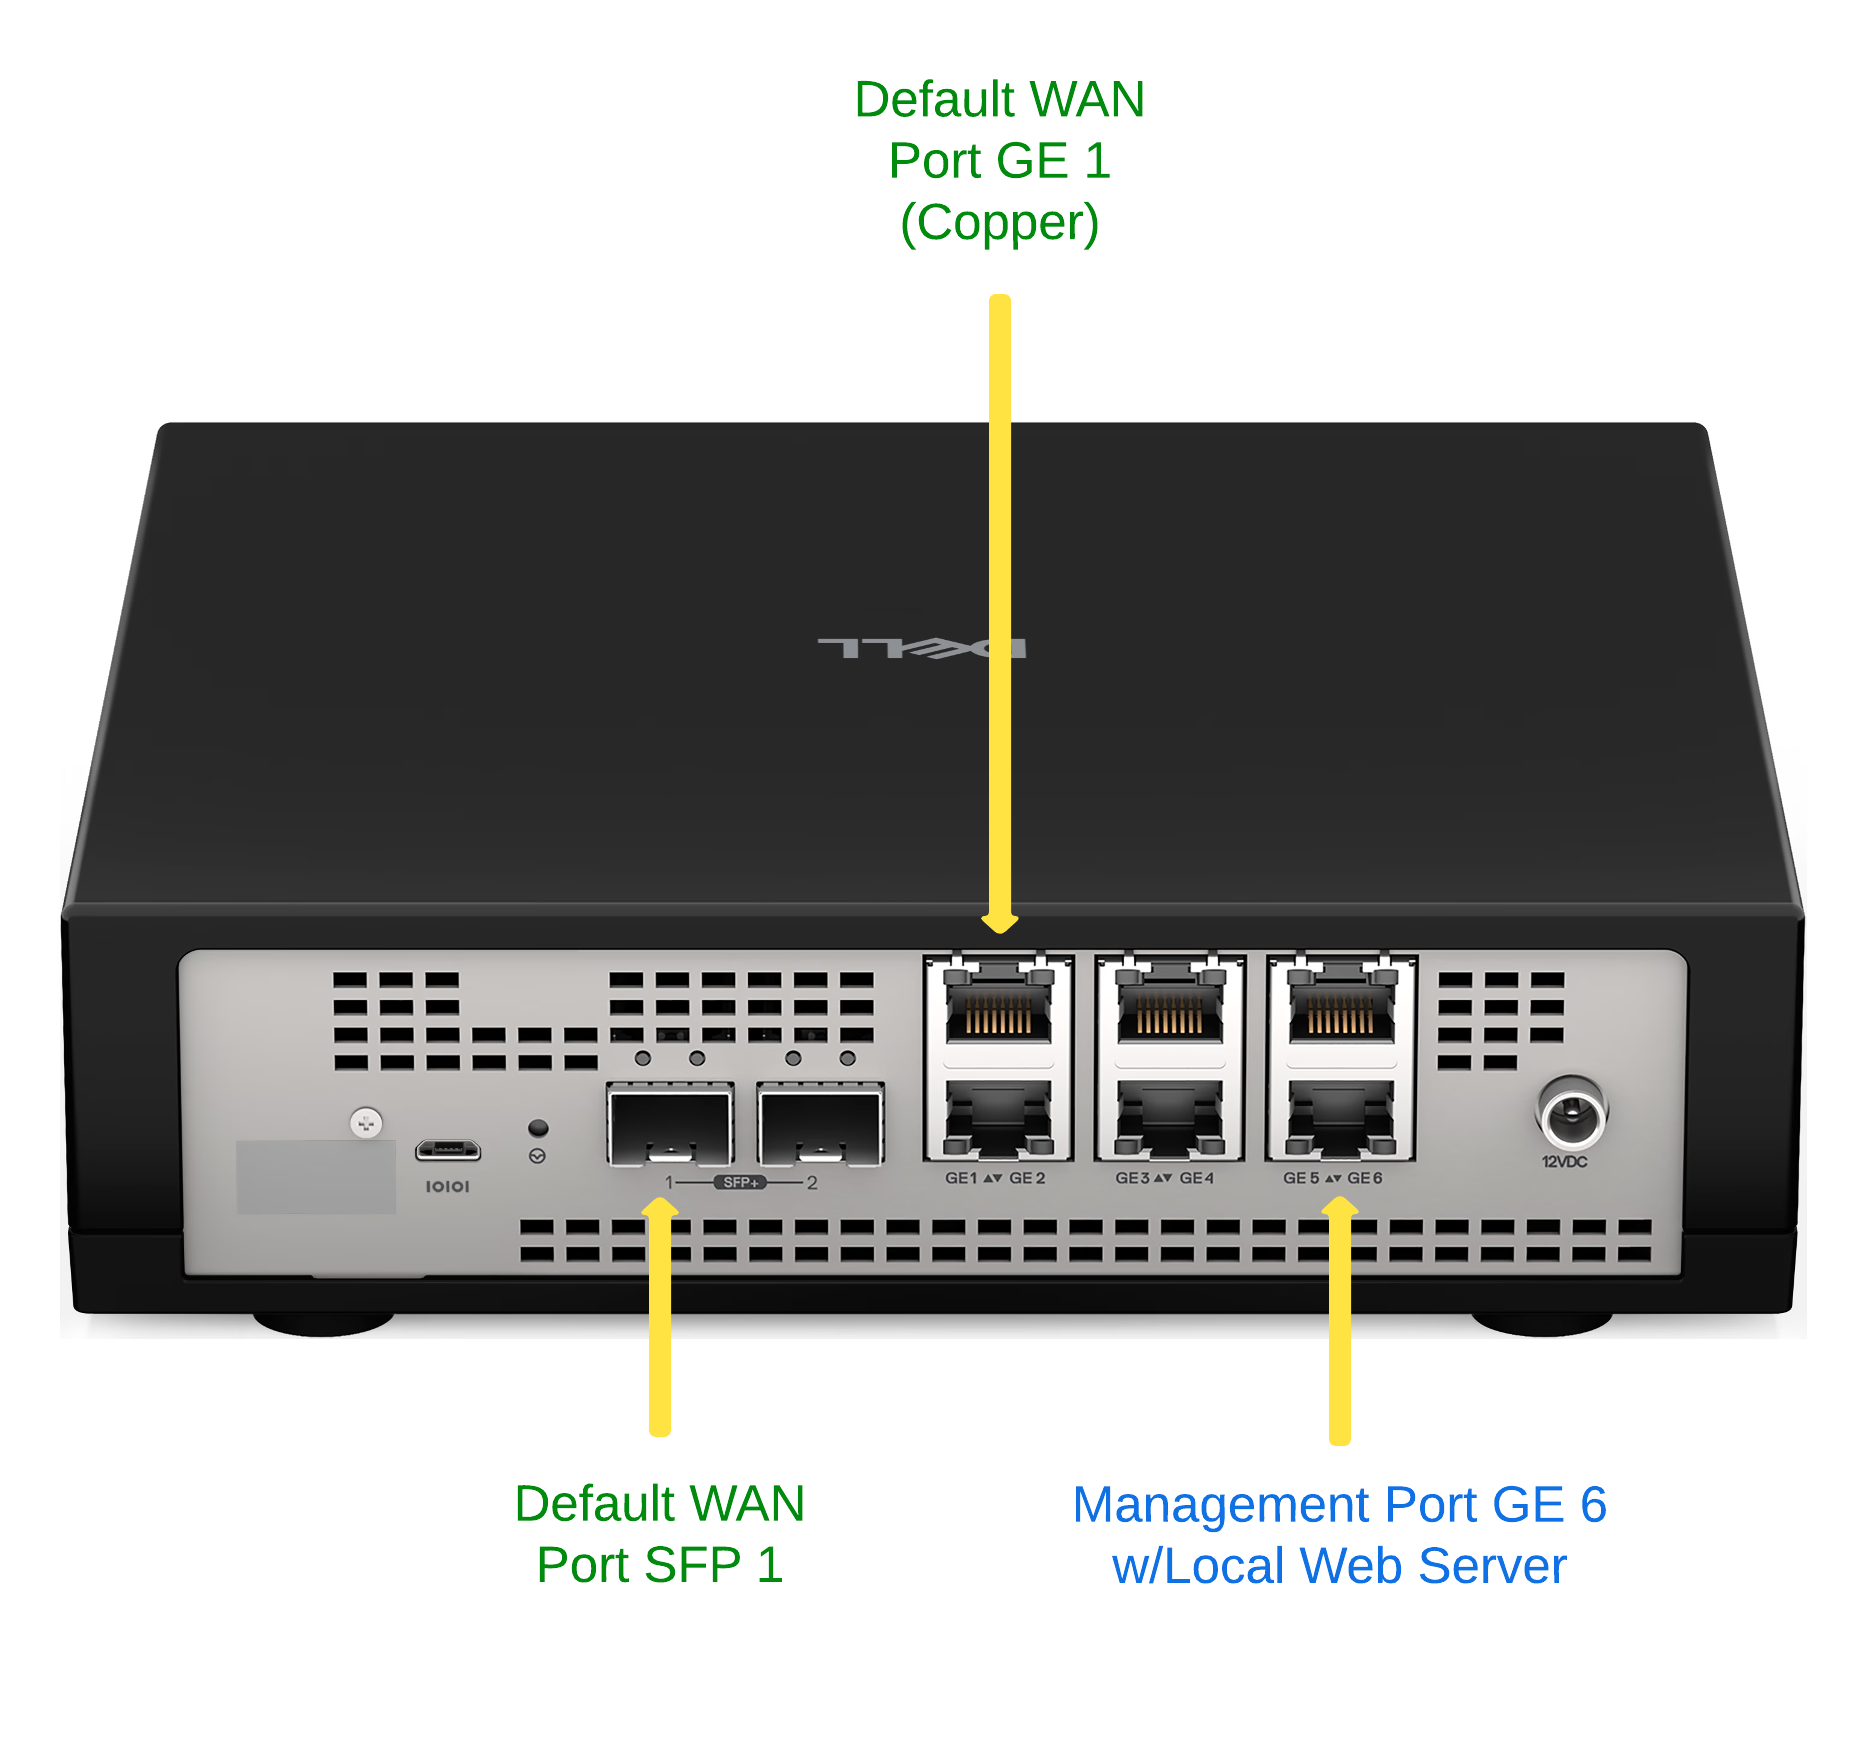
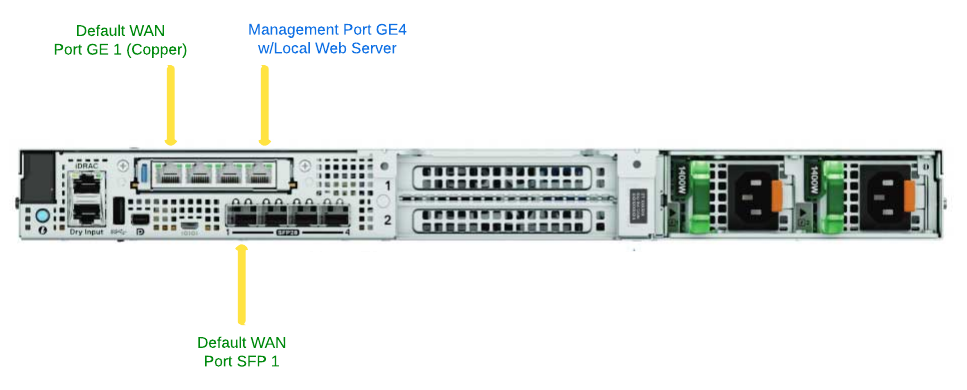
Setting Static WAN IP on a Dell VEP-1425N
Ports:
WAN Port:
The default WAN ports on the Dell VEP-1425N are SFP Port-1 and GE Port-1. SFP Port-1 requires an SFP module; GE Port-4 is copper. Both ports are in DHCP client mode. DHCP client mode enables the edge to do zero touch provisioning to the Graphiant network. If the WAN interface doesn't have a DHCP server, Static IP address must be configured manually. Configuring an IP address for use on the WAN Port is done via the Management Port.
Management port:
The management port on the Dell VEP-1425N is GE Port-6. There is a local web server running, and the port is in DHCP server mode. The laptop/PC will receive an IP address in the 192.168.1.0/24 subnet if it is configured for DHCP client. Alternatively, a static IP address may be set on the laptop/PC’s ethernet to 192.168.1."X" (where "X" does not equal 1), mask 255.255.255.0. There is no need to set a default gateway.
Note":
The DHCP Server does not hand out a default gateway; other networks are still accessible while connected to the management interface.
Connect the laptop/PC's ethernet port to GE Port-6.
Configuring the Edge's Static WAN IP
After plugging in the laptop/PC and the receiving an IP address, open a browser and go to 192.168.1.1.
A security error will appear because Graphiant uses a self-signed certificate. Go ahead and proceed to this site.
From the login screen just click the login button; there is no password configured.

This will open the "Service Status" section of "Local Settings". At this time since the device is new, there will be no connection yet to the Graphiant Portal and Core.
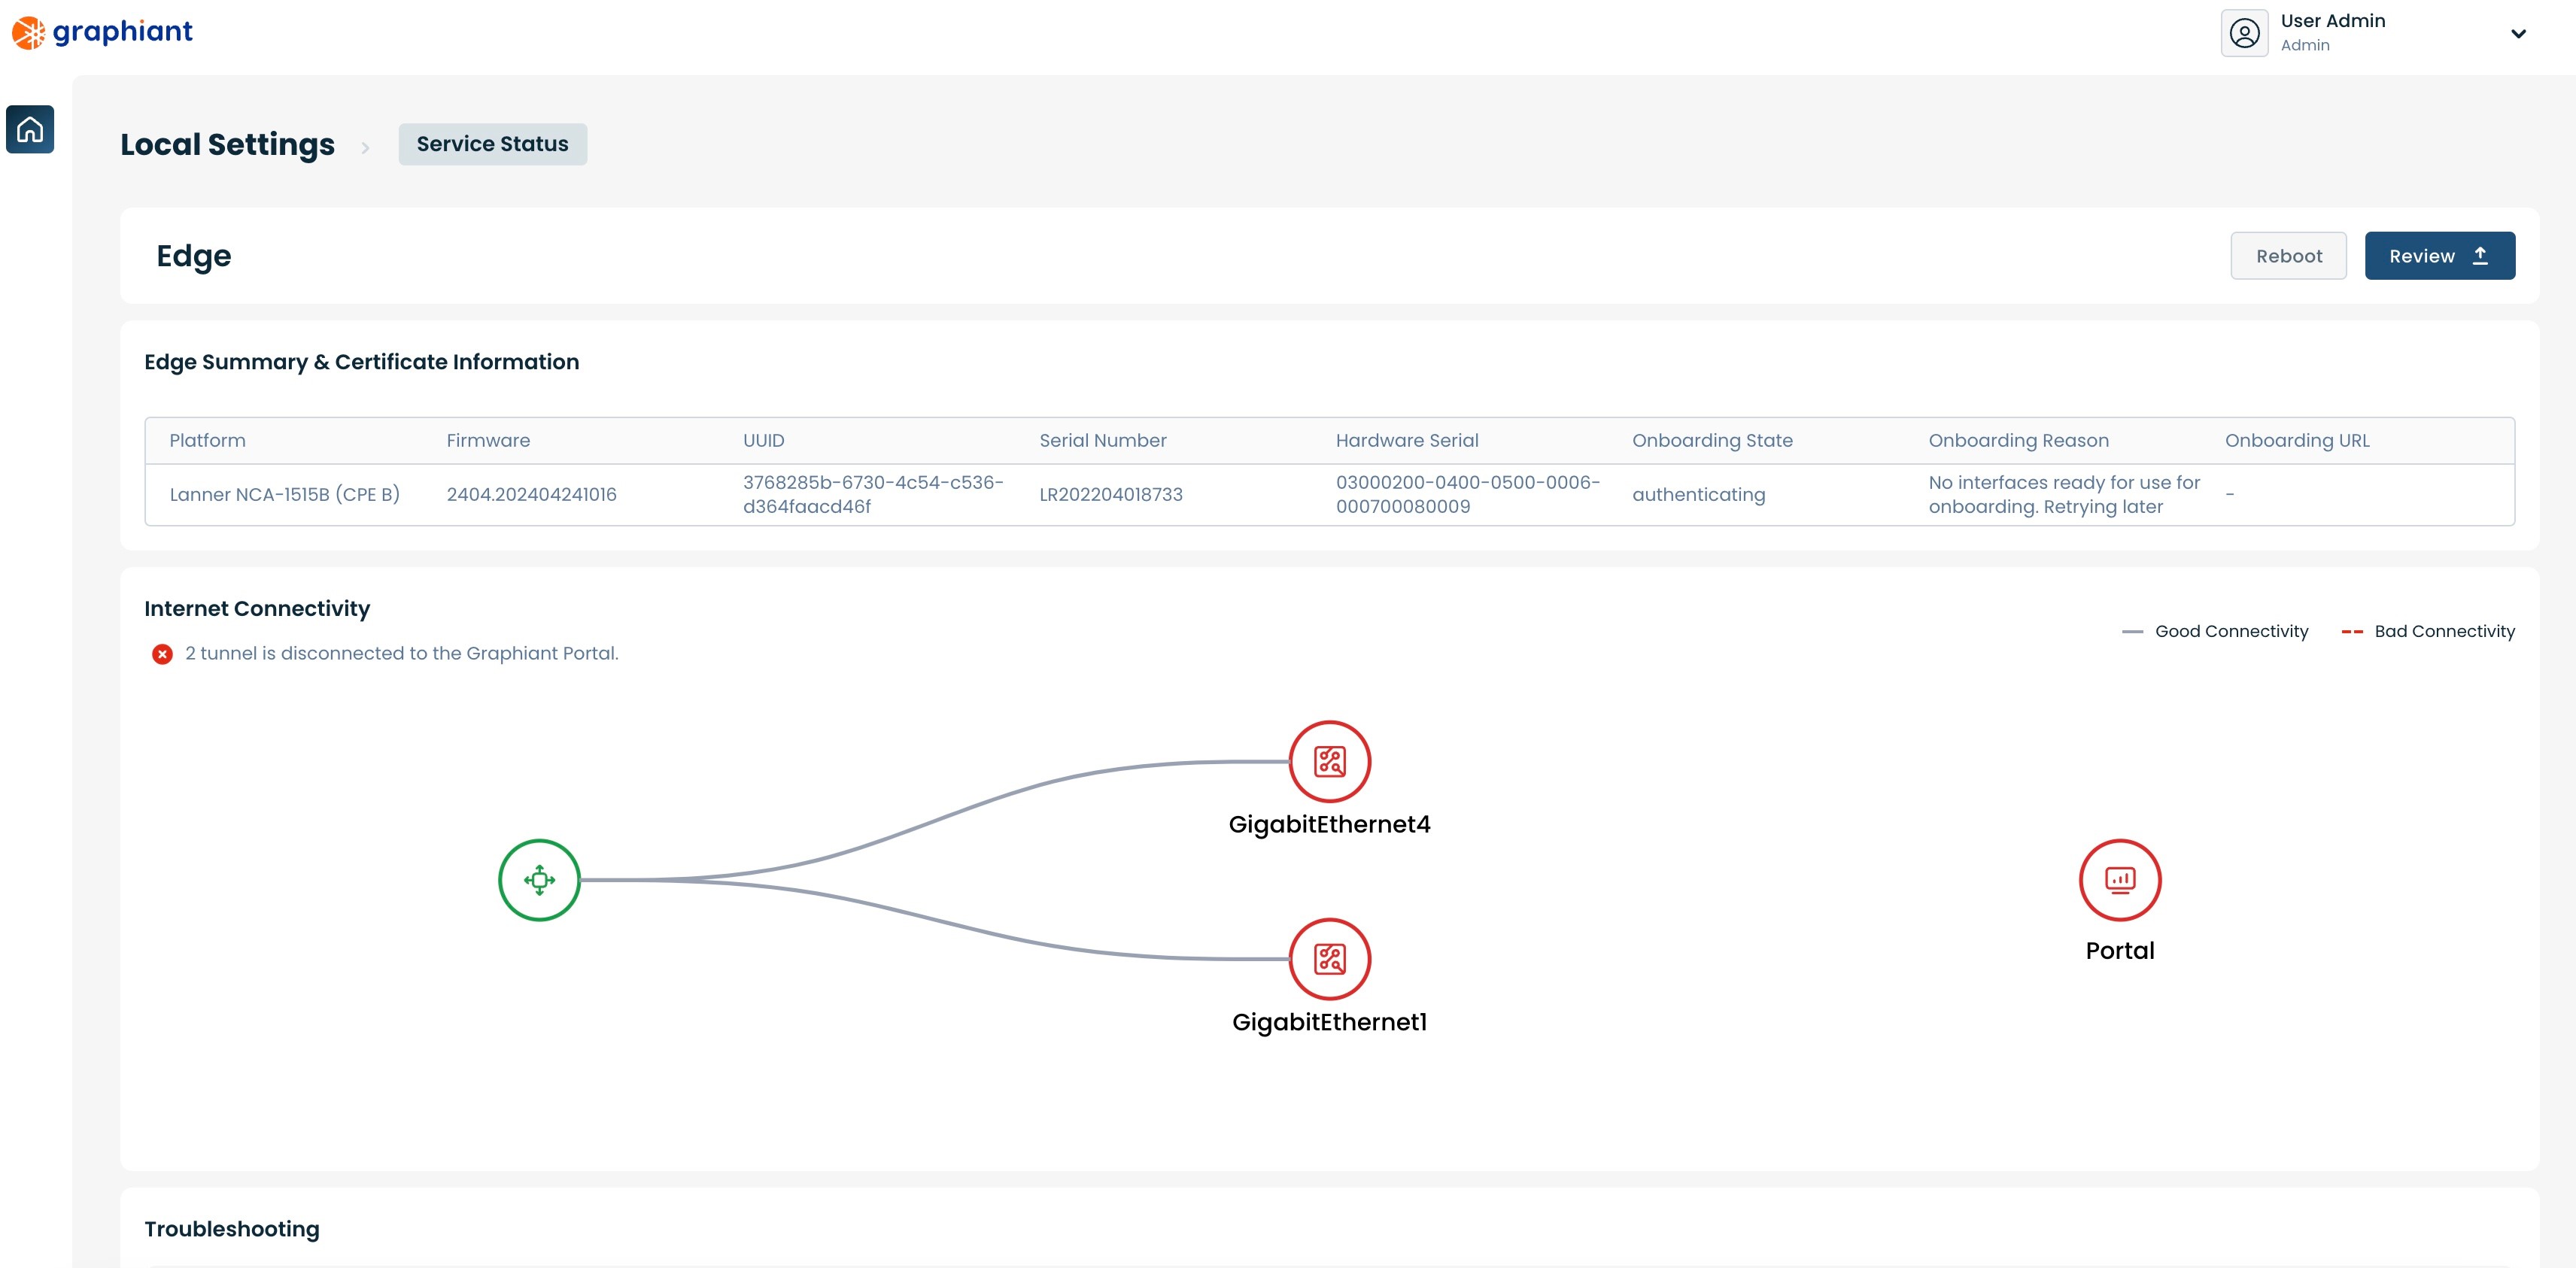
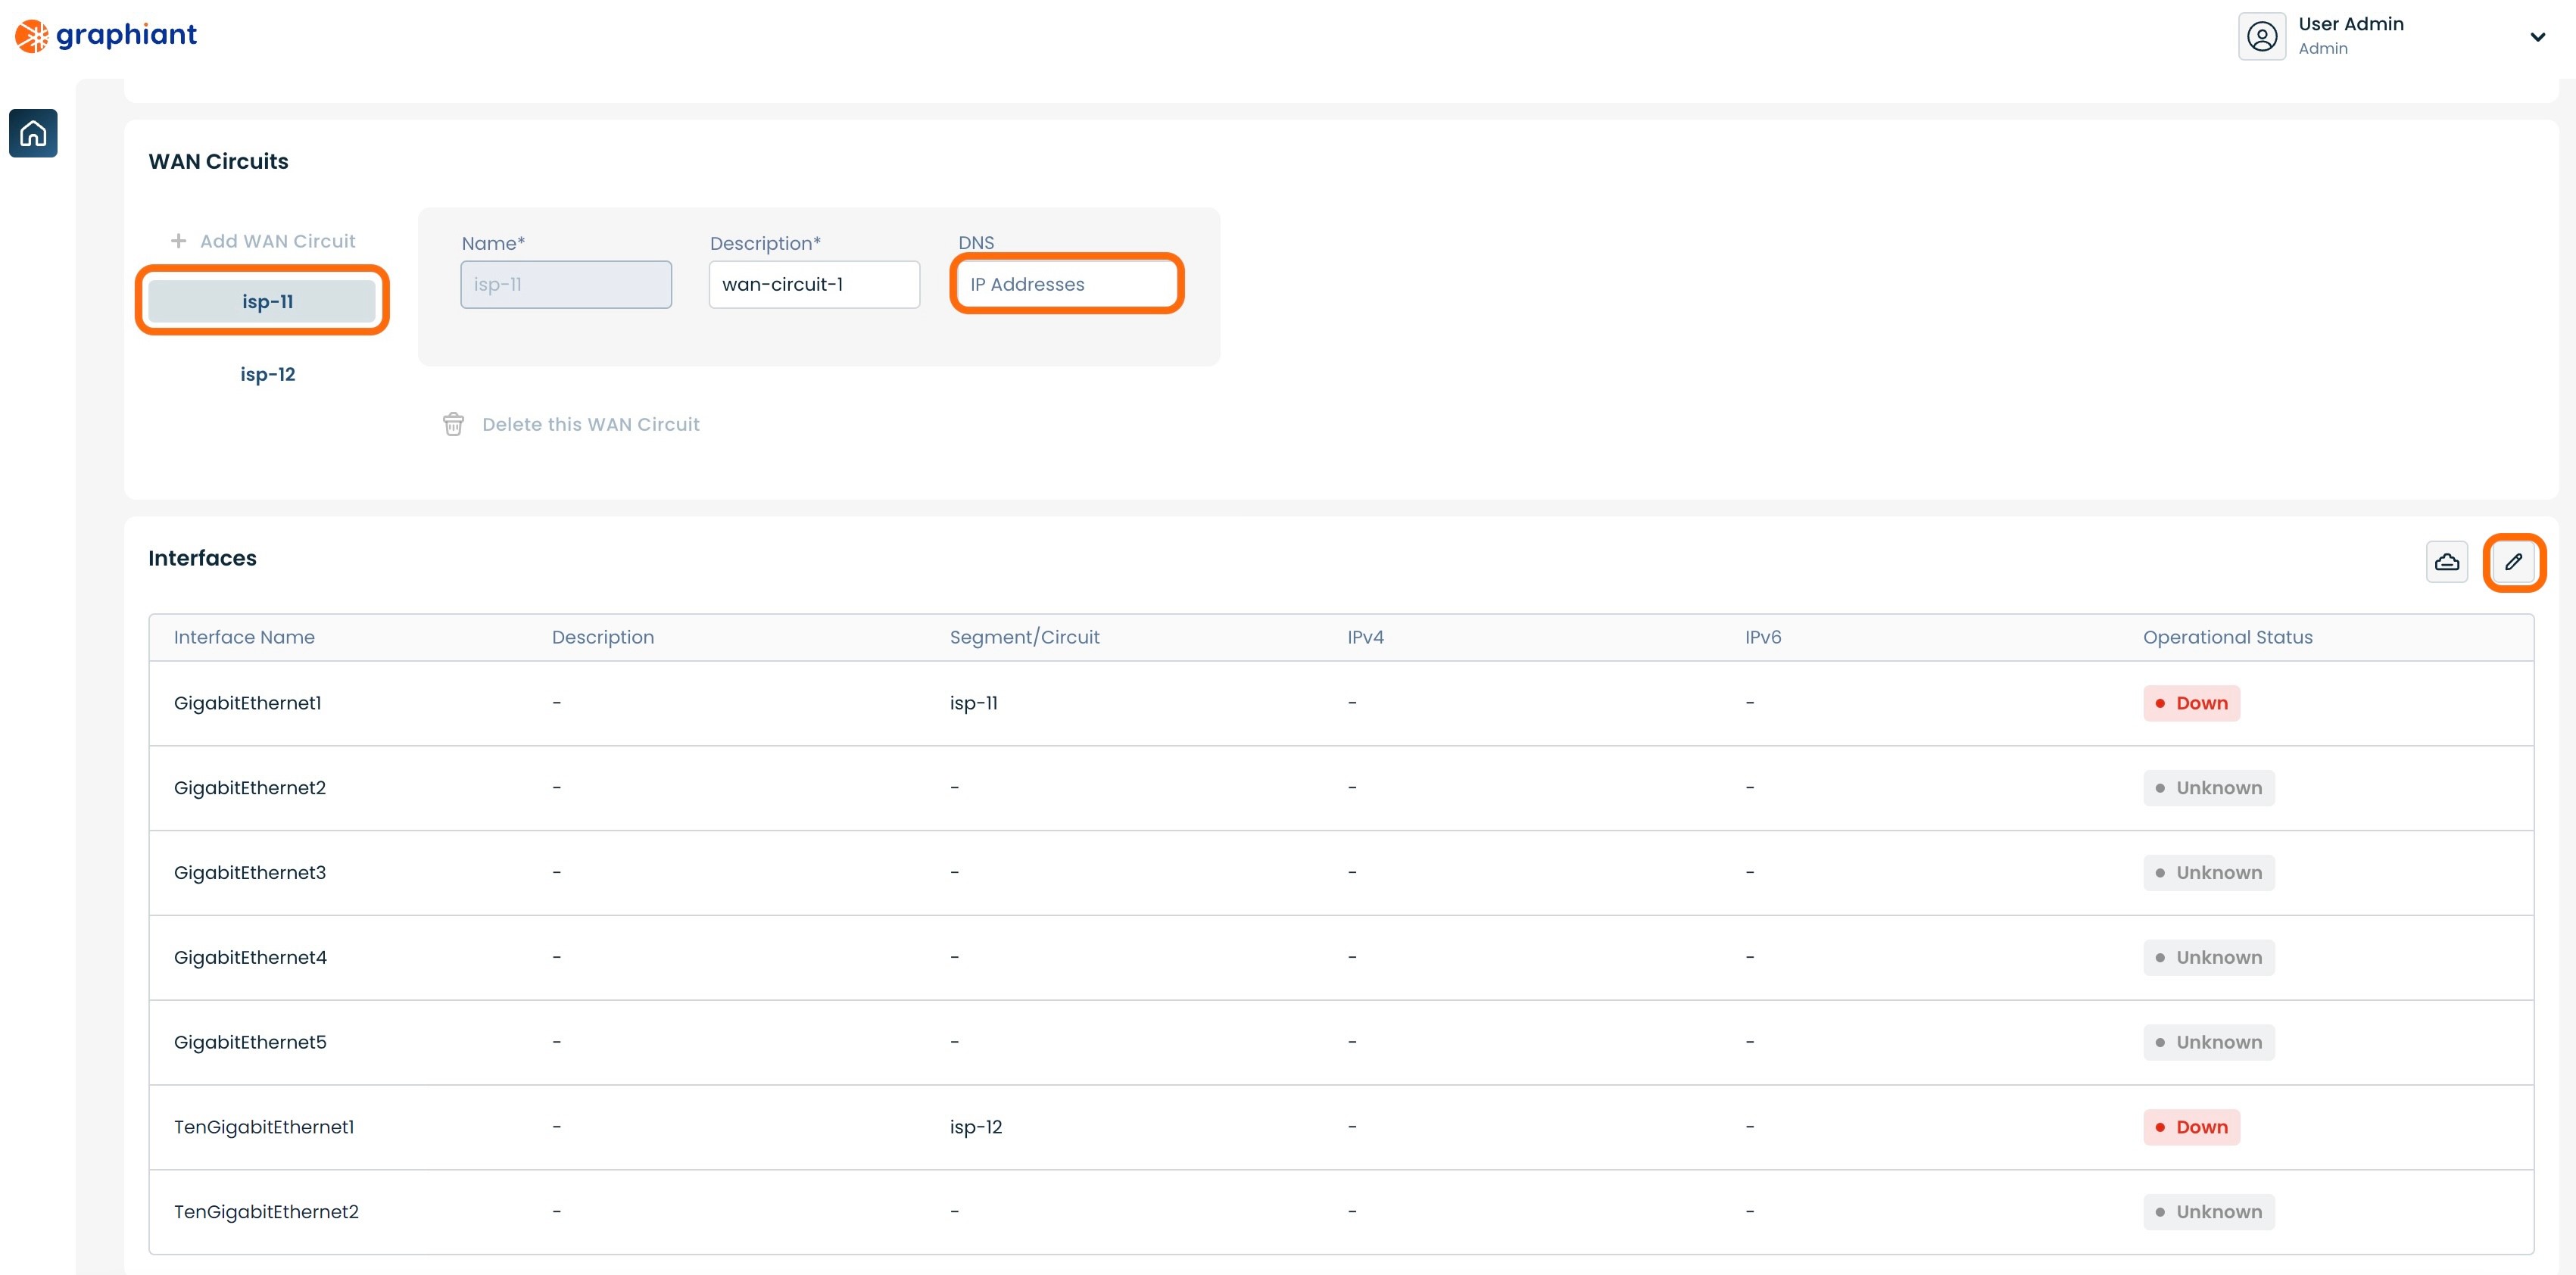
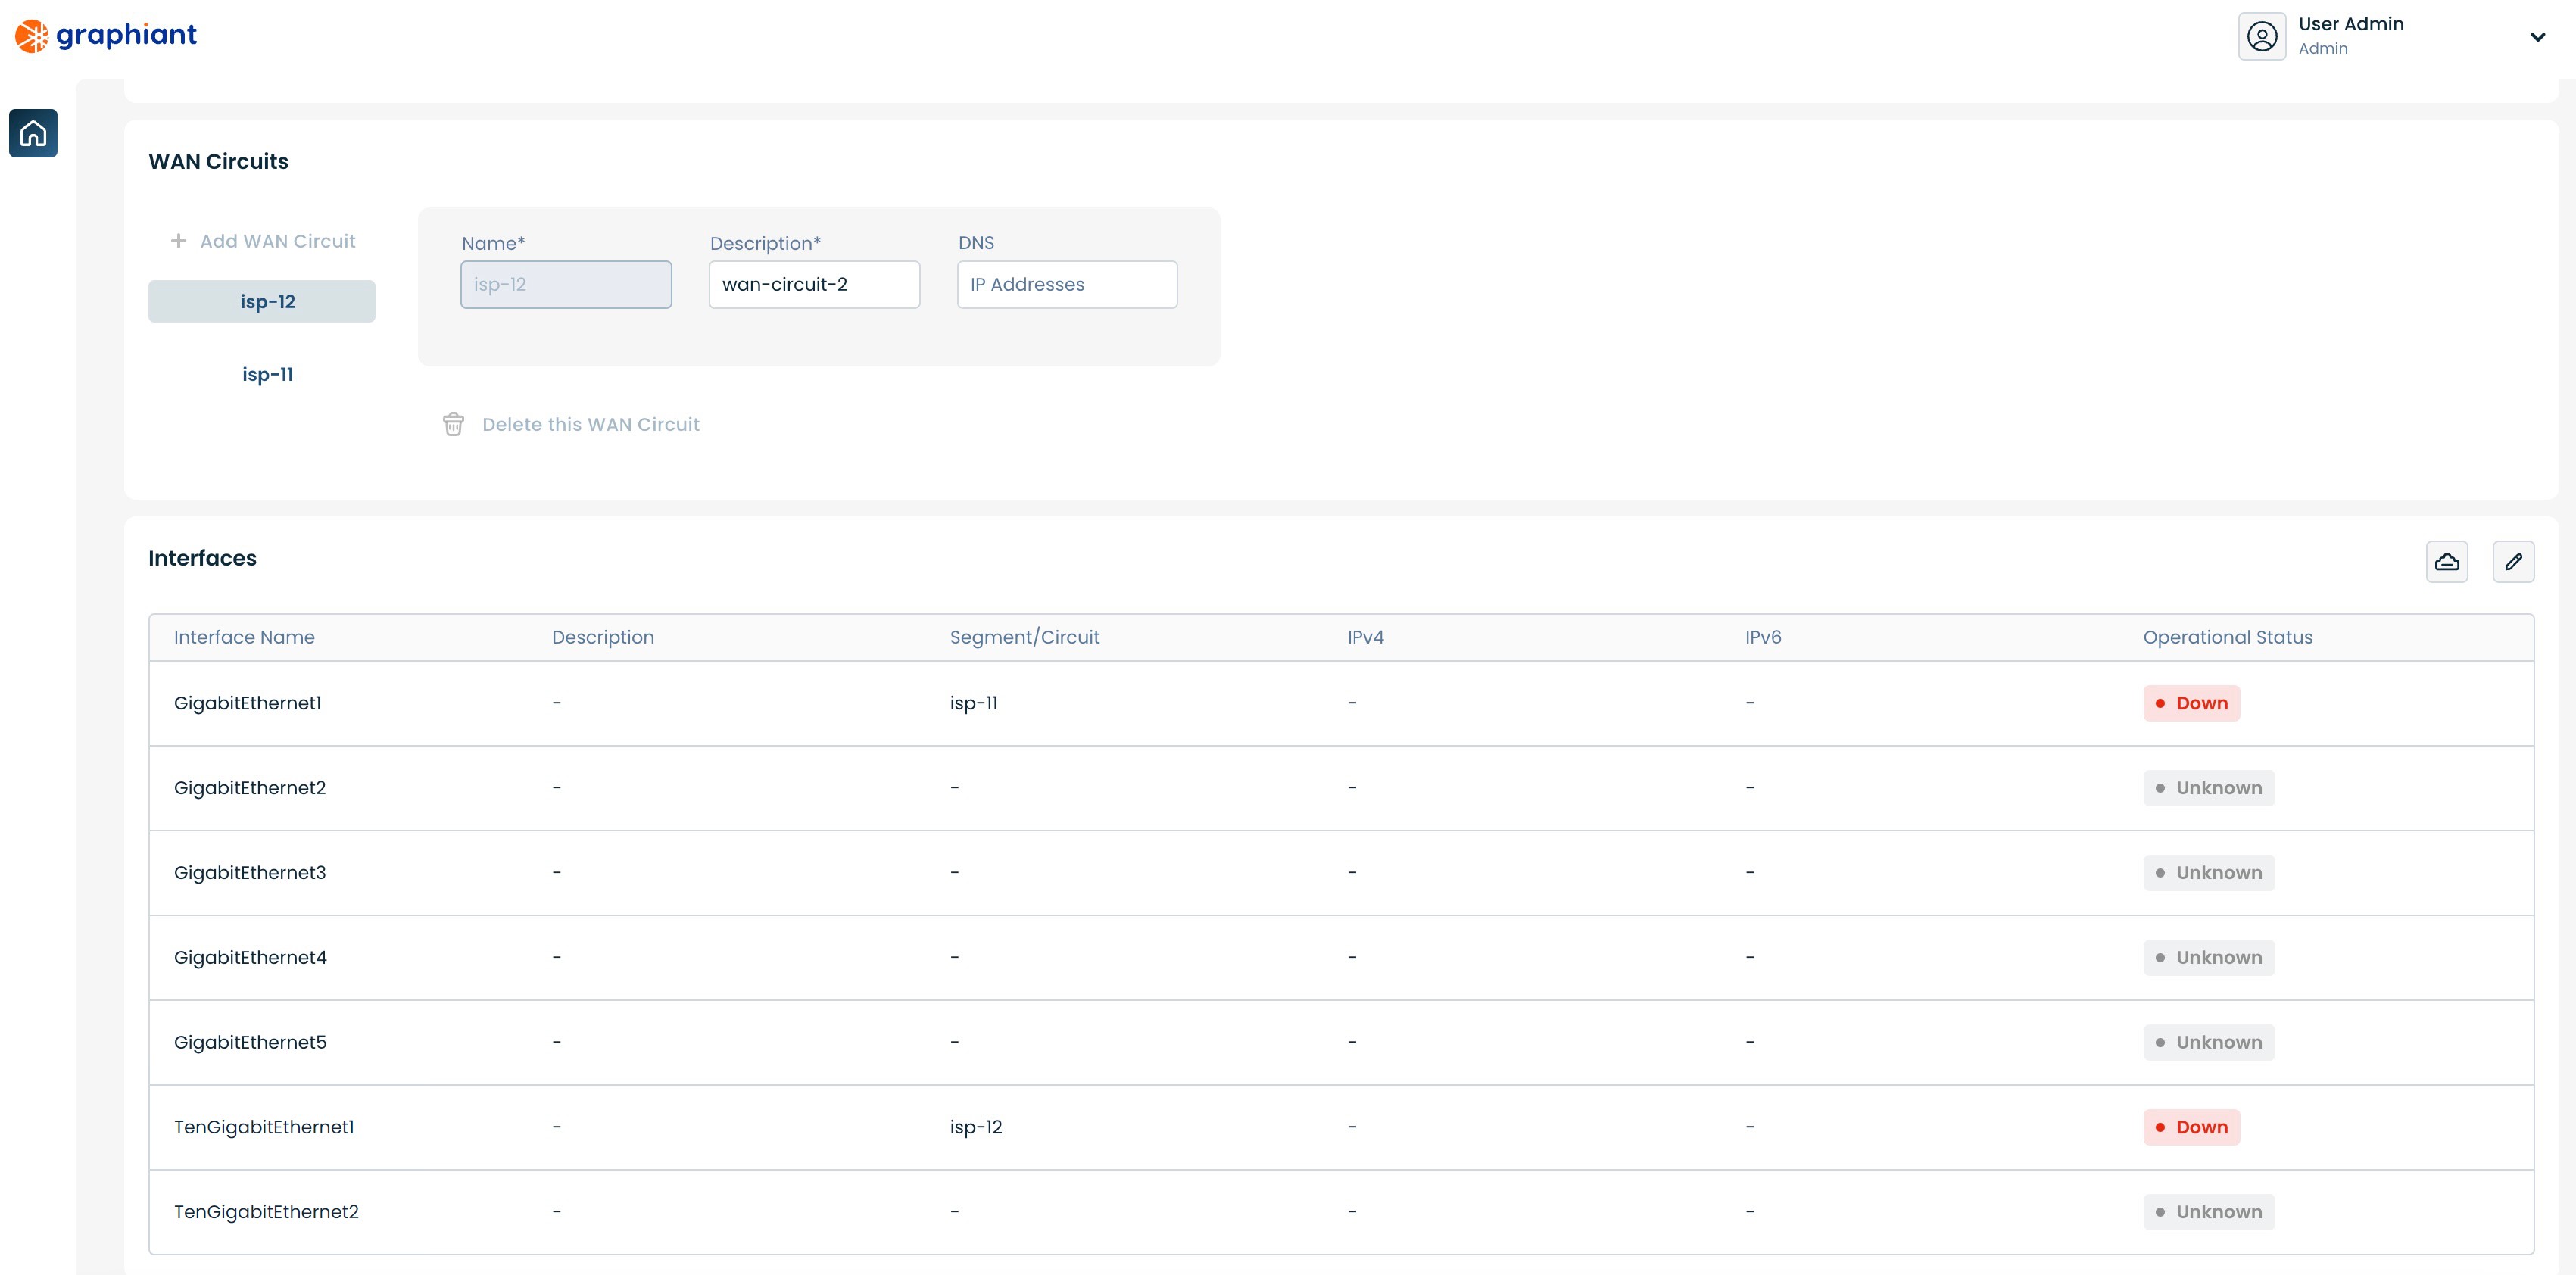
Scroll to the bottom to find the "WAN Circuits" and "Interfaces" sections.

Configuring Static IP via the SFP Default WAN Port SFP1
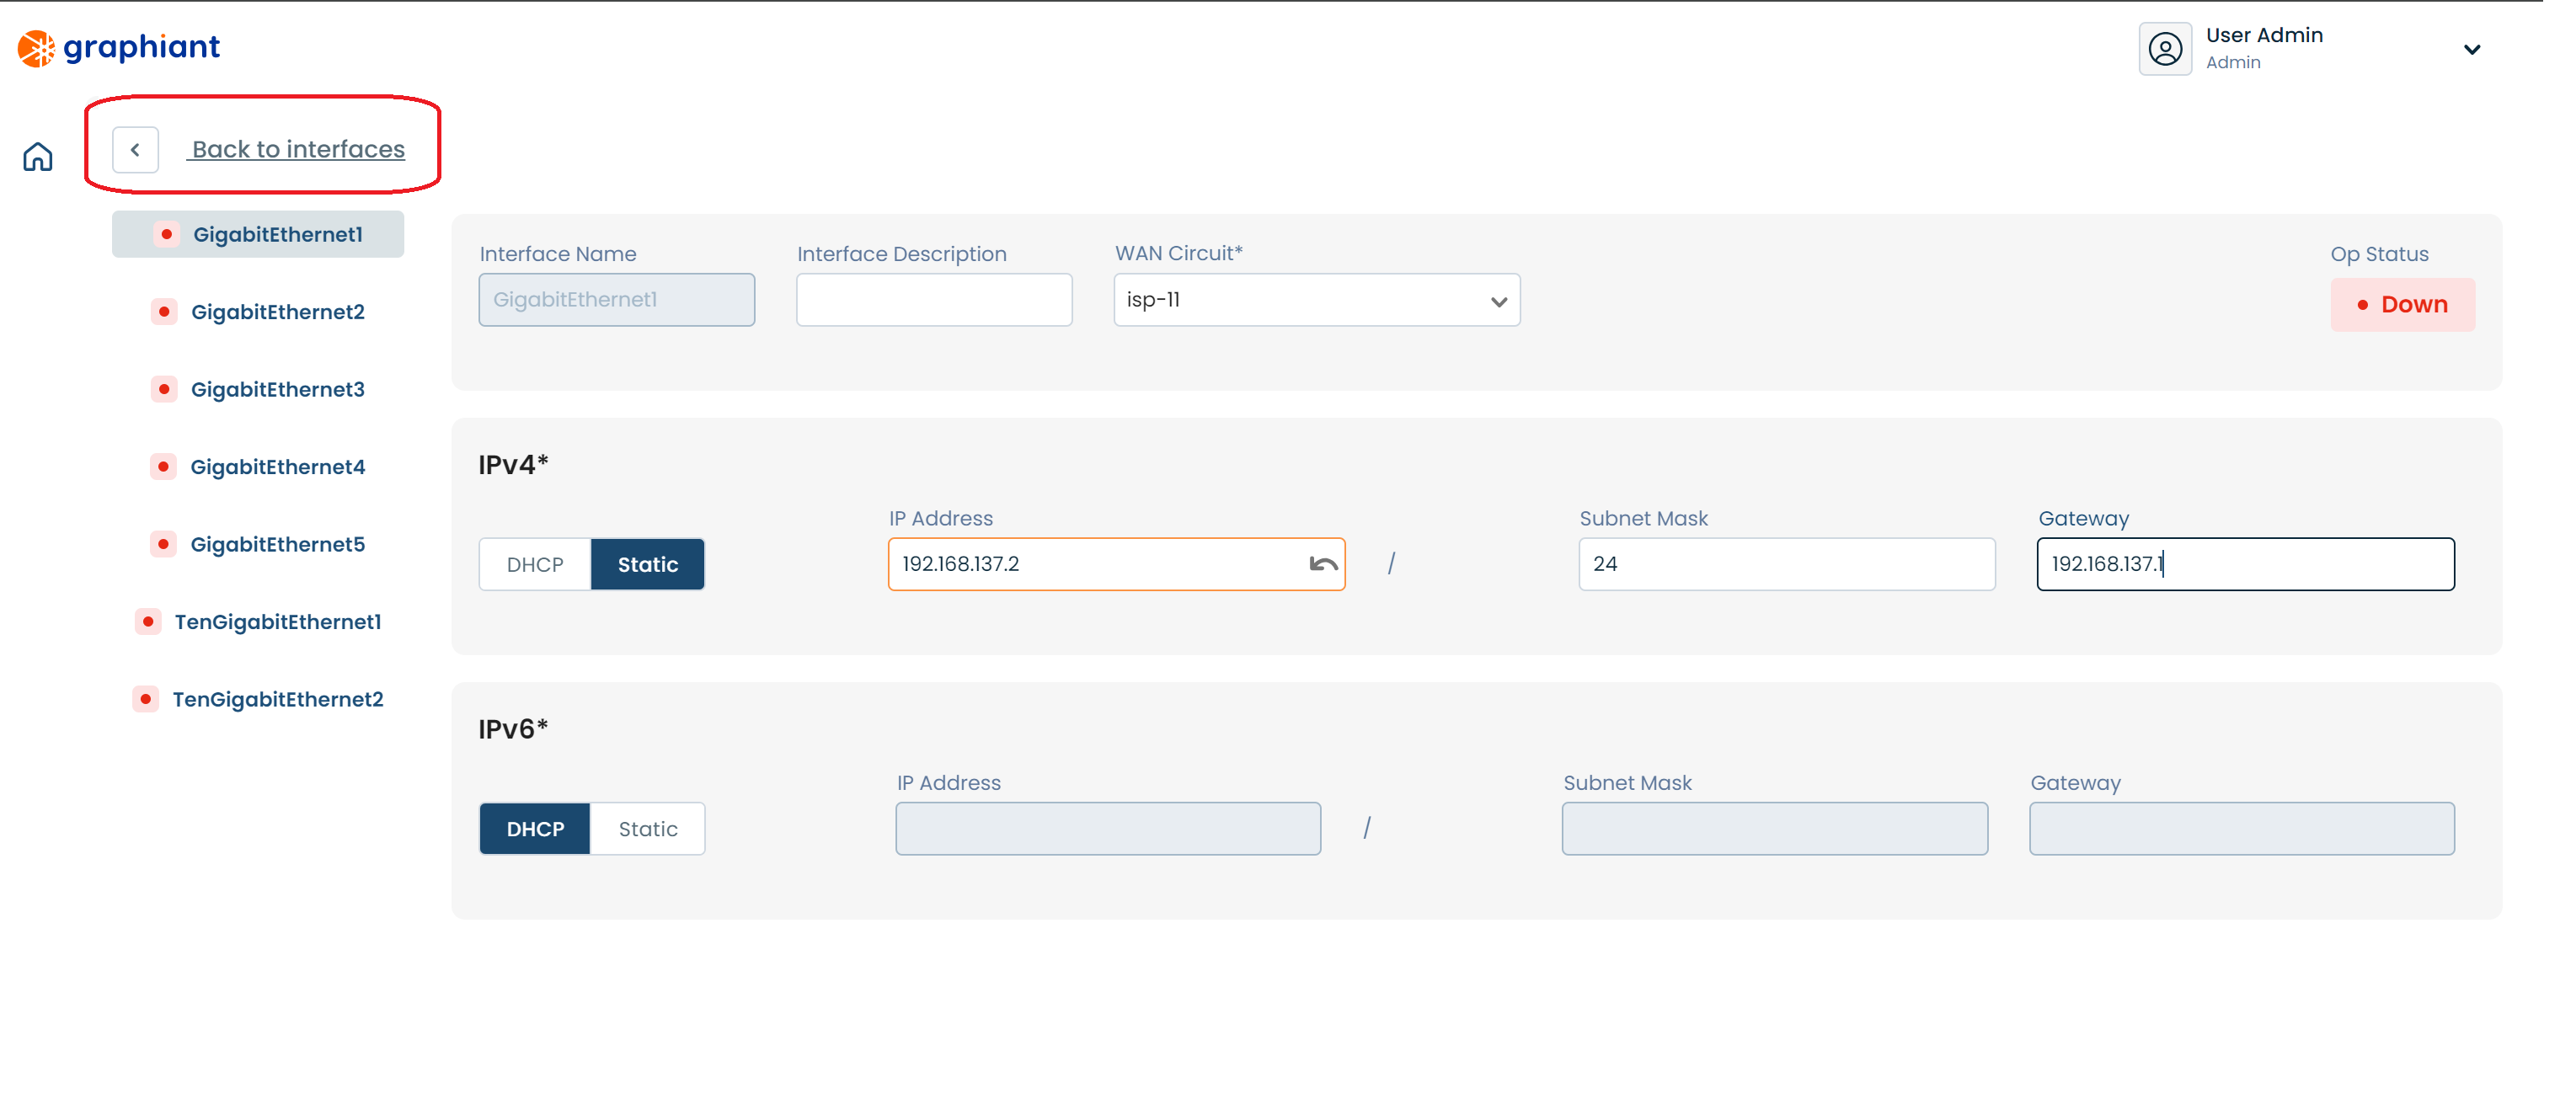
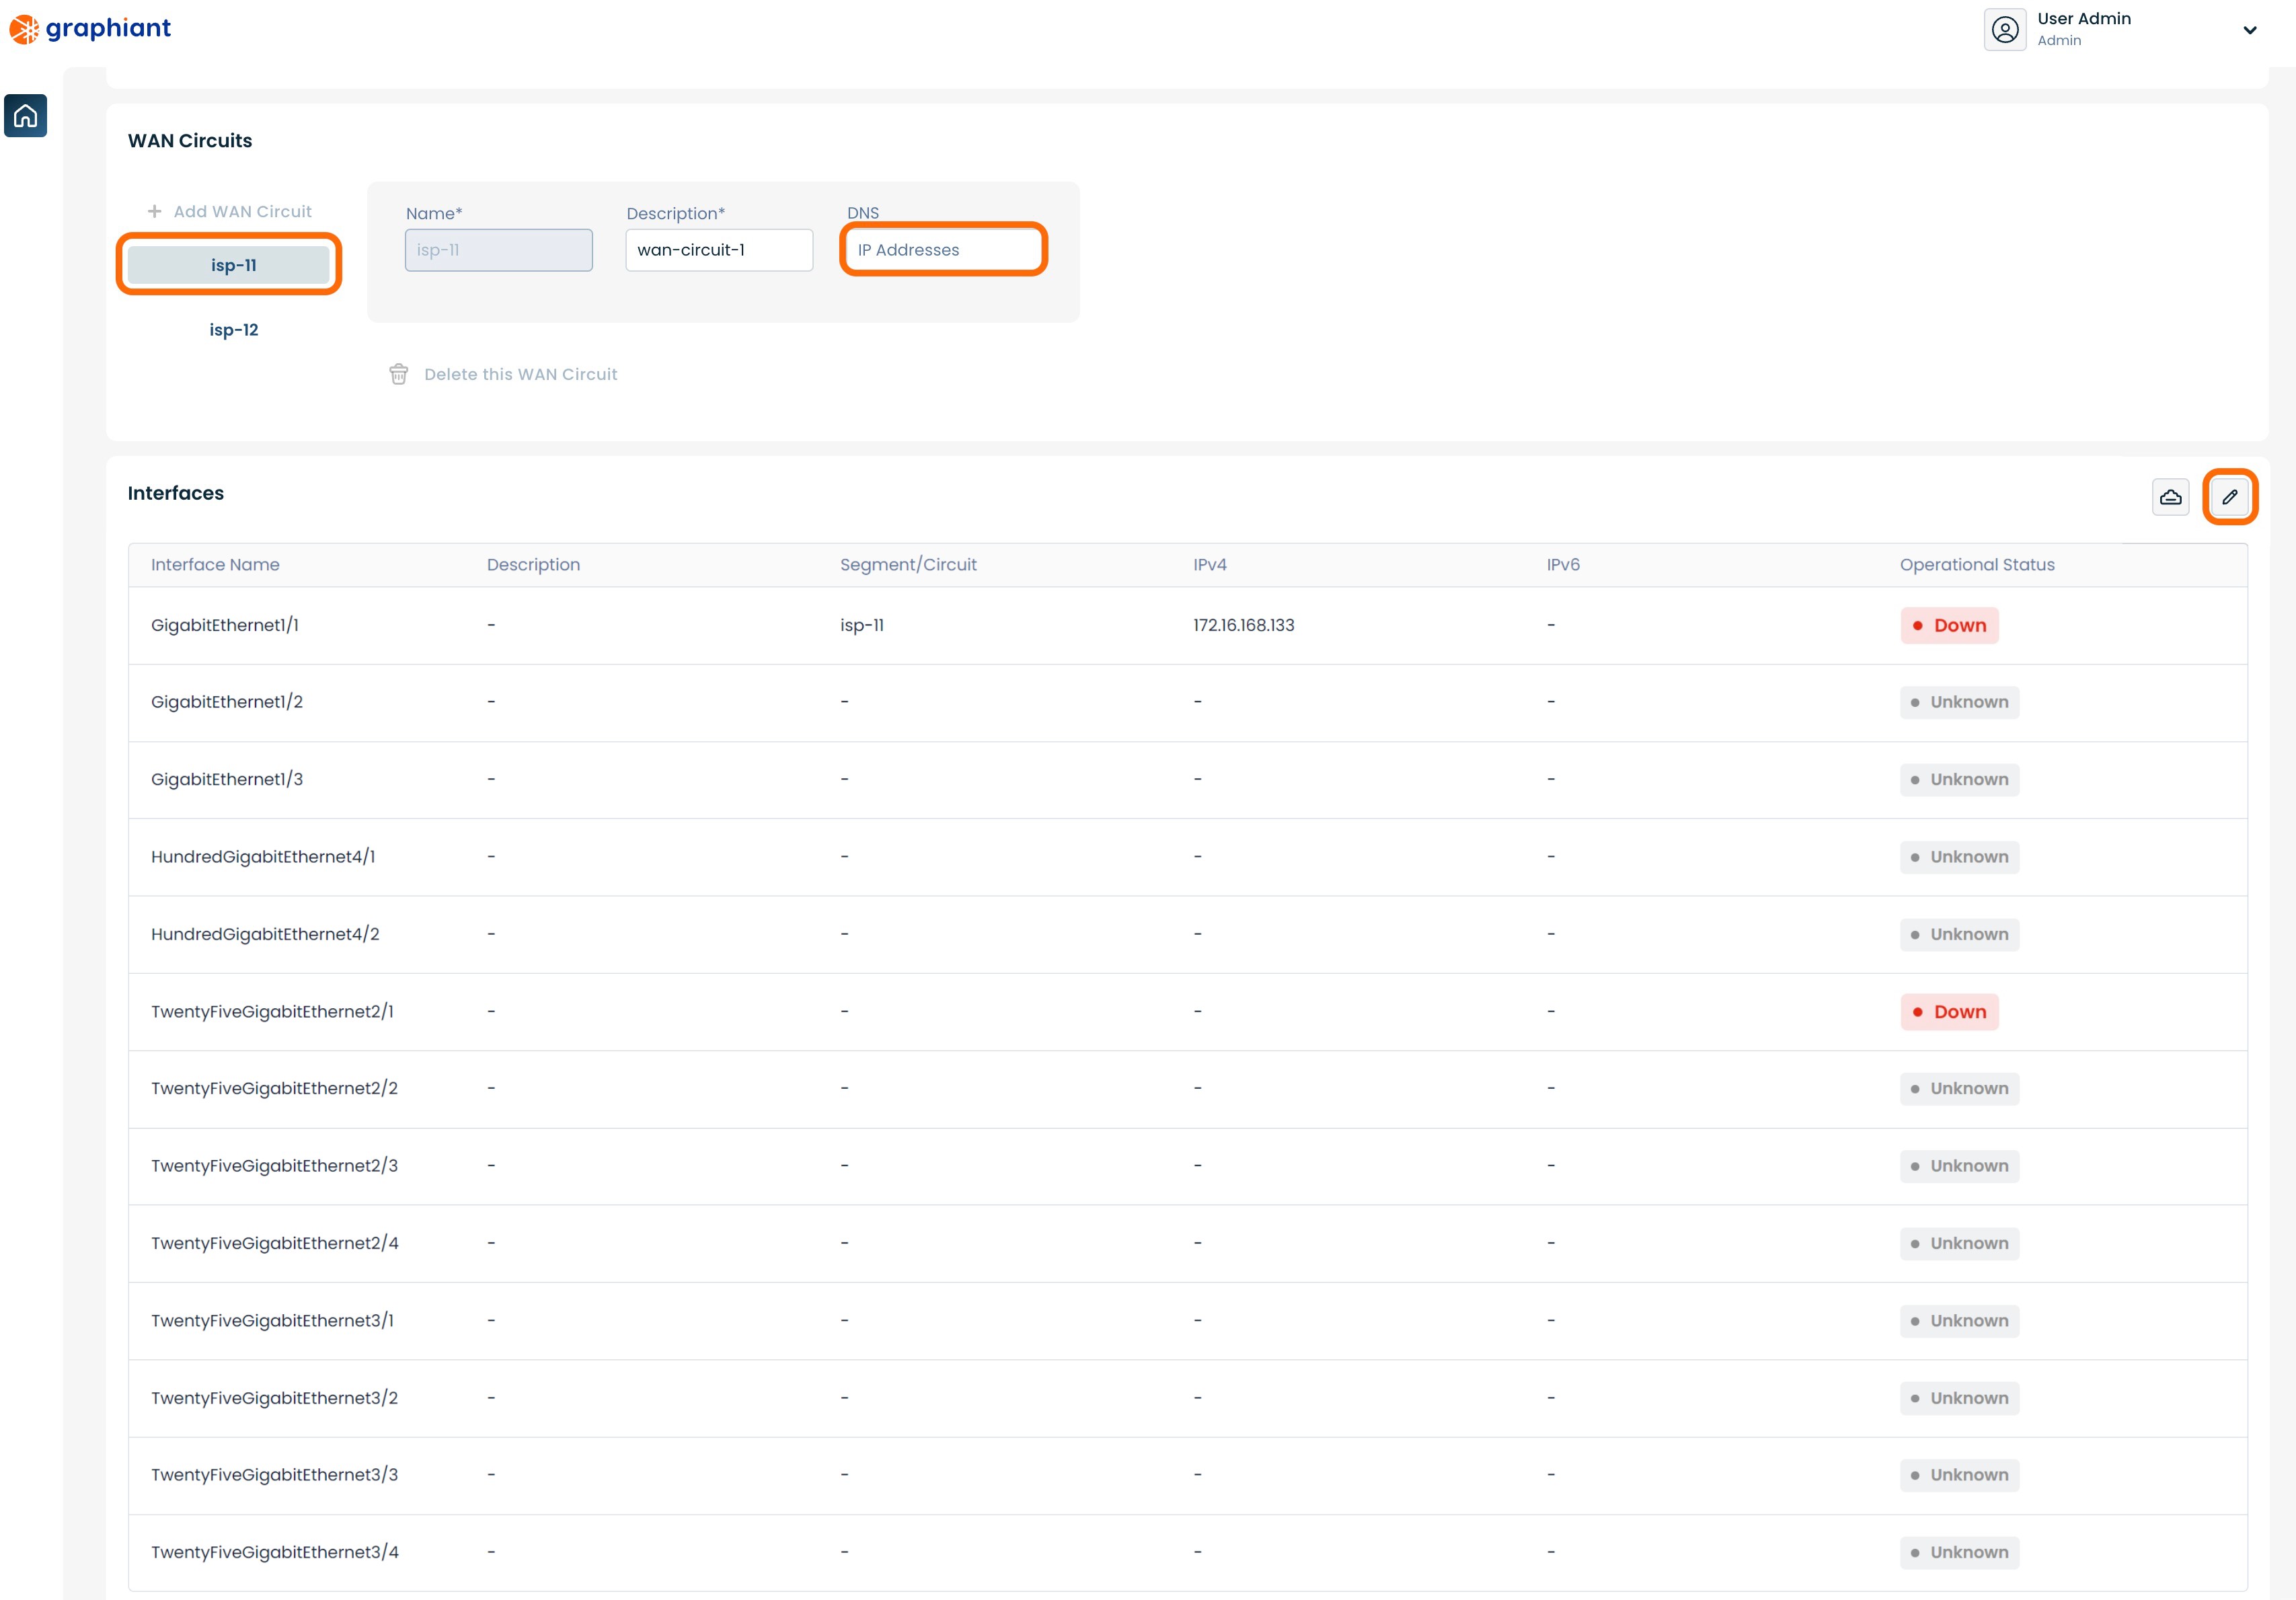
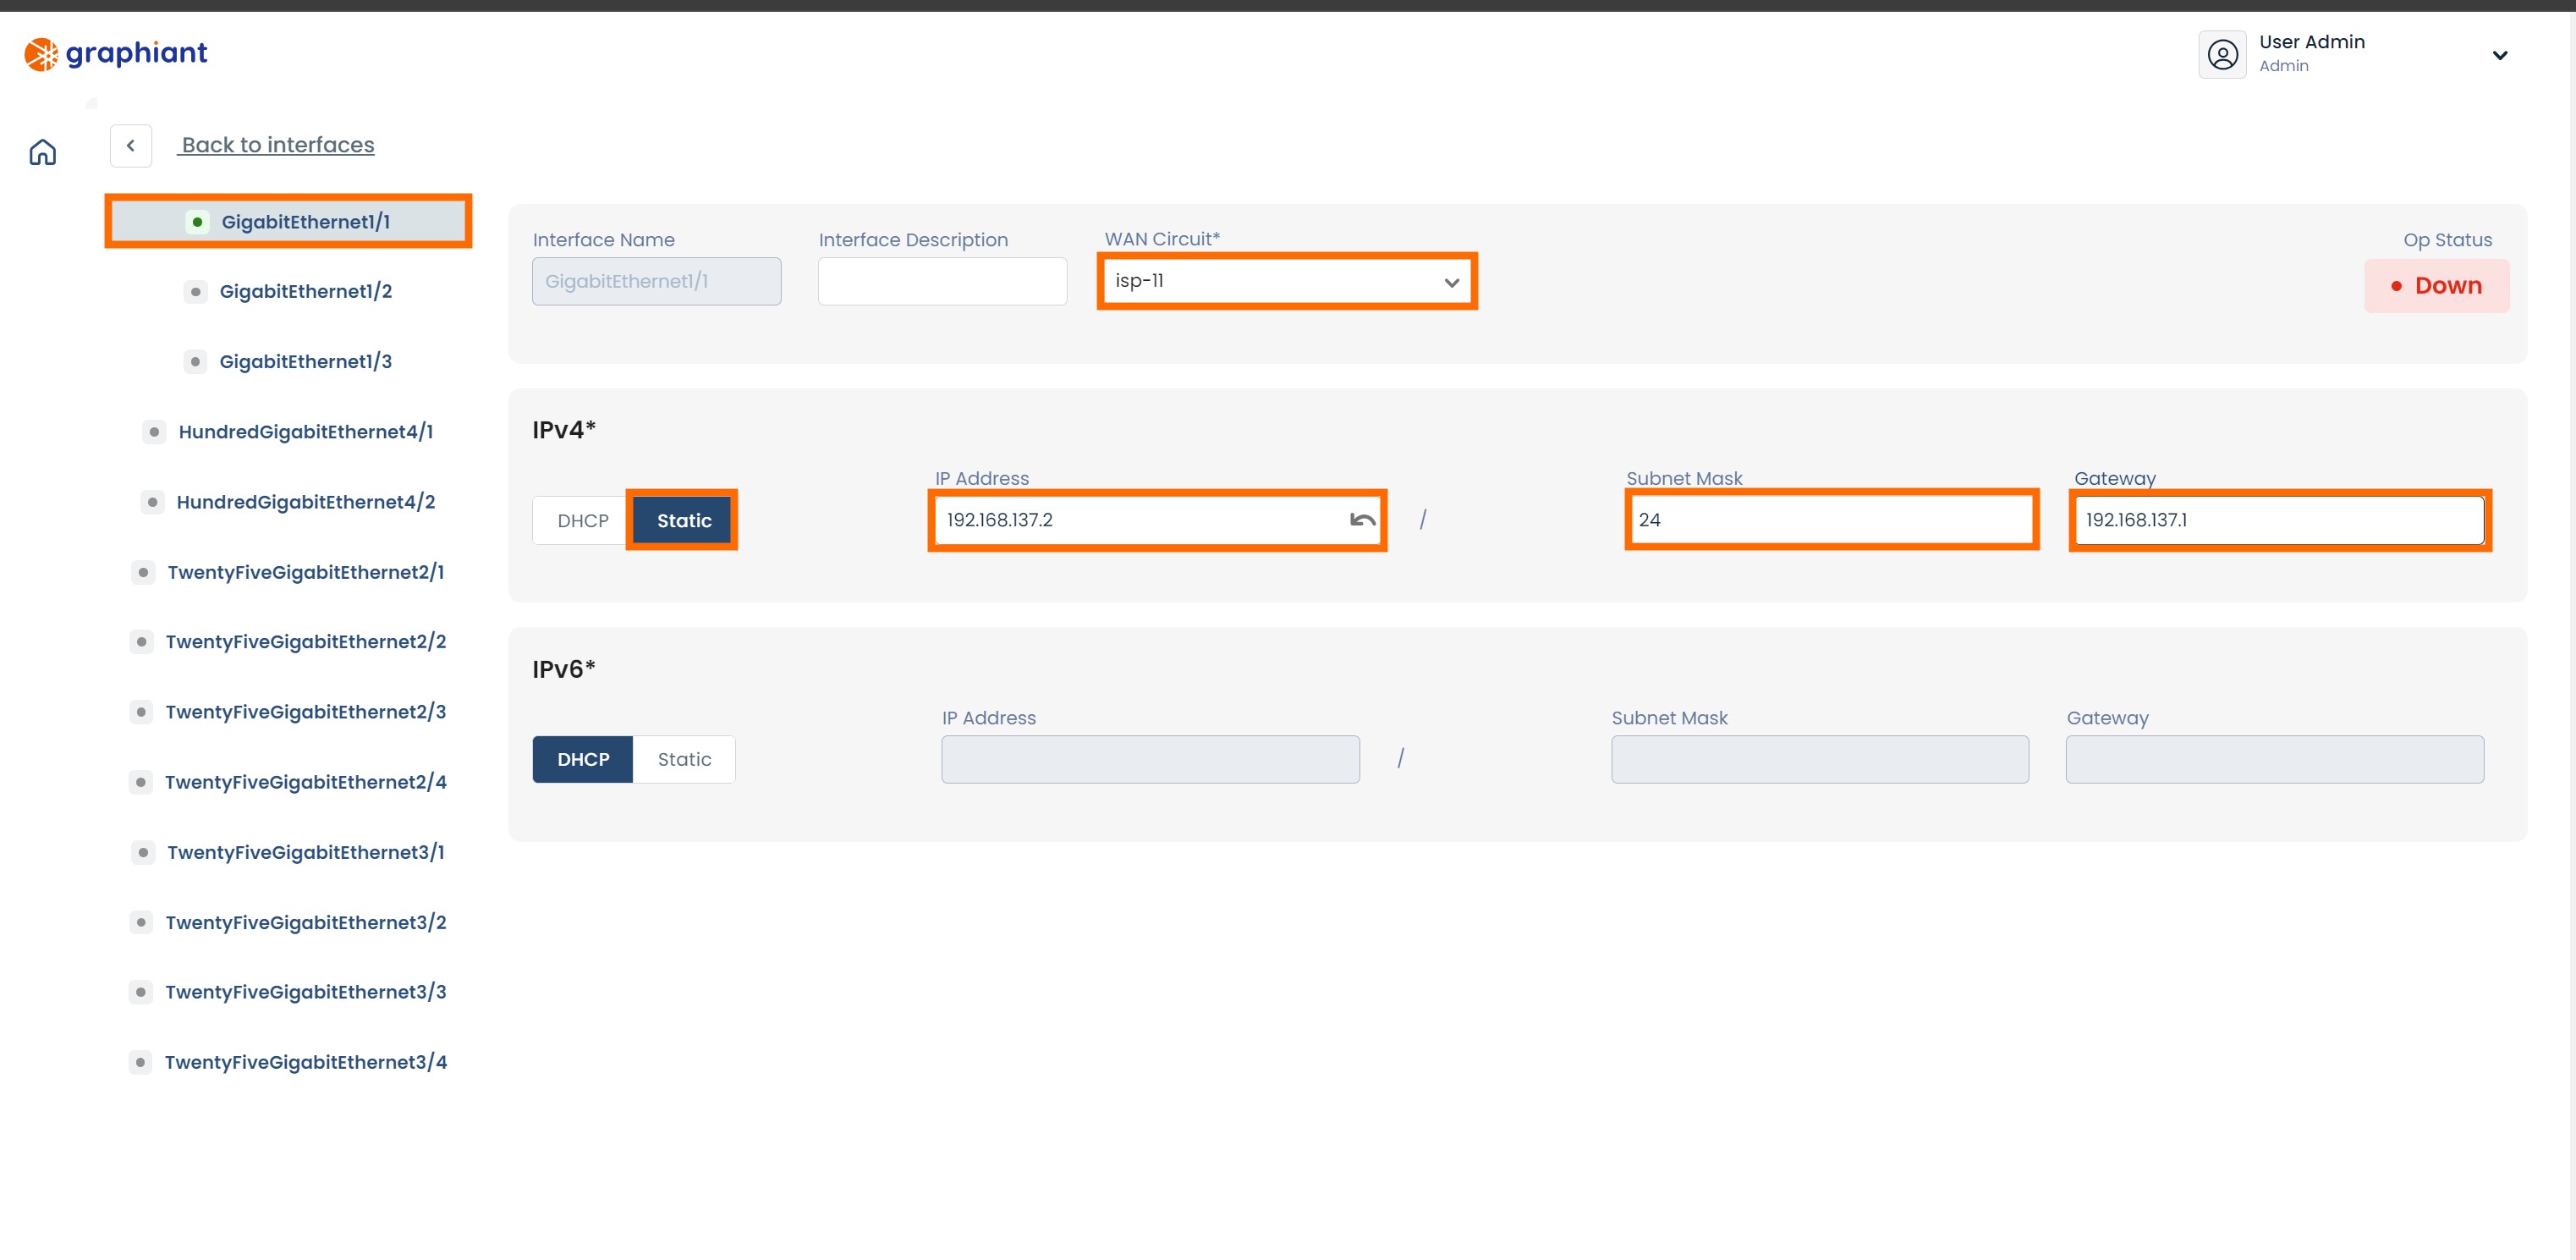
Under "WAN Circuits" select 'isp-11'.
DNS: If desired, enter the IP address of the preferred DNS. If left blank, this field will be filled via Cloudflare with either "1.1.1.1" or "1.0.0.1".
Click the 'Edit' button on the far right of the "Interfaces" section.
Click the 'Static' slider to set the WAN IP address.
Ensure that 'GigabitEthernet1' is selected on the left.
Enter the information for the following fields:
WAN Circuit: Select "isp-11" from the drop-down
IP Address: IP address of the WAN
Subnet Mask: Subnet mask of the WAN IP address
Gateway: IP address of the default gatewa
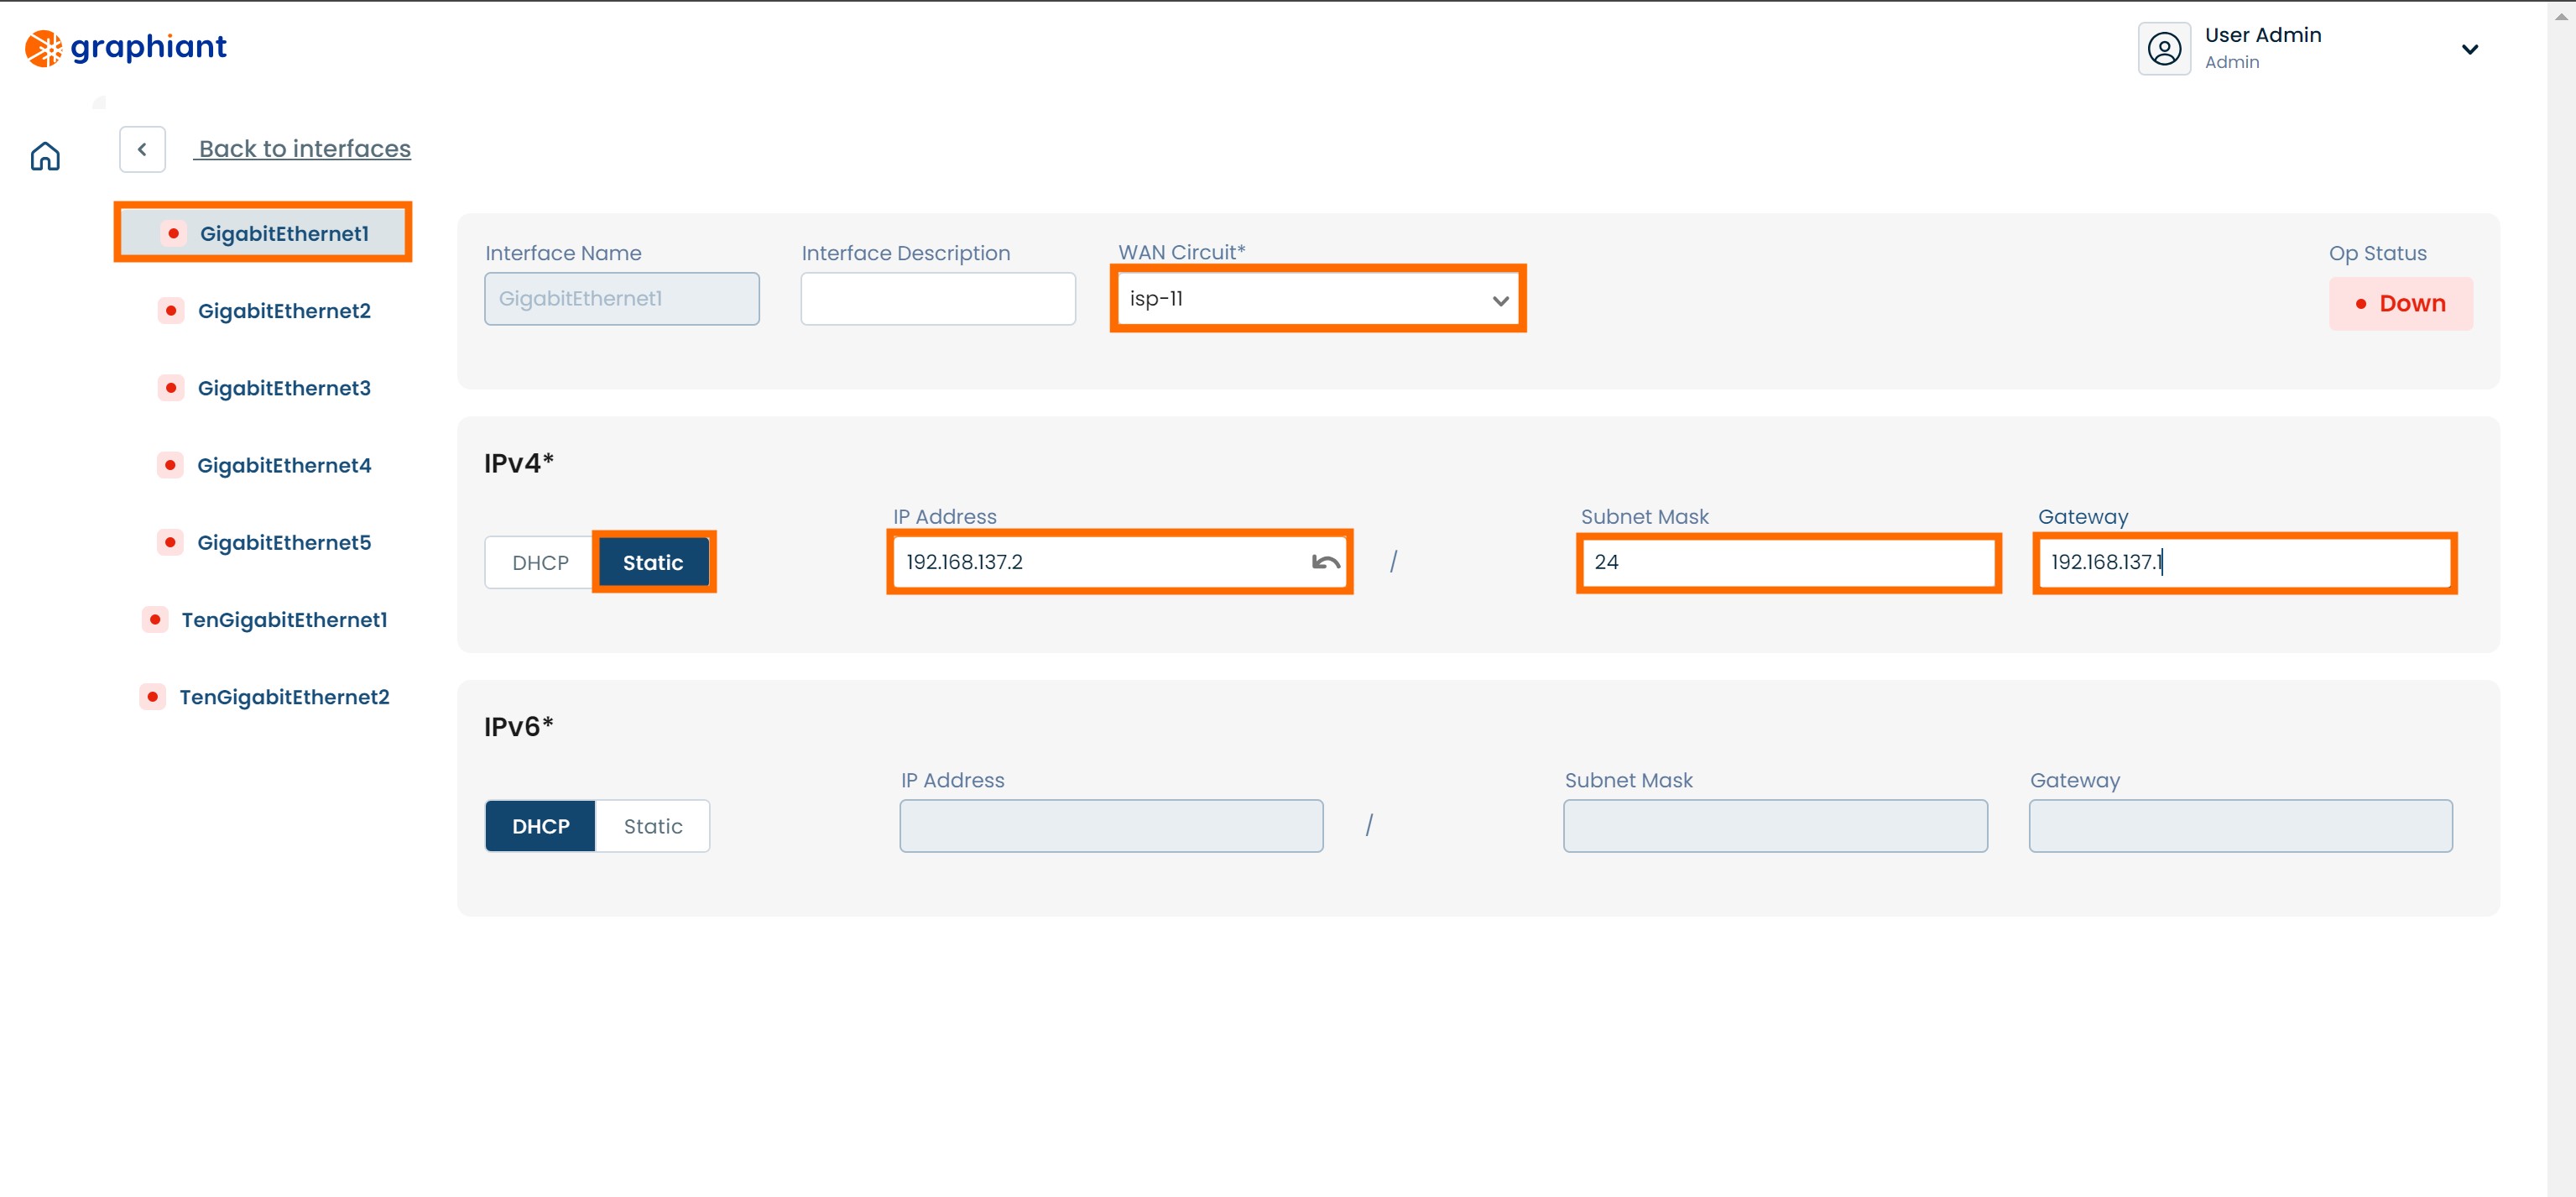
Click 'Back to interfaces' link at the upper left of the screen.
Click 'Review' at the top right.

This will bring up a screen showing the changes to be made.
Click 'Apply' in the upper right.
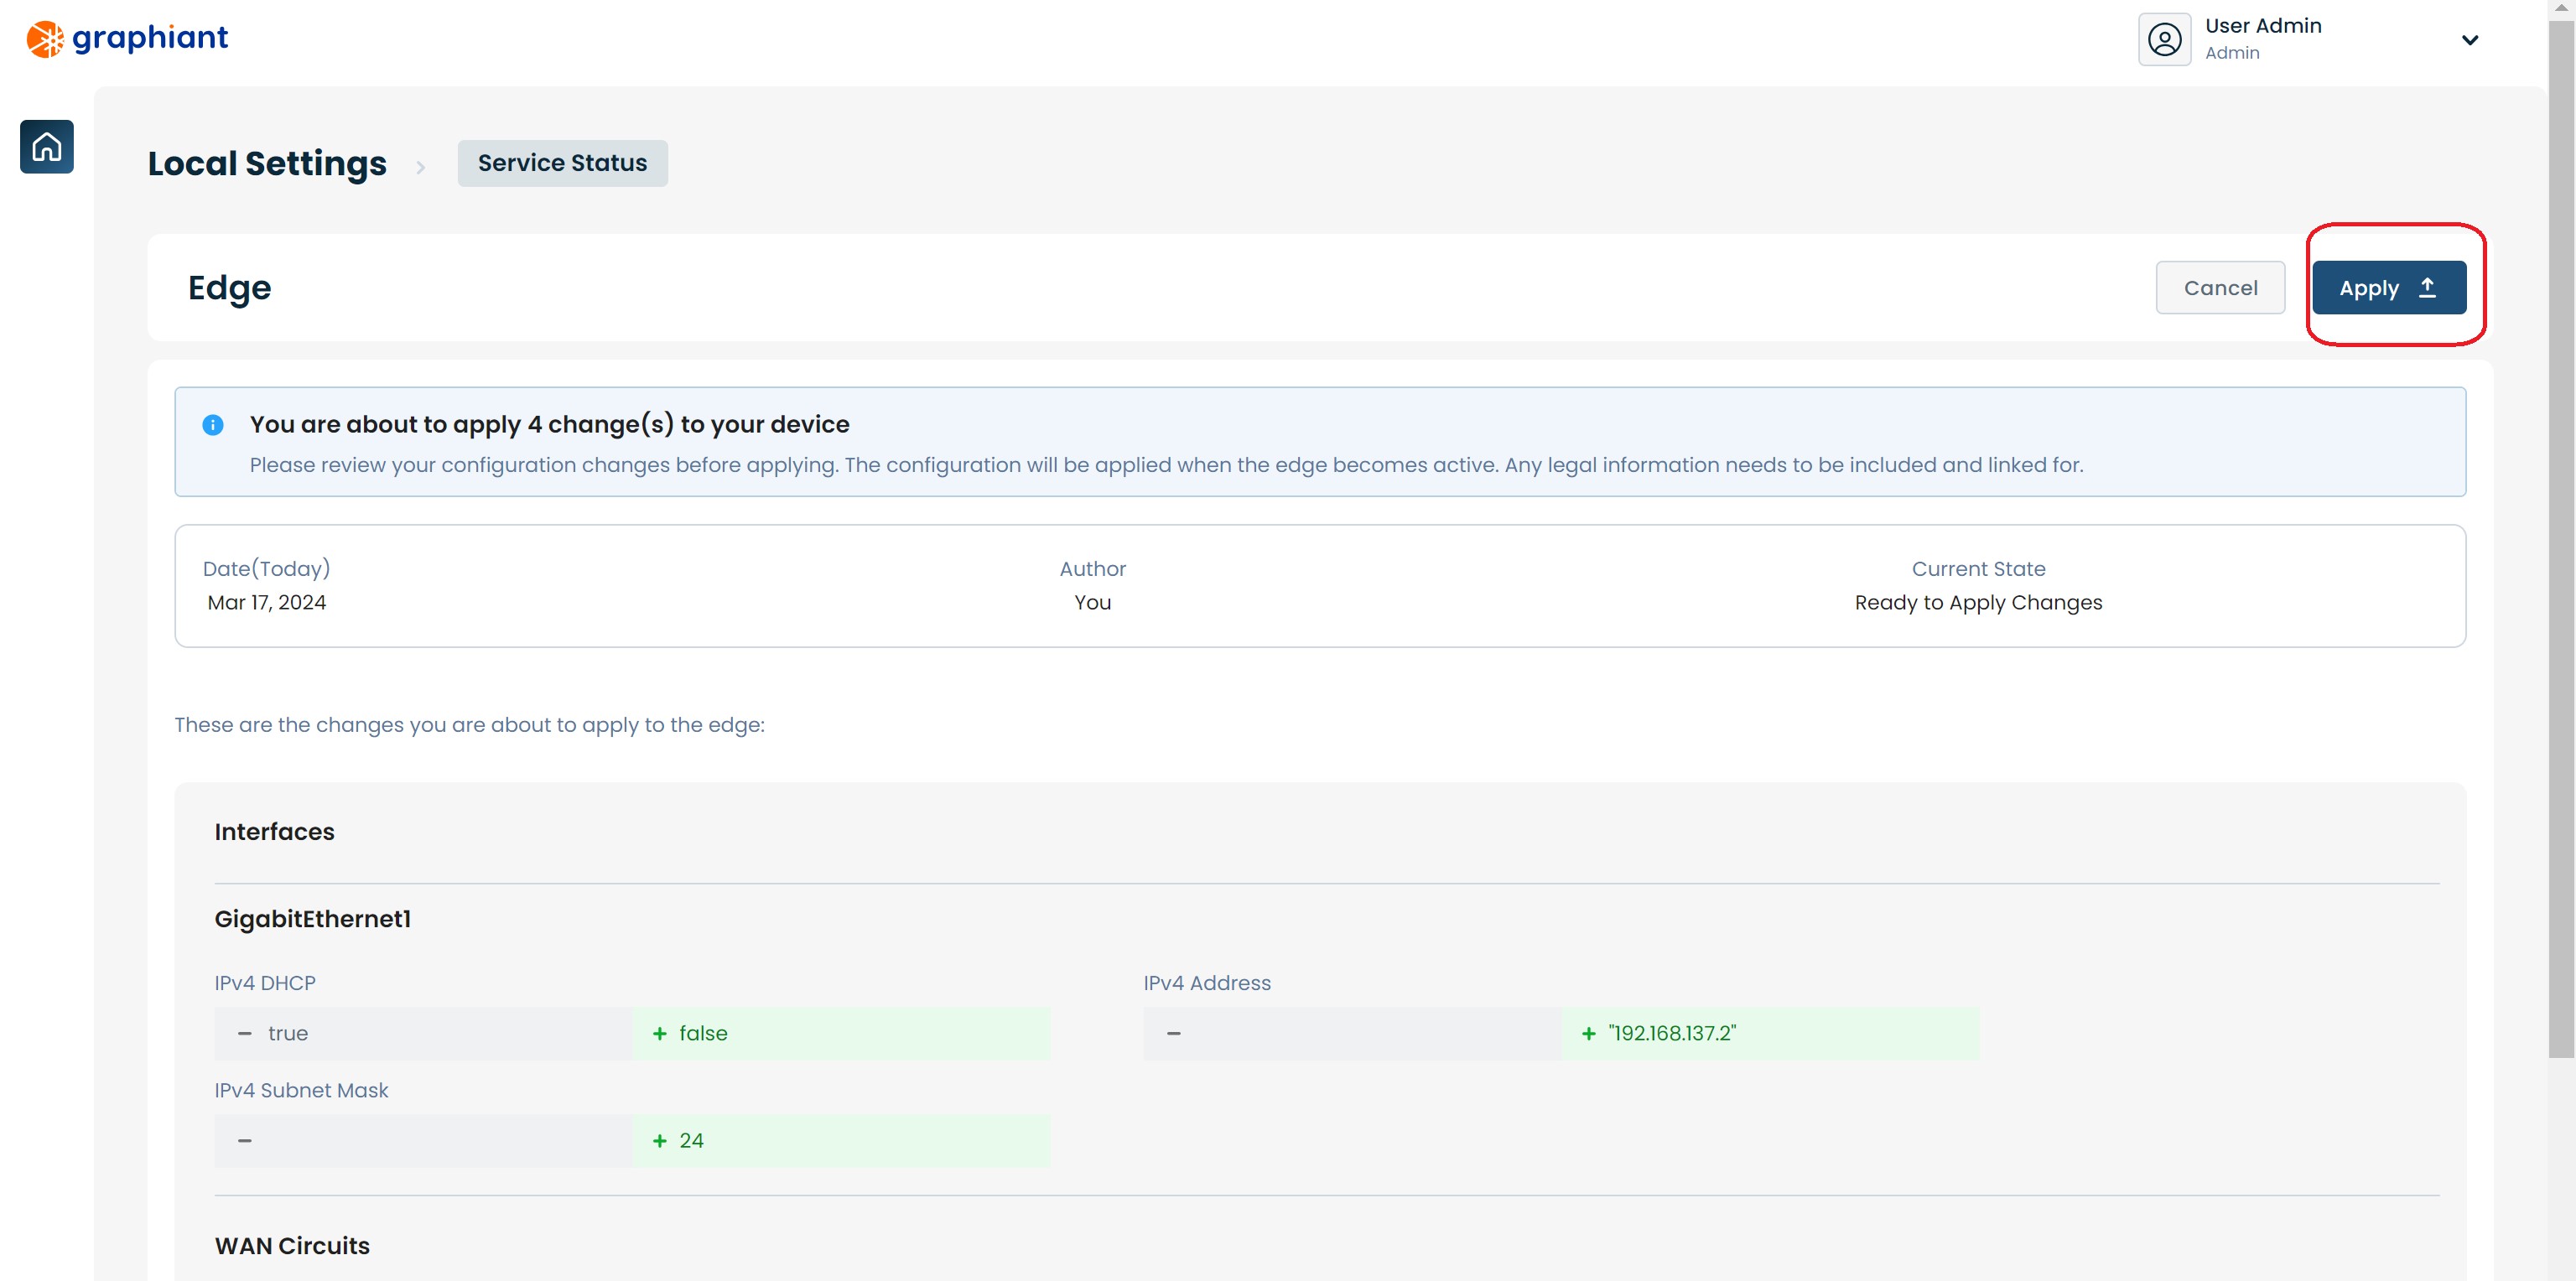
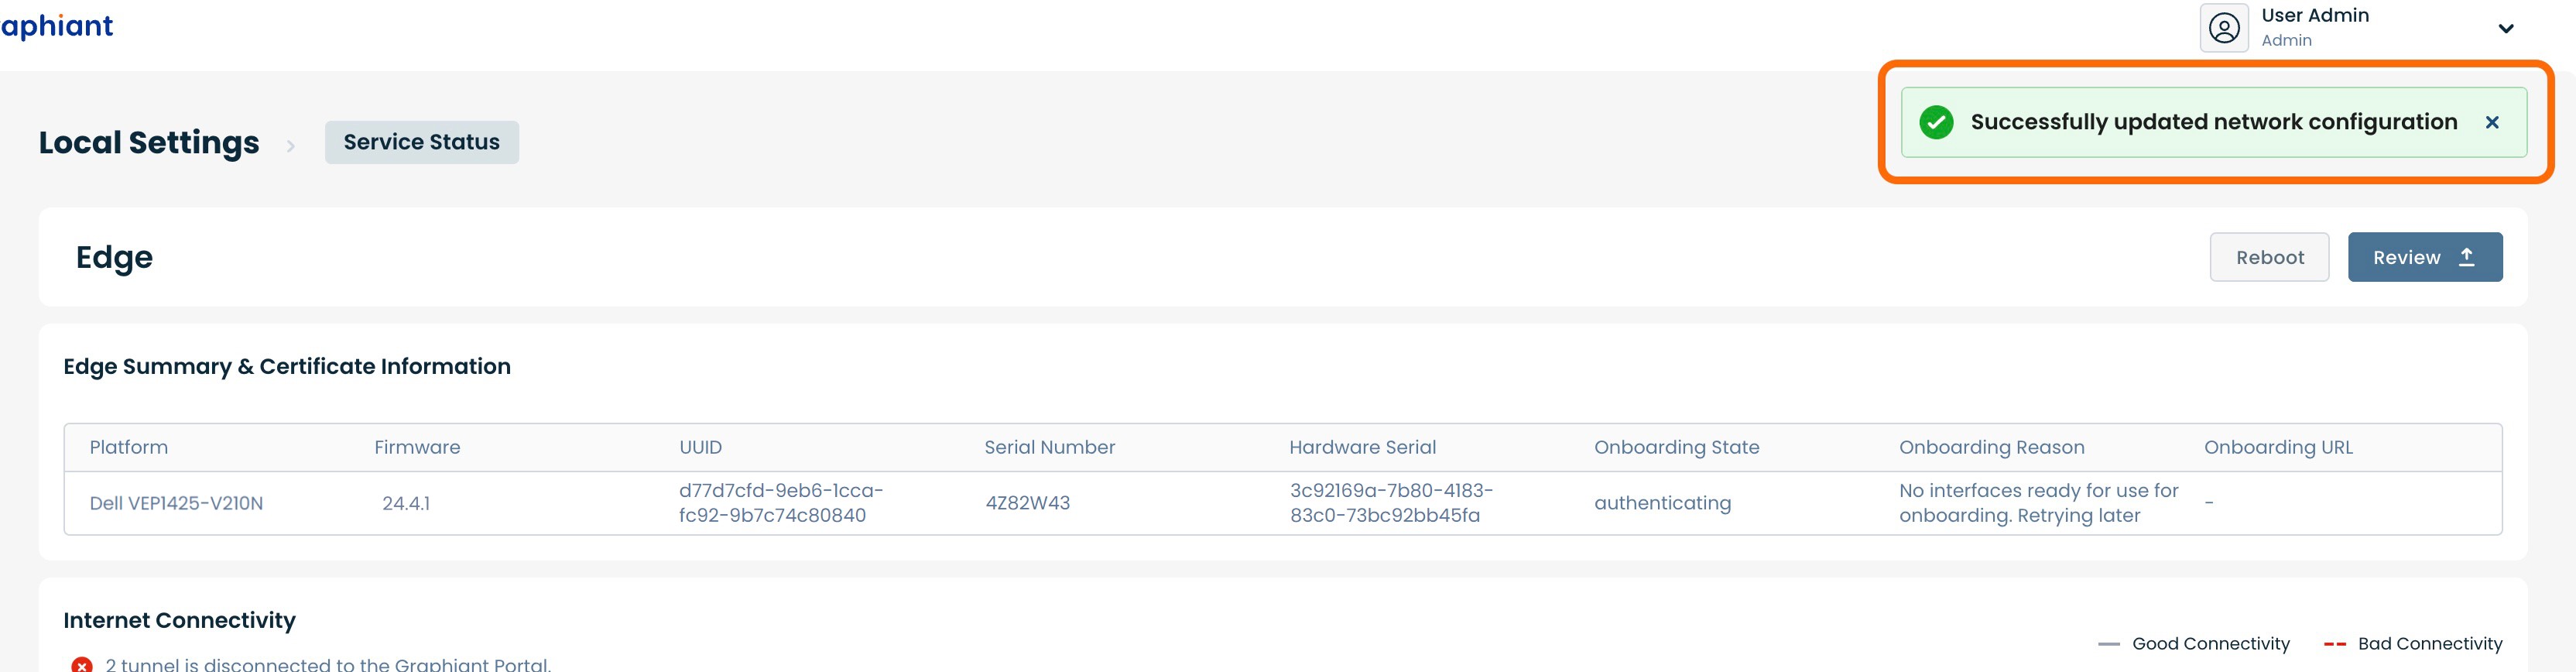
The configuration will be applied and a green pop-up message will appear in the upper right corner indicating that the configuration change was successful.
Static IP is assigned to the WAN interface and is ready to be used.
Configuring Static IP via the Copper Default WAN Port GE1
Under "WAN Circuits" select 'isp-12'.
DNS: If desired, enter the IP address of the preferred DNS. If left blank, this field will be filled via Cloudflare with either "1.1.1.1" or "1.0.0.1".
Click the 'Edit' button on the far right of the "Interfaces" section.
Click the 'Static' slider to set the WAN IP address.
Ensure that 'TenGigabitEthernet1' is selected on the left.
Enter the information for the following fields:
WAN Circuit: Select "isp-12" from the drop-down
IP Address: IP address of the WAN
Subnet Mask: Subnet mask of the WAN IP address
Gateway: IP address of the default gateway
Click 'Back to interfaces' link at the upper left of the screen.

Click 'Review' at the top right.

This will bring up a screen showing the changes to be made.
Click 'Apply' in the upper right.

The configuration will be applied and a green pop-up message will appear in the upper right corner indicating that the configuration change was successful.

Static IP is assigned to the WAN interface and is ready to be used.
Setting Static WAN IP on a Dell XR5610
Ports:
WAN Port:
The default WAN ports on the Dell XR5610 are SFP Port-1 and GE Port-1. SFP Port-1 requires an SFP module; GE Port-4 is copper. Both ports are in DHCP client mode. DHCP client mode enables the edge to do zero touch provisioning to the Graphiant network. Configuring an IP address for use on the WAN Port is done via the Management Port.
Management port:
The management port on the Dell XR5610 is GE Port-4. There is a local web server running, and the port is in DHCP server mode. The laptop/PC will receive an IP address in the 192.168.1.0/24 subnet if it is configured for DHCP client. Alternatively, a static IP address may be set on the laptop/PC’s ethernet to 192.168.1."X" (where "X" does not equal 1), mask 255.255.255.0. There is no need to set a default gateway.
Note:
The DHCP Server does not hand out a default gateway; other networks are still accessible while connected to the management interface.
Connect the laptop/PC's ethernet port to GE Port-4.
Configuring the Edge's Static WAN IP
After plugging in the laptop/PC and receiving an IP address, open a browser and go to
192.168.1.1.
A security error will appear because Graphiant uses a self-signed certificate. Go ahead and proceed to this site.
From the login screen just click the login button; there is no password configured.

This will open the "Service Status" section of "Local Settings". At this time since the device is new, there will be no connection yet to the Graphiant Portal and Core.

Scroll to the bottom to find the "WAN Circuits" and "Interfaces" sections.
Note:
The complete interface list for the Dell XR5610 will depend on the configuration ordered; the default interfaces do remain the same across all configurations.
Configuring Static IP via the SFP Default WAN Port SFP1
Under "WAN Circuits" select 'isp-11'.
DNS: If desired, enter the IP address of the preferred DNS. If left blank, this field will be filled via Cloudflare with either "1.1.1.1" or "1.0.0.1".
Click the 'Edit' button on the far right of the "Interfaces" section.
Click the 'Static' slider to set the WAN IP address.
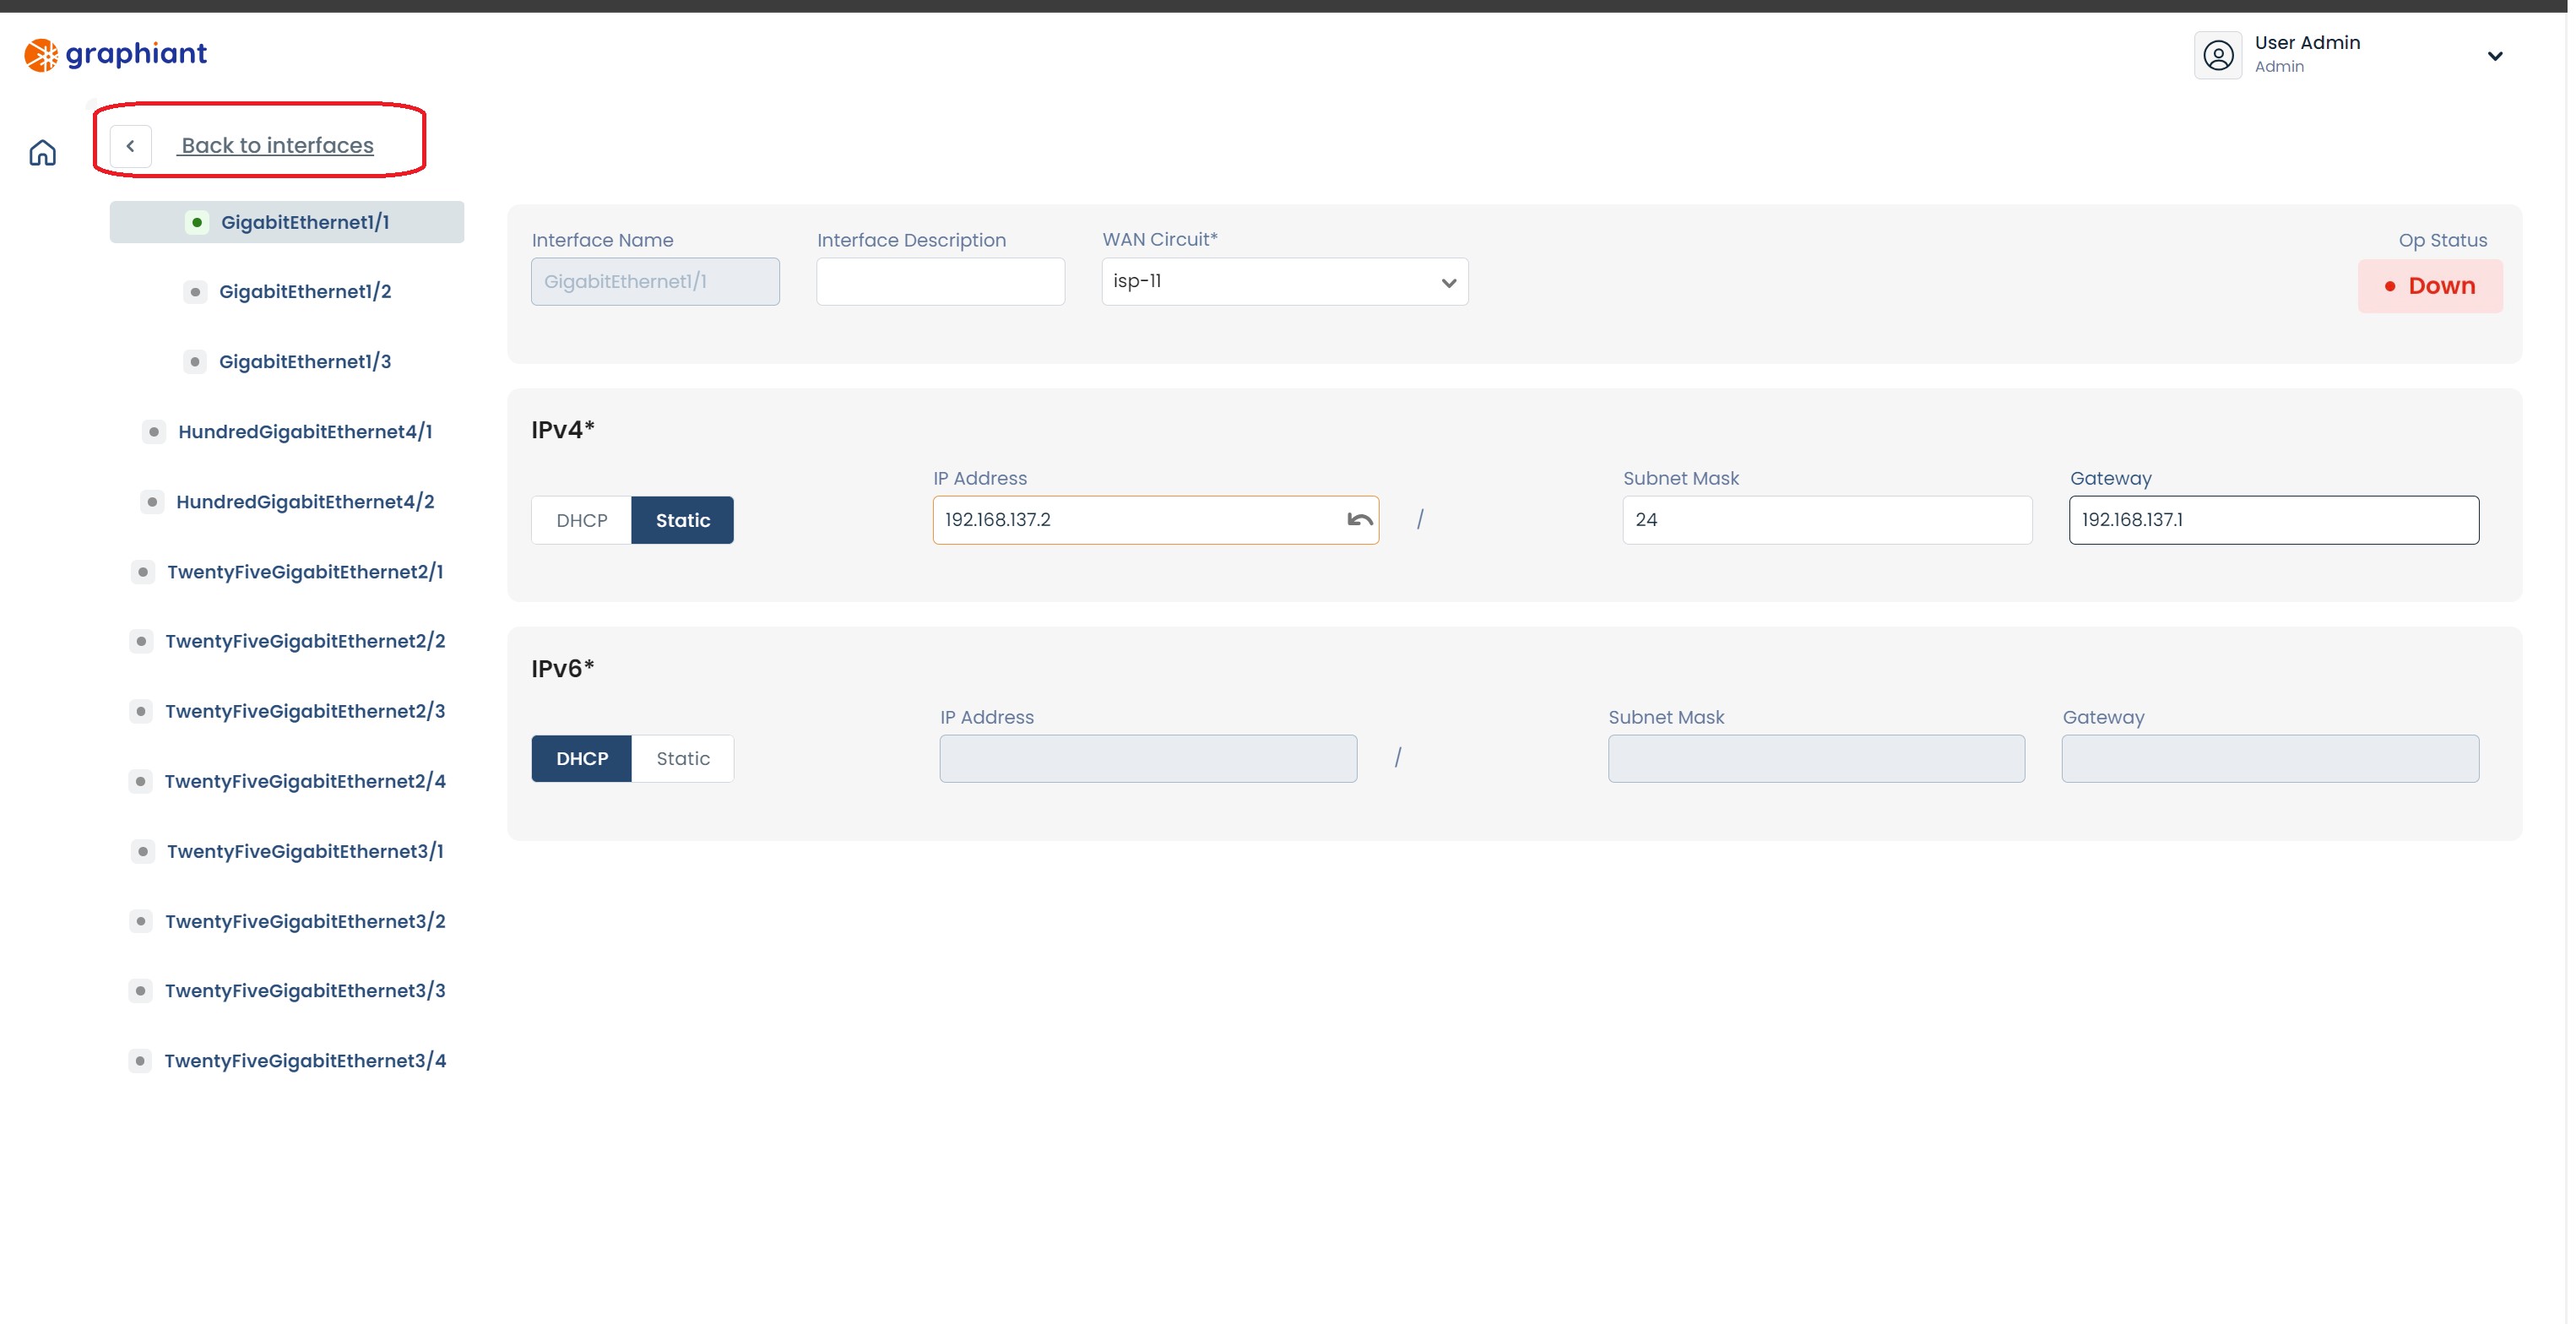
Ensure that 'GigabitEthernet1/1' is selected on the left.
Enter the information for the following fields:
WAN Circuit: Select "isp-11" from the drop-down
IP Address: IP address of the WAN
Subnet Mask: Subnet mask of the WAN IP address
Gateway: IP address of the default gateway
Click 'Back to interfaces' link at the upper left of the screen.
Click 'Review' at the top right.
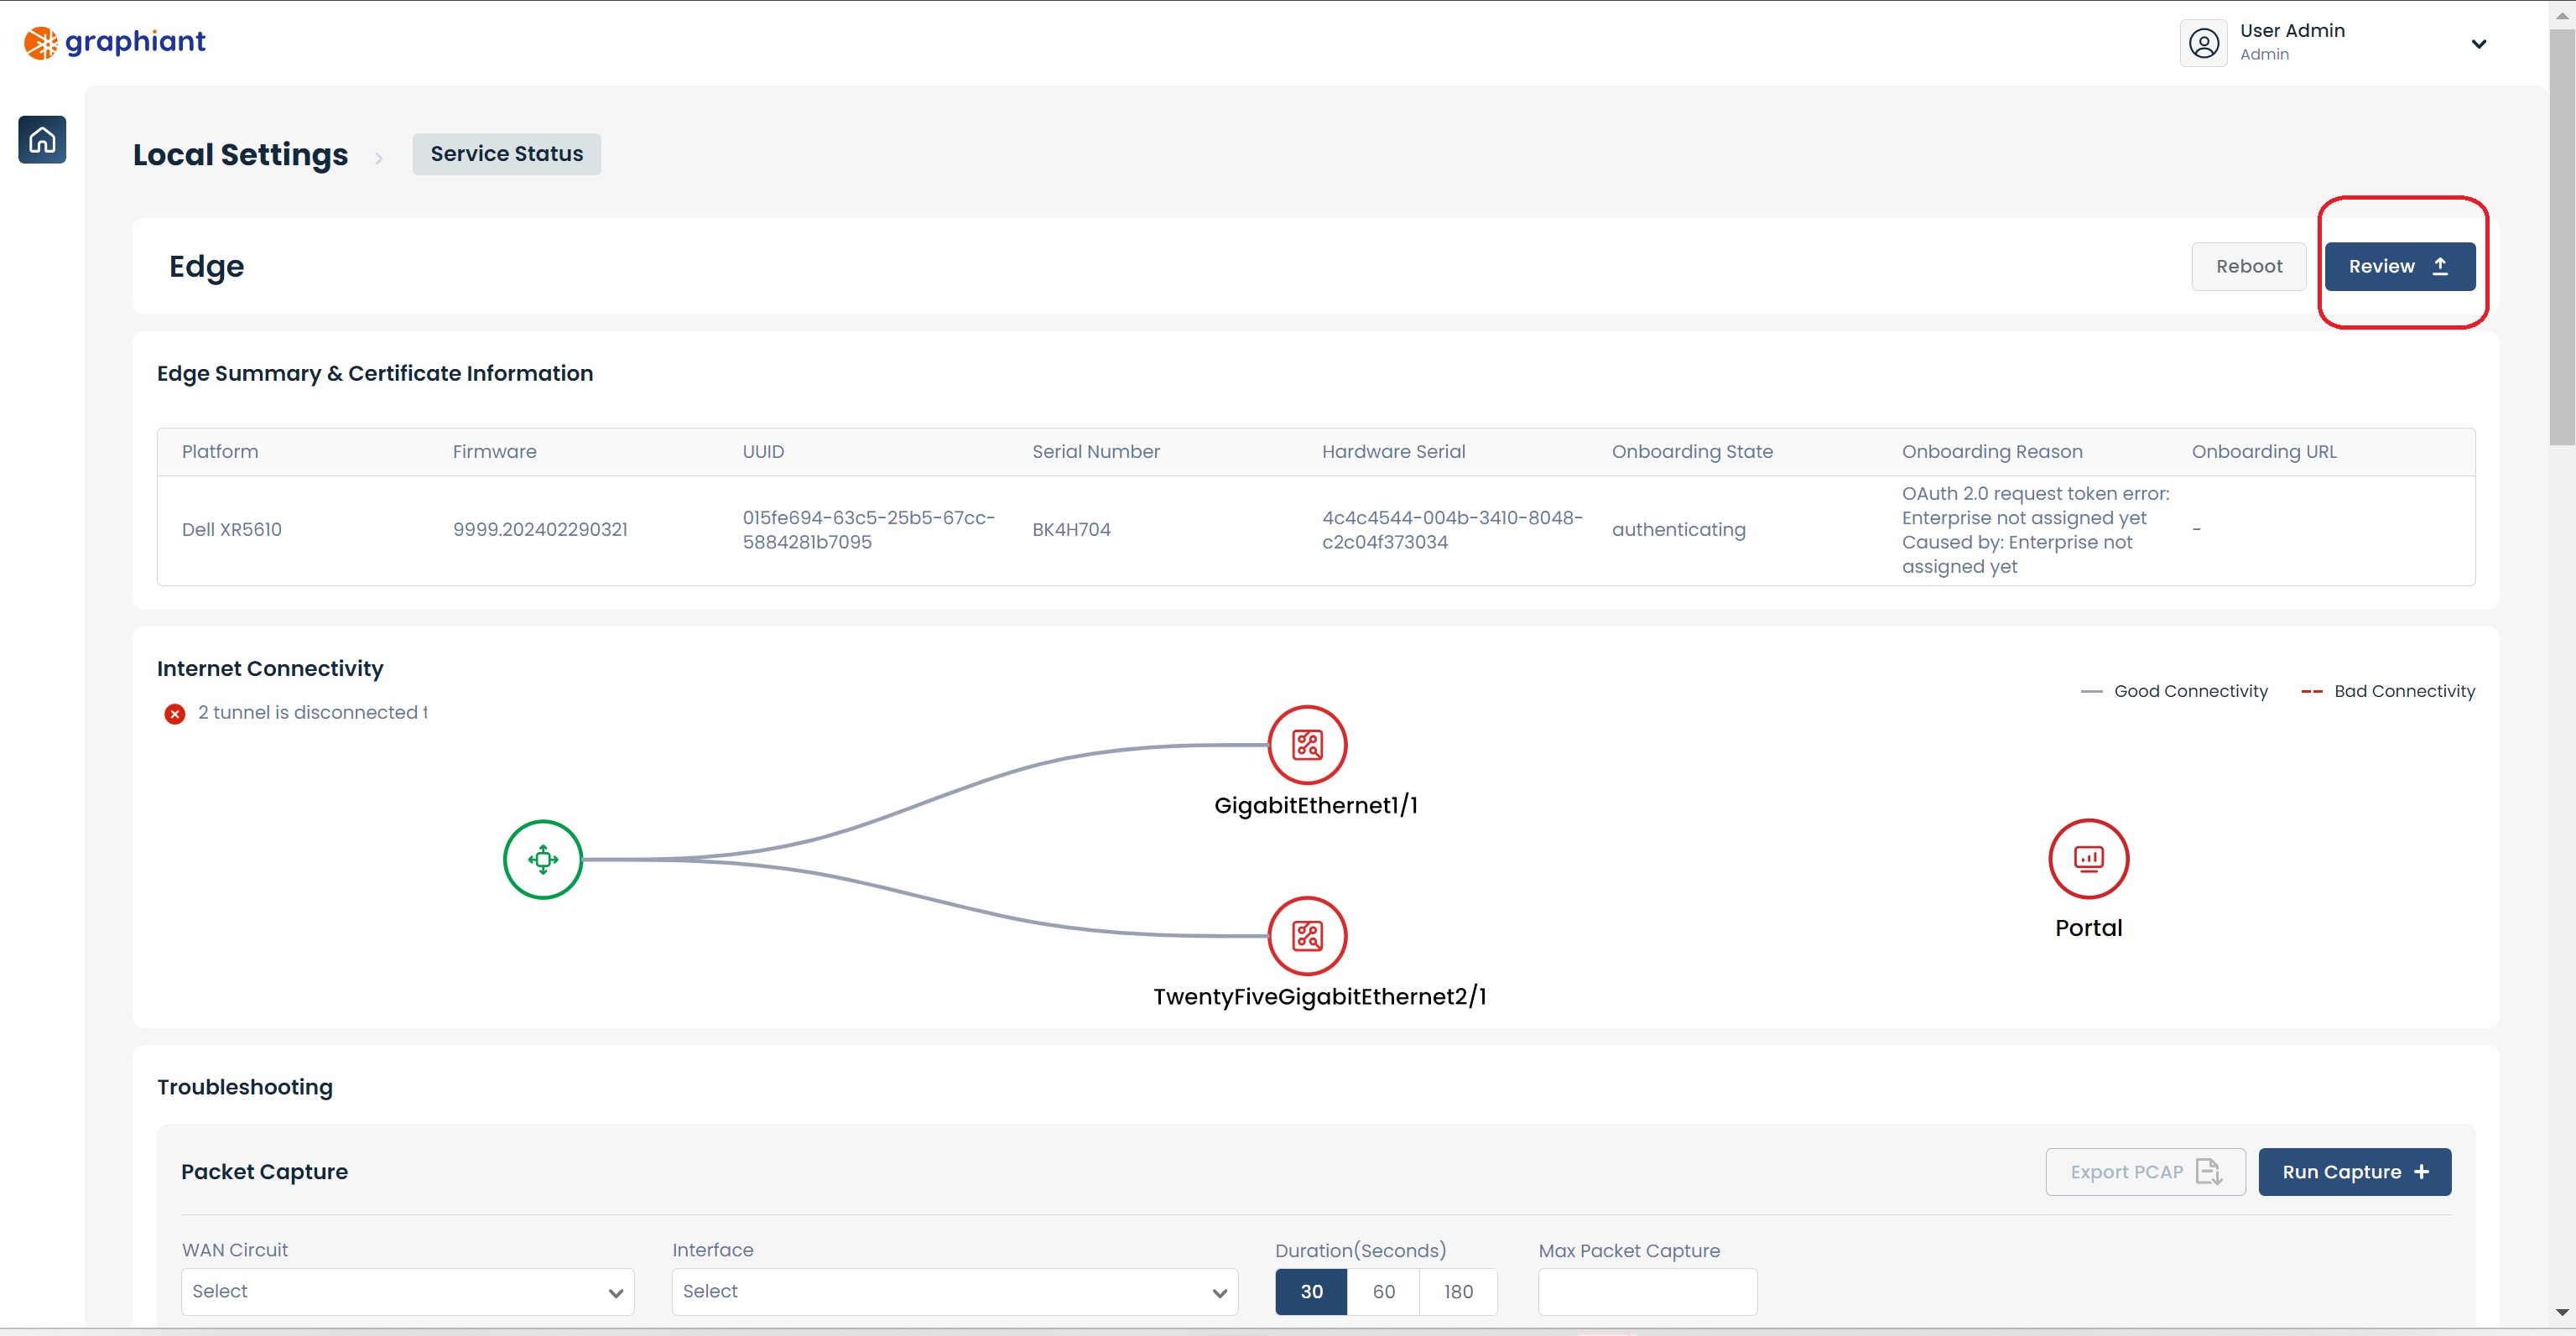
This will bring up a screen showing the changes to be made.
Click 'Apply' in the upper right.

The configuration will be applied and a green pop-up message will appear in the upper right corner indicating that the configuration change was successful.

Static IP is assigned to the WAN interface and is ready to be used.
Configuring Static IP via the Copper Default WAN Port GE1
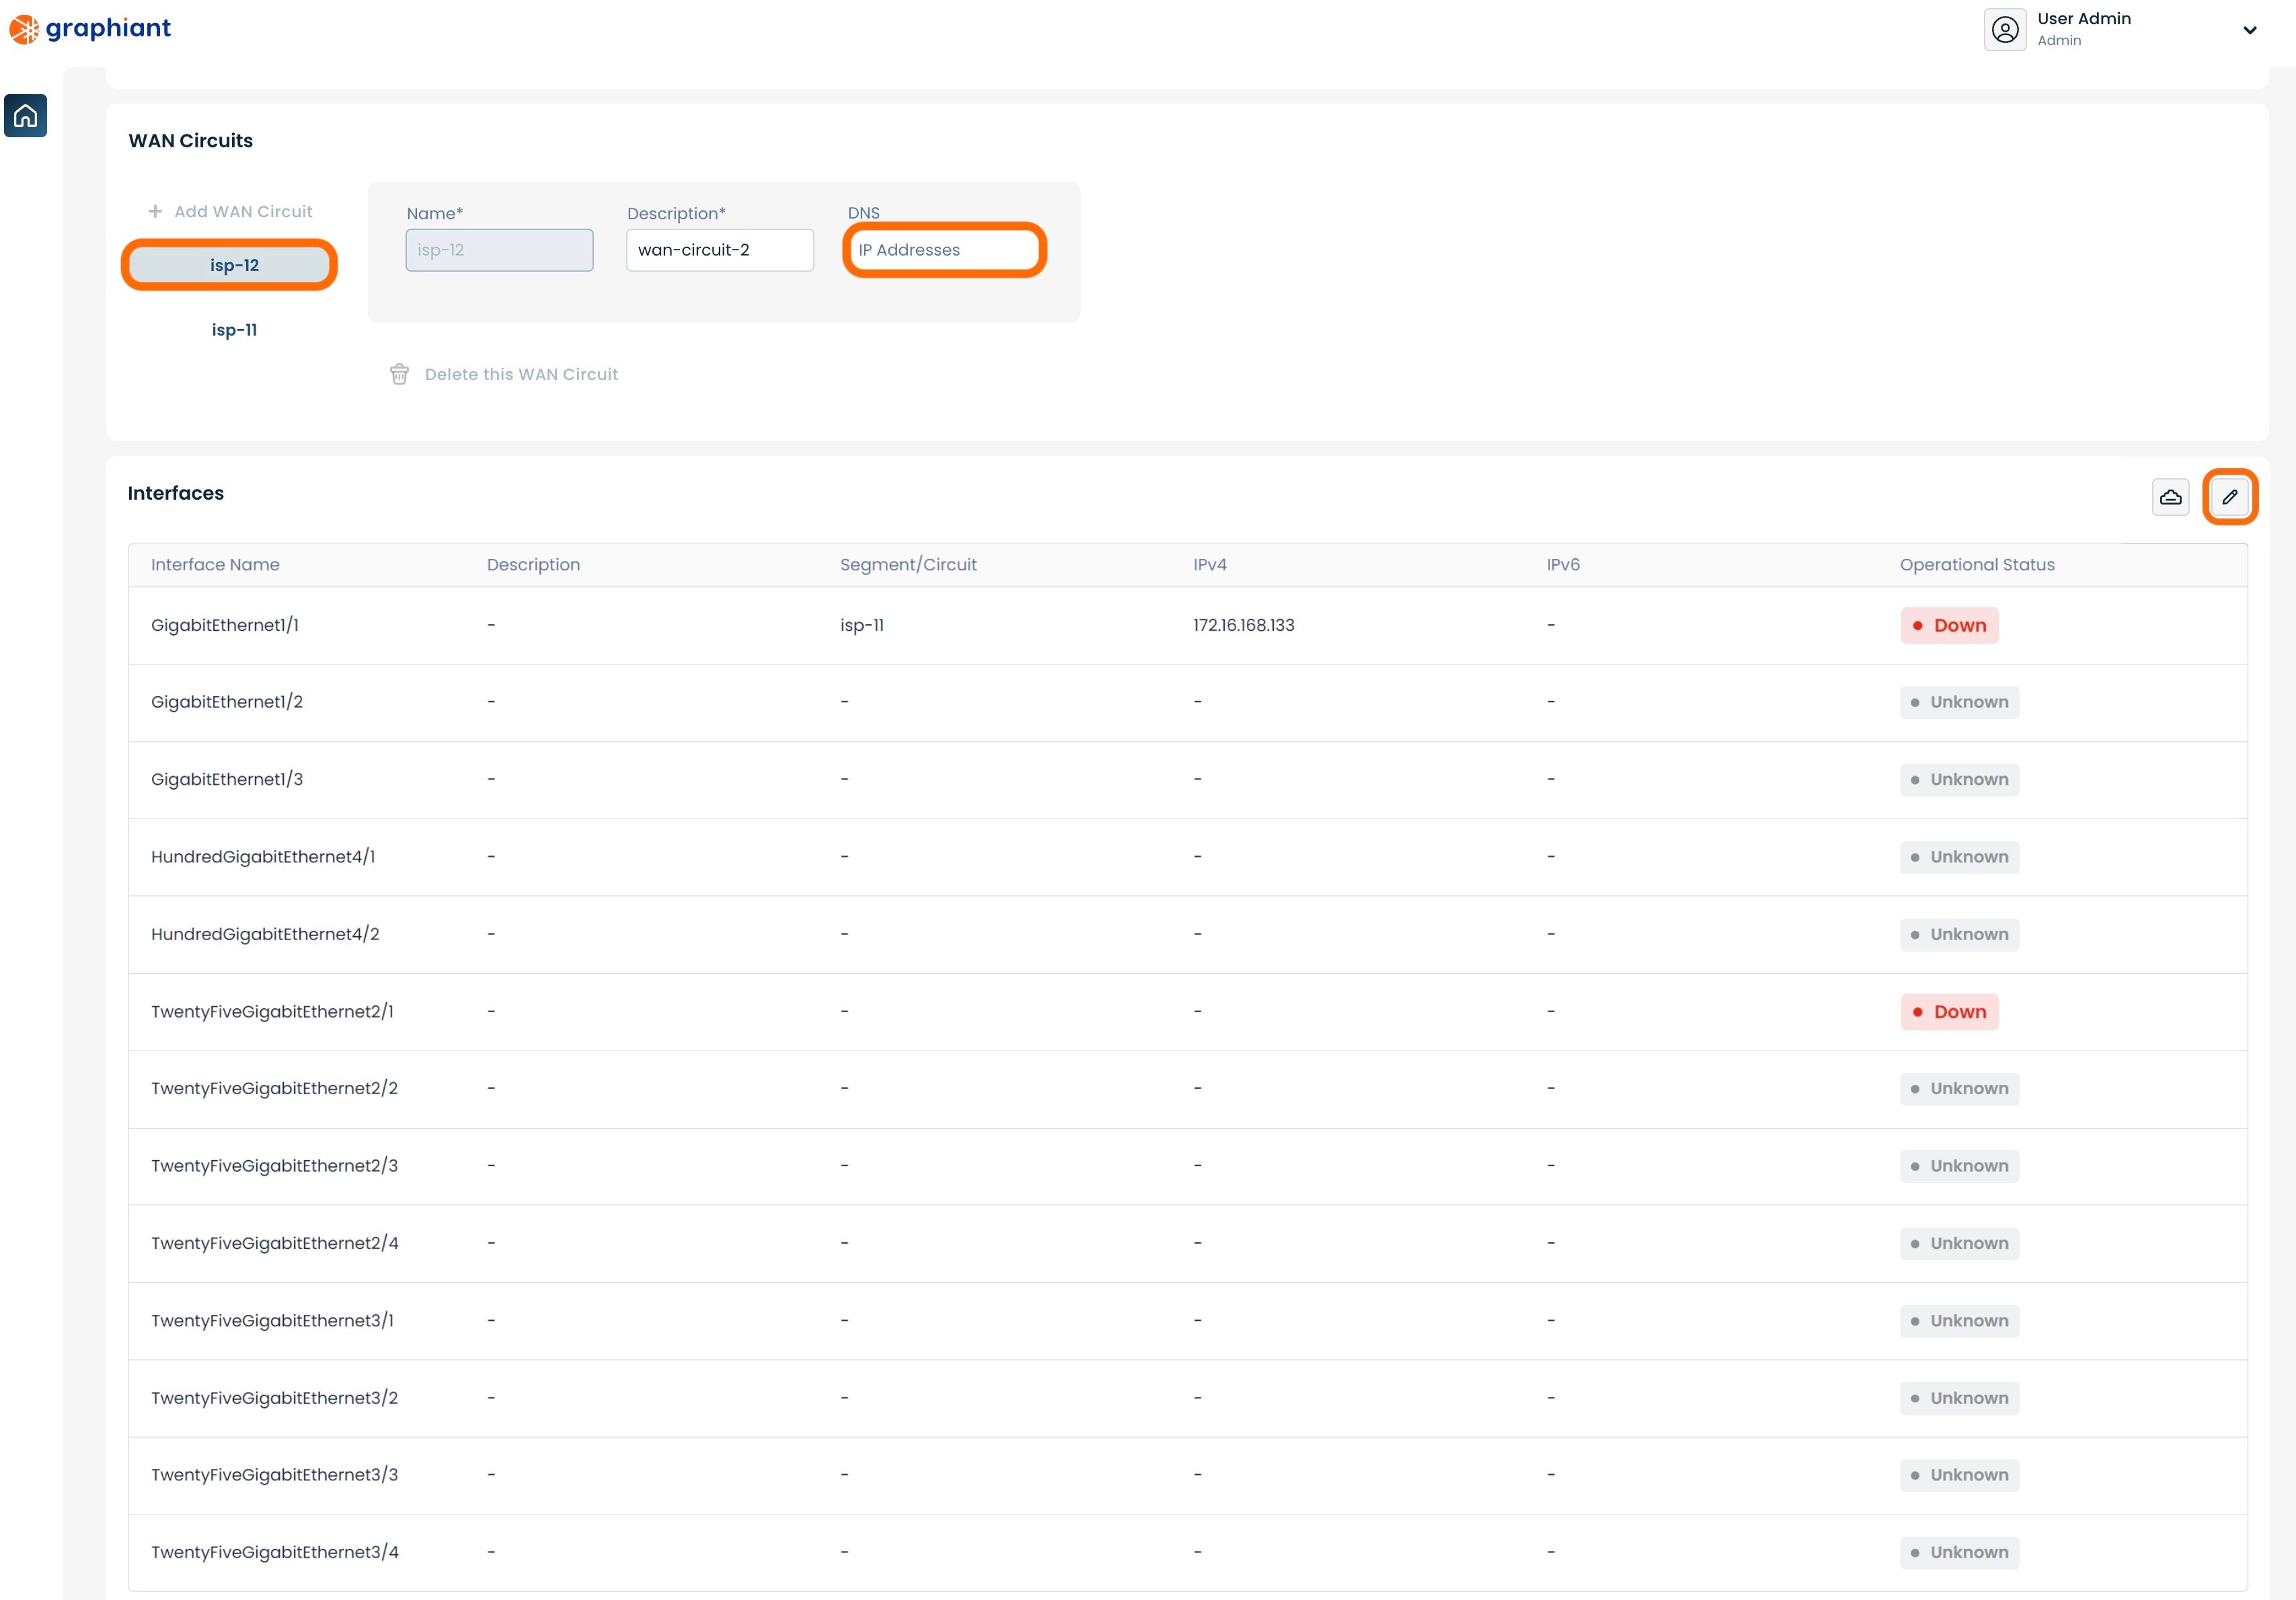
Under "WAN Circuits" select 'isp-12'.
DNS: If desired, enter the IP address of the preferred DNS. If left blank, this field will be filled via Cloudflare with either "1.1.1.1" or "1.0.0.1".
Click the 'Edit' button on the far right of the "Interfaces" section.
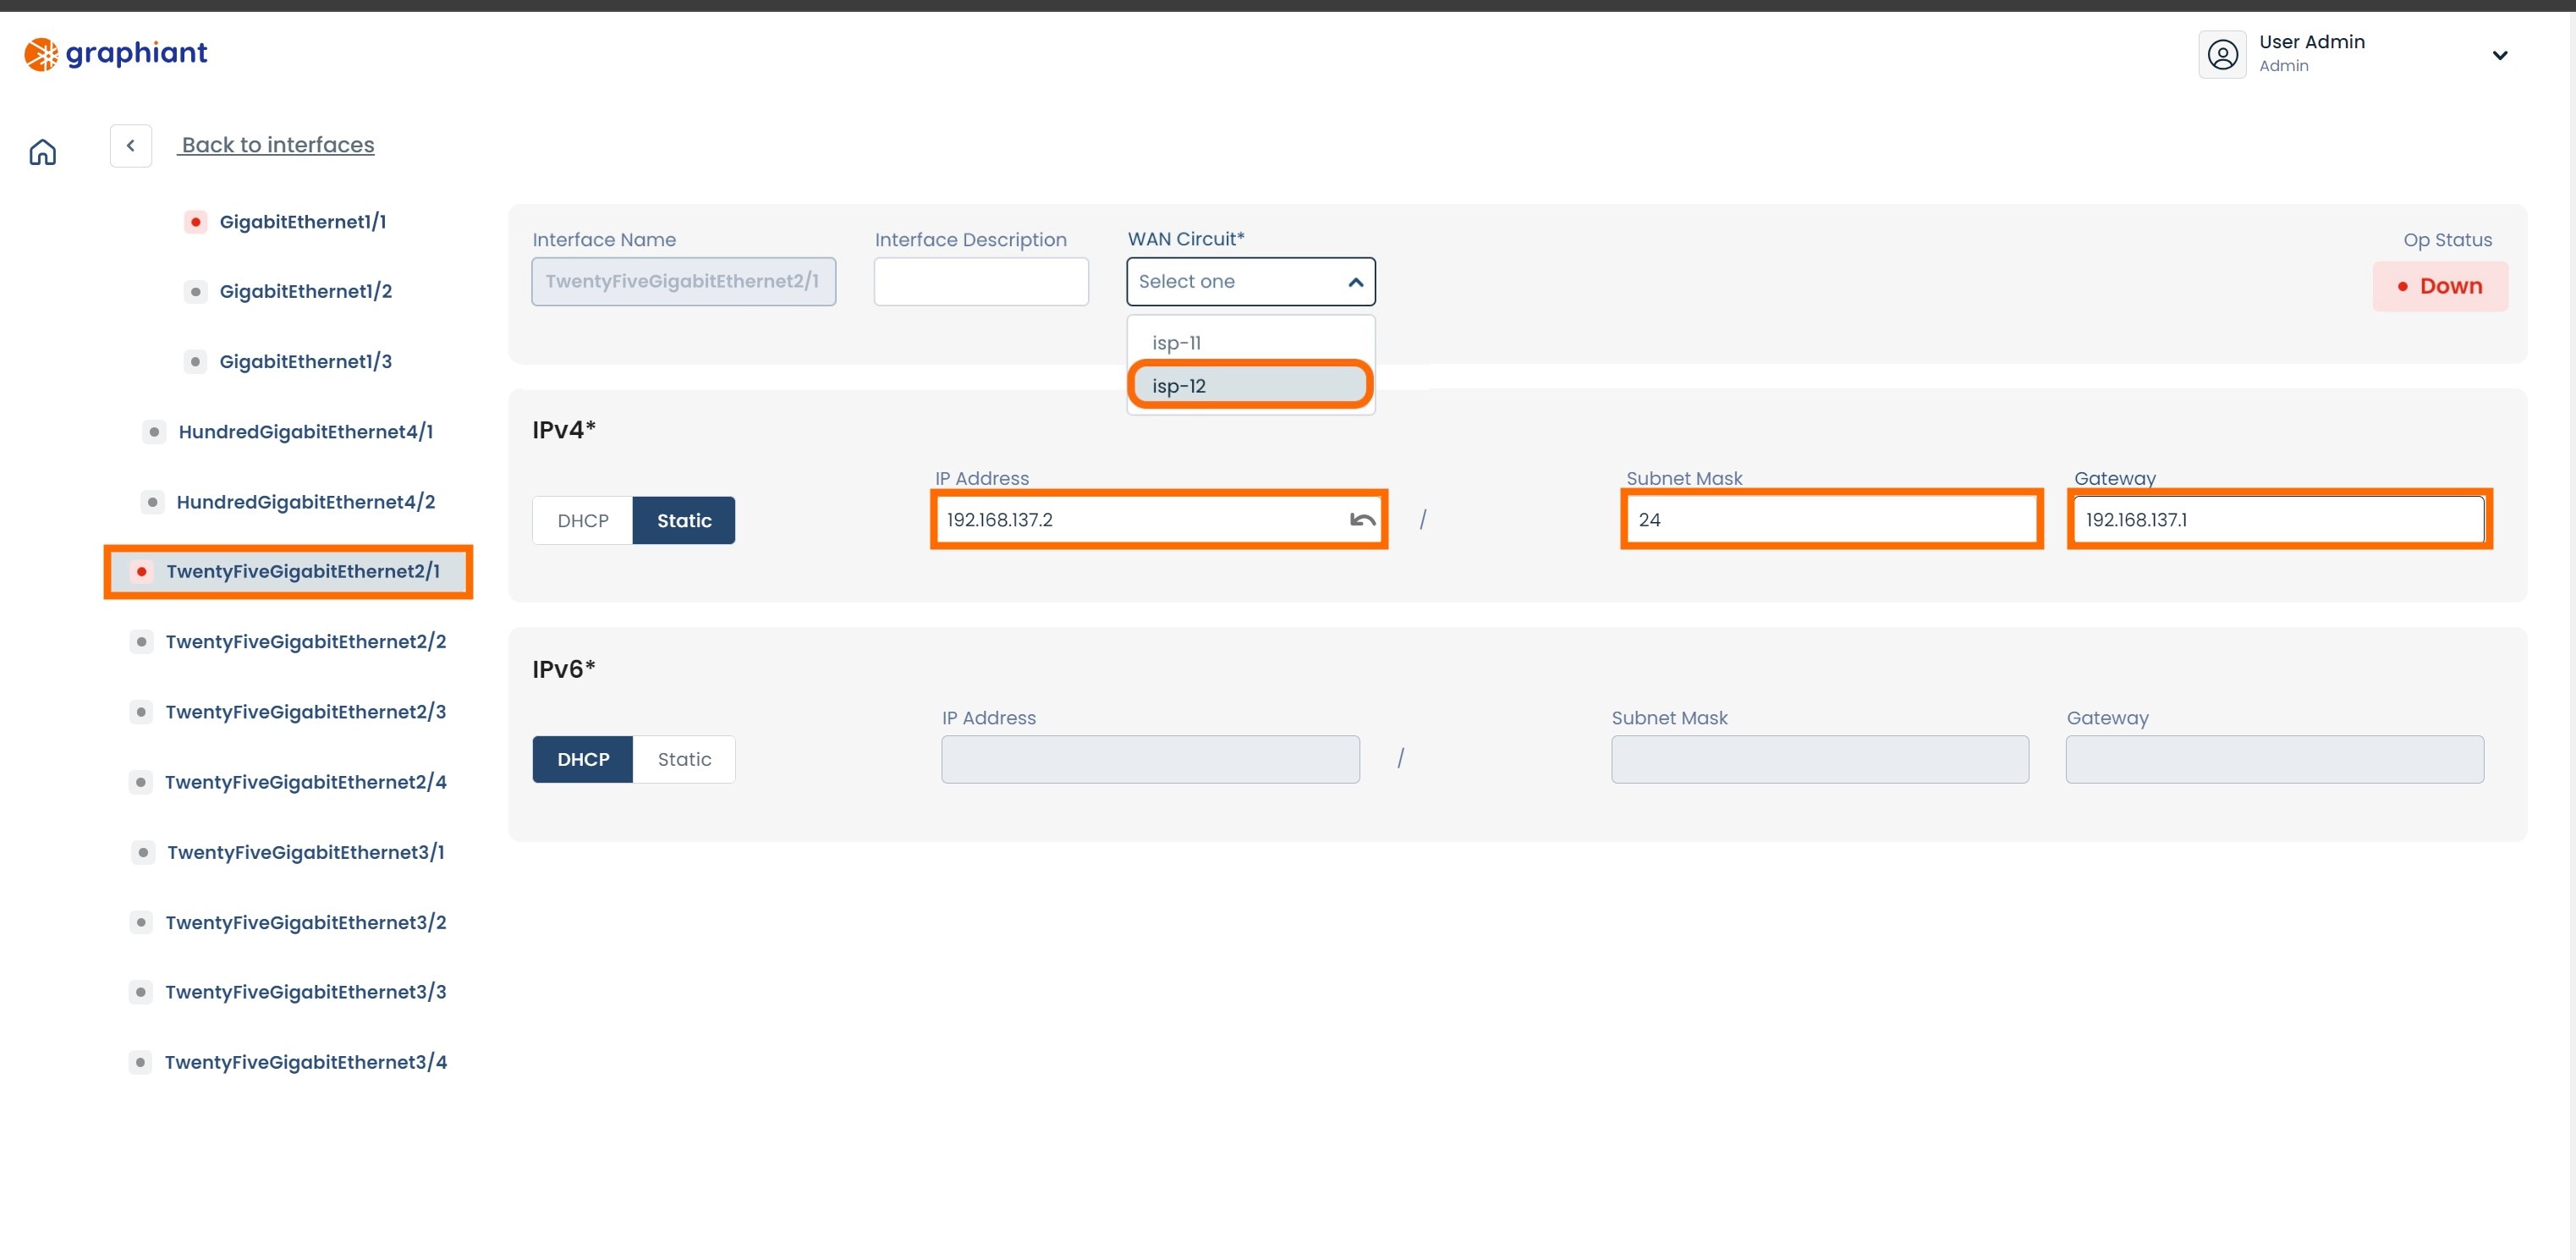
Click the 'Static' slider to set the WAN IP address.
Ensure that 'TwentyFiveGigabitEthernet2/1' is selected on the left.
Enter the information for the following fields:
WAN Circuit: Select "isp-12" from the drop-down
IP Address: IP address of the WAN
Subnet Mask: Subnet mask of the WAN IP address
Gateway: IP address of the default gateway
 Click 'Back to interfaces' link at the upper left of the screen.

Click 'Review' at the top right.

This will bring up a screen showing the changes to be made.
Click 'Apply' in the upper right.

The configuration will be applied and a green pop-up message will appear in the upper right corner indicating that the configuration change was successful.

Static IP is assigned to the WAN interface and is ready to be used.
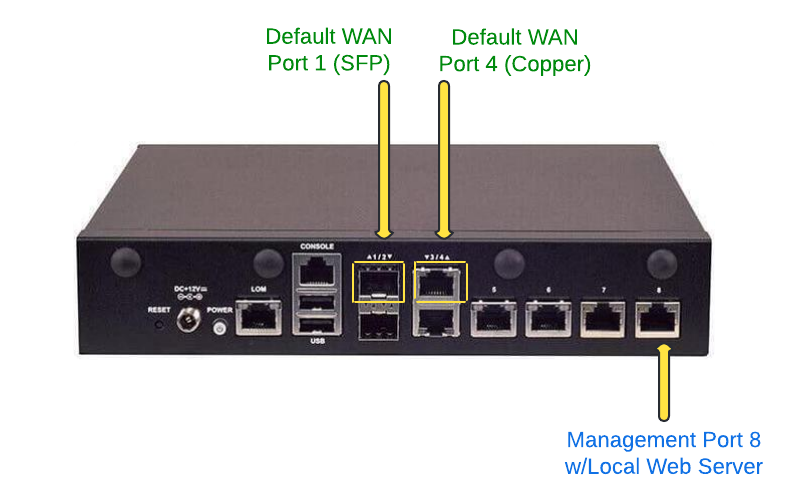
Setting Static WAN IP on a Lanner 1515B
Ports:
WAN Port:
The default WAN ports on the Lanner-1515B are Port-1 and Port-4. Port 1 requires an SFP module; Port 4 is copper. Both ports are in DHCP client mode. DHCP client mode enables the edge to do zero touch provisioning to the Graphiant network. Configuring an IP address for use on the WAN Port is done via the Management Port.
Management port:
The management port on the Lanner-1515B is Port-8. There is a local web server running, and the port is in DHCP server mode. The laptop/PC will receive an IP address in the 192.168.1.0/24 subnet if it is configured for DHCP client. Alternatively, a static IP address may be set on the laptop/PC’s ethernet to 192.168.1."X" (where "X" does not equal 1), mask 255.255.255.0. There is no need to set a default gateway.
Note:
The DHCP Server does not hand out a default gateway; other networks are still accessible while connected to the management interface.
Connect the laptop/PC's ethernet port to Port-8.
Configuring the Edge's Static WAN IP
After plugging in the laptop/PC and receiving an IP address, open a browser and go to
192.168.1.1.
A security error will appear because Graphiant uses a self-signed certificate. Go ahead and proceed to this site.
From the login screen just click the login button; there is no password configured.

This will open the "Service Status" section of "Local Settings". At this time since the device is new, there will be no connection yet to the Graphiant Portal and Core.

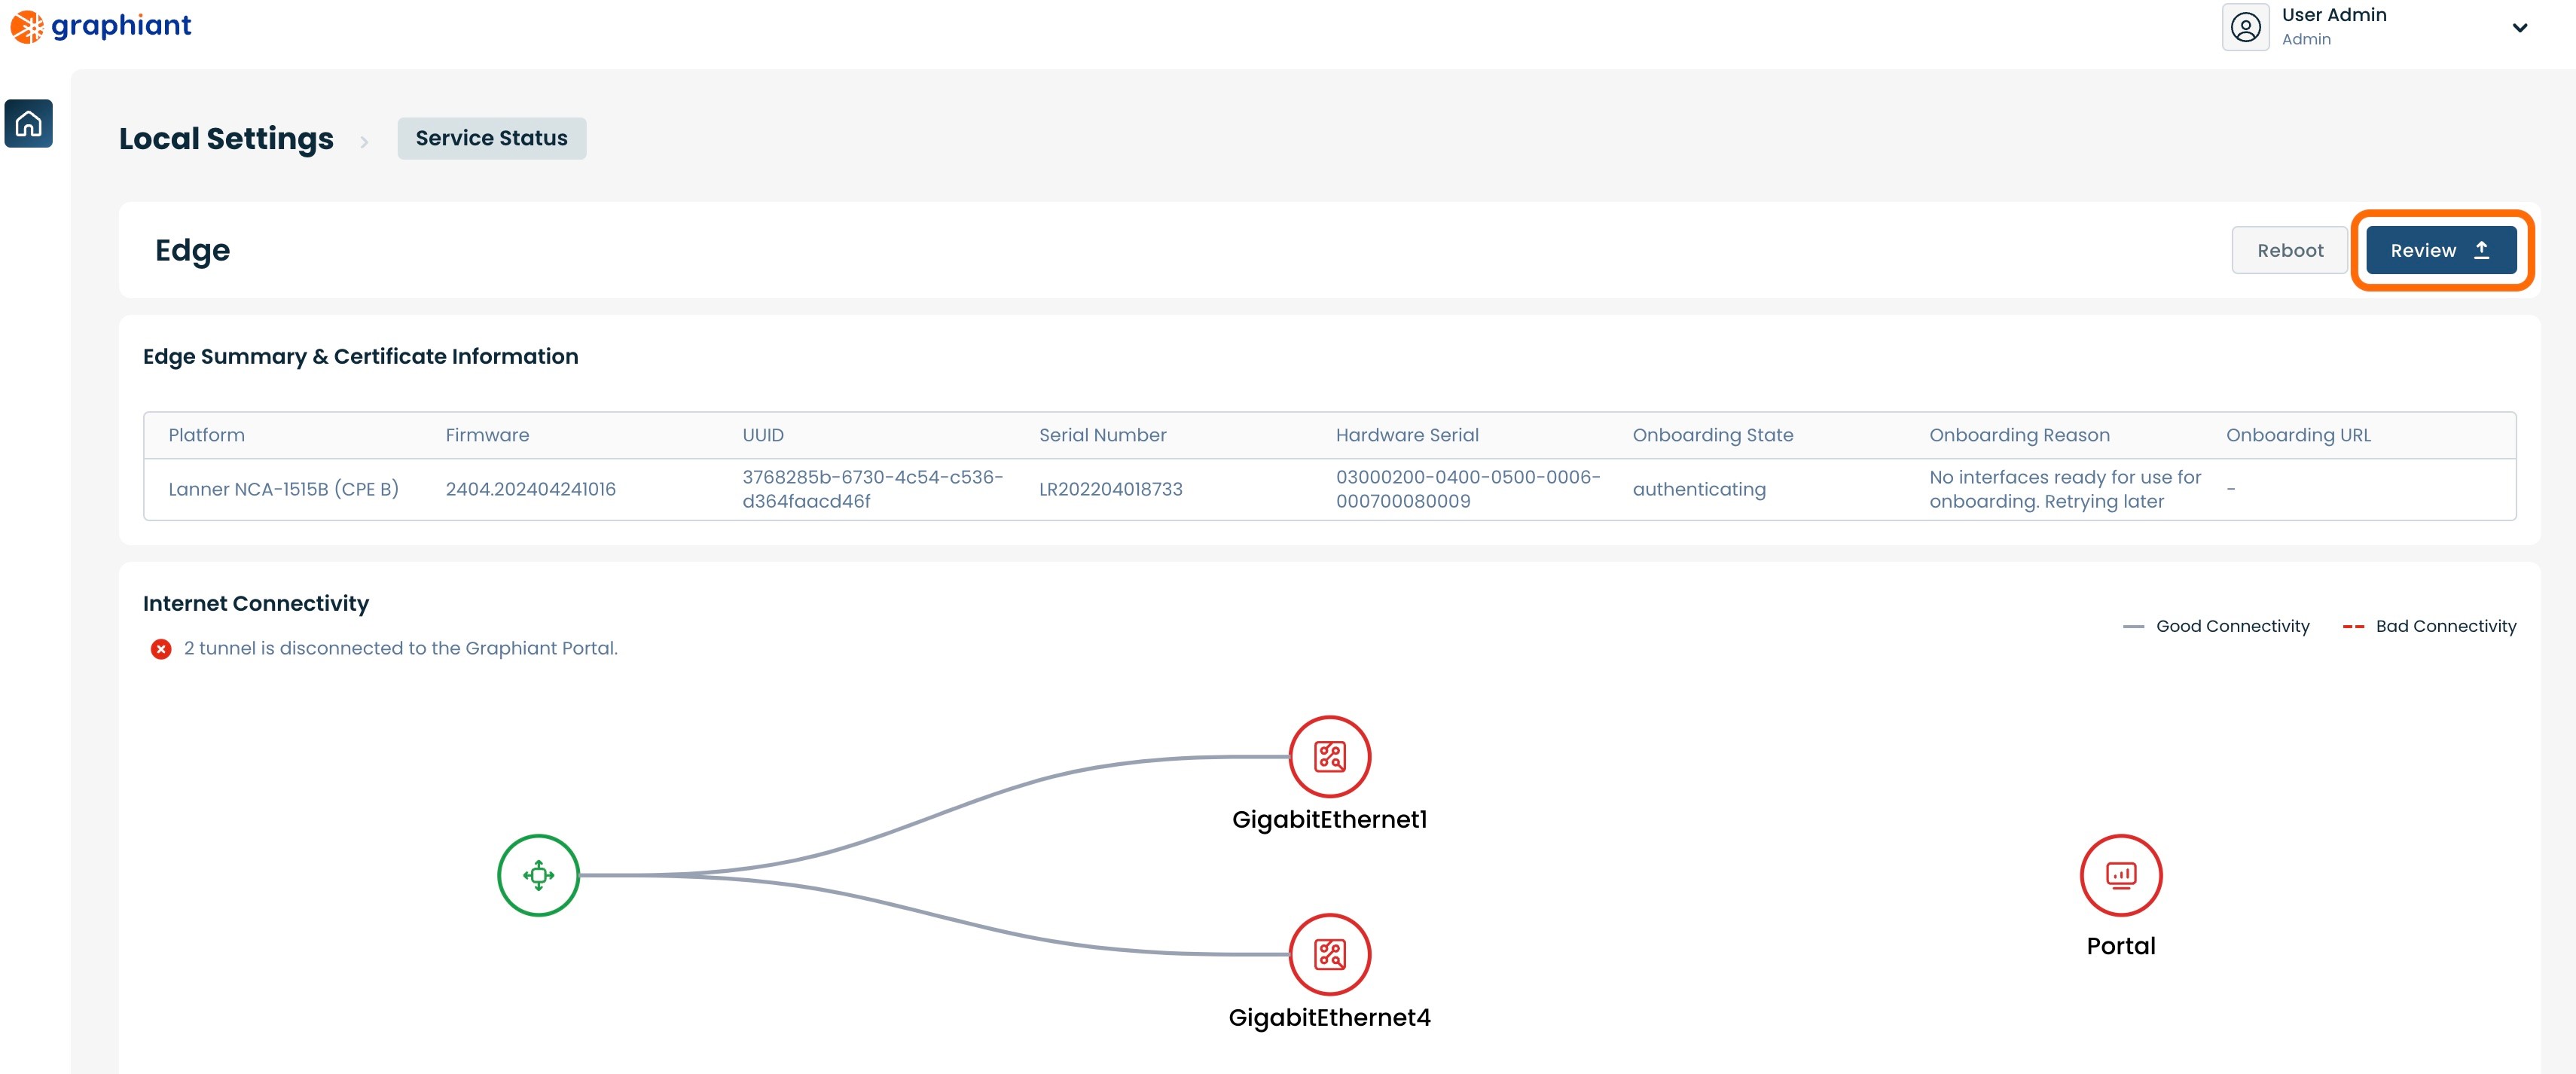
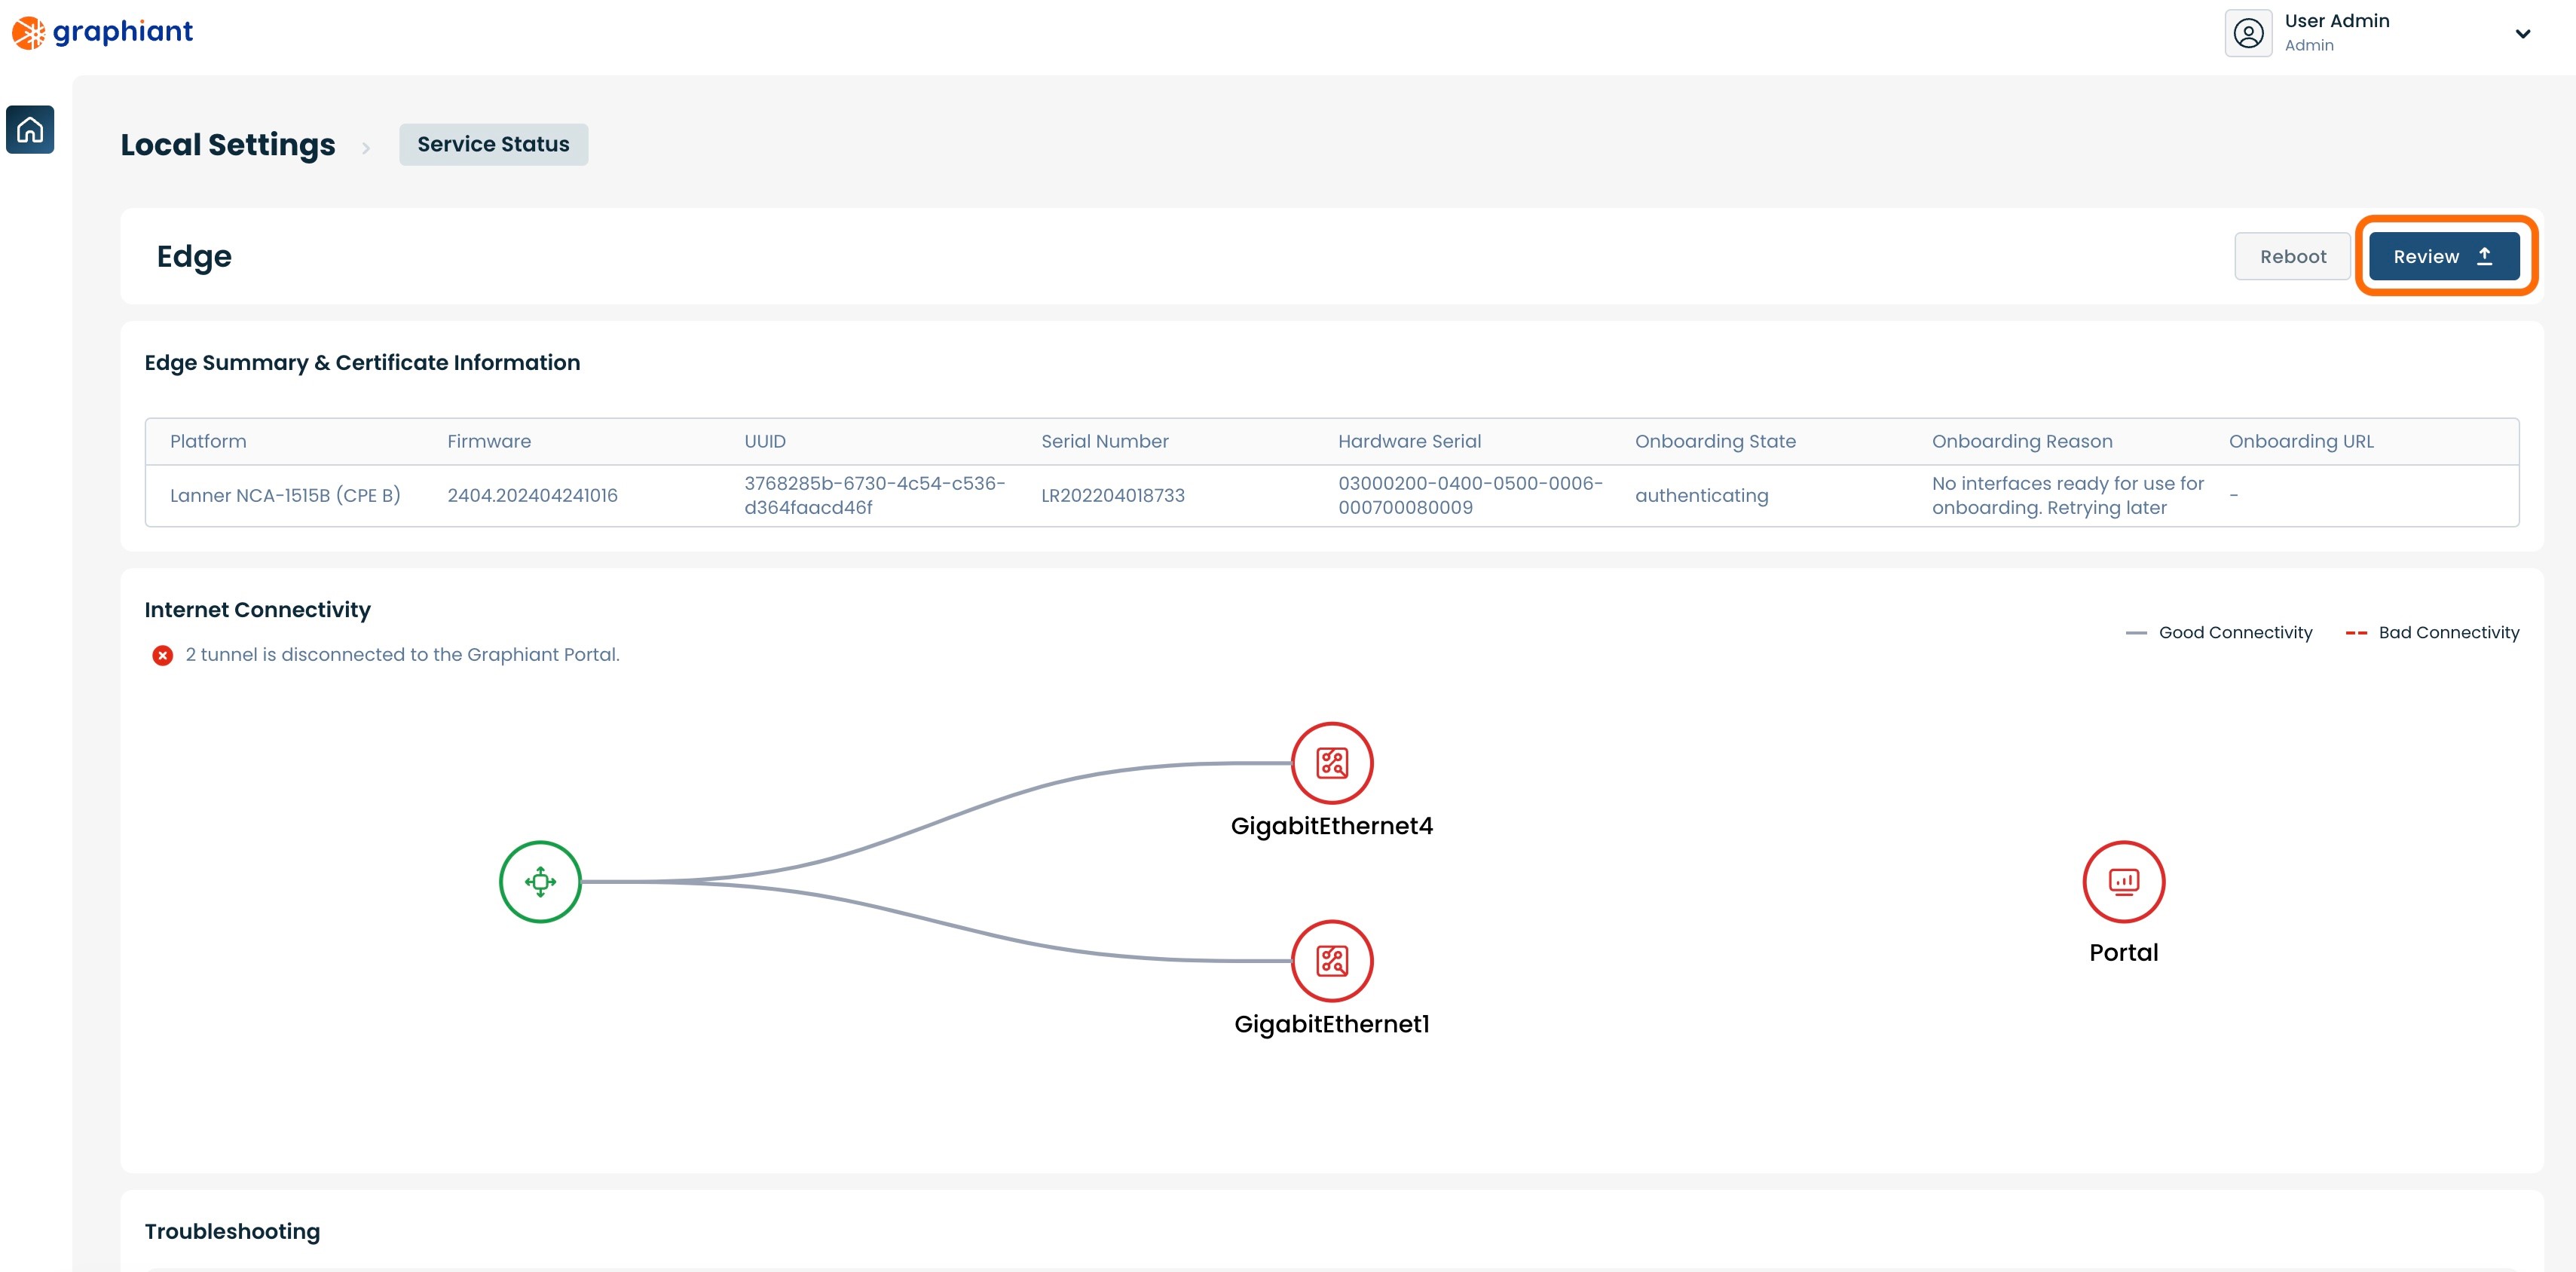
Scroll to the bottom to find the "WAN Circuits" and "Interfaces" sections.
Both options of WAN circuits will show "Down", as the interfaces are not yet connected.
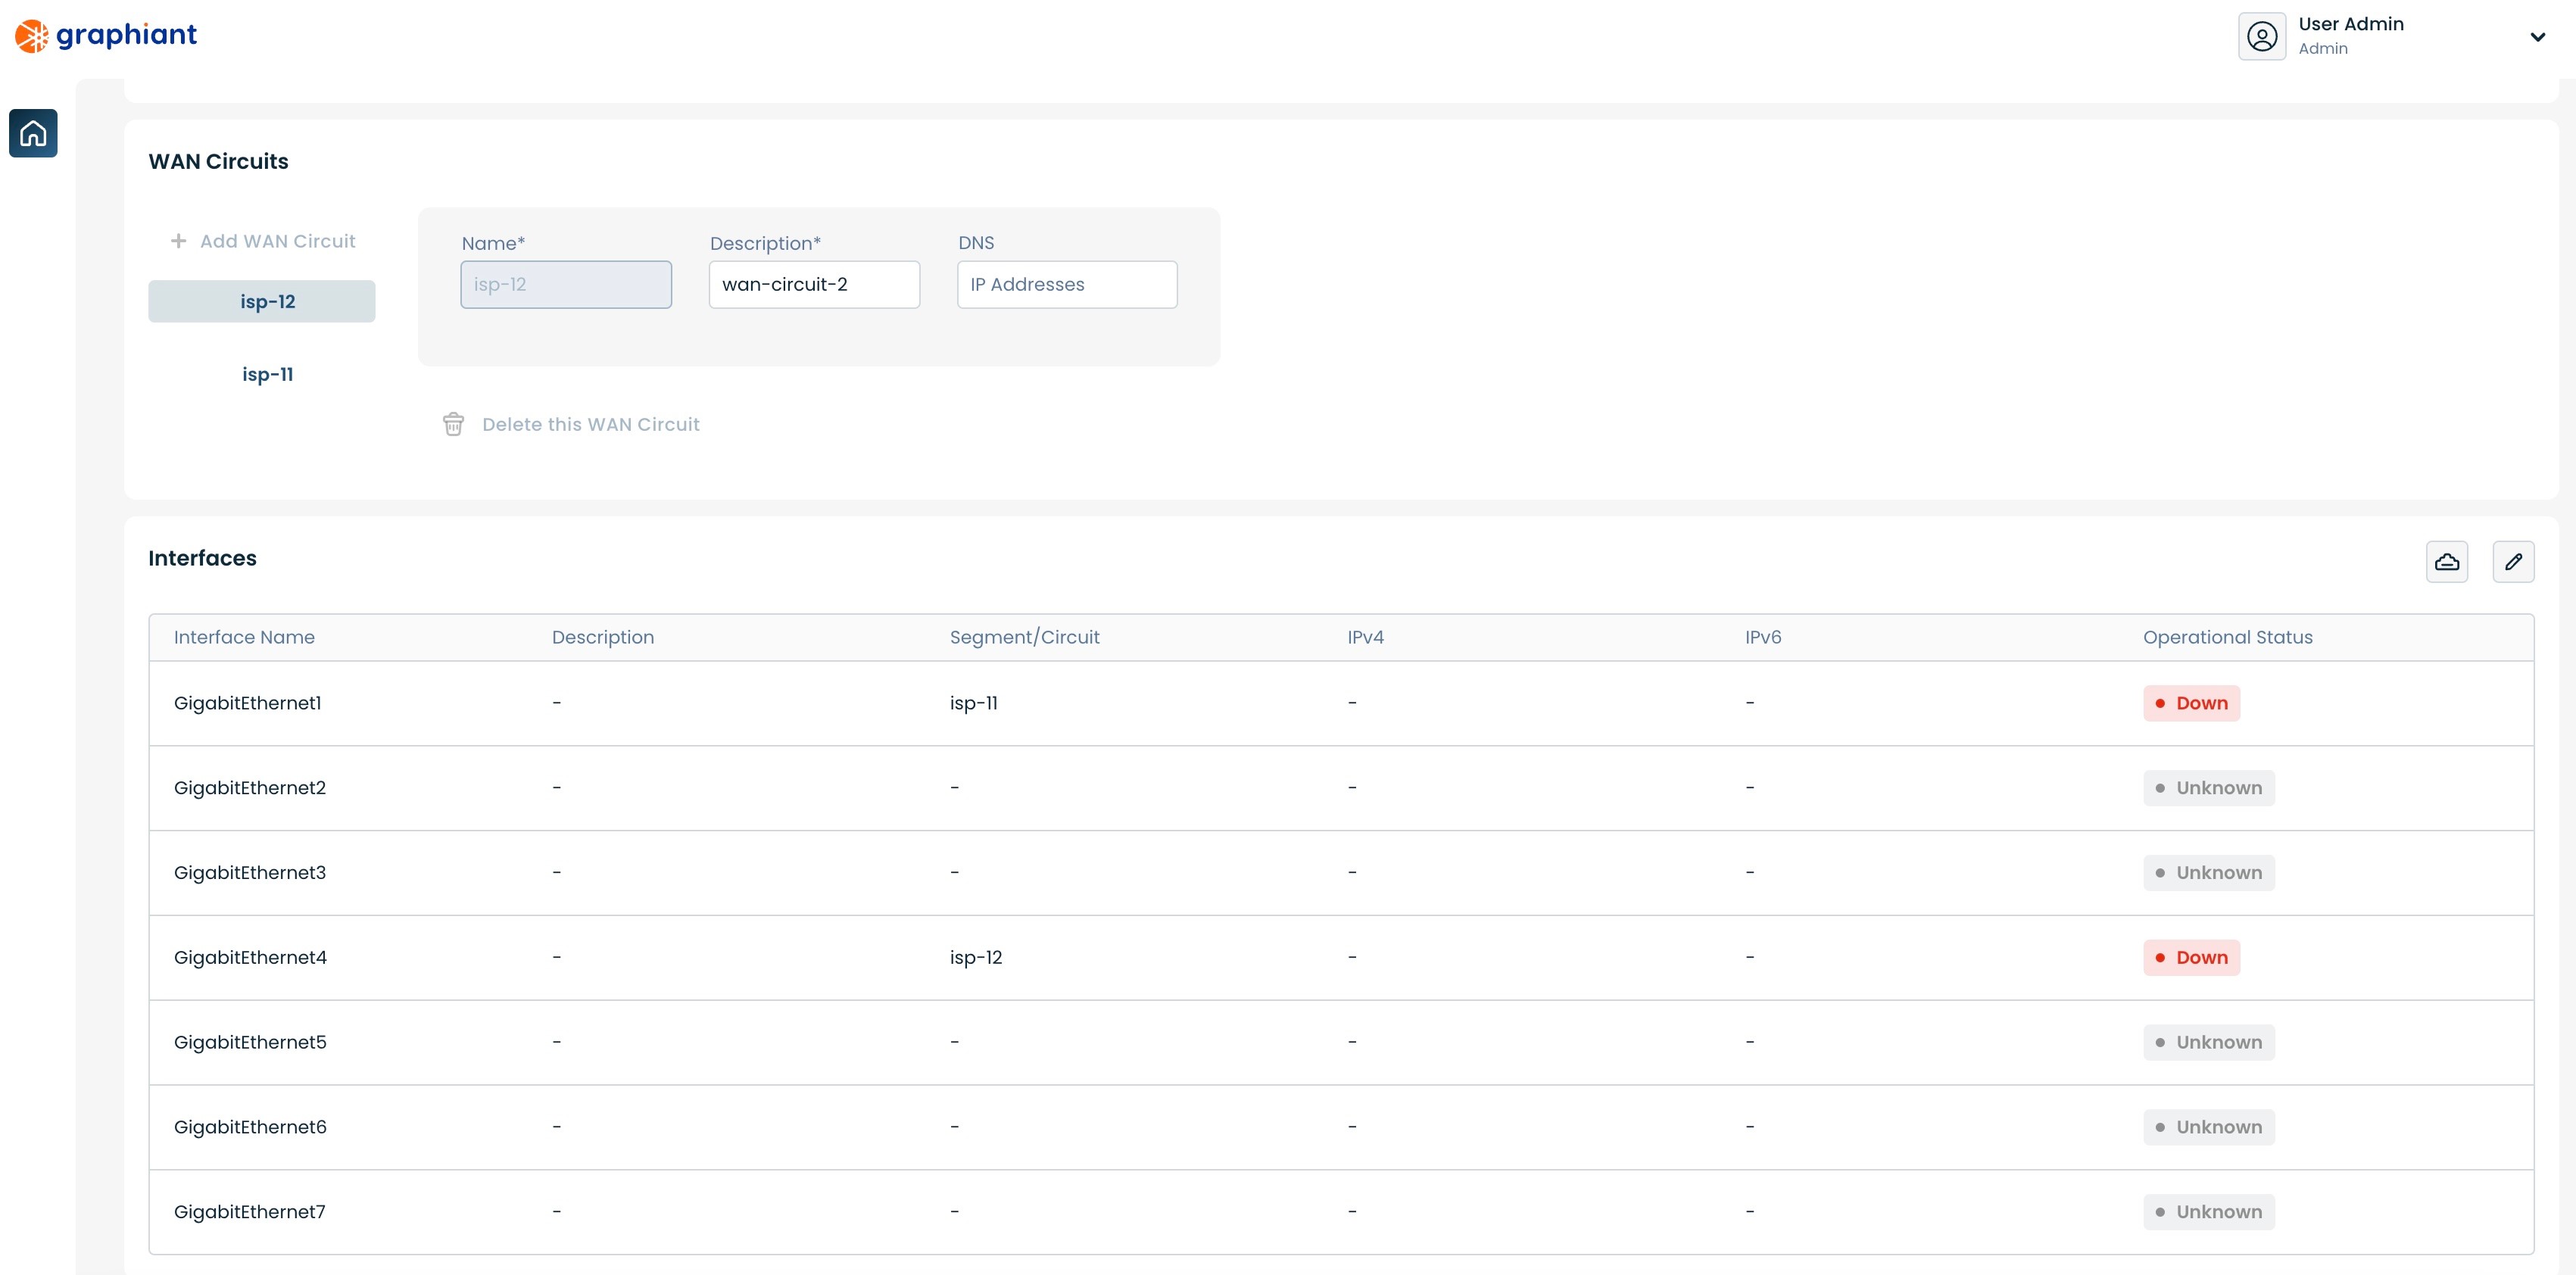
Configuring Static IP via the SFP Default WAN Port #1
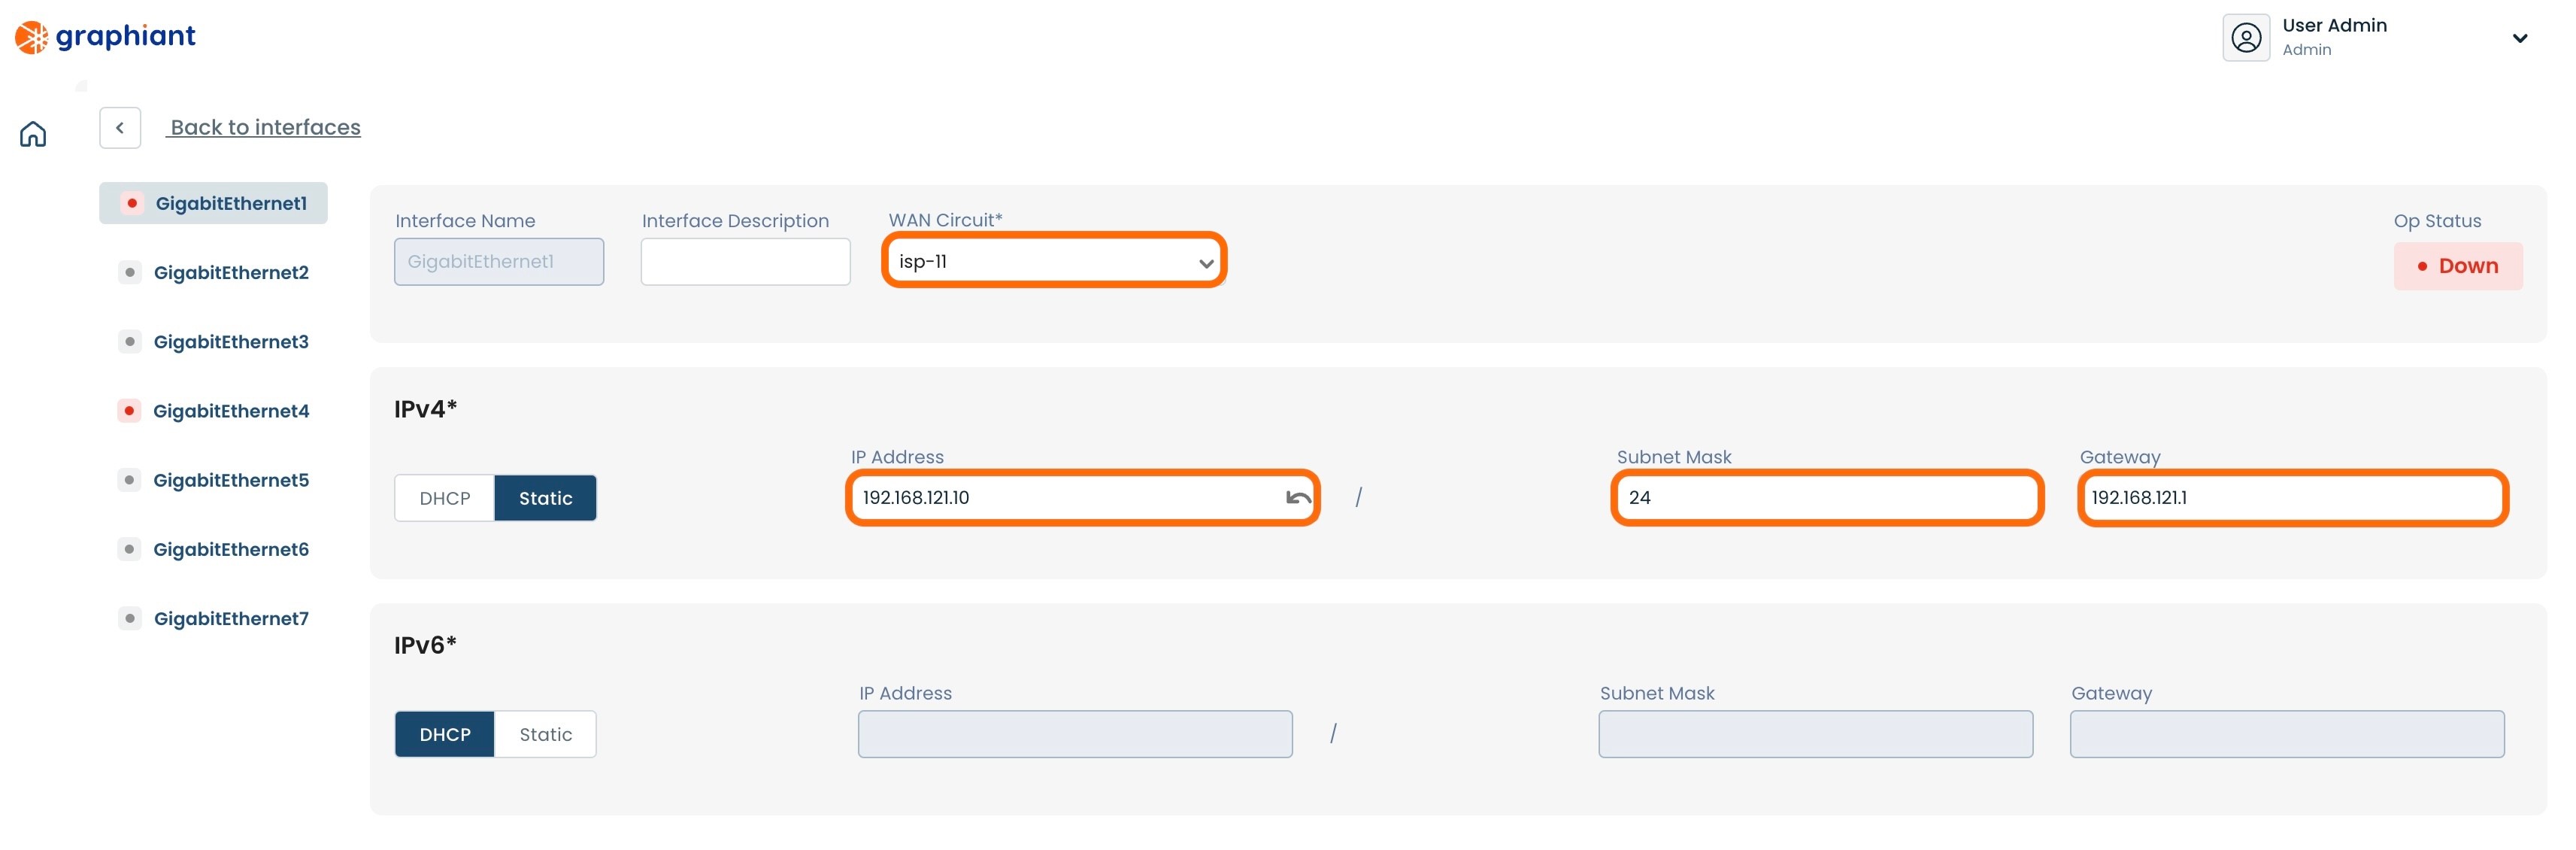
Under "WAN Circuits" select 'isp-11'.
DNS: If desired, enter the IP address of the preferred DNS. If left blank, this field will be filled via Cloudflare with either "1.1.1.1" or "1.0.0.1".
Click the 'Edit' button on the far right of the "Interfaces" section.
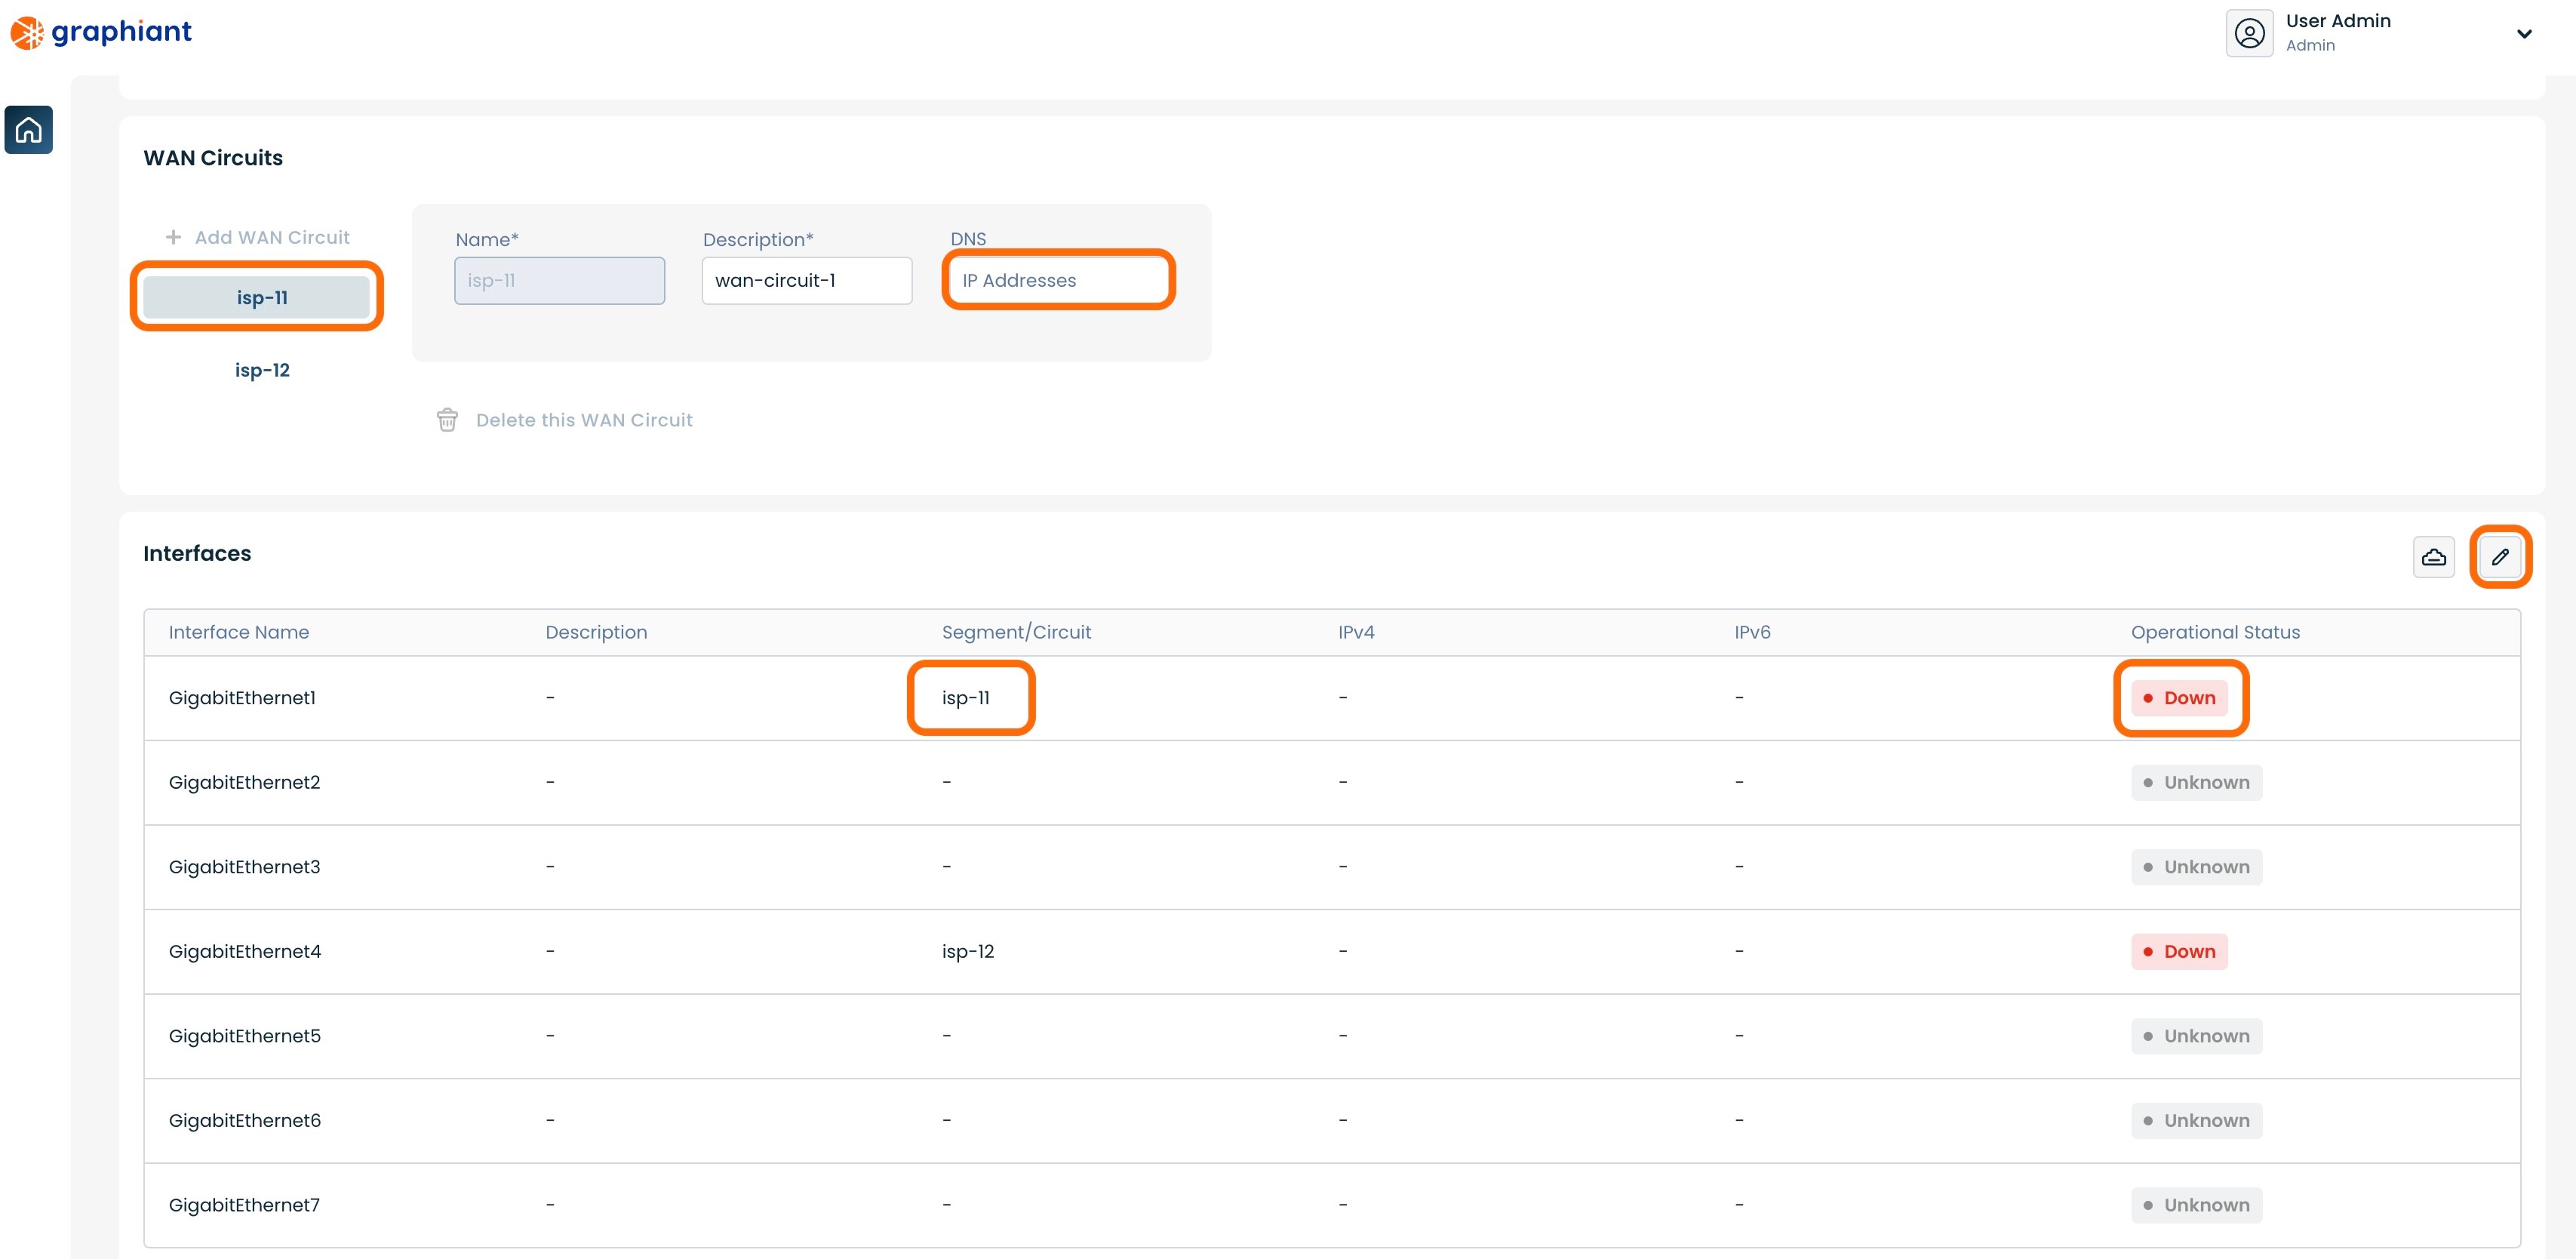
Click the 'Static' slider to set the WAN IP address.
Ensure that 'GigabitEthernet1' is selected on the left.
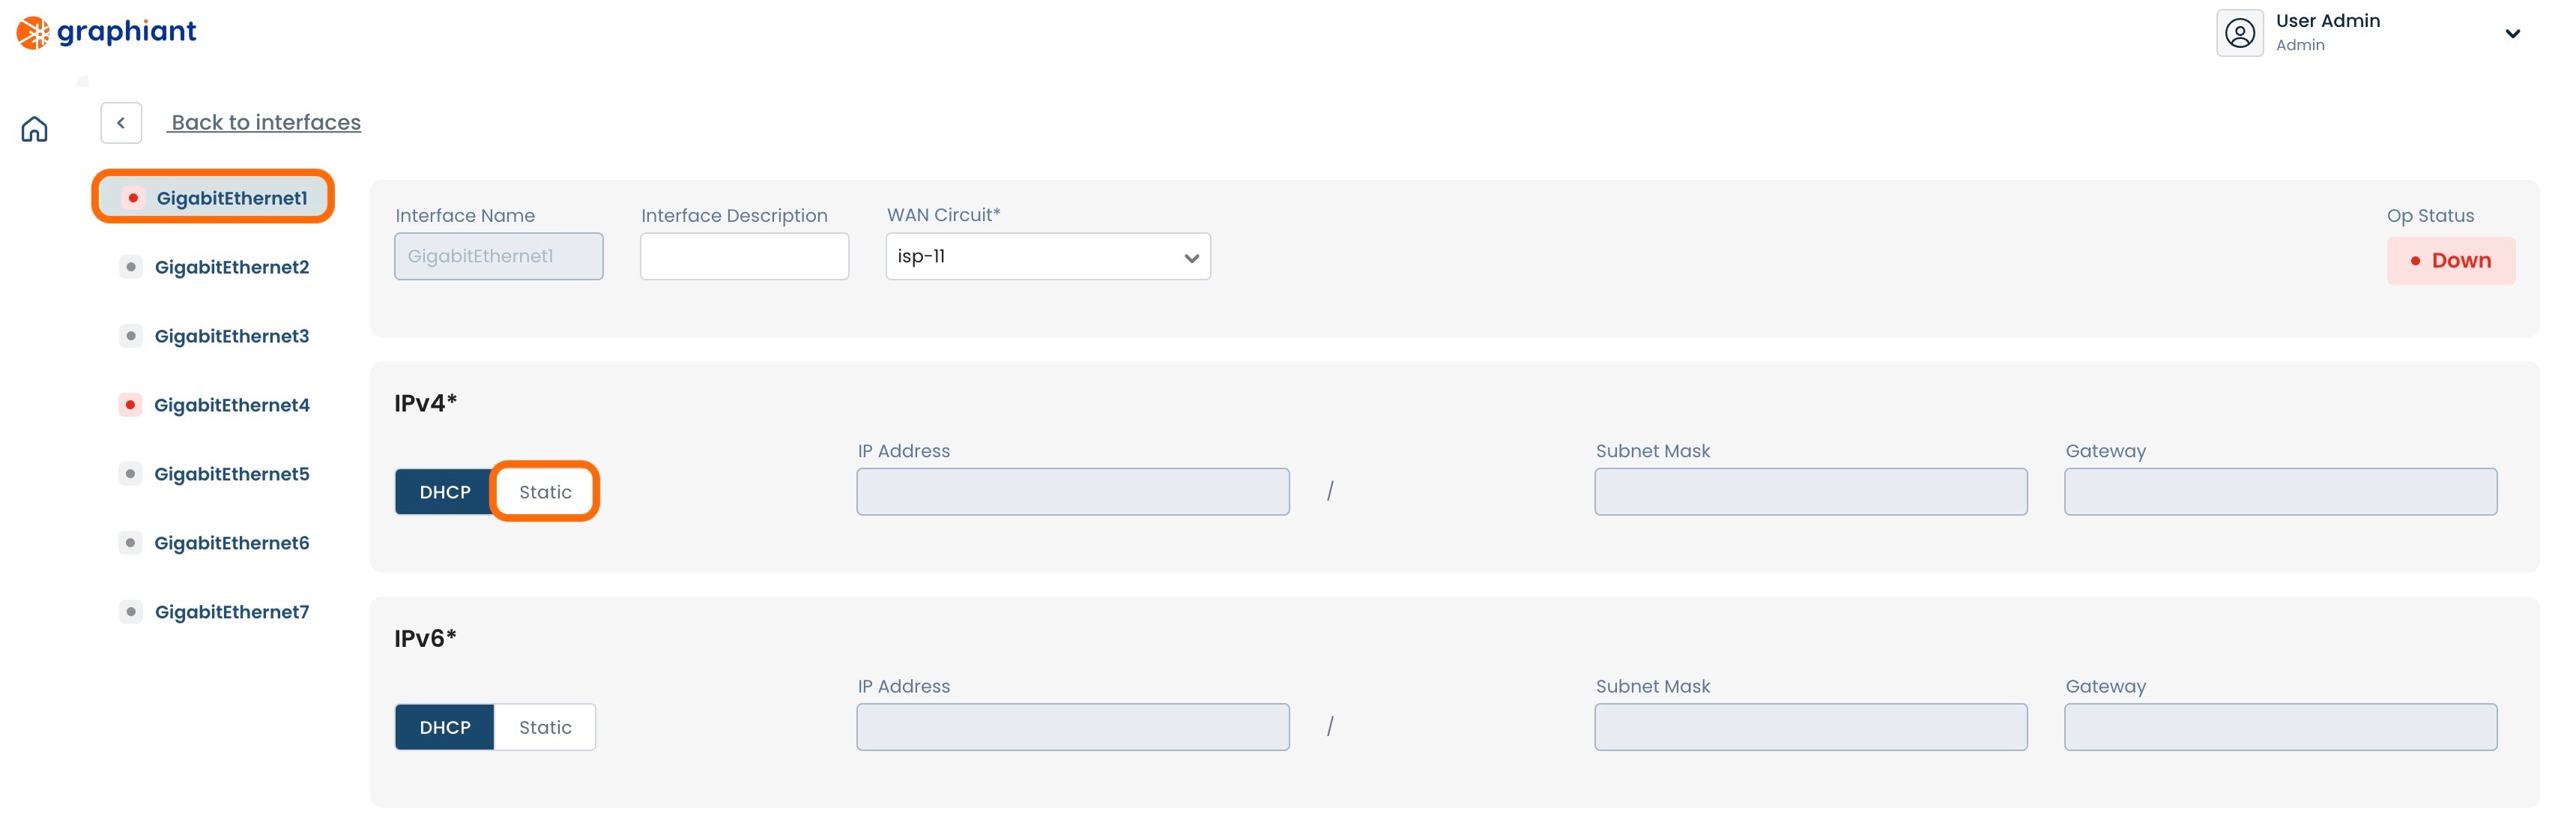
Enter the information for the following fields:
WAN Circuit: Select "isp-11" from the drop-down.
IP Address: IP address of the WAN
Subnet Mask: Subnet mask of the WAN IP address
Gateway: IP address of the default gateway
Click 'Back to interfaces' link at the upper left of the screen.
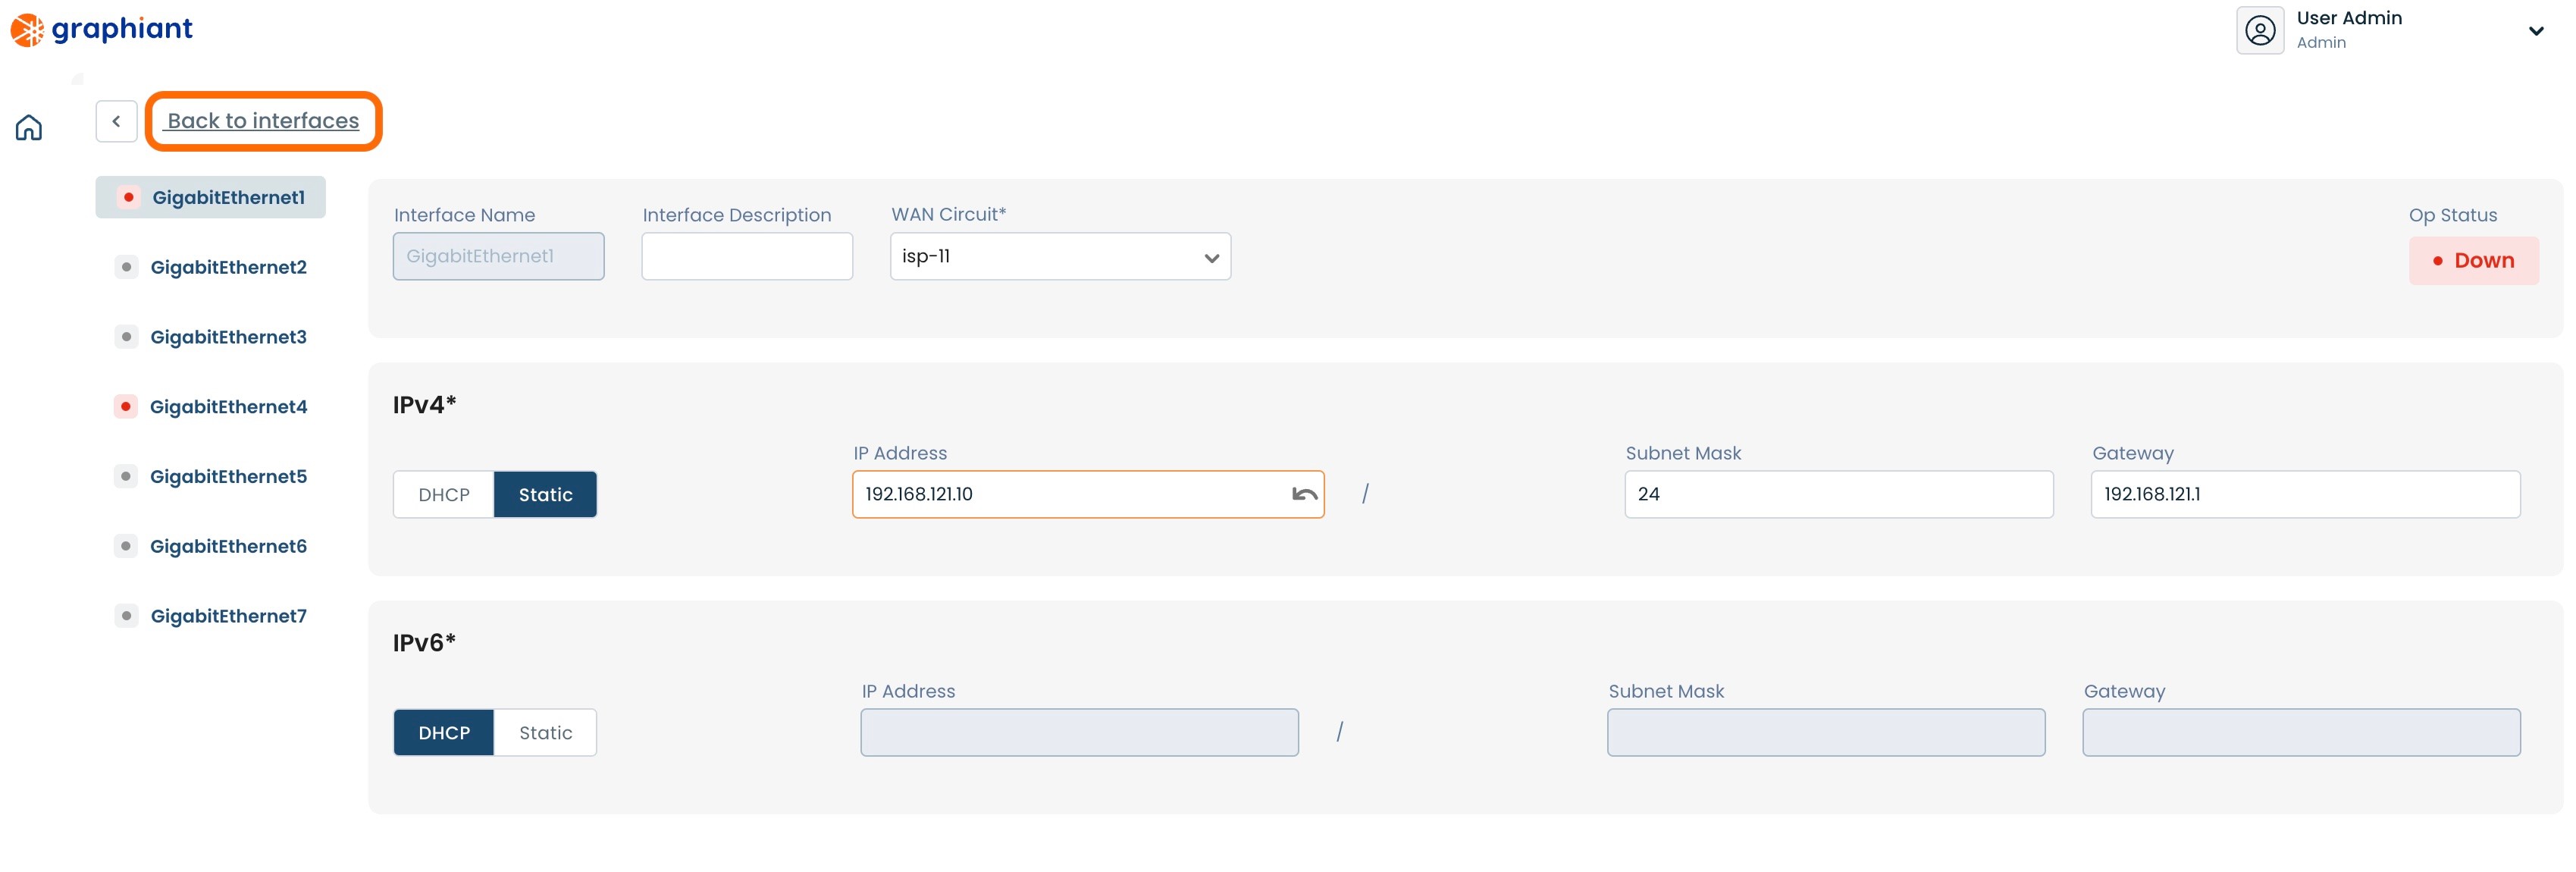
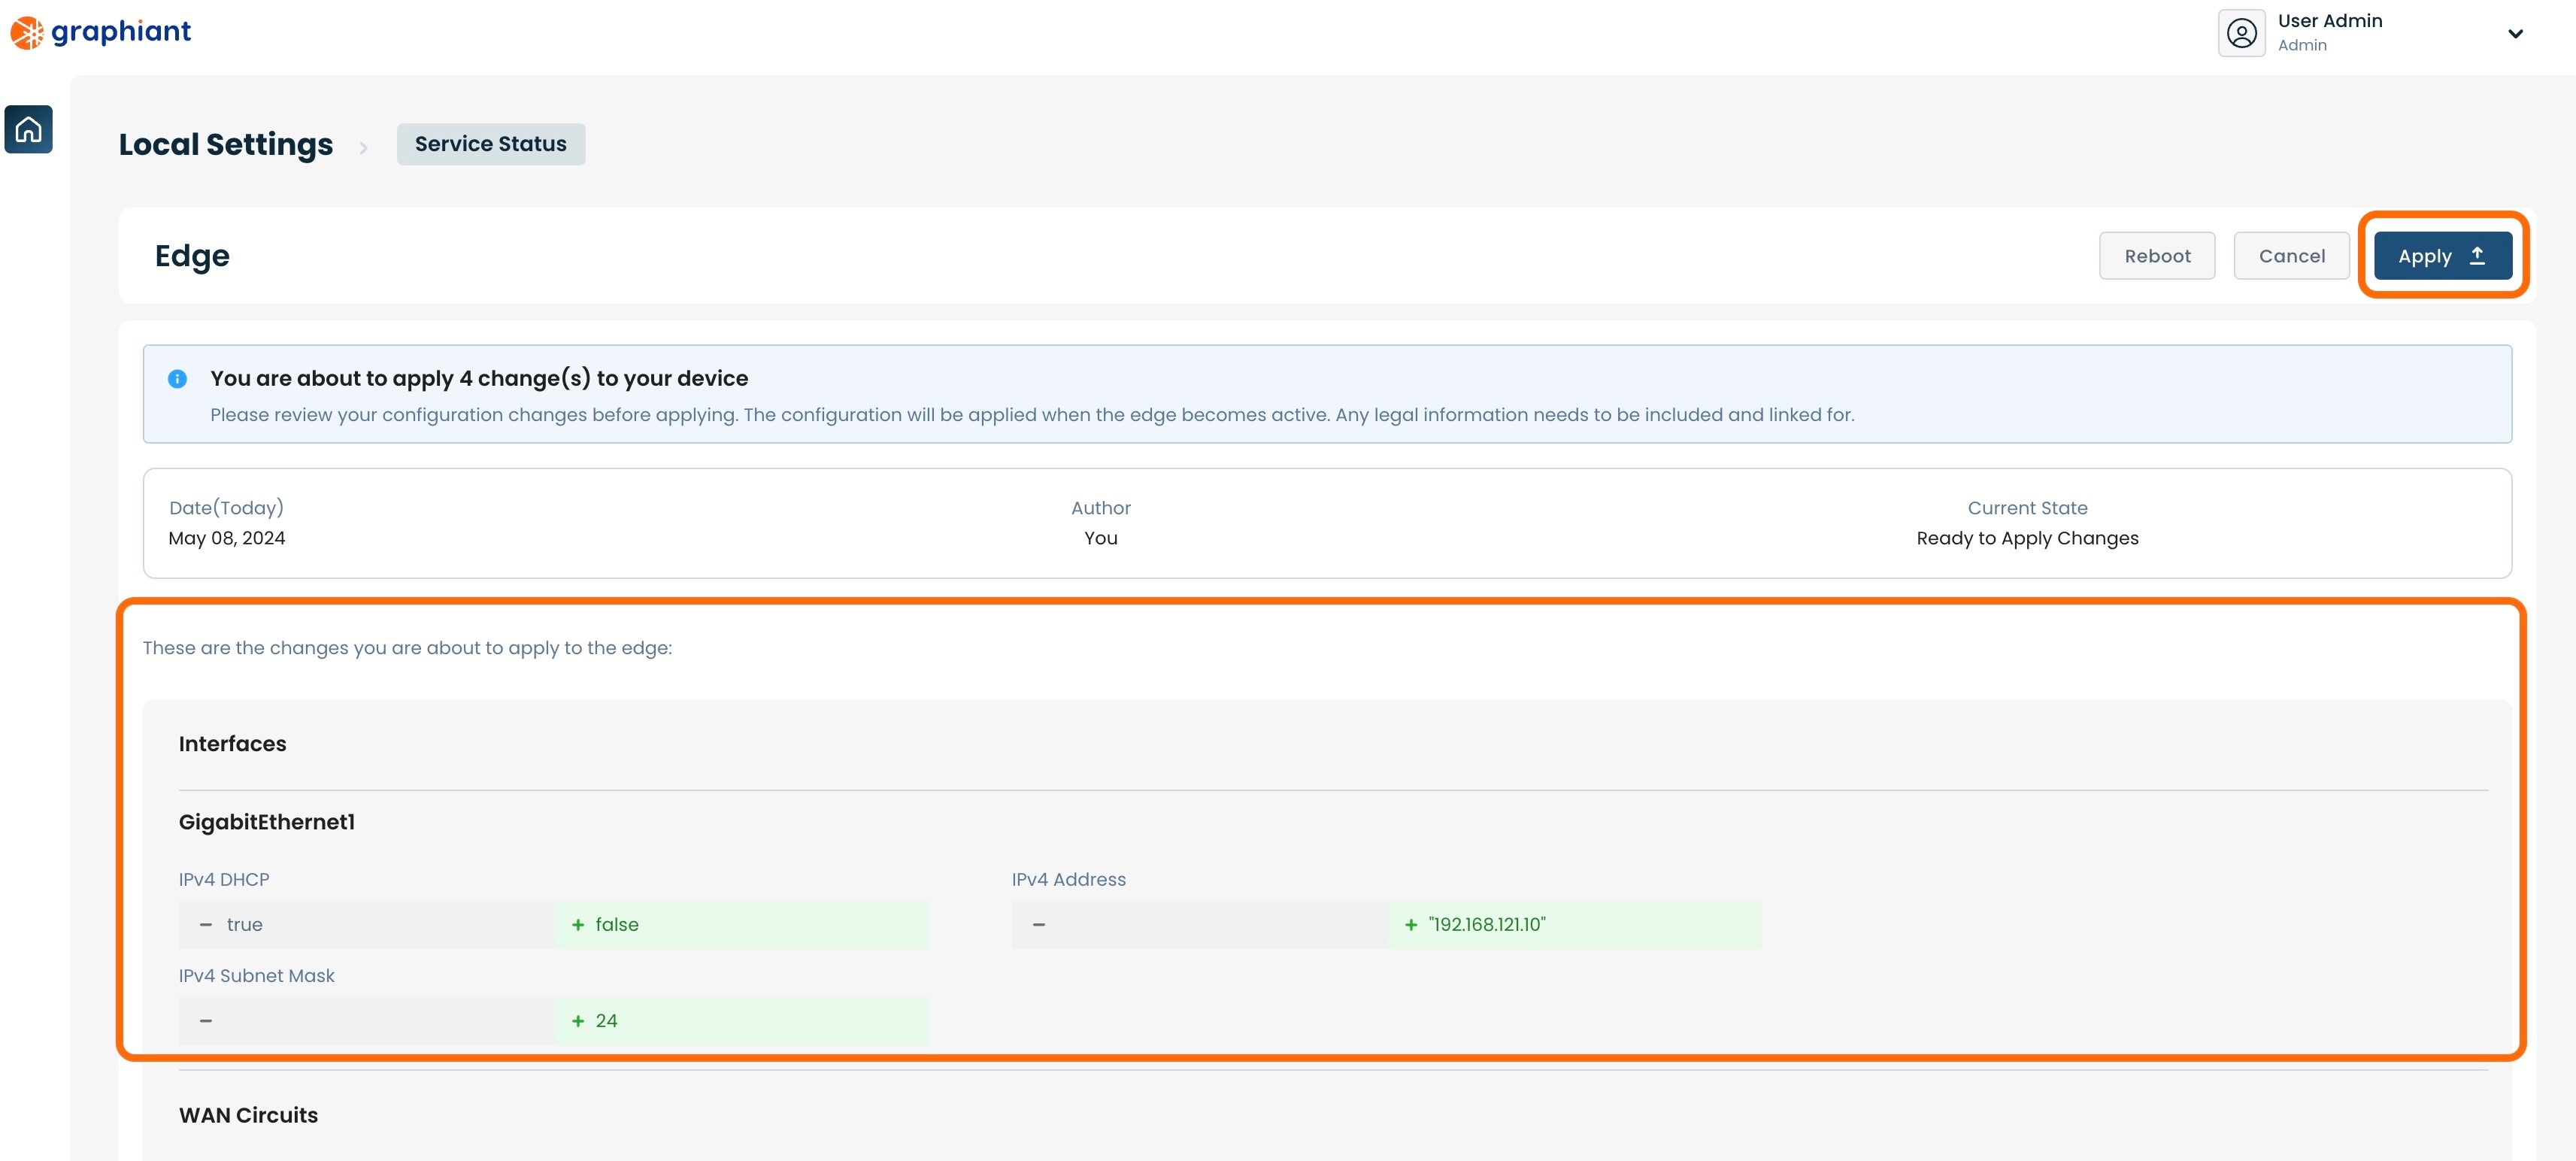
Click 'Review' at the top right.
This will bring up a screen showing the changes to be made.
Click 'Apply' in the upper right.
The configuration will be applied and a green pop-up message will appear in the upper right corner indicating that the configuration change was successful.
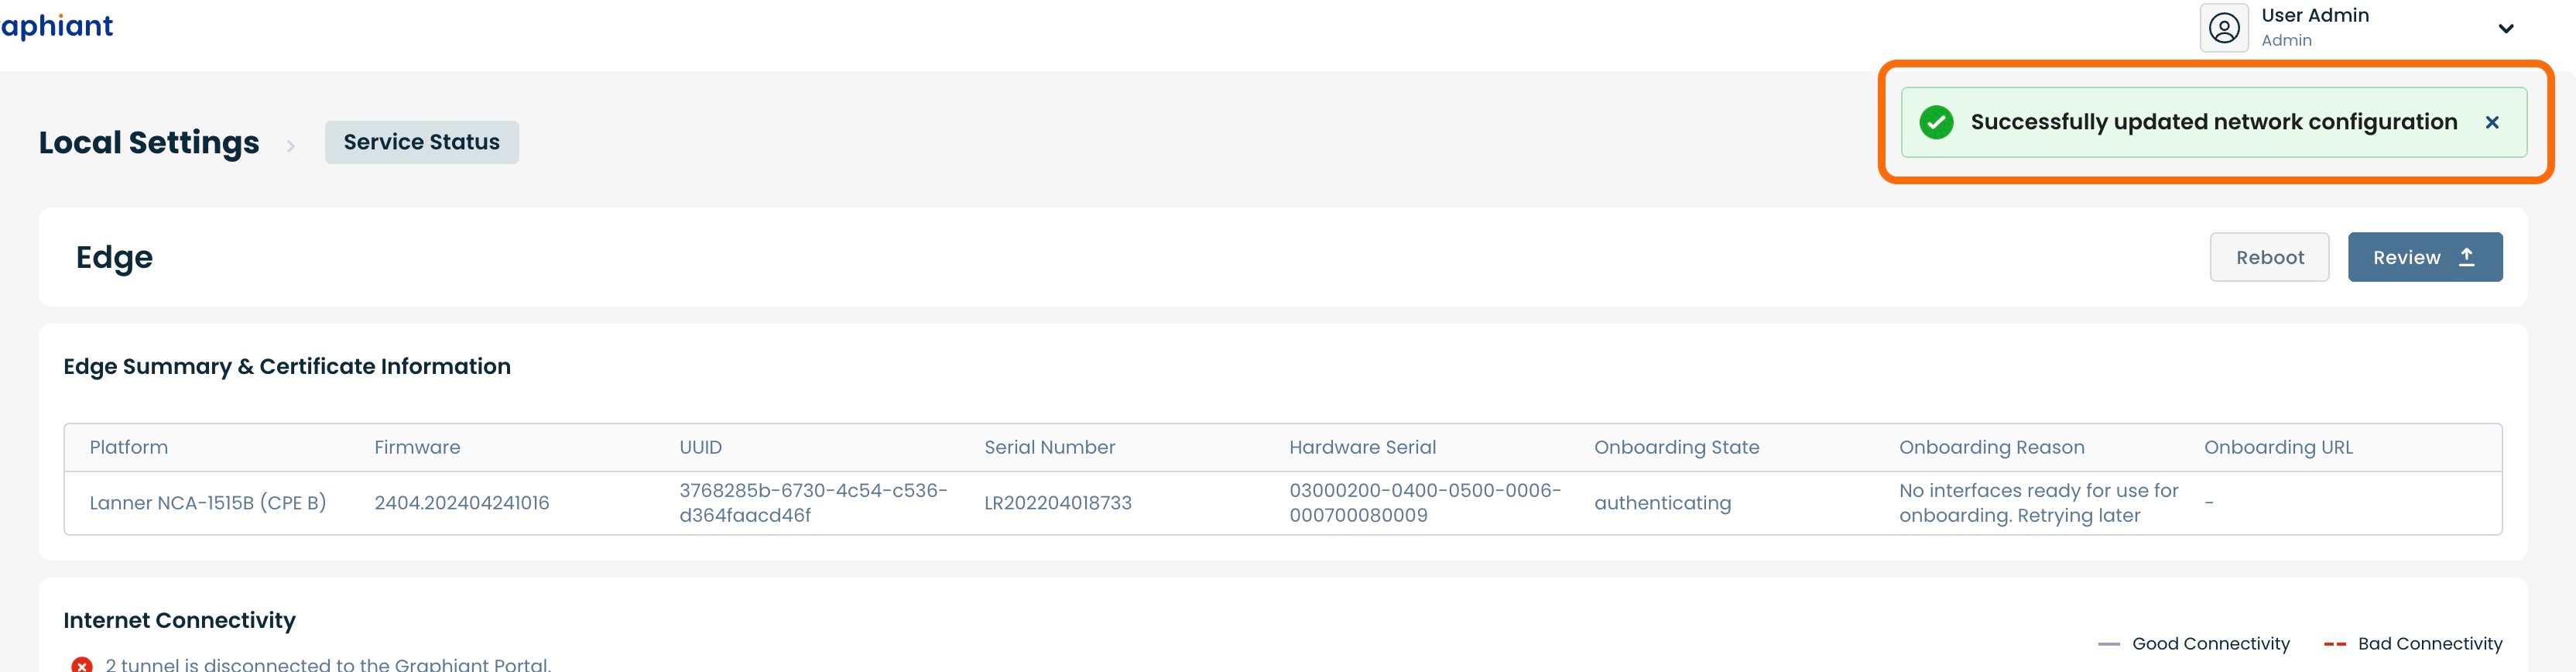
Static IP is assigned to the WAN interface and is ready to be used.
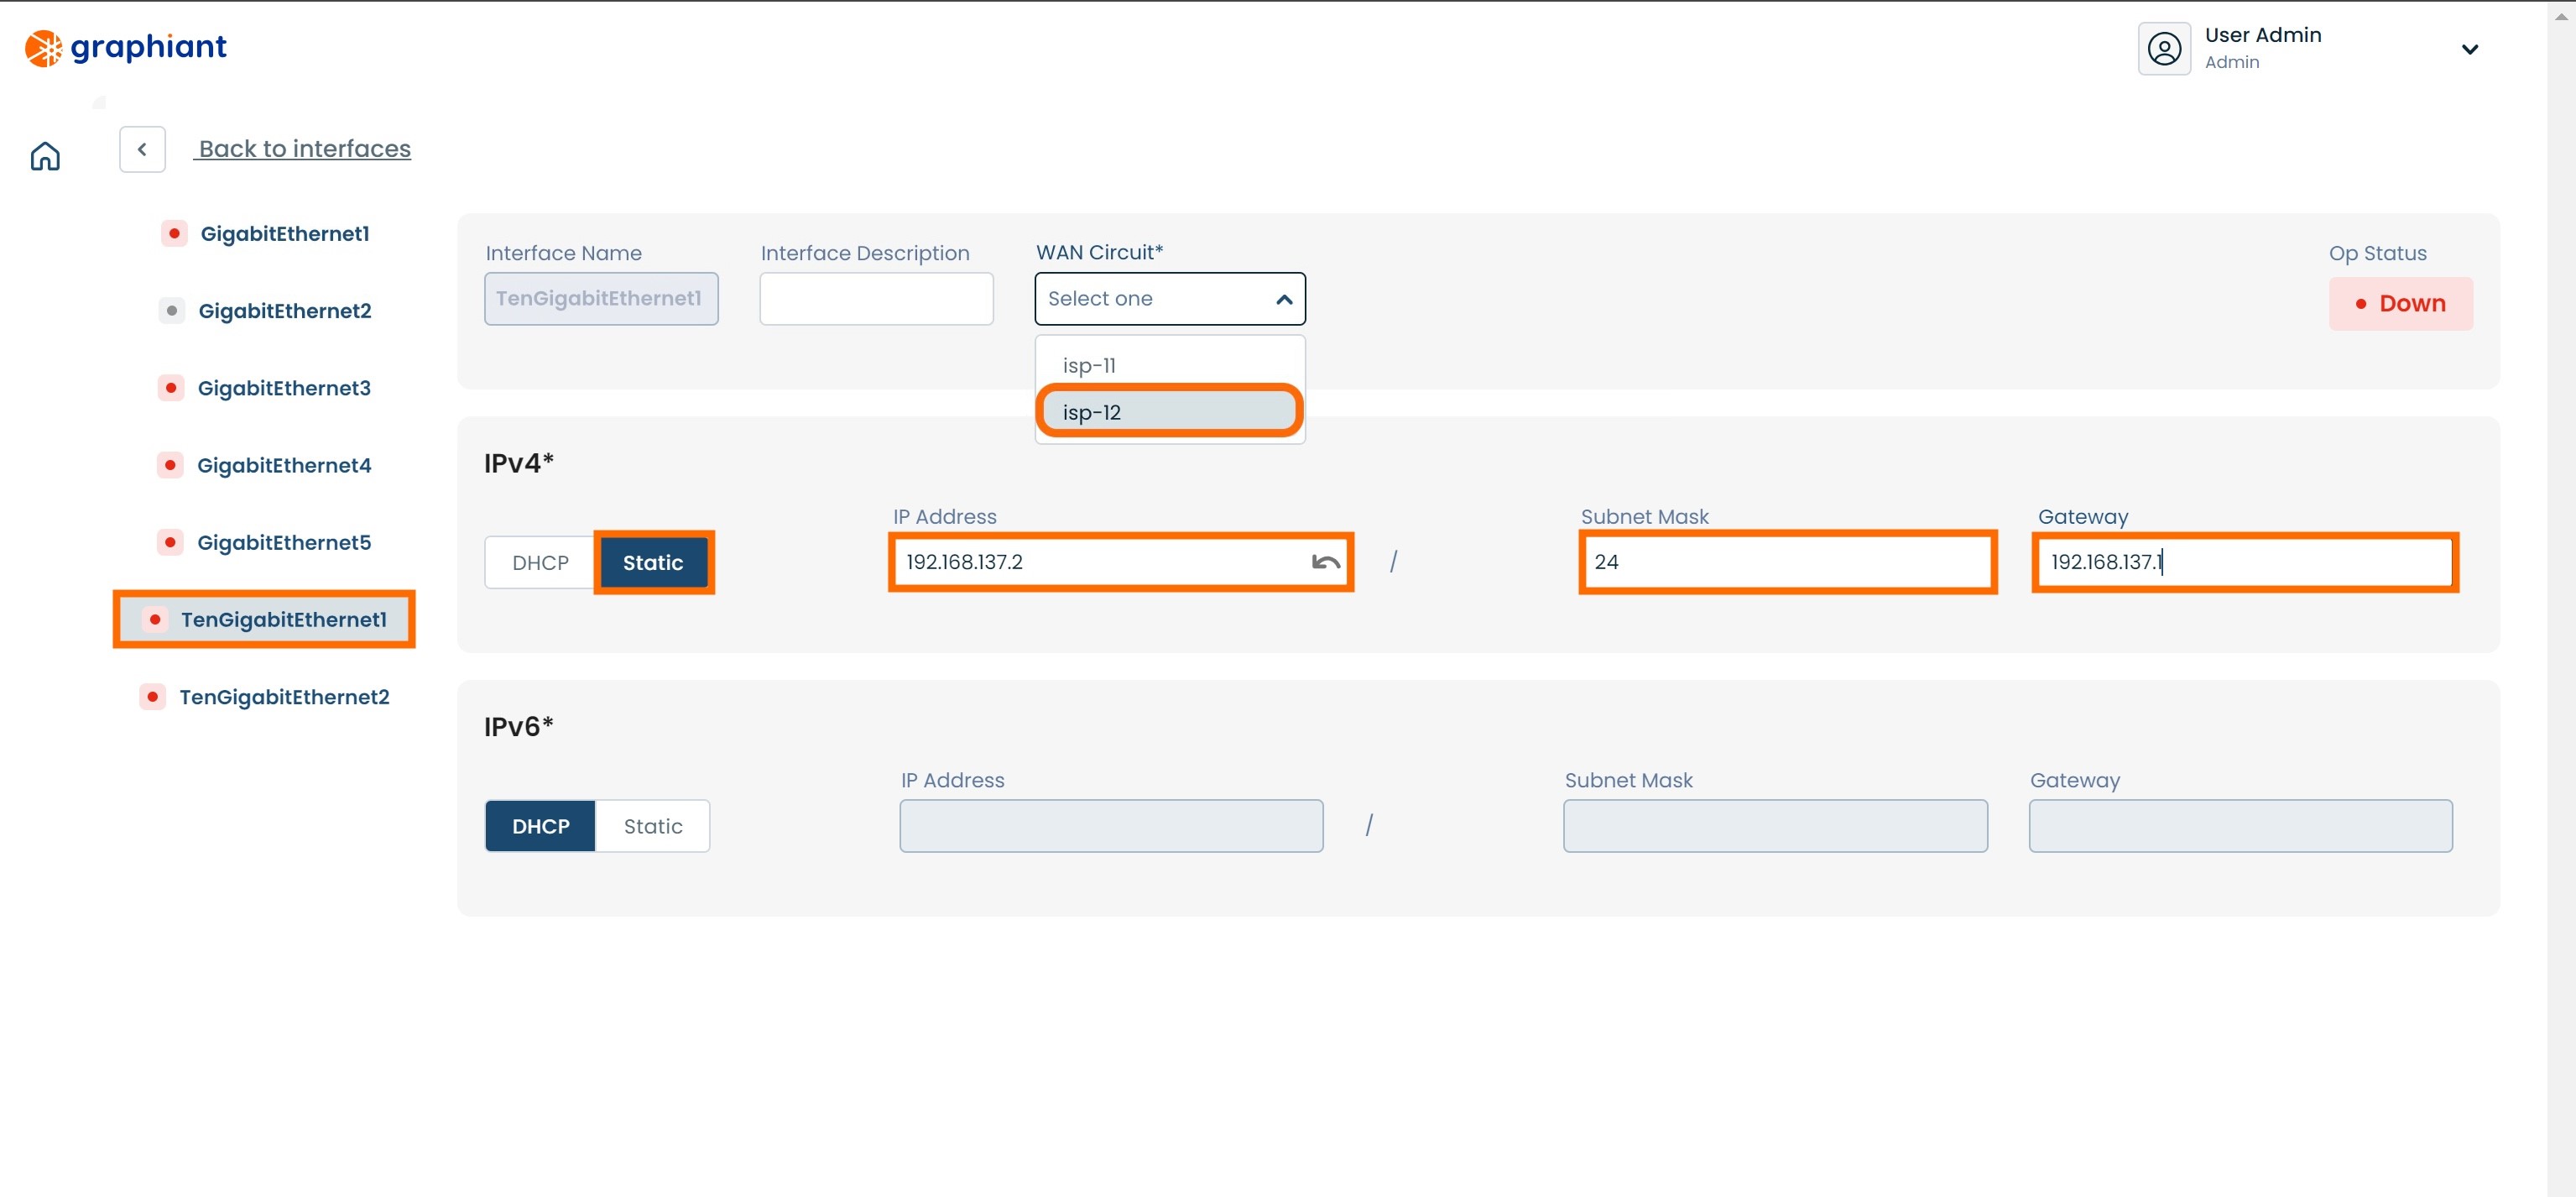
Configuring Static IP via the Copper Default WAN Port #4
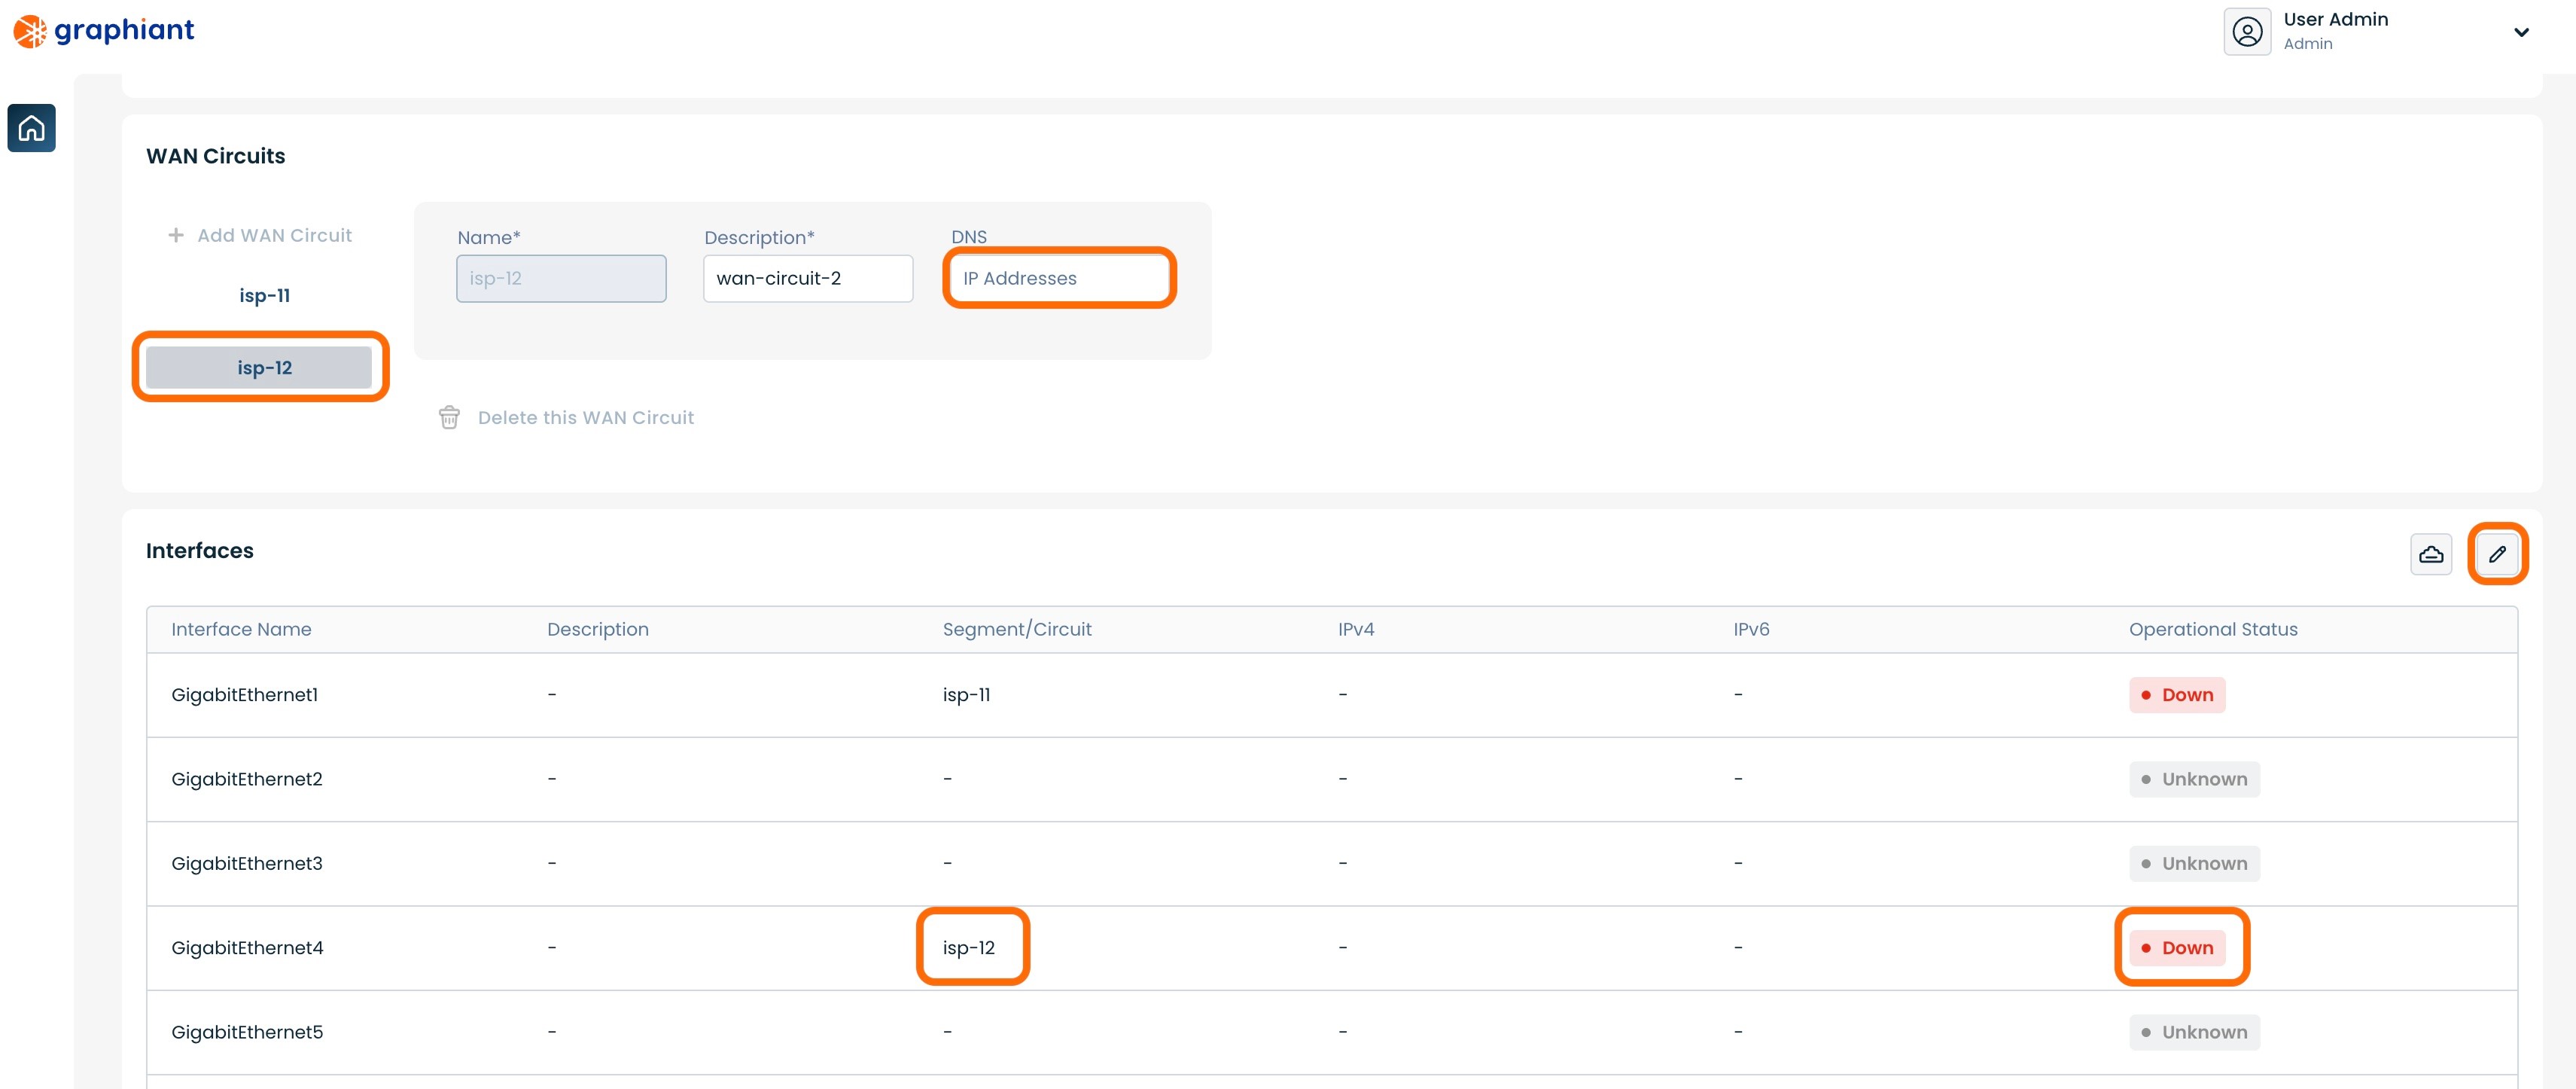
Under "WAN Circuits" select 'isp-12'.
DNS: If desired, enter the IP address of the preferred DNS. If left blank, this field will be filled via Cloudflare with either "1.1.1.1" or "1.0.0.1".
Click the 'Edit' button on the far right of the "Interfaces" section.
Click the 'Static' slider to set the WAN IP address.
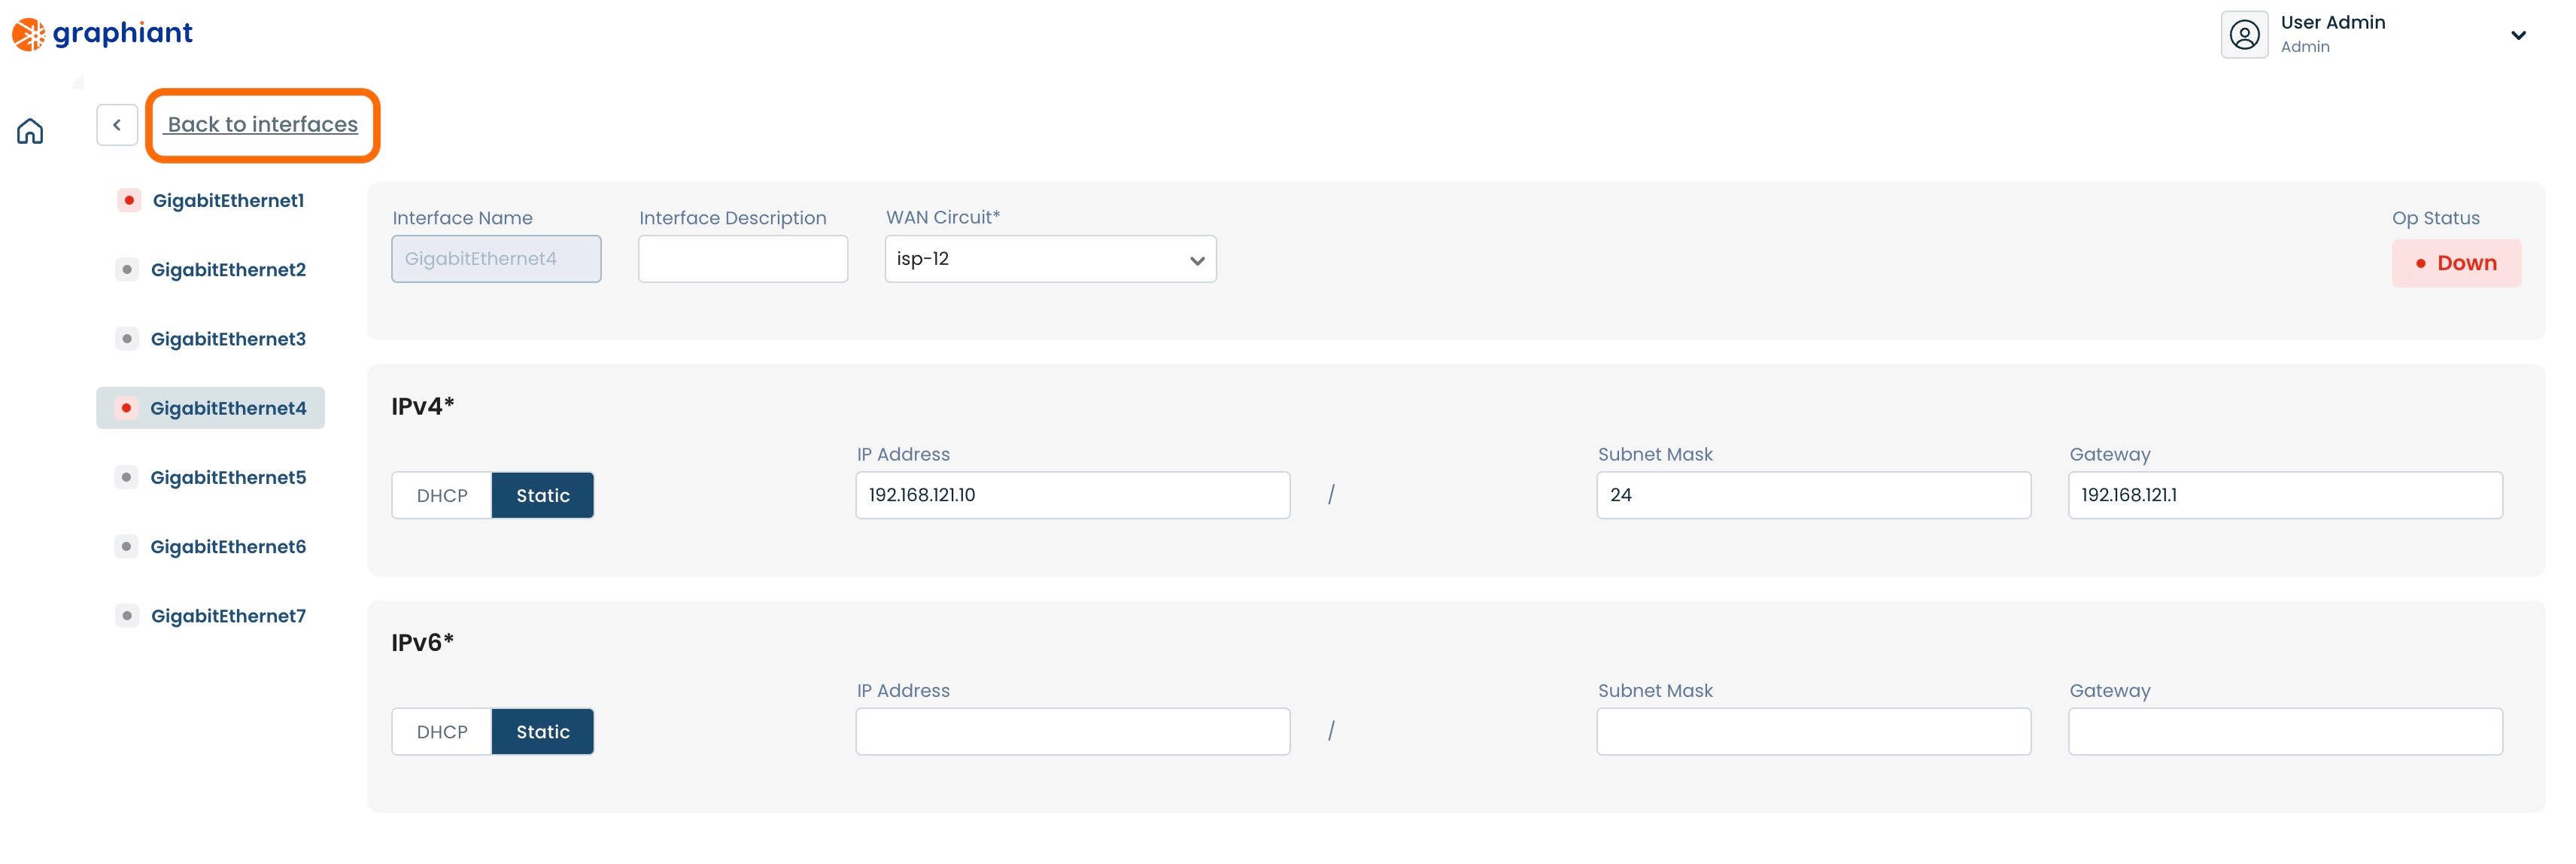
Ensure that 'GigabitEthernet4' is selected on the left.
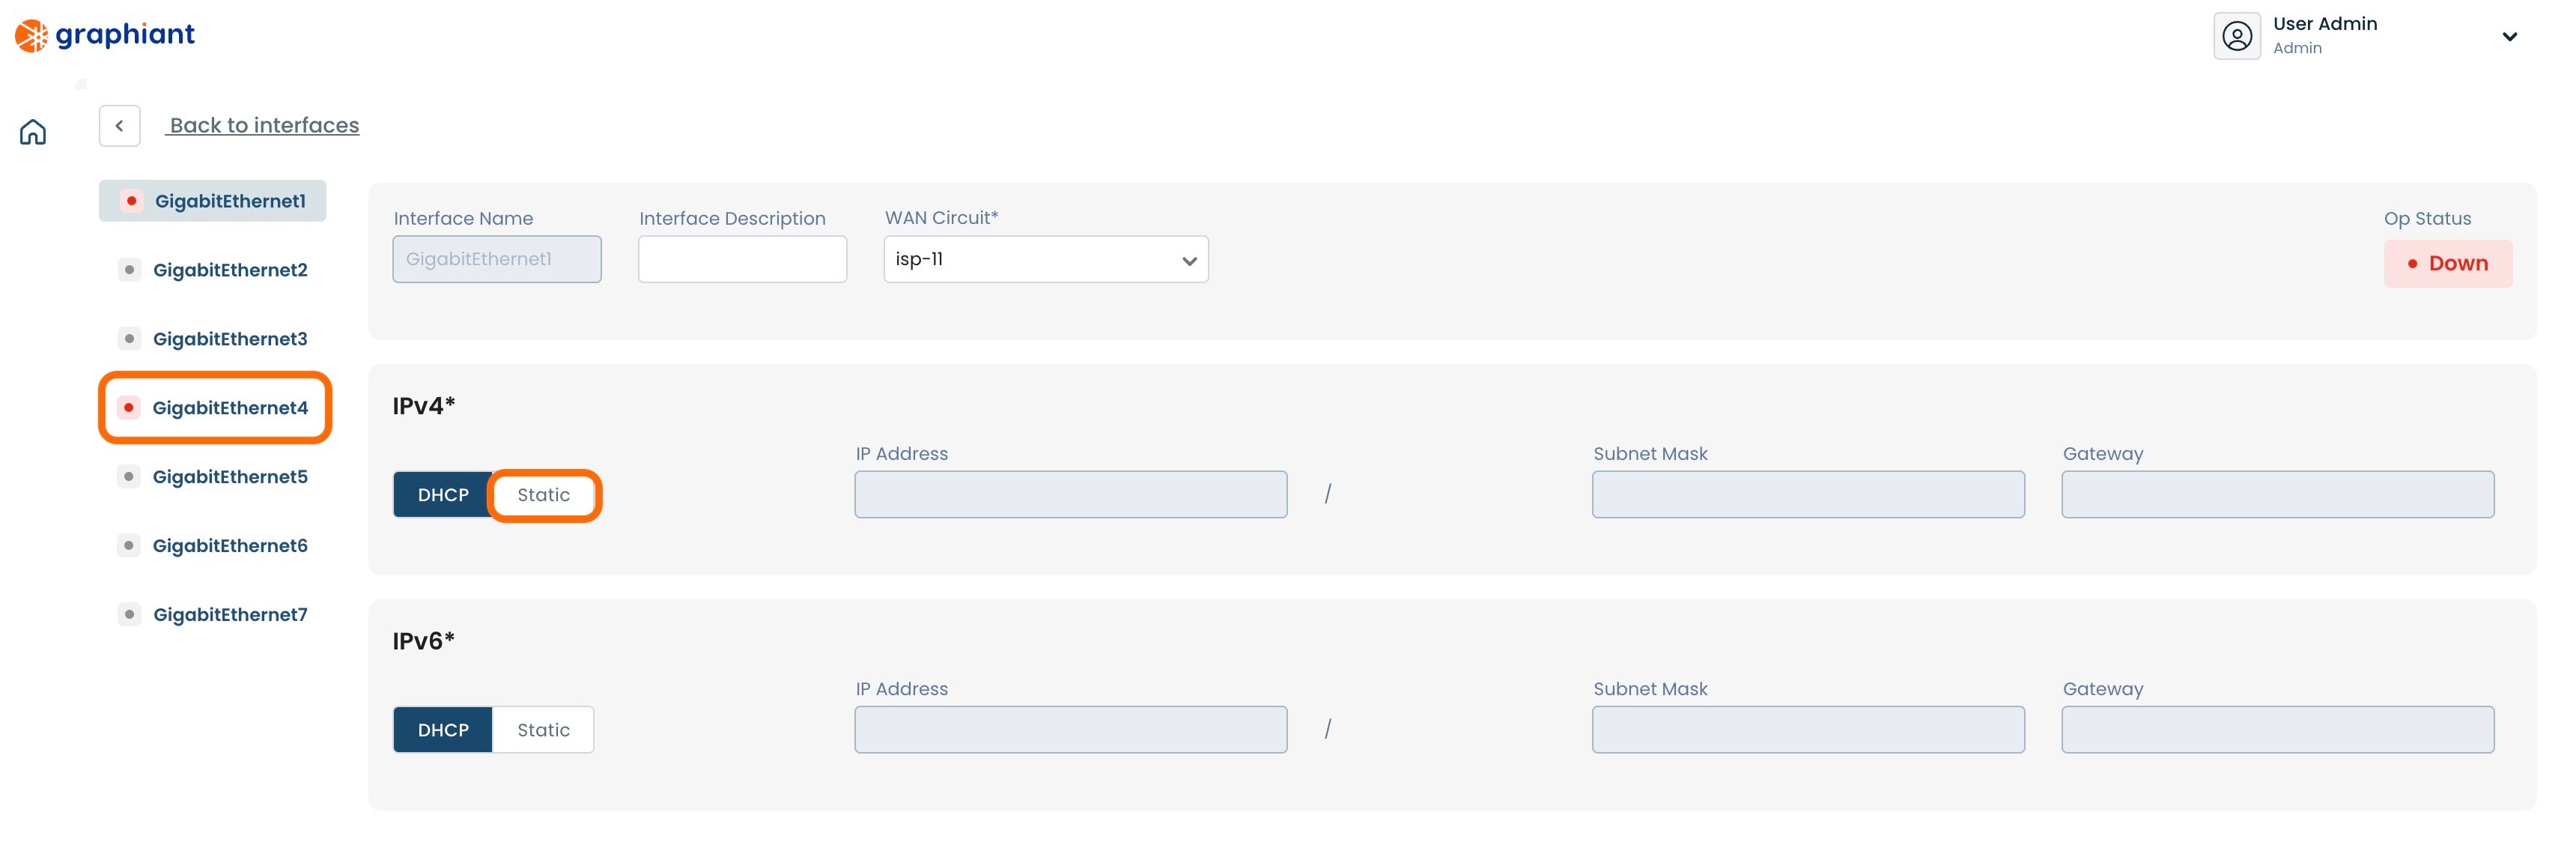
Select isp-12 from the WAN Circuit drop-down.

Enter the information for the following fields:
IP Address: IP address of the WAN
Subnet Mask: Subnet mask of the WAN IP address
Gateway: IP address of the default gateway

Click 'Back to interfaces' link at the upper left of the screen.
Click 'Review' at the top right.
This will bring up a screen showing the changes to be made.
Click 'Apply' in the upper right.
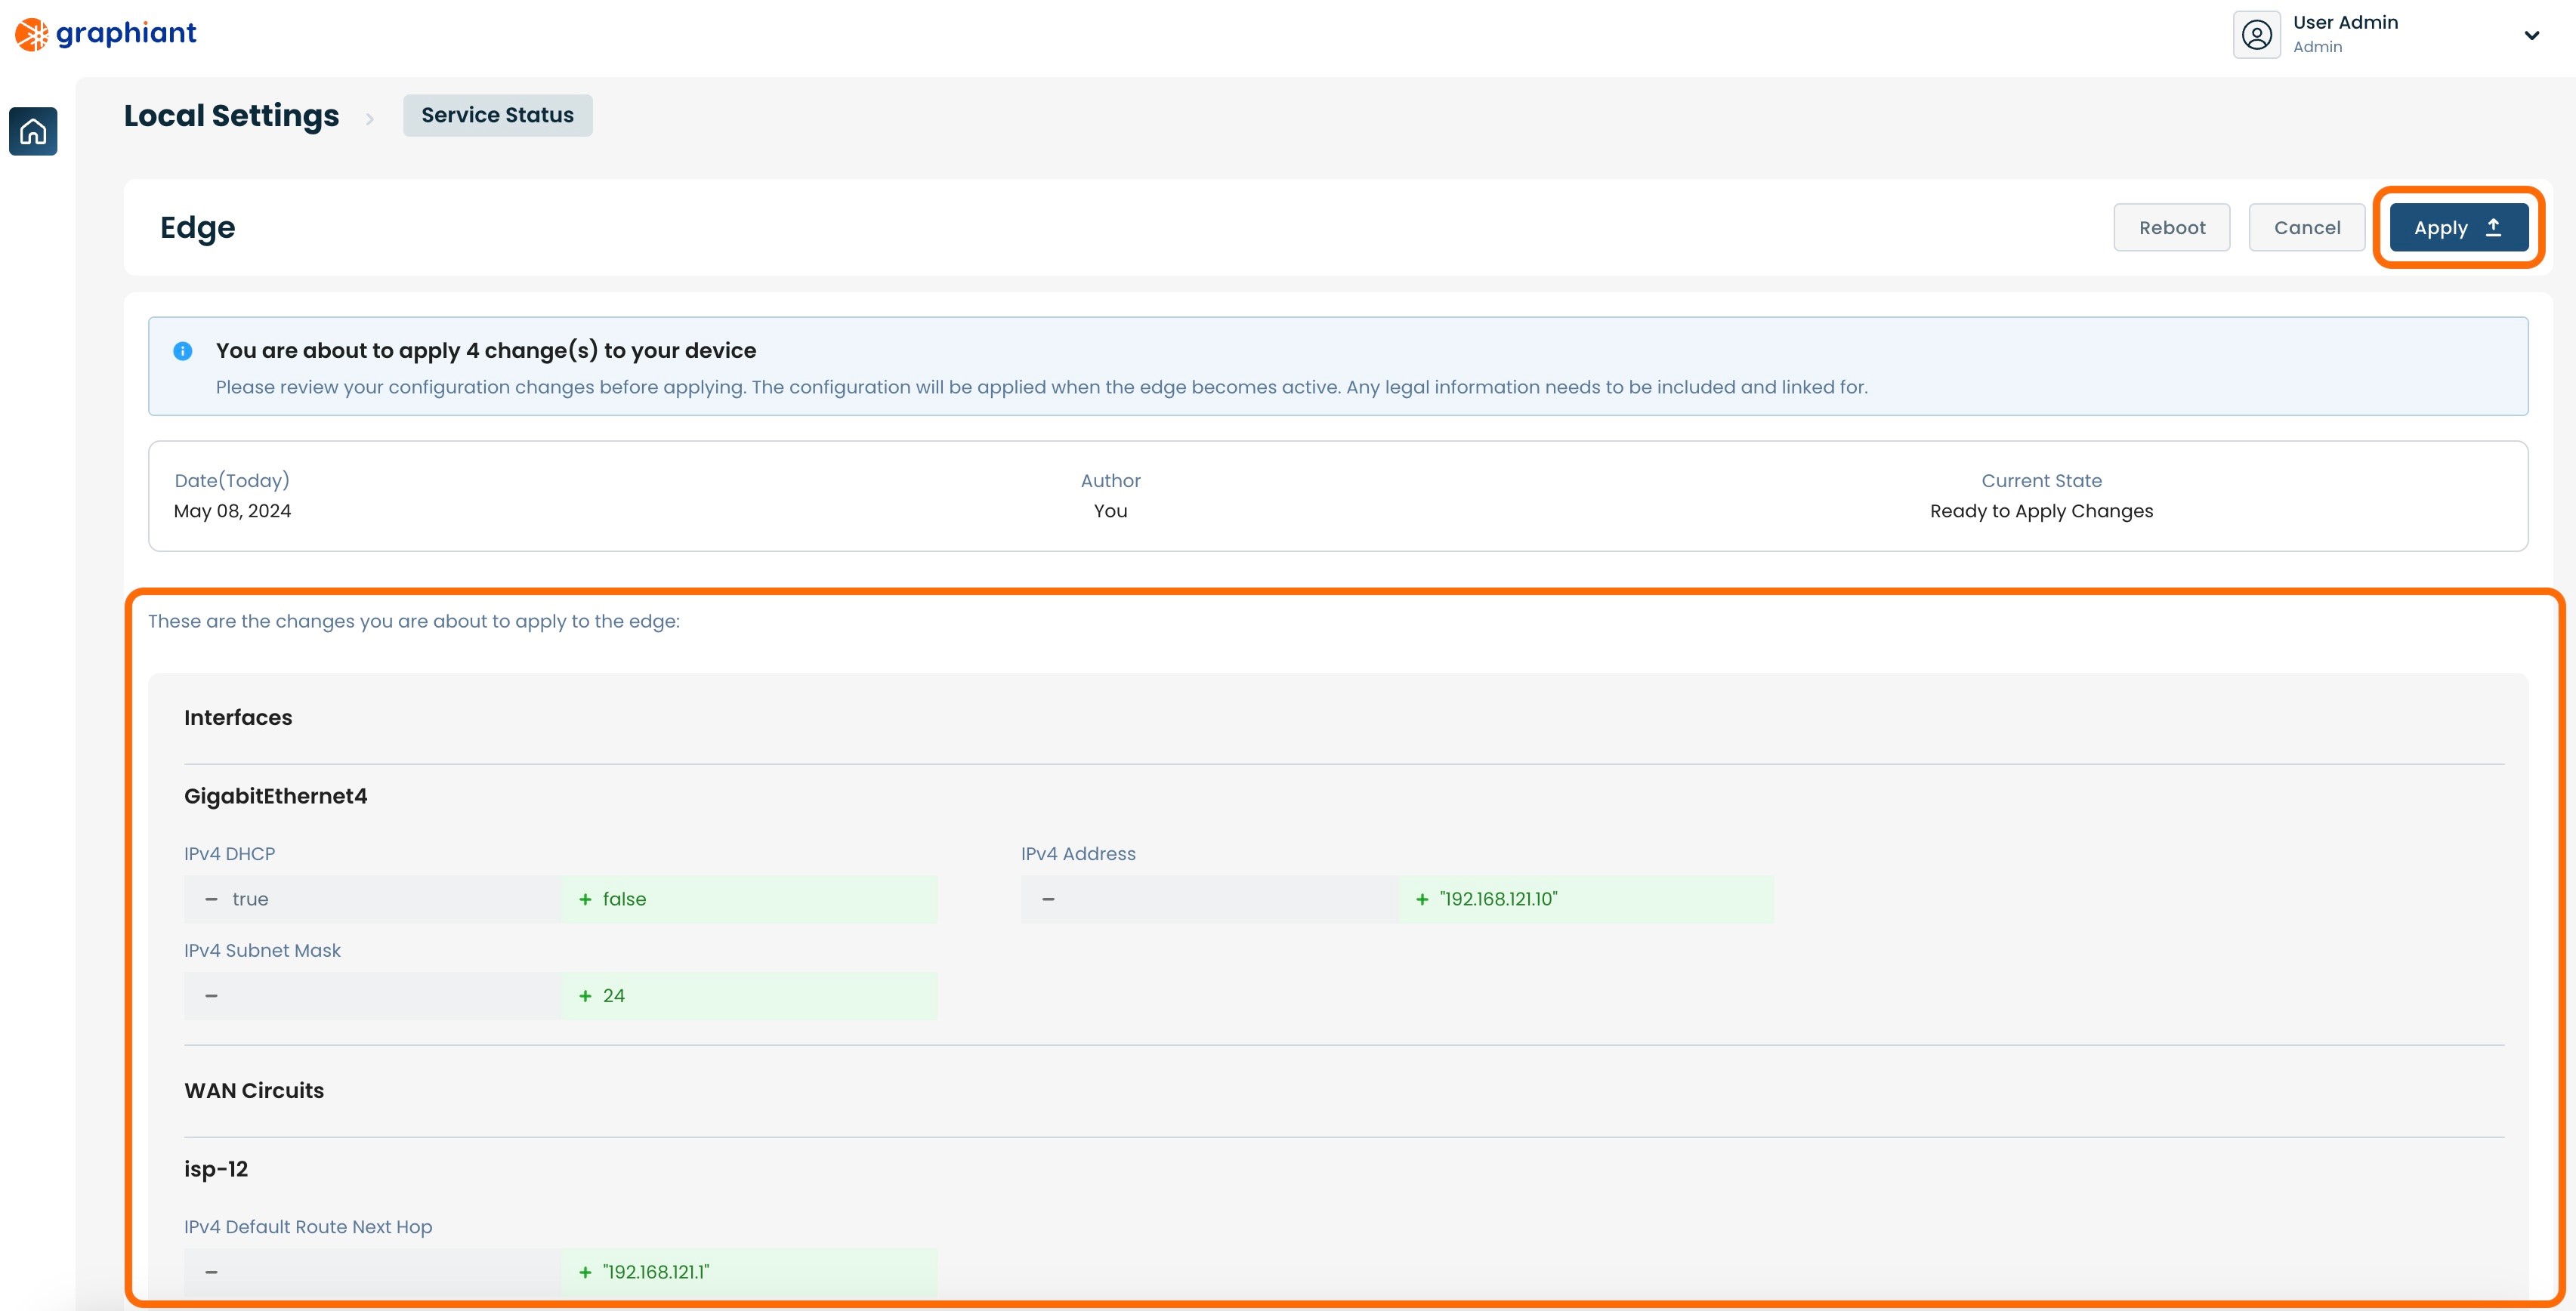
The configuration will be applied and a green pop-up message will appear in the upper right corner indicating that the configuration change was successful.

Static IP is assigned to the WAN interface and is ready to be used.
Note:
If more than one WAN interface is needed, the others can be configured through the Graphiant Portal after onboarding.
Once the Graphiant Edge is connected to the Portal, the DHCP server is turned off.
Once the Graphiant Edge can get to the Core, the laptop/PC will no longer be given an IP address, a Static IP would need to be set as instructed here.
Onboarding the edge to the Graphiant Portal
Once you have successfully set the WAN IP address, you may proceed to the Graphiant portal: https://portal.graphiant.com.
Follow instructions for Onboarding.