What is Graphiant’s Site-to-Site VPN?
Graphiant’s site-to-site VPN creates encrypted and authenticated communication via a secure IPsec tunnel over the internet to connect two or more separate networks (or "sites"). This allows devices at one site to securely communicate with devices at the other site as if they were on the same local network.
If you are connected to the Graphiant Core, and your remote site connects via Graphiant’s IPsec service, you can quickly and effectively extend your private, policy-based network fabric (via Graphiant) to reach locations that don’t directly peer with the Graphiant Core — like remote offices or partner networks — using a standard site-to-site IPsec tunnel.
Step 1: Creating a VPN Profile
A VPN Profile contains all of the detailed information regarding the encryption for your site-to-site communication.
Graphiant provides you with a default VPN profile, but you also have the ability to configure and specify different VPN profiles that best suit your needs.
Creating a new VPN Profile is optional:
If left unspecified, the VPN Profile will use the default values.
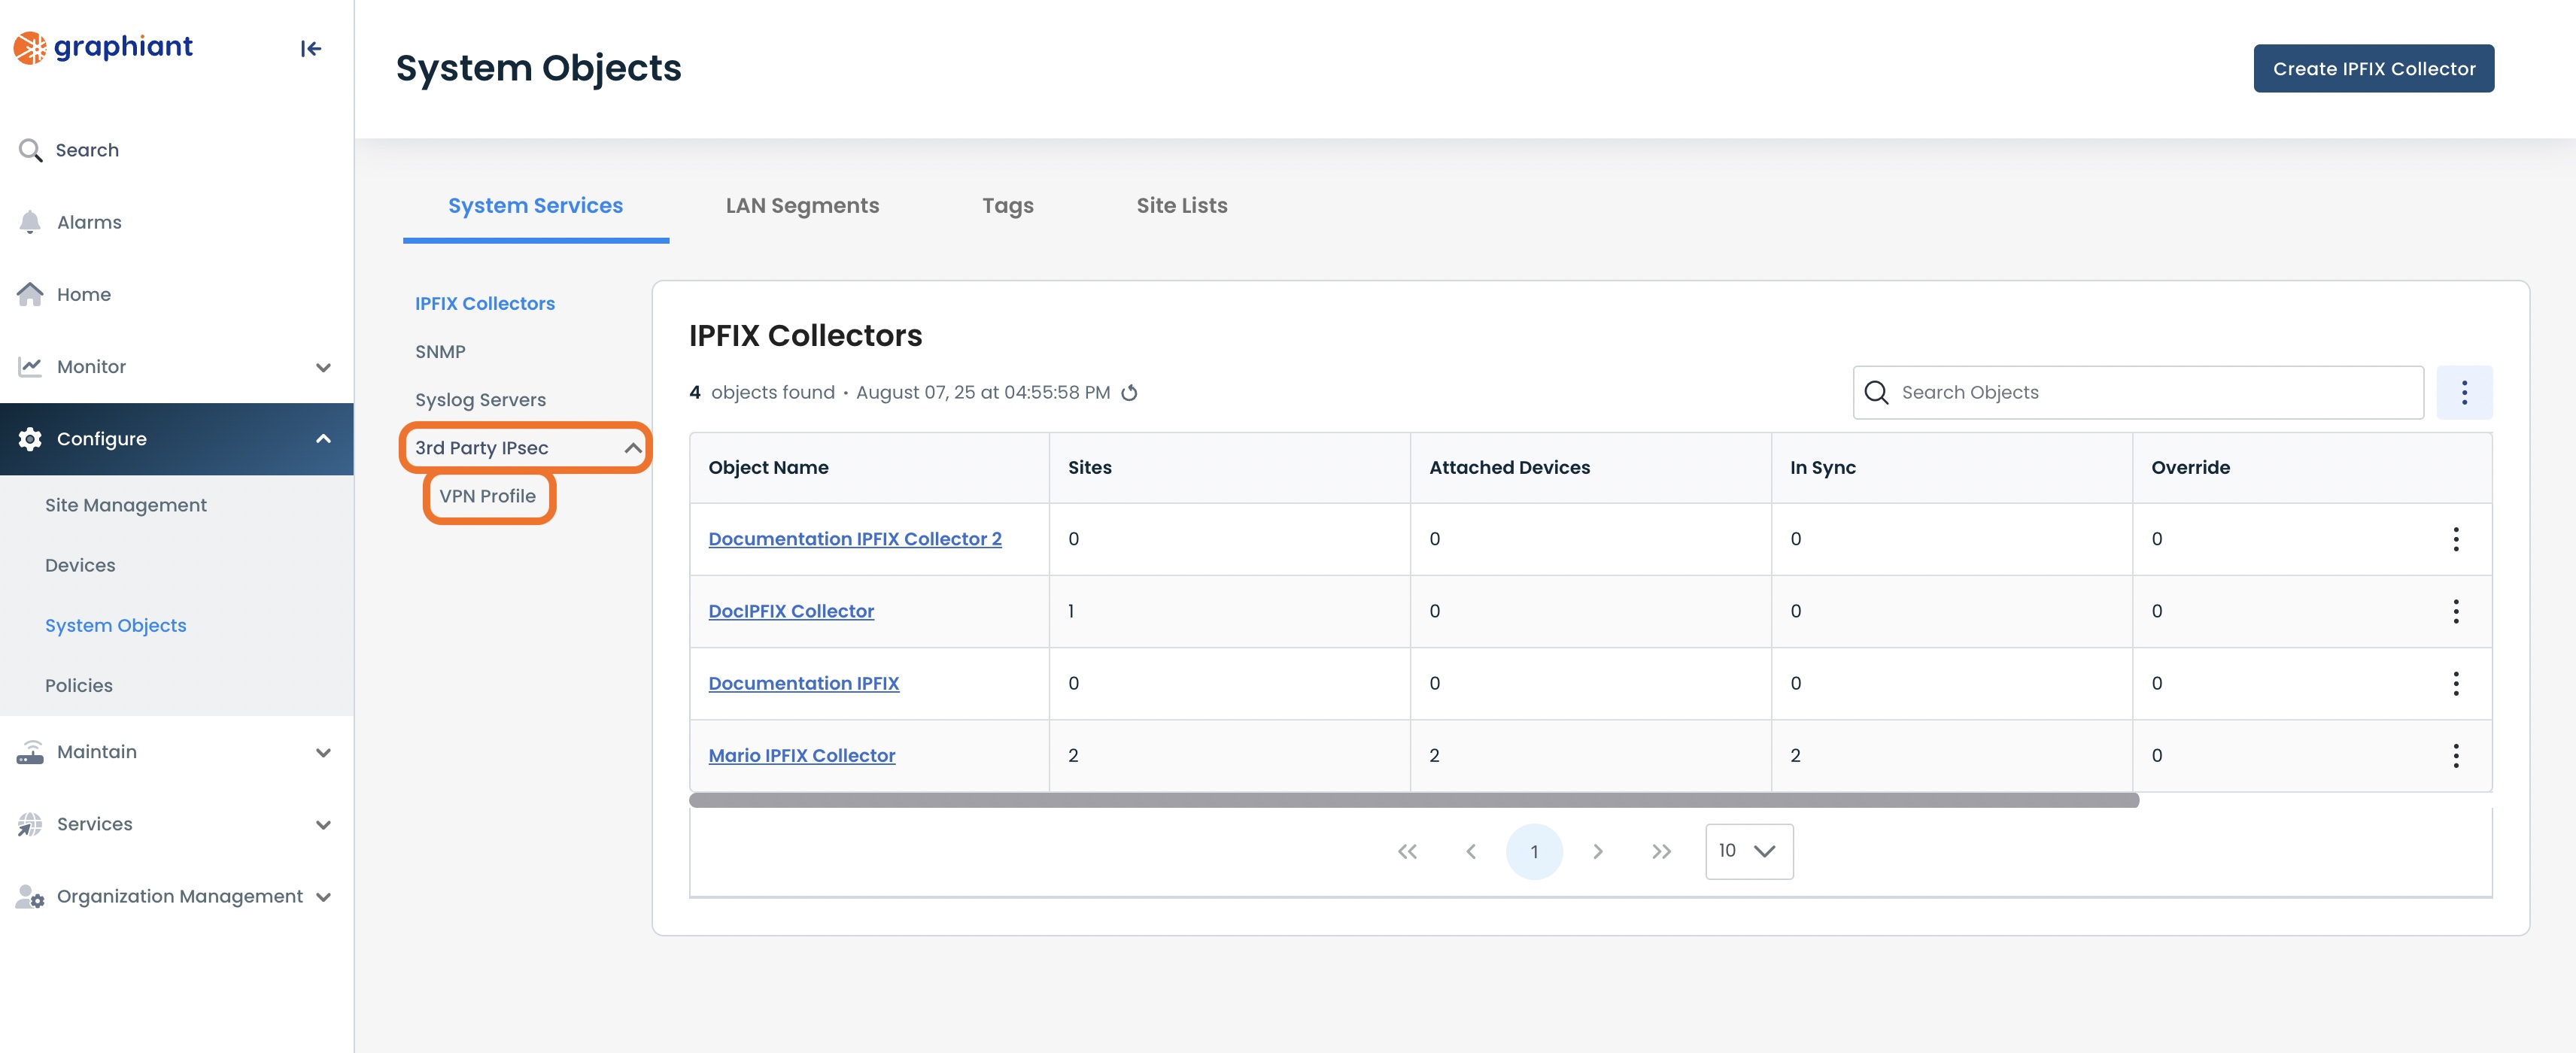
To view the default or create a new VPN Profile, from the Portal home page, navigate to System Objects by one of the following:
Locate the "Configurations" section within the top left of the screen; select 'Create System Object'.
OR
Click 'Configure' in the sidebar; select 'System Objects'.
.jpg)
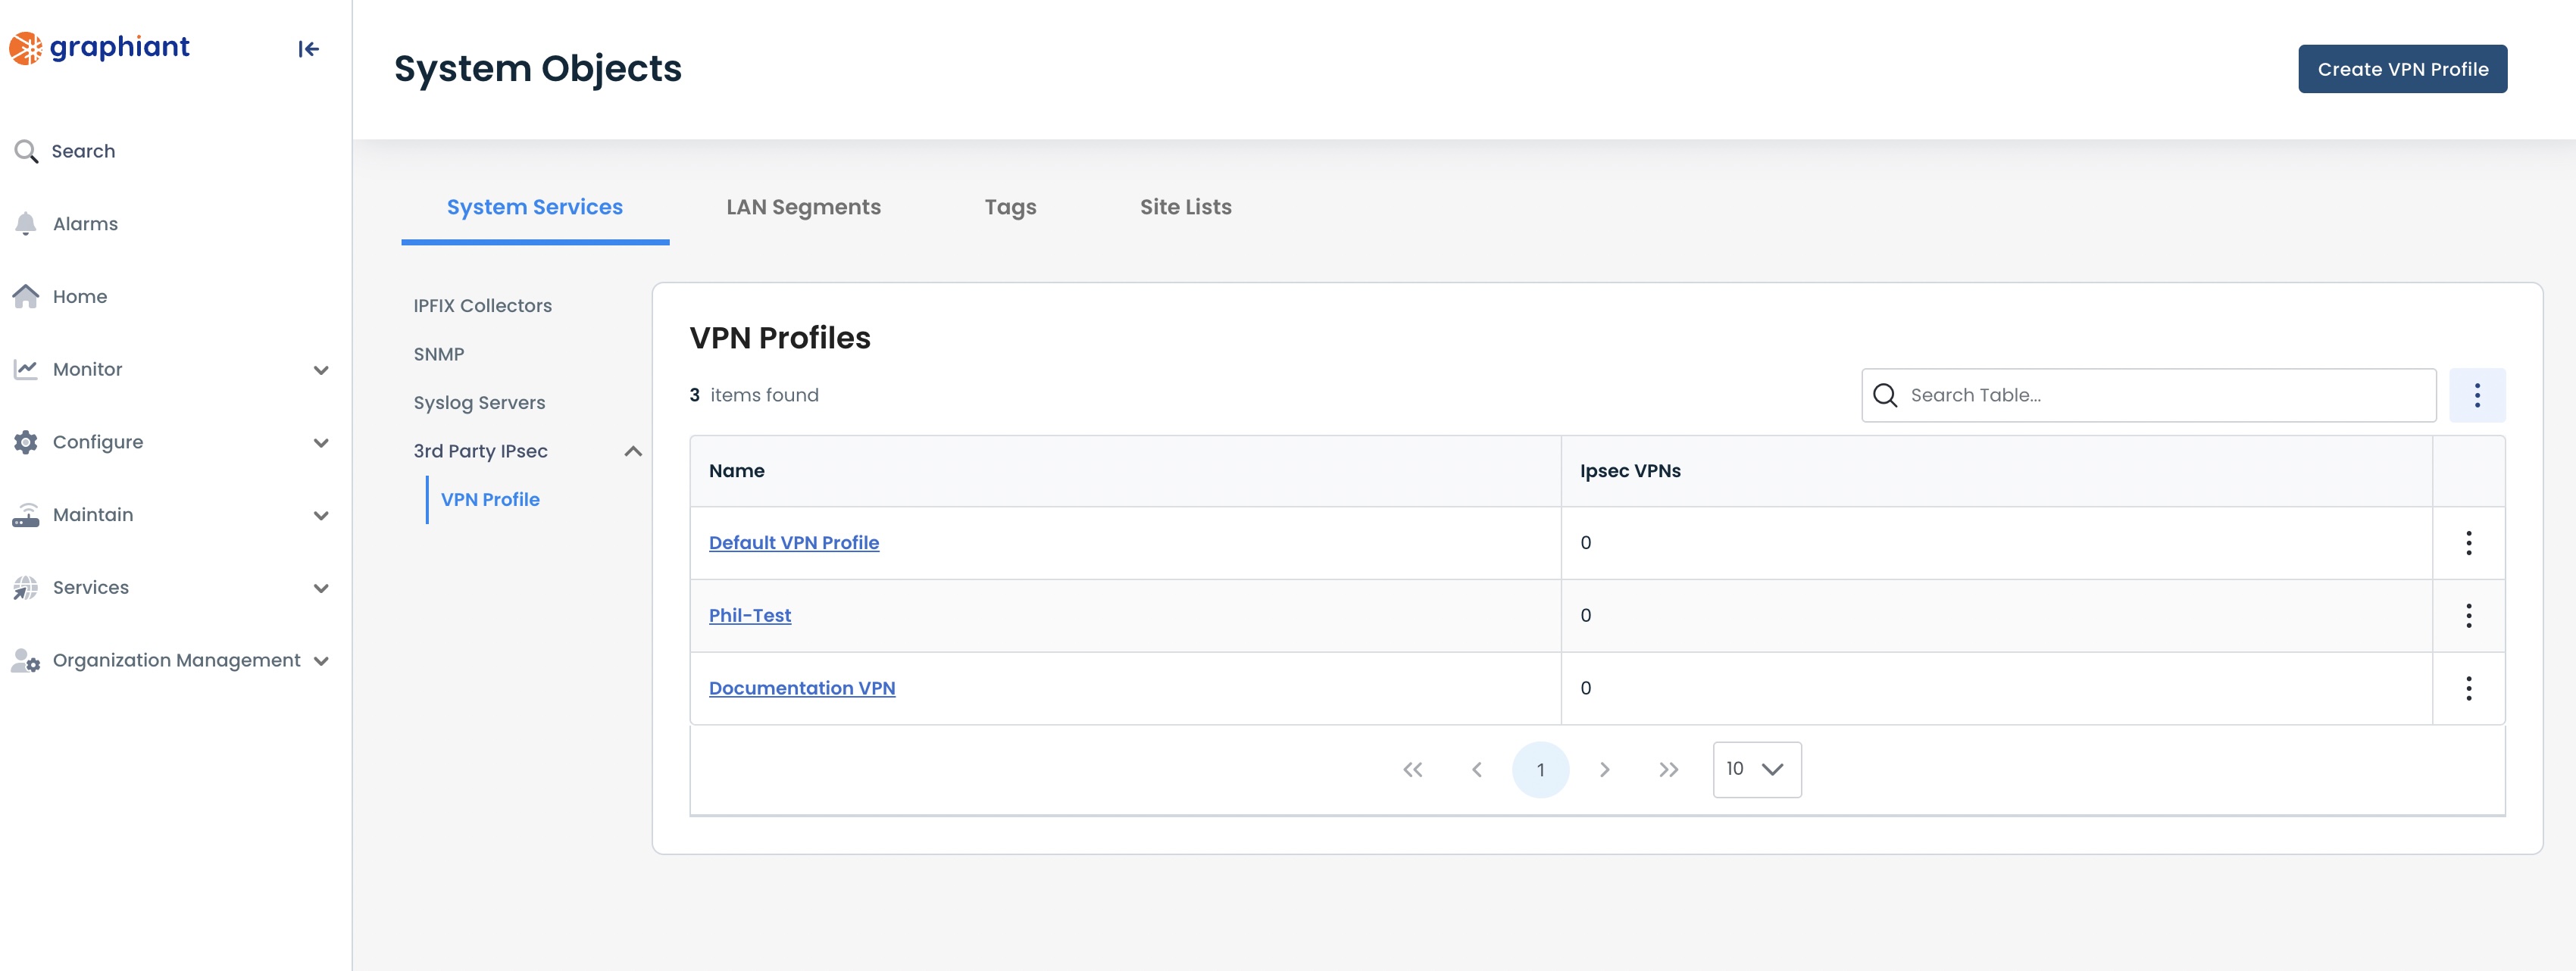
Select ‘3rd Party IPsec’; click ‘VPN Profile’.
To View the Default VPN
To view the information of the default VPN, click it’s link.
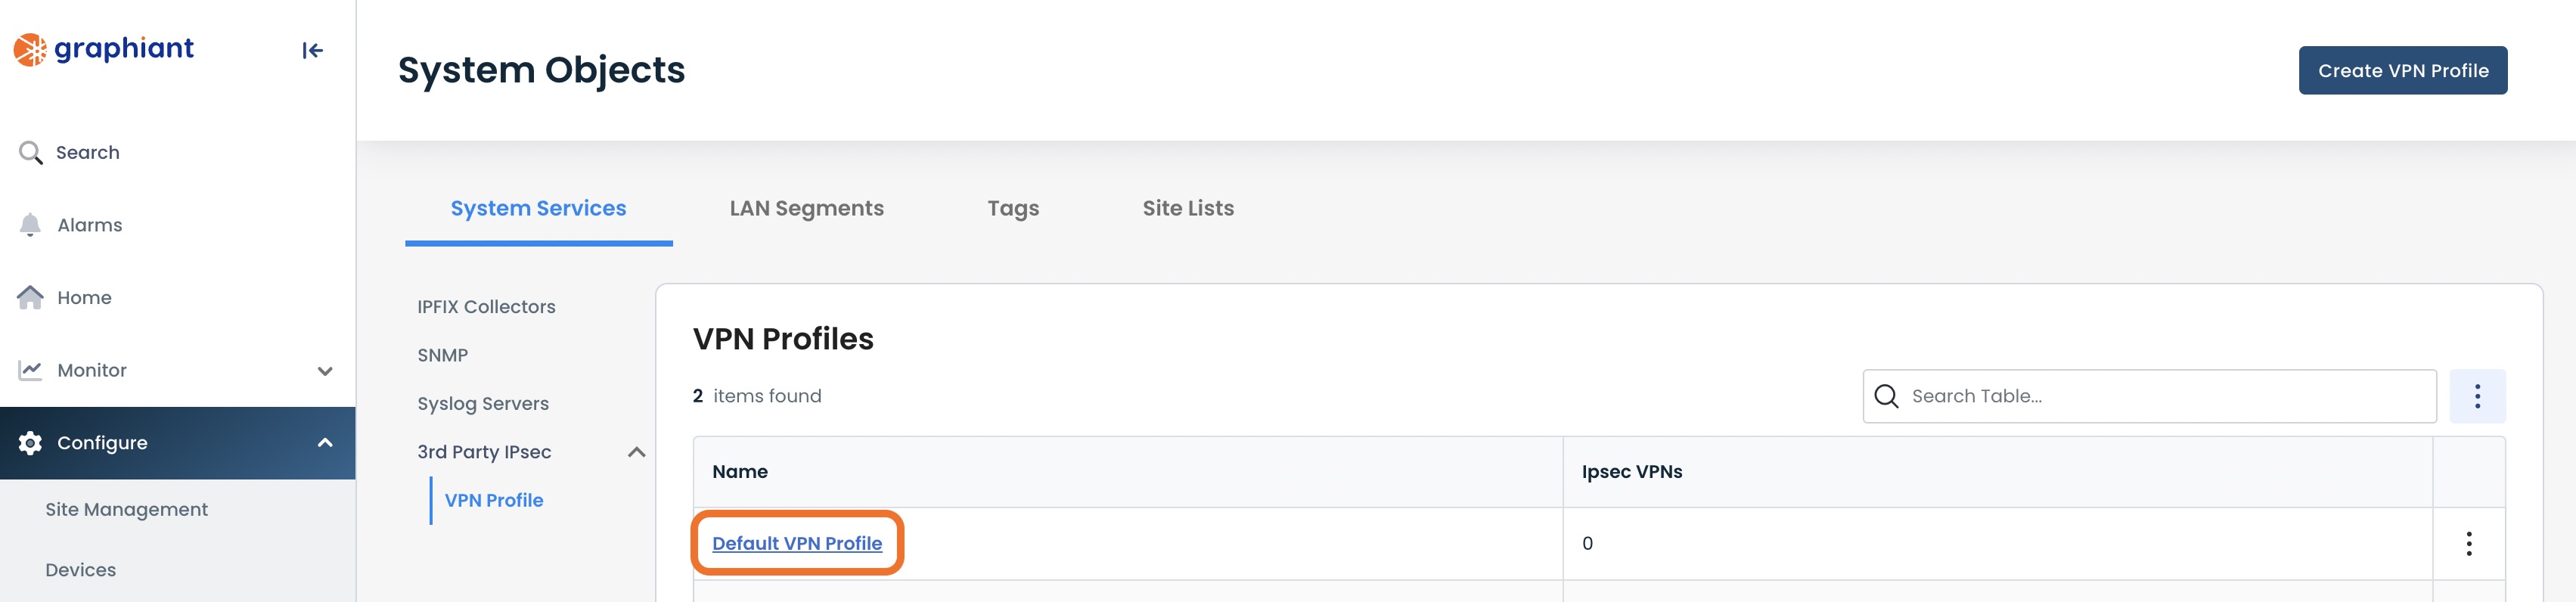
Here you will see the options set for the Graphiant default VPN profile.
Note:
The default VPN cannot be edited nor deleted.
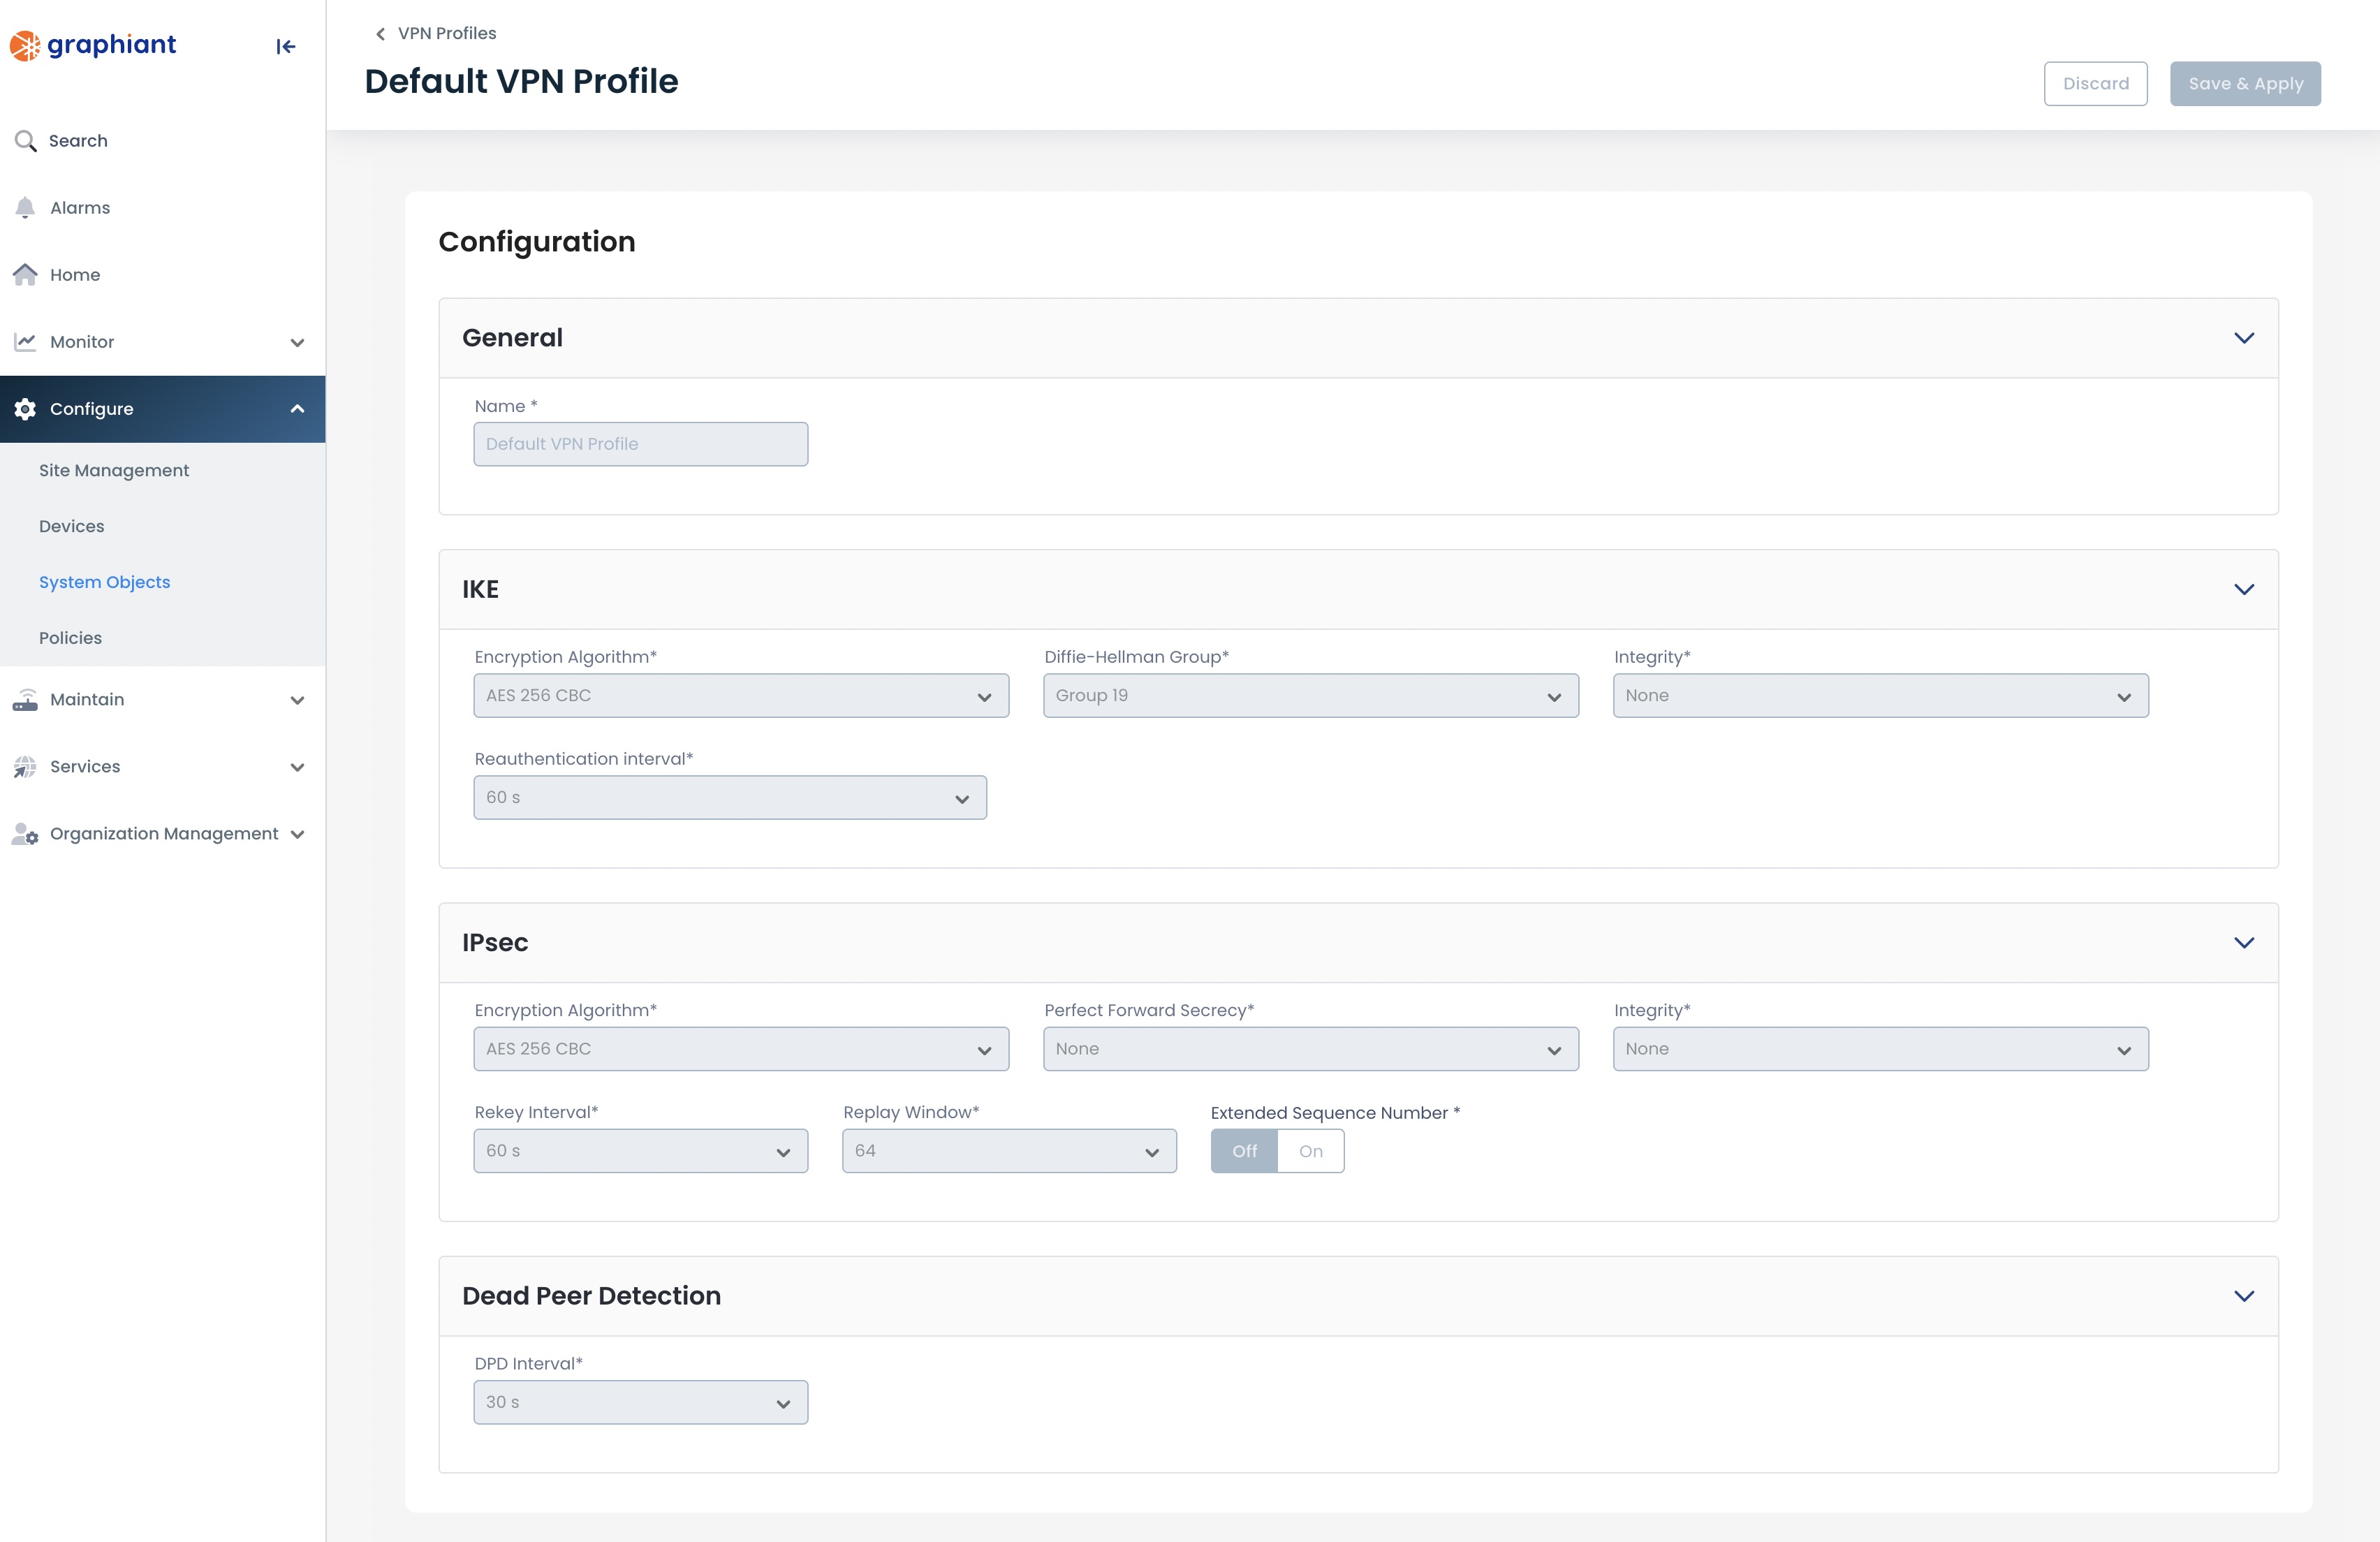
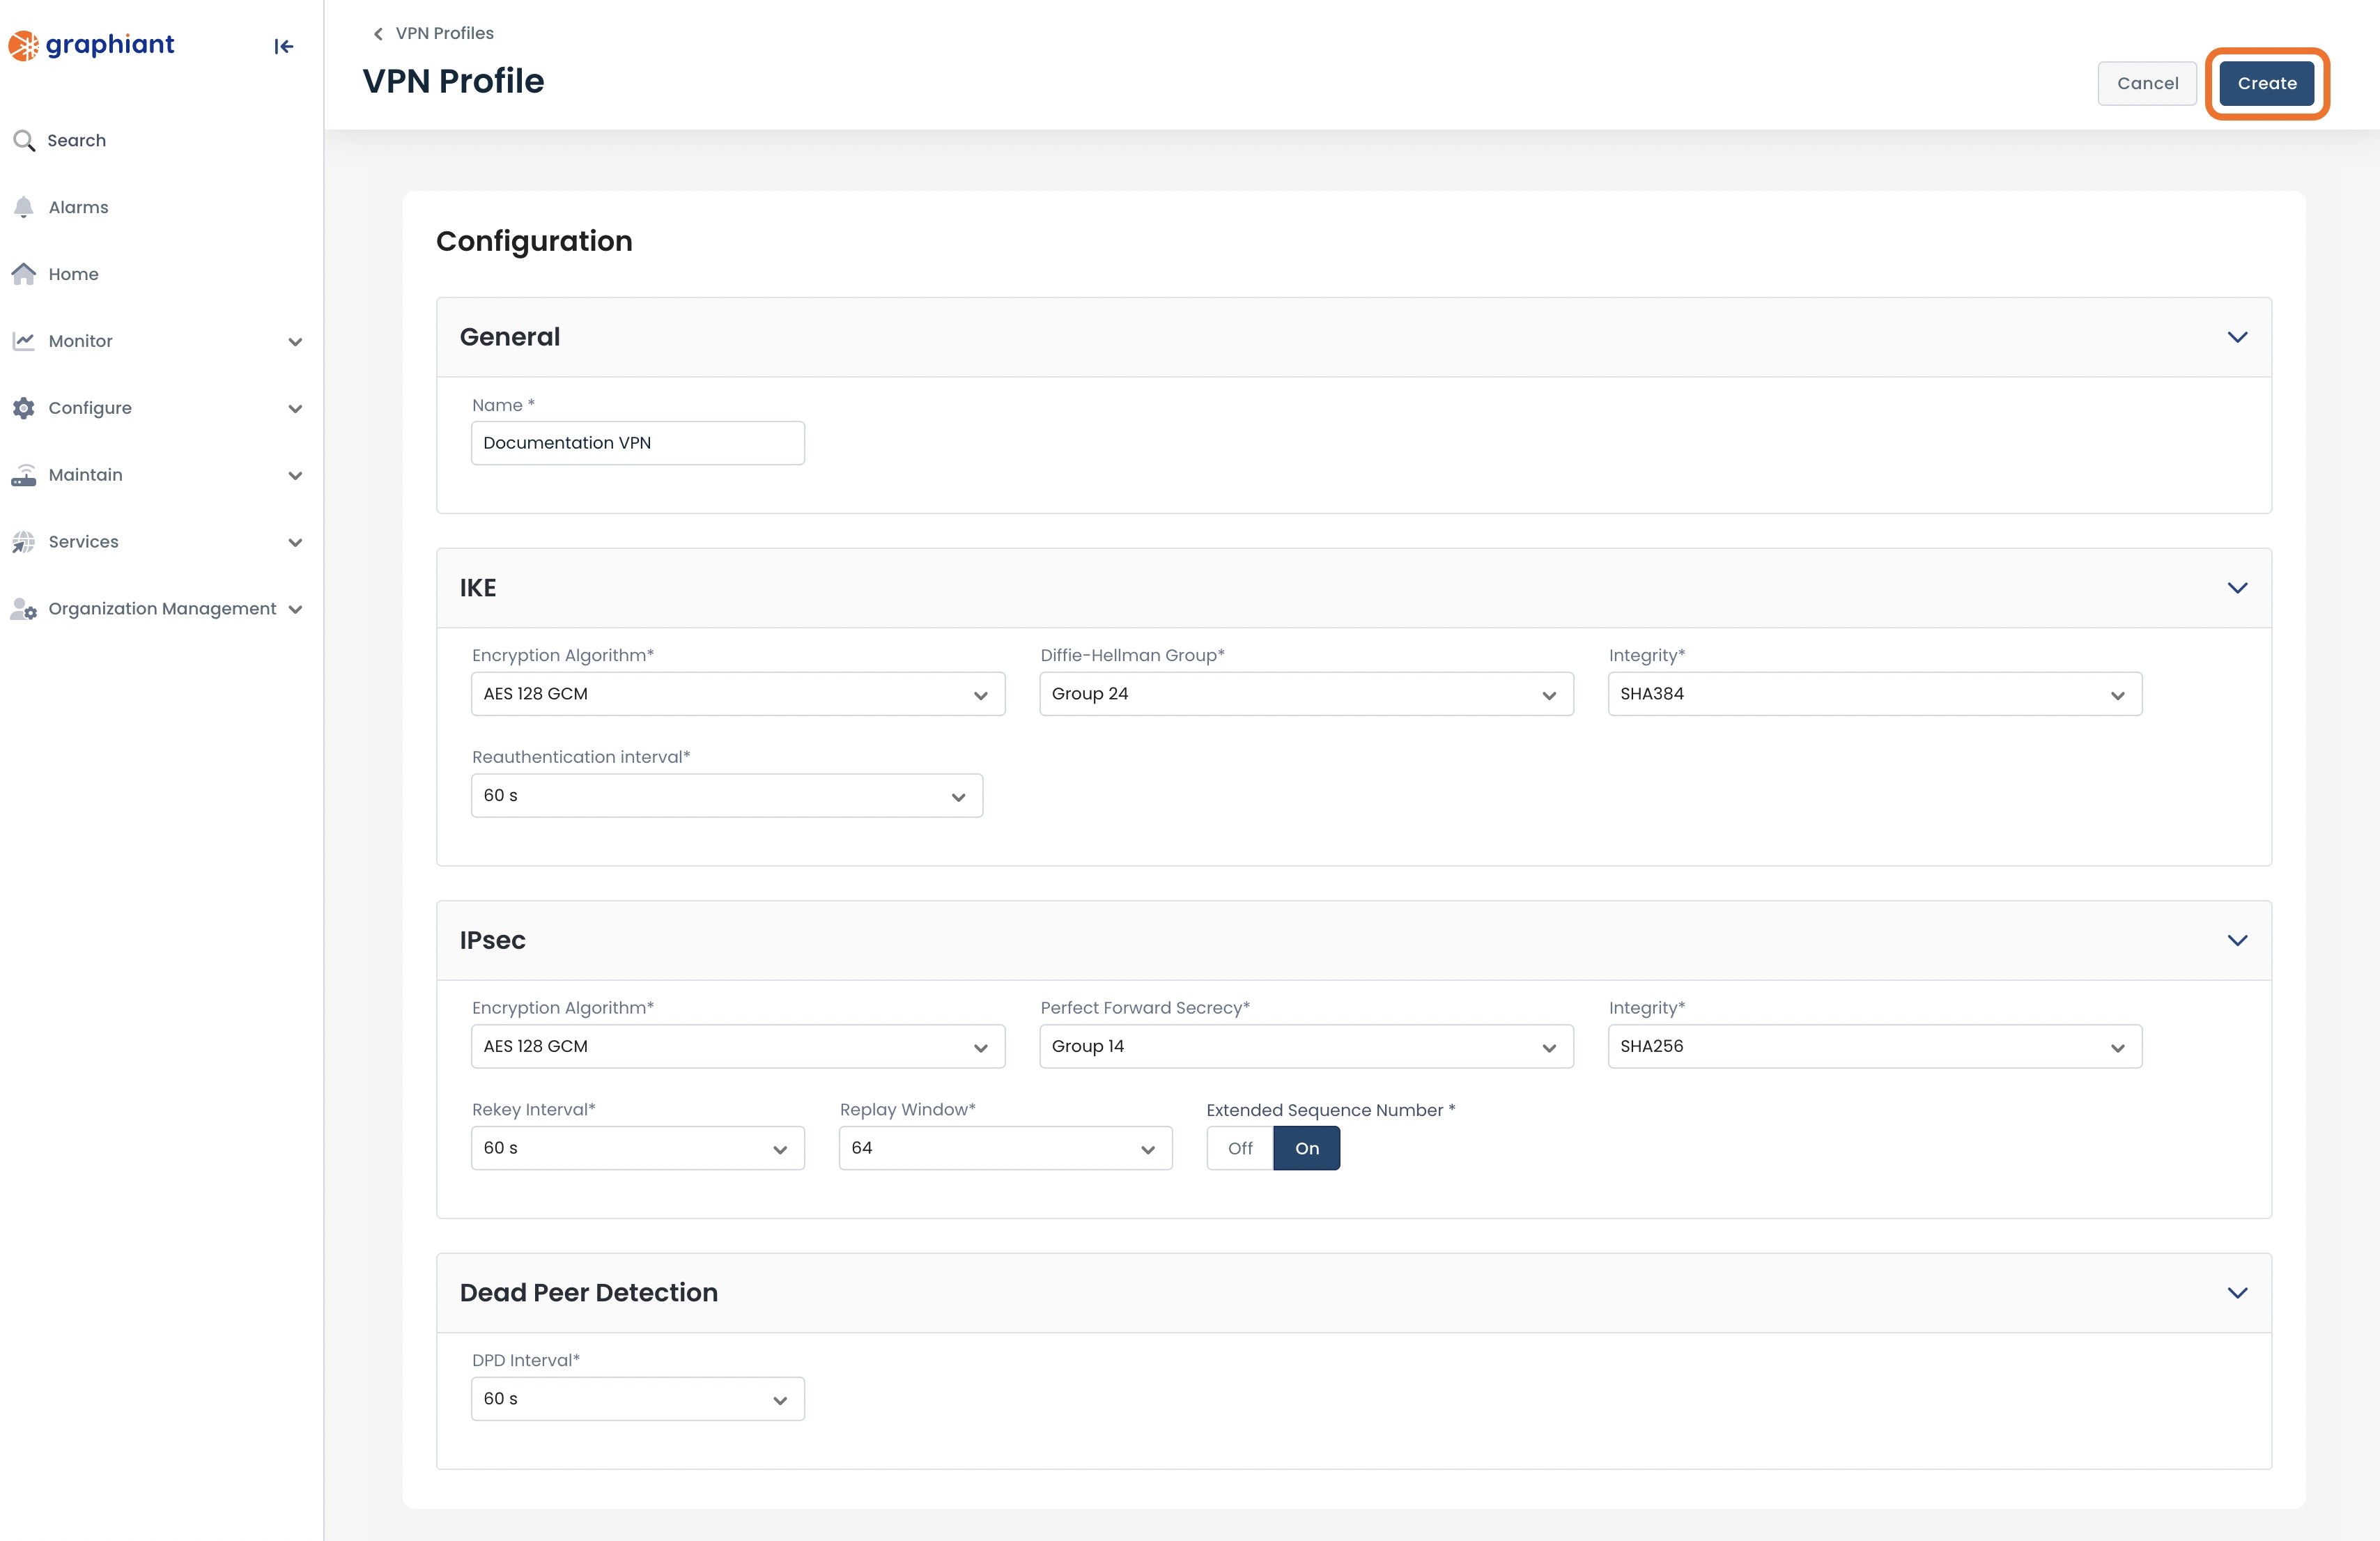
VPN Profile Fields
The configuration fields for the VPN profile are defined as follows:
IKE (Internet Key Exchange) Settings
Encryption Algorithm: The algorithm used to encrypt messages for key exchange security
Diffie-Hellman Group: The mathematical parameters used for securely exchanging cryptographic keys
Integrity: The hash algorithm used to verify that data hasn’t been altered during IKE
Reauthentication Interval : How often the IKE session should be reestablished to maintain security
IPsec Settings (Phase 2)
Encryption Algorithm: The cipher used to encrypt VPN traffic (data packets) during IPsec tunnel operation
Perfect Forward Secrecy: Enforces additional key exchange for each session, ensuring that compromise of one session doesn’t affect others
Integrity: The algorithm for verifying the integrity of encrypted data packets during IPsec transmission
Rekey Interval: How frequently new IPsec keys are generated to maintain secure communication
Replay Window: How many packets the system will accept out of order, helping to prevent replay attacks while allowing minor reordering
Extended Sequence Number: Enables 64-bit sequence numbers instead of 32-bit, to prevent rollover in long-lived IPsec sessions
Dead Peer Detection (DPD)
DPD Interval: How often the system checks that the remote VPN peer is still reachable
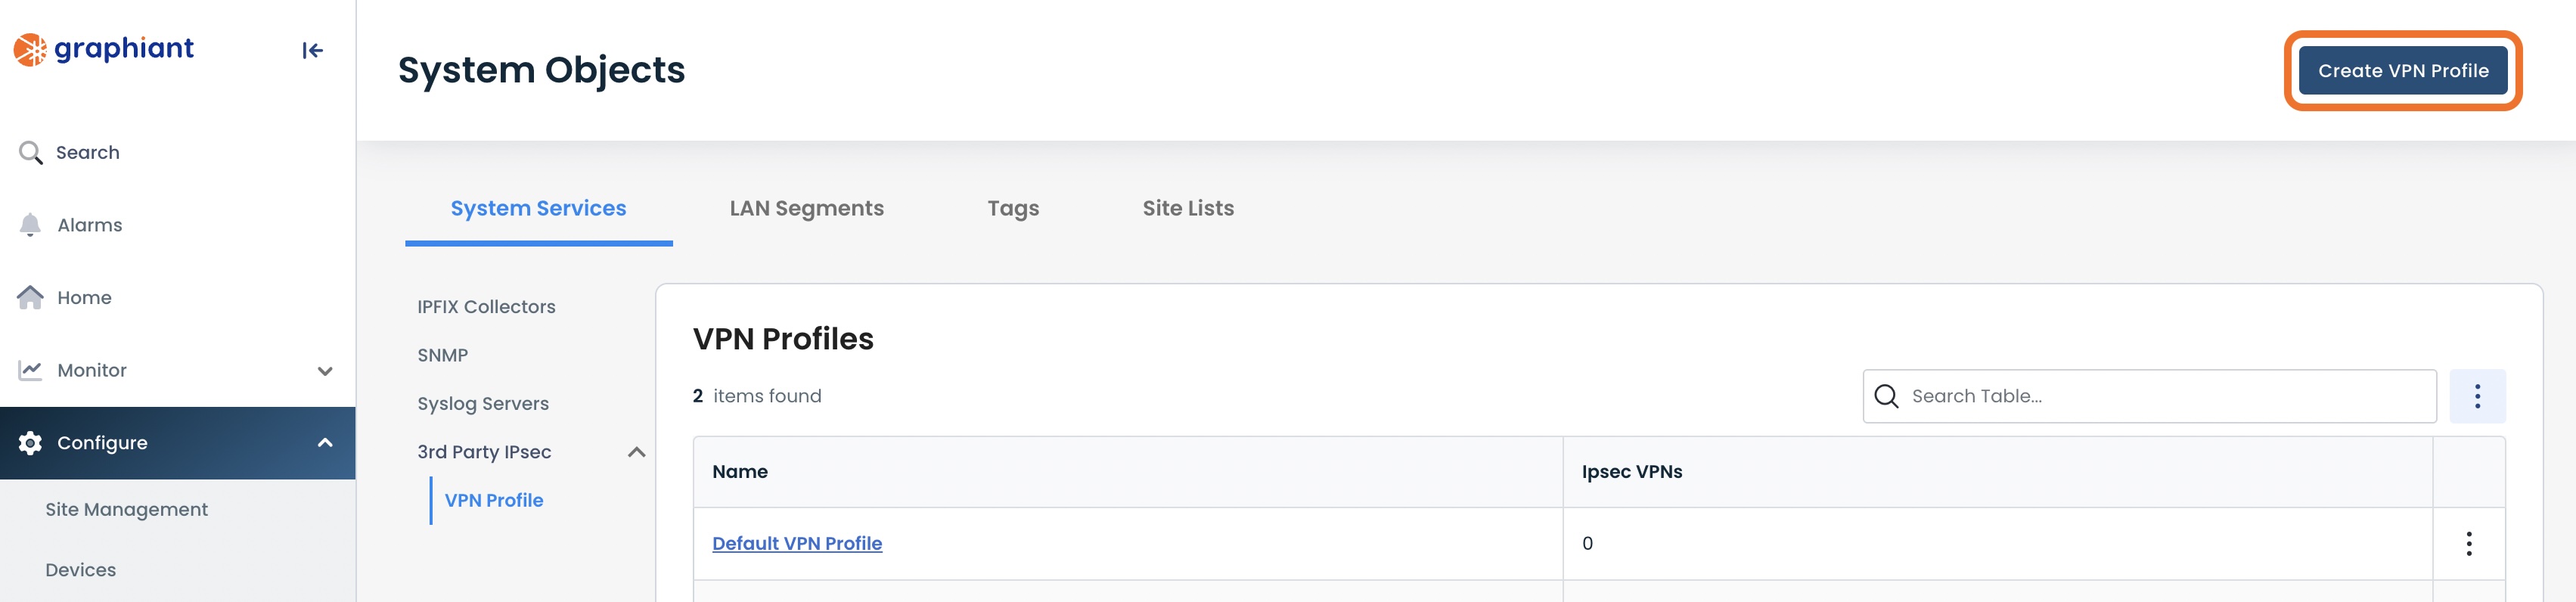
To Create a Custom VPN Profile
Should you desire to create your own VPN Profile, from the System Objects VPN Profiles table click ‘Create VPN Profile’ at the top right.
Fill out the fields as described above here.
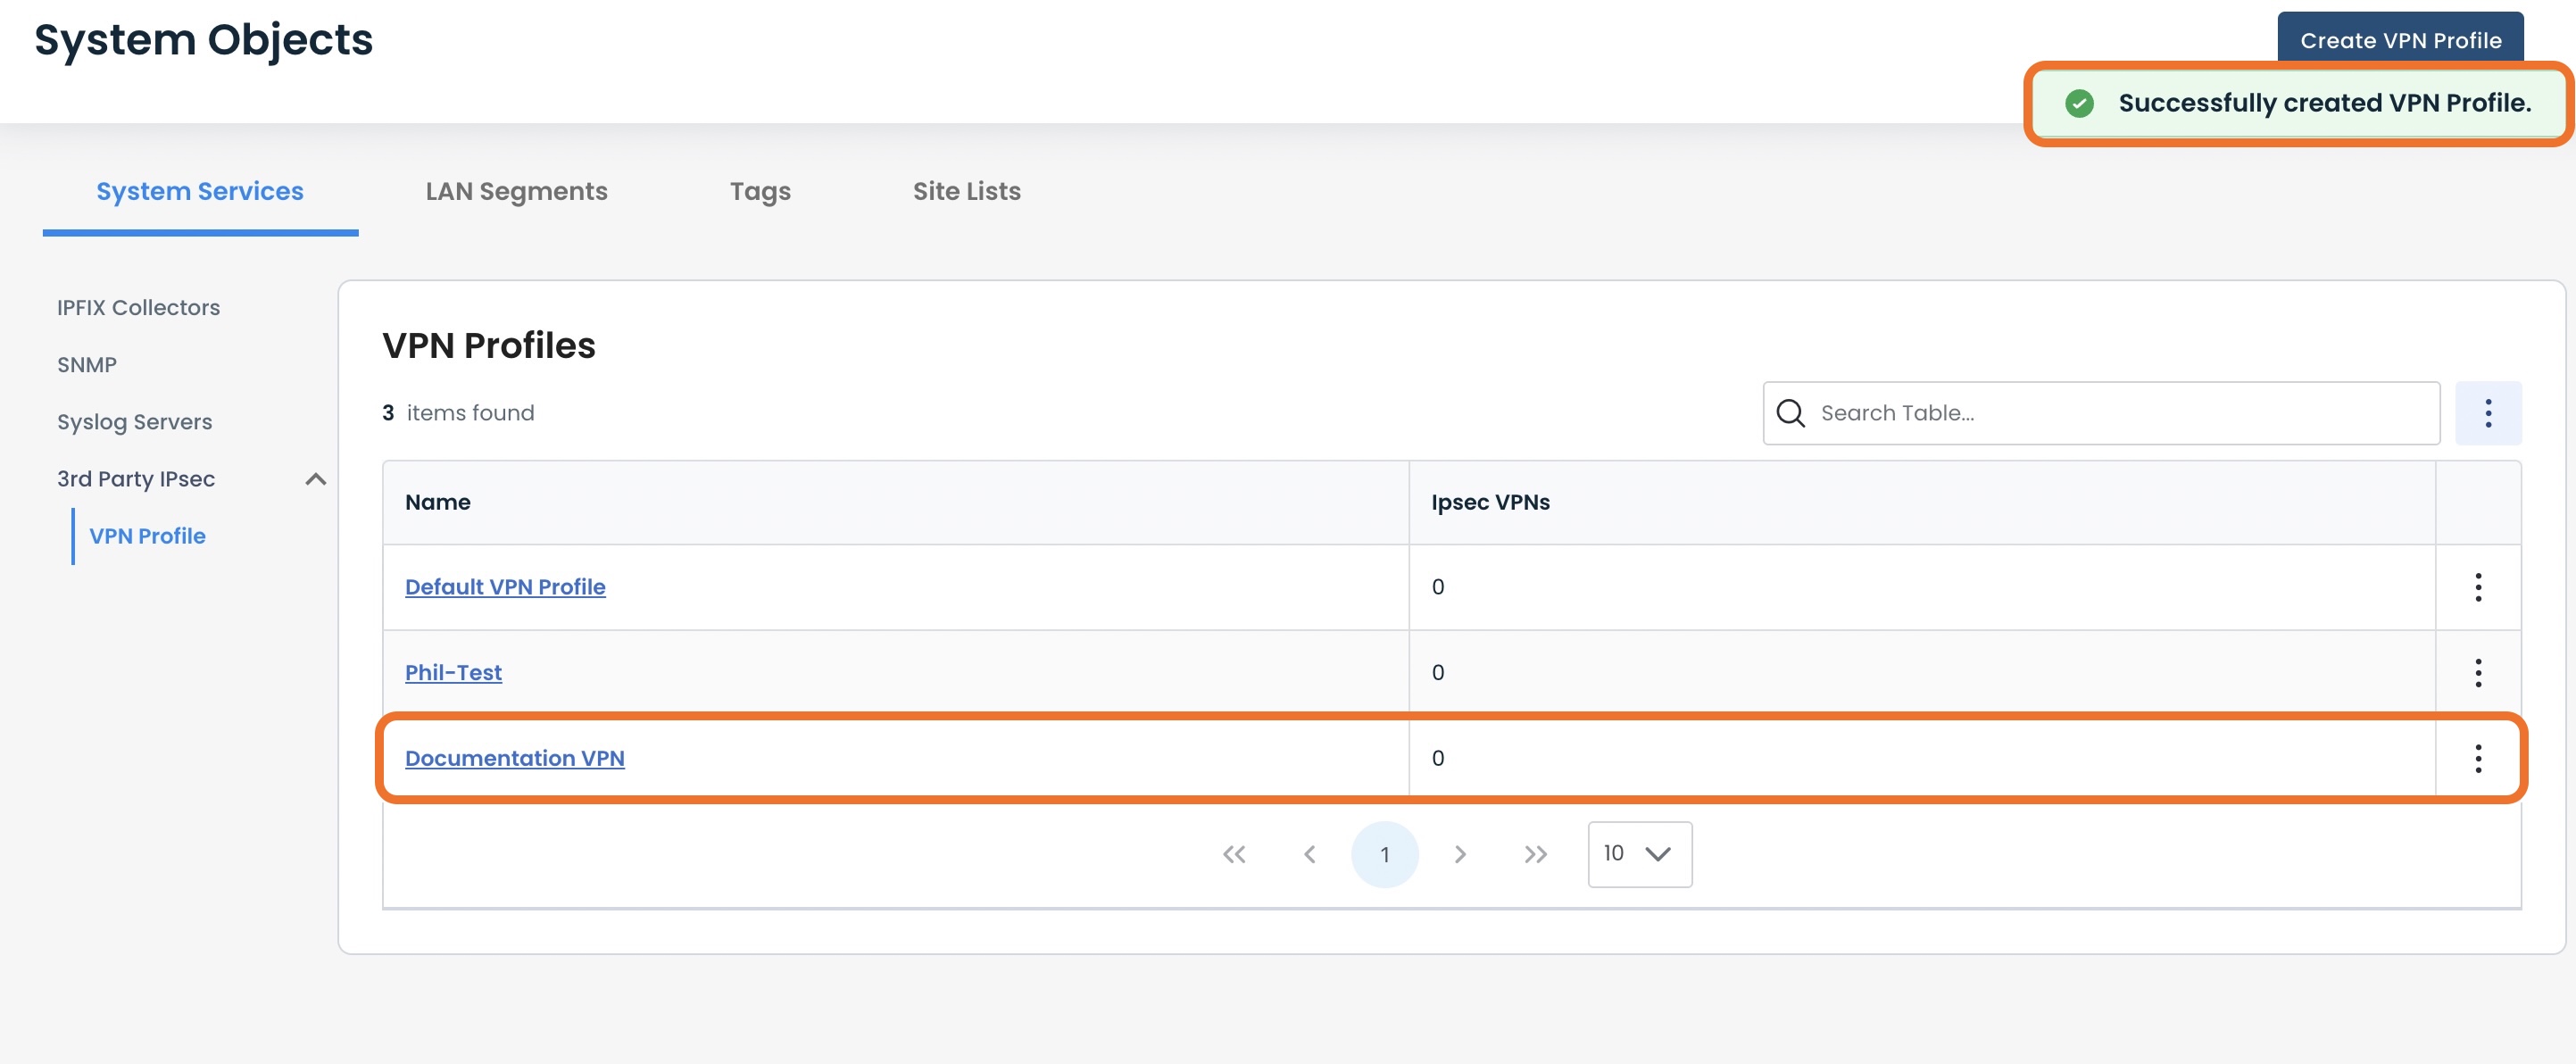
Click ‘Create’.
You will see a green banner at the top right stating that the VPN Profile has been successfully created, and the profile will now appear in the table.
You are now ready to configure site-to-site VPN.
Viewing VPN Profile Associations
If you would like to see the VPNs using any given Profile, that is shown in the VPN Profile table in the “IPsec VPNs” column.
The value there represents the number of VPN that are utilizing that Profile.
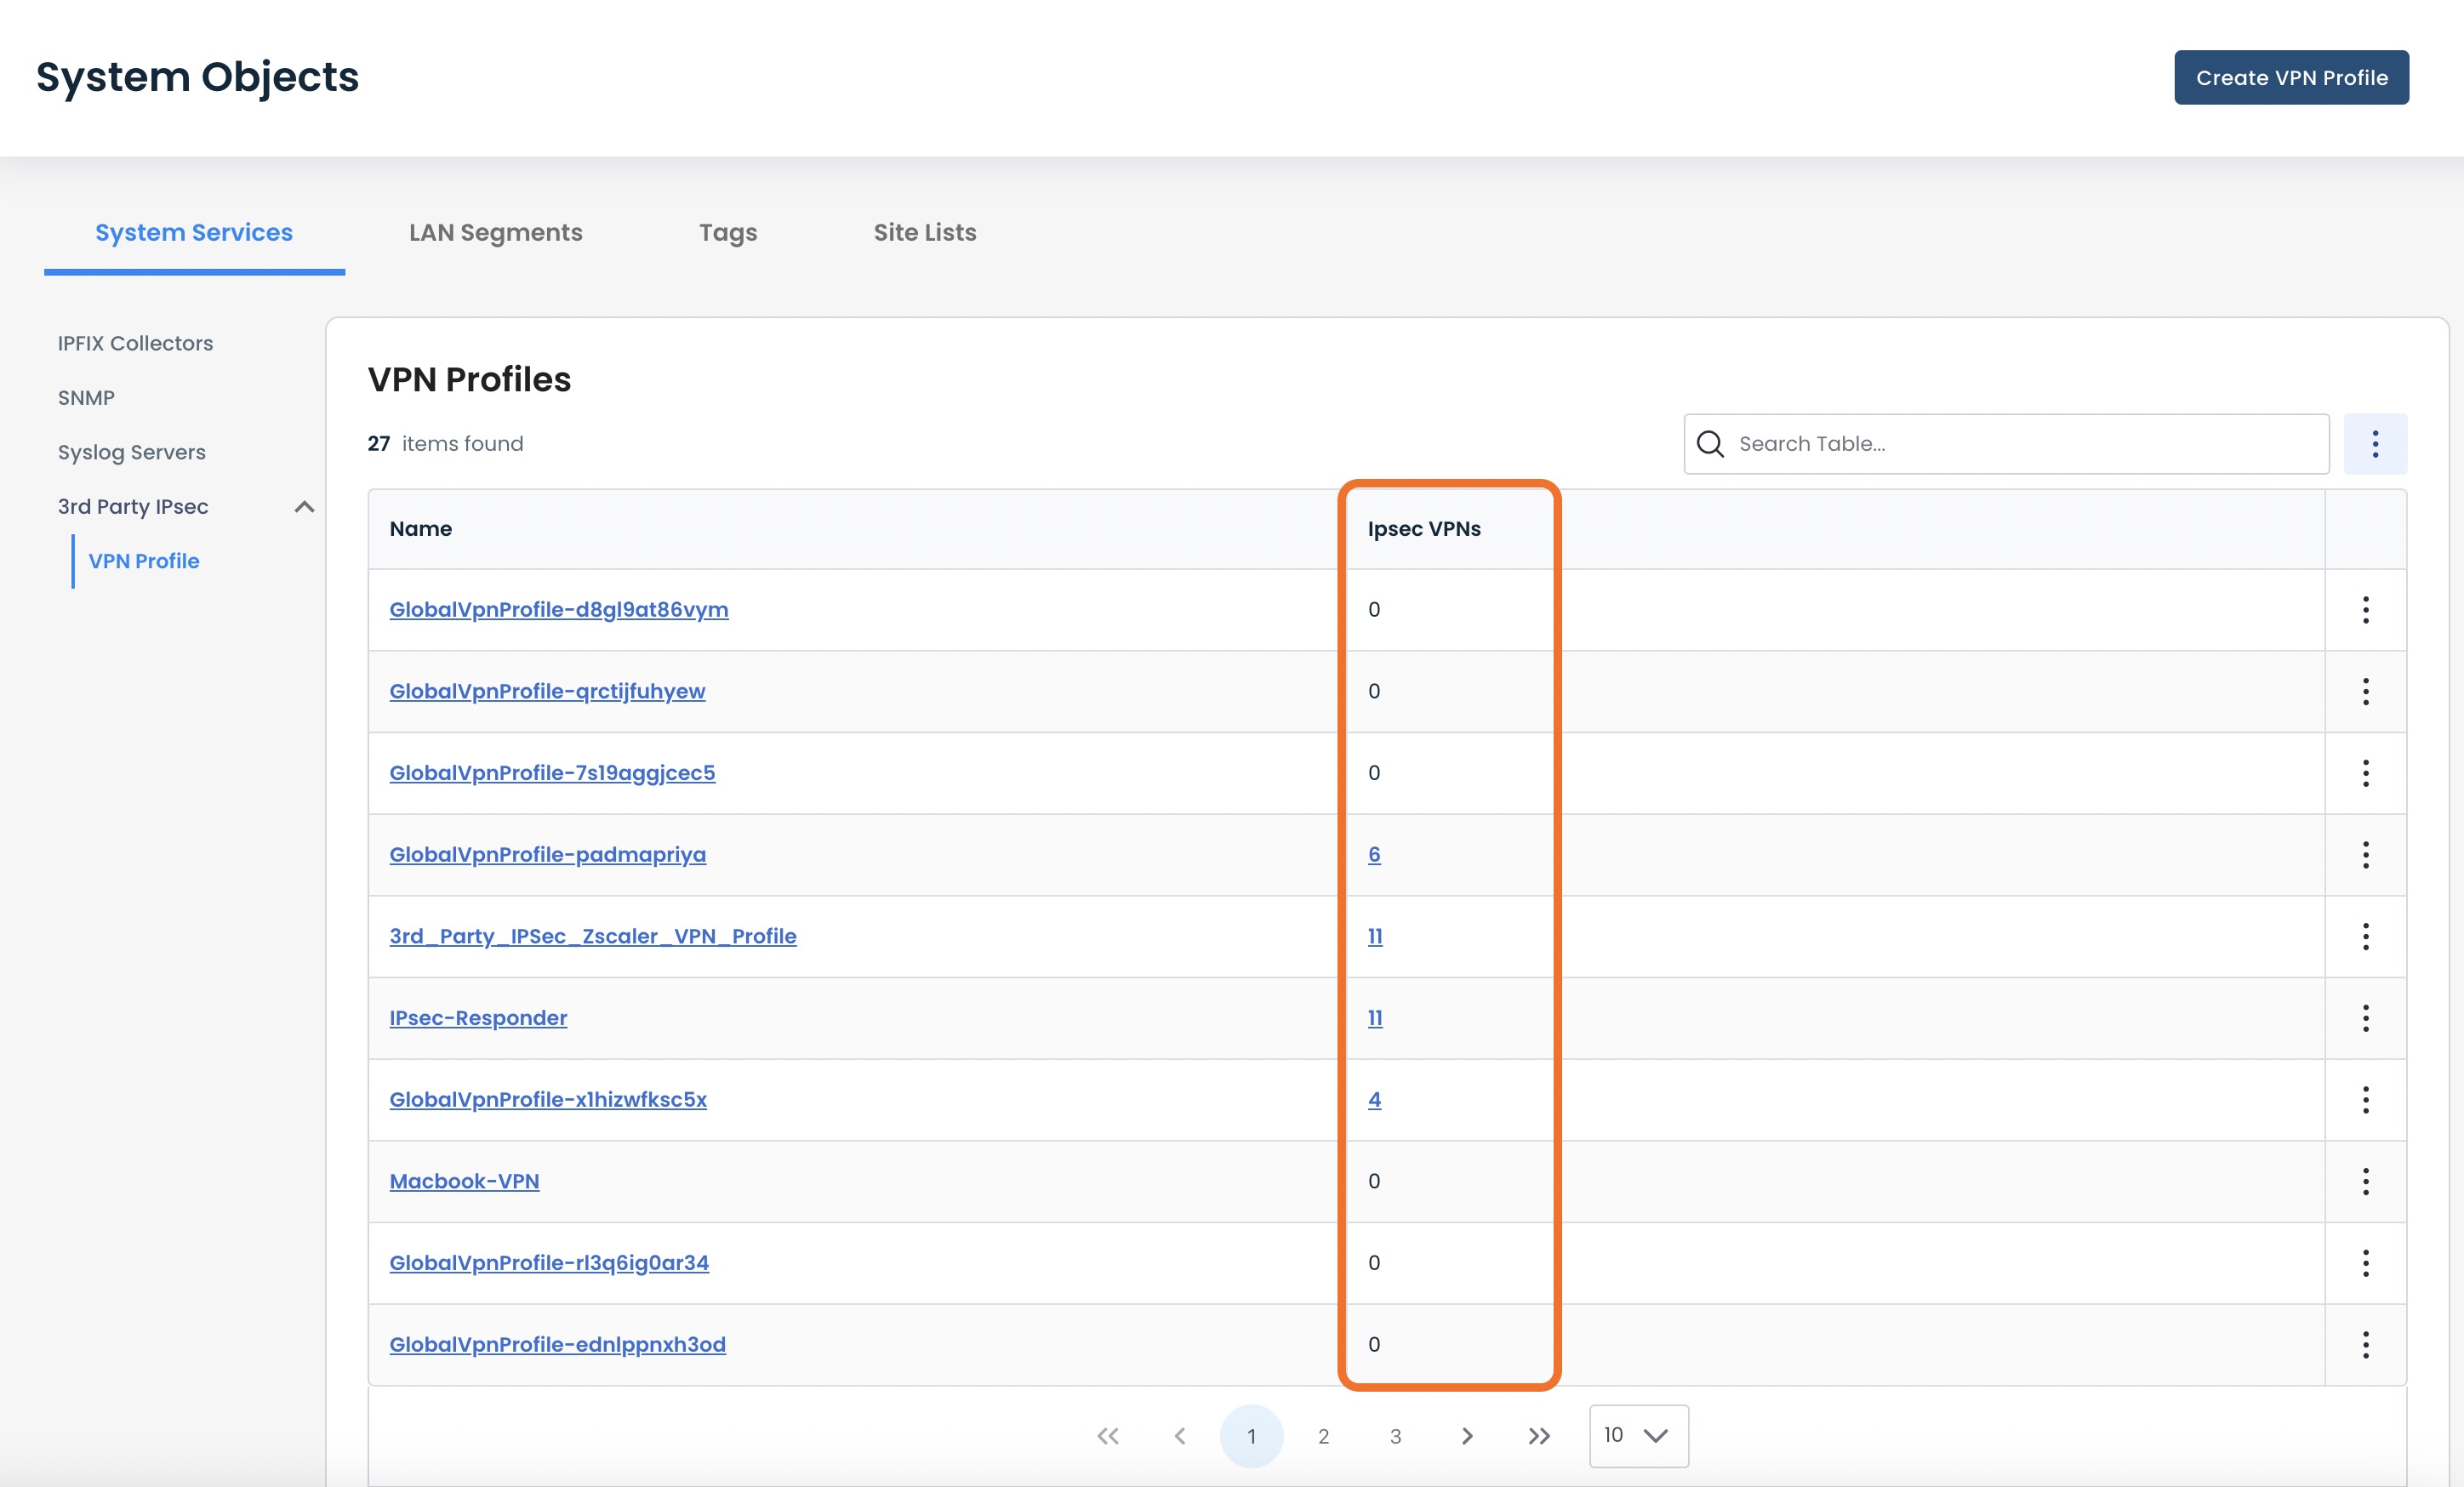
To view the associated VPNs that are using that Profile, click the number value for that Profile.
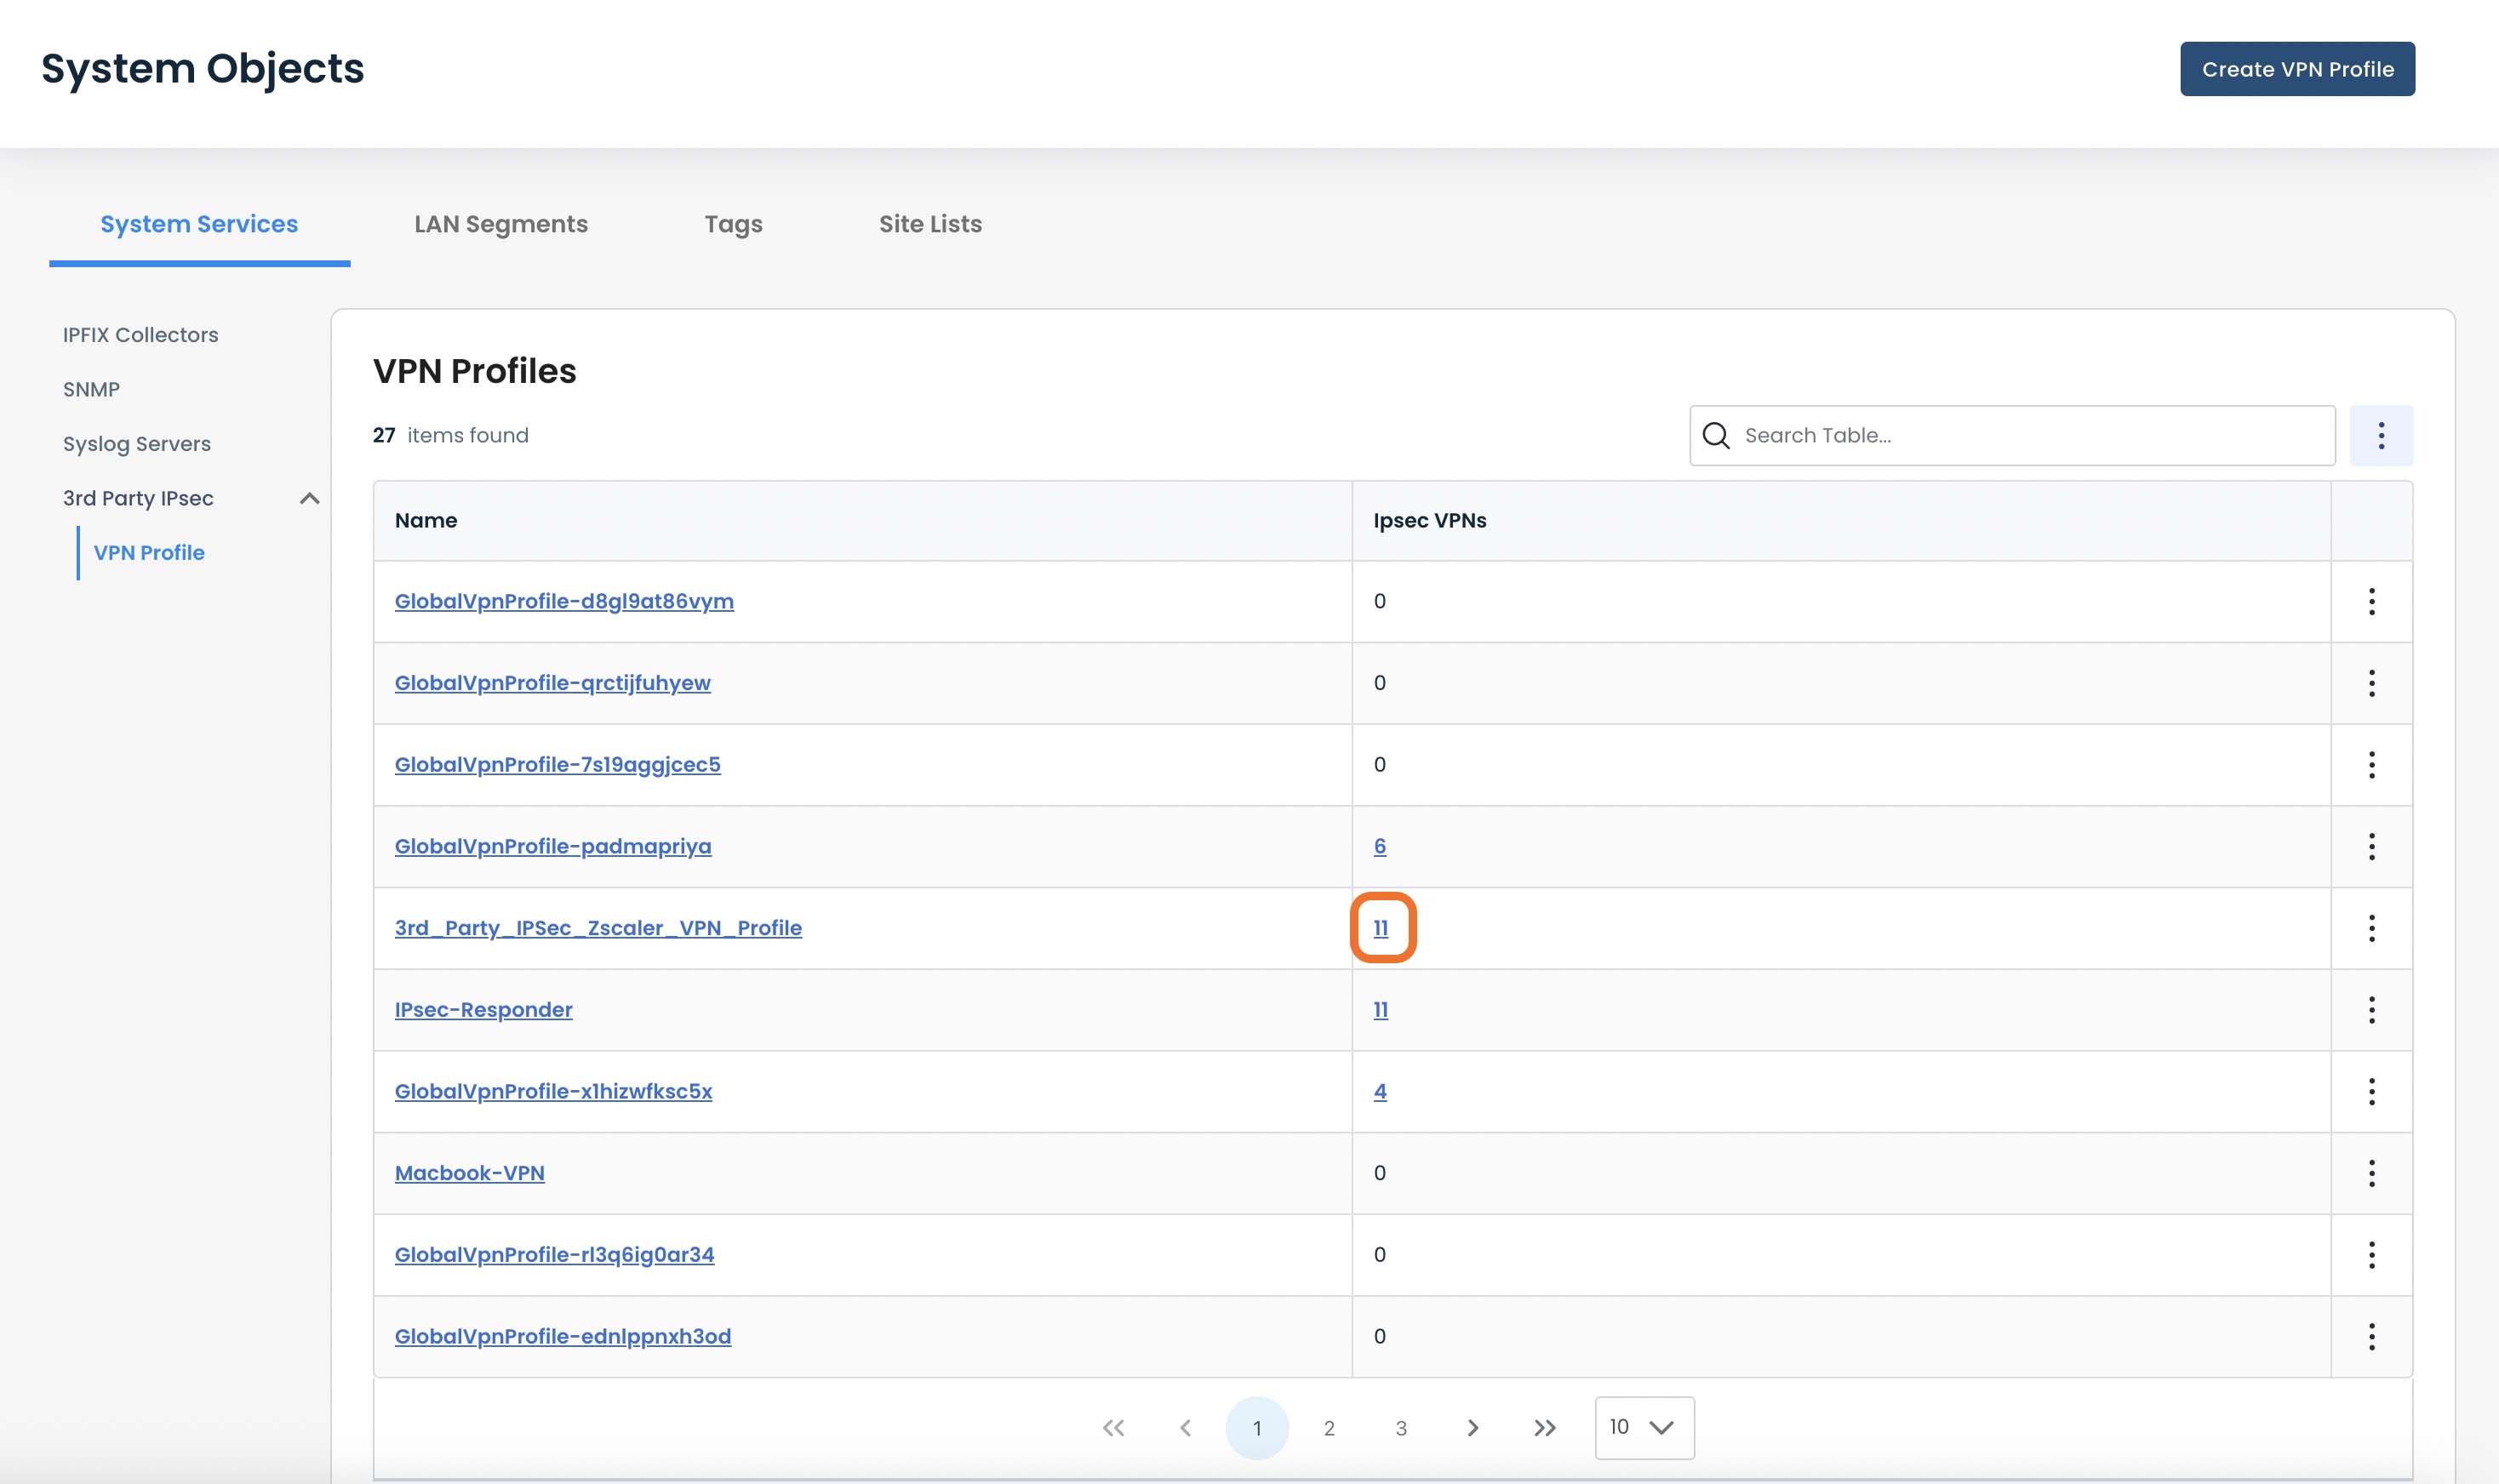
This will open a. modal that shows the name and type of every VPN utilizing that Profile.
To see details on any of these VPNs, click anywhere in the “Name” field of the desired VPN.

You will be directed to the details of that VPN configuration.
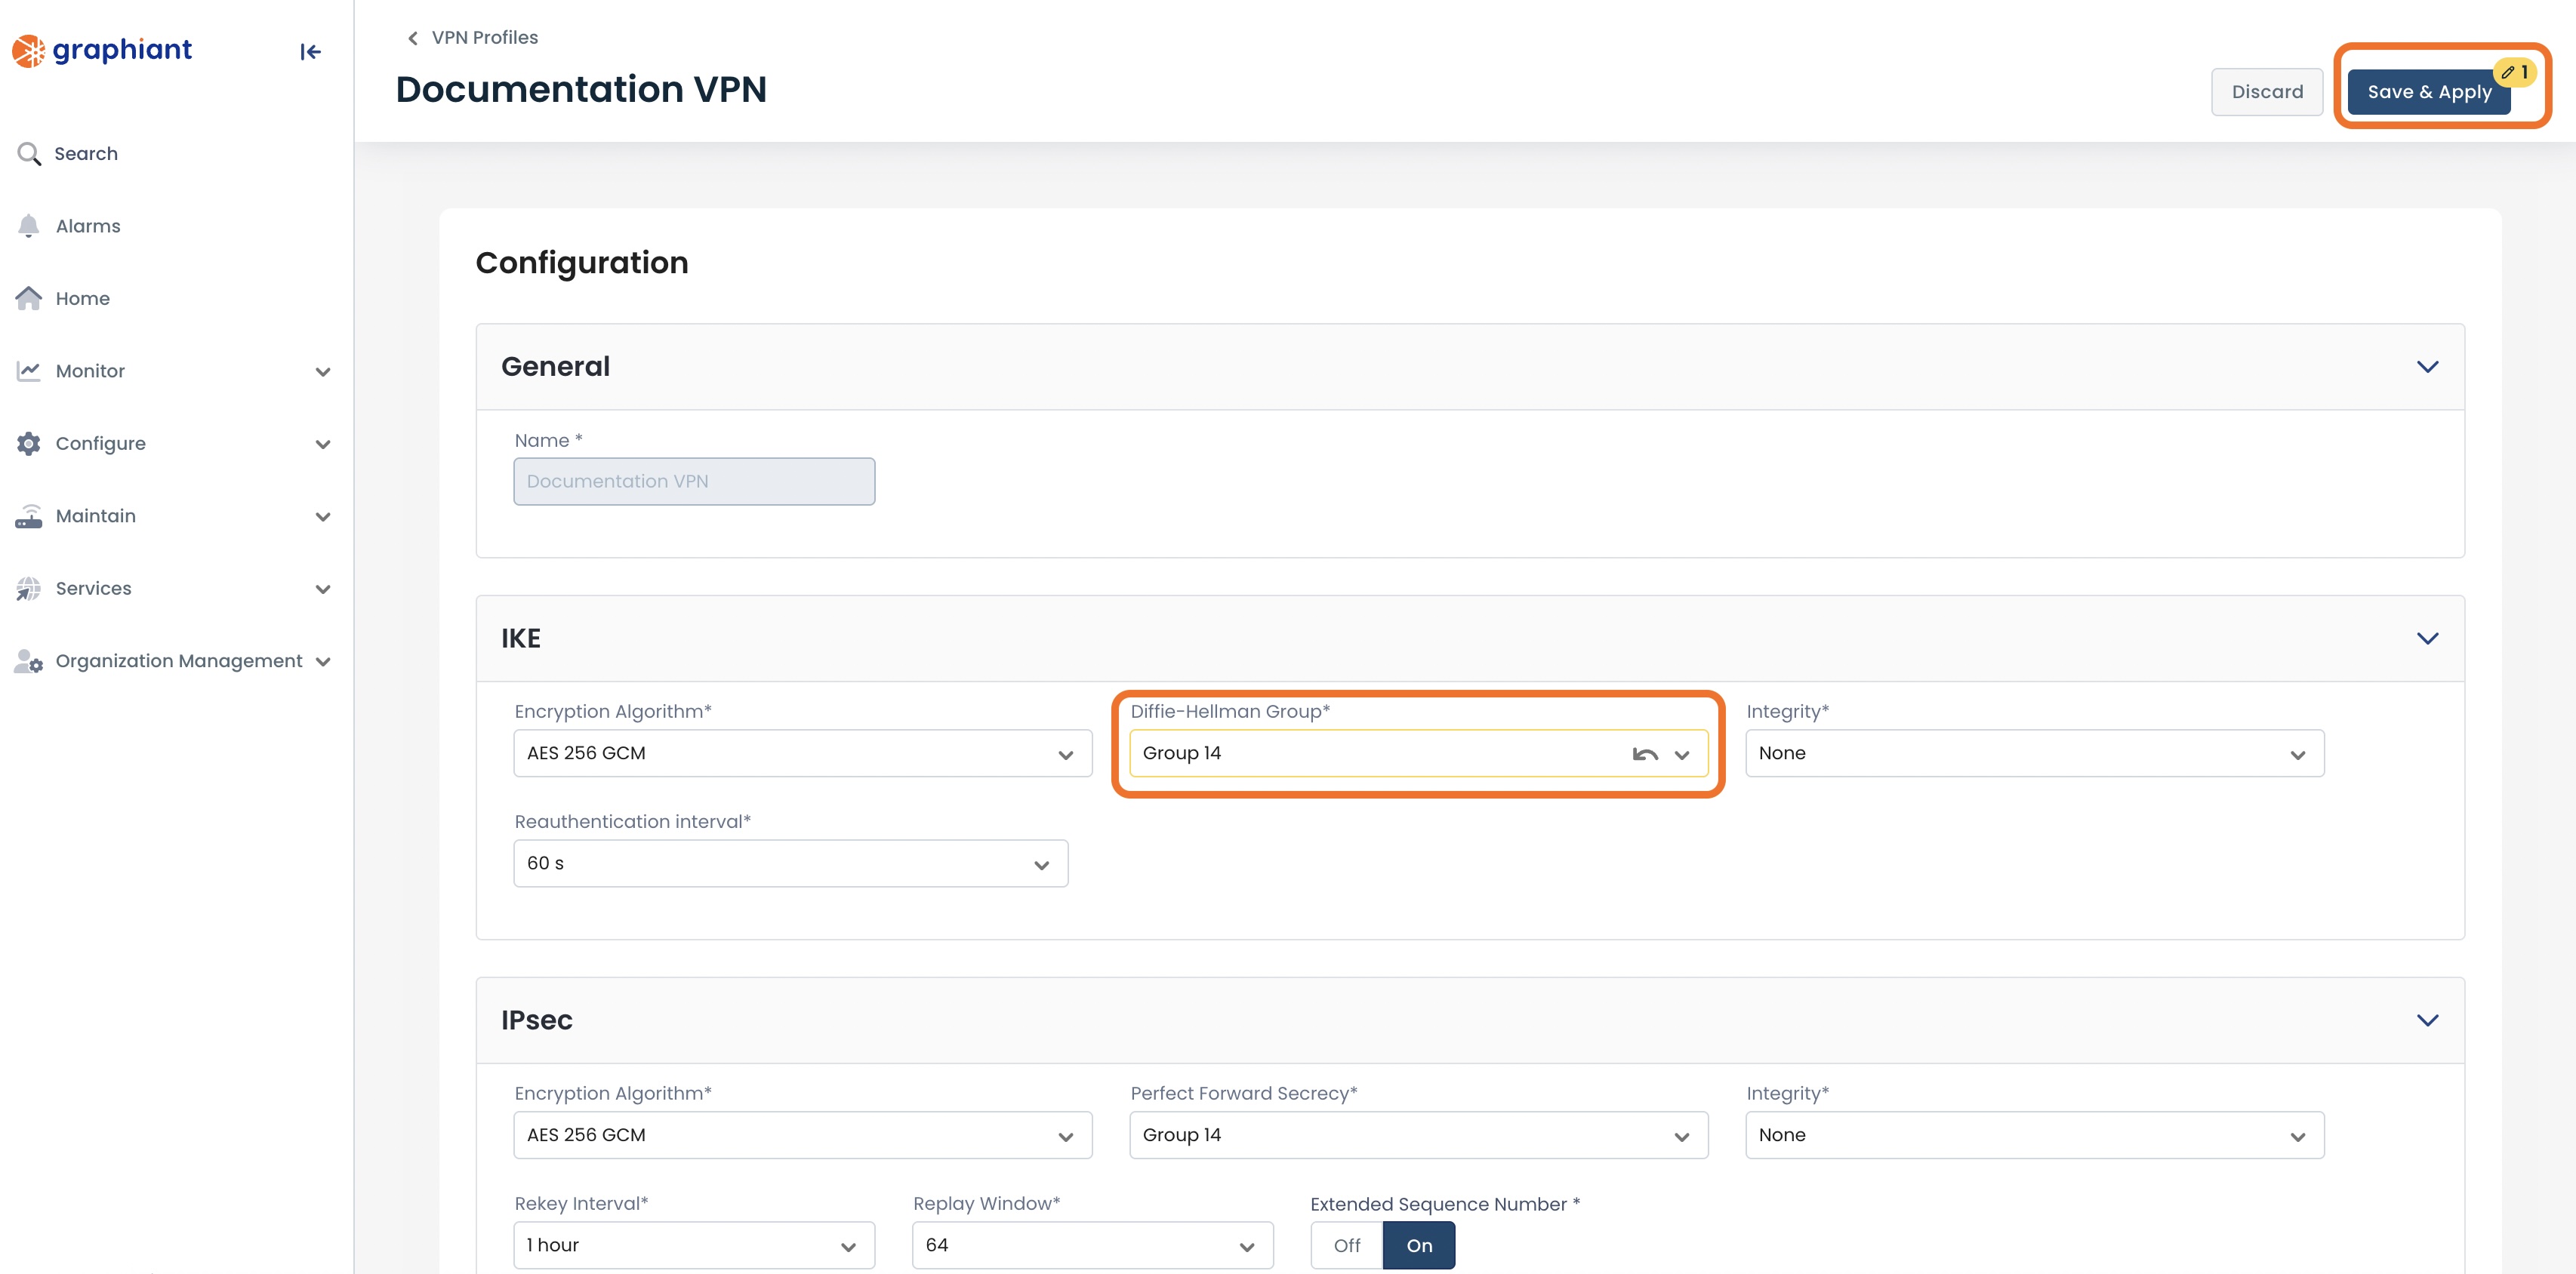
Editing a VPN Profile
To make changes to your VPM profile, from the VPN Profiles table, locate the VPN profile to be edited.
Click the ellipses; select ‘Configure’.
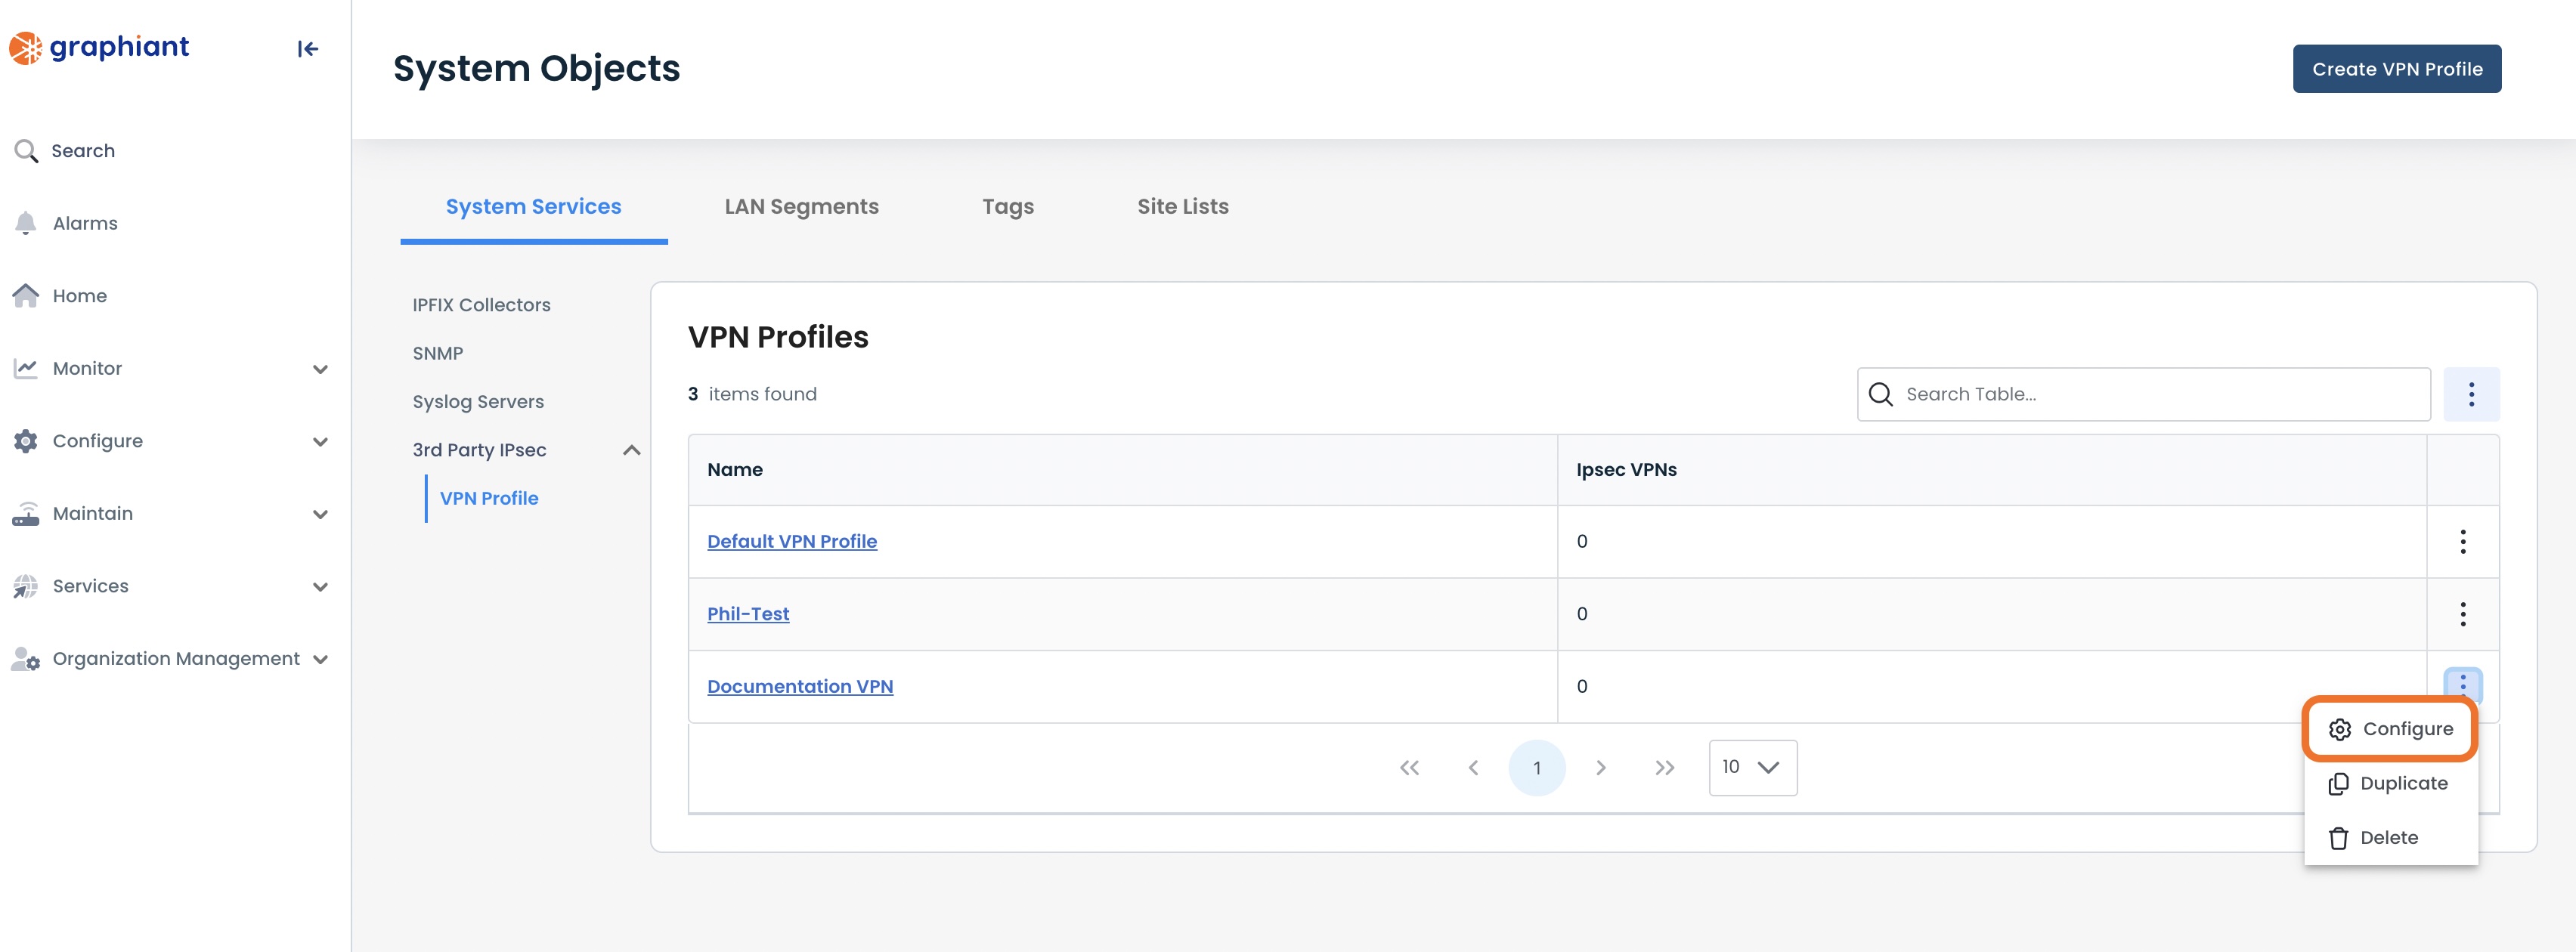
Change the desired values; click ‘Save & Apply’.
When editing a VPN Profile:
Any changed field will be highlighted in yellow prior to saving
Only the name is not editable; should you need to use the same values for another VPN Profile name, follow the instructions for duplicating a VPN profile.
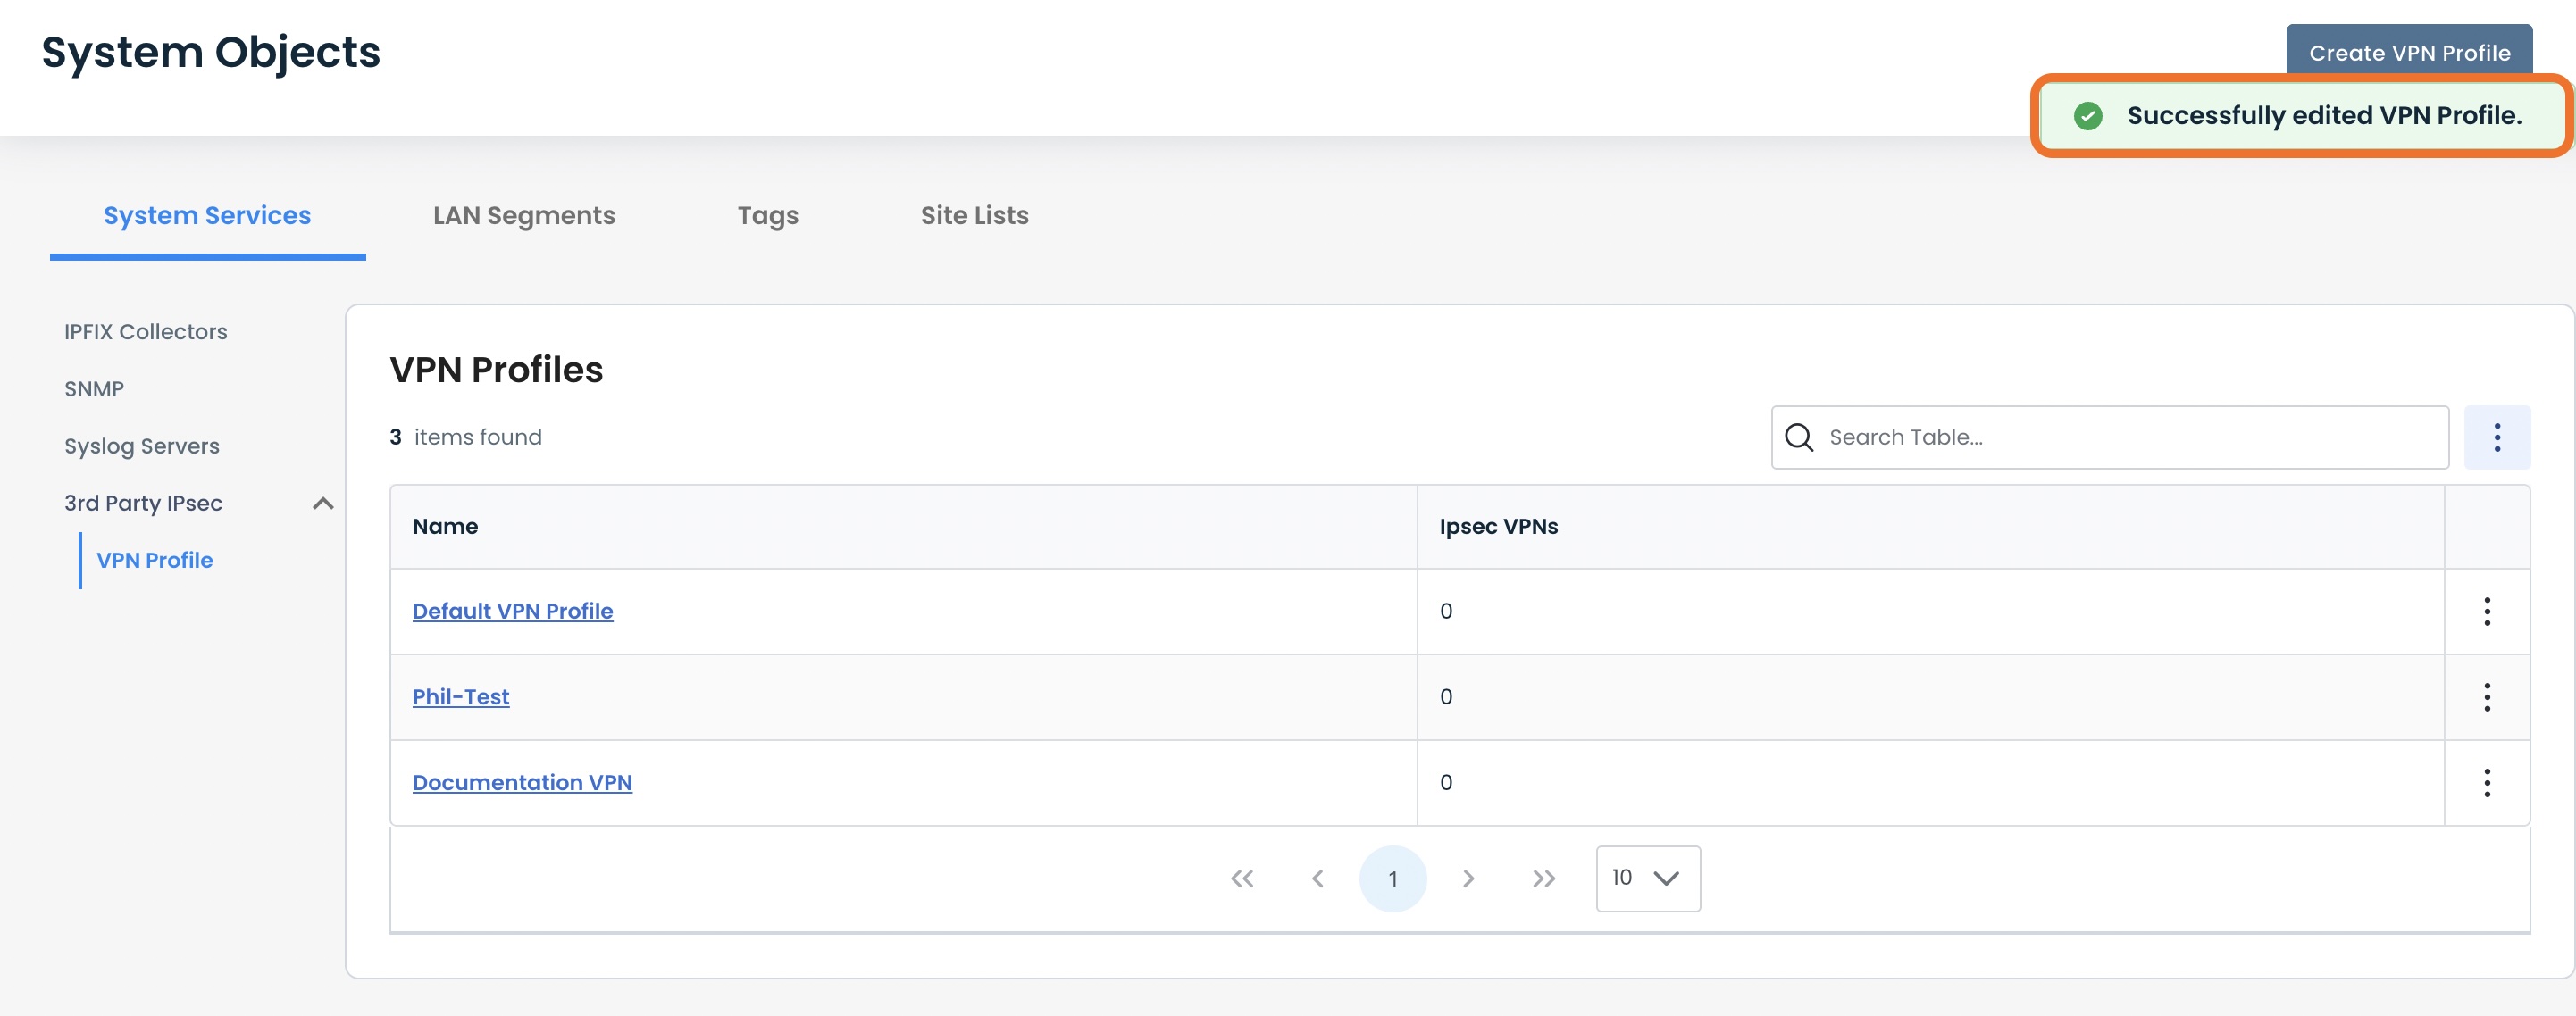
A green banner will appear stating that the edit was successful.
Duplicating a VPN Profile
To duplicate your VPM profile, from the VPN Profiles table, locate the VPN profile to be edited.
Click the ellipses; select ‘Duplicate’.
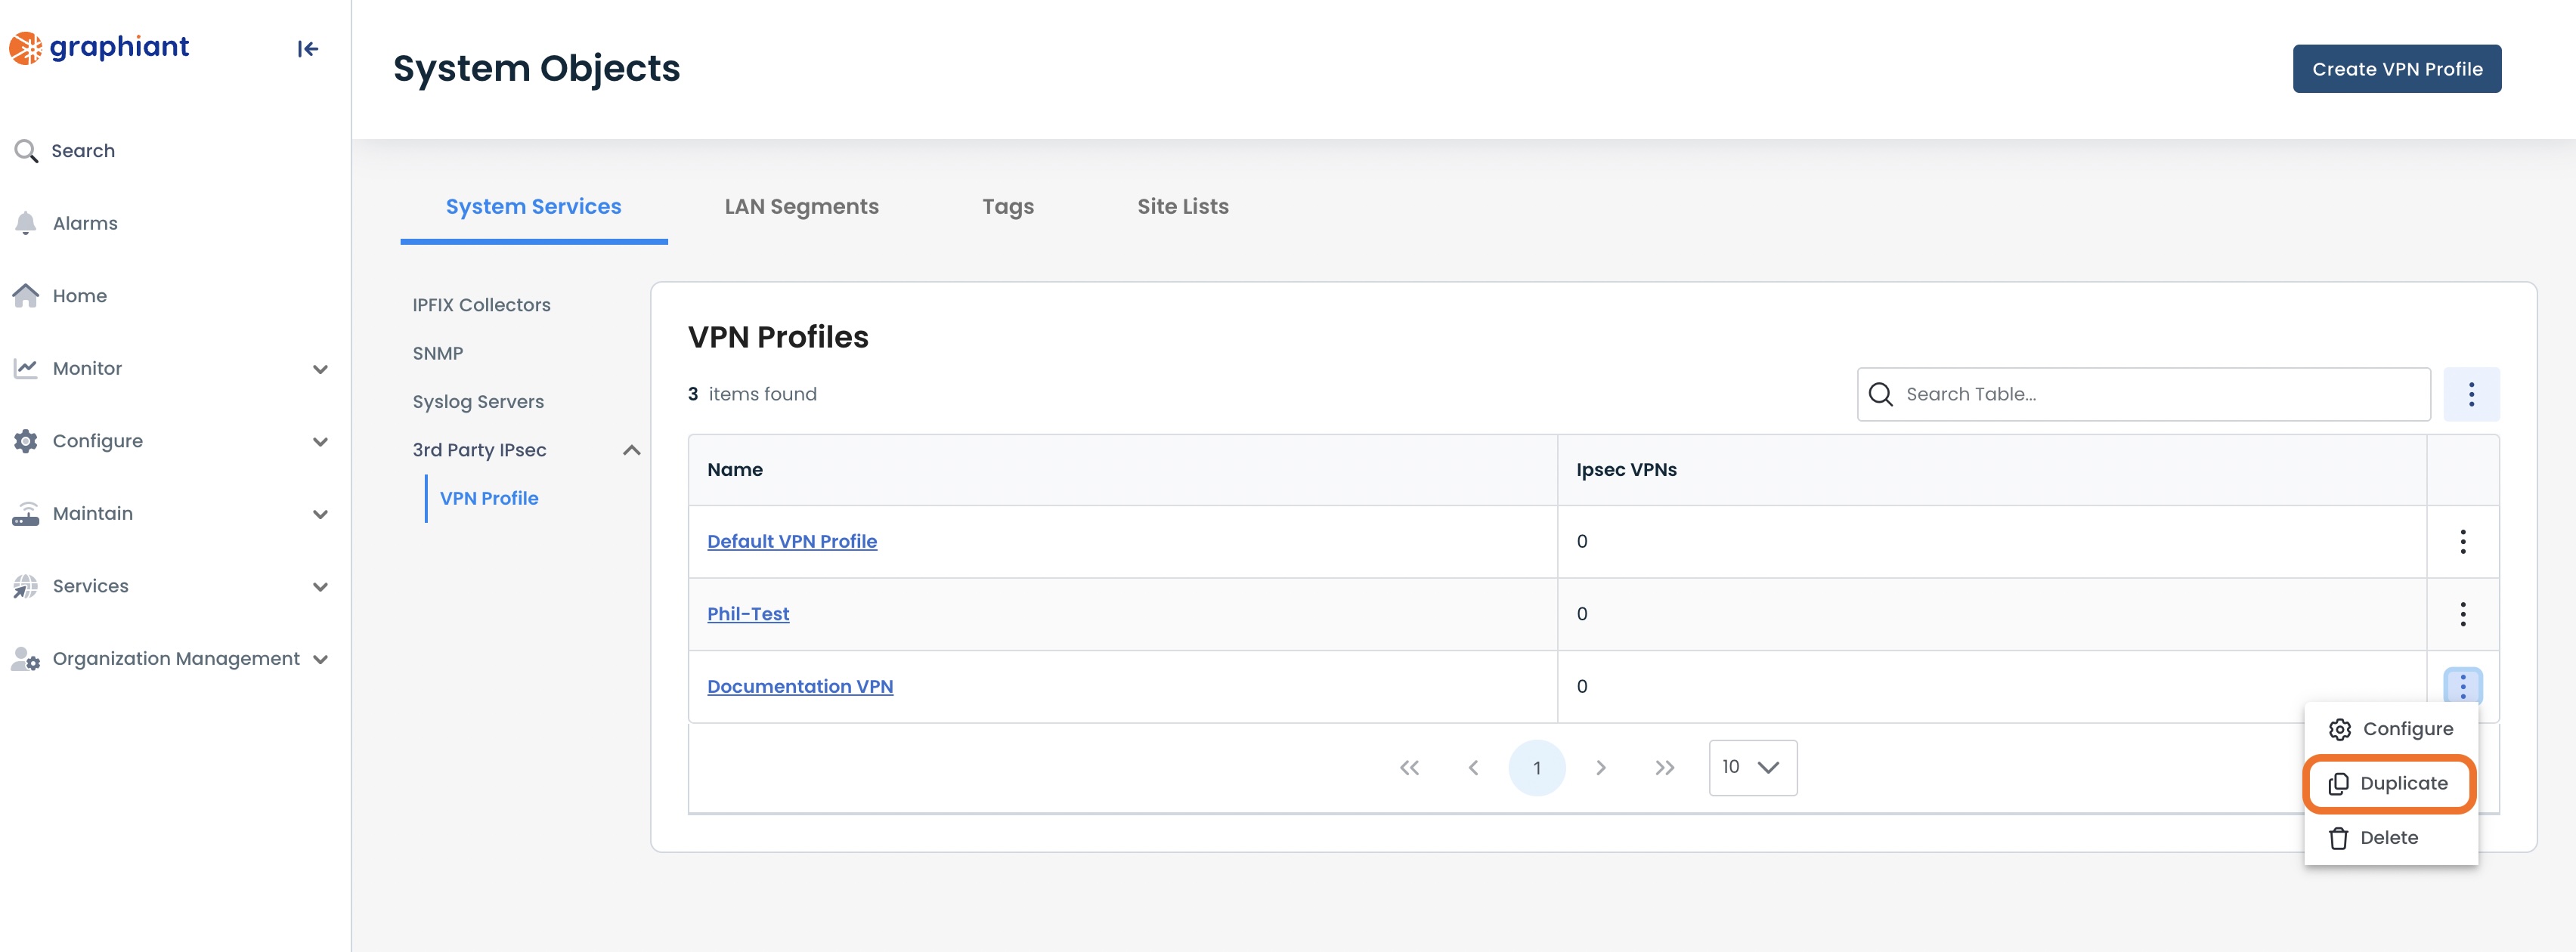
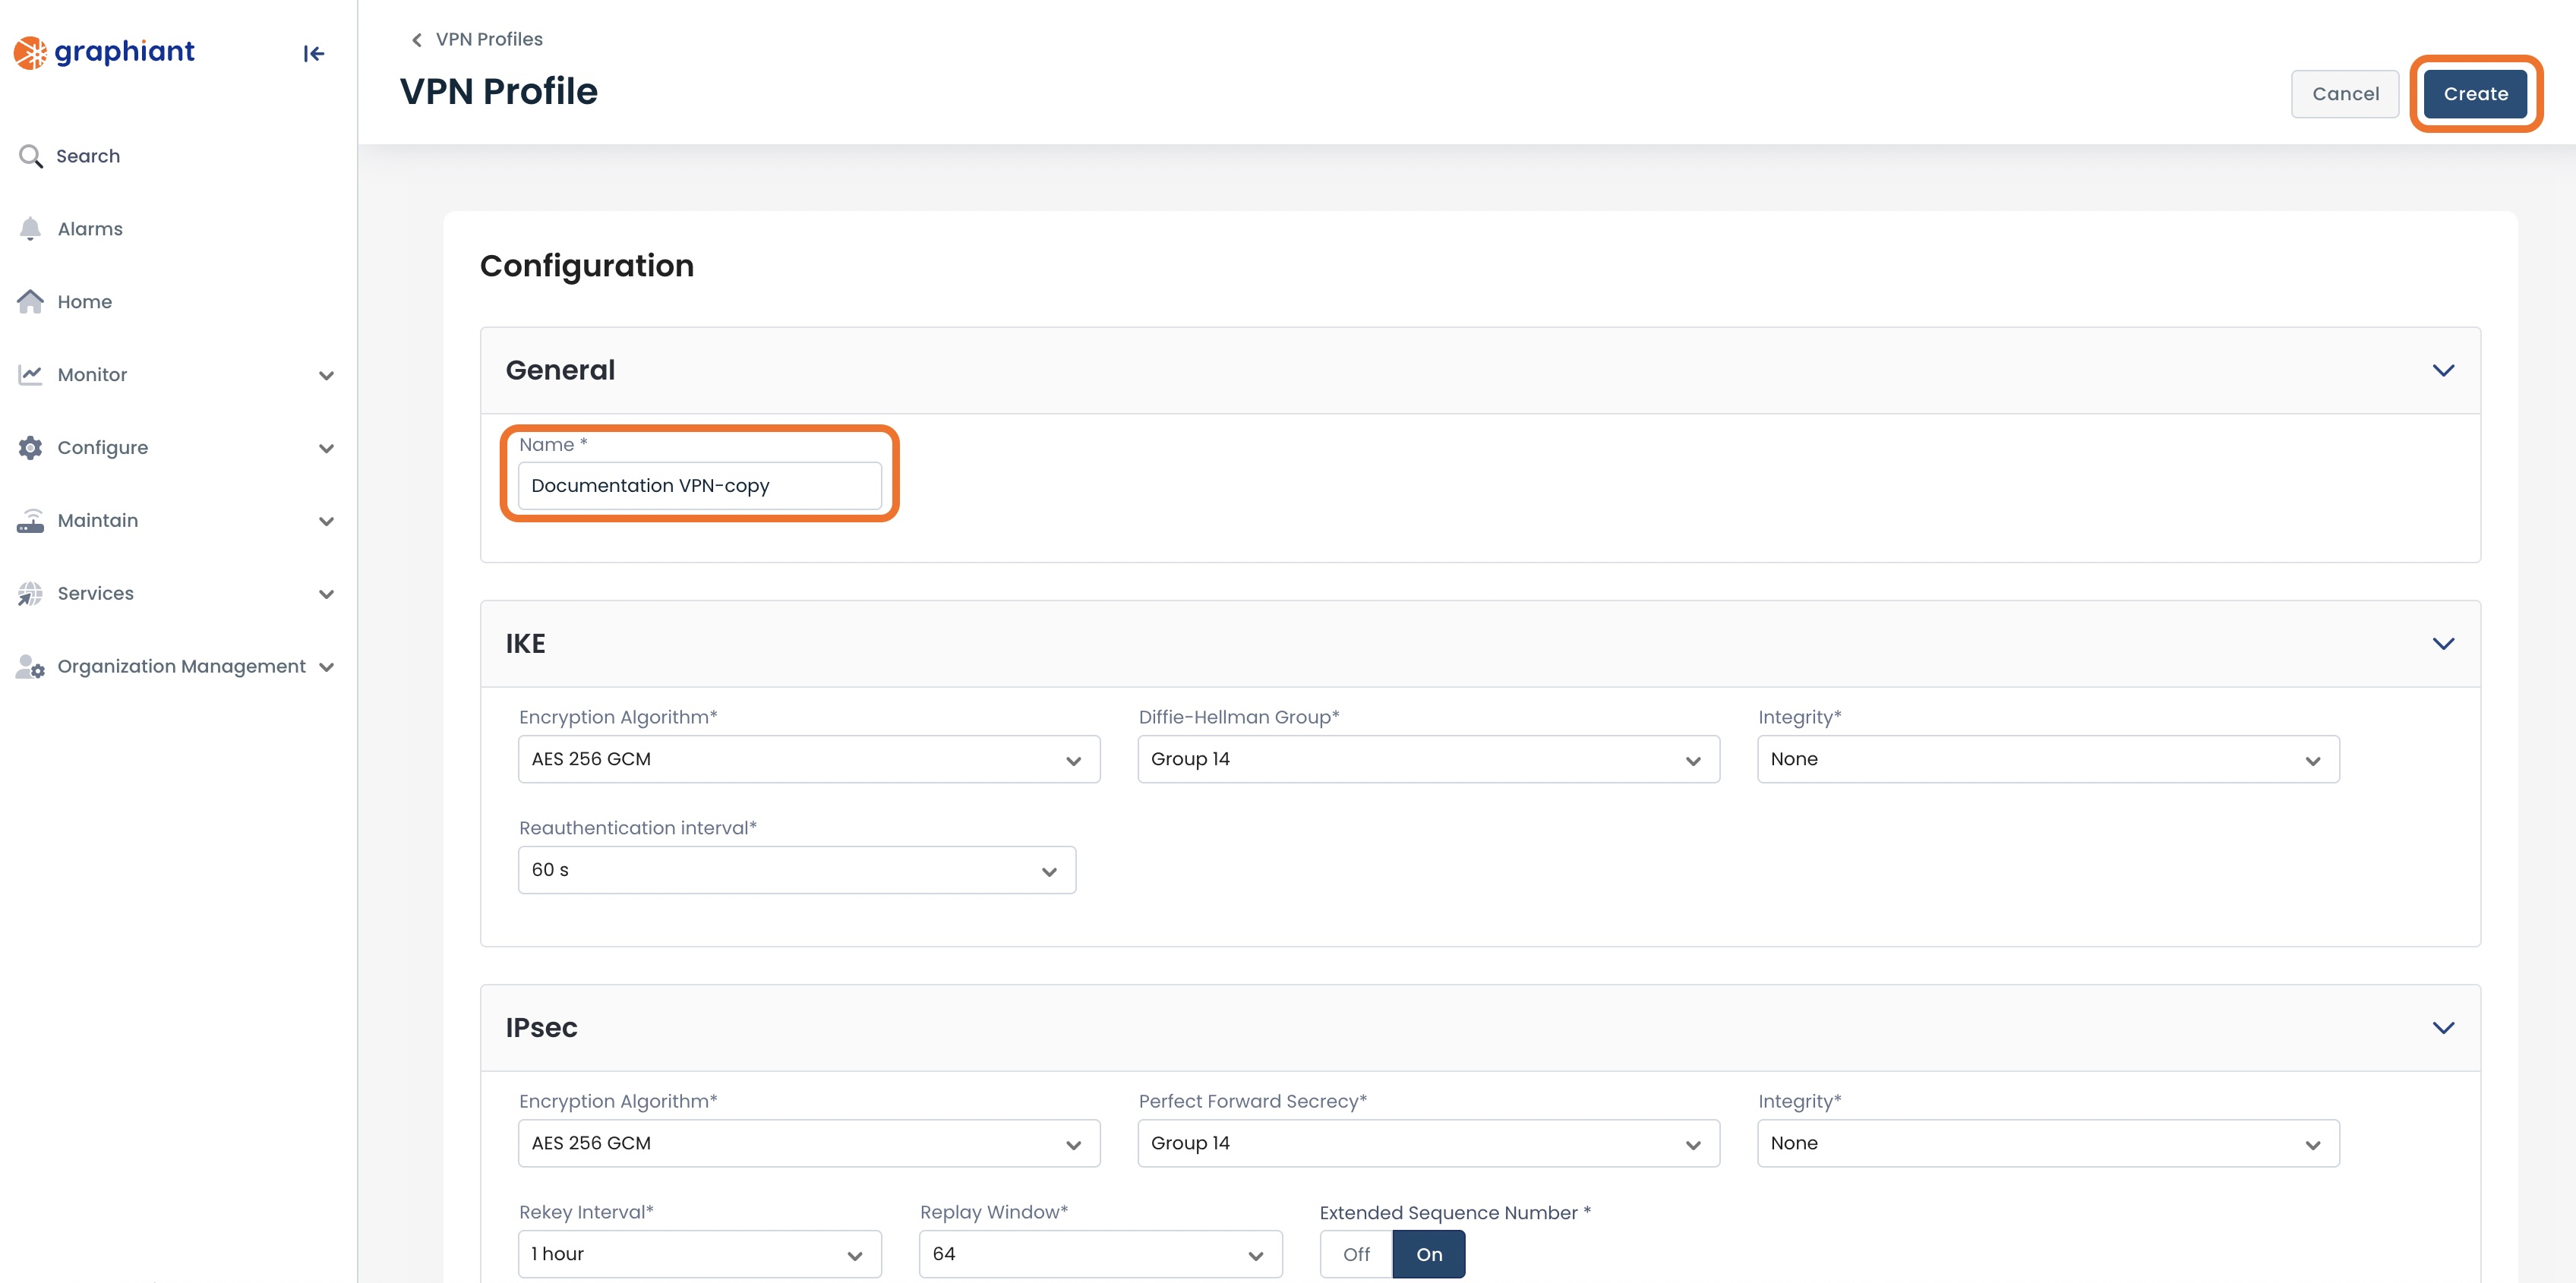
The new name will be automatically be labeled “[Original name]-copy”; enter a new name if desired.
Any field here can also be edited.
Once you have the profile the way you would like it, click ‘Create’.
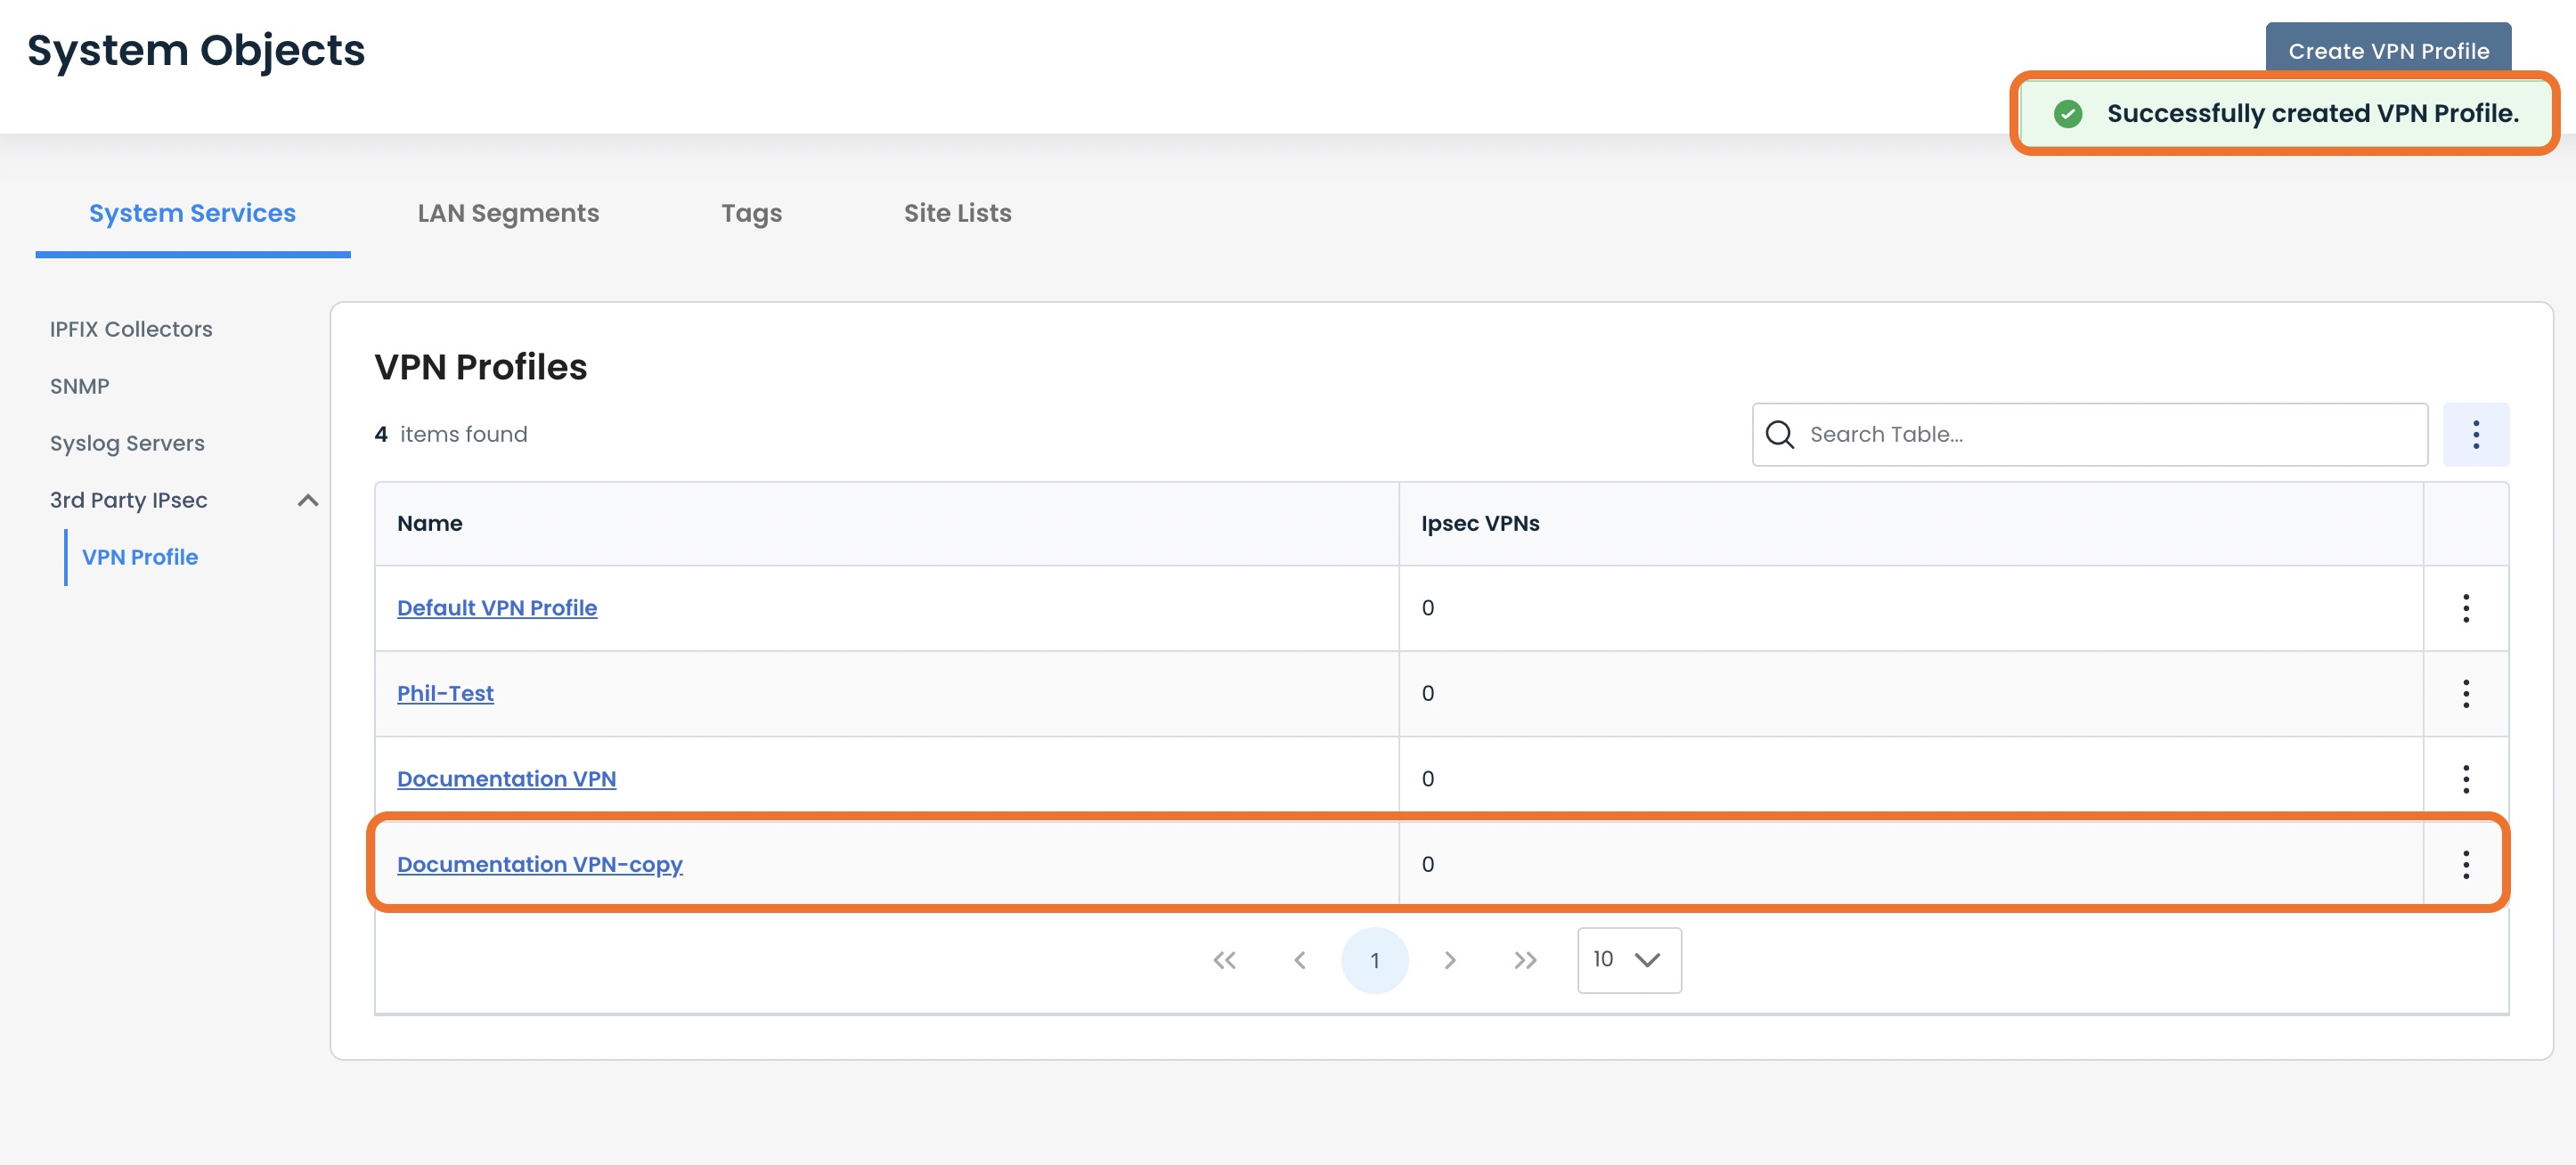
A green banner will appear stating that the duplicated VPN Profile has been successfully created, and the new profile will appear in the table.
Deleting a VPN Profile
To delete your VPM profile, from the VPN Profiles table, locate the VPN profile to be deleted.
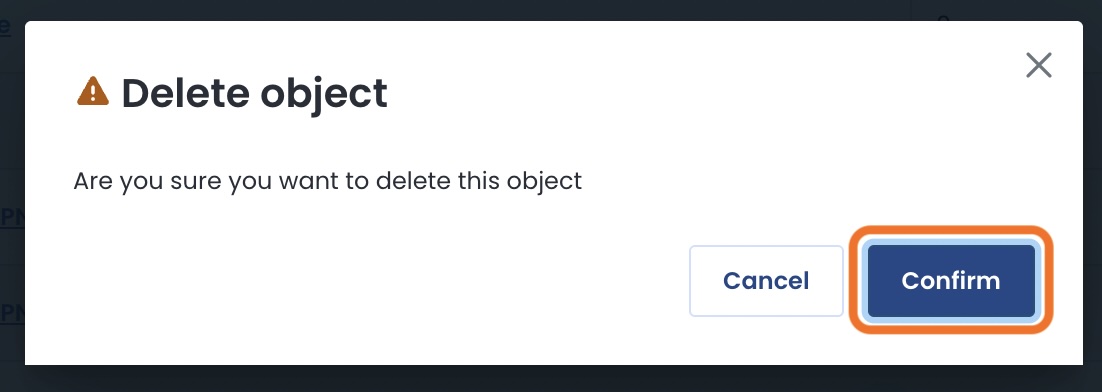
Click the ellipses; select ‘Delete’.
.jpg)
A modal will appear to confirm that you are sure you want to delete this system object VPN profile.
Click ‘Confirm’.
That VPN profile will be deleted and no longer appear in the table.
Step 2: Configure Site-to-Site VPN
There are two methods of configuring Site-to-Site VPN:
Via the Graphiant Gateway service
For a VPN tunnel between a 3rd party router/firewall and the Gateway to the Graphiant Core
Locally on your Graphiant Edge
For a VPN tunnel between a 3rd party router/firewall and your Graphiant Edge
Configuring Site-to-Site VPN via the Graphiant Gateway Service
This will create a VPN between a 3rd party router or firewall and the Gateway to the Graphiant Core.
Locating Gateway Service in the Graphiant Portal
From the Home screen, navigate to the “Create Gateway Services” screen by one of the following options:
**Option A: Reaching the Gateway Service via Quickstart
Locate the "Quickstart" section on the left of the screen; select 'Setup Gateway Service'.
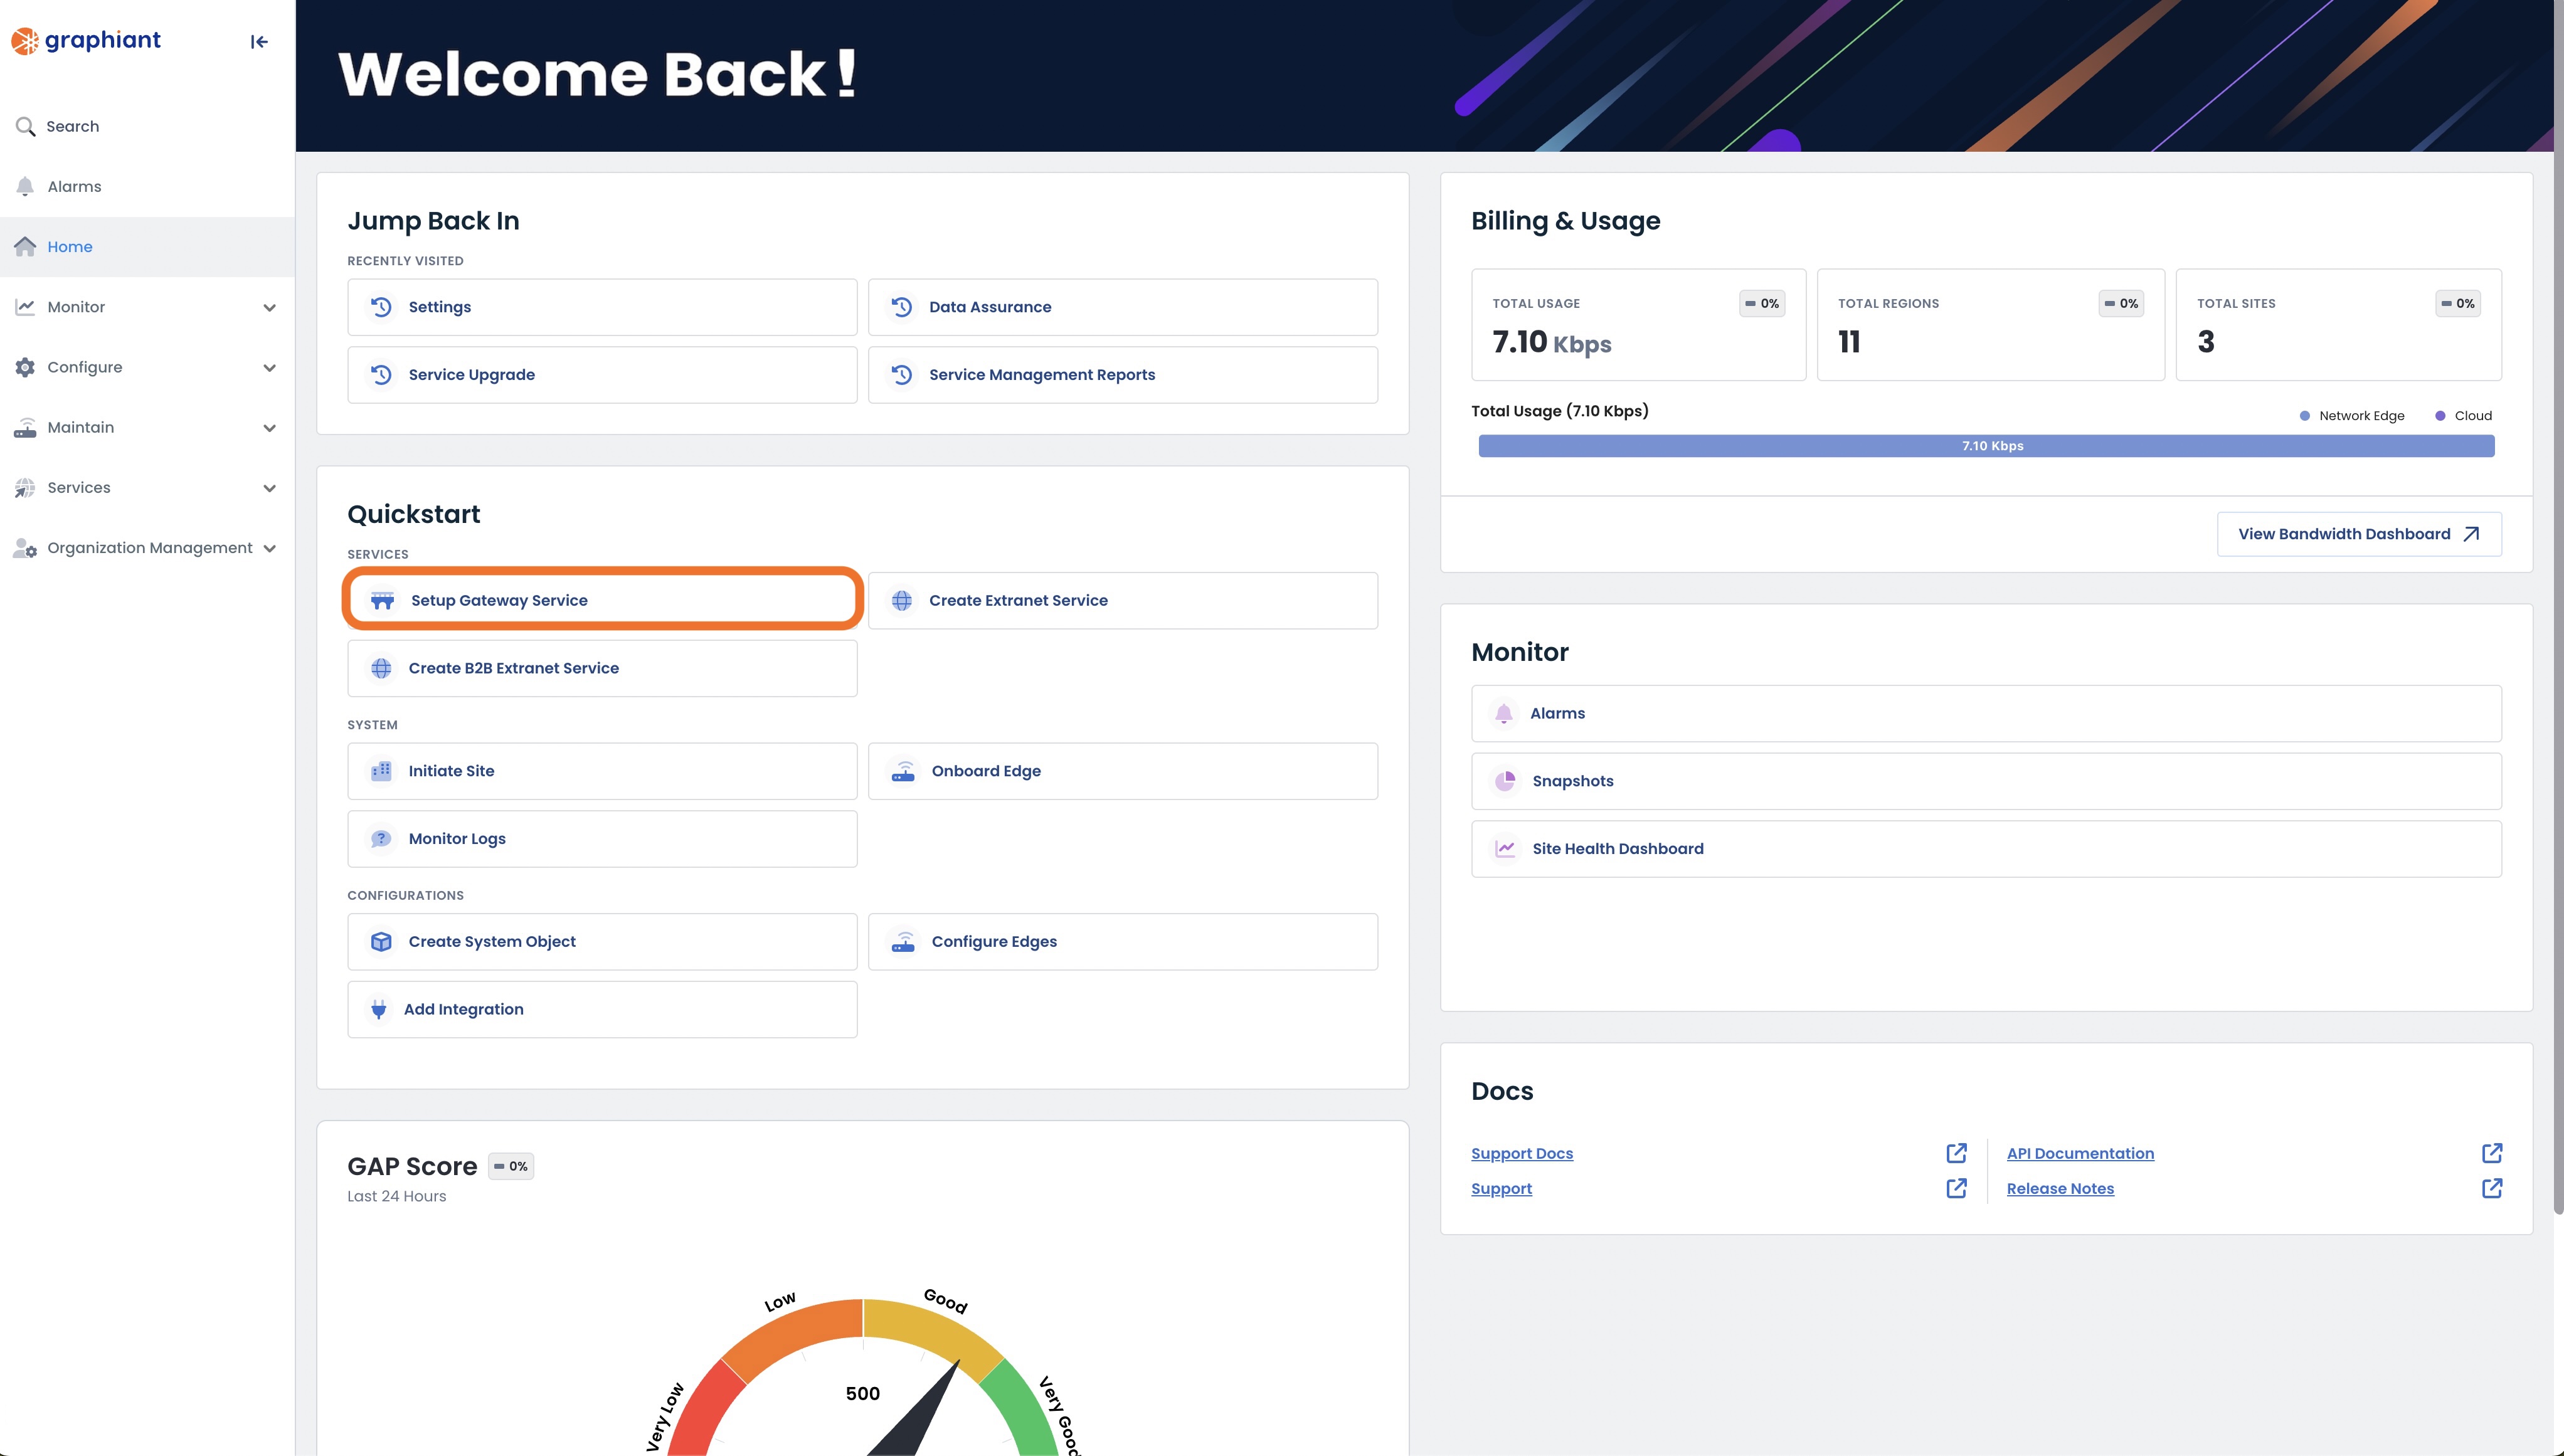
This will take you to the Gateway Services page of the Graphiant Portal.
Follow the instructions here to configure your Site-to-Site VPN.
**Option B: Reaching the Gateway Service via the Sidebar Menu
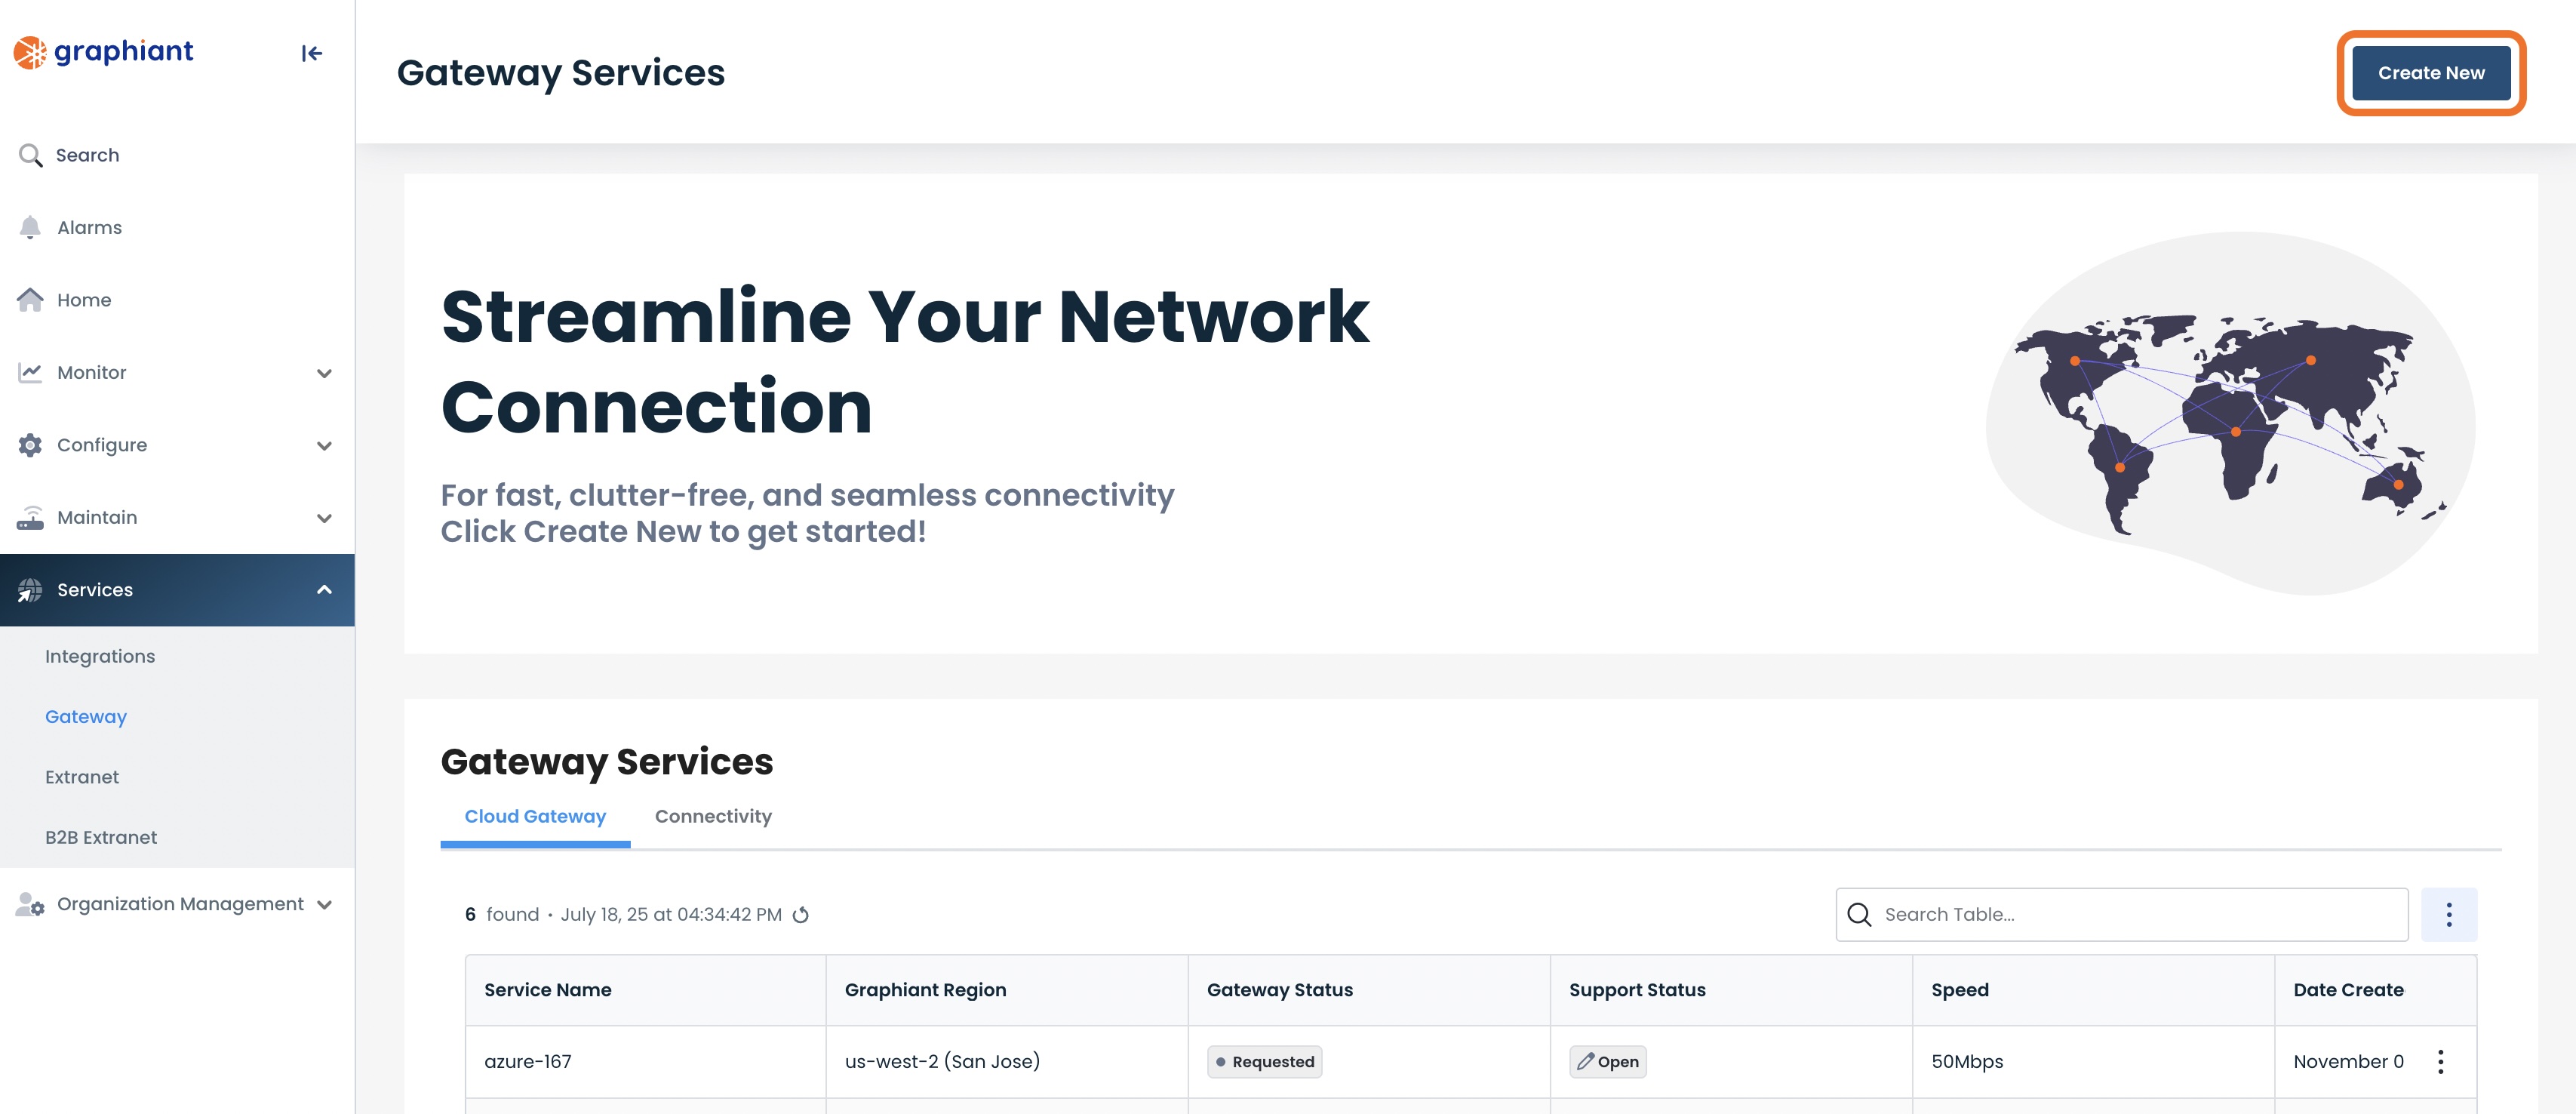
Click 'Services' in the sidebar; select 'Gateway’.
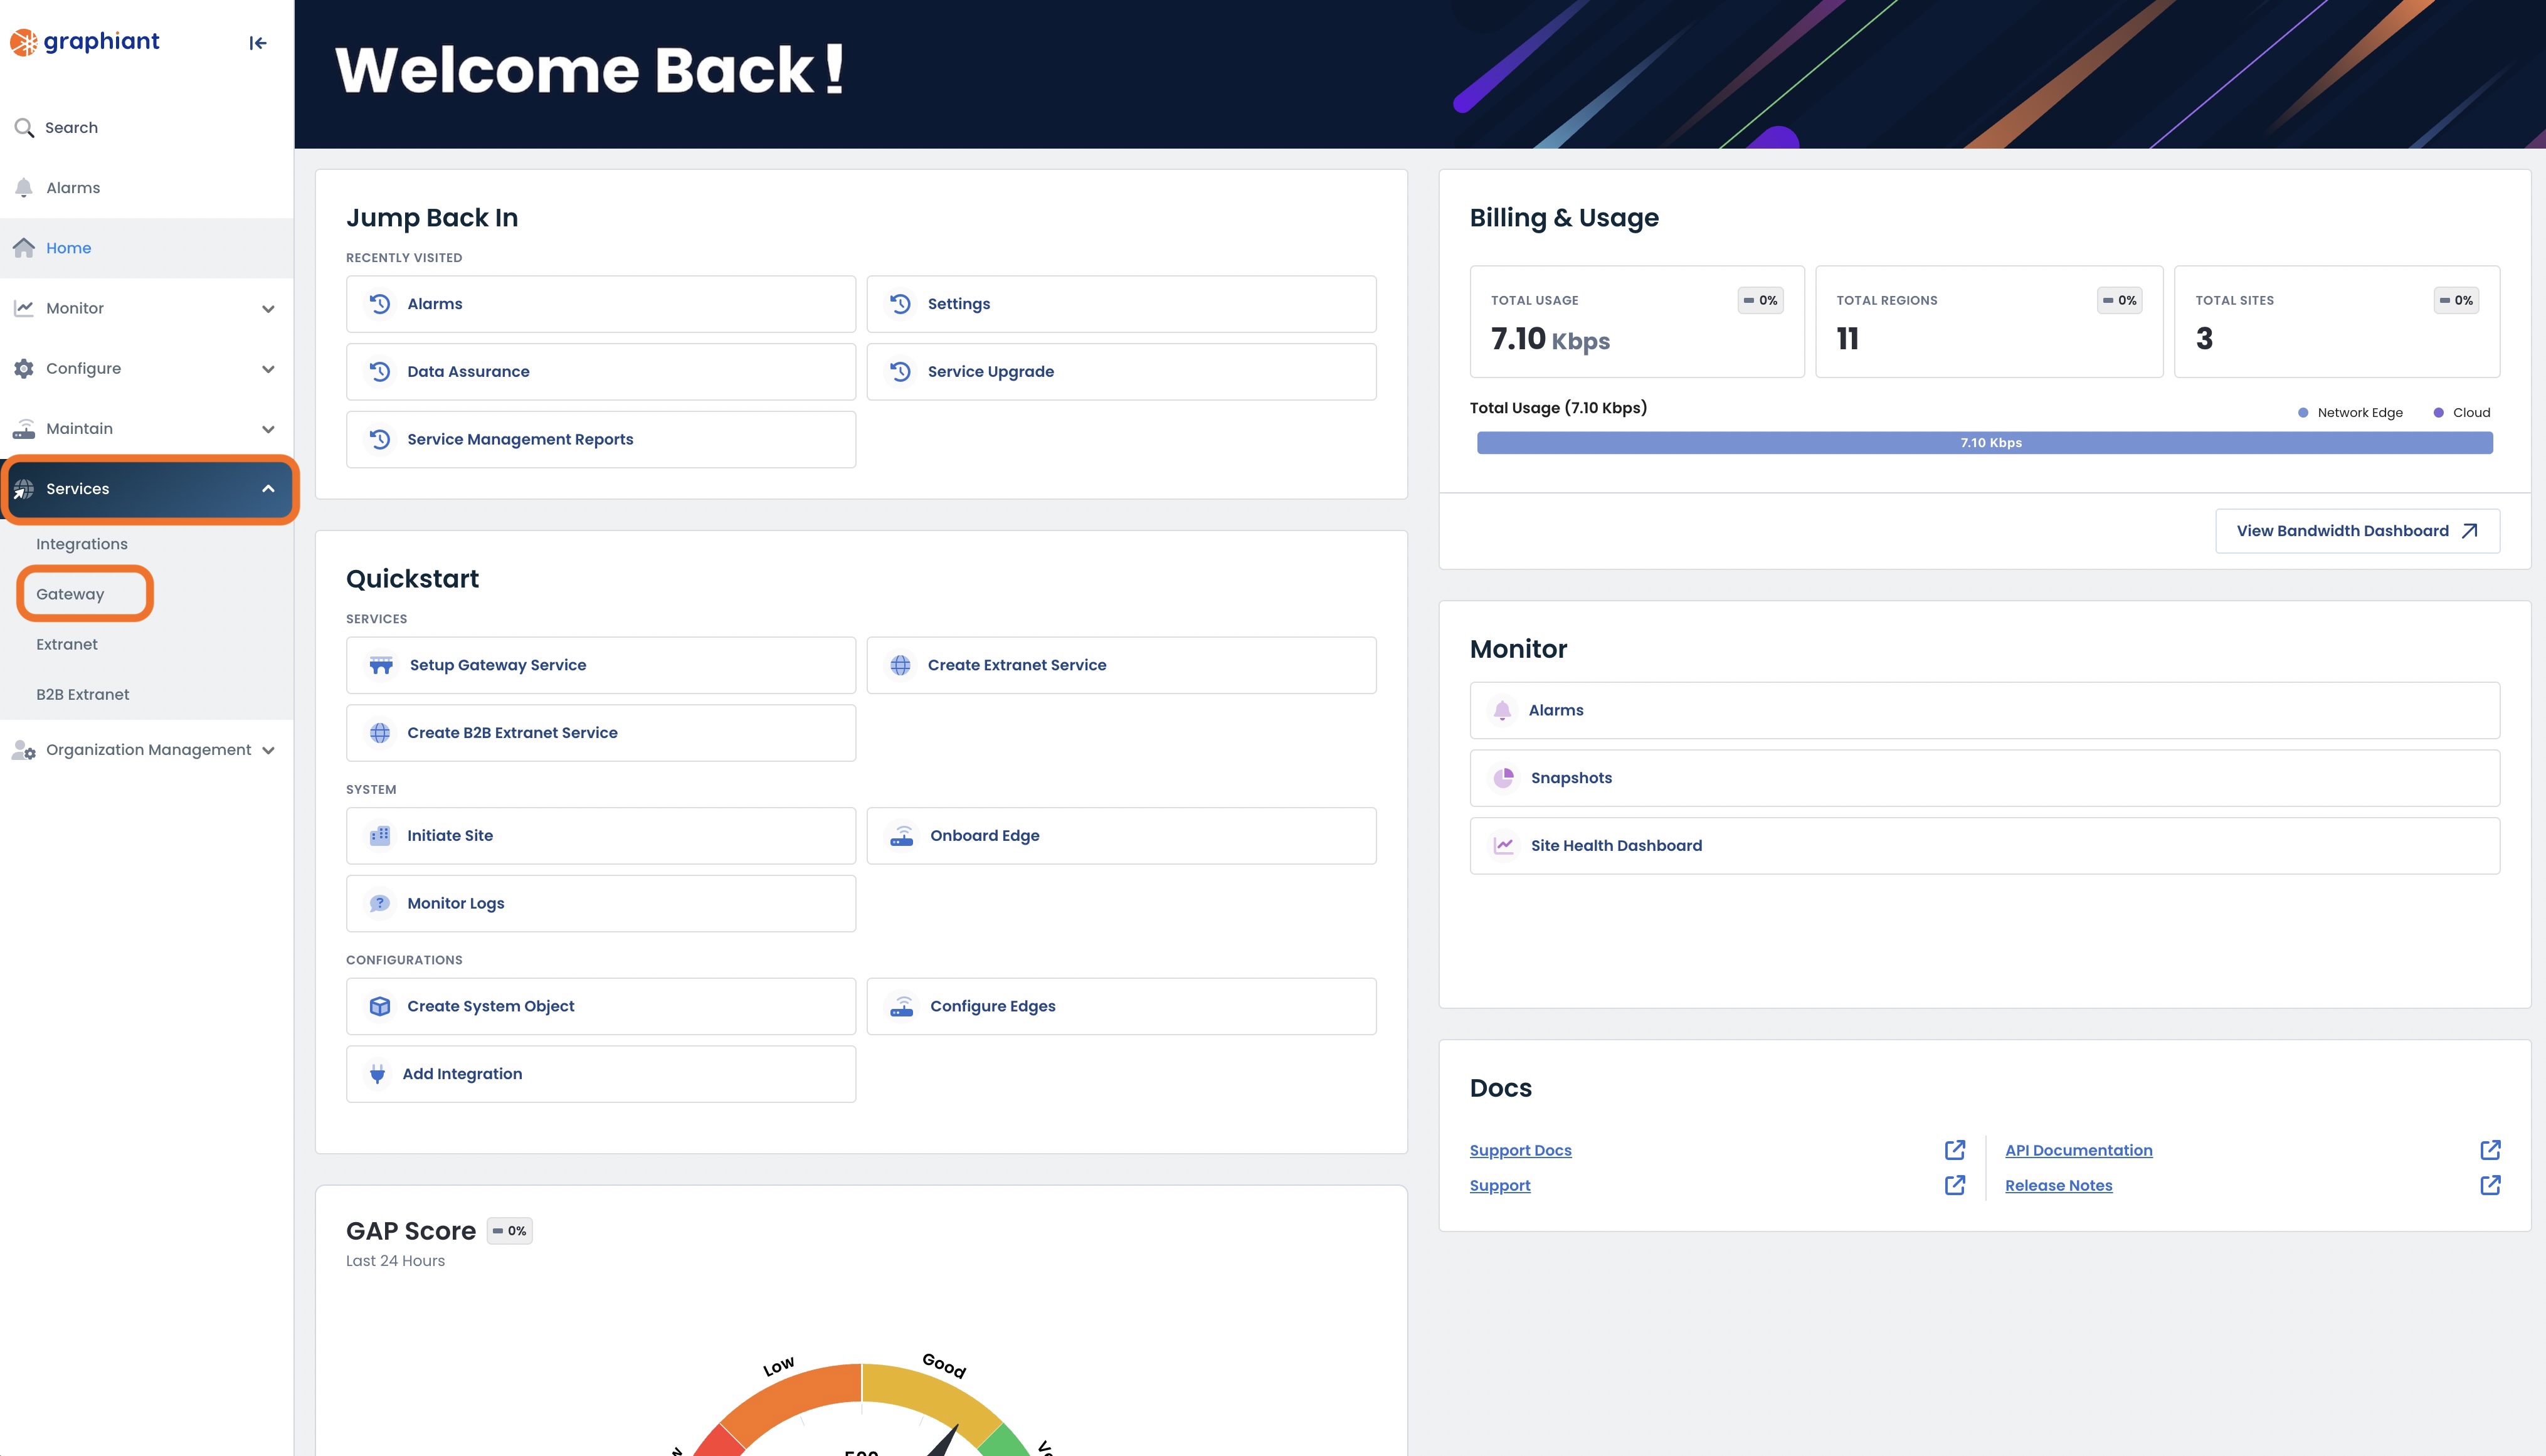
This will take you to the Gateway Services page of the Graphiant Portal where you will be able to view existing Gateway services as well as provision new ones.
.png)
To configure the Site-to-Site VPN, click the 'Create New' button.
Note:
To view an existing gateway service, simply click on the ellipses to the right of that service in the table.
This will take you to the Gateway Services page of the Graphiant Portal.
Follow these instructions to configure your Site-to-Site VPN.
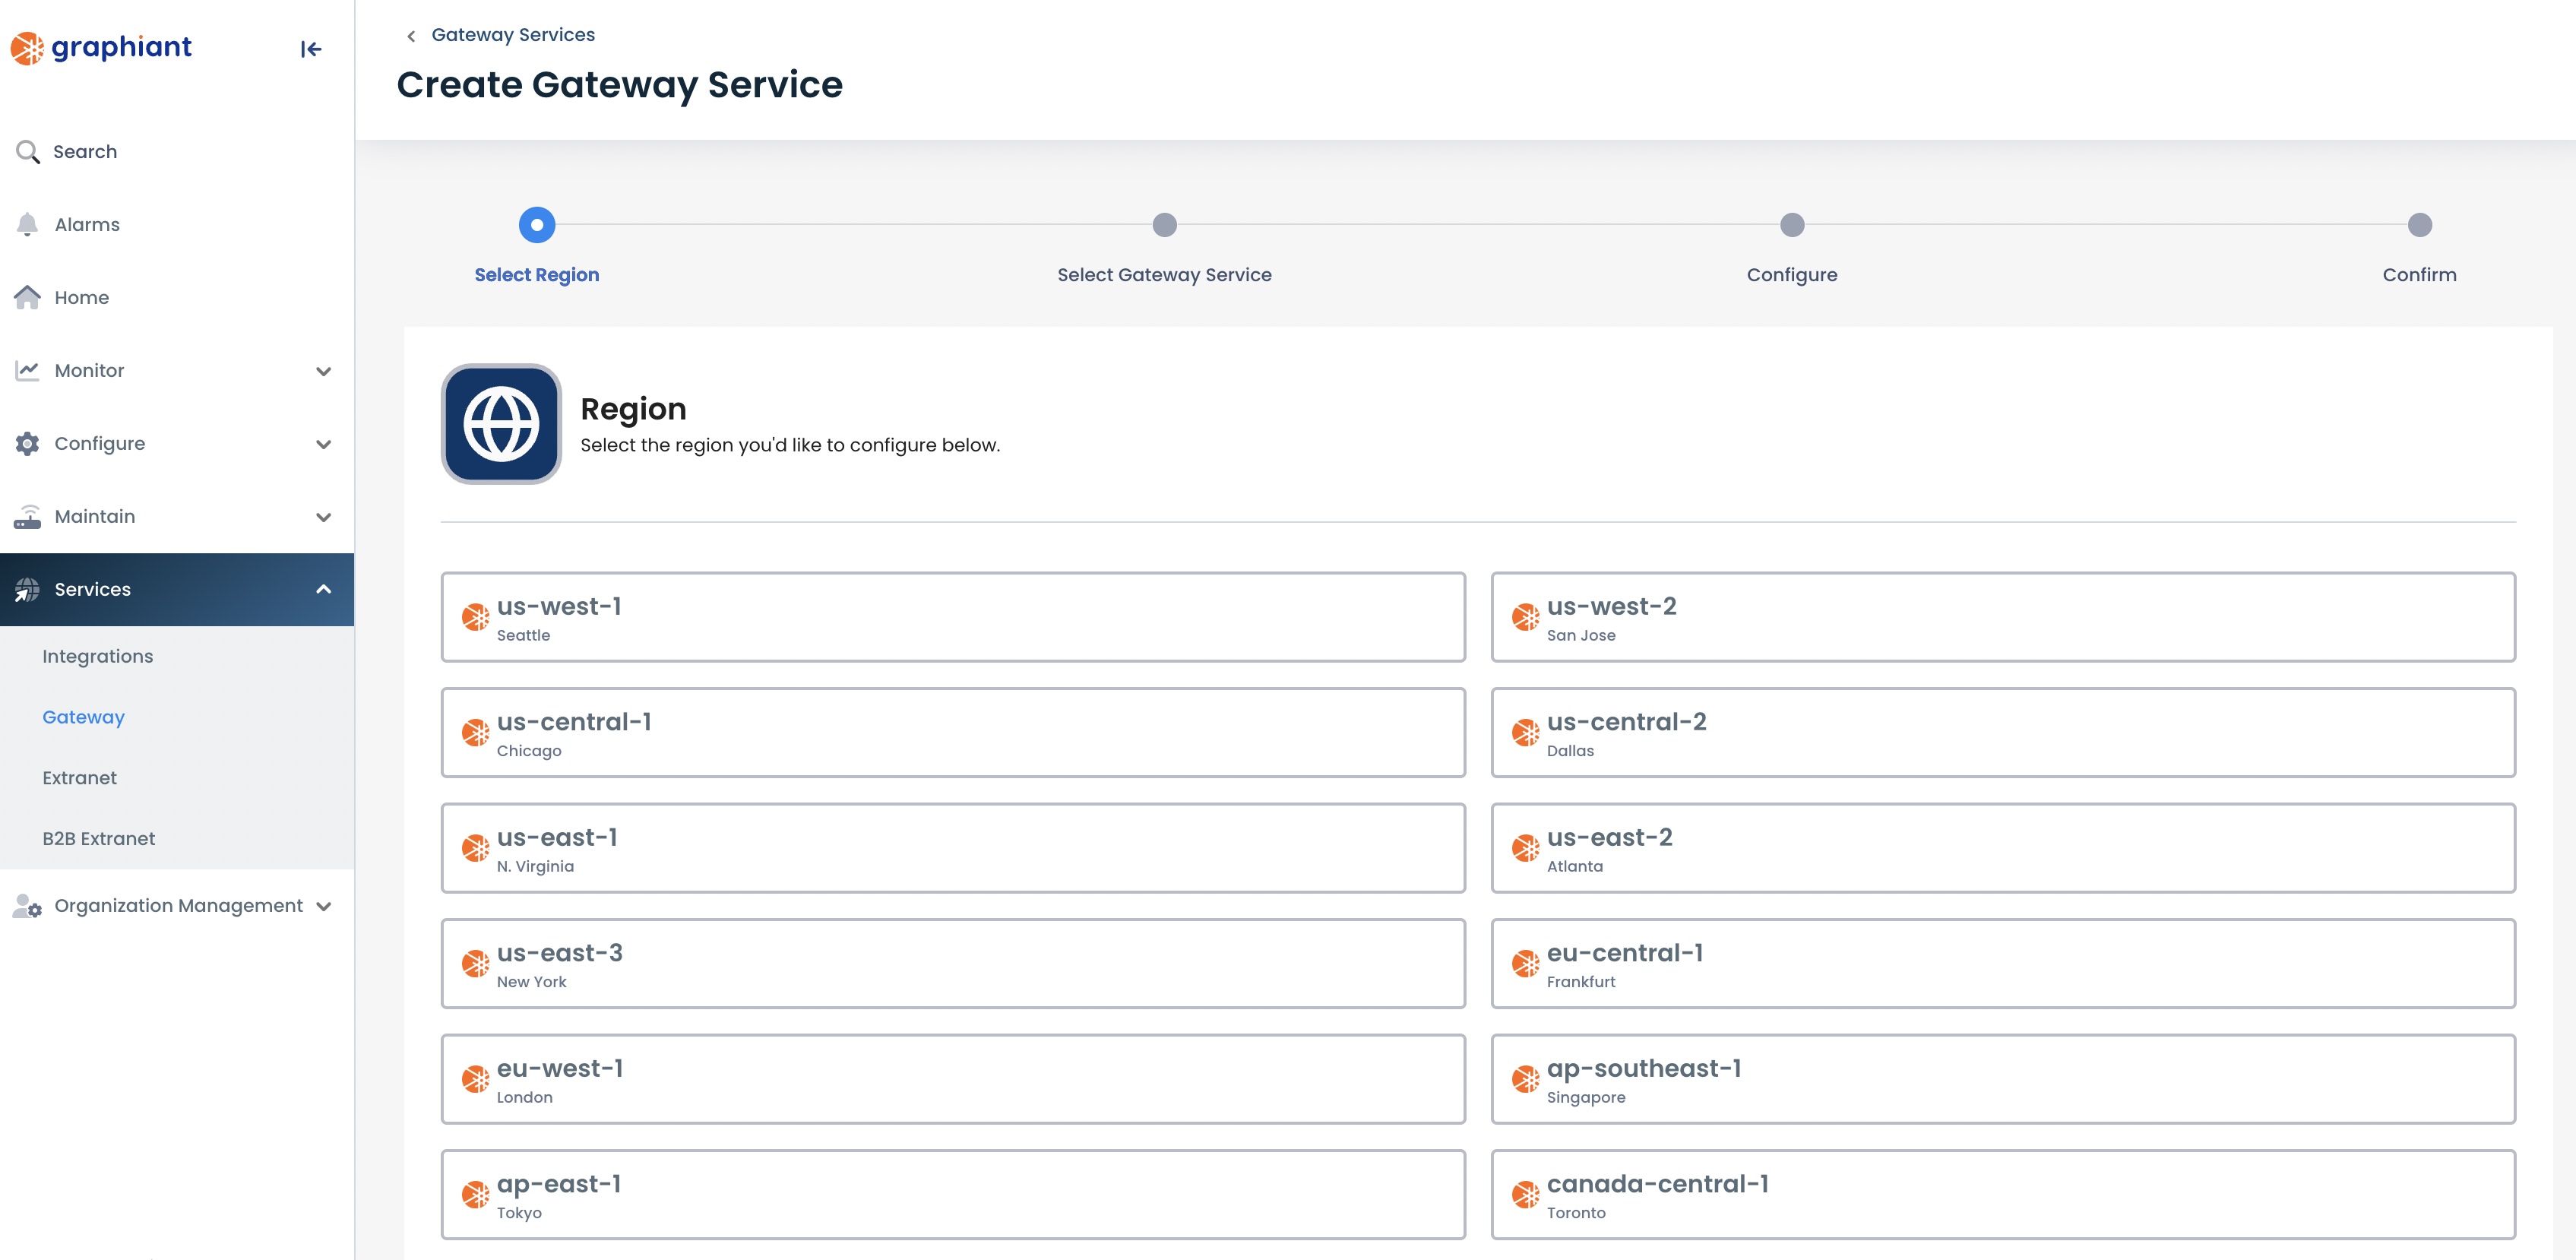
Provisioning the Site-to-Site VPN
Select the Graphiant region that is closest to the VPN’s origination location.
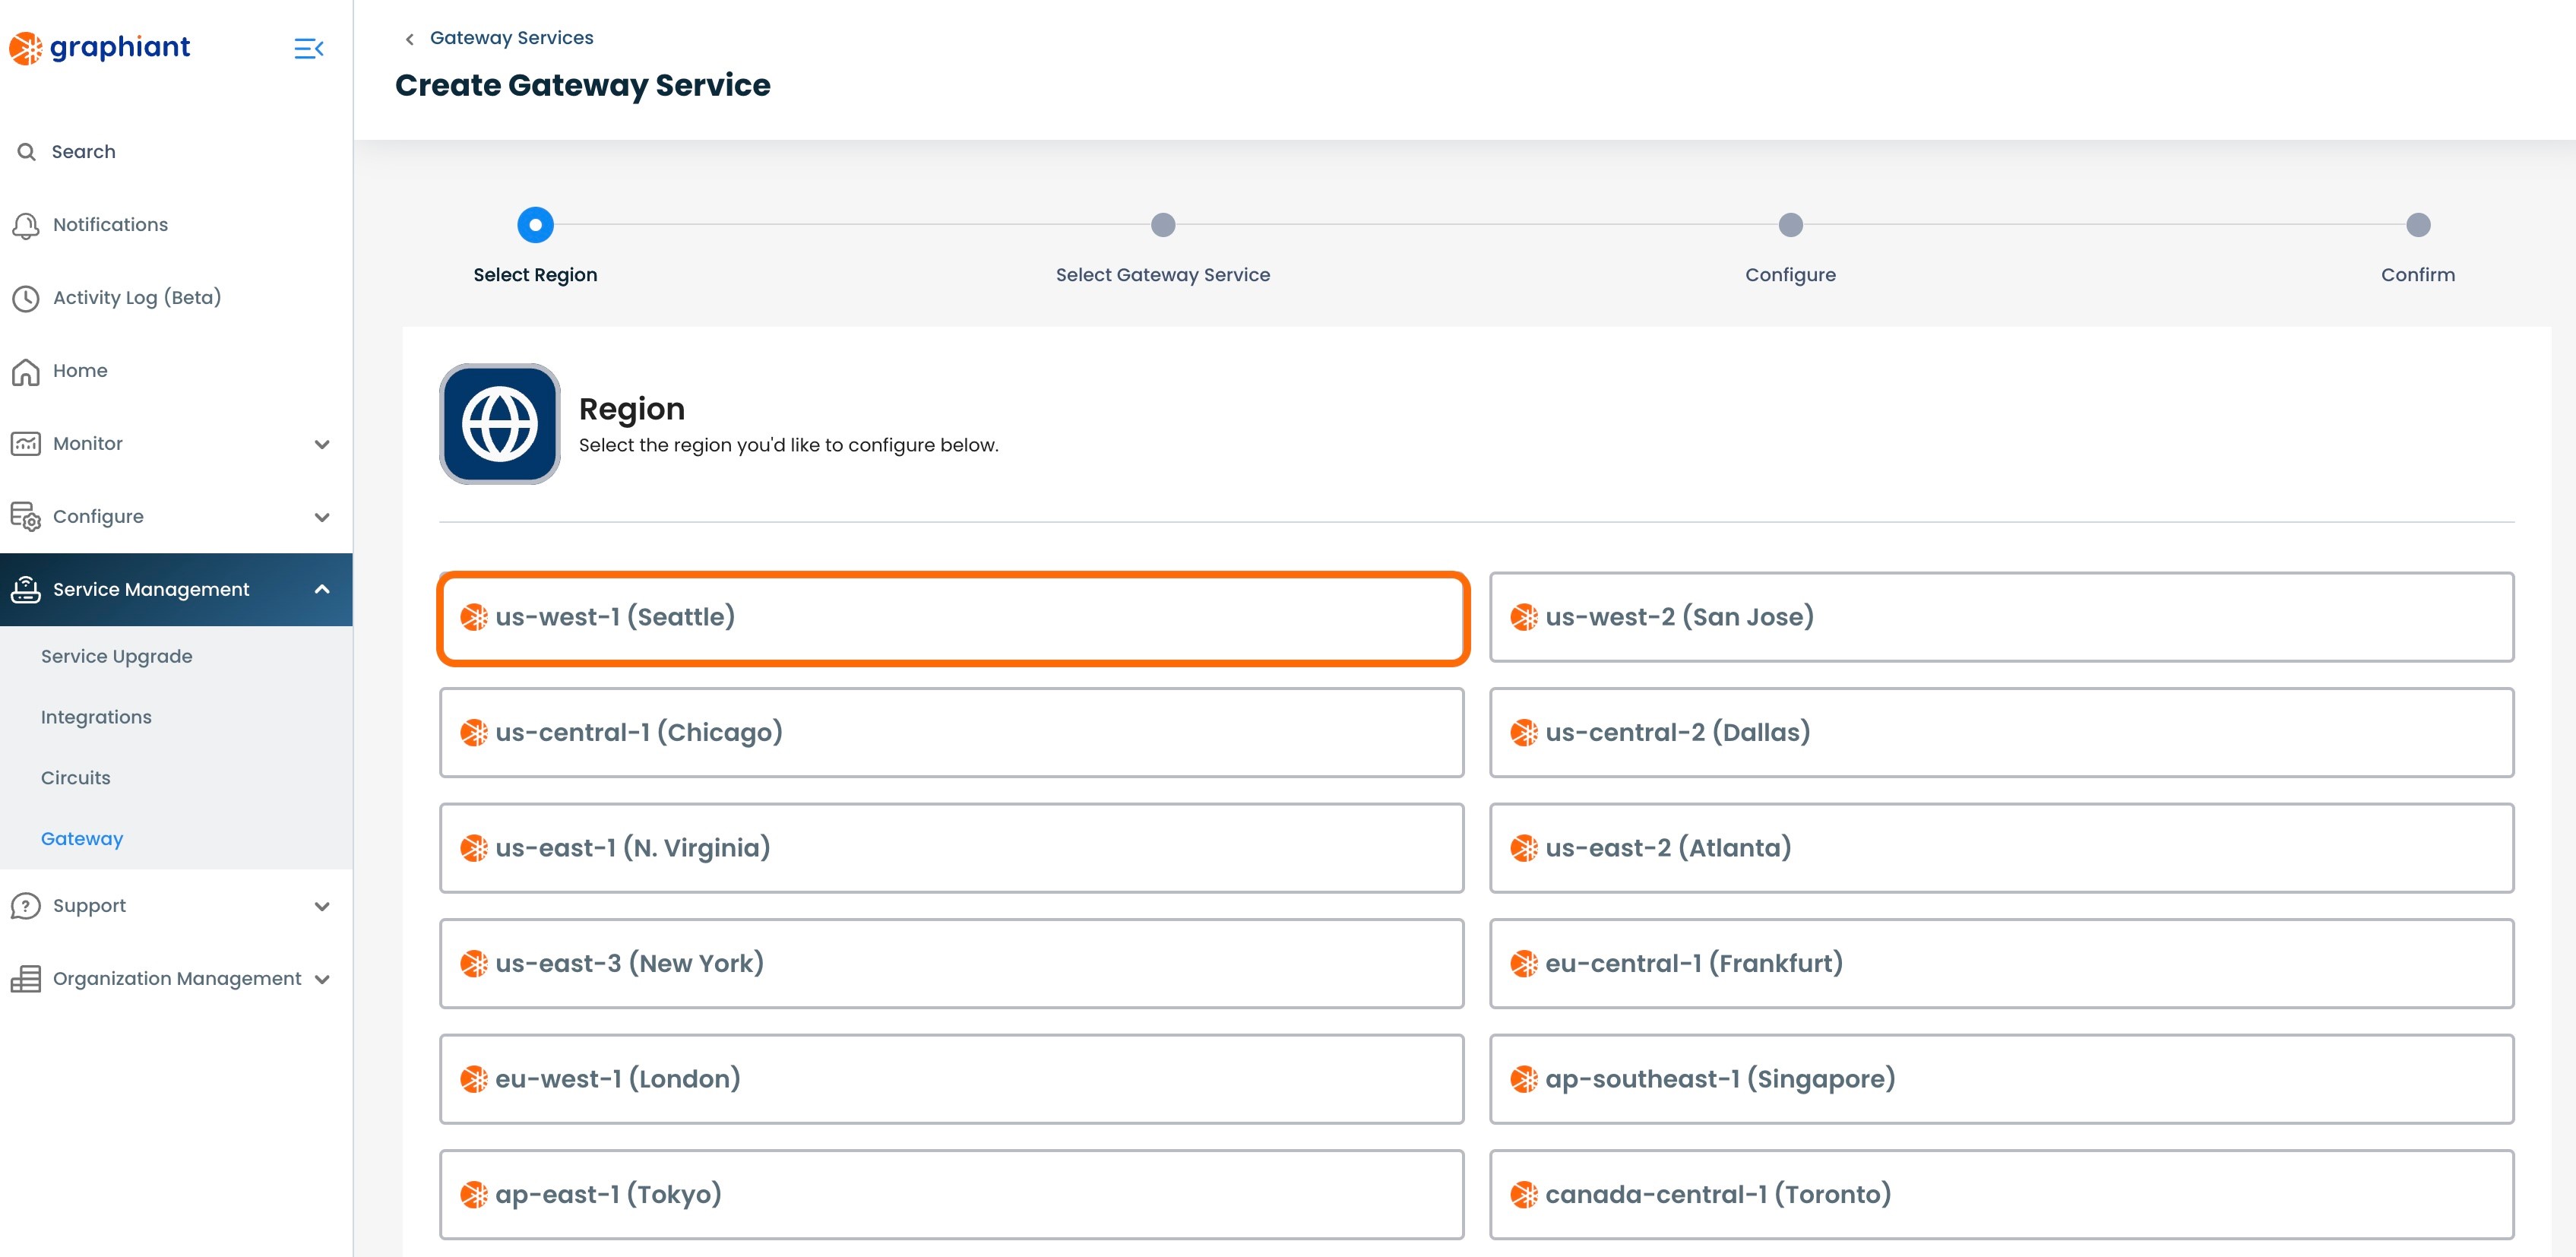
This opens the Gateway Service screen.
Under “Connectivity”, click ‘Site to Site VPN”.
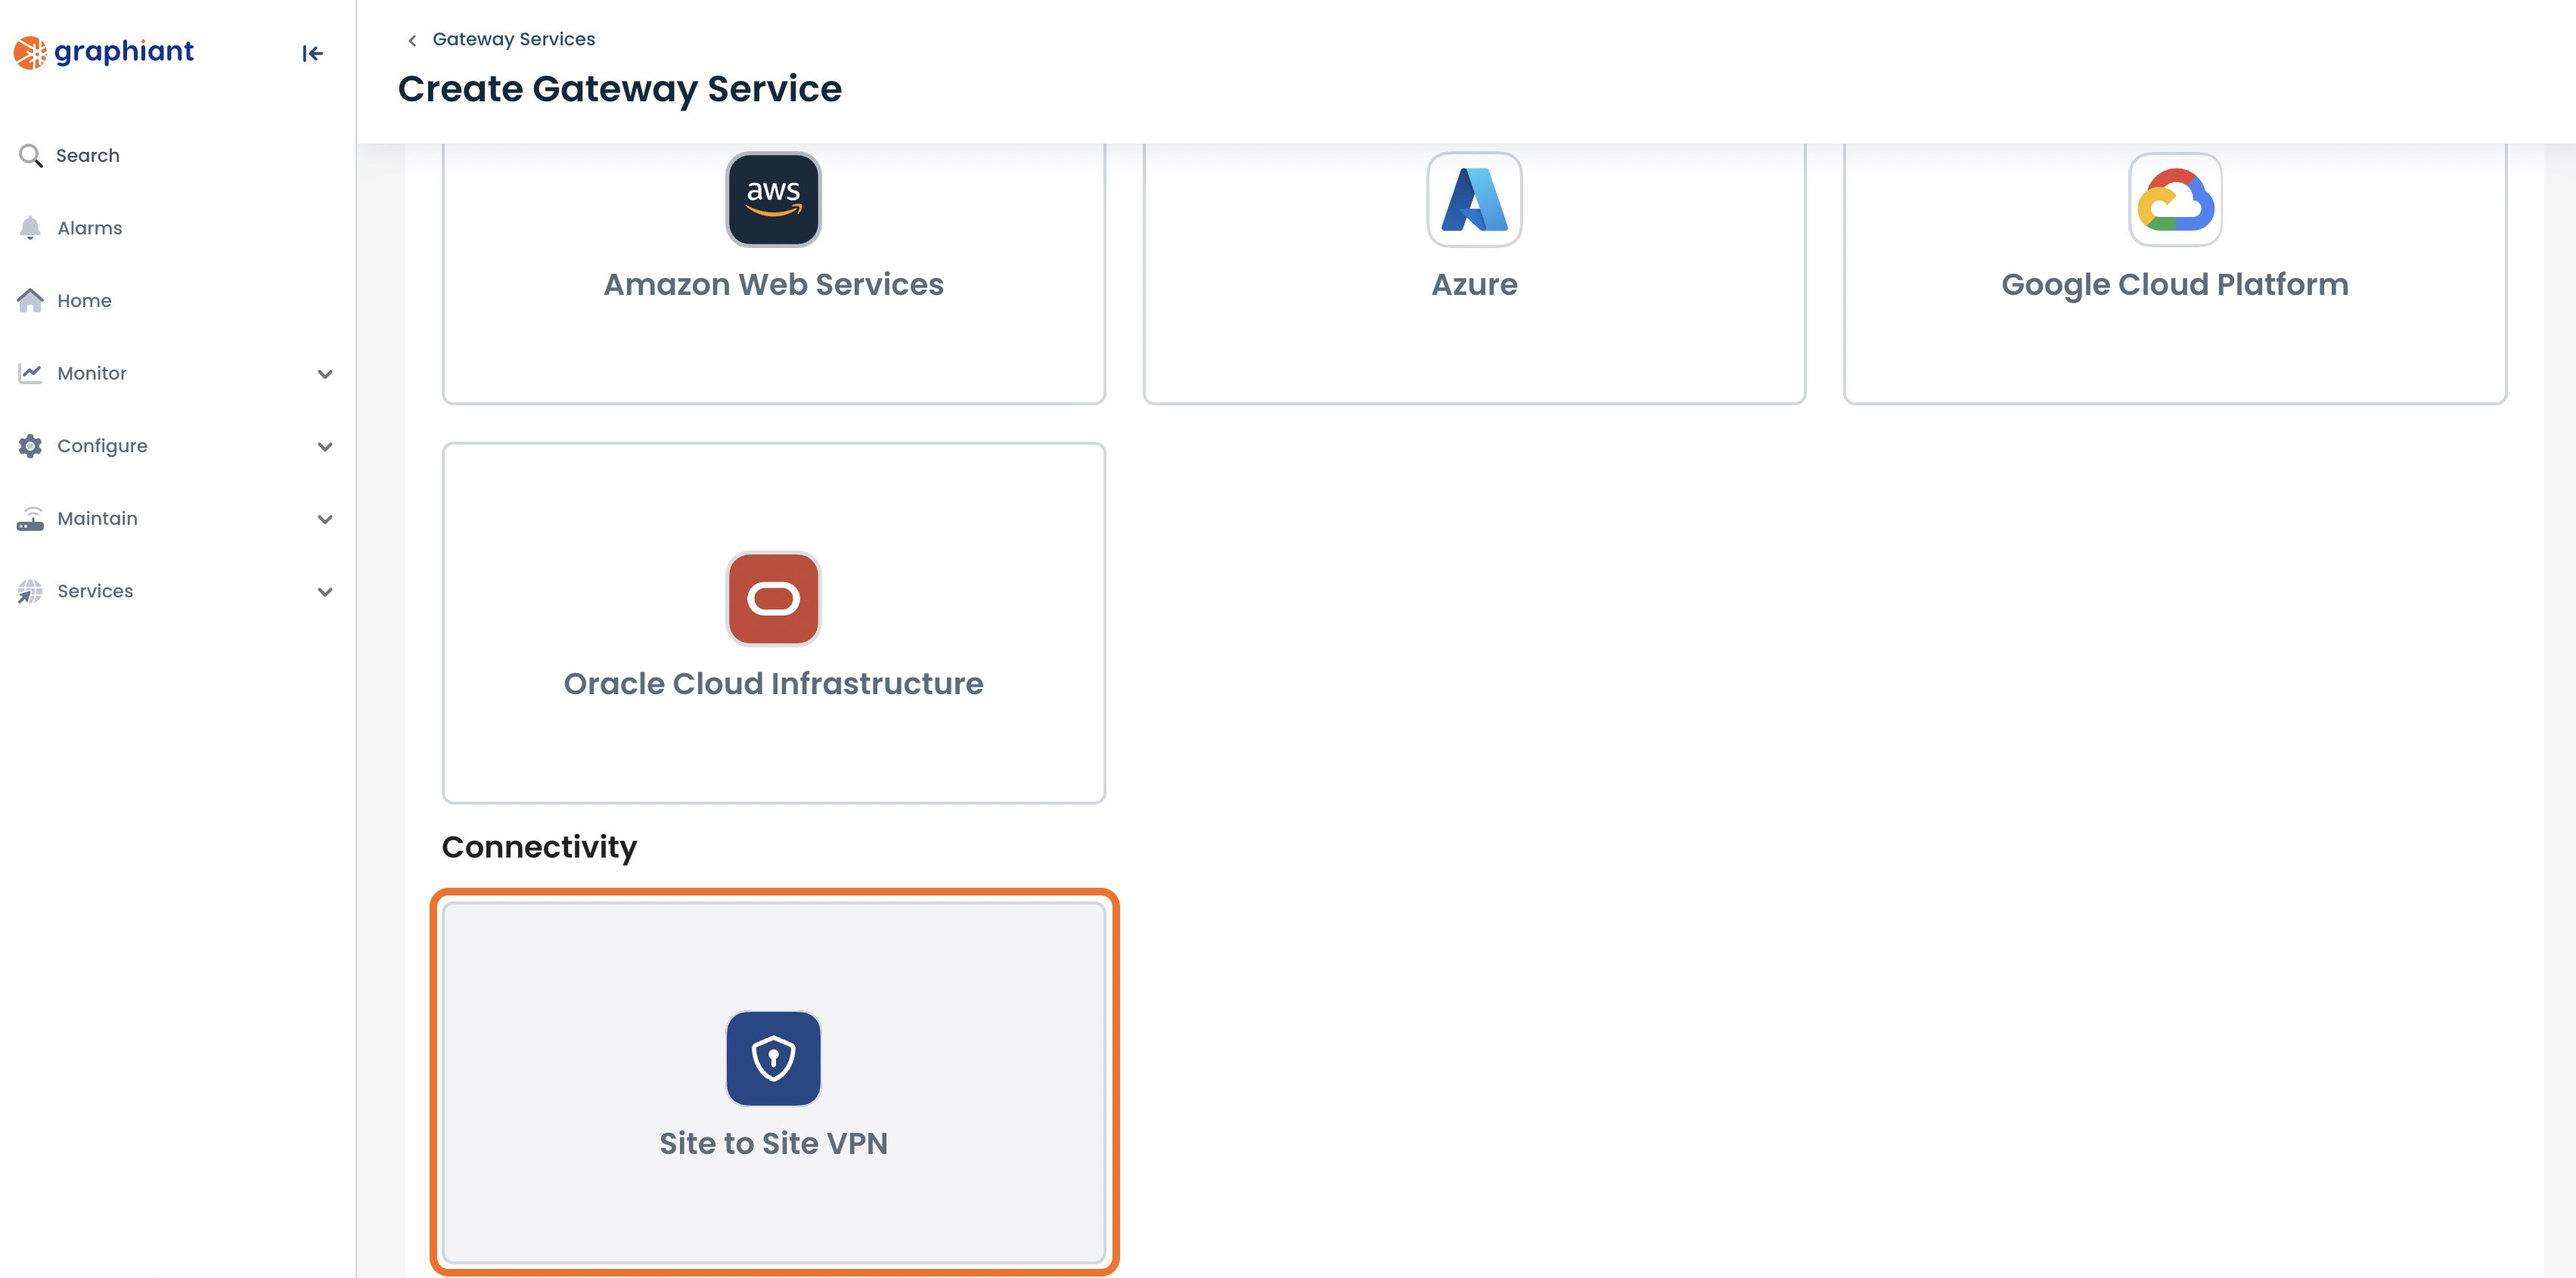
This opens the configuration page for the Site-to-Site VPN.
There are 3 categories to configure:

General:
Fill out these required fields:
Name: The name for this particular VPN
LAN Segment: The Graphiant LAN Segment that your 3rd party device will connect to
Primary Destination IP Address: Public IP address of the 3rd party device with which you will connect to the Graphiant core
Ensure that:
Your destination IP address are unique for every site-to-site VPN.
.jpg)
Routing:
In the routing section, you have a choice of Static or BGP routes.
Note:
This section is completely optional if you are using a Static route without a return route to your Graphiant LAN network. Should you need a return route or wish to choose BGP routes, expand the section and complete as desired.
Static Routes
The default Routing Type is “Static”.
For Static routes:
Although it’s not required to include a return route to your Graphiant LAN network, if you need such a route, be sure to include one under ‘Subnet’.
Subnet: Enter the remote subnet(s) that your devices on the prior selected Graphiant LAN Segment will need to reach via the VPN
.jpg)
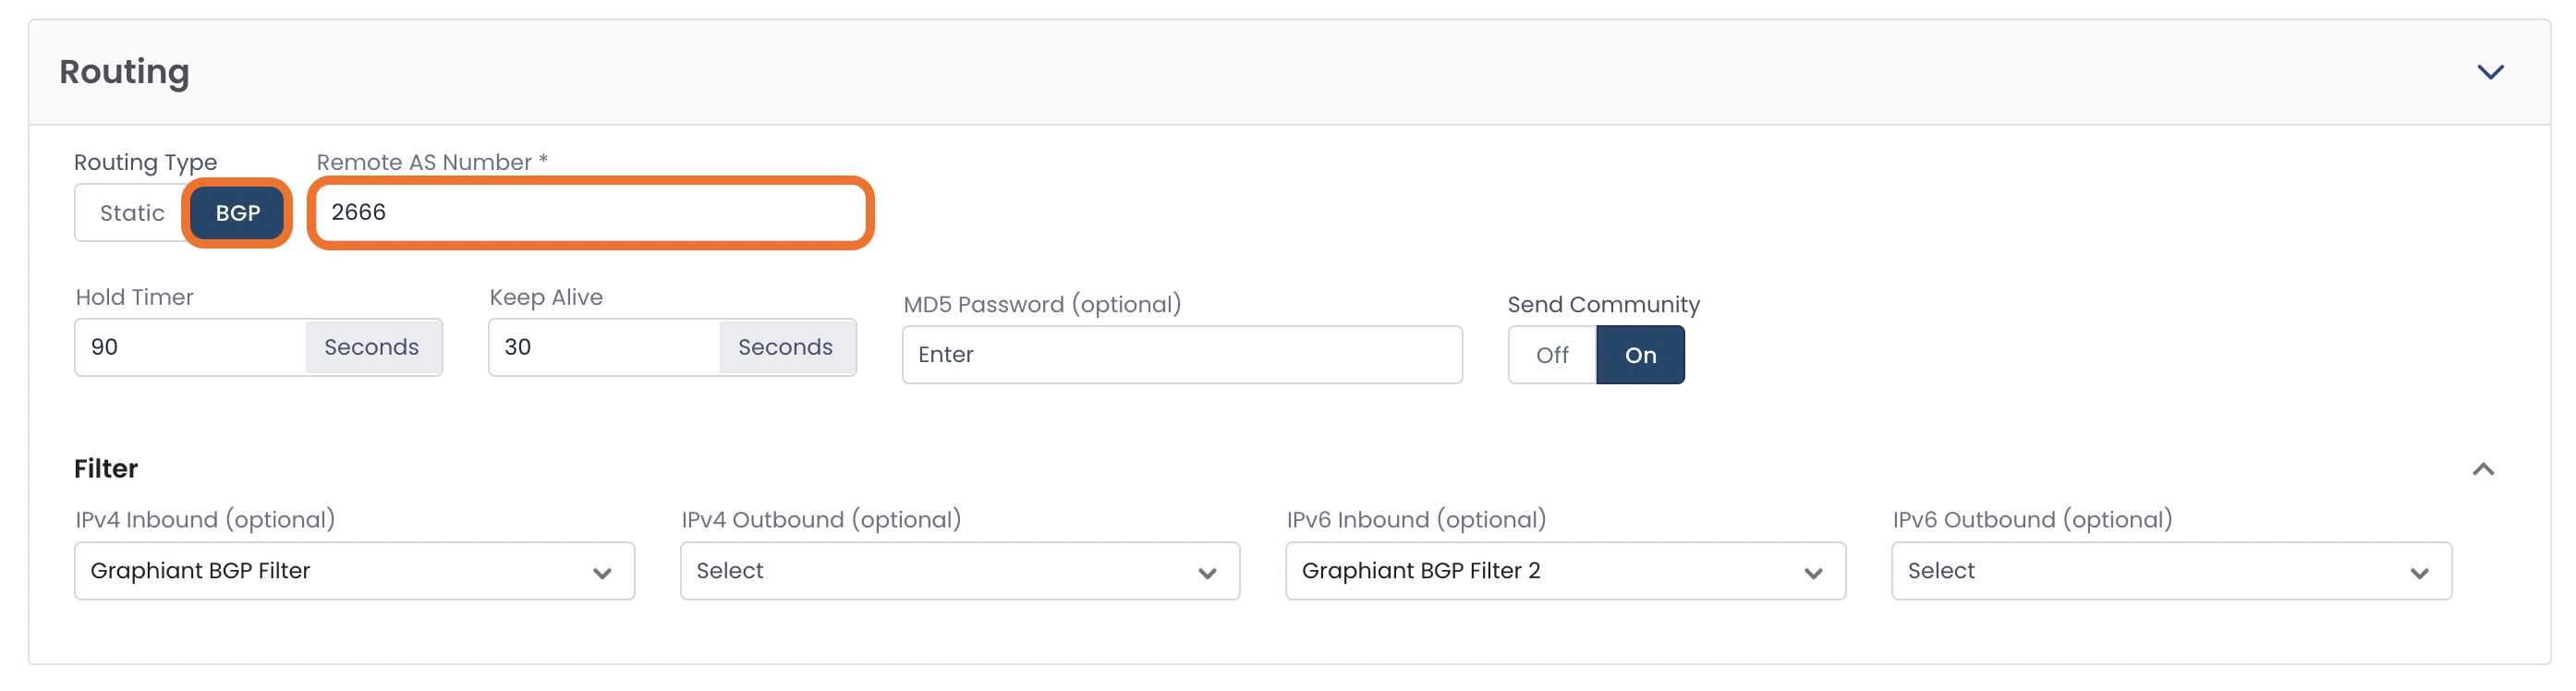
BGP Routes
Should you choose to utilize BGP routes for your VPN connection, the “Routing” section will expand to include the fields shown below.
Click the toggle to turn on ‘BGP’.
Enter the AS Number from the 3rd party device’s BGP setting.
The remaining fields are optional, and if left blank will be populated with default values.
Hold Timer: The period of time to wait for messages from the BGP neighbor before considering that neighbor unreachable; default is 90 seconds.
Keep Alive Timer: The interval at which messages to the neighbor are sent to maintain the BGP session and check that the neighbor is reachable.
MD5 Password: The shared password for authentication between the BGP neighbors.
Send Community: Specifies that the router should support sending BGP communities to that neighbor. Sending Communities is 'Off' by default.
Inbound Filters: Control what routes you accept from a neighbor
Outbound Filters: Control what routes you advertise to a neighbor
Advanced Settings:
Note:
This section is completely optional, to be used if you would like to specify more detailed information for your VPN.
The fields are as follows, and if left blank will be populated with default values.
TCP MSS: Maximum TCP segment size allowed through the VPN to prevent fragmentation
IP MTU: Largest IP packet size (including headers) that can be transmitted without fragmentation
ID Remote End Point: Identifier for the remote VPN device used during IKE authentication
IKE Initiation Mode: Determines whether this gateway starts the VPN negotiation (Initiator) or waits for the remote side (Responder)
ID Local End Point: Identifier for the local VPN device used in IKE authentication
Inside Subnets: The internal network behind this VPN endpoint that should be reachable over the tunnel
Preshared Key: Shared secret used to authenticate both ends of the VPN tunnel
System VPN Profile: The VPN Profile that best matches your encryption needs.
Note:
The System VPN Profile will be prefilled with the default profile, but you can also:
Select any profile you have created by using the drop-down menu.
Create a new profile by clicking ‘Create New +’. This will open a modal to configure a new VPN profile. For more information regarding creating VPN Profiles, click here.
After all sections are filled out to your specifications, click ‘Next’ in the bottom right.
.jpg)
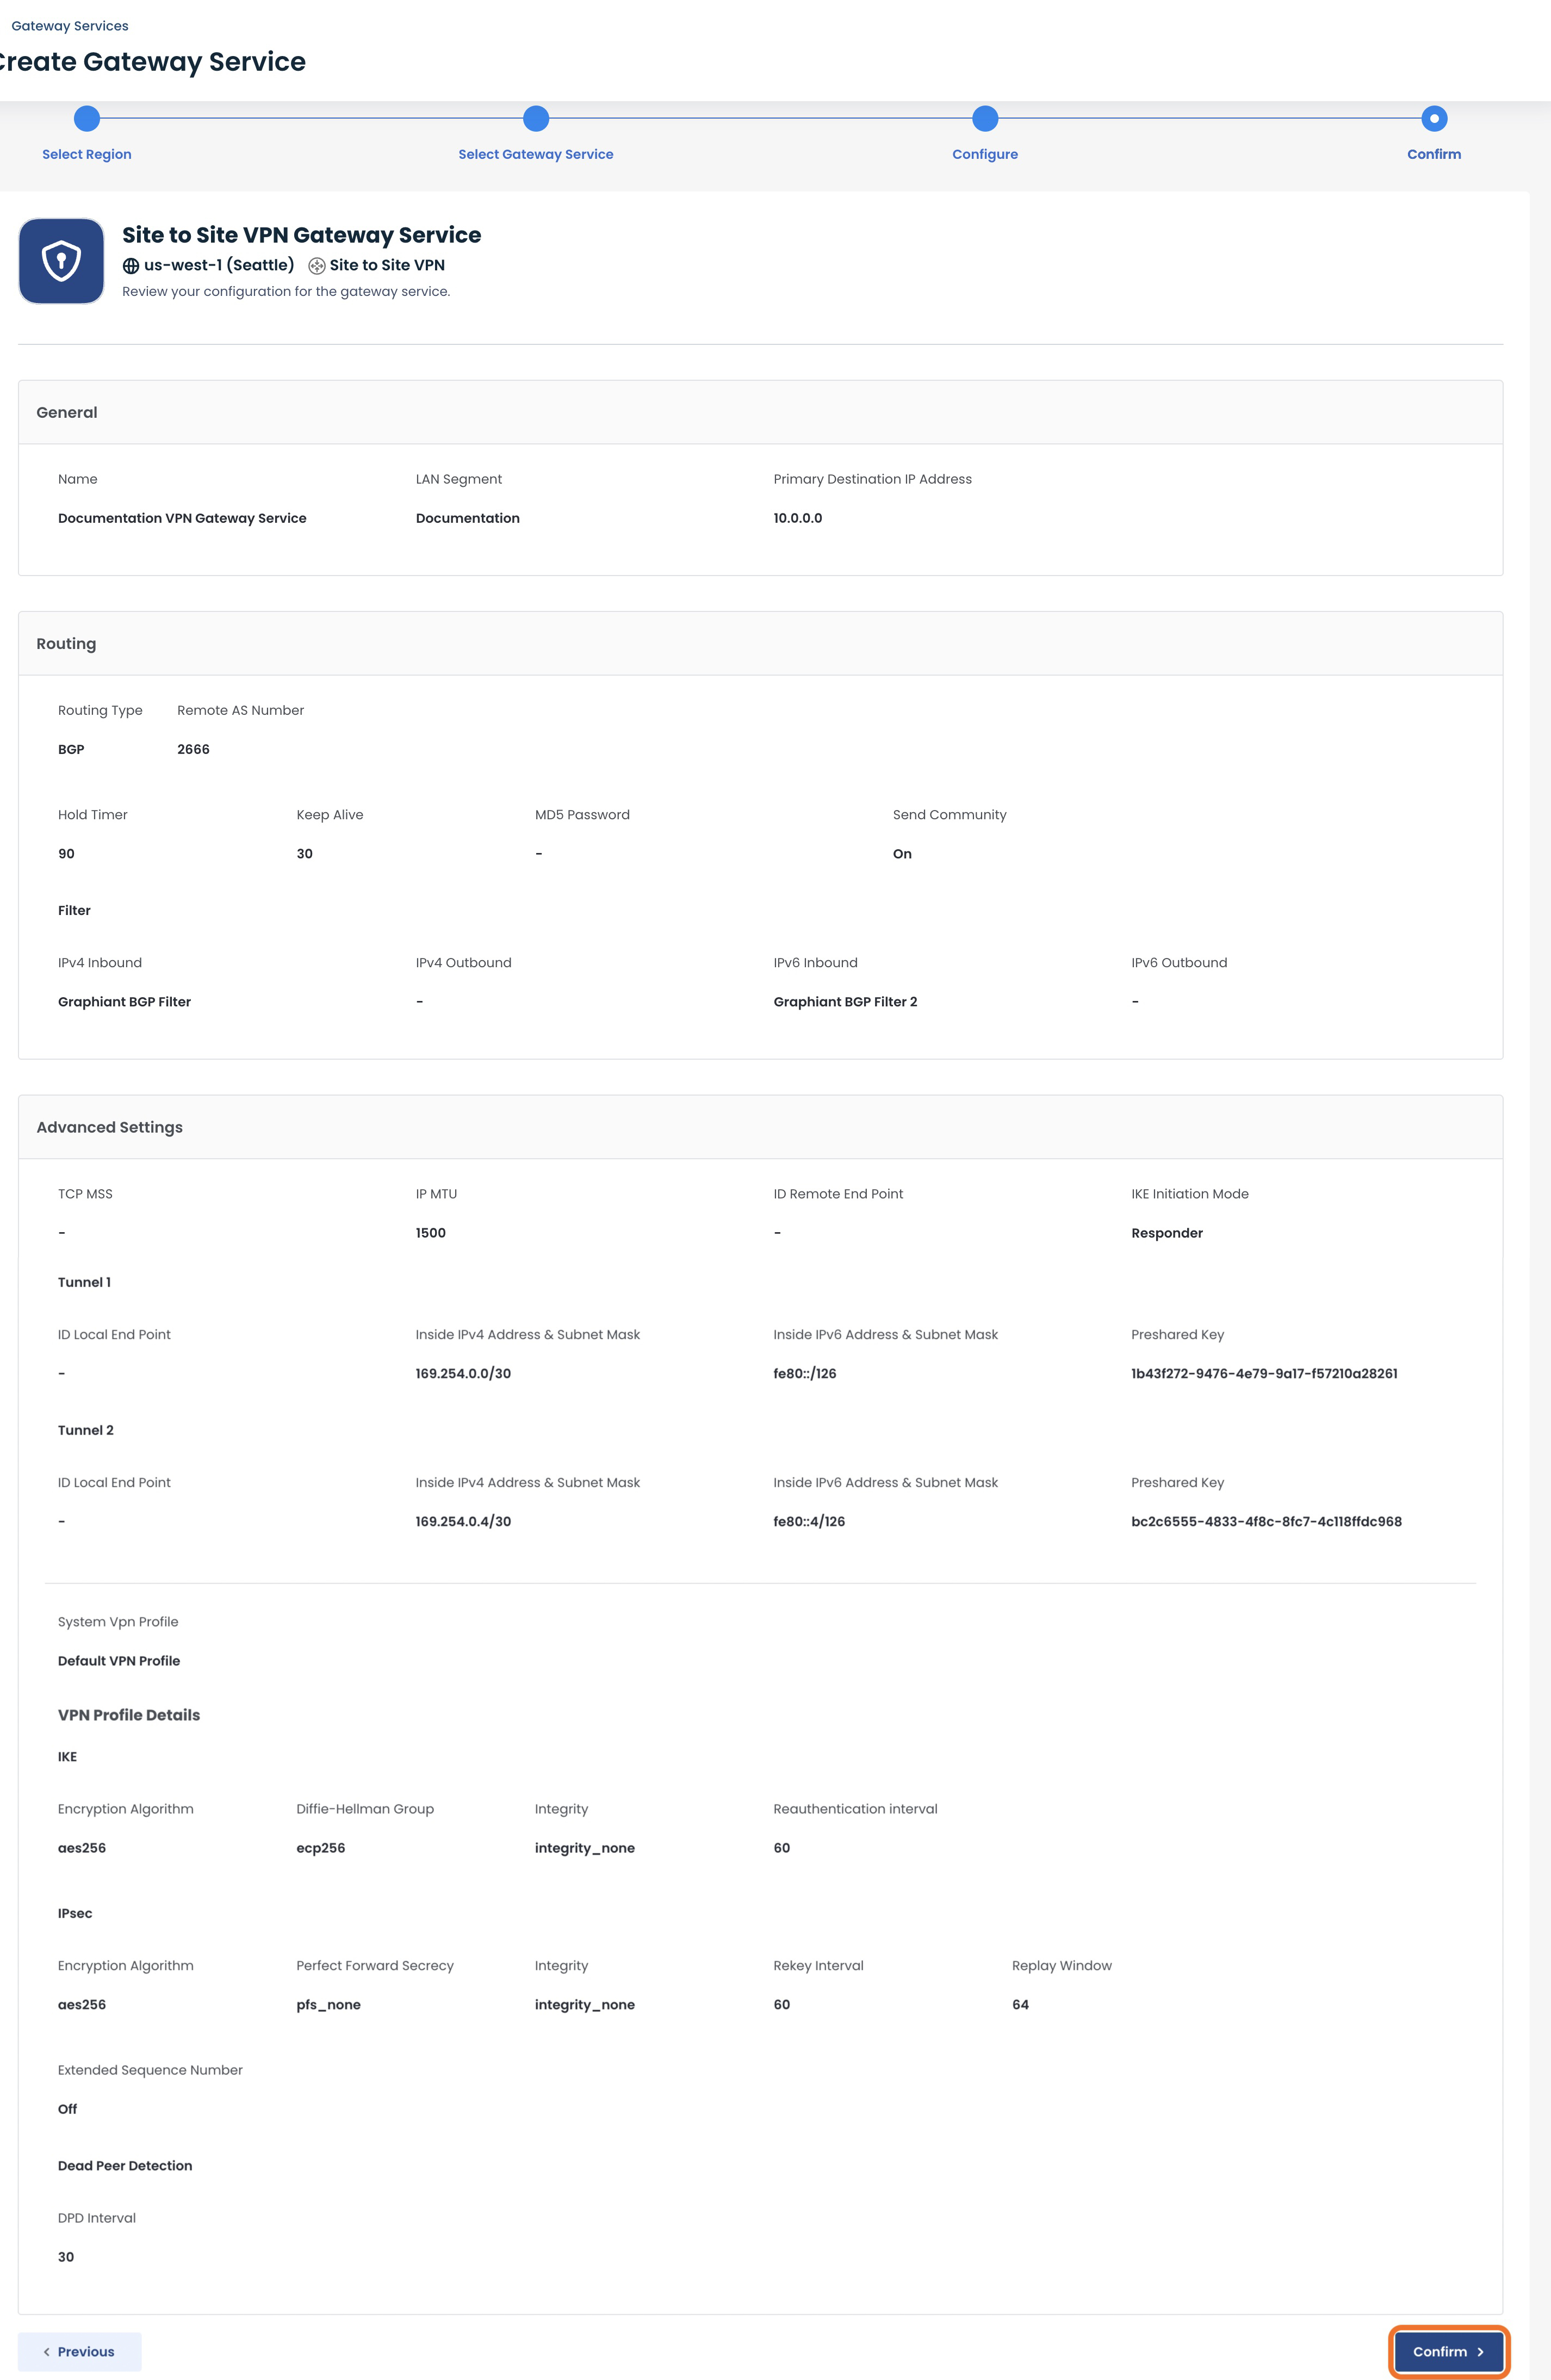
A summary page will appear, where you can confirm all of your selections for your VPN.
Take Note:
All of the information you will need to configure the remote end will be here.
You can download a copy of this configuration by following these instructions.
Once you have ensured that everything is correct, click ‘Confirm’ at the bottom right.
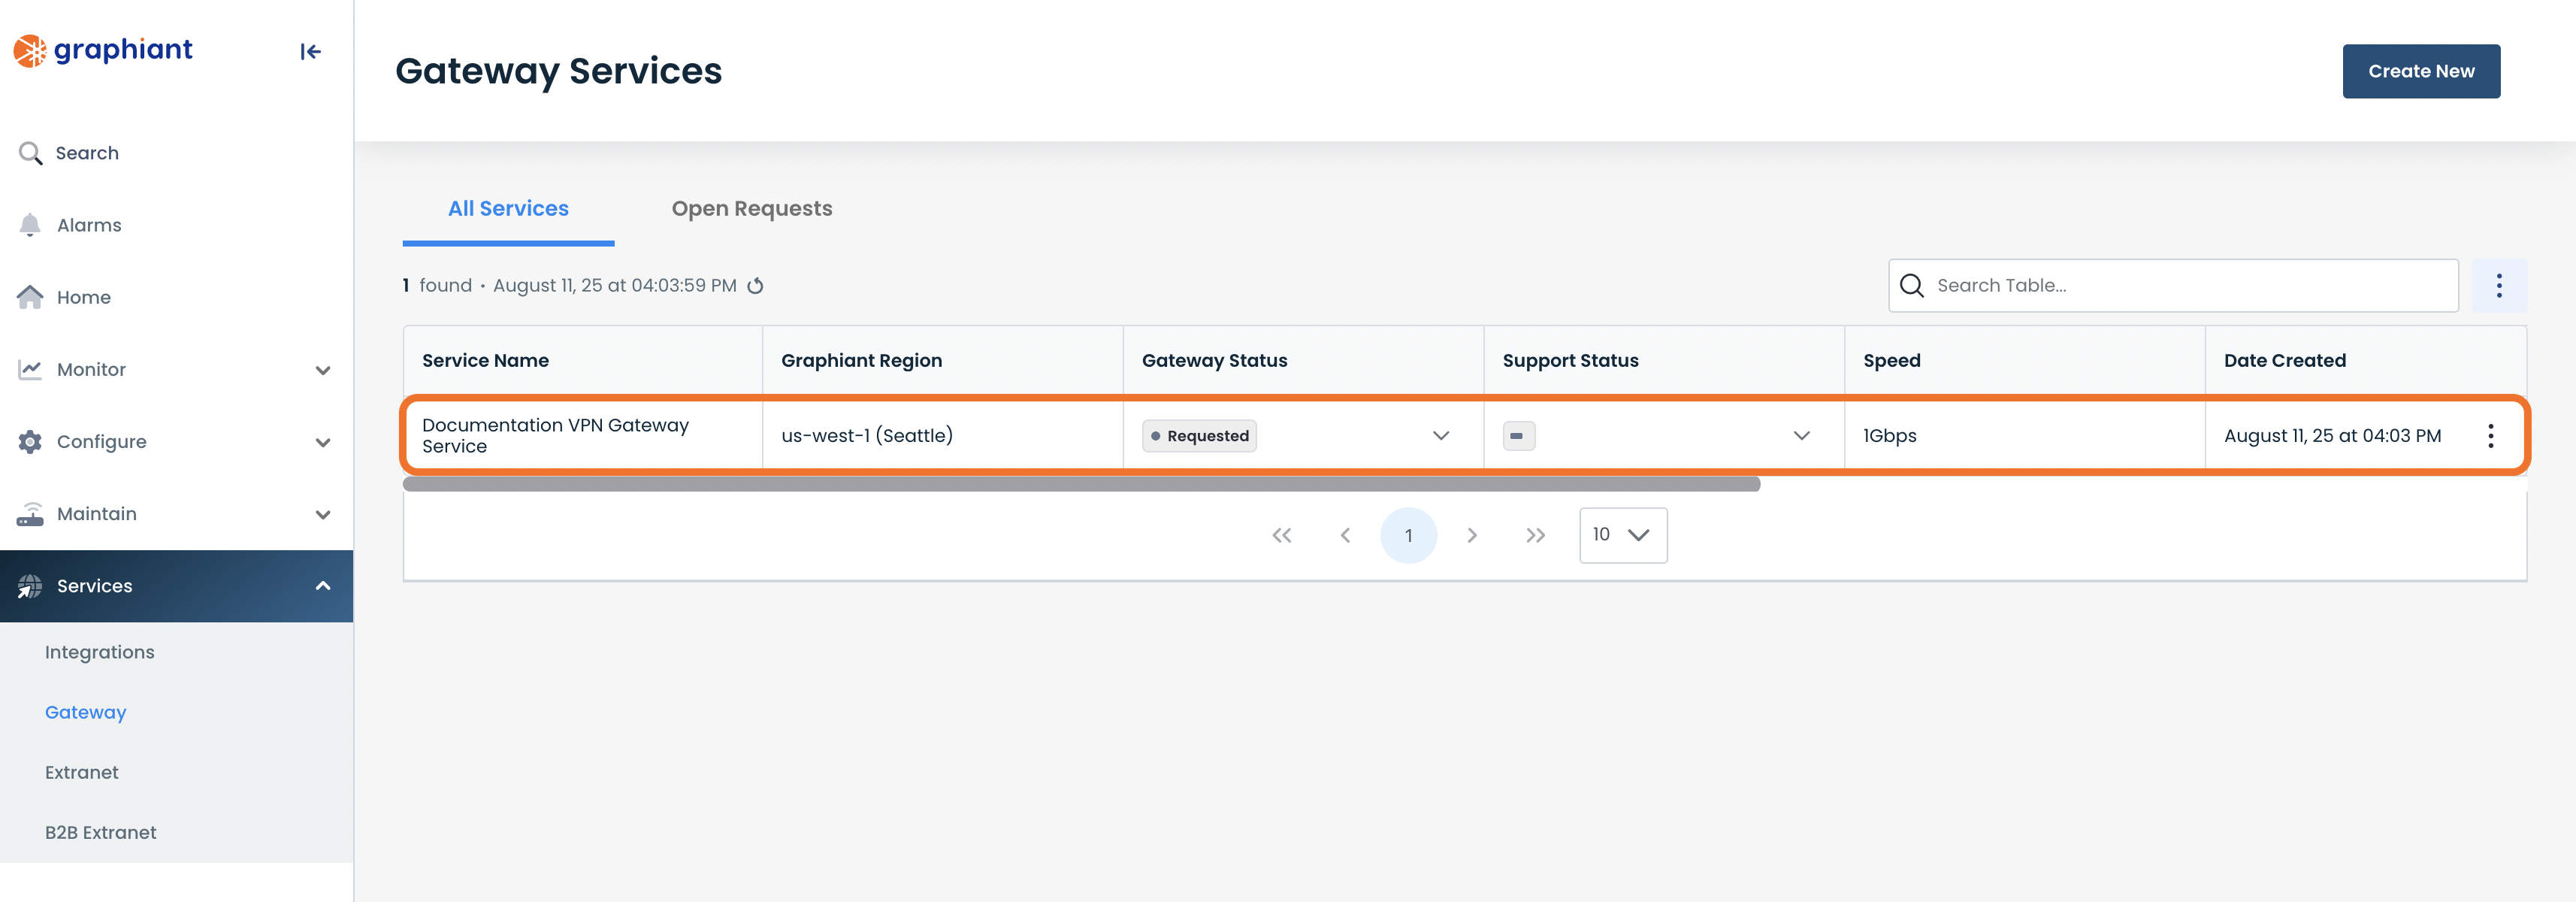
You will be brought to the Audit Trail page.
Click ‘Gateway’ in the sidebar to return to the Gateway Services table.

Click the ‘Connectivity’ tab.

The new VPN is now listed in the Gateway Services table, as “Requested”.
The VPN will be live within 24 hours (next business day).
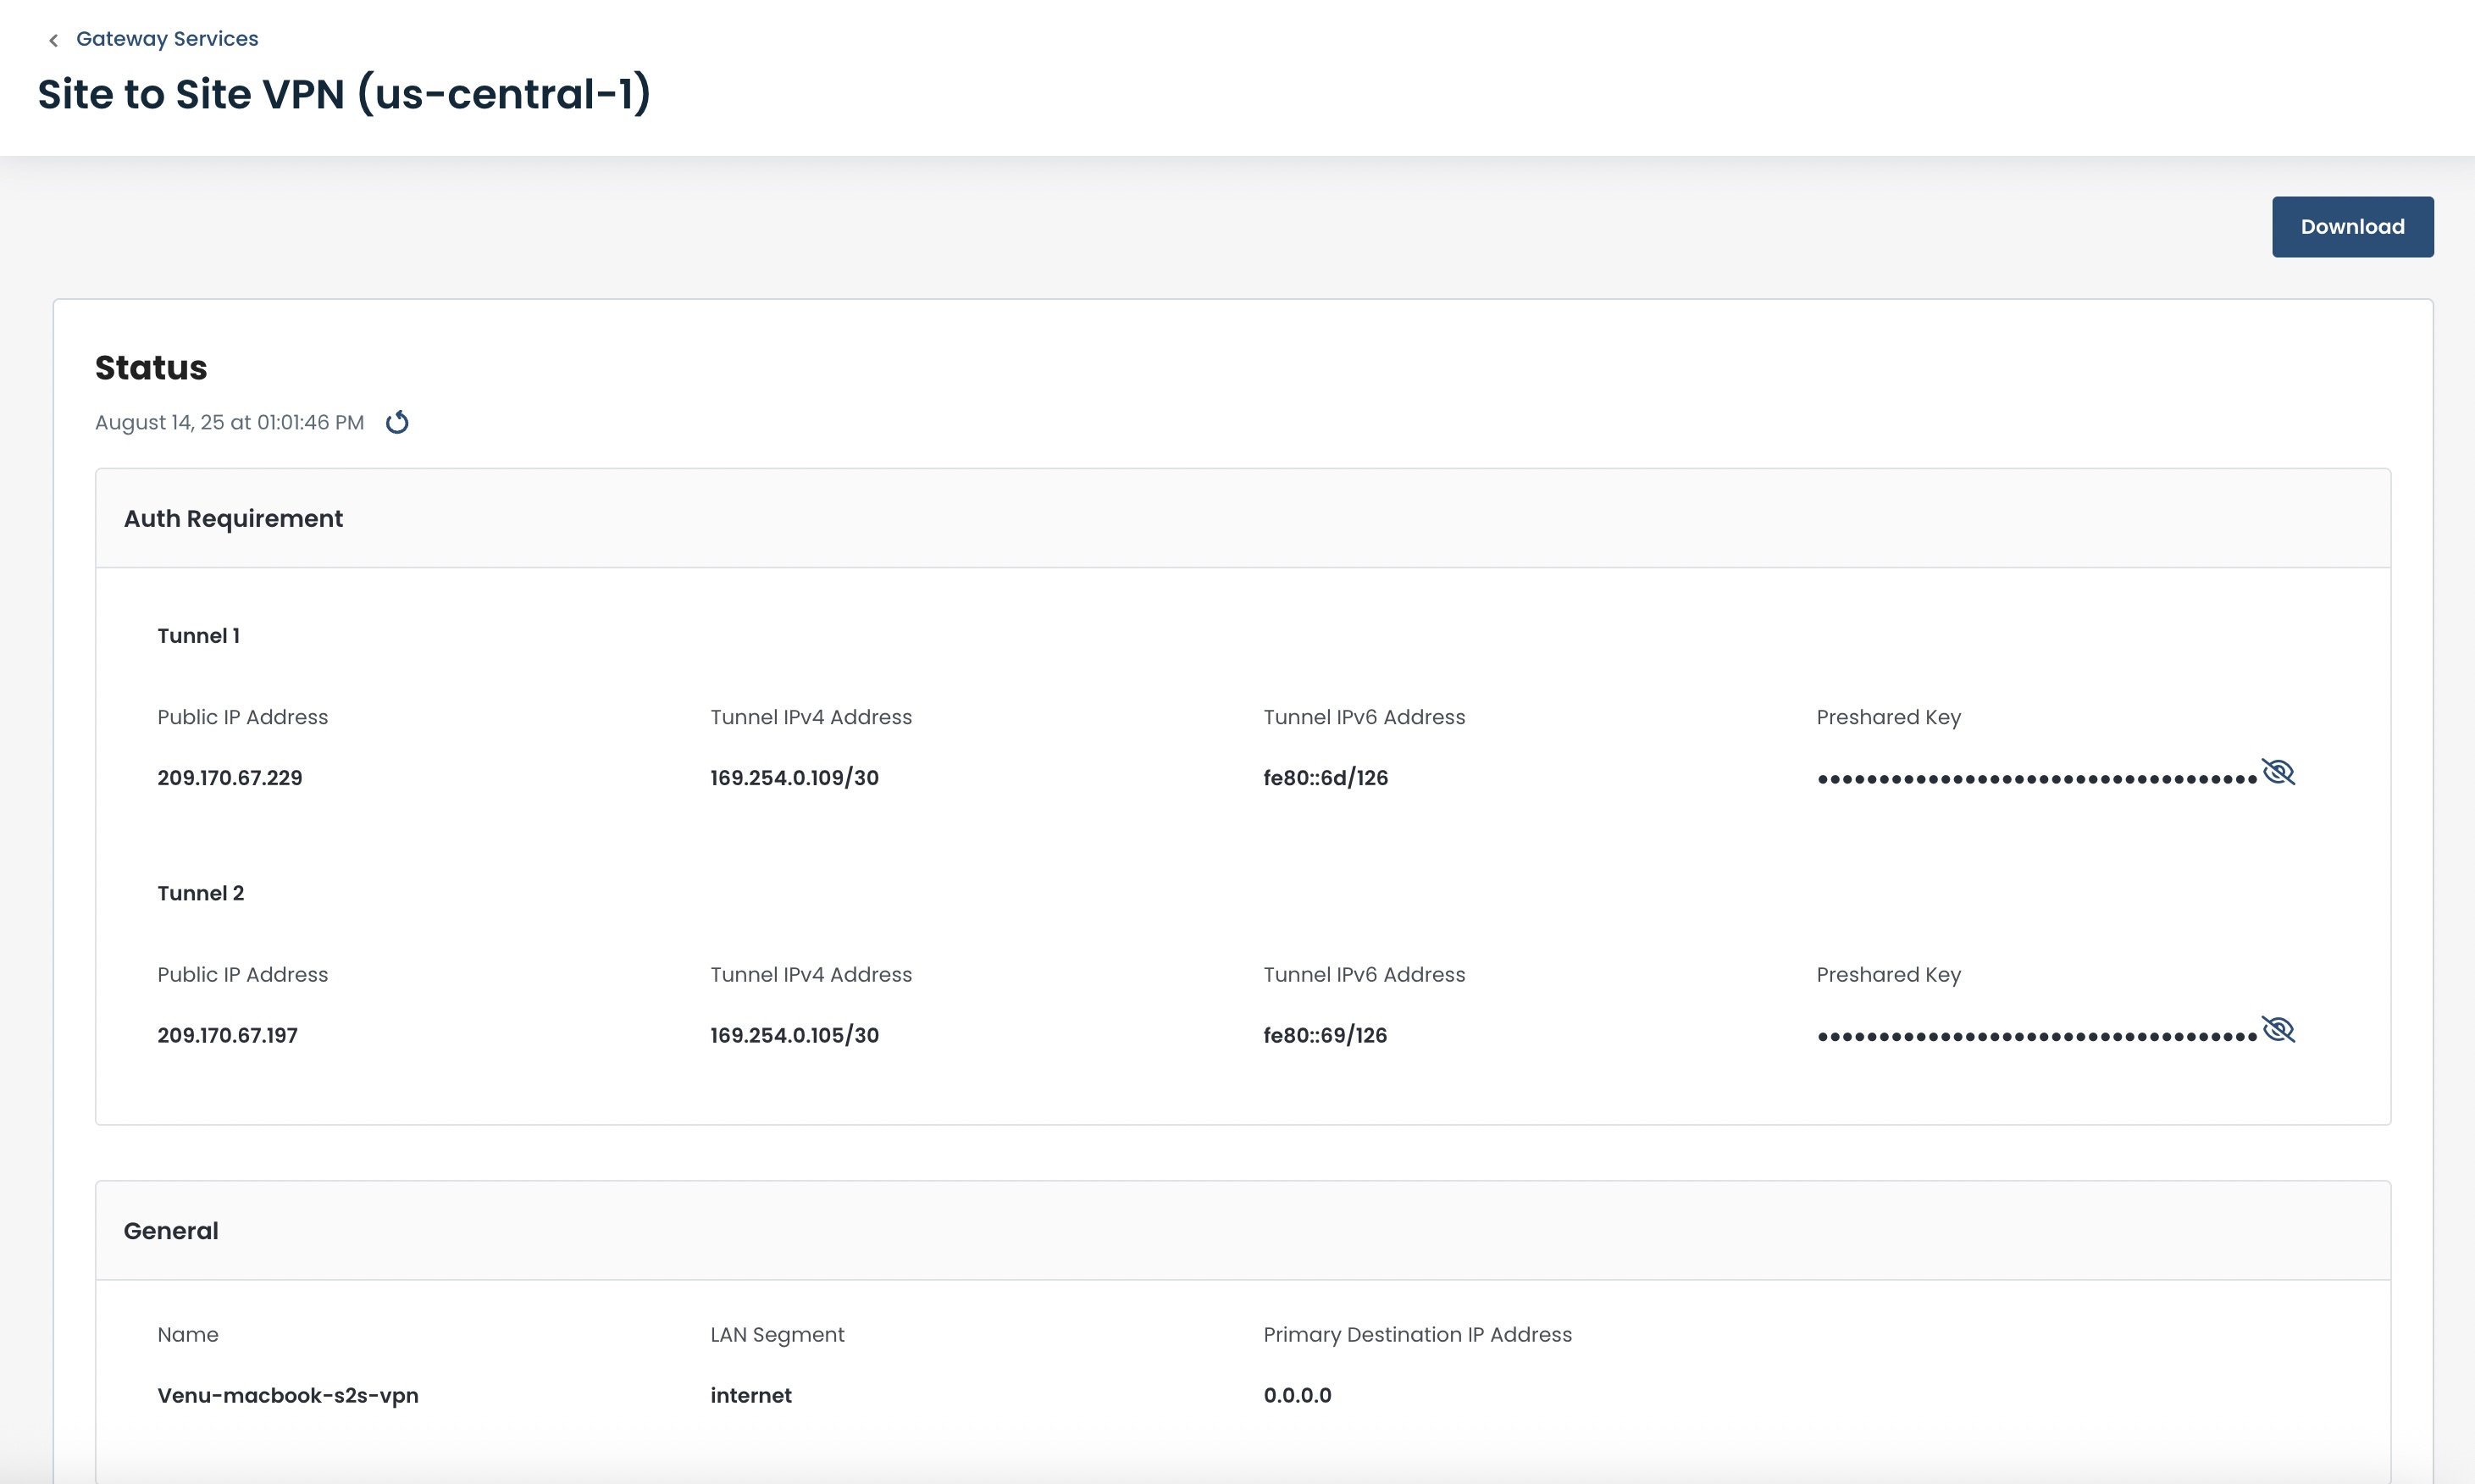
Downloading the Gateway VPN Configuration
To have the configuration information available to send to your remote site, you can download the configuration once the VPN has been provisioned.
To download the configuration of a VPN, navigate to the Gateway Services table “Connectivity” tab.
Click the ellipses to the right of that VPN; select ‘View Status’.
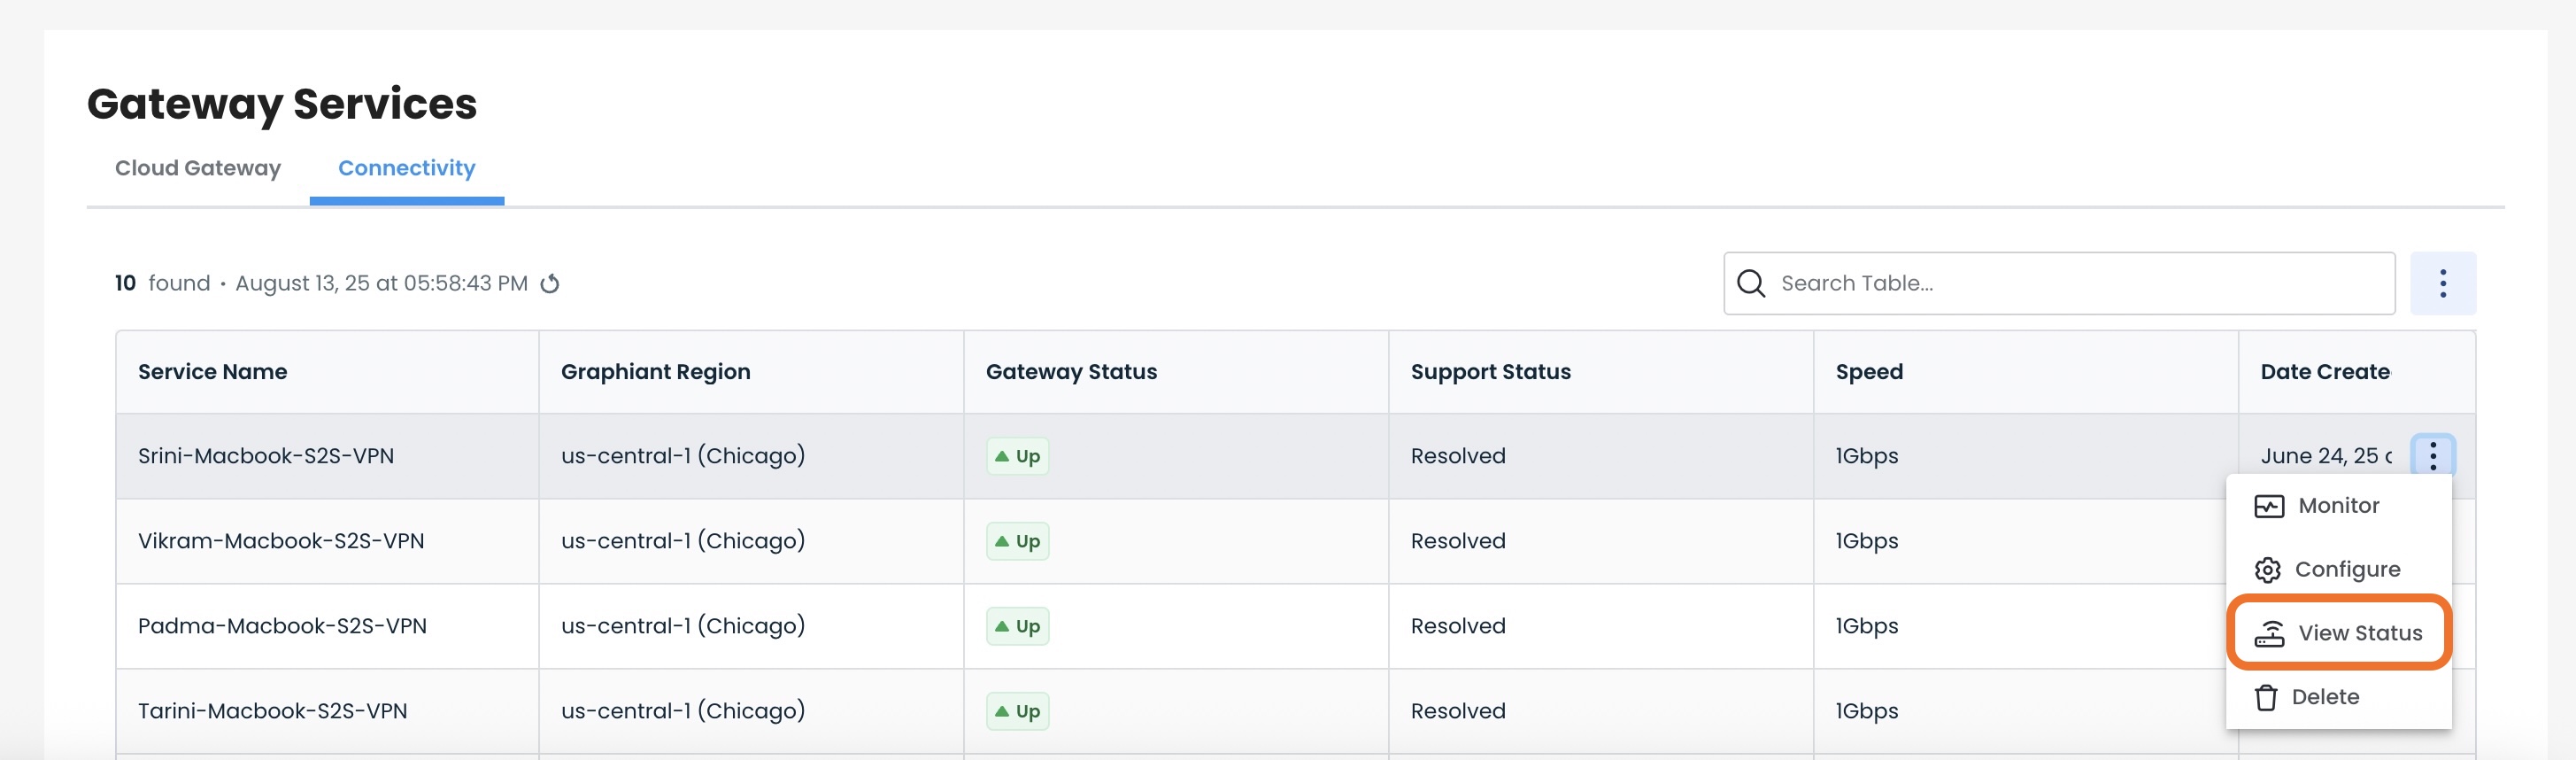
This will bring up the configuration information for that VPN.
Click ‘Download’.
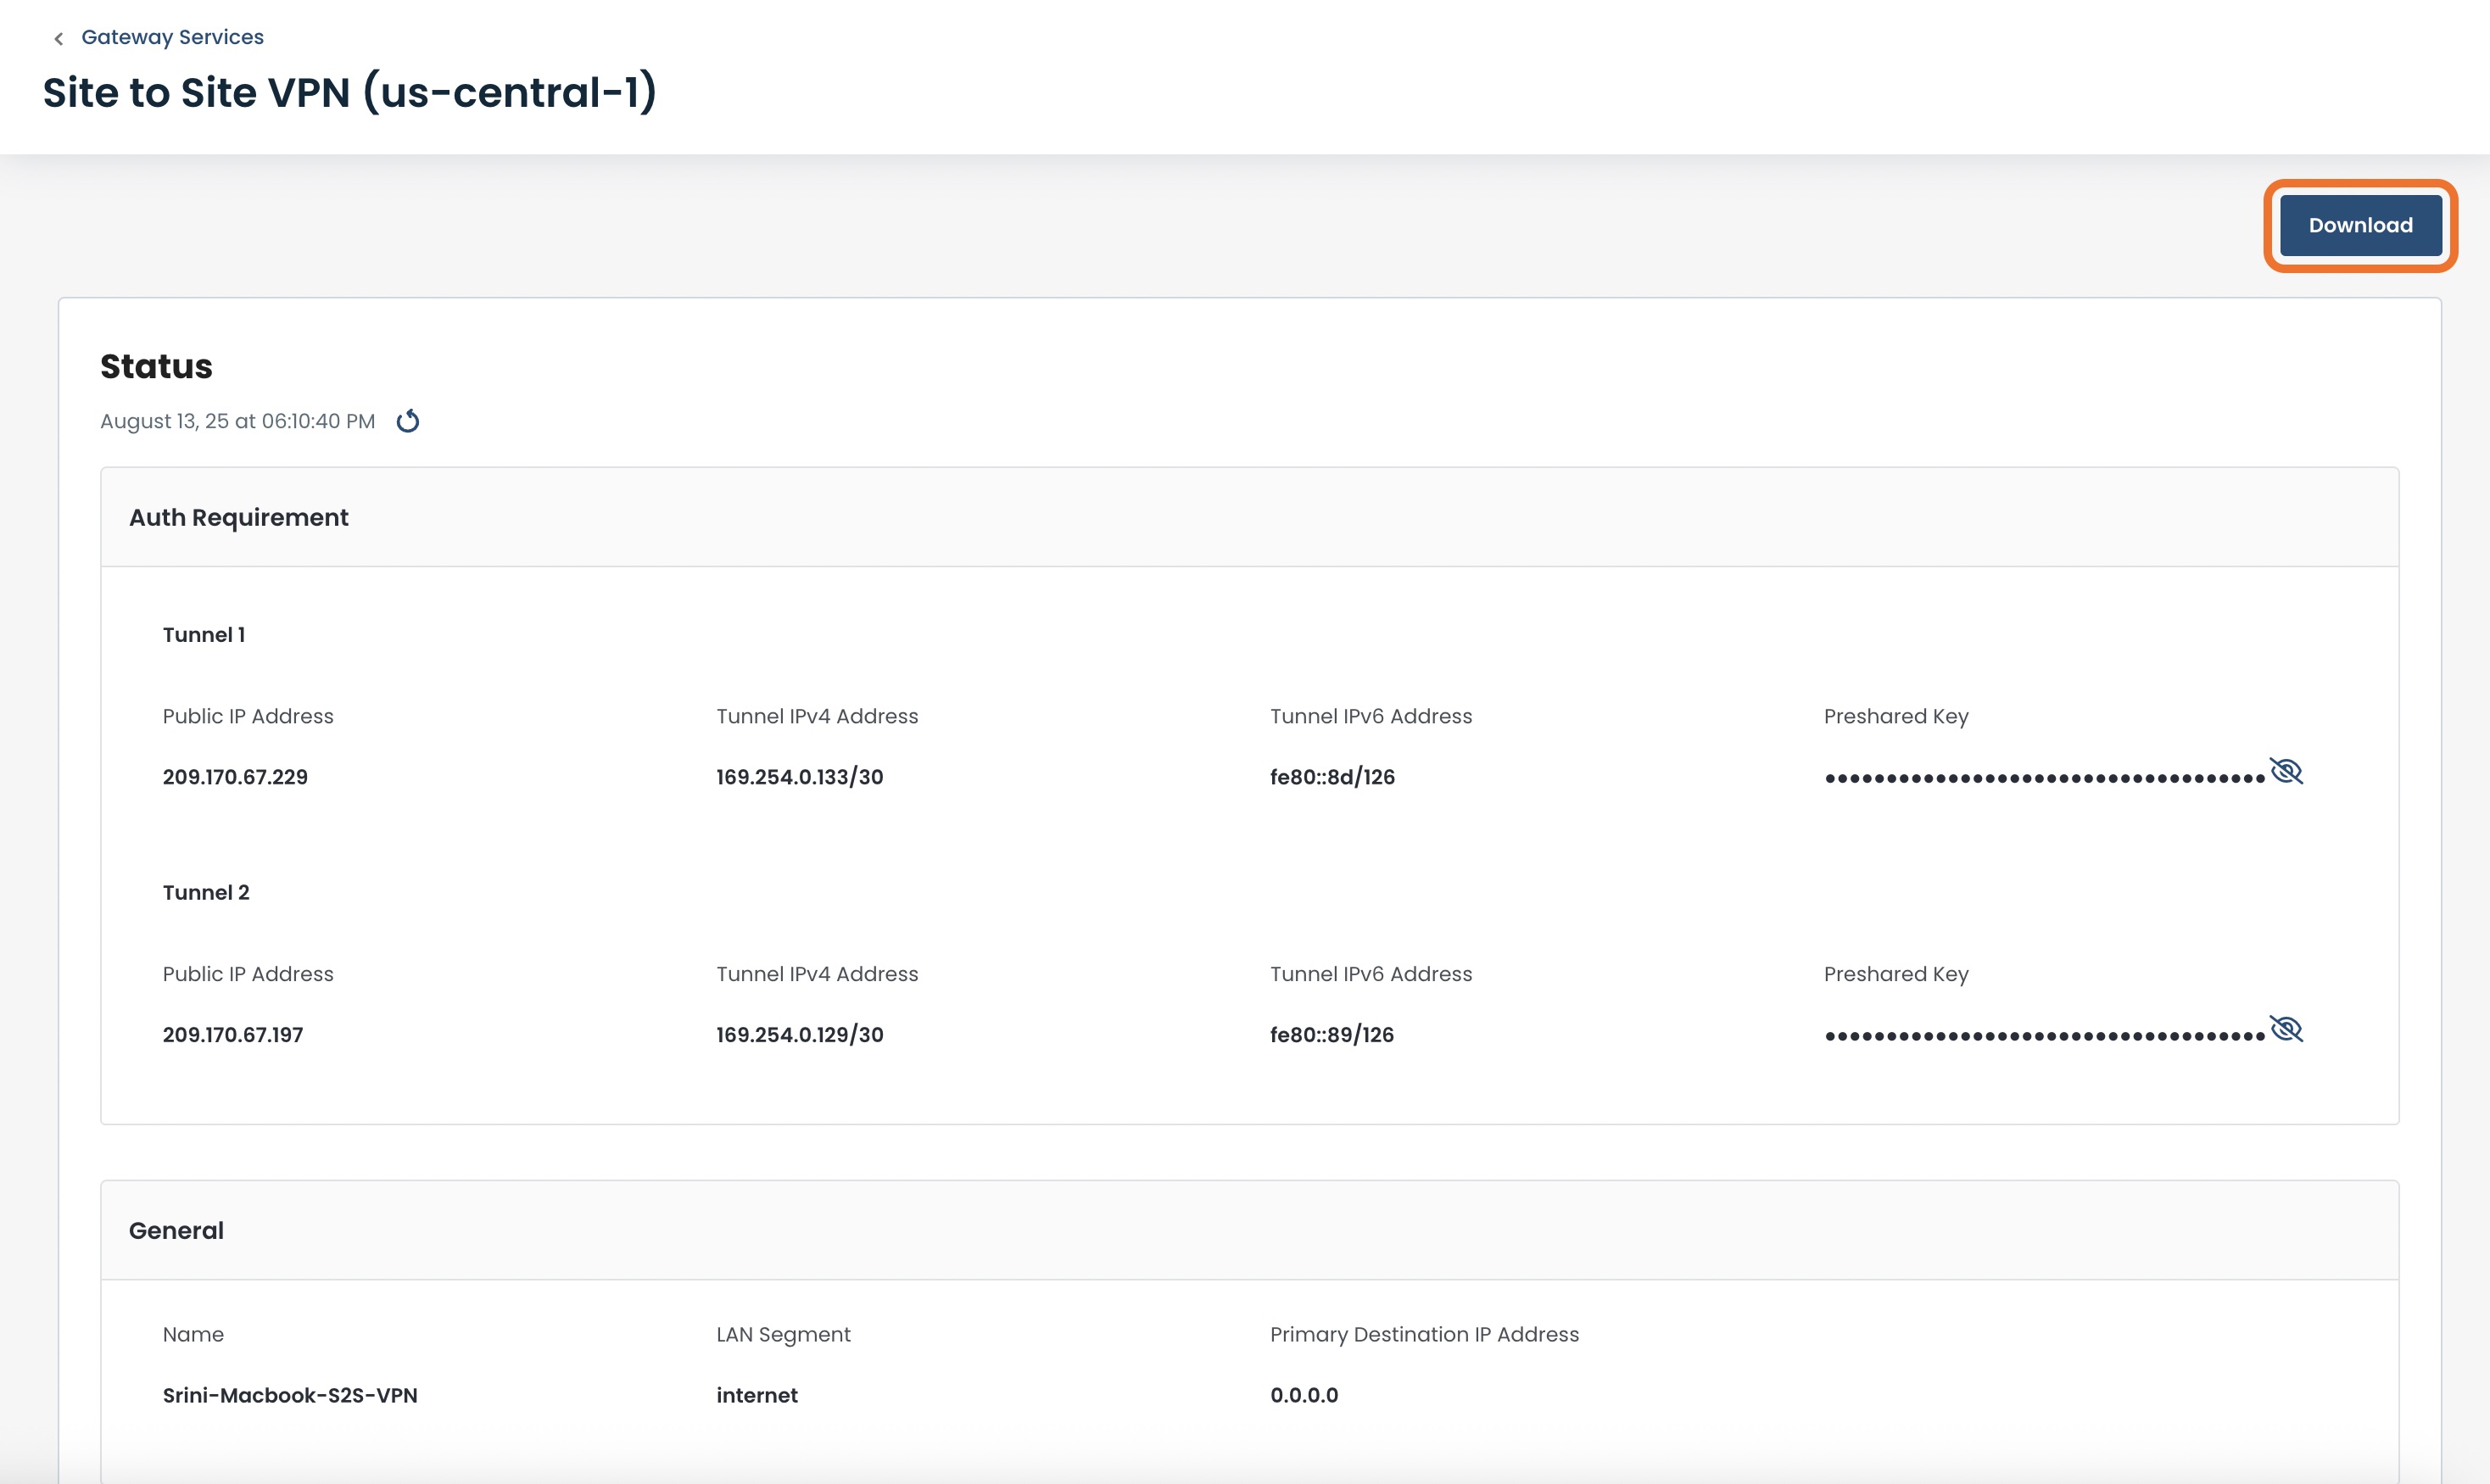
You will now have the information in a txt file to share with your remote site.
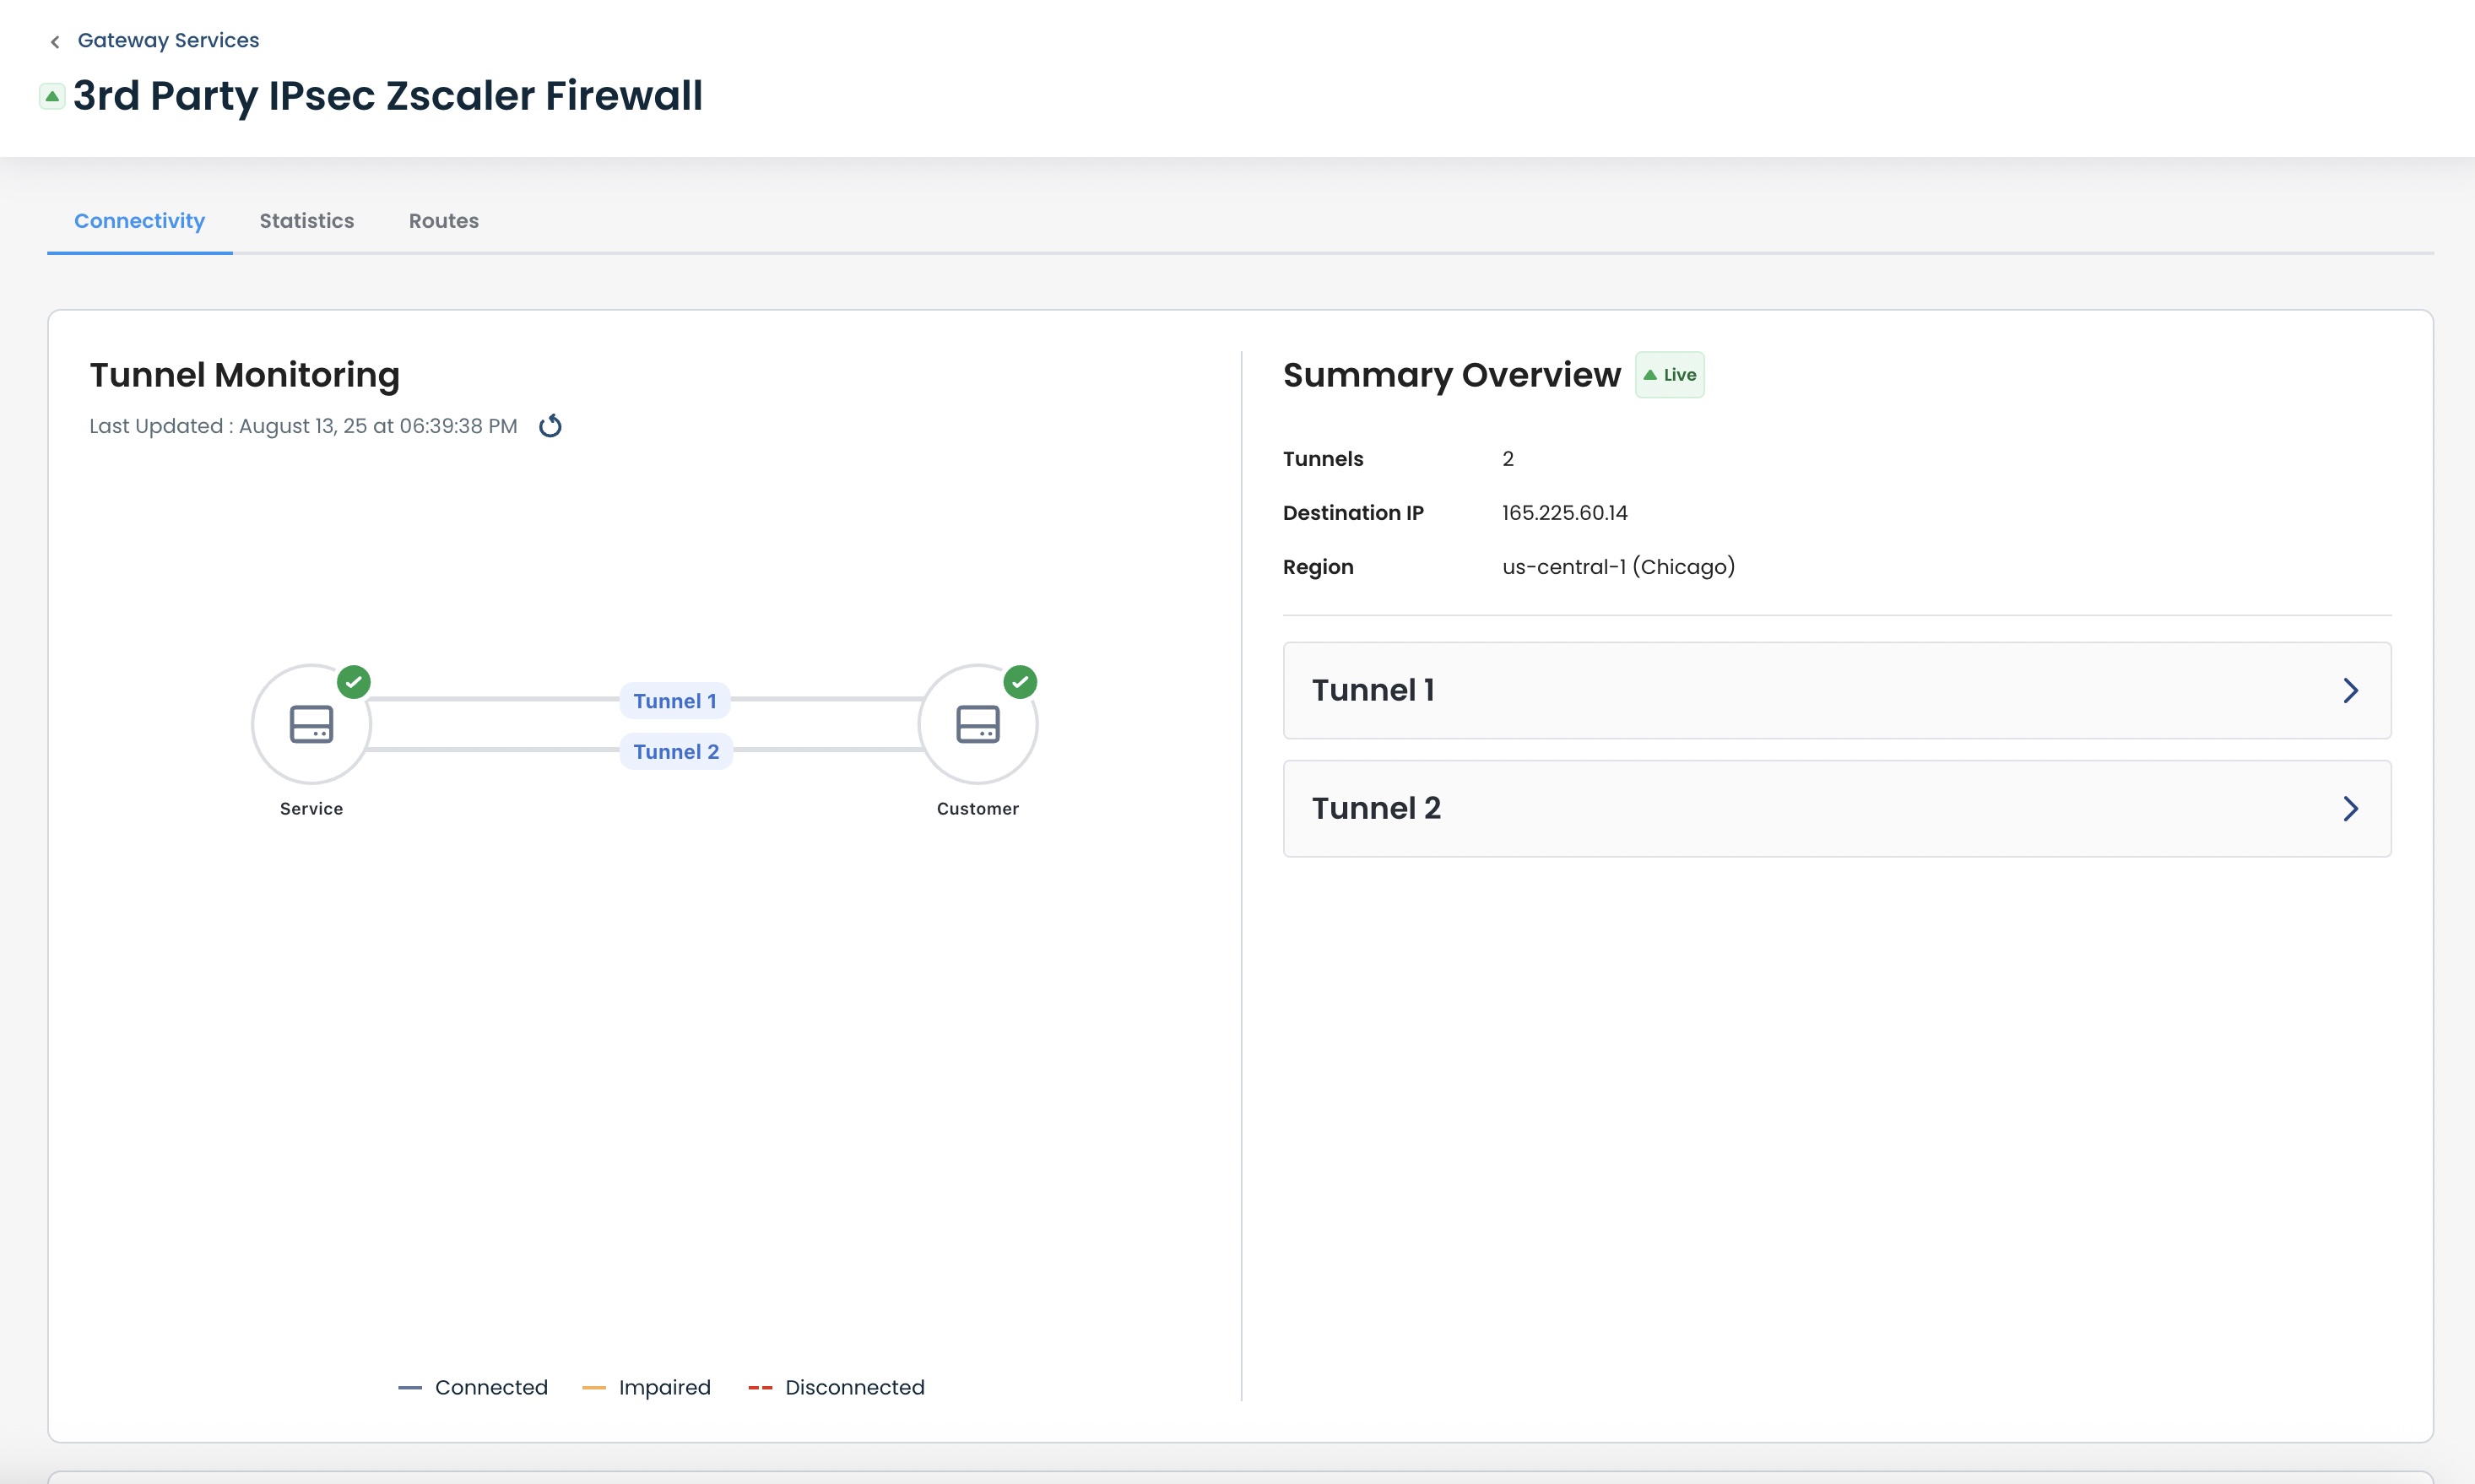
Monitoring Your Gateway Site-to-Site VPN
To monitor a site-to-site VPN, navigate to the Gateway Services table “Connectivity” tab.
Click the ellipses to the right of that VPN; select ‘Monitor’.
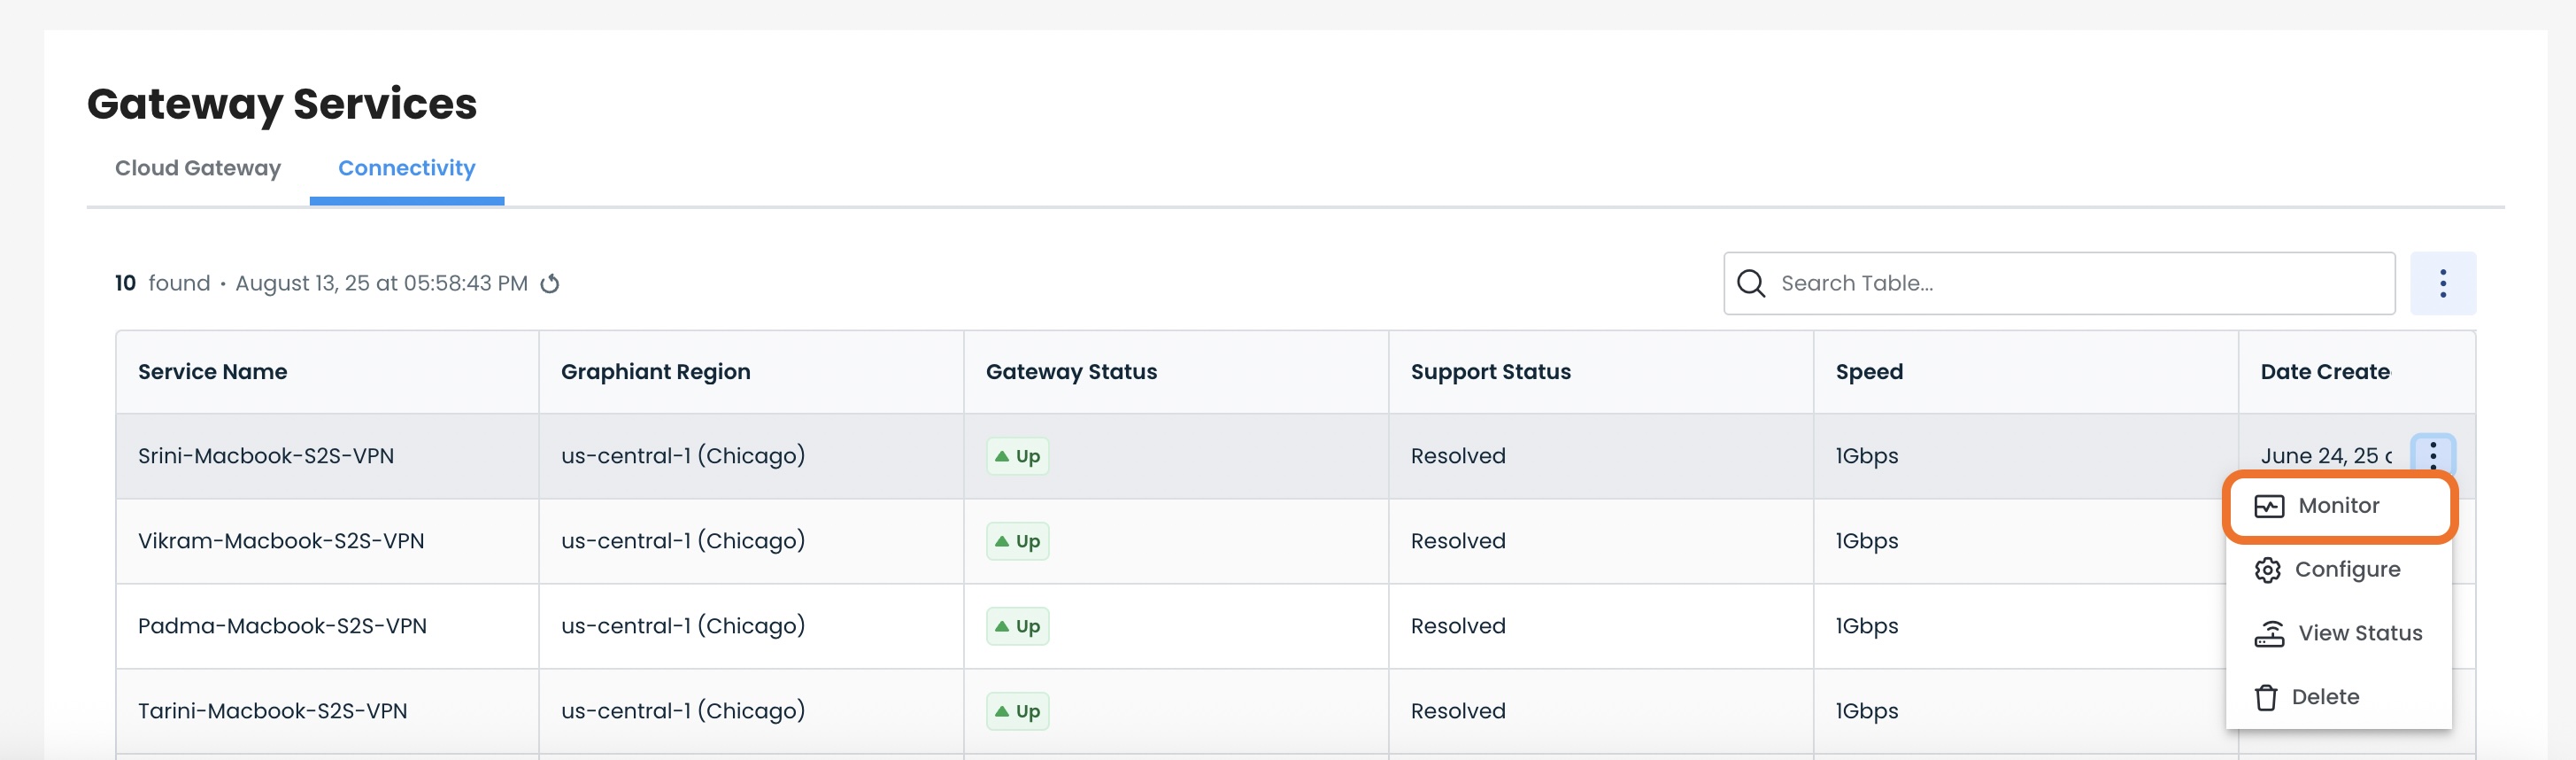
Here you can monitor every aspect of your site-to-site VPN.
Editing a Gateway VPN
To edit a site-to-site VPN, navigate to the Gateway Services table “Connectivity” tab.
Click the ellipses to the right of that VPN; select ‘Configure’.
Note:
Even though you are selecting ‘Configure’, the VPN will only be able to be accessed and edited; to configure a new VPN follow the instructions here.
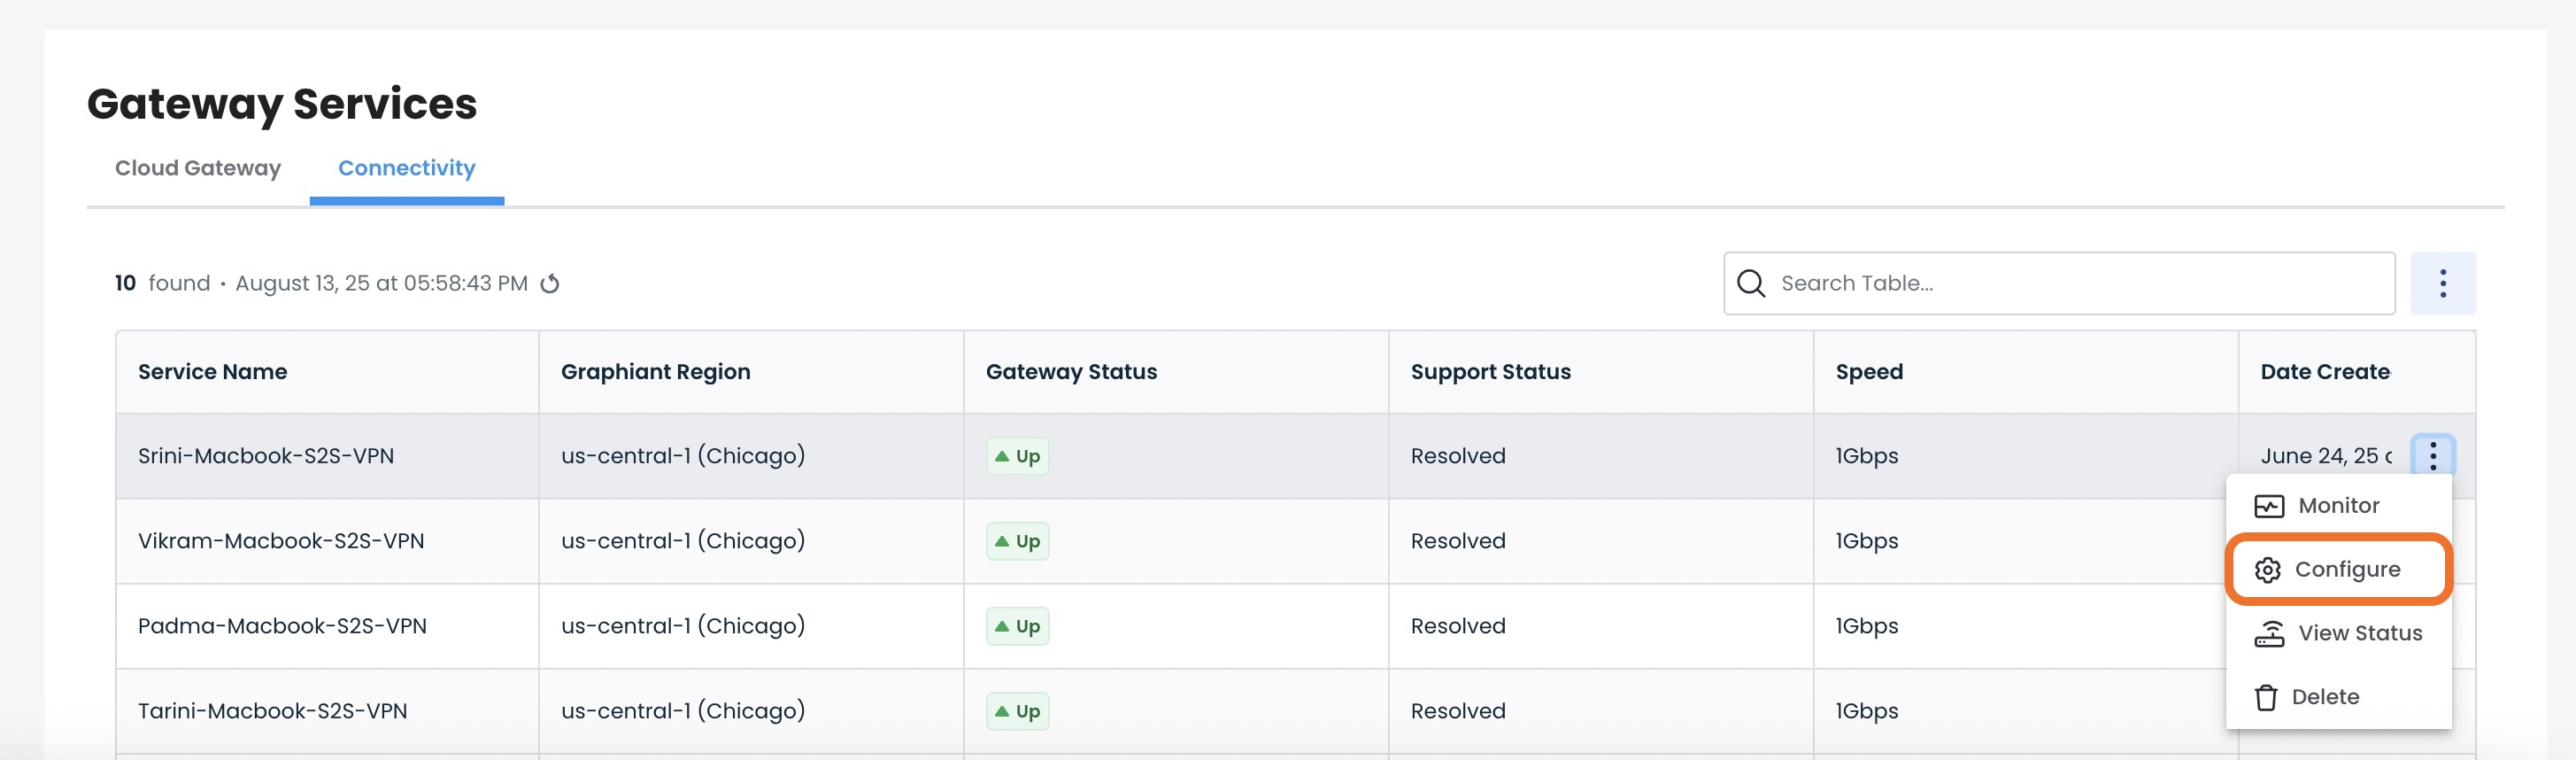
You will be brought to the edit area of the VPN.
All fields are editable EXCEPT:
LAN Segment:
To use a different LAN Segment, you will need to create a new VPN; follow these instructions.
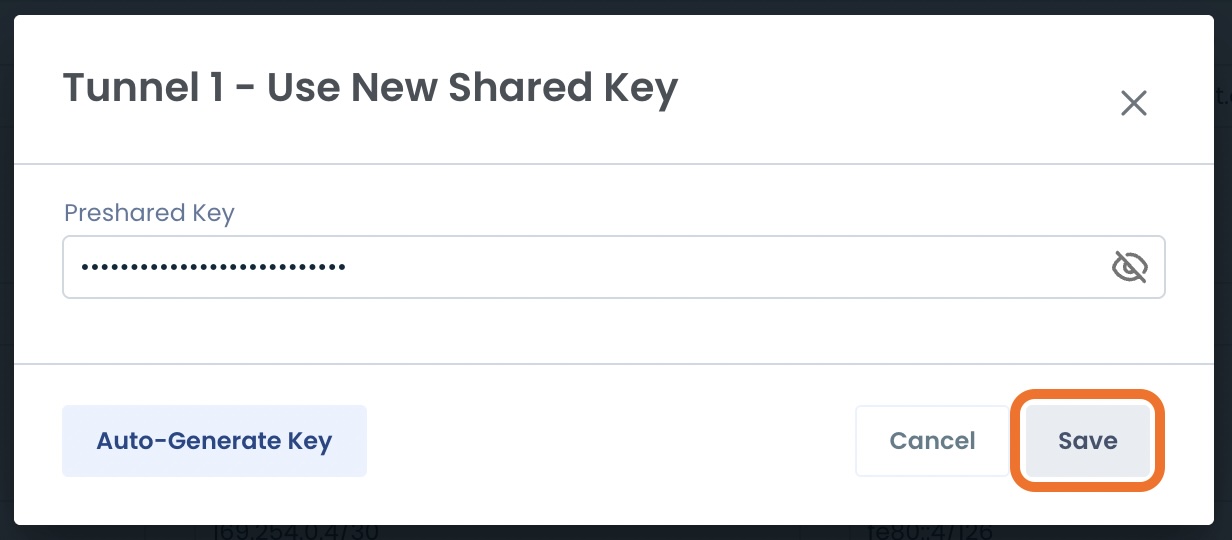
Preshared Key:
To change the preshared key you will need to click ‘Use New Key’.
You can then either enter a key, or autogenerate one; click ‘Save’.
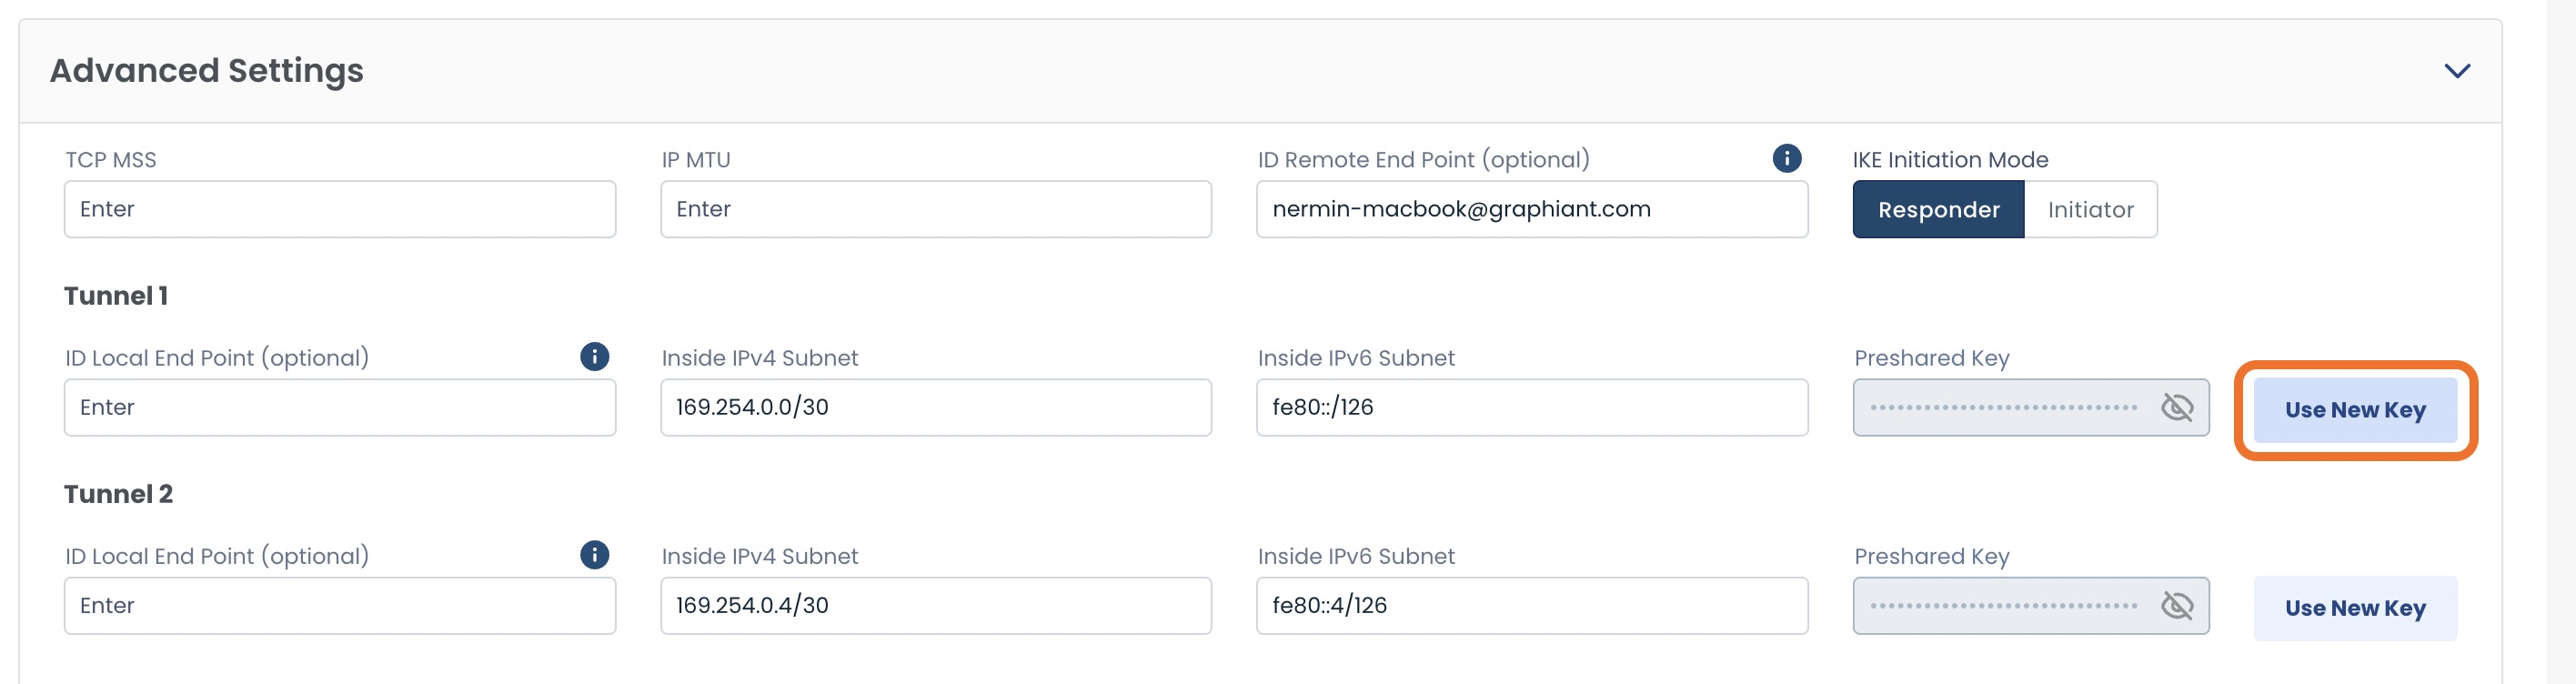
Make any edits needed; the fields changed will be highlighted in yellow.
Click ‘Apply’.
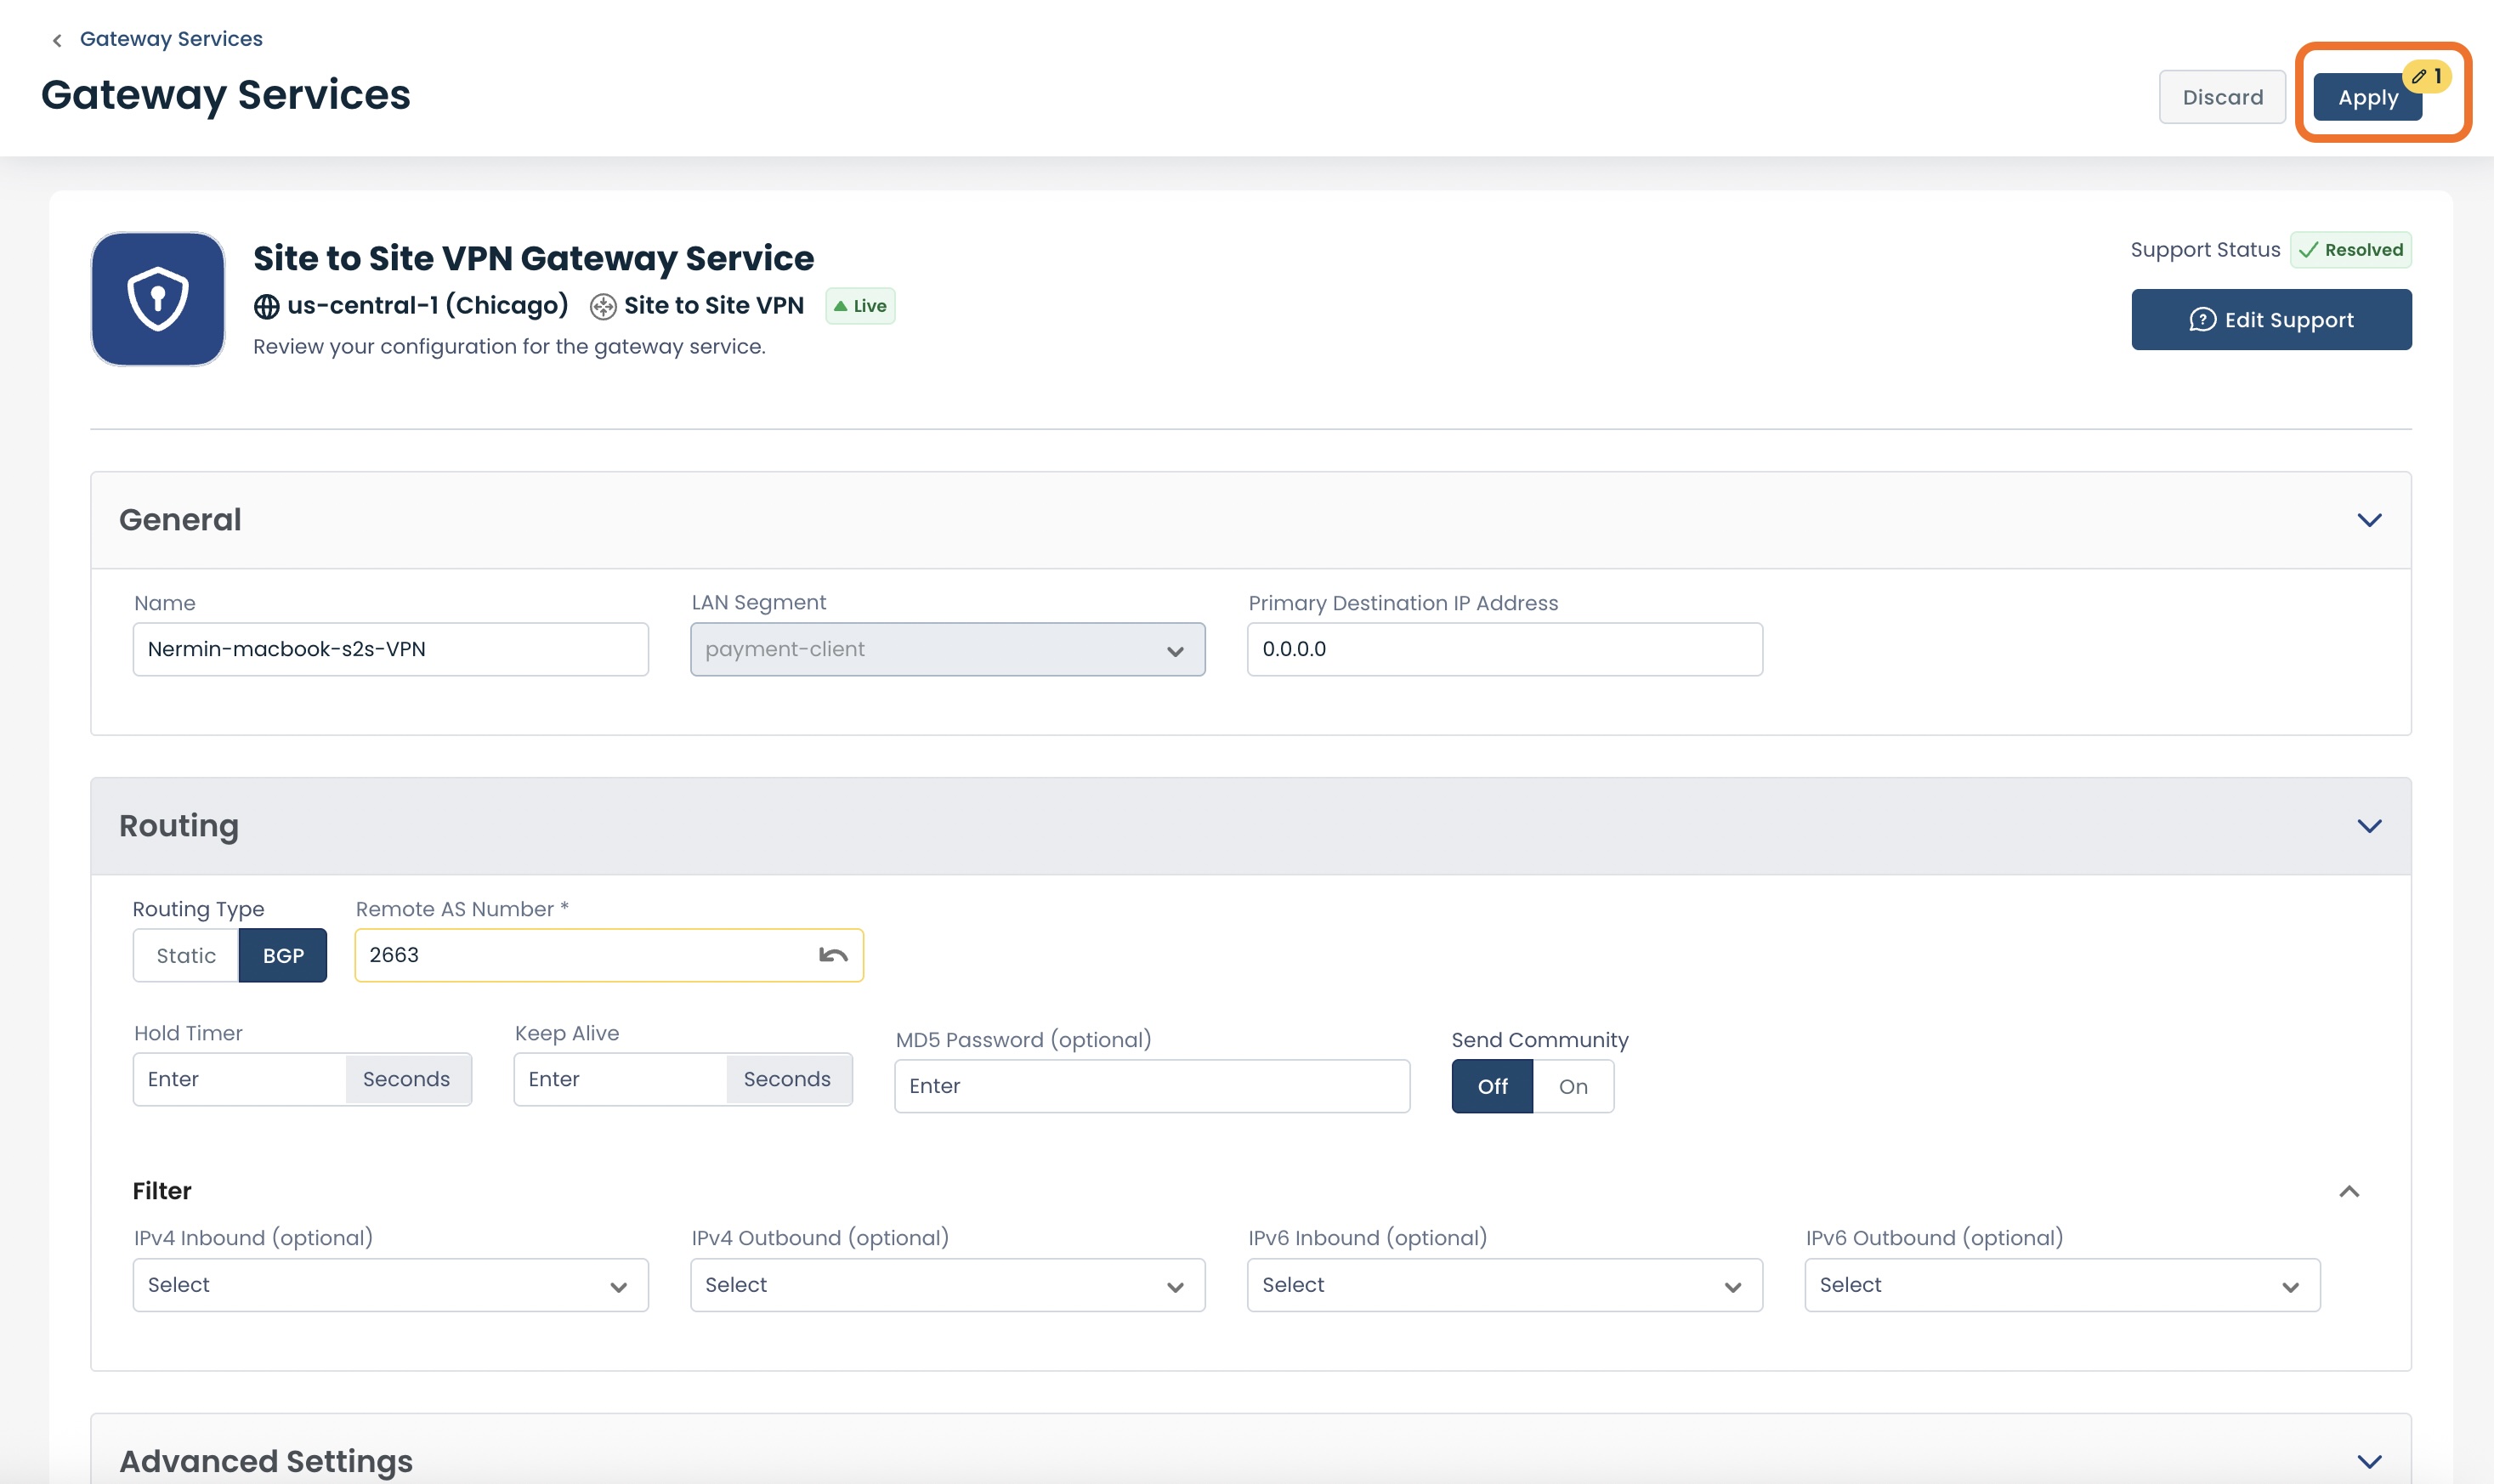
You will receive a green banner stating that the gateway configuration has been successfully updated.

Deleting a Gateway VPN
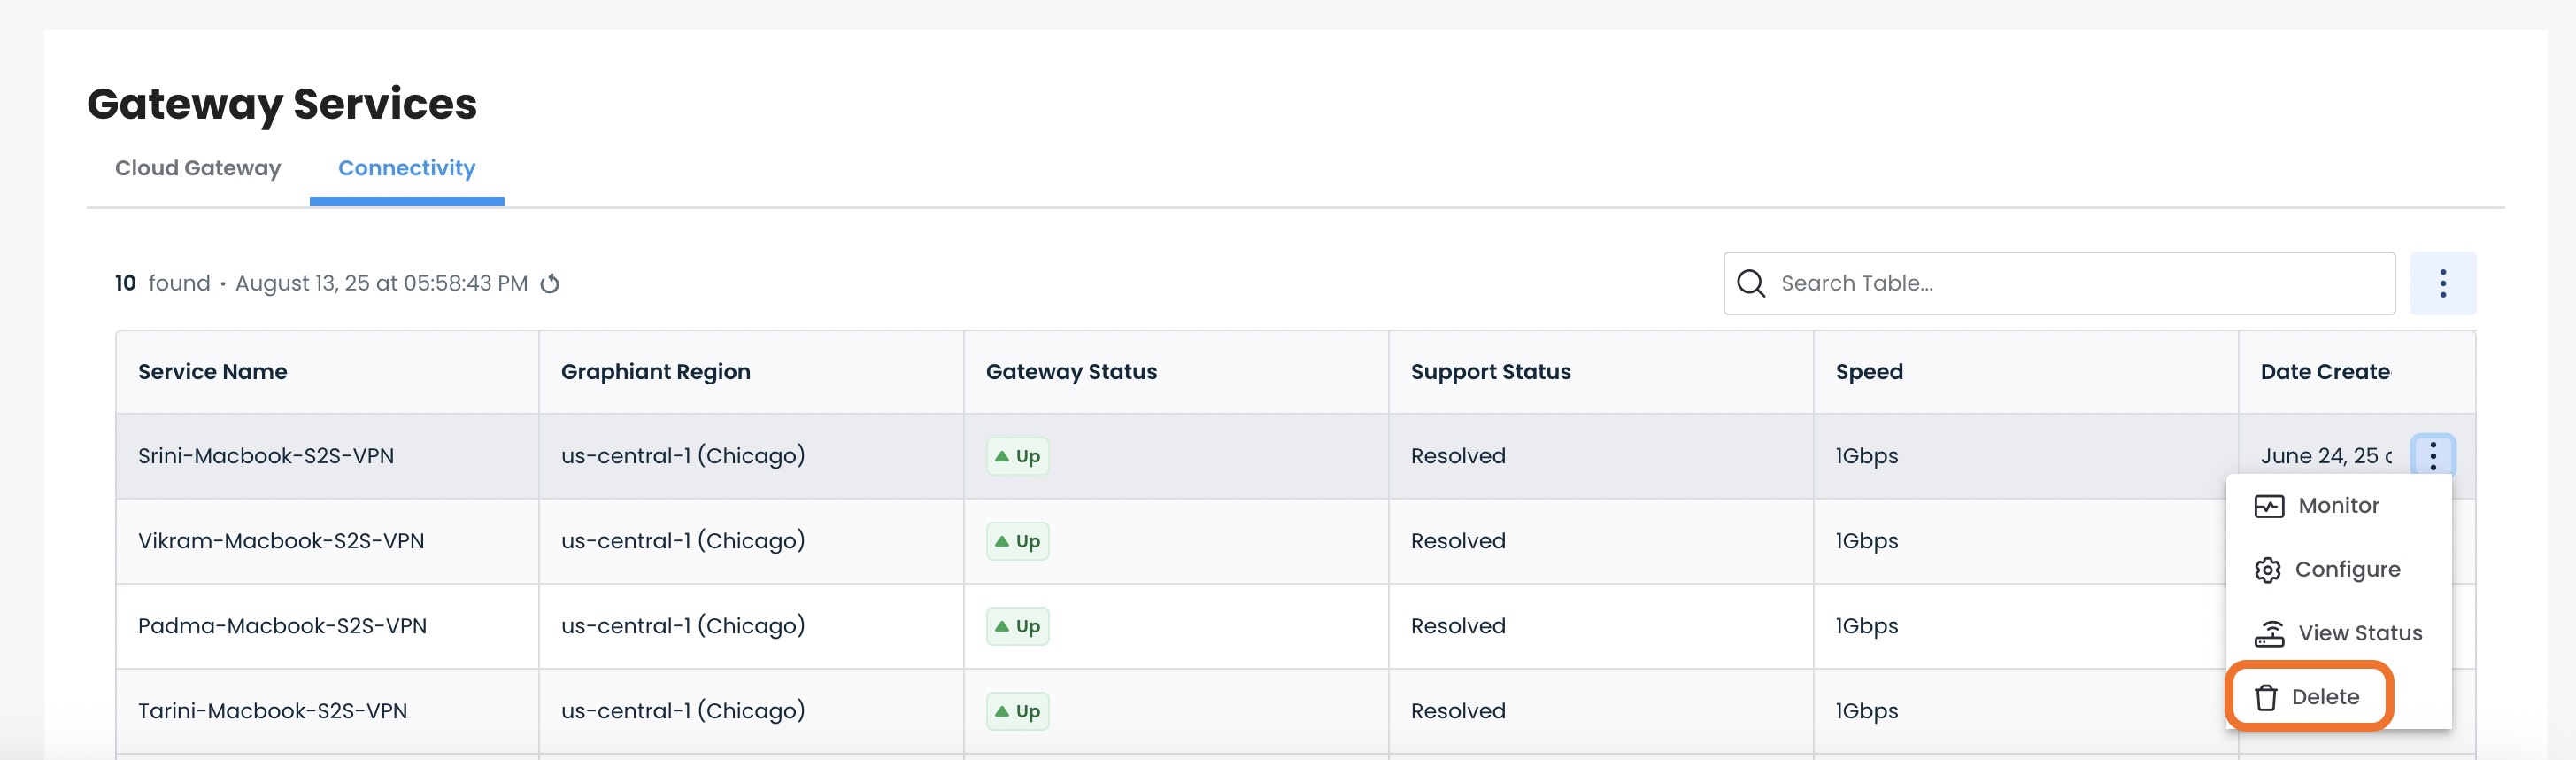
To delete a site-to-site VPN, navigate to the Gateway Services table “Connectivity” tab.
Click the ellipses to the right of that VPN; select ‘Delete’.
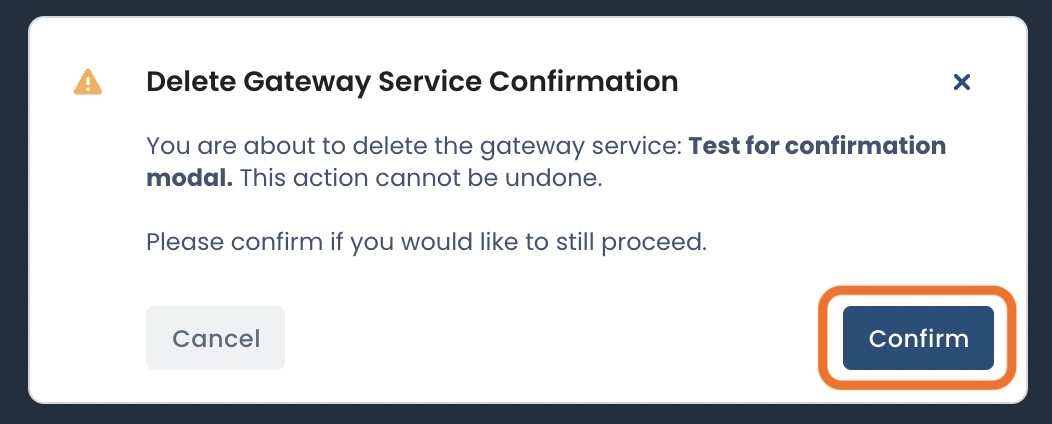
A modal will appear to confirm that you wish to permanently delete the site-to-site VPN.
Warning:
This action cannot be reversed.
If you are sure that you want to delete the site-to-site VPN, click ‘Confirm’.
The site-to-site VPN will be deleted, and no longer appear in the Gateway Services table.
Configuring a Site-to-Site VPN Locally on Your Graphiant Edge
This will create a VPN between a 3rd party router or firewall and your Graphiant Edge.
Locating Site-to-Site VPN on Your Graphiant Edge
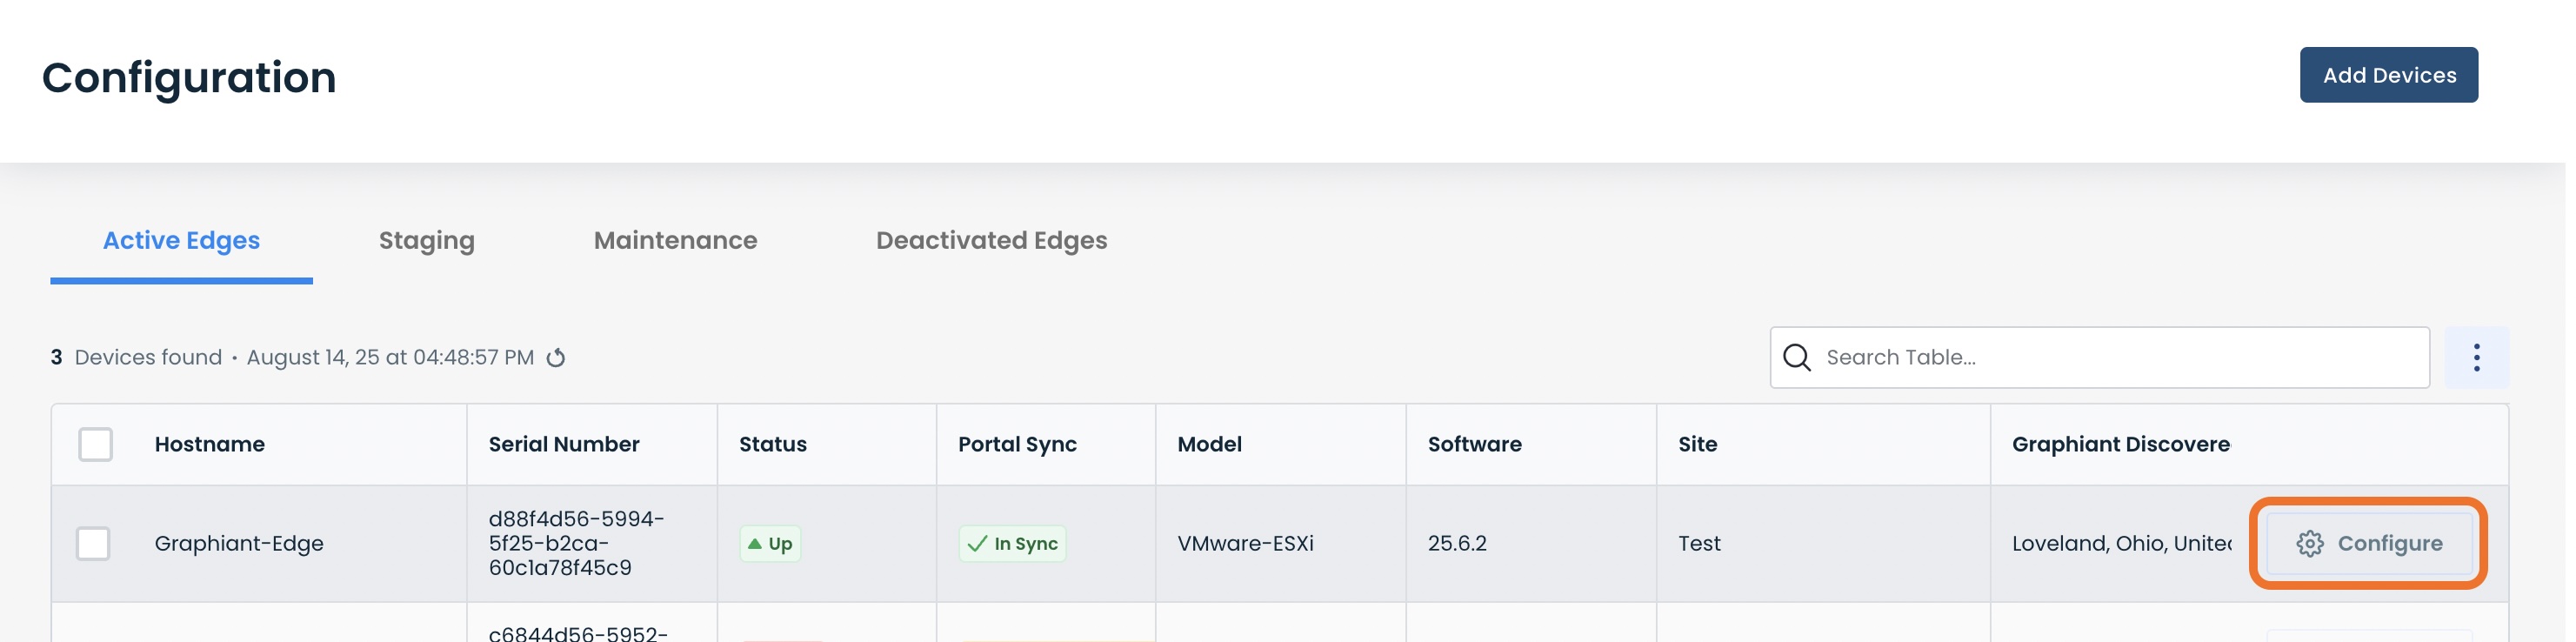
From the Home screen, navigate to the Edge Configuration screen by one of the following:
Locate the "Configurations" section within the “Quickstart” area of the screen; select ‘Configure Edges’.
or
Click 'Configure' in the sidebar; select 'Devices'.
.png)
This will take you to the ‘Configuration’ page of the Graphiant Portal where you can view all Active, Staged, and Deactivated Edges. From here you can select among the Active Edges which Edge(s) you would like to be configured with Site-to-Site VPN.
On the right hand side, select and click ‘Configure’ in tandem with the Edge you wish to manage.
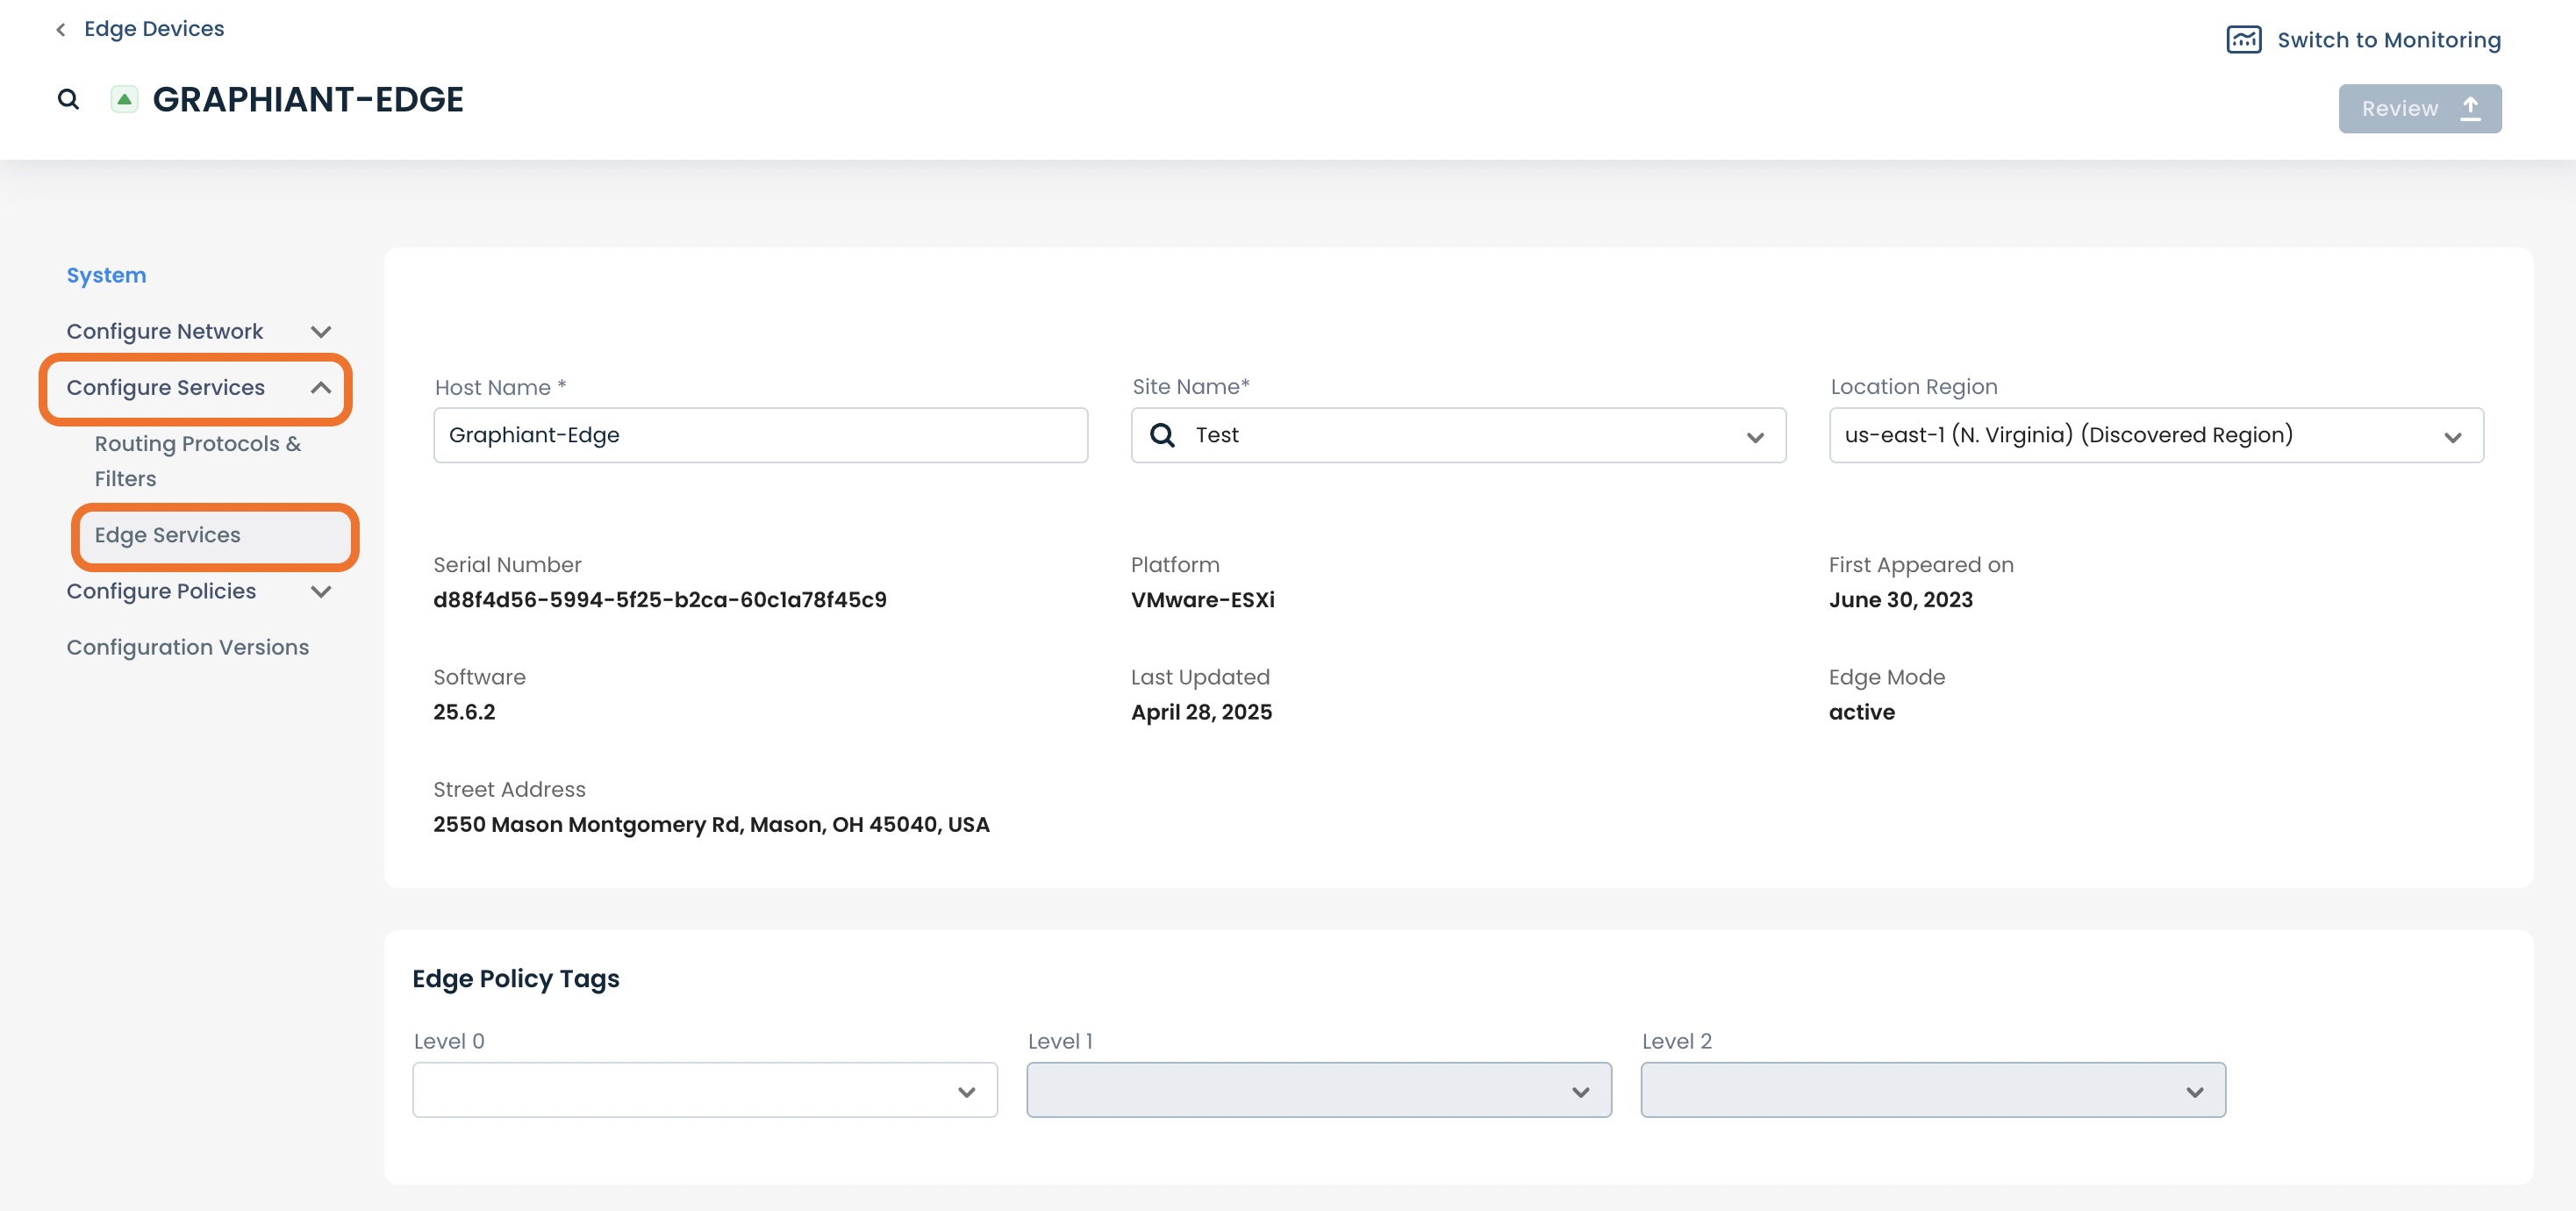
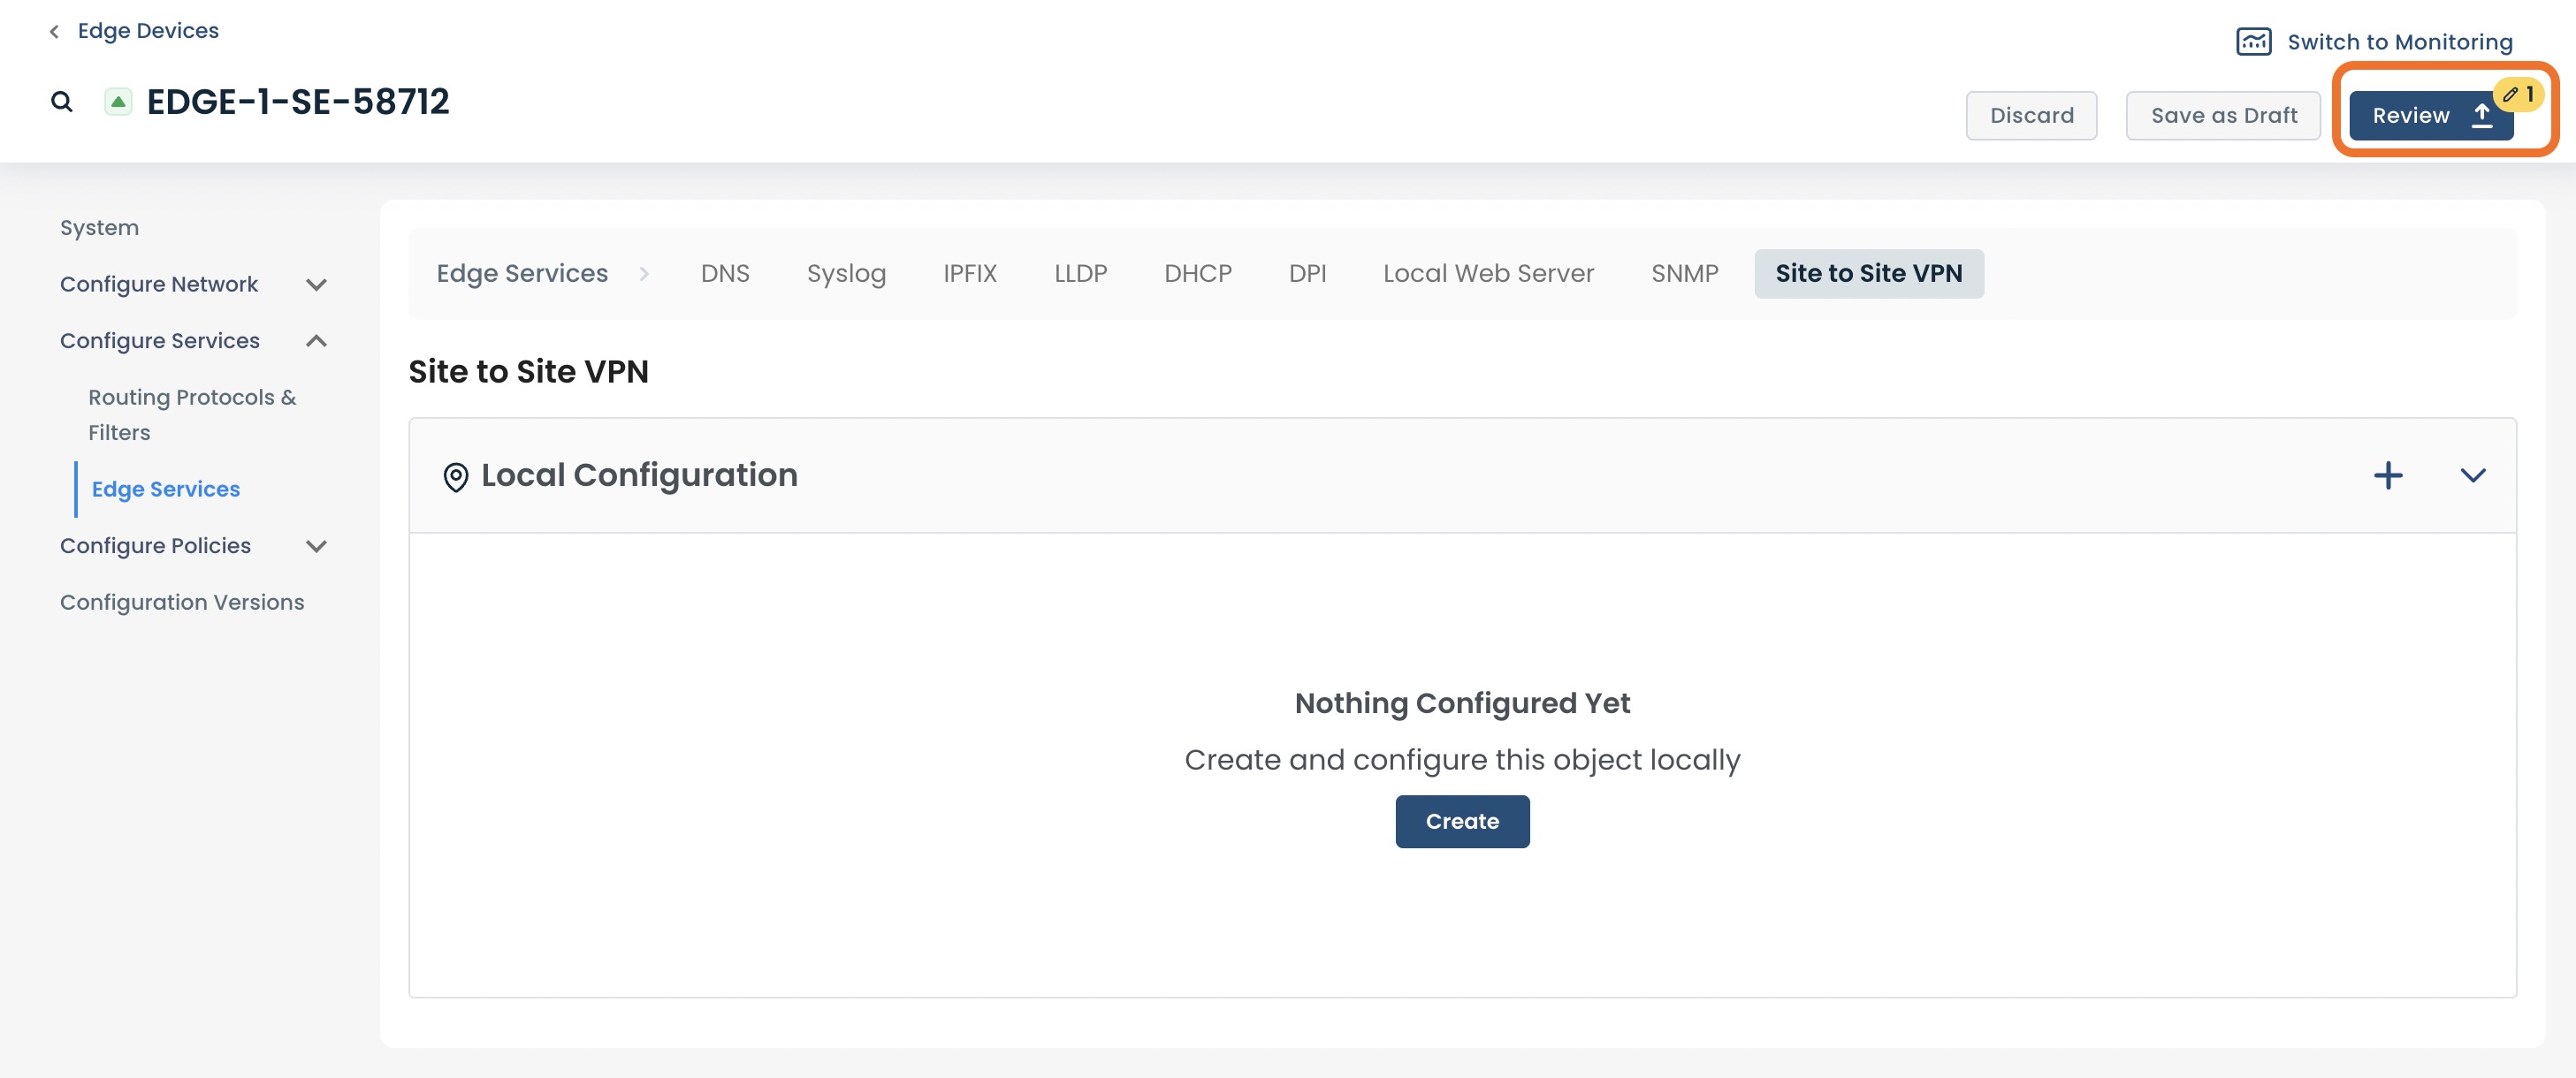
Under “System”, click ‘Configure Services’; select ‘Edge Services’.
Select the ‘Site to Site VPN’ tab.
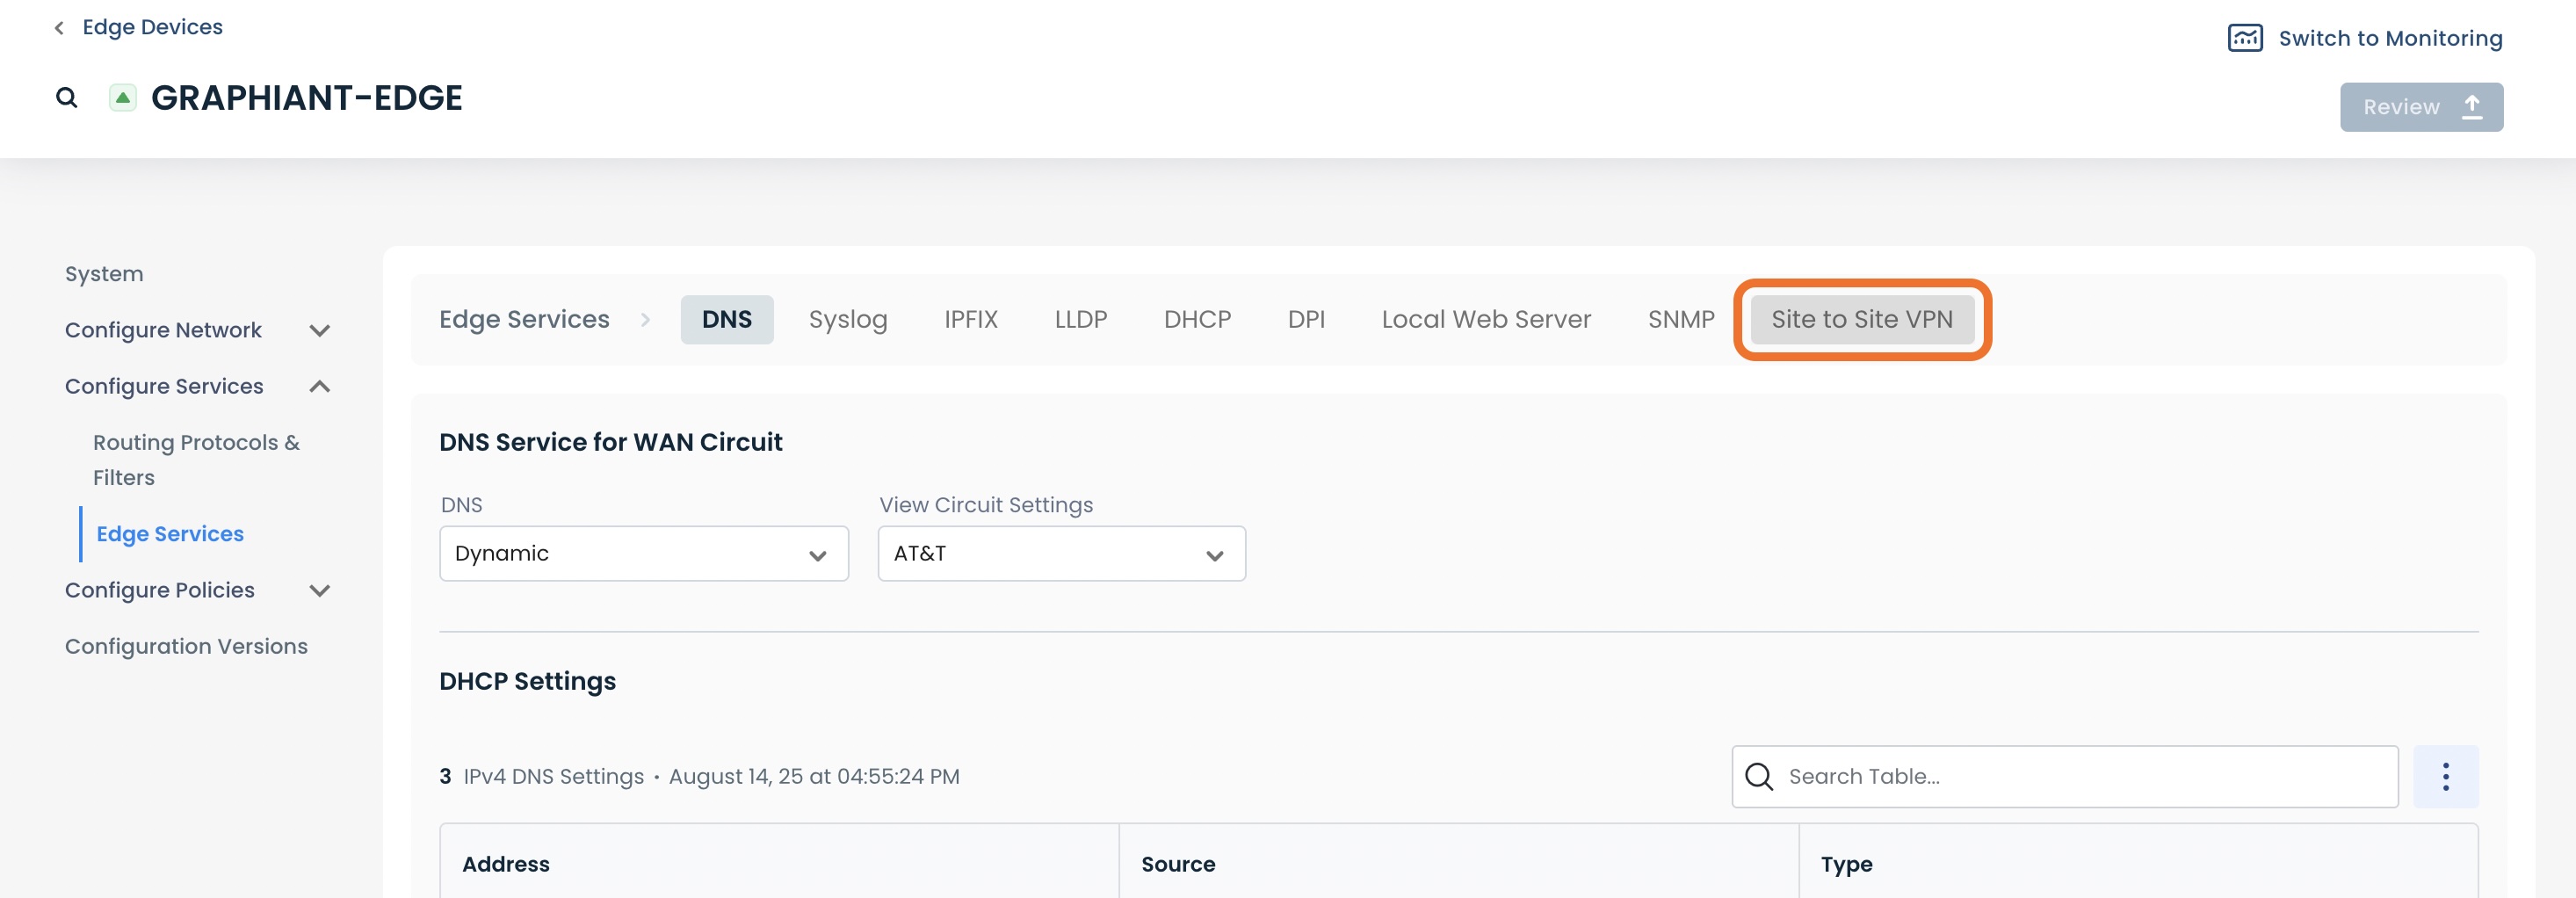
This will take you to the landing page for any site-to-site VPNs that are local to your Graphiant Edge, along with the capability to create new ones.

Creating the Site-to-Site VPN
Click ‘Create’ to create a new site-to-site VPN.
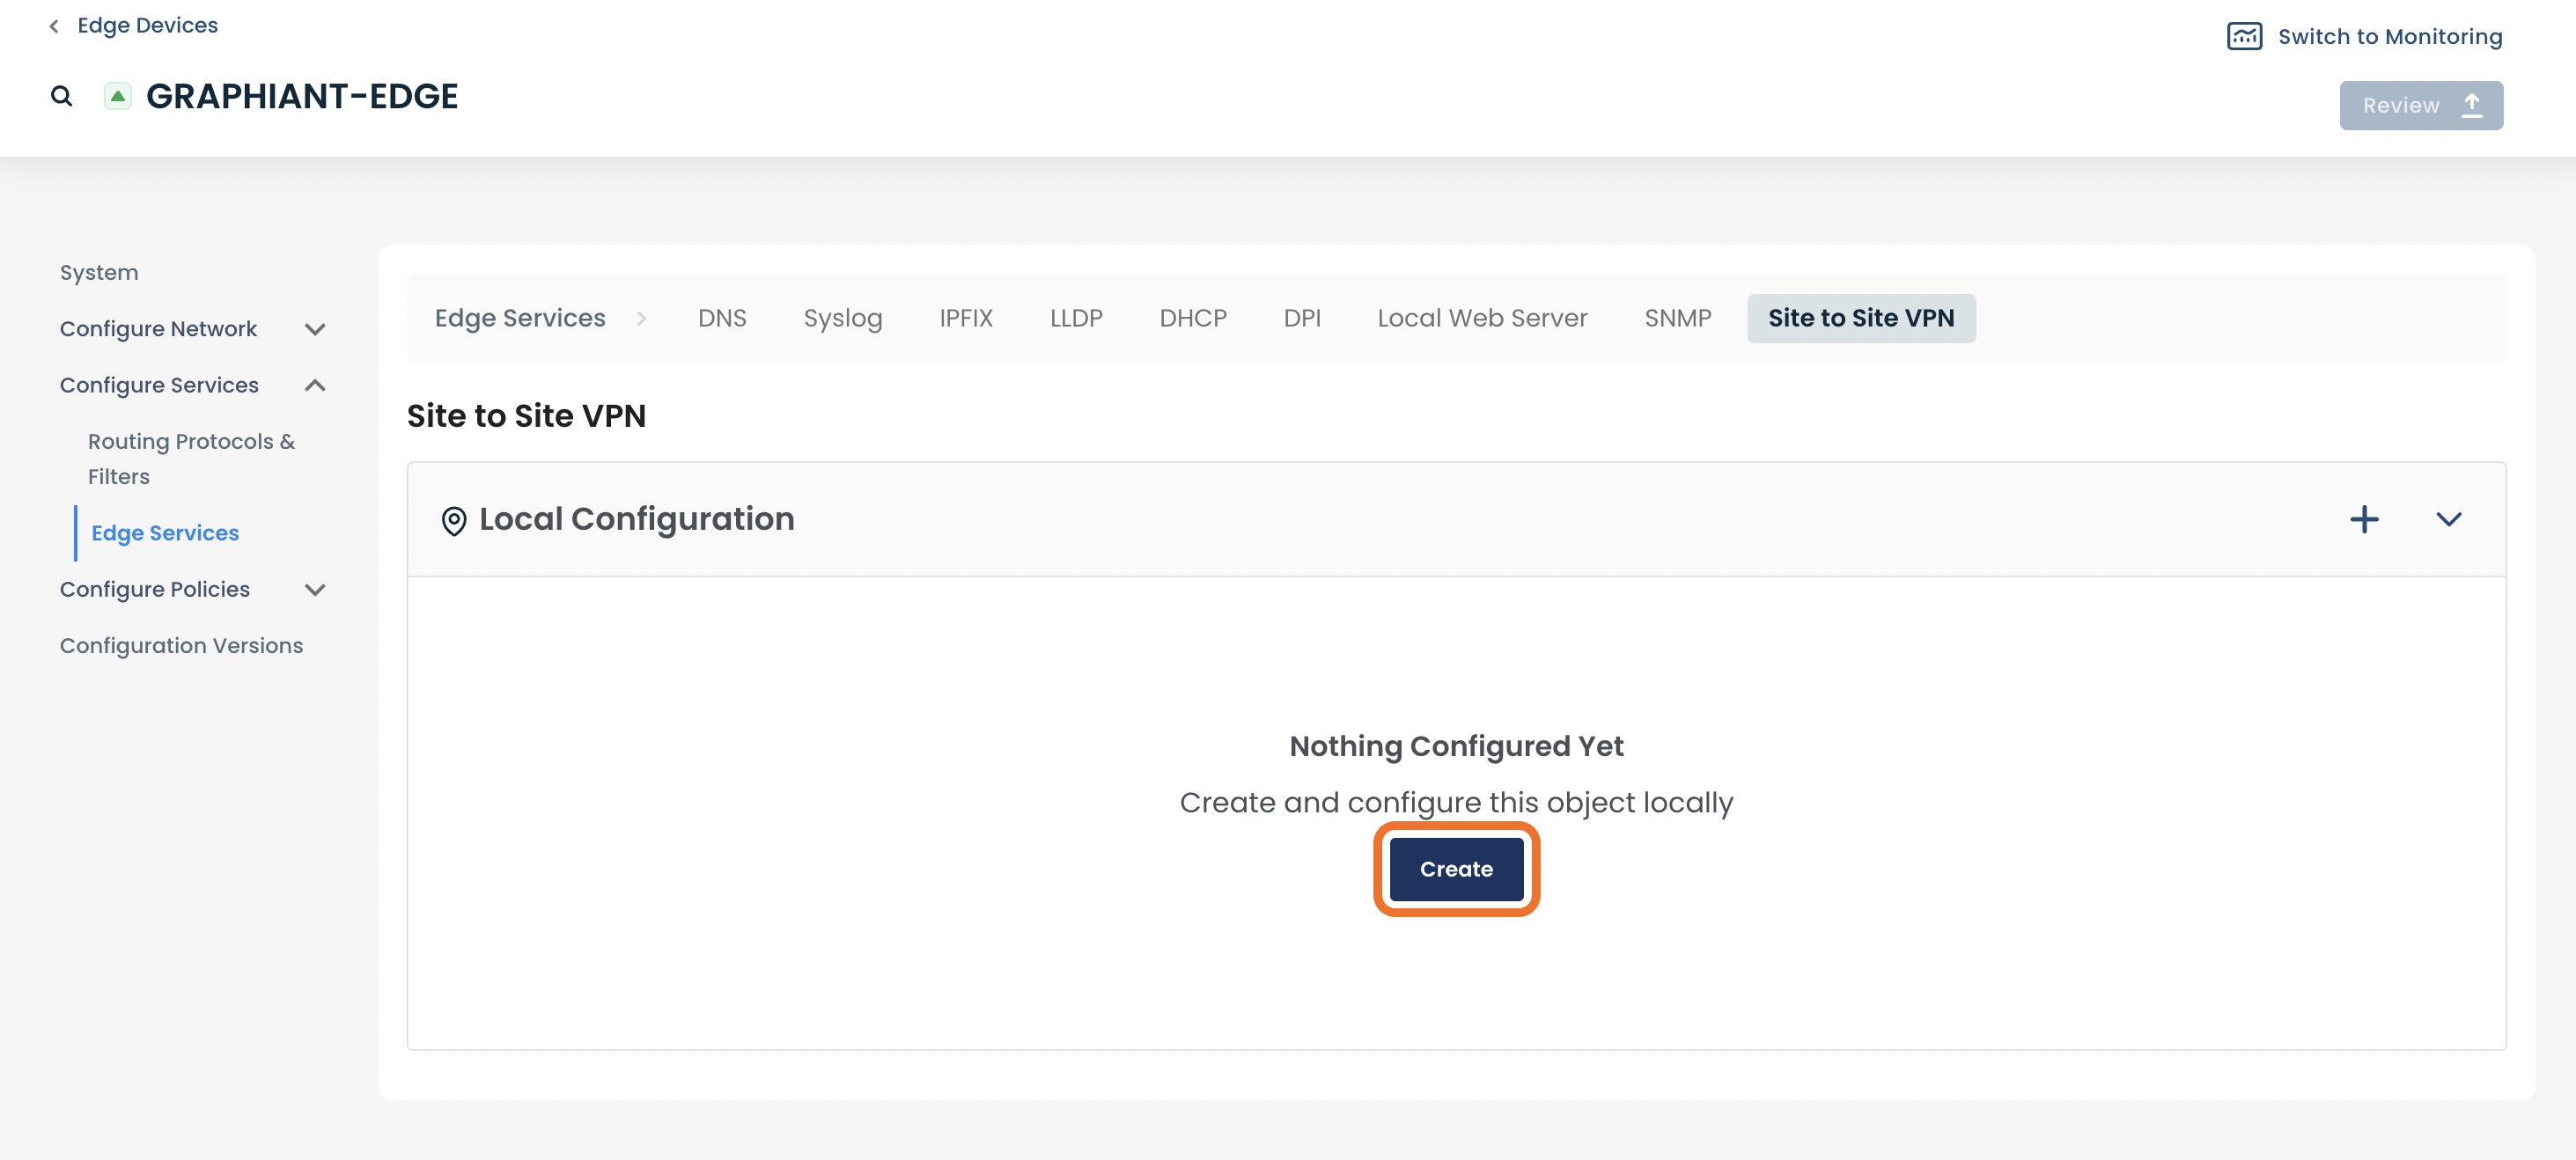
This opens the configuration page for the Site-to-Site VPN.
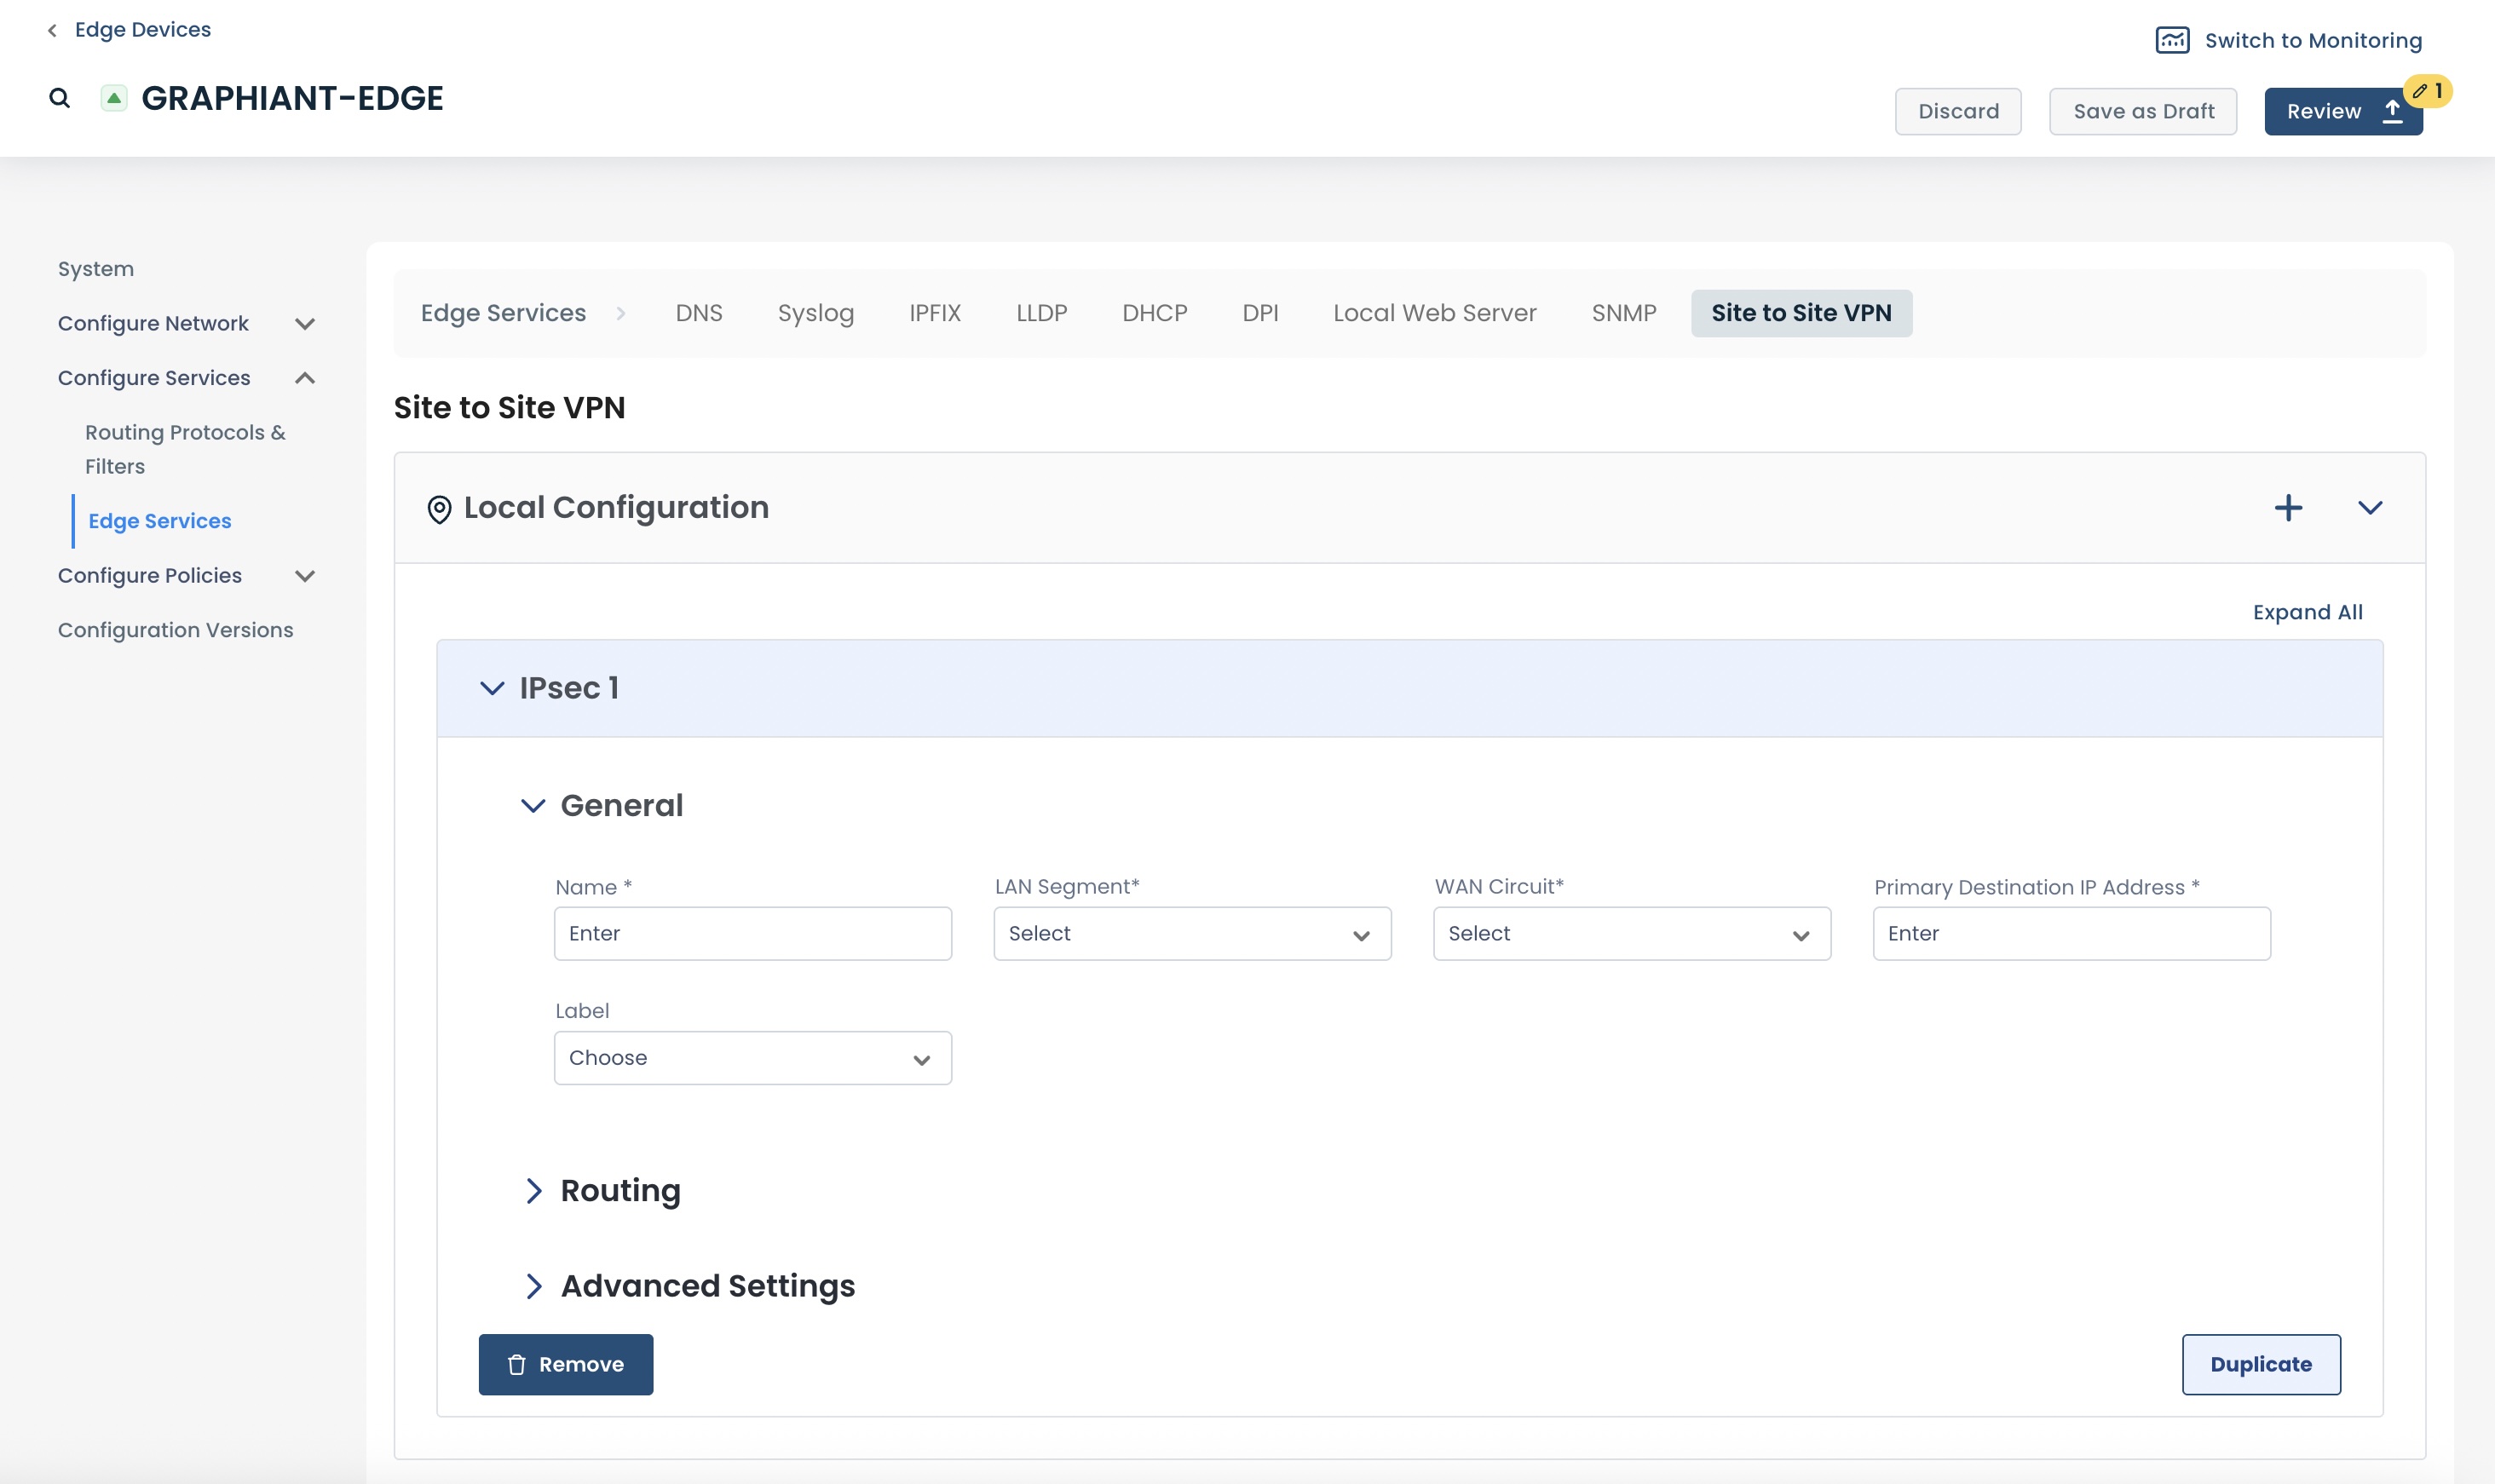
You are now ready to create a site-to-site VPN on your Graphiant Edge.
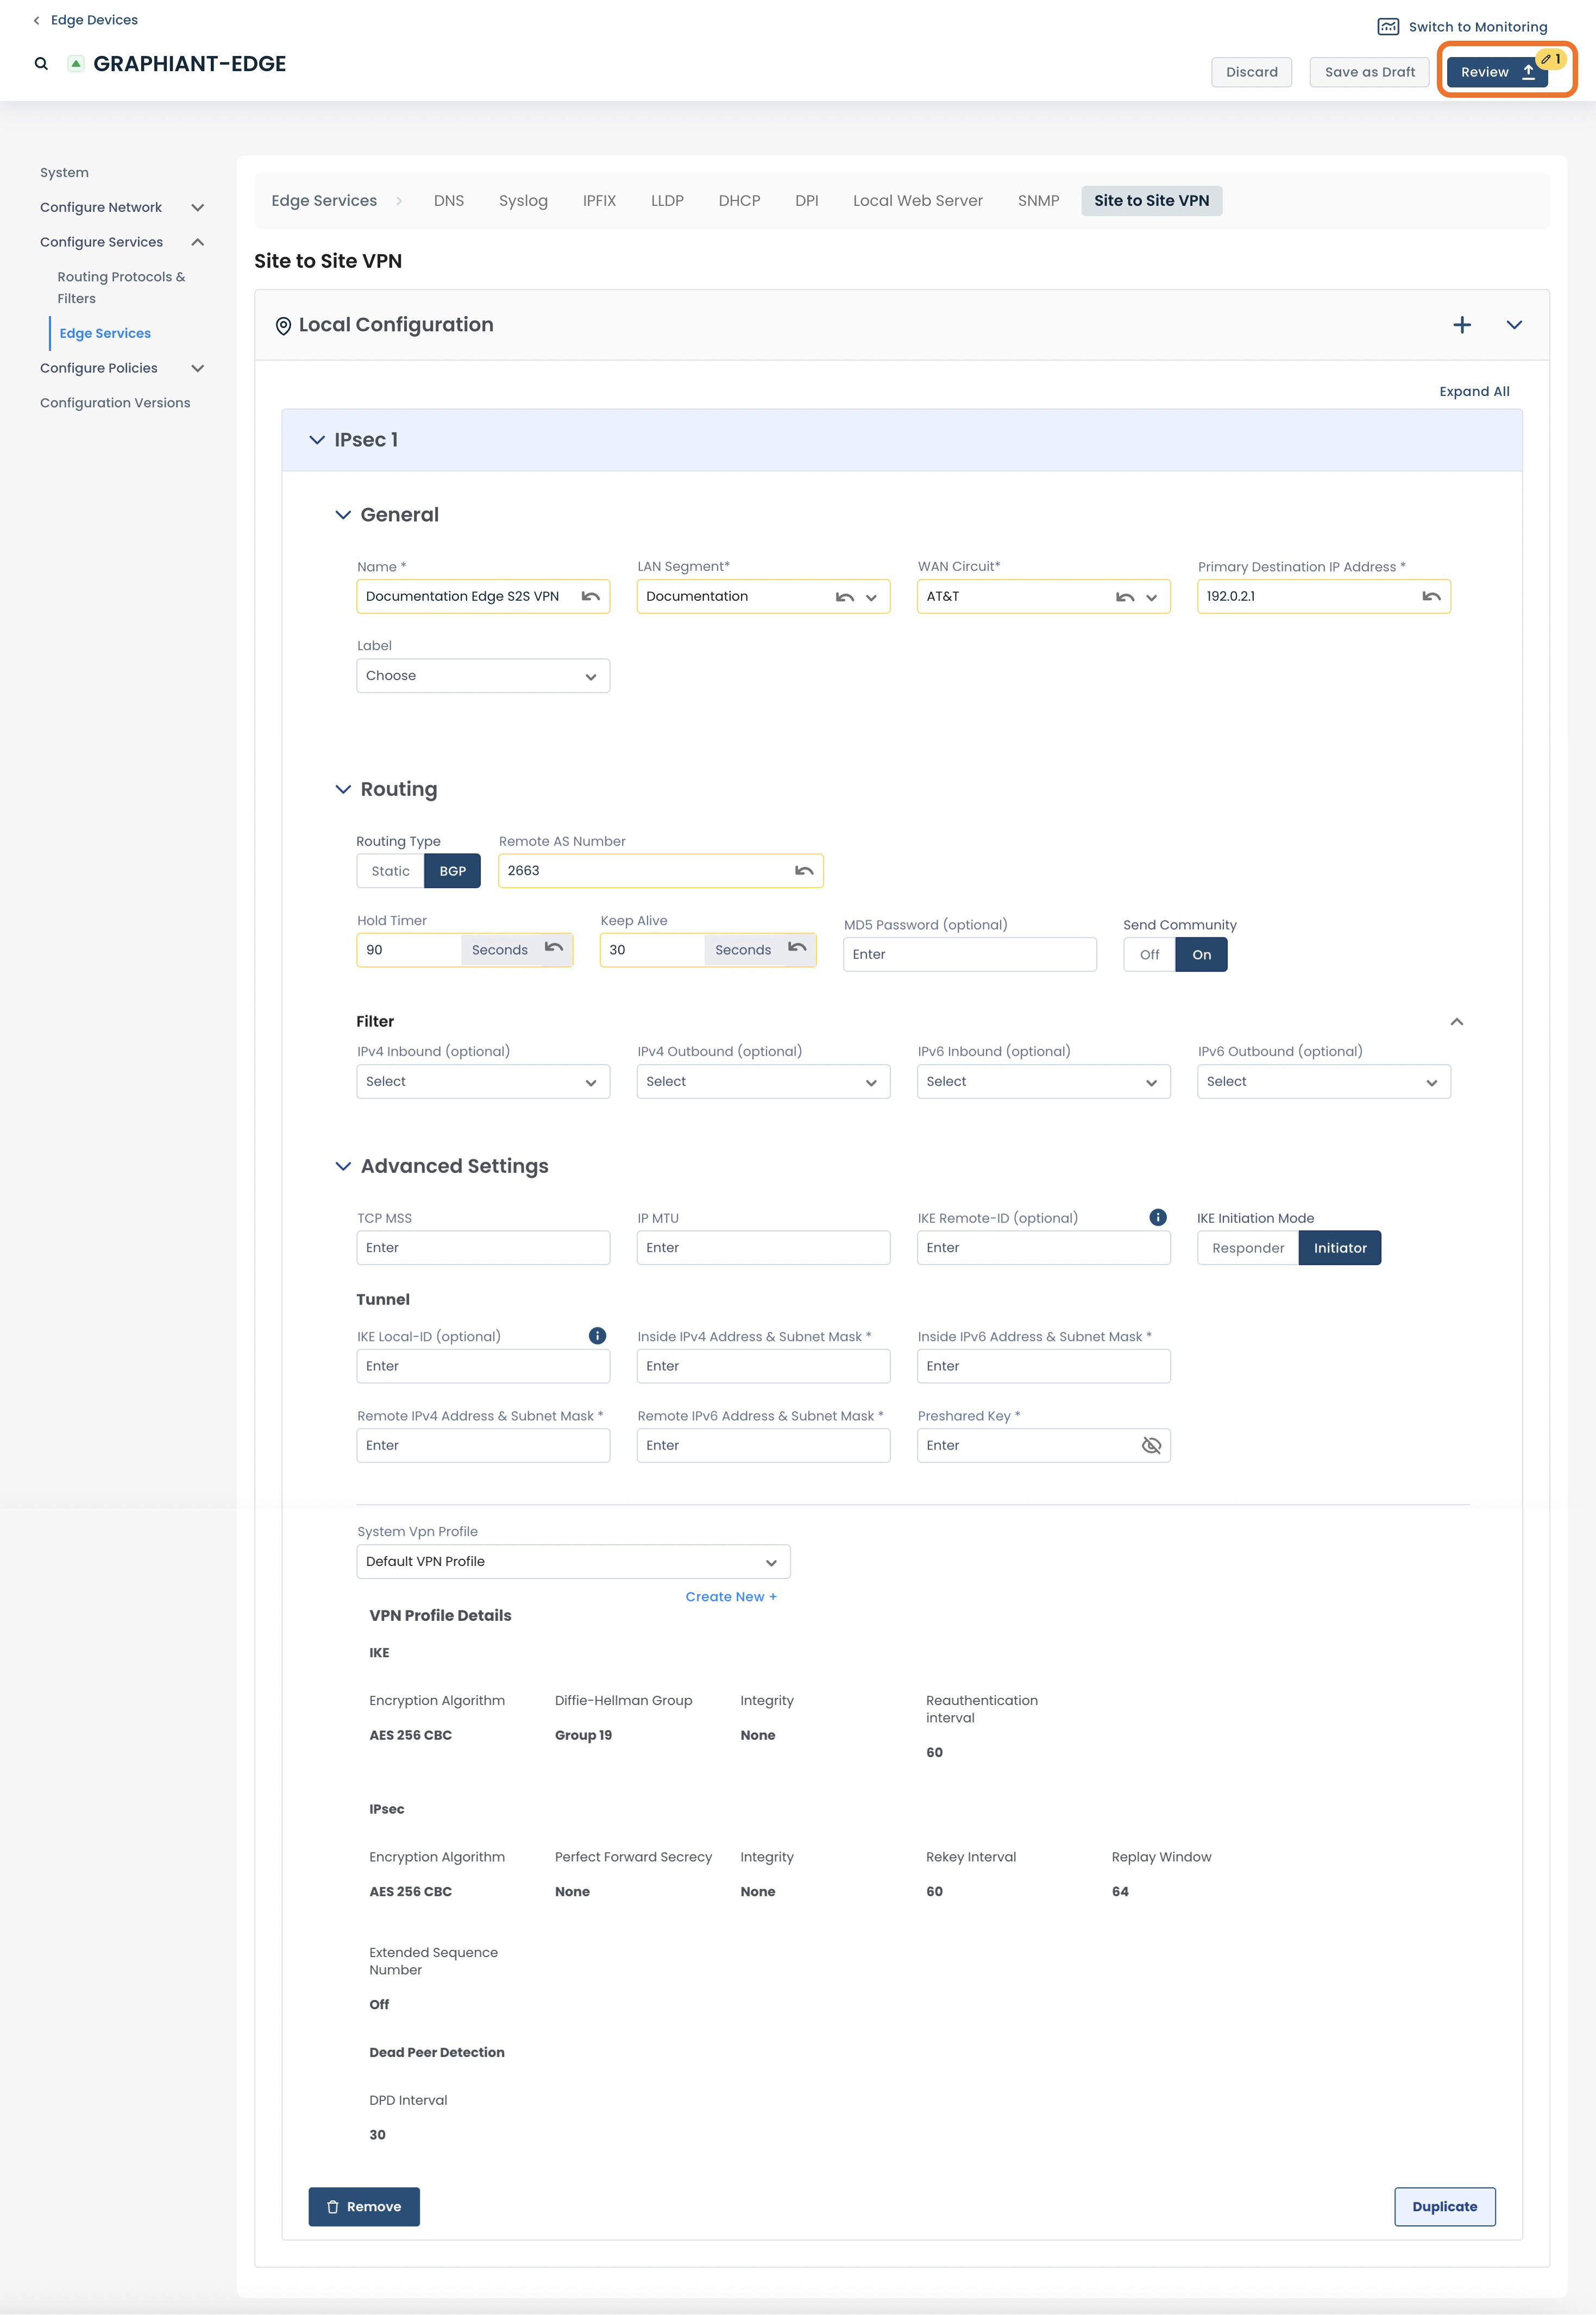
There are 3 categories to configure:
General
Routing
Advanced Settings
.jpg)
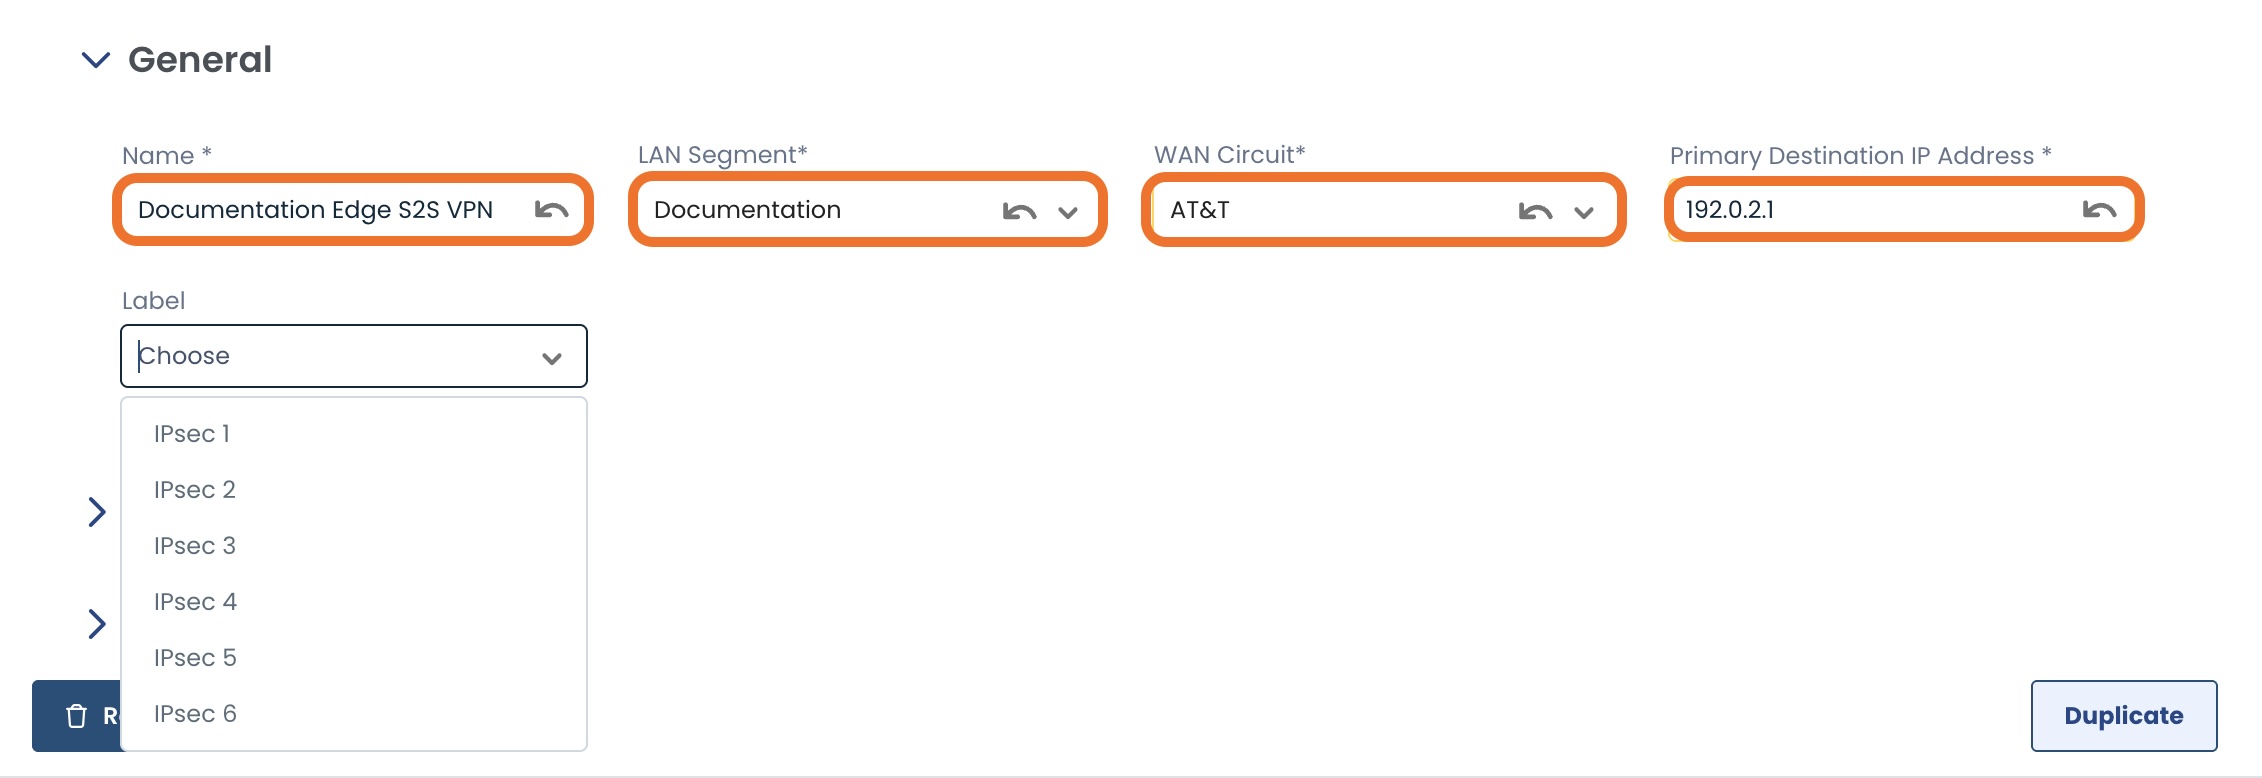
General:
Fill out the followiing fields:
Name: The name for this particular VPN
LAN Segment: The Graphiant LAN Segment that your 3rd party device will connect to
WAN Circuit: The WAN Circuit on which to terminate the incoming VPN connection
Primary Destination IP Address: Public IP address of the 3rd party device with which you will connect to the Graphiant core
Label (optional): An identifier so that you can quickly recognize which of your site-to-site VPNs are associated with the same tunnel
Ensure that:
Your destination IP address are unique for every site-to-site VPN.
Routing:
In the routing section, you have a choice of Static or BGP routes.
Note:
This section is completely optional if you are using a Static route without a return route to your Graphiant LAN network. Should you need a return route or wish to choose BGP routes, expand the section and complete as desired.
Static Routes
The default Routing Type is “Static”.
For Static routes:
Although it’s not required to include a return route to your Graphiant LAN network, if you need such a route, be sure to include one under ‘Subnet’.
Subnet: Enter the remote subnet(s) that your devices on the prior selected Graphiant LAN Segment will need to reach via the VPN
BGP Routes
Should you choose to utilize BGP routes for your VPN connection, the “Routing” section will expand to include the fields shown below.
Click the toggle to turn on ‘BGP’.
Enter the AS Number from the 3rd party device’s BGP setting.
The AS Number is the only required field for BGP.
The remaining fields are optional, and if left blank will be populated with default values:
Hold Timer: The period of time to wait for messages from the BGP neighbor before considering that neighbor unreachable; default is 90 seconds.
Keep Alive Timer: The interval at which messages to the neighbor are sent to maintain the BGP session and check that the neighbor is reachable.
MD5 Password: The shared password for authentication between the BGP neighbors.
Send Community: Specifies that the router should support sending BGP communities to that neighbor. Sending Communities is 'Off' by default.
Inbound Filters: Control what routes you accept from a neighbor
Outbound Filters: Control what routes you advertise to a neighbor
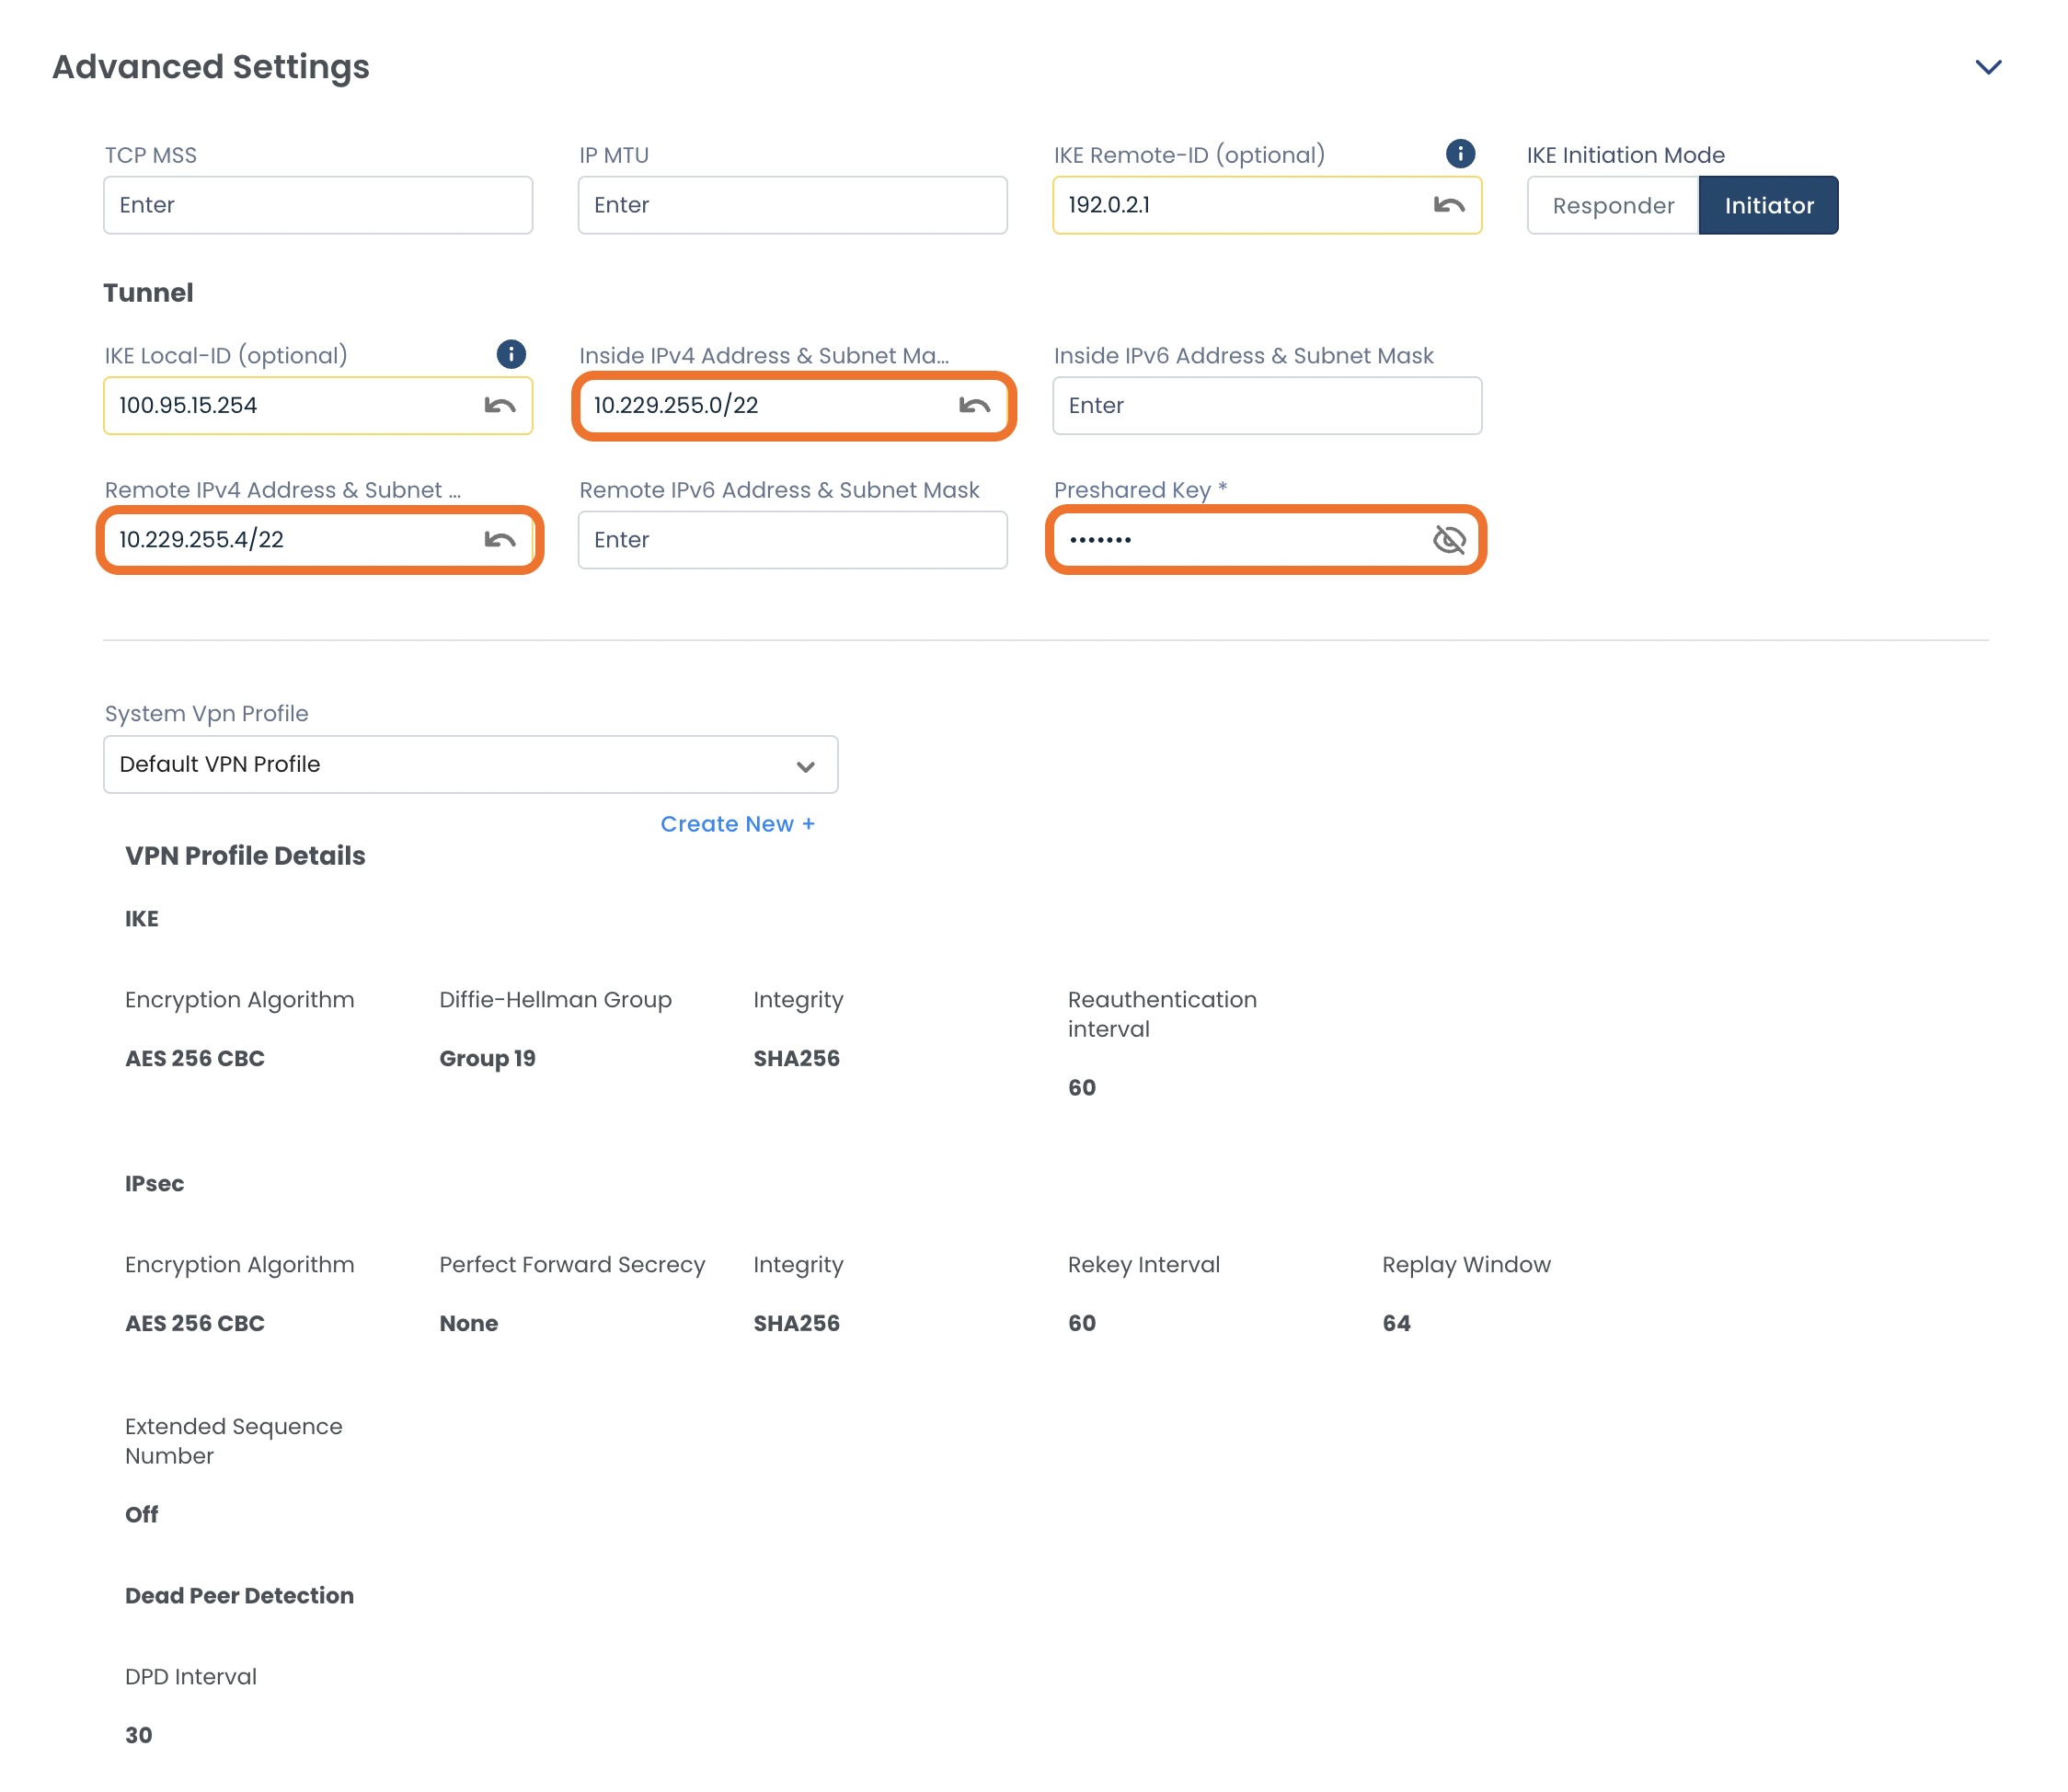
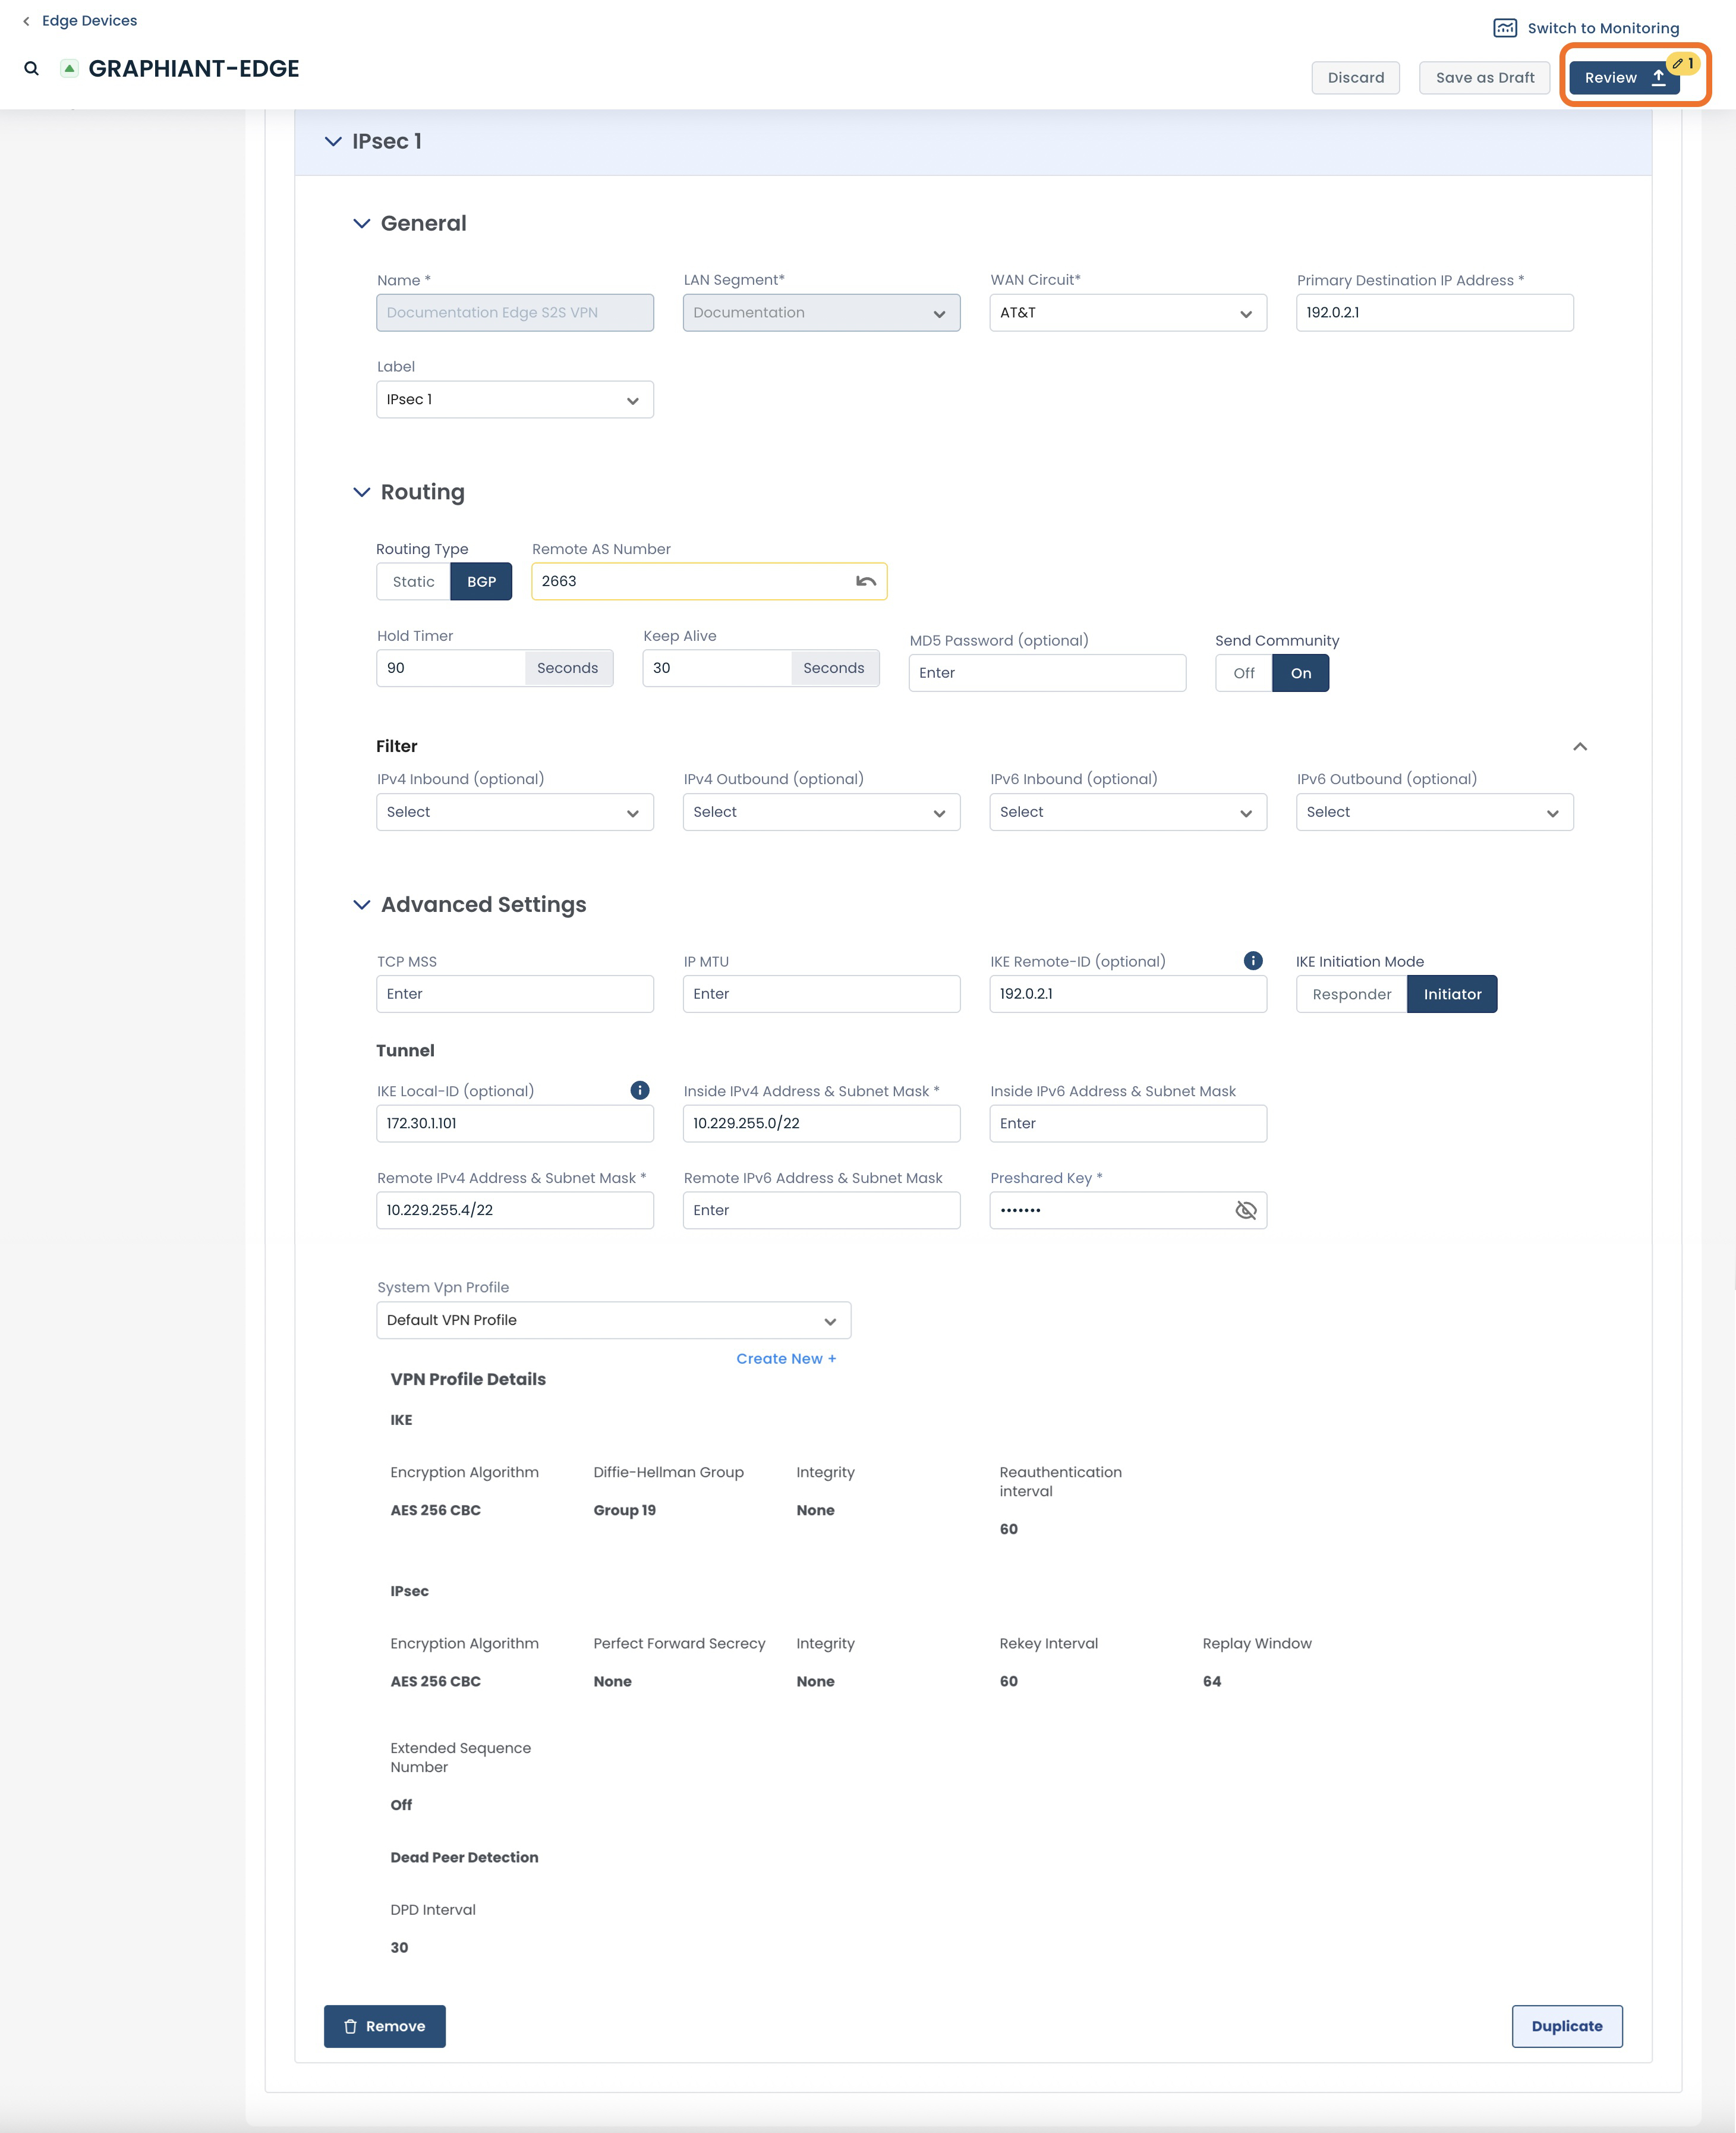
Advanced Settings
These fields are required:
Inside Address and Subnets (IPv4 or IPv6): The inside tunnel address assigned to your local VPN device
Remote Address and Subnets (IPv4 or IPv6): The inside tunnel address assigned to the remote VPN device
Caution:
The Inside and Remote addresses must be on the same subnet.
Preshared Key: Shared secret used to authenticate both ends of the VPN tunnel
The optional fields are as follows, and if left blank will be populated with default values:
TCP MSS: Maximum TCP segment size allowed through the VPN to prevent fragmentation
IP MTU: Largest IP packet size (including headers) that can be transmitted without fragmentation
IKE Remote ID: Your device’s identity in the IKE negotiation
IKE Initiation Mode: Determines whether this gateway starts the VPN negotiation (Initiator) or waits for the remote side (Responder)
IKE Local ID: The identity of the peer device
System VPN Profile: The VPN Profile that best matches your encryption needs.
Note:
The System VPN Profile will be prefilled with the default profile, but you can also:
Select any profile you have created by using the drop-down menu.
Create a new profile by clicking ‘Create New +’. This will open a modal to configure a new VPN profile. For more information regarding creating VPN Profiles, click here.
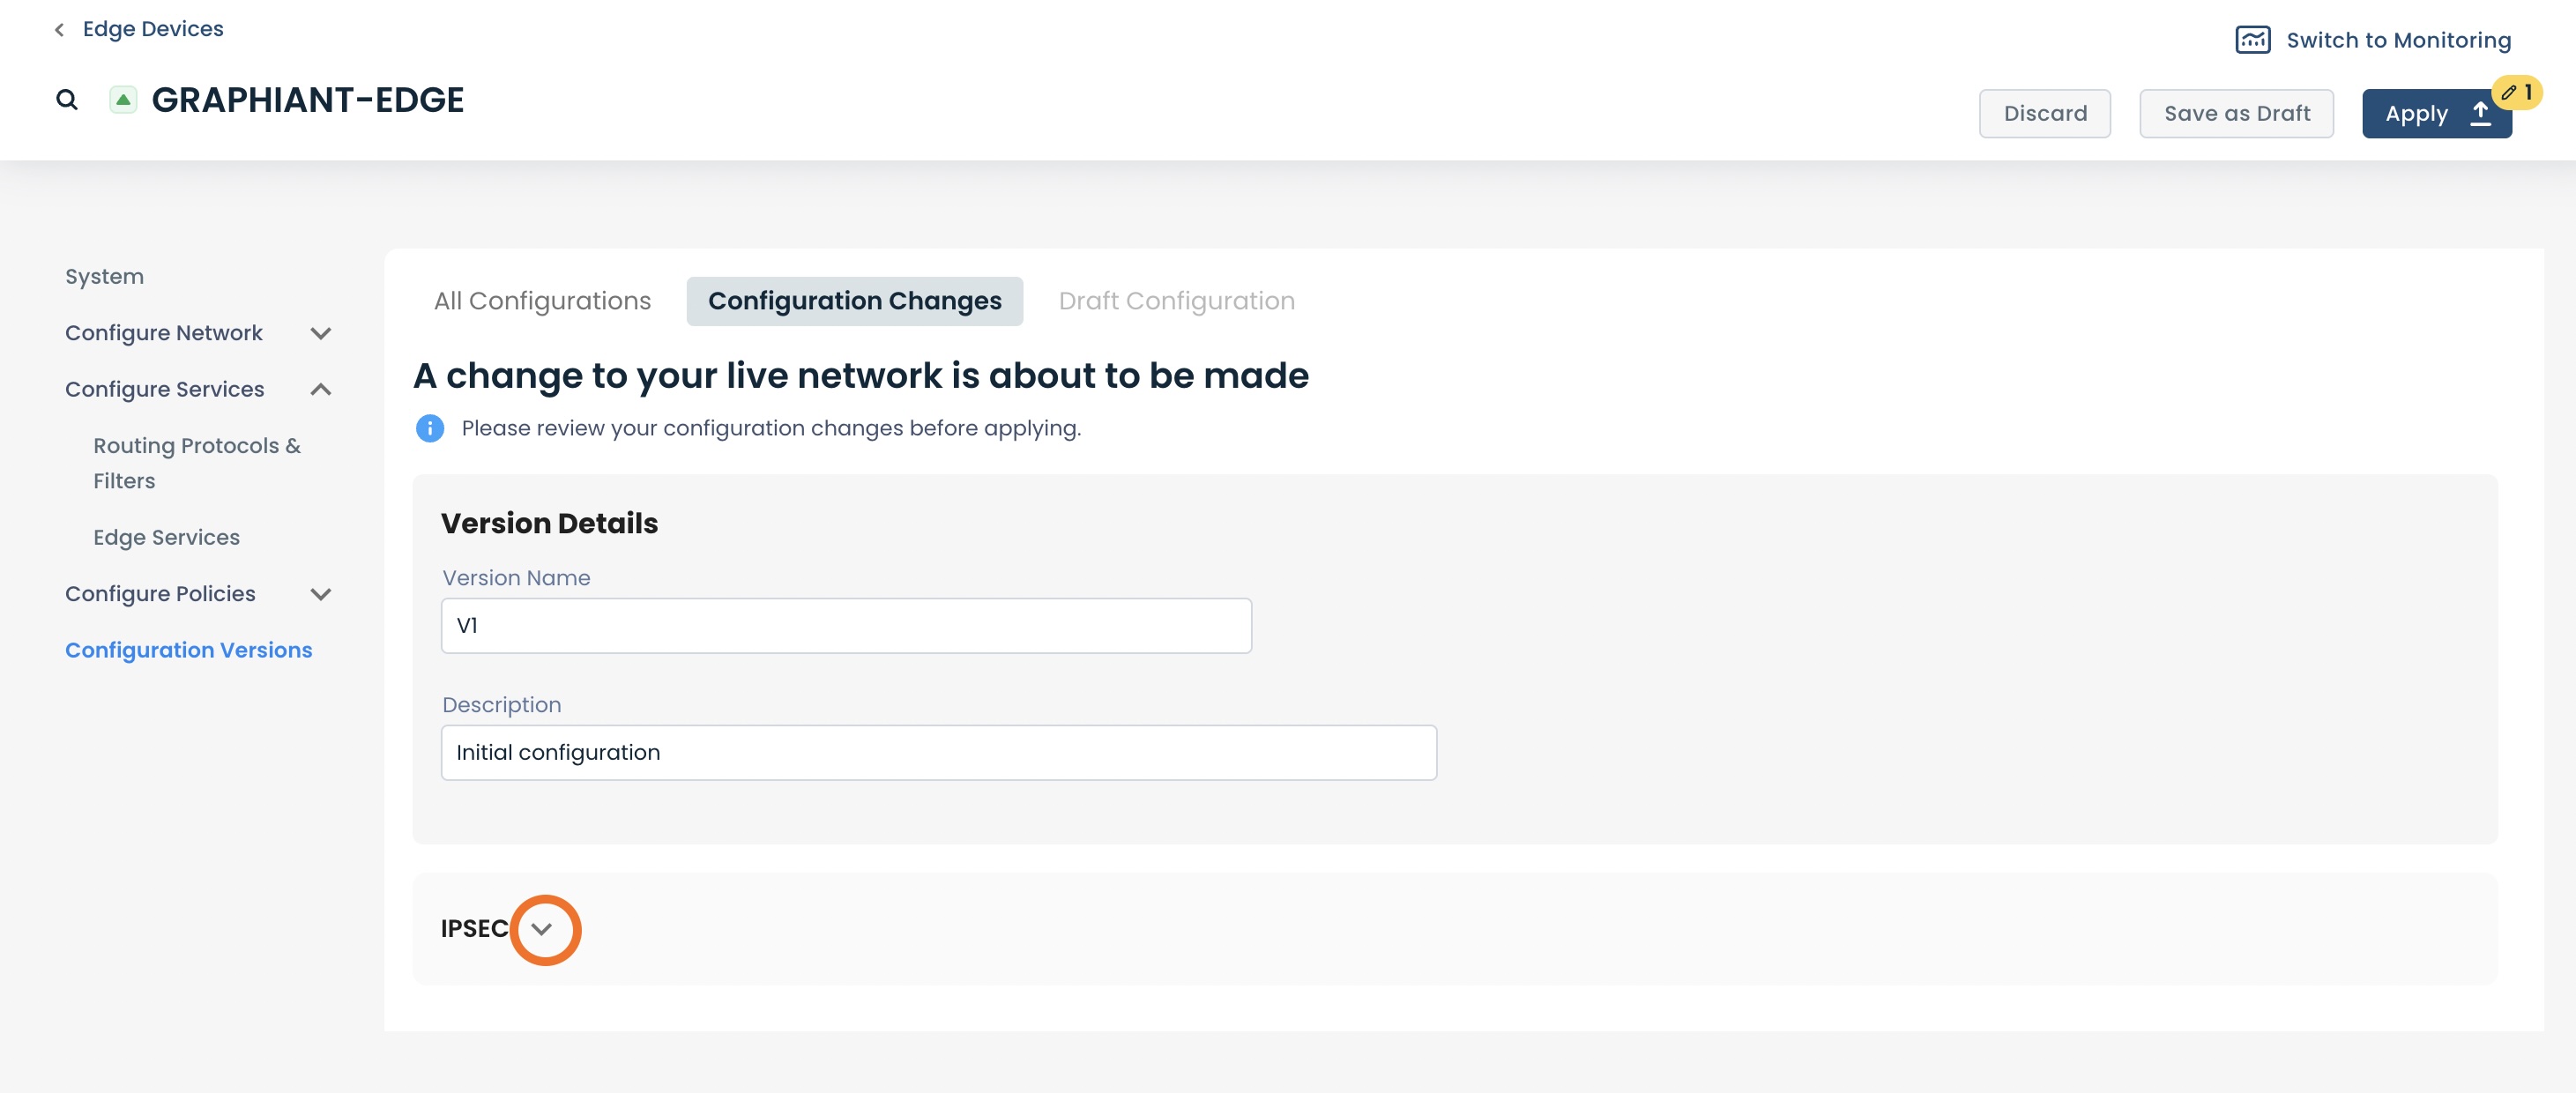
After all sections are filled out to your specifications, click ‘Review’ at the top right.
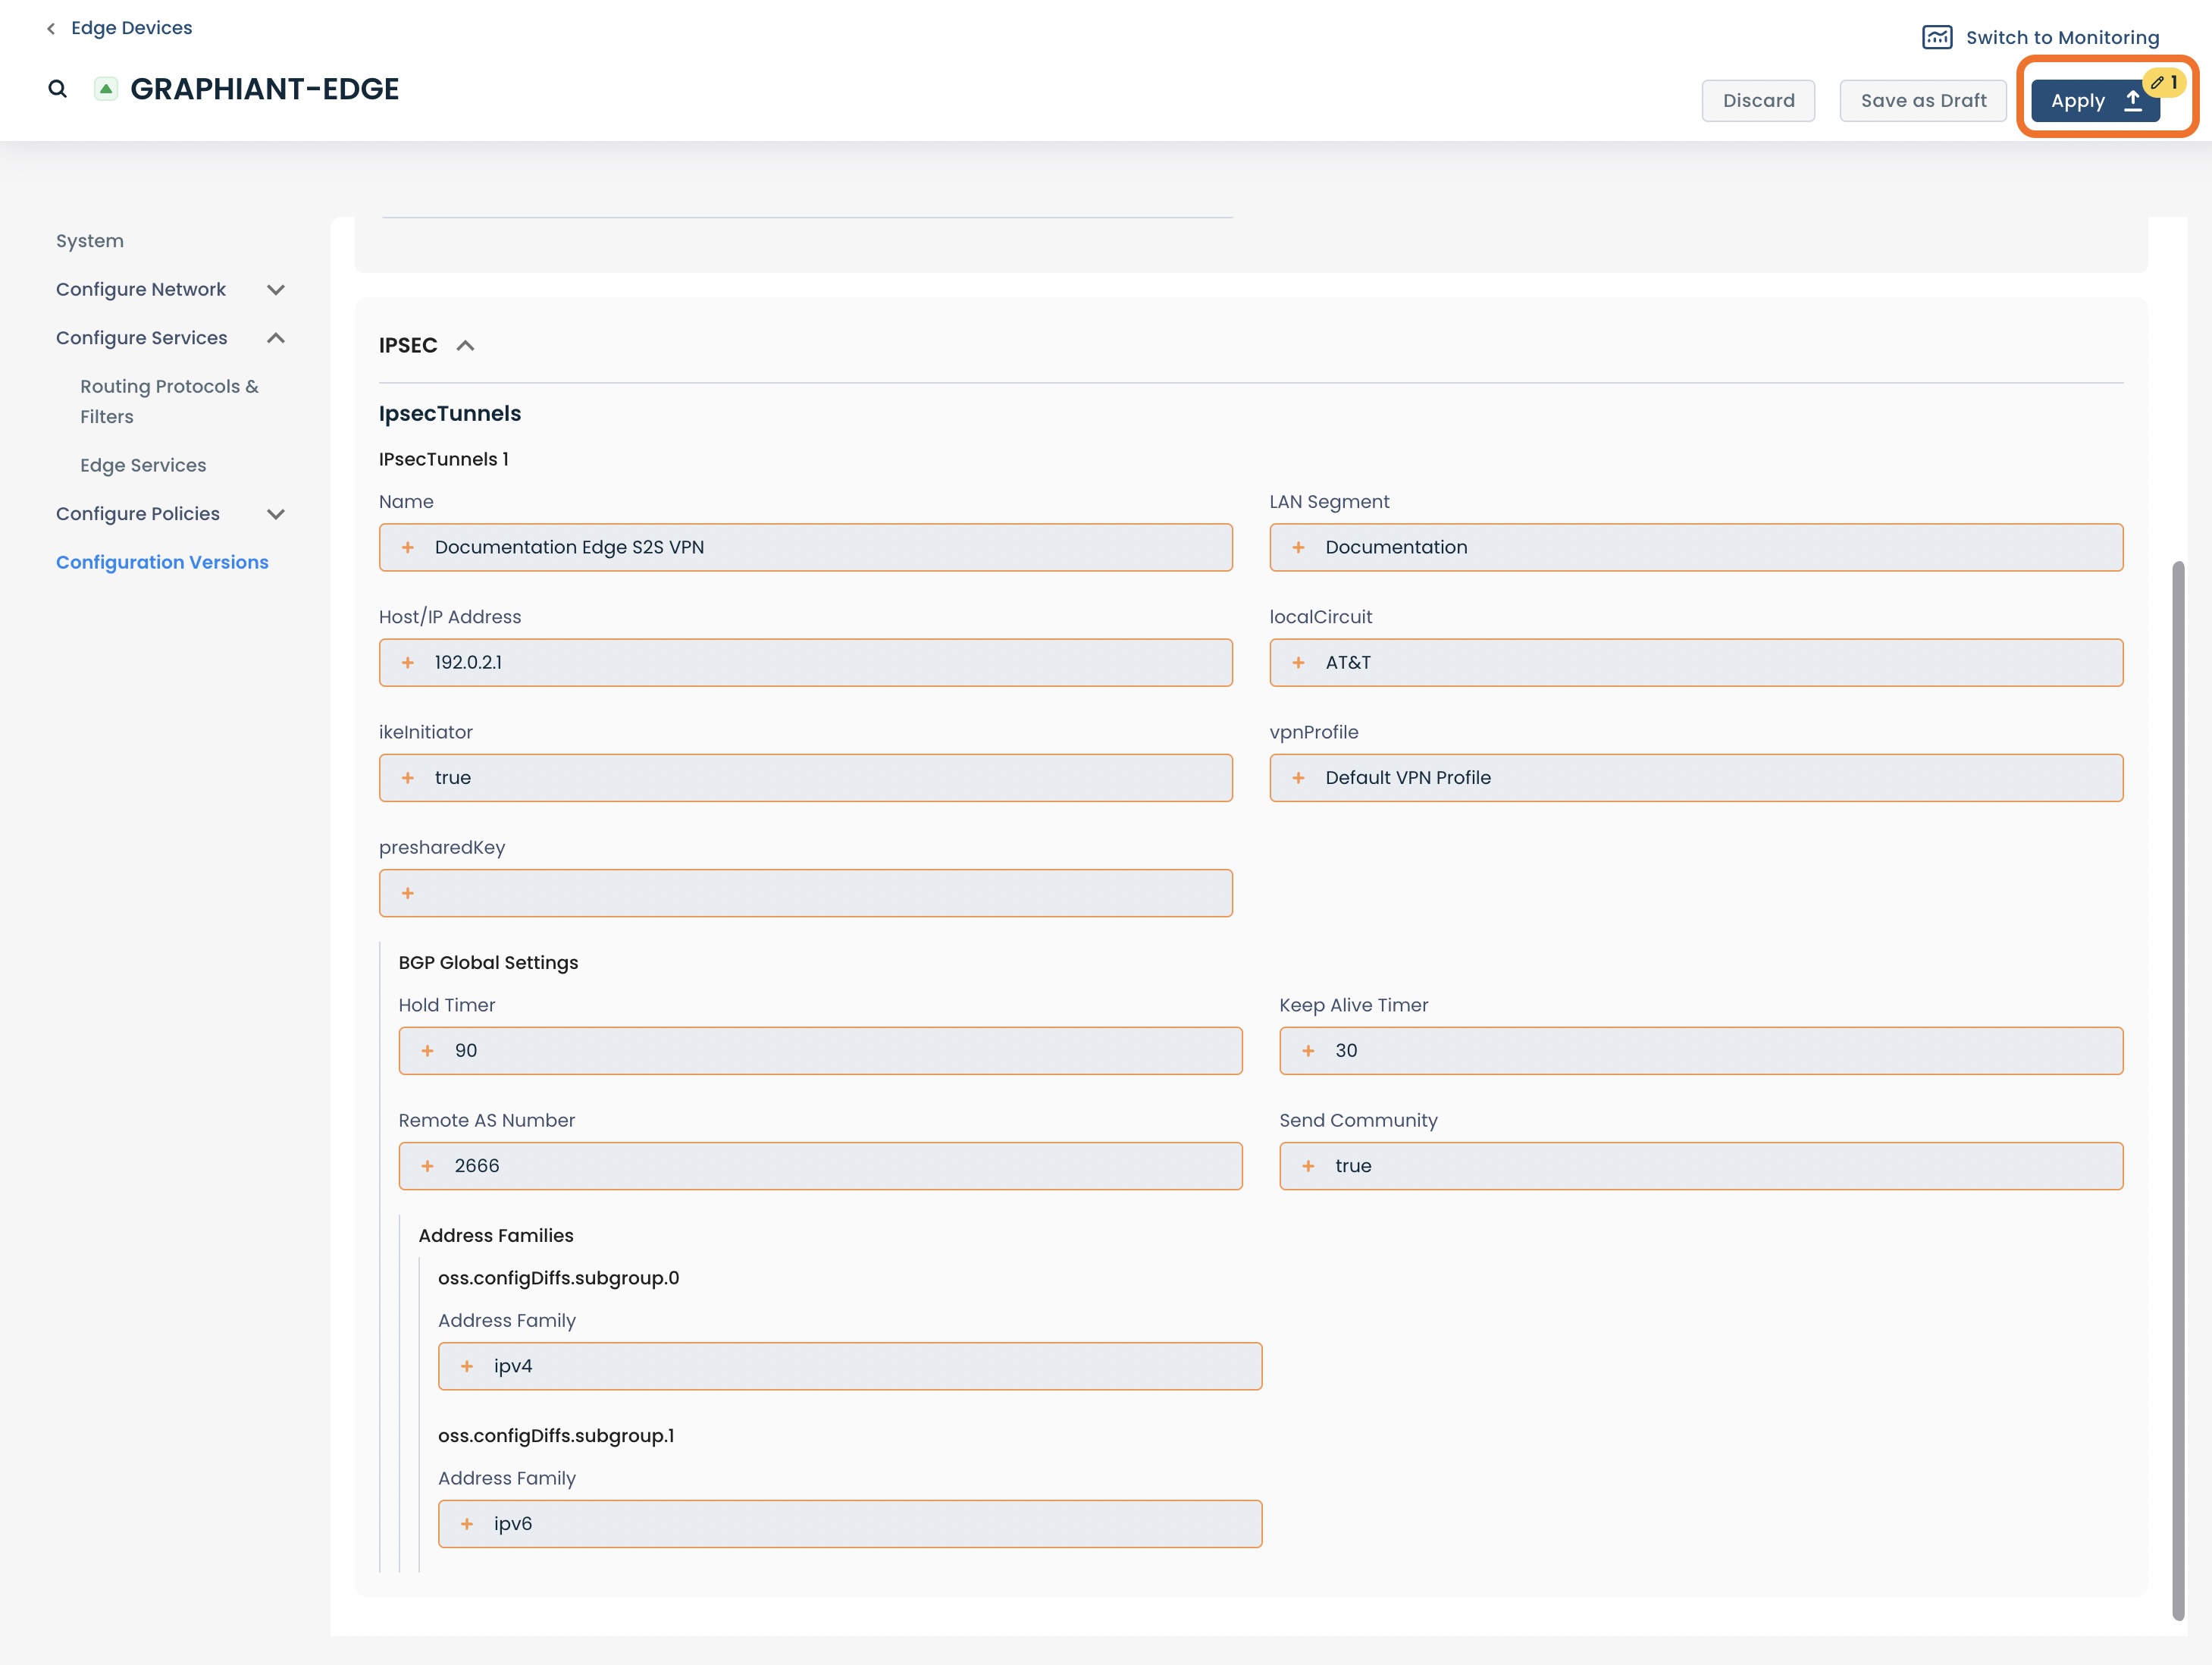
This will open a screen where you can review and verify your configuration by clicking on the caret next to “IPSEC”.
If desired, you can label the details of this configuration by entering the Version Name and a Description.
A summary page will appear, where you can confirm all of your selections for your VPN.
Take Note:
All of the information you will need to configure the remote end will be here to share with your remote site.
Once you have ensured that everything is correct, click ‘Apply’ at the top right.
You will be taken to the screen where you can see that the configuration was applied as the most recent change.
Click ‘Edge Services’ to return to the site-to-site VPN.

The newly created VPN will be visible here.

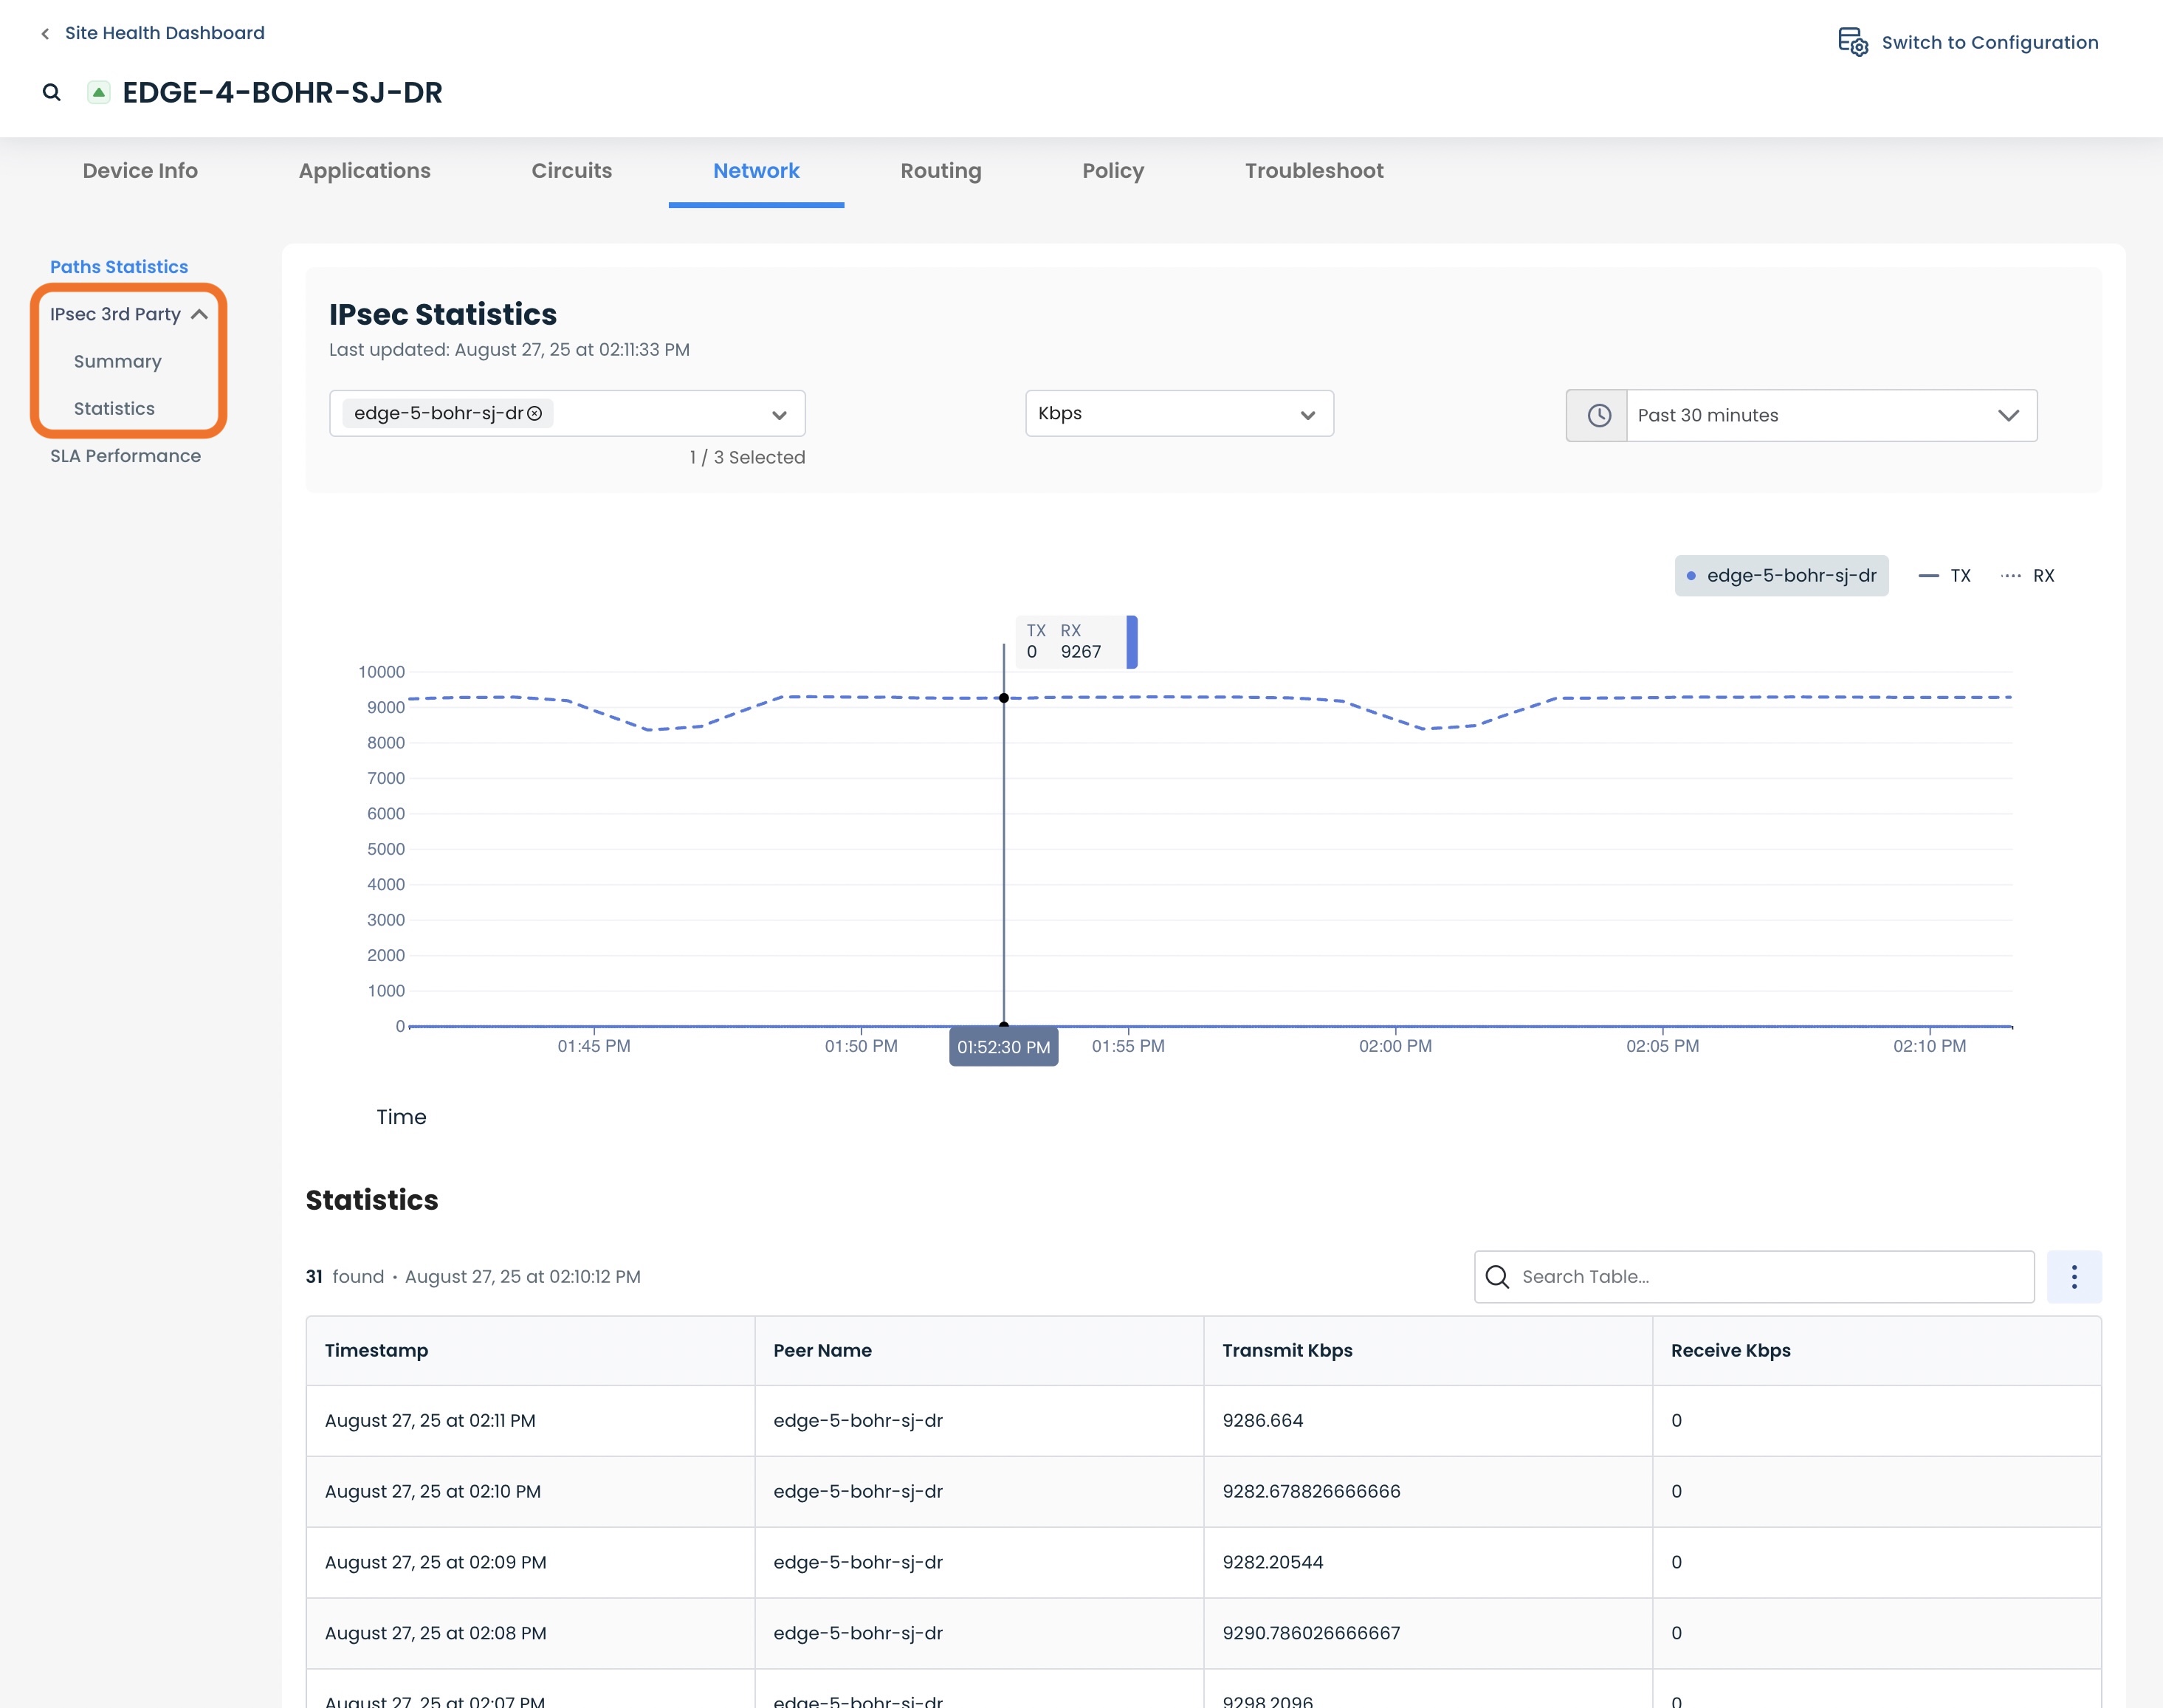
Monitoring Your Site-to-Site VPN on Your Graphiant Edge
To monitor a site-to-site VPN, from the Edge configuration screen, click ‘Switch to Monitoring’.

Select the ‘Network’ tab.

From this landing page you can also go into the Summary and Statistics areas and monitor every aspect of your site-to-site VPN.
Editing a Local VPN on Your Graphiant Edge
To edit a site-to-site VPN, navigate to the Site to Site VPN configuration page as shown here.
Simply change any field(s) desired.
All fields are editable EXCEPT:
Name
LAN Segment
To assign either a new Name or LAN Segment:
Click ‘Duplicate’ at the bottom right. This will create an exact copy of the VPN where you can select a new name, as well as edit any other fields.
Follow the same ‘Review’ and ‘Apply’ procedure once all fields are as needed.
Make any edits needed; the fields changed will be highlighted in yellow.
Click ‘Review’.
If desired, you can label the details of this configuration by entering the Version Name and a Description.
Click ‘Apply’ to update the configuration.
Warning:
This action cannot be reversed.

Your Site-to-Site VPN has been successfully updated.
Deleting a Local VPN on Your Graphiant Edge
To delete a site-to-site VPN, navigate to the Site to Site VPN configuration page as shown here.
Click ‘Remove’ at the bottom left of that VPN.

The VPN will no longer appear as a configuration on this page; click ‘Review’.
If desired, you can label the details of this change by entering the Version Name and a Description.
Click ‘Apply’ to delete the configuration.
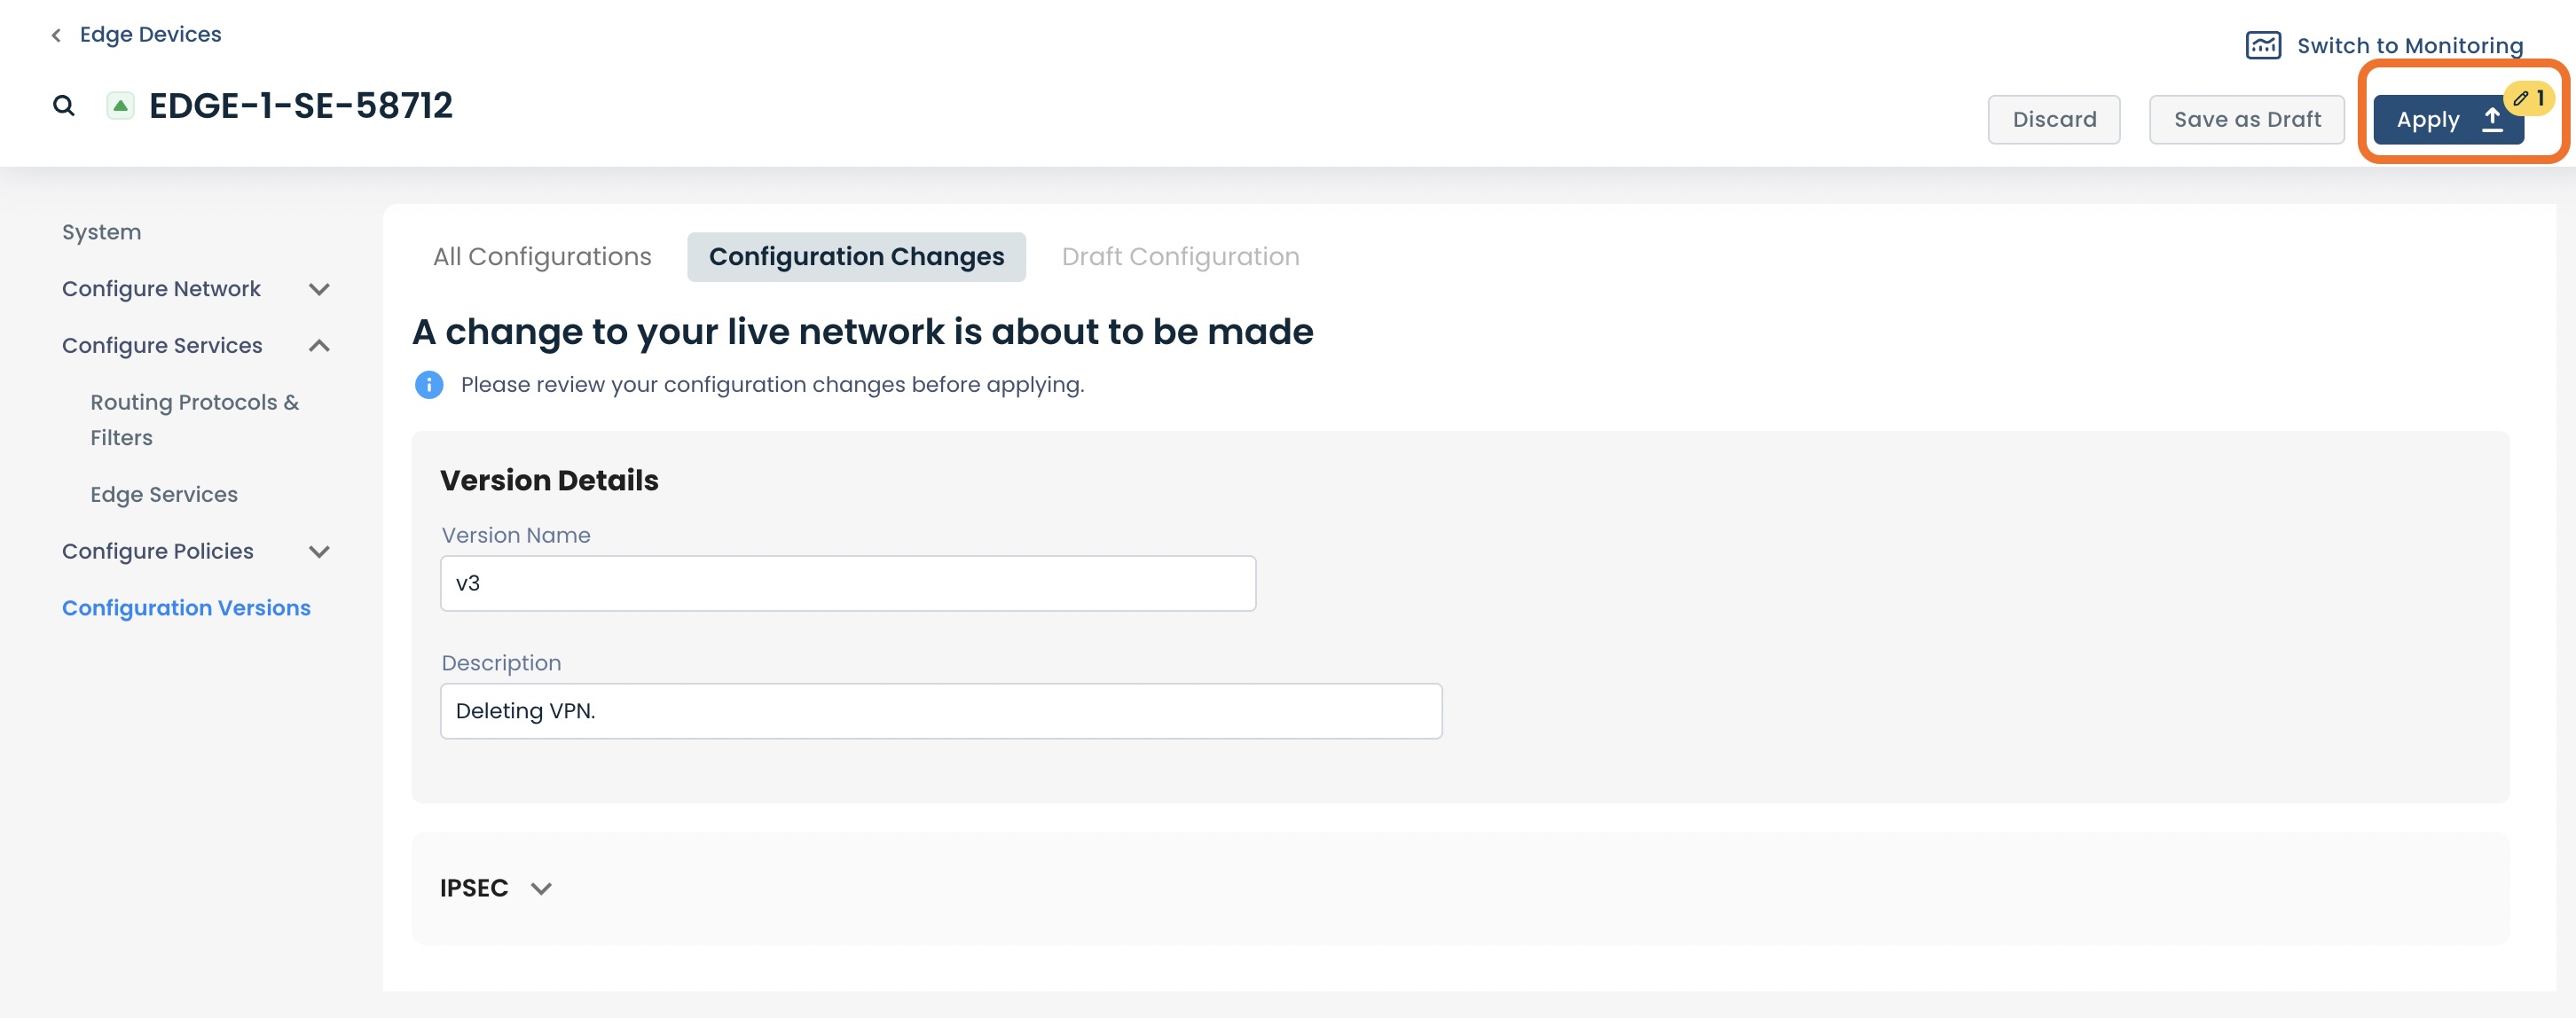
The site-to-site VPN will be deleted.