What is VRRP?
Every device on a network needs to be configured with a gateway router in order to ultimately reach the internet, or to other branches and connected businesses on an enterprise’s WAN. But what if the elected gateway router fails?
In the instance of a failed gateway router, any communications from connected devices destined for the WAN will be stopped, halting any and all traffic from coming in or out of the LAN. Service interruptions such as this can be detrimental to a business, but can be avoided by using what is known as gateway redundancy via a Virtual Router Redundancy Protocol (VRRP).
VRRP allows for routers to essentially act as back-ups to one-another in the case of a gateway router failure. In this instance, if one router goes down, another router on the LAN can take the forwarding responsibility of the failed router, allowing for communications to flow uninterrupted to and from the WAN.
VRRP functions in creating a virtual gateway router, with its own virtual IP address, to act as the pseudo gateway for the LAN.
This virtual gateway router is configured as the gateway router by devices on the LAN, and sends all communication to one of several connected routers, while remaining capable of rerouting communications to a back-up router in a moment’s notice should the initial connected router fail.
VRRP in the Graphiant Portal
From within the Graphiant Portal, you will be able to establish and configure VRRP connections to and between various network Edges under your control.
Step 1: Locating VRRP in the Graphiant Portal
From the Home screen, navigate to the Edge Configuration screen by one of the following:
Locate the "Configurations" section within the top left of the screen; select 'Configure Edges'.
or
Click 'Configure' in the sidebar; select 'Devices'.
.jpg)
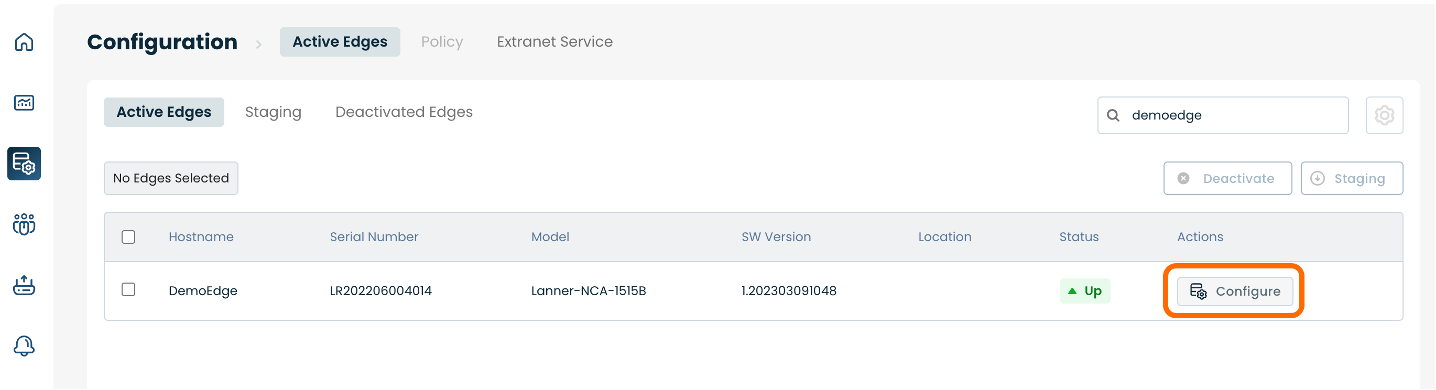
This will take you to the ‘Configuration’ page of the Graphiant Portal where you will be able to view all active, staged, and deactivated Edges. From here you will be able to select among the active Edges which Edge(s) you would like to be configured with VRRP.
On the righthand side, select and click ‘Configure’ in tandem with the Edge you wish to manage.
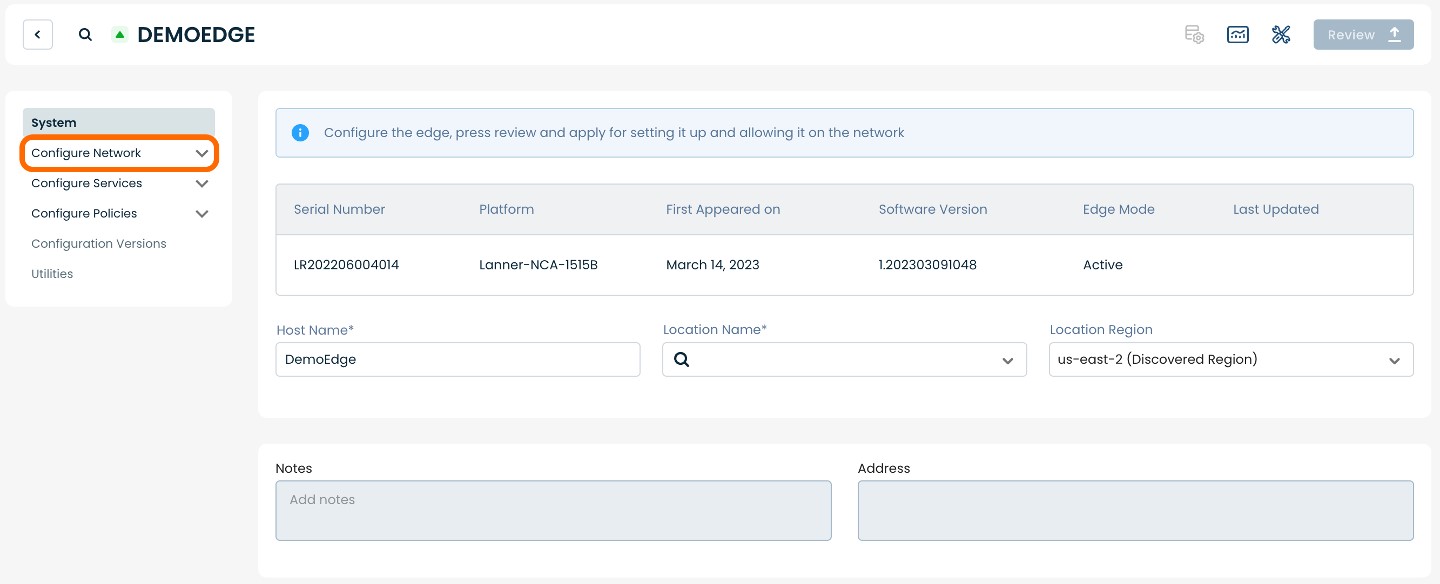
This will take you to a Configuration page with a focus on the Edge you have just chosen.
Here you will see a list of headers along the lefthand side of the page, such as ‘Configure Network’, ‘Configure Services’, ‘Configure Policies’, etc.
From here, select and click ‘Configure Network’.
A dropdown menu will appear. From the dropdown menu, select and click ‘Interfaces’.
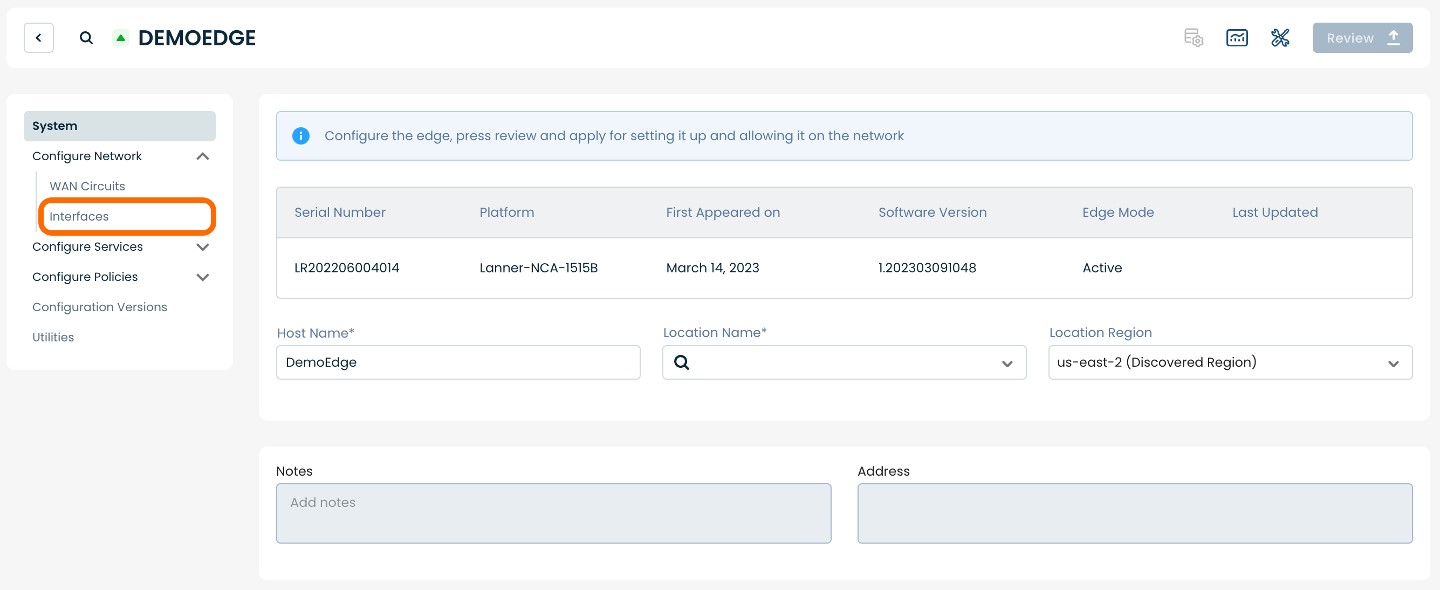
This will take you to the Interfaces page for the chosen Edge.
On the Interfaces page, you will see a list of available interfaces to choose from.
Select and click the interface with which you would like to establish VRRP.
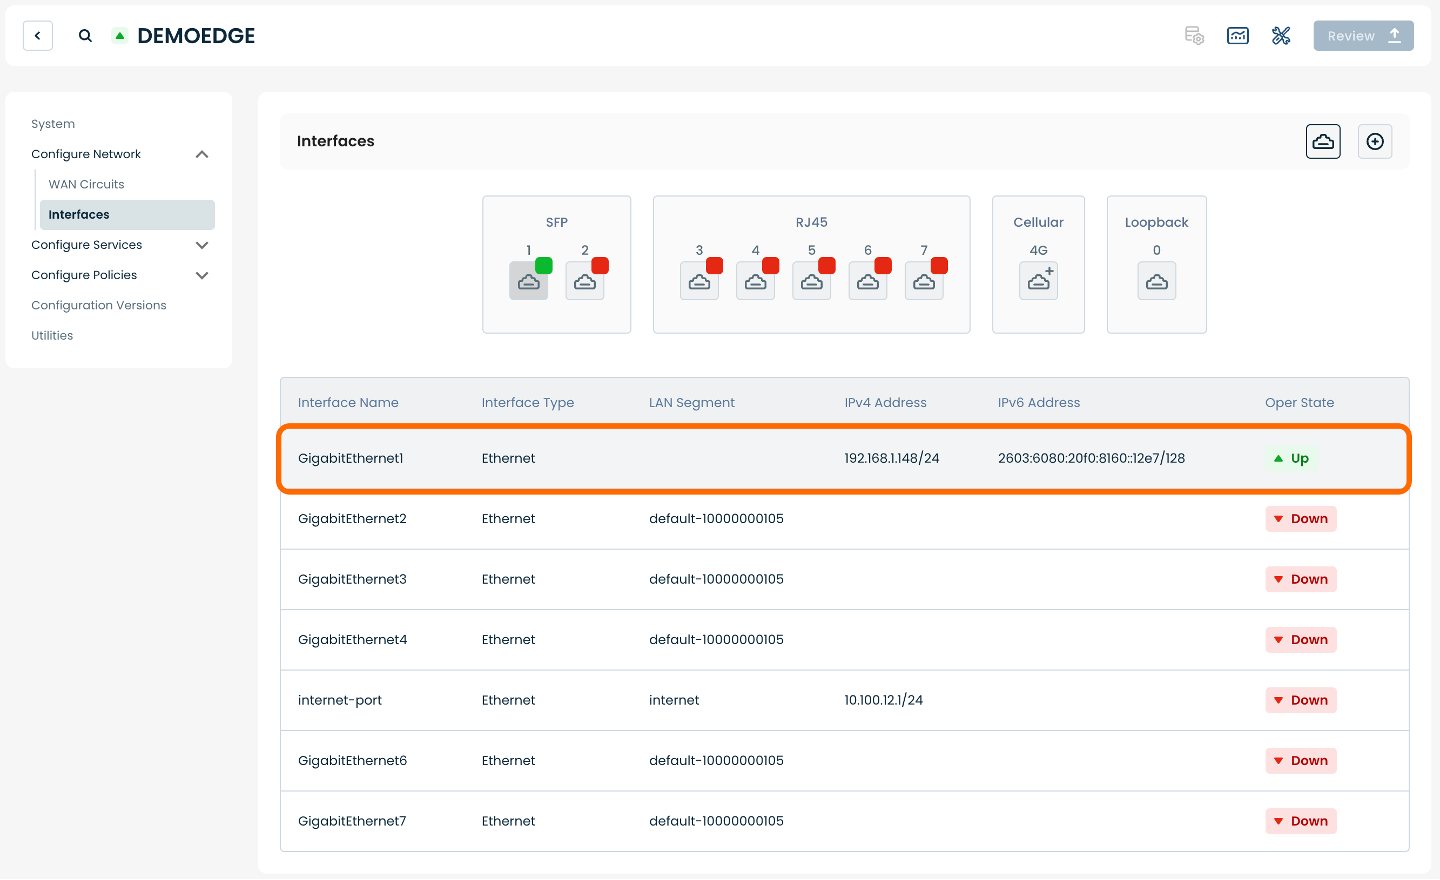
This will bring you to a page dedicated to the interface selected.
On this page you will be able to manage the selected interface, as well as add a subinterface.
Note:
For instructions on establishing a subinterface, see Configuring Interfaces.
Step 2: Setting up VRRP in the Graphiant Portal
Below are instructions for onboarding interfaces on a LAN. Here you will be able to establish a DHCP Relay, toggle Static and DHCP for IPv4 and IPv6 addresses, and establish VRRP.
Note:
For instructions on establishing DHCP Relay, see Configuring DHCP Relay.
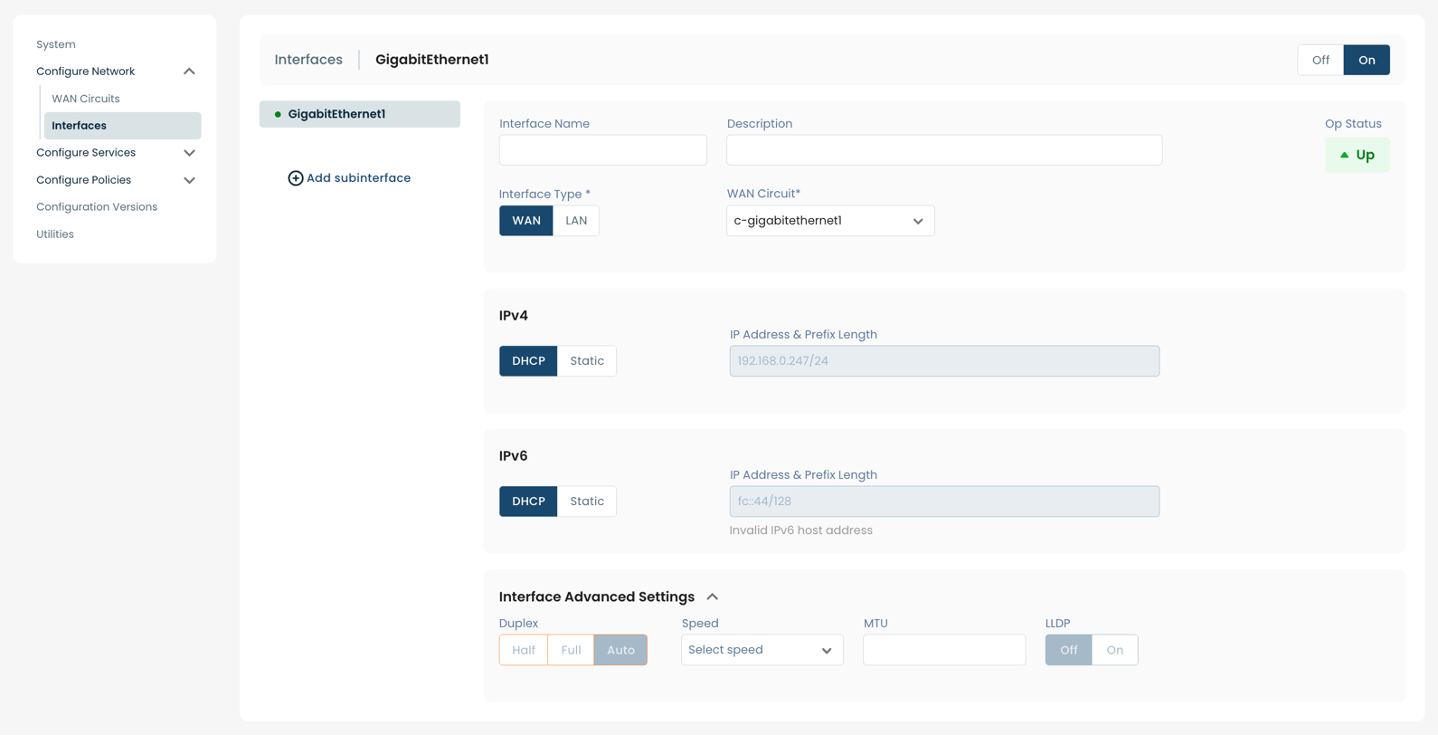
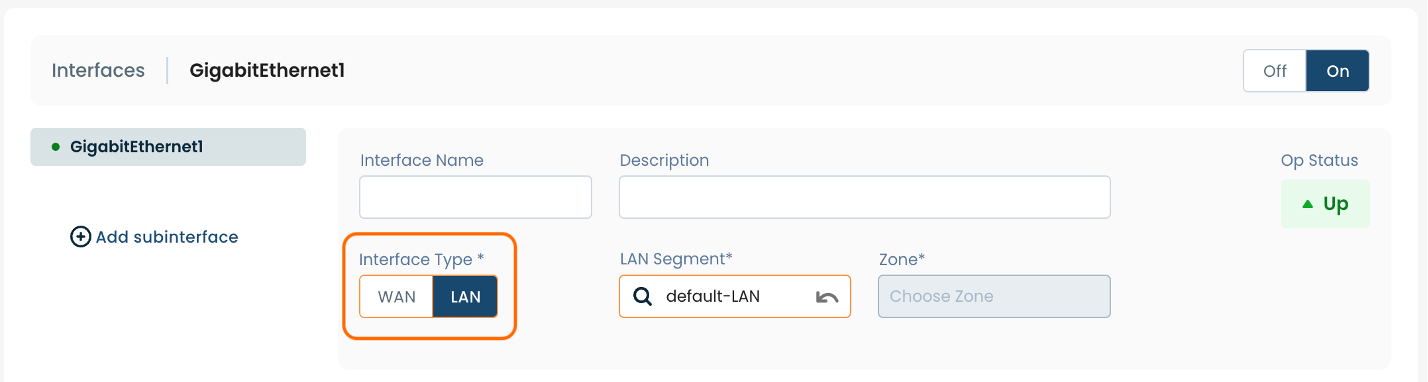
At the center of the page dedicated to the selected interface, you will be able to toggle the interface type, with the choice of either ‘LAN’ or ‘WAN’.
Select and click ‘LAN’.
The page will propagate various fields of required information.
(An * indicates a required field.)
Interface Name*: Choose a name to label the interface.
Description: Choose a description for the interface.
Interface Type*: Select LAN.
LAN Segment*: Choose a desired LAN segment from the dropdown menu.
Below are descriptors for each of the fields required in order to establish VRRP on the selected interface.

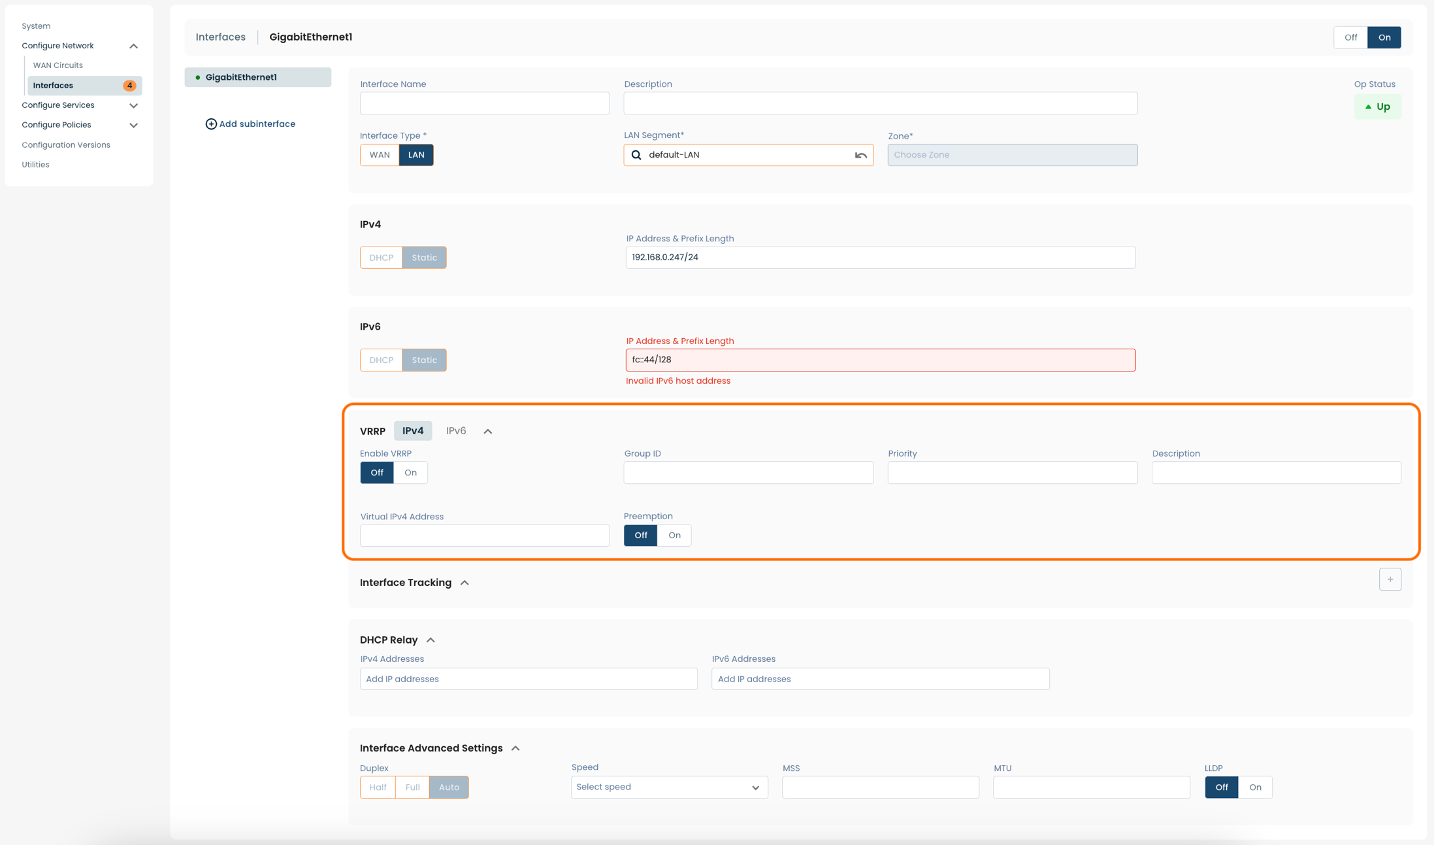
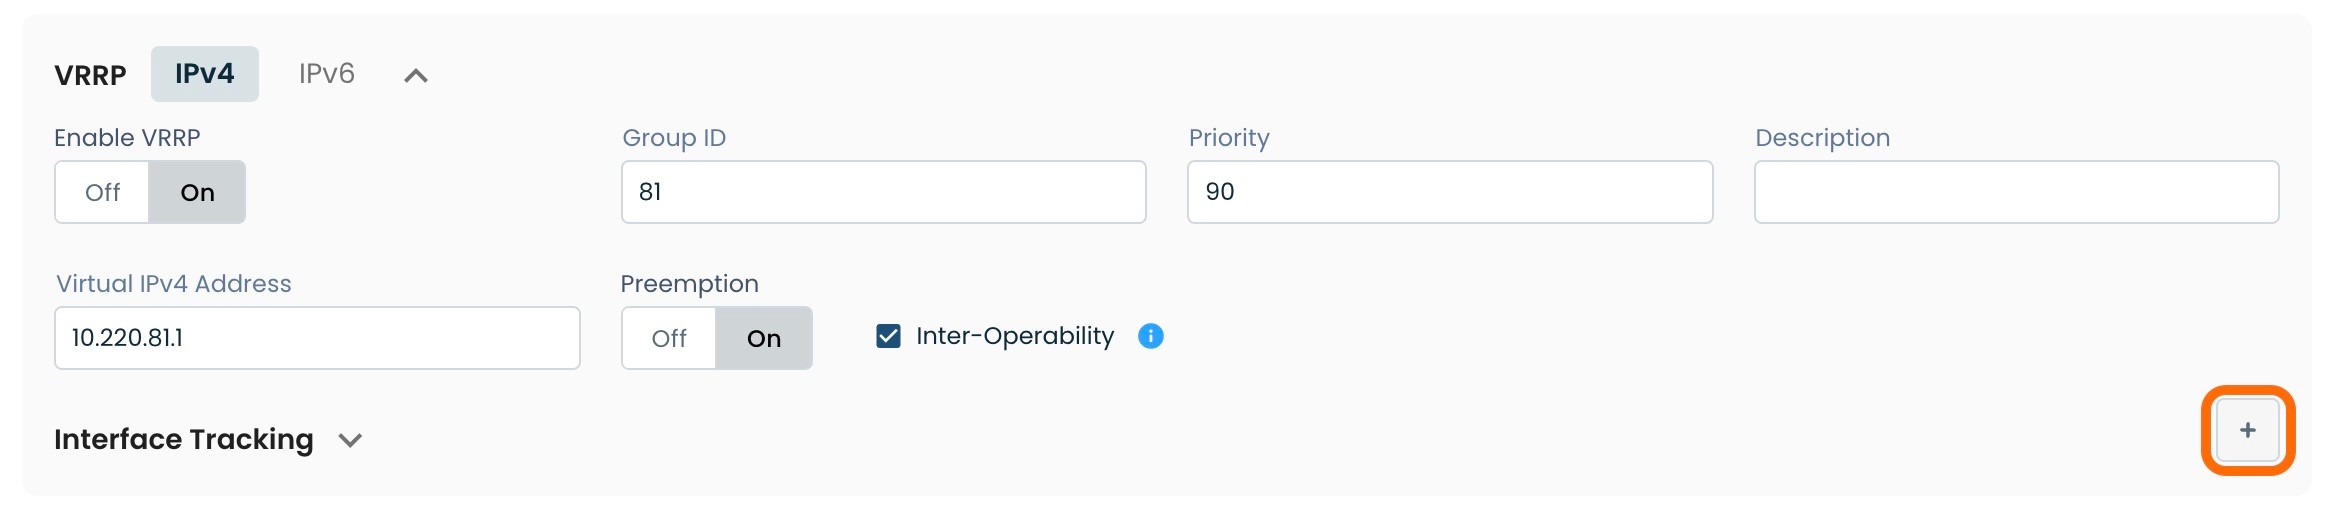
Setting up VRRP for IPv4
To establish VRRP for IPv4 on the selected interface:
Select 'IPv4' to the right of 'VRRP'.
Enable VRRP*: To enable VRRP for IPv4 addresses, toggle to ‘ON’.
Group ID*: Choose value from range 1-255.
** Priority*: Choose priority from range 1-254; if left blank, the field will auto-populate with "100".
Description: Choose a description for the IPv4 VRRP.
Virtual IPv4 Addresses*: An alias IP address for the group of interfaces utilizing VRRP; this will typically be the first or last address in the subnet assigned to the interface
** Preemption*: Choose whether or not to enable preemption by toggling this field to ‘ON’ or ‘OFF’.
Inter-Operability: Check this box if needing to peer with non-Graphiant devices.
Note:
Priority determines which device in the Group ID is active; the device with the highest priority value is the active one.
Preemption becomes applicable when the original primary device comes back online from an outage or failure. When preemption is turned ‘ON’, the original primary device will pre-empt the secondary device, and will again resume responsibility for forwarding traffic.
Interface Tracking: If the selected WAN interface is unable to connect to the Graphiant core, the priority value will be decremented by the amount entered.
To enable Interface Tracking, click the (+) to the right of 'Interface Tracking'.
Interface Name: Select the desired interface from the drop-down.
Priority Decrement: Type in the desired decrement of priority should the interface not be able to connect to the Graphiant core.

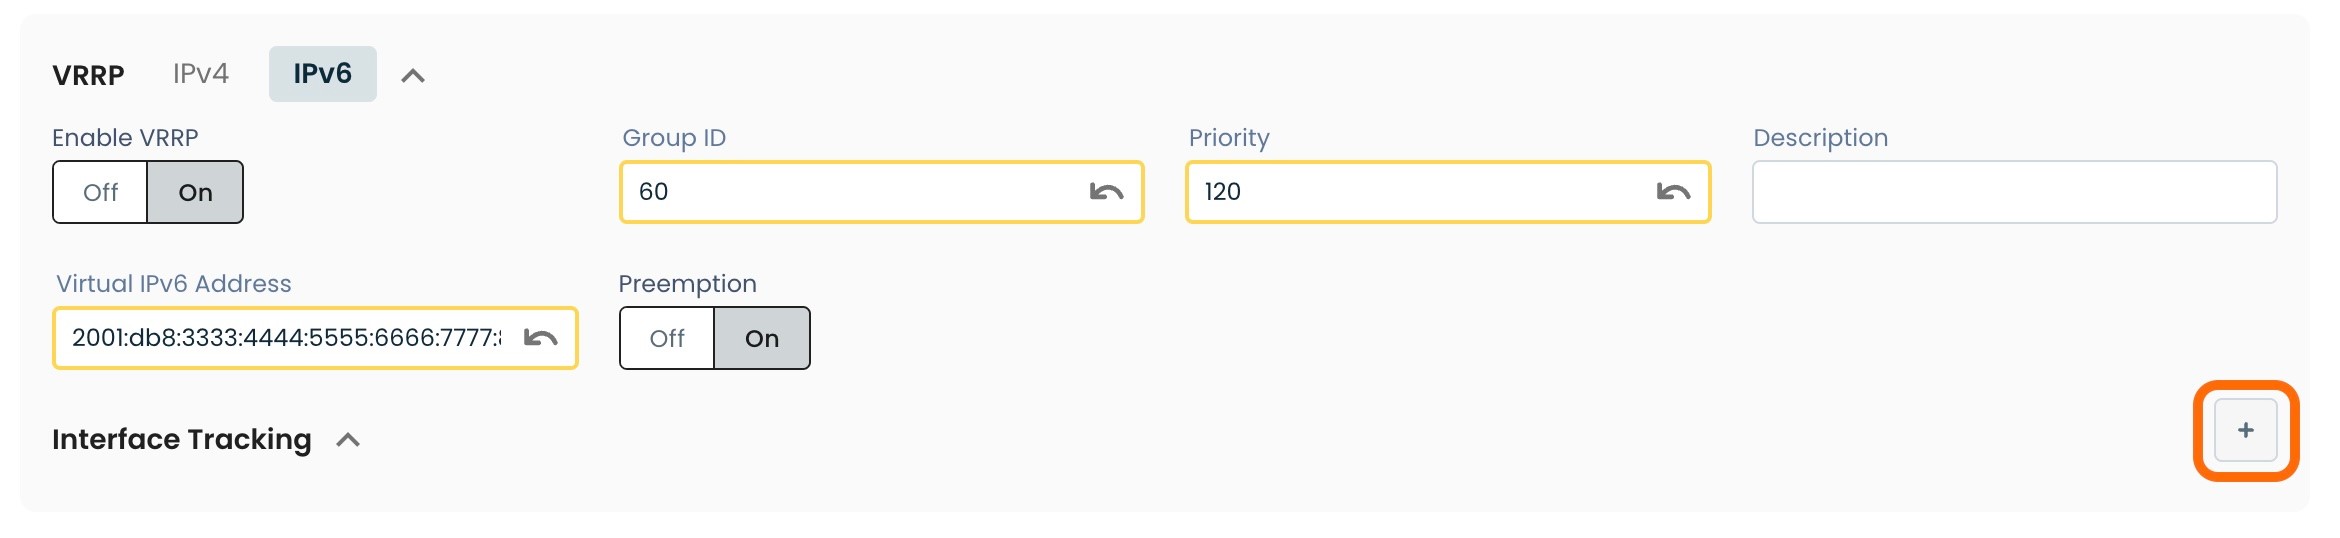
Setting up VRRP for IPv6
To establish VRRP for IPv6 on the selected interface:
Select IPv6 to the right of 'VRRP'.
Enable VRRP*: To enable VRRP for IPv6 addresses, toggle to ‘ON’.
Group ID*: Choose priority from range 1-255.
. Priority*: Choose priority from range 1-254; if left blank, the field will auto-populate with "100".
Description: Choose a description for the IPv6 VRRP
Virtual IPv6 Addresses*: An alias IP address for the group of interfaces utilizing VRRP; this will typically be the first or last address in the subnet assigned to the interface.
** Preemption*: Choose whether or not to enable preemption by toggling this field to ‘ON’ or ‘OFF’.
Note:
Priority determines which device in the Group ID is active; the device with the highest priority value is the active one.
Preemption becomes applicable when the original primary device comes back online from an outage or failure. When preemption is turned ‘ON’, the original primary device will pre-empt the secondary device, and will again resume responsibility for forwarding traffic.

Interface Tracking: If the selected WAN interface is unable to connect to the Graphiant core, the priority value will be decremented by the amount entered.
To enable Interface Tracking, click the (+) to the right of 'Interface Tracking'.
Interface Name: Select the desired interface from the drop-down.
Priority Decrement: Type in the desired decrement of priority should the interface not be able to connect to the Graphiant core.

Step 3: Review & Apply
Once the above fields are filled in, the selected Edge interface will be ready to begin utilizing VRRP, however you will first need to review and approve all changes made.

On the top righthand corner, choose from the following options:
‘Discard’ to discard changes made.
‘Save as Draft’ to save changes made to be implemented at a later time.
‘Review’ to review and apply changes made for immediate deployment.
VRRP Stats
Details on the VRRP Profile (such as State, IP addresses and Priorities) for a given circuit are found within the monitoring information on that device.
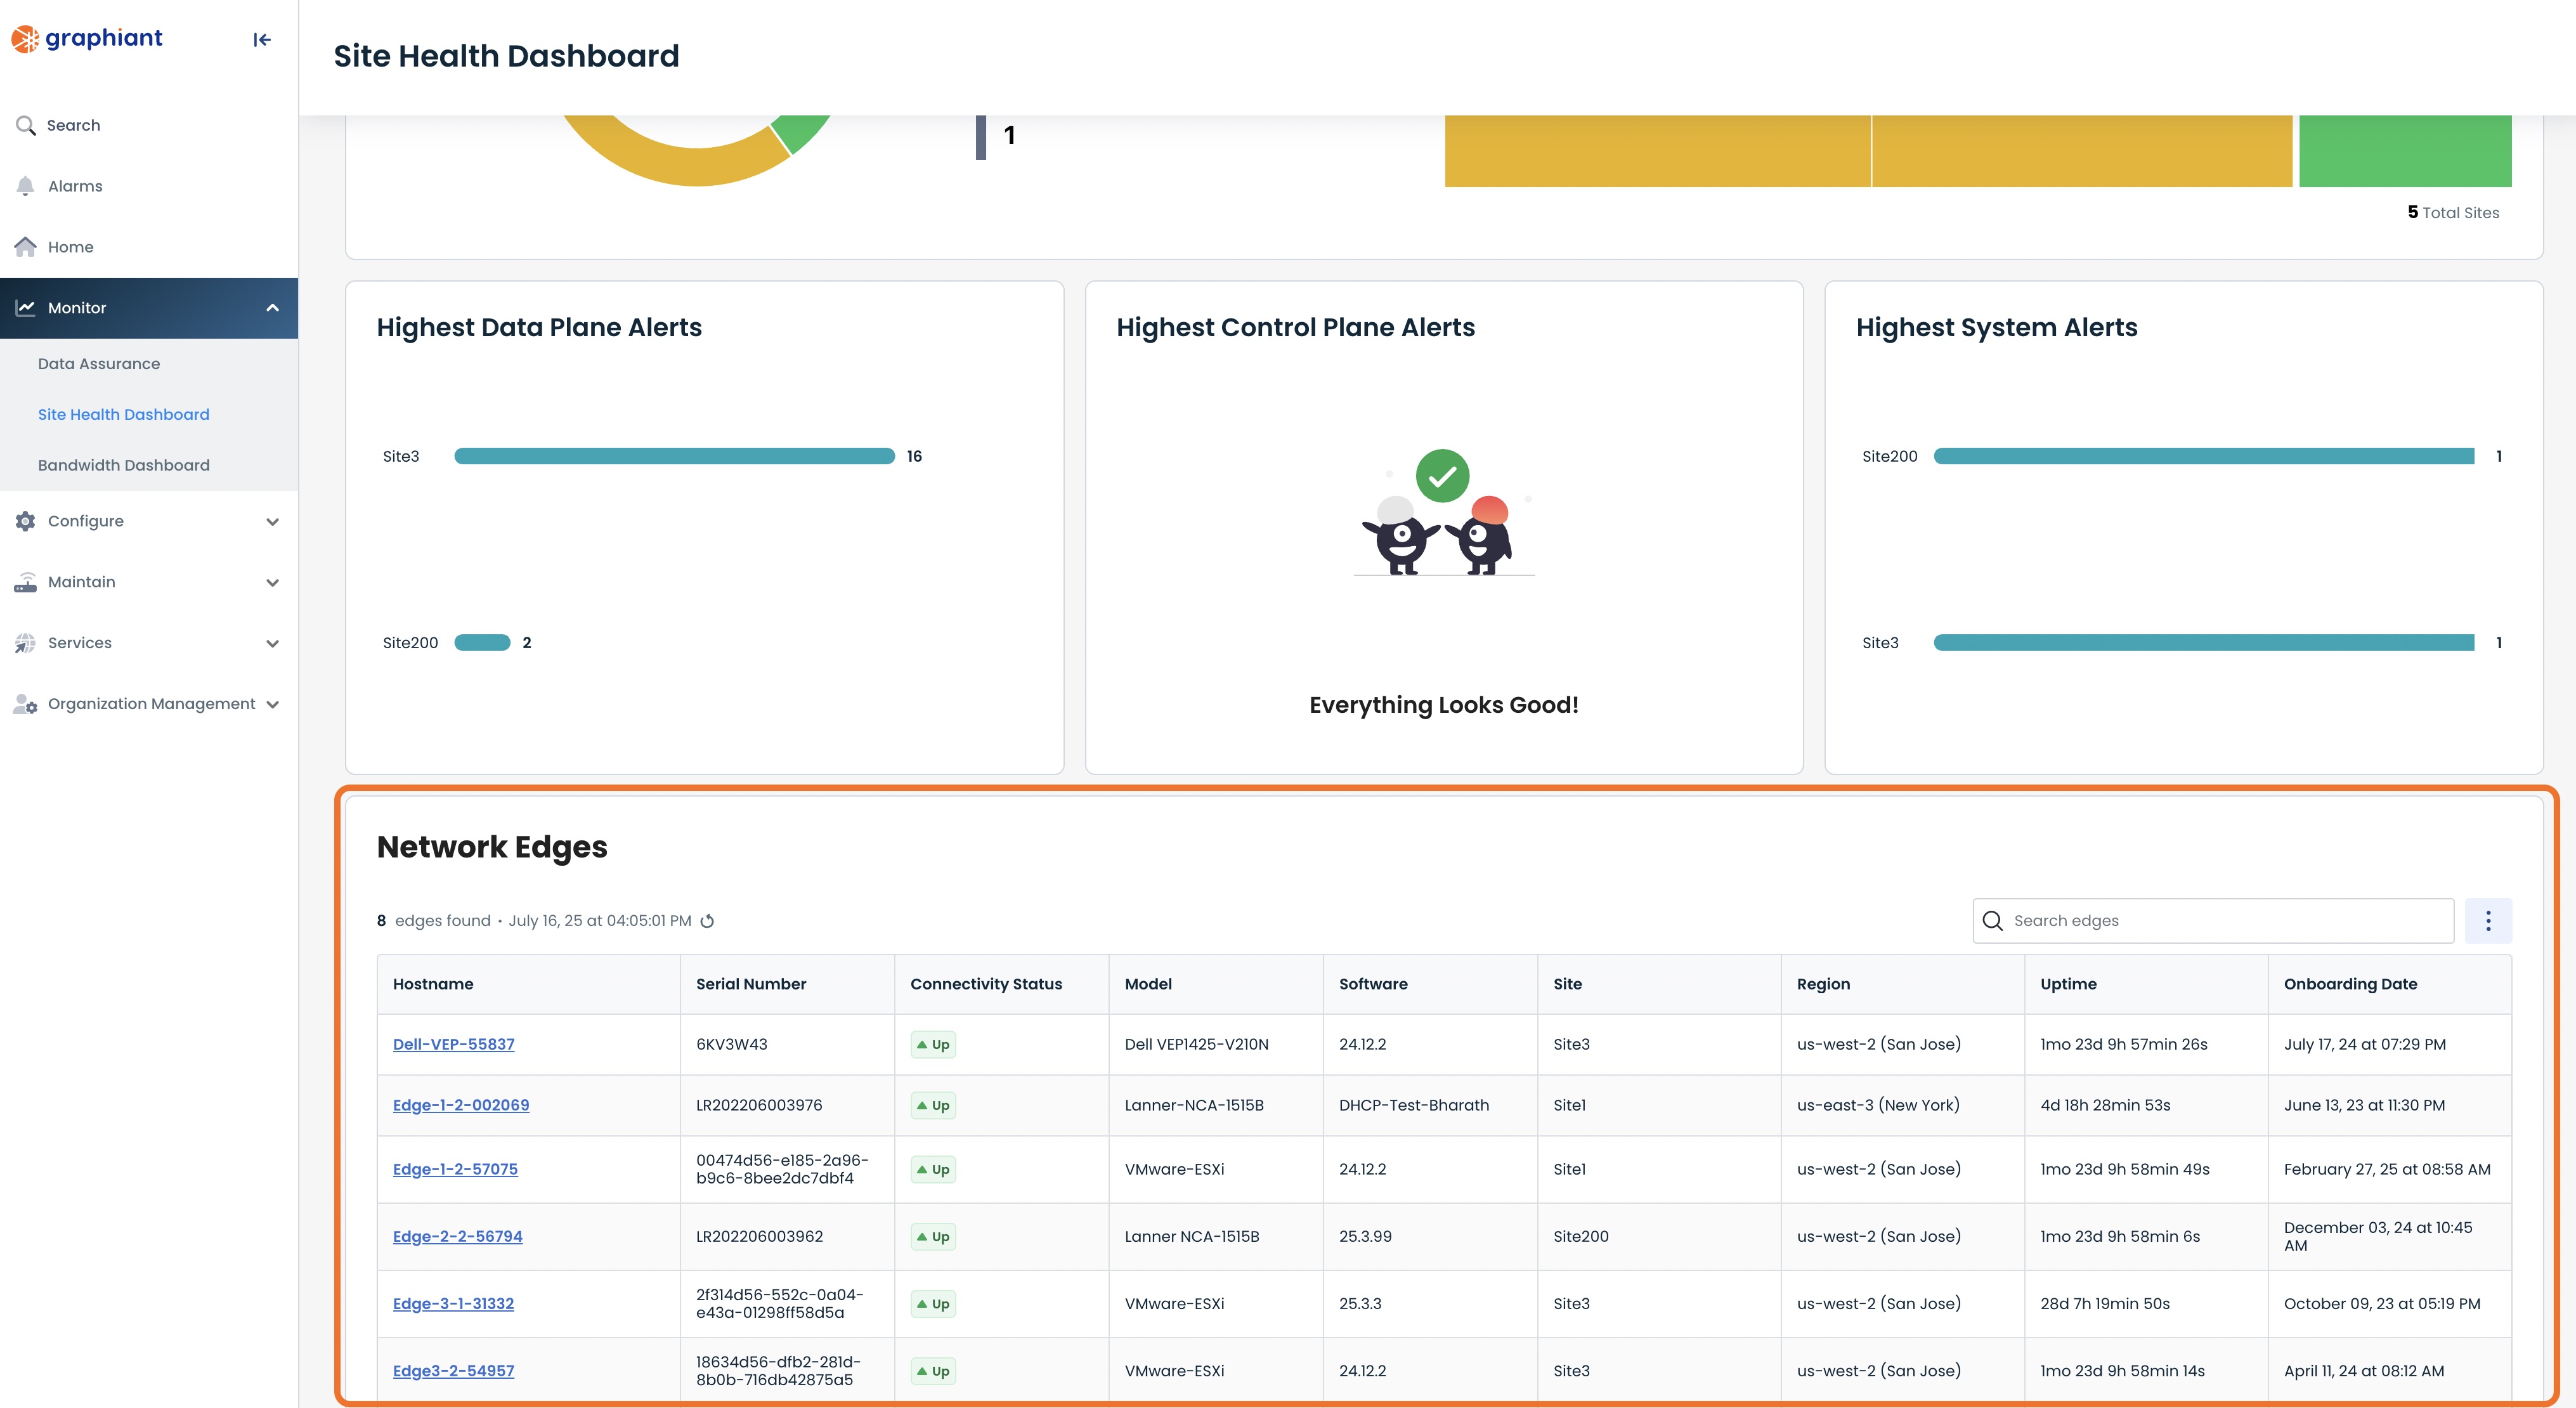
Locating the Edge Monitoring Page
From the Graphiant Portal Home screen click 'Monitor' in the left sidebar; select ‘Site Health Dashboard’.
.jpg)
Scroll down to the bottom of the page.
Here you will see the list of your network edges.
Pulling UP VRRP Stats
Once you are at the Network Edges page, select the Edge to which the desired circuit is attached by clicking anywhere in that line.
Select the desired edge by clicking on its Hostname.
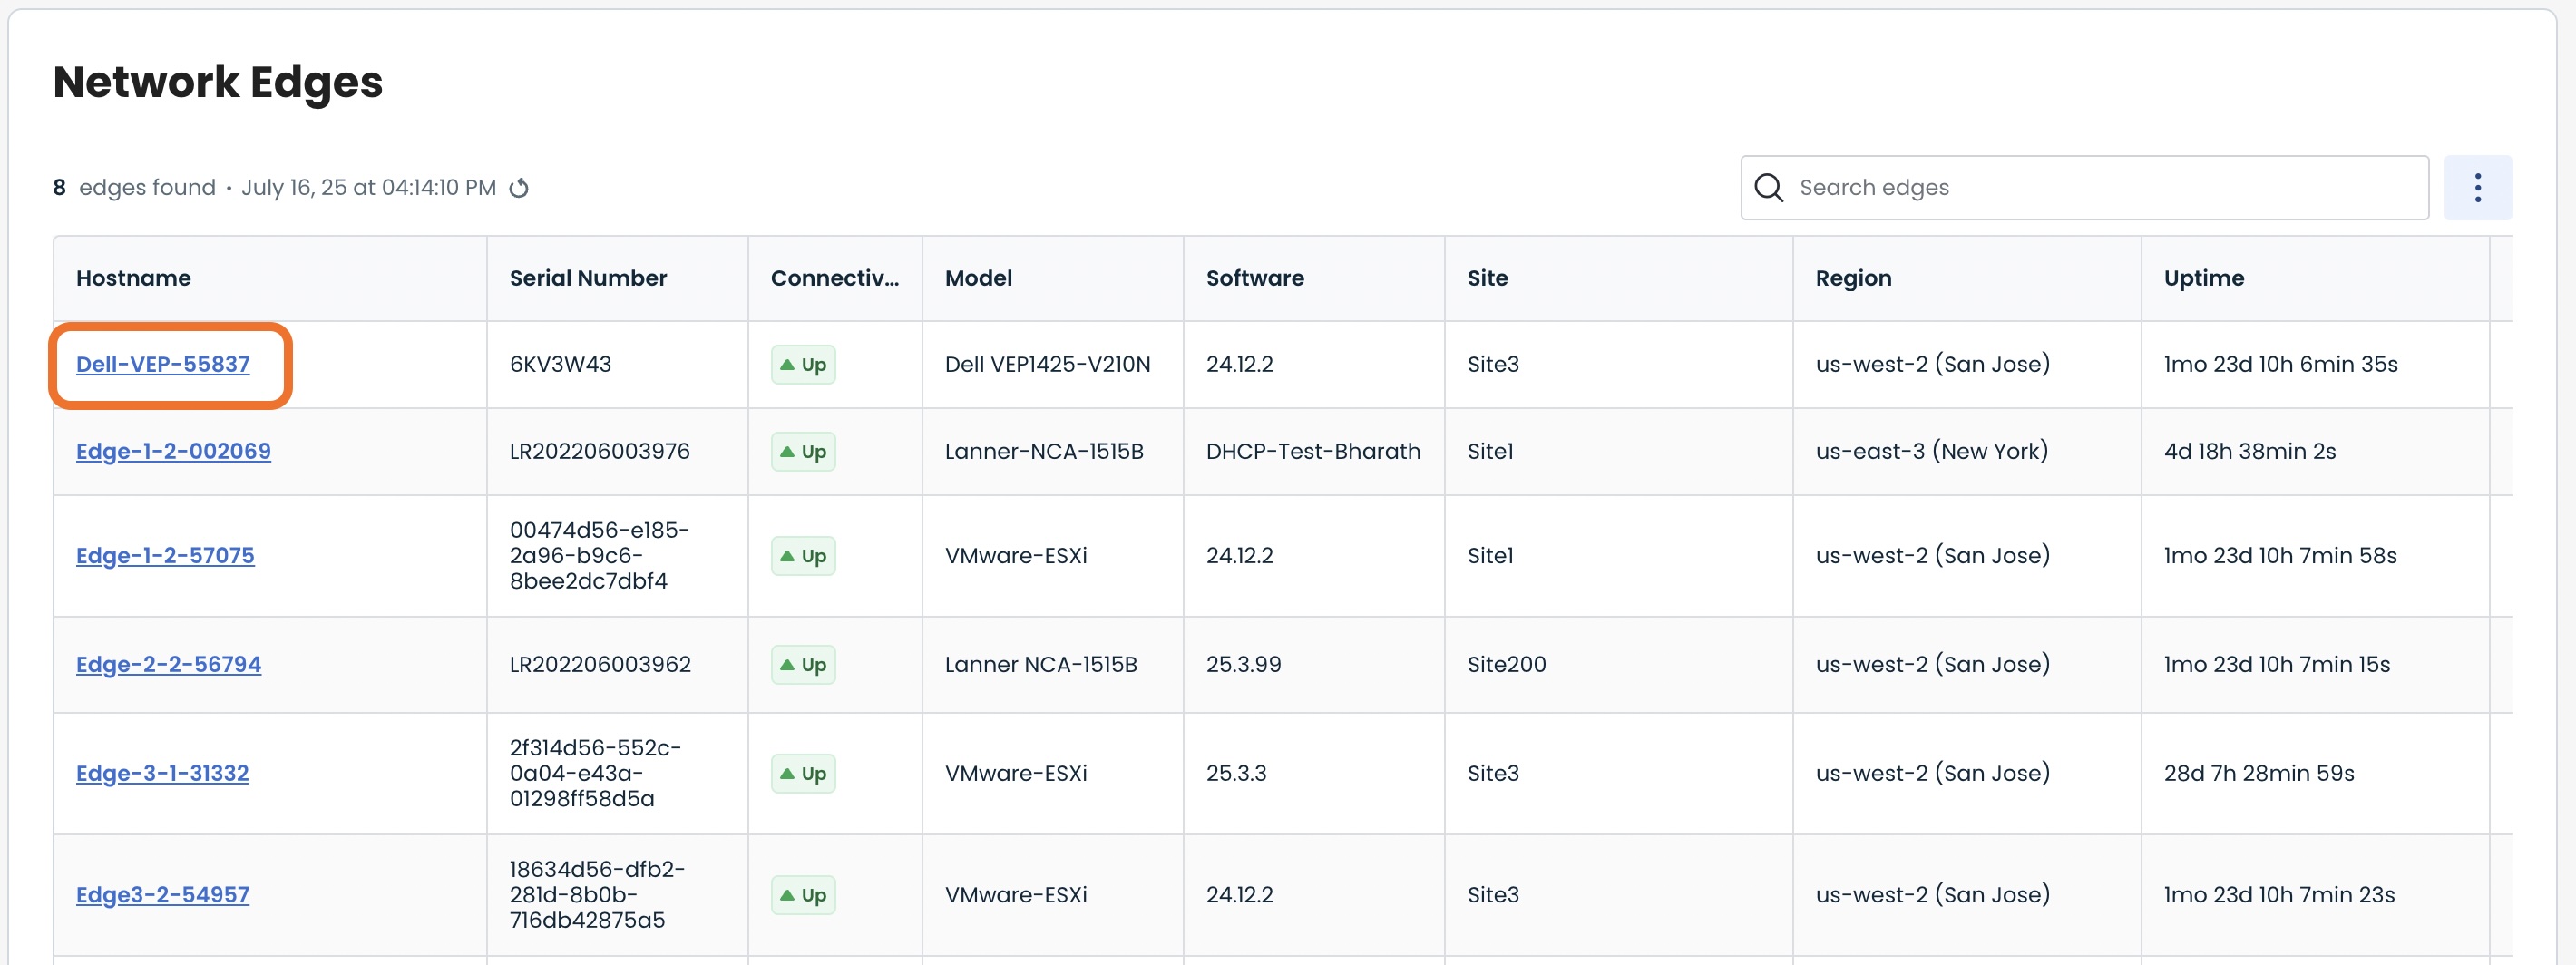
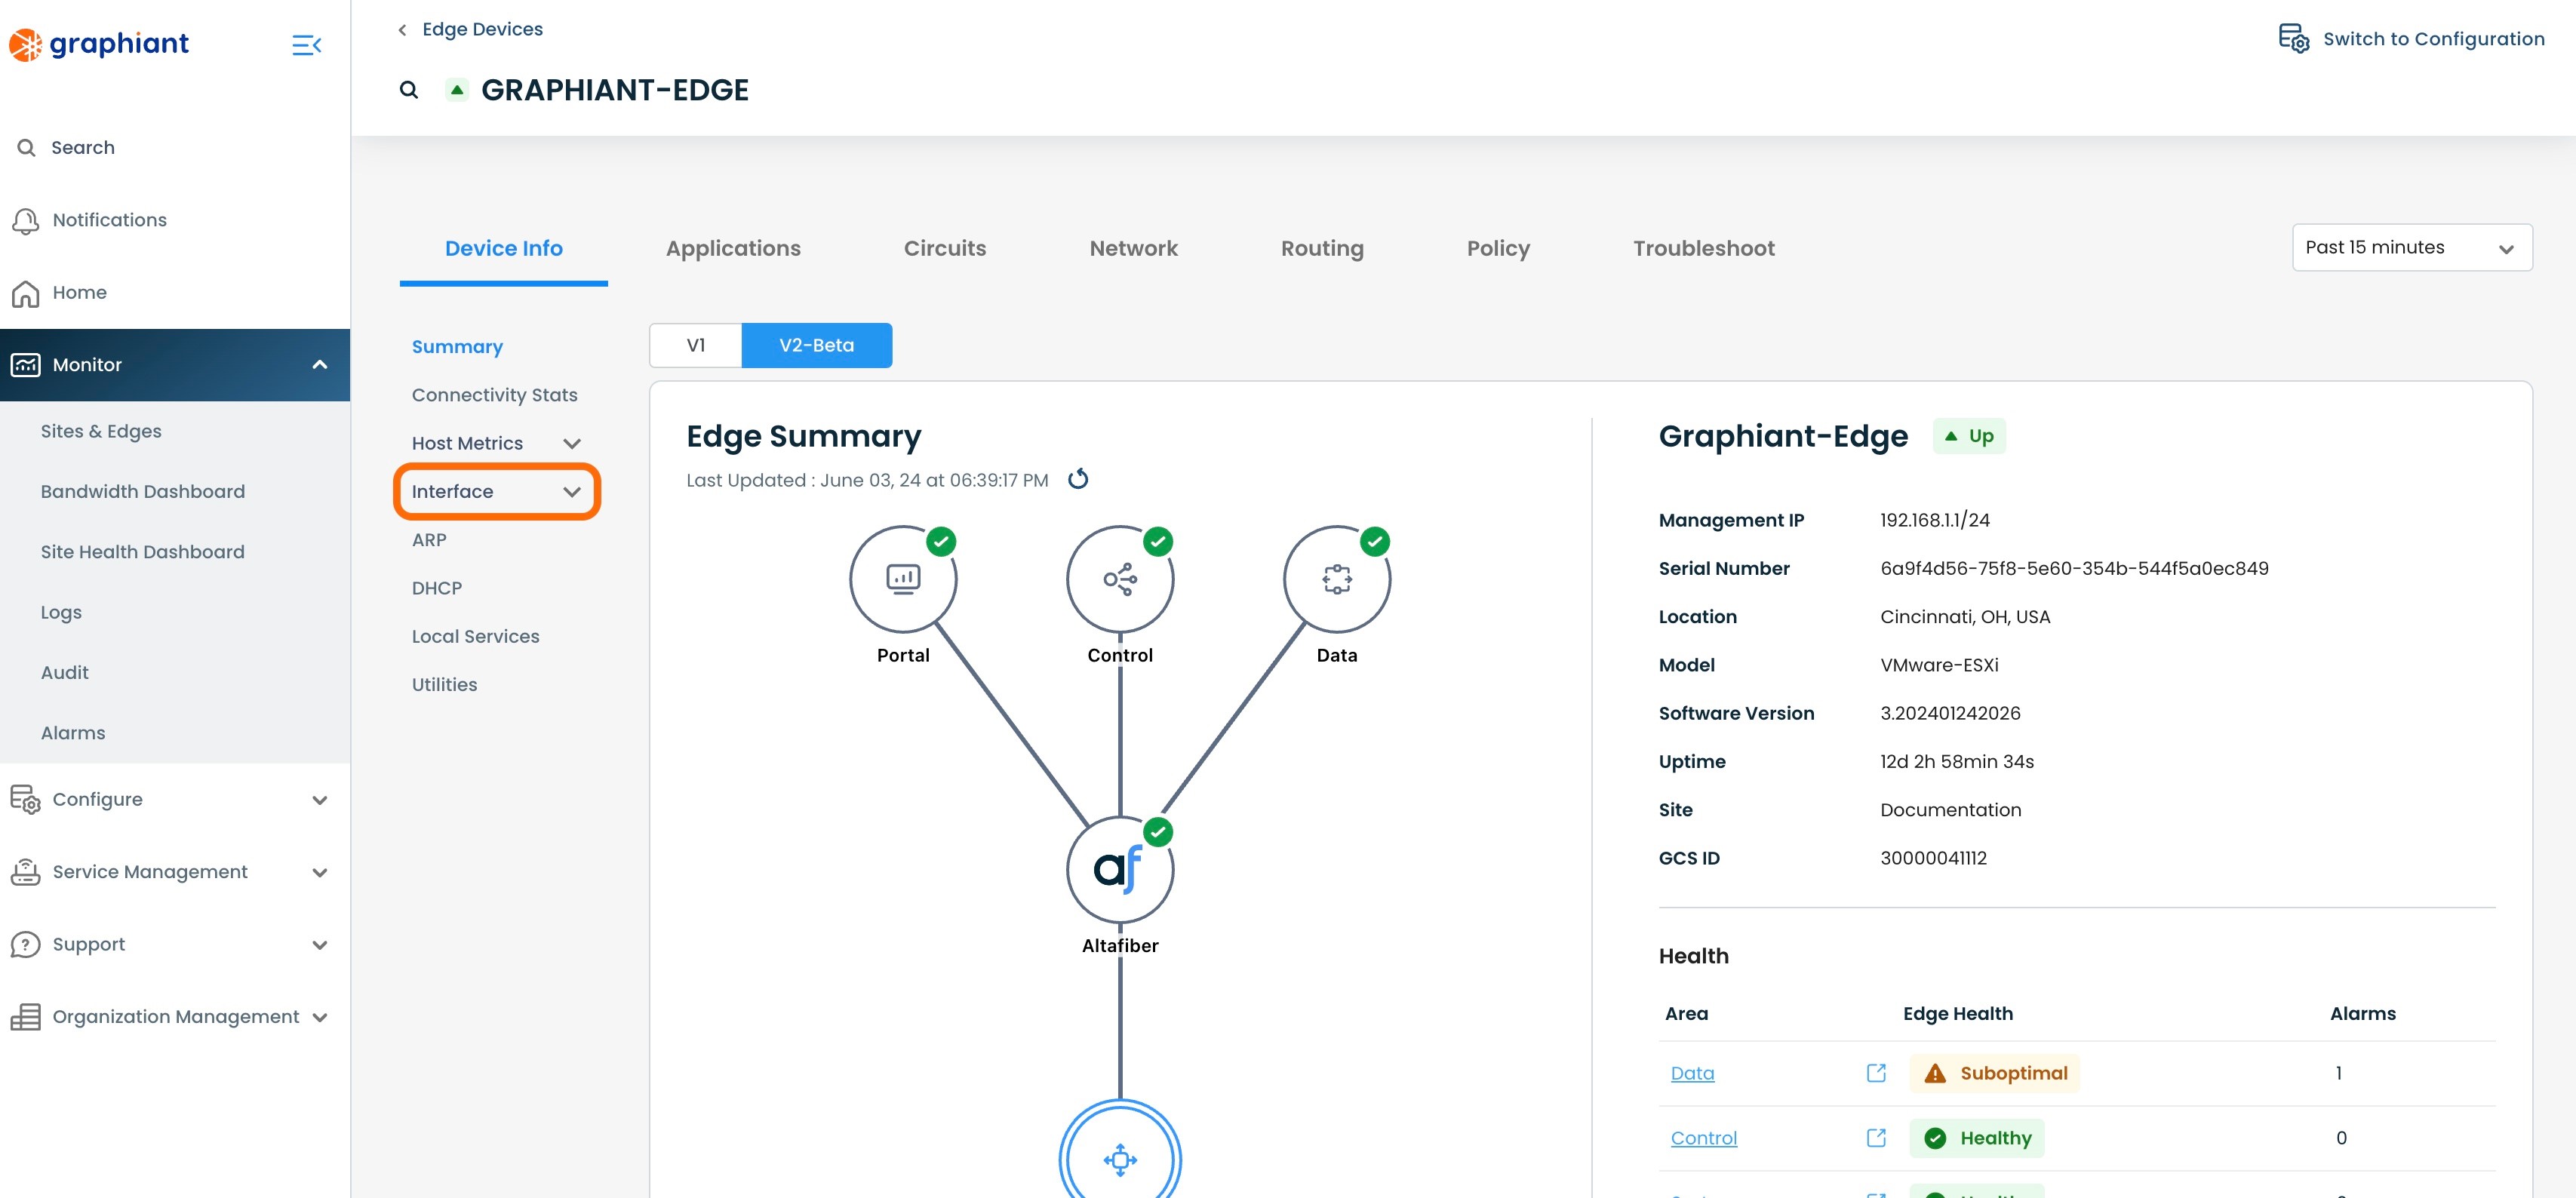
This brings up the "Device Info" screen for the Edge.
Click 'Interface'.
Select 'VRRP'.
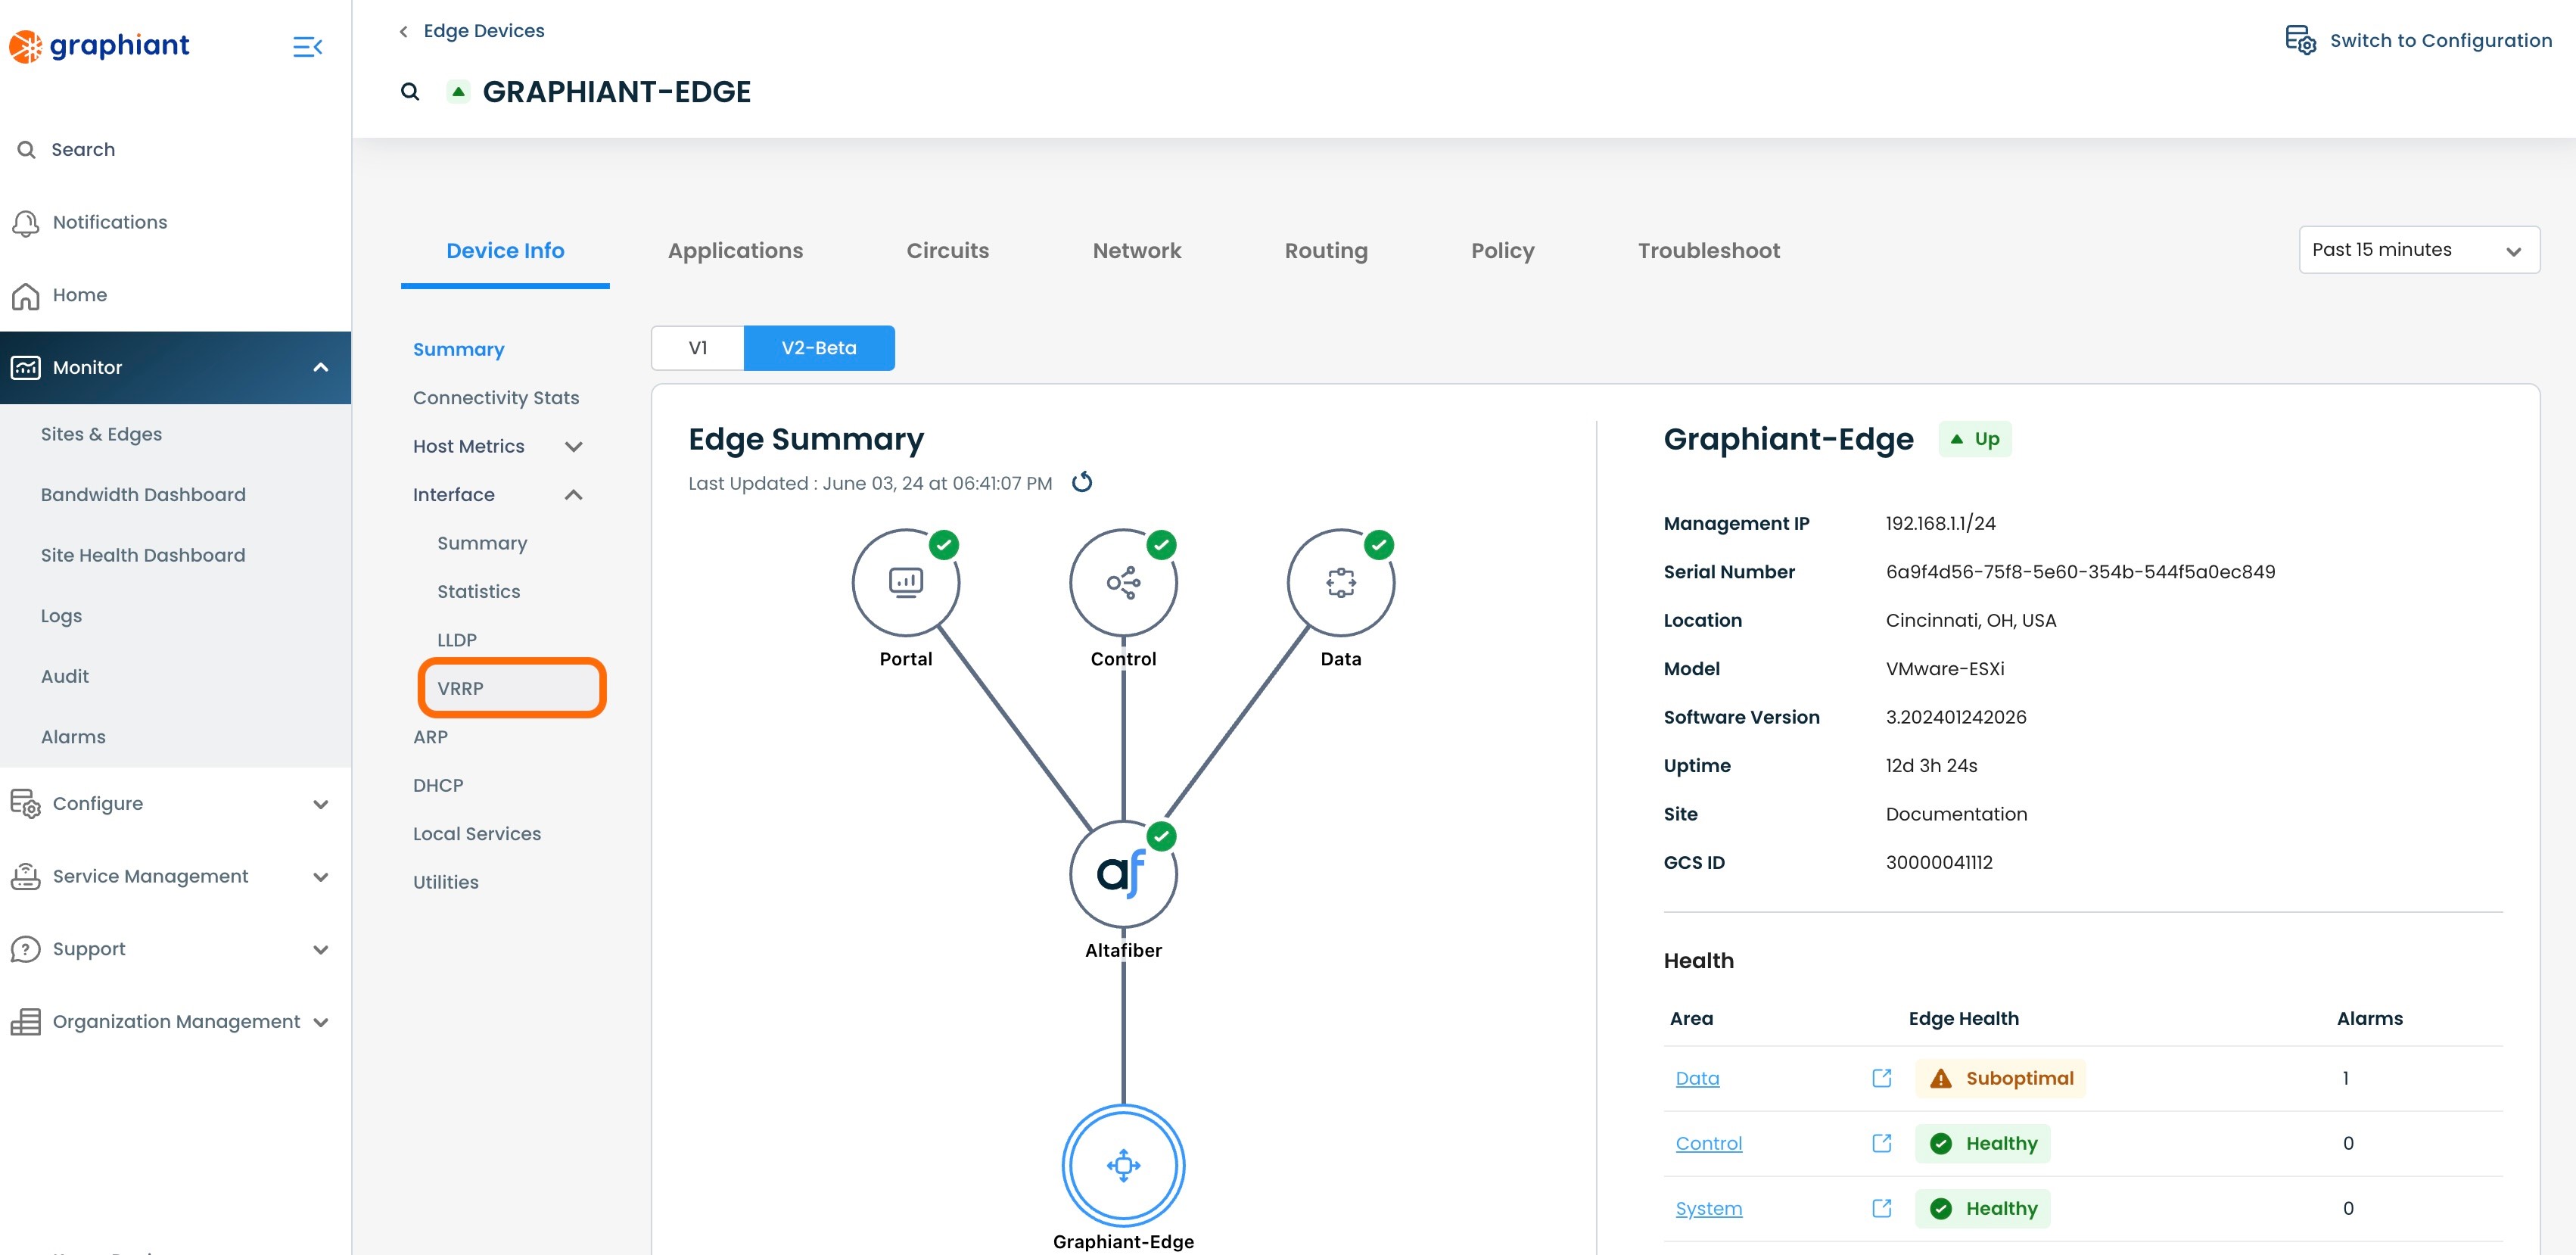
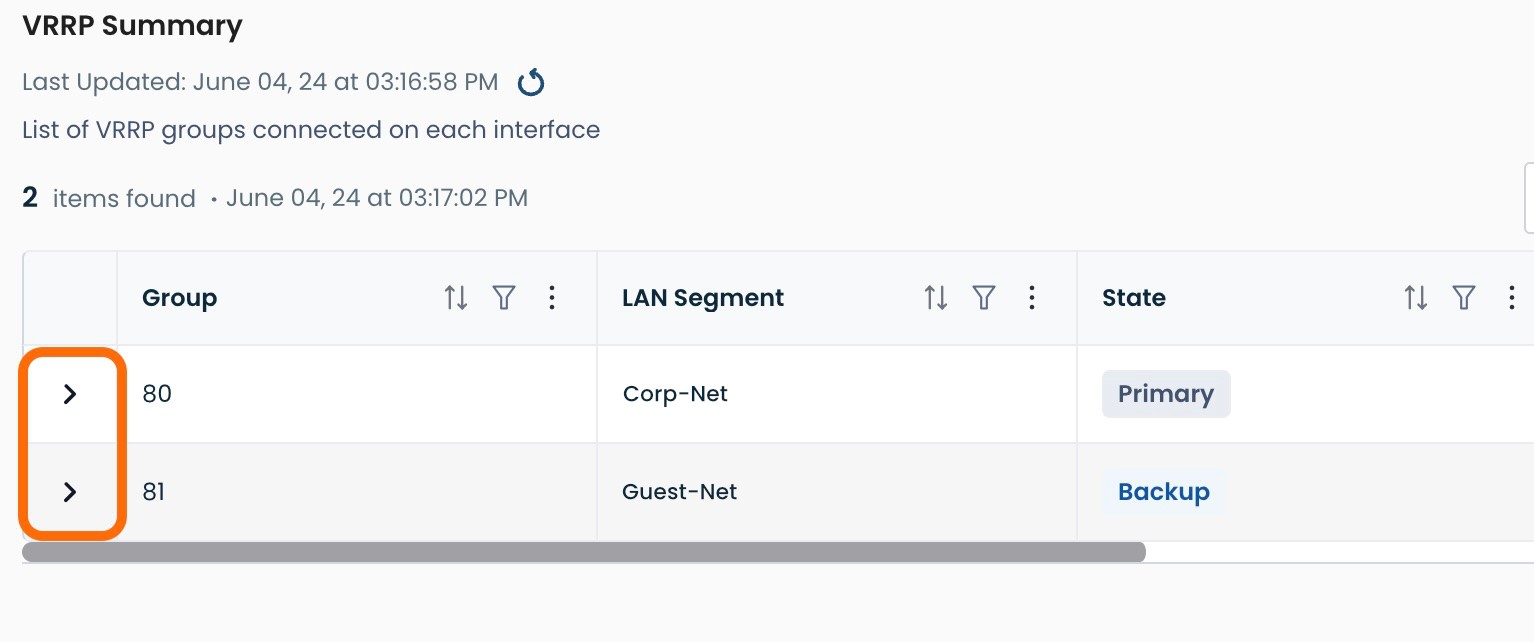
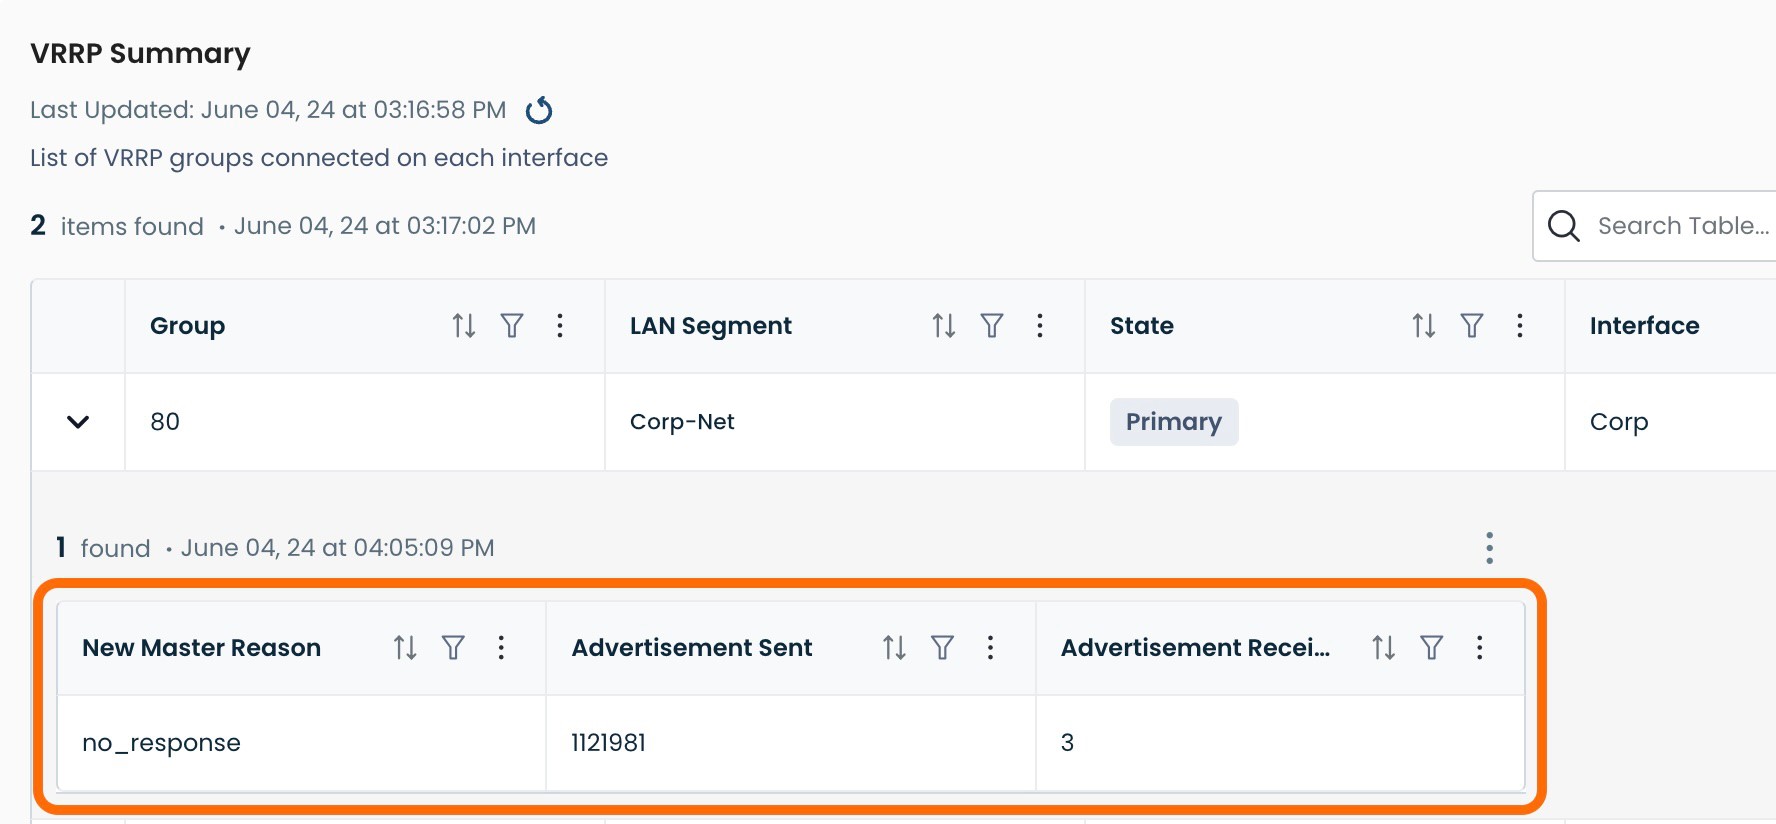
This brings up the VRRP Summary Table.
This table shows the following information for each VRRP group:
Group: ID of the VRRP Group
LAN Segment: LAN Segment to which the VRRP is attached
State: Whether the Edge in the group is primary or backup
Interface: The interface to which the VRRP is connected
Primary IP Address: IP address of the active Edge
Local IP Address: IP address for physical interface of the local Edge
Virtual IP: IP address acting as default gateway shared among the group
Virtual MAC Address: The MAC address used by the active Edge
Effective Priority: Priority at which the Edge is operating (this may change if the Interface Tracking has been configured and engaged, lowering the priority)
Configured Priority: Priority at which the Edge is configured

A nested table is positioned within each group that can be accessed by clicking on the caret to the left of the Group ID.
The columns in the nested table show:
New Master Reason: Reason that the Primary changed within the group
Advertisements Sent: Number of advertisements sent to VRRP peers within the group
Advertisements Received: Number of advertisements received from VRRP peers within the group
Each column is able to be sorted top/bottom and have a search filter added.
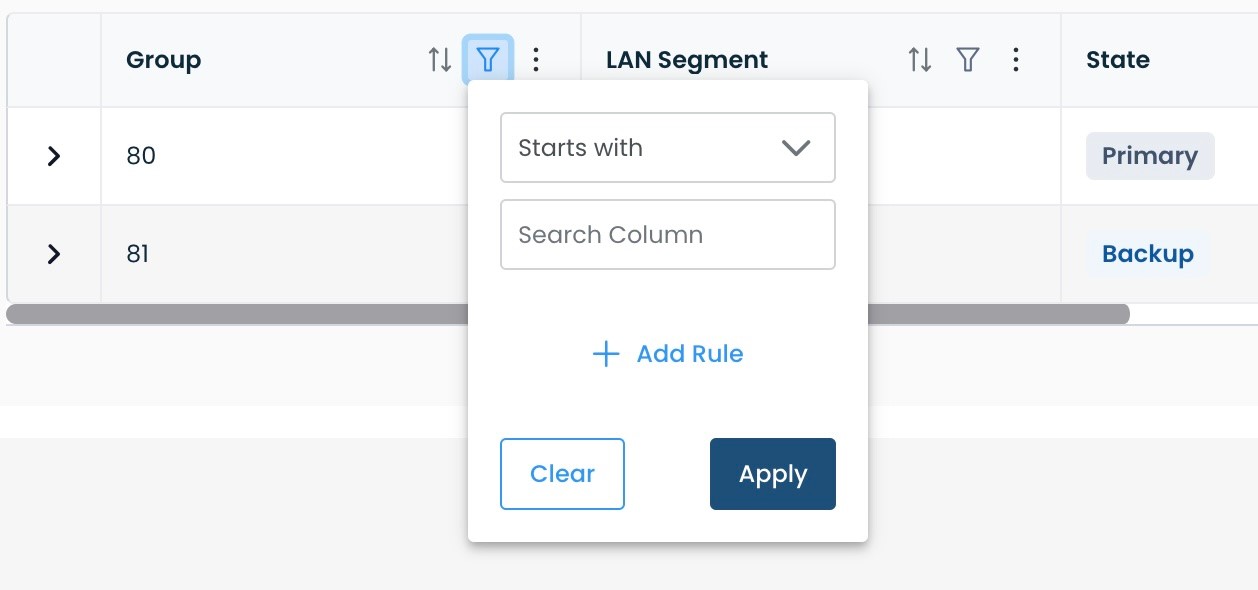
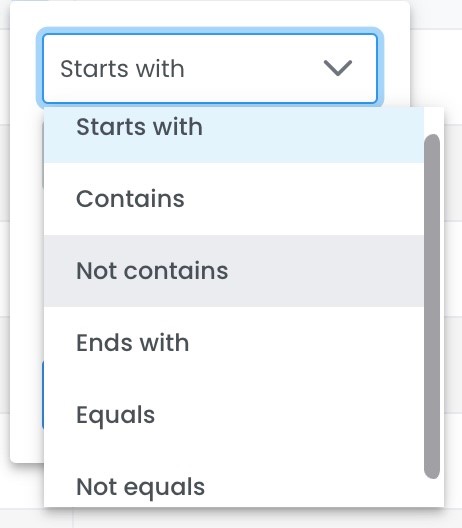
The Search Filter can search a column for an open text search.
The options for search type appear in the drop-down.
Additional search rules can be added by clicking '+ Add Rule'.
Click Apply.
To clear a search rule, click the 'Clear' button.
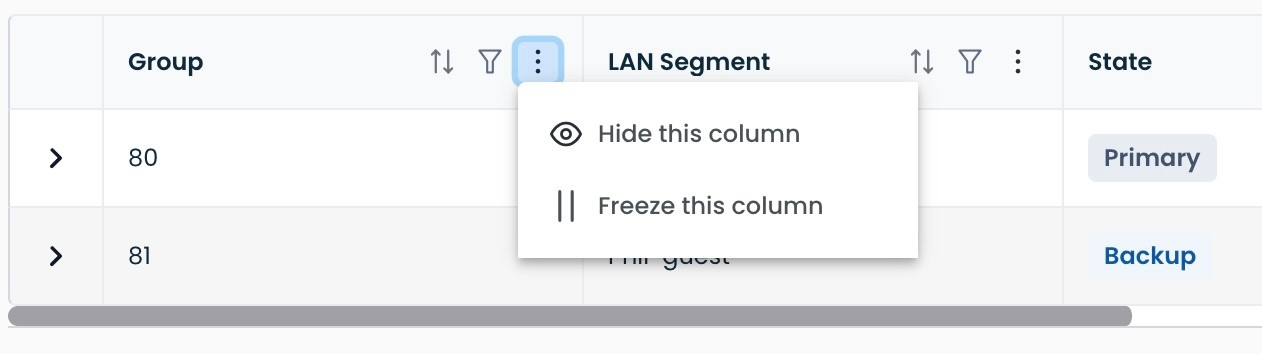
Within each column is a menu reached by clicking the 3 dots.
Hide this column: This will hide the column if desired so that the data can be compacted horizontally for ease of reading.
Freeze this column: This will keep the column in place while allowing the other columns to move left to right for ease of comparing data.
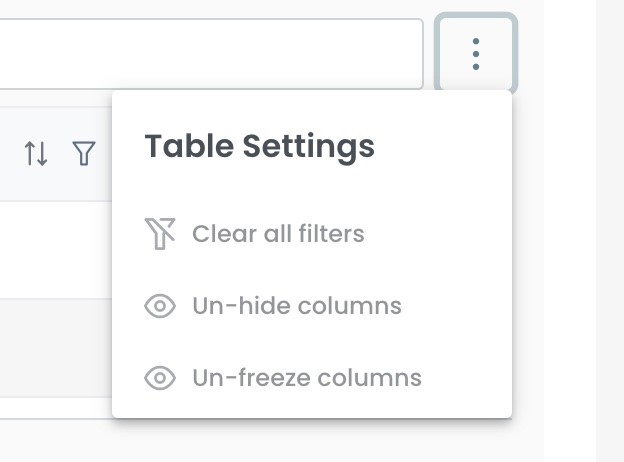
The 3 dots in the upper right corner yield a drop-down menu:
Clear all filters: All filters on the data for the table thus far will be cleared
Un-hide columns: Any hidden columns will re-appear
Un-freeze columns: Any frozen columns will again move with the others