What is BGP?
Border Gateway Protocol (BGP) is used to exchange information among autonomous systems on the Internet by controlling the routing of traffic across the entire web, being in essence the postal service of the Internet.
BGP’s primary responsibility is to find the best route available for any given IP packet to reach its final destination. When a network node crashes, BGP can easily route around the interruption, recalculating the new best route.
From within the Graphiant Portal, you will be able to configure and deploy BGP between various network Edges under your control.
Locating Local BGP in the Graphiant Portal
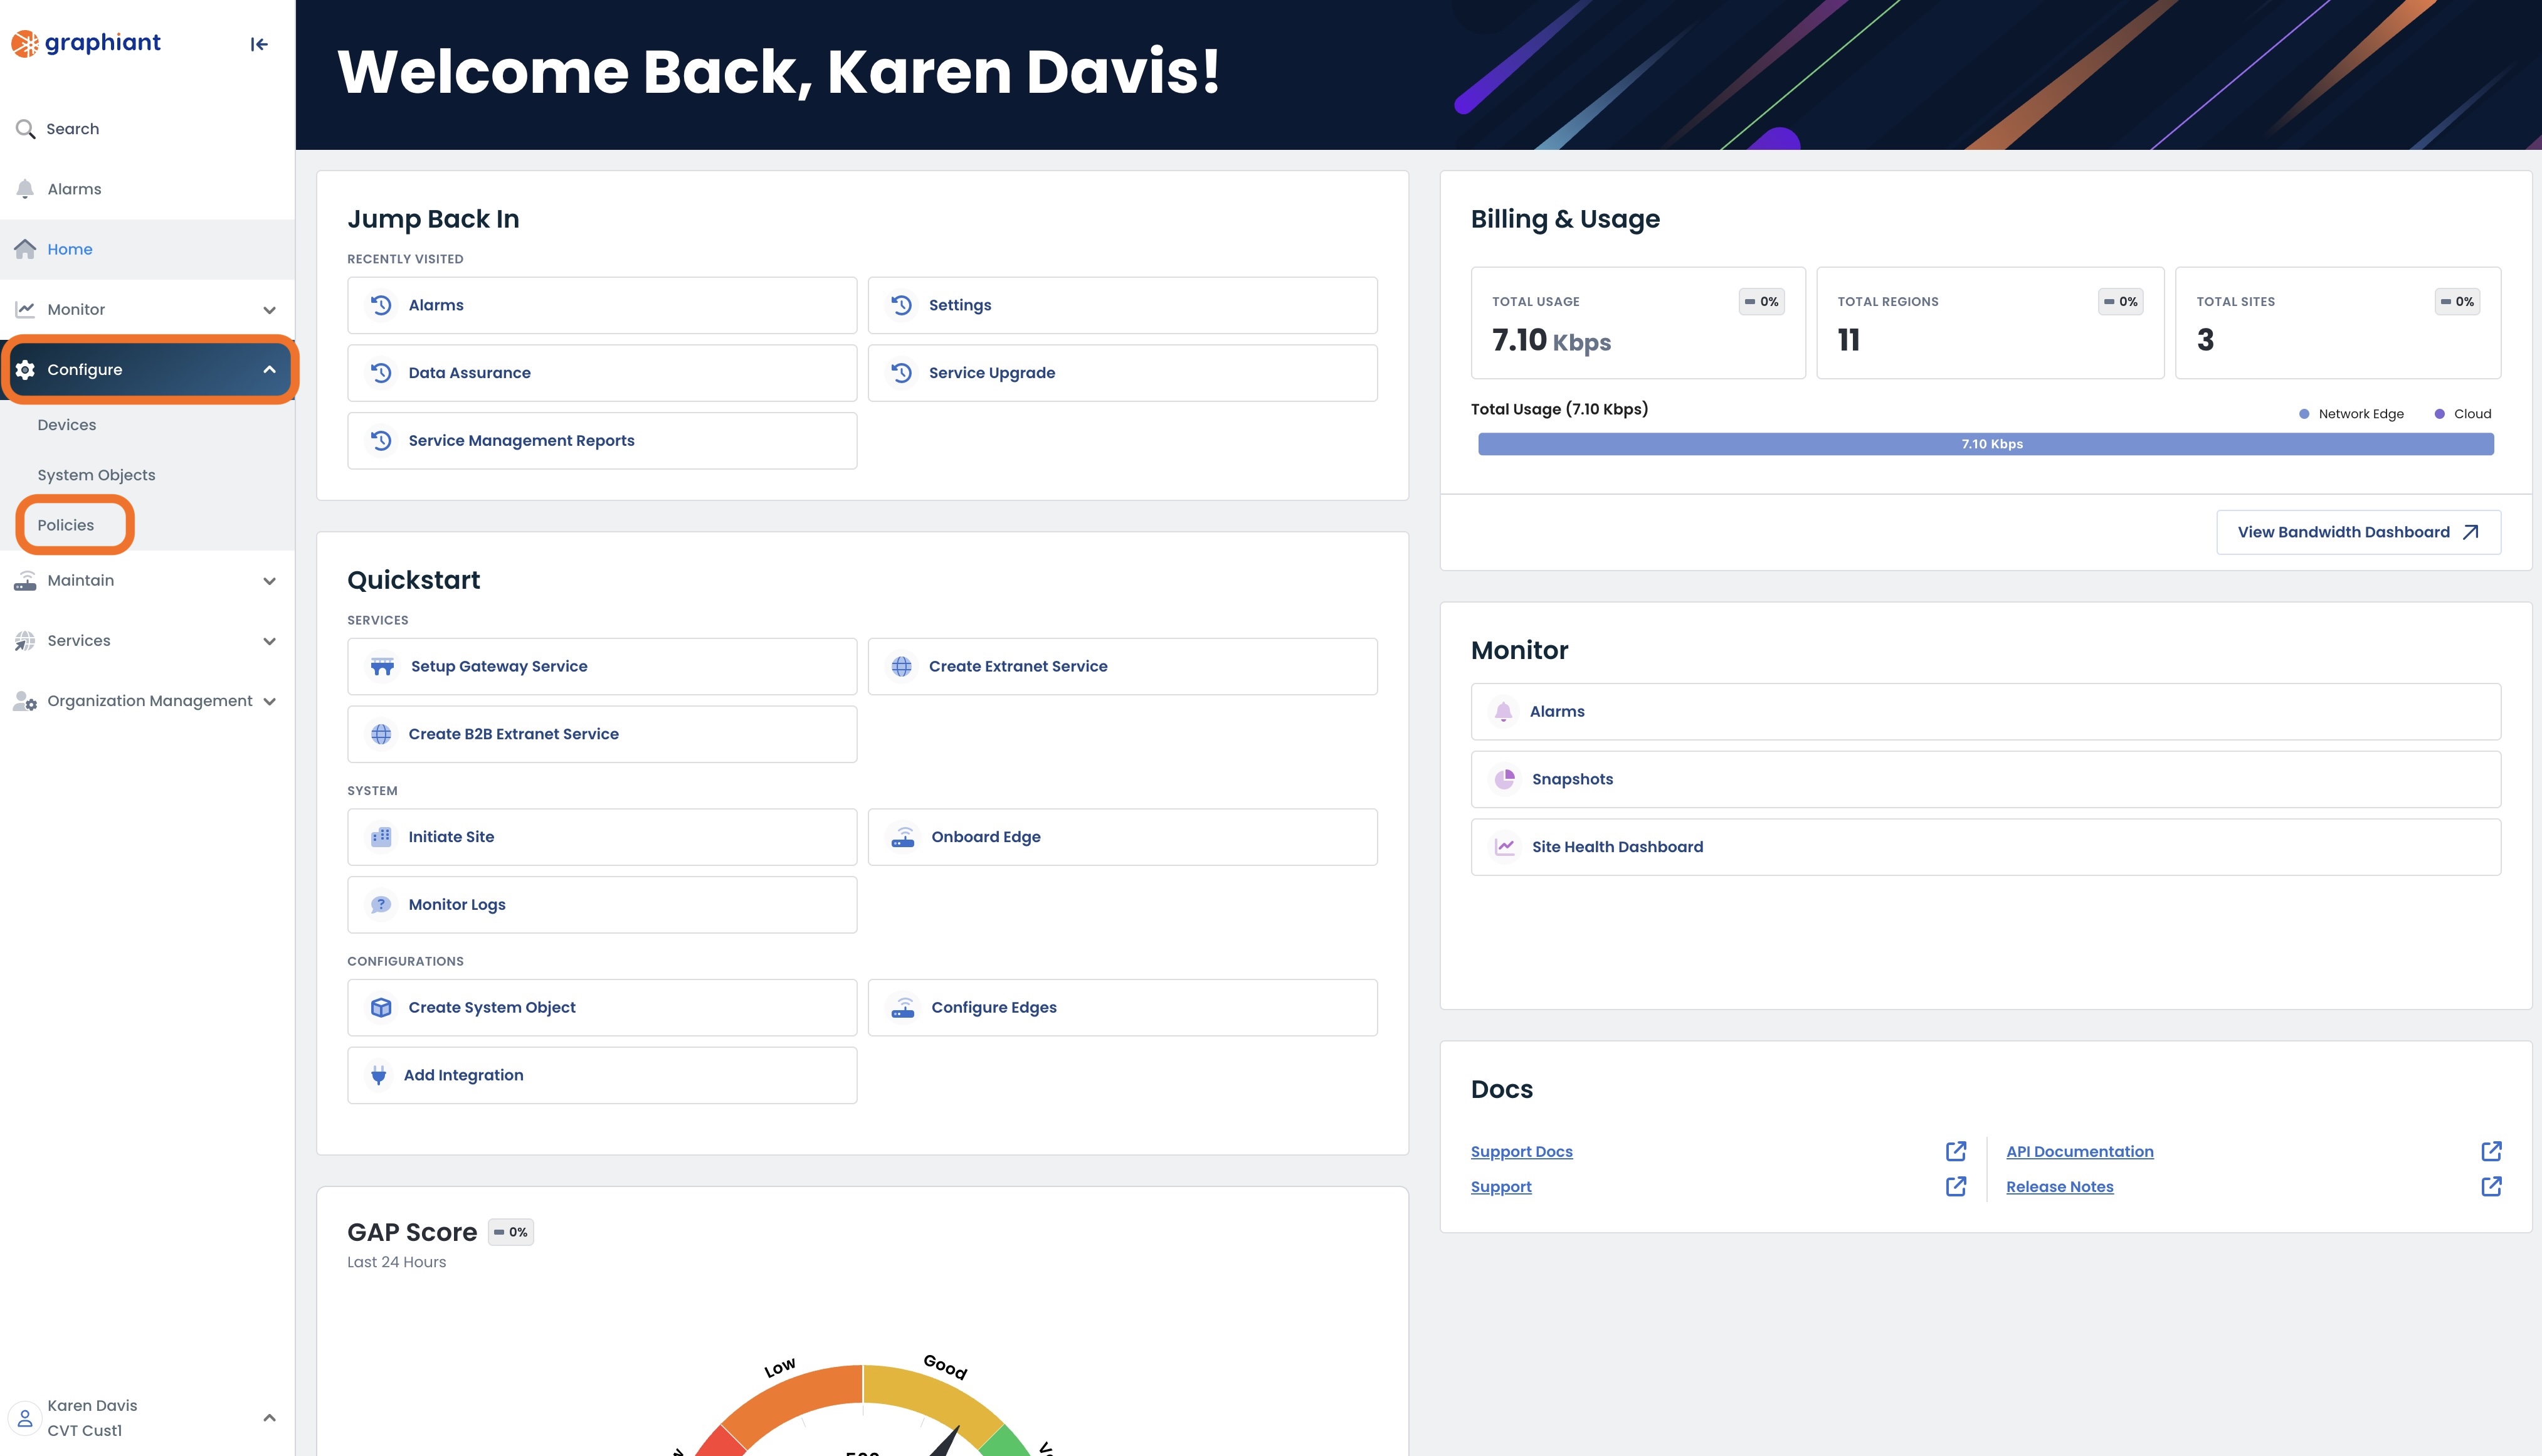
On the homepage of the Graphiant Portal, you can reach the edge configuration page by either:
Locate the "Quickstart" section on the left of the screen; select 'Configure Edges'.
OR
Click 'Configure' in the sidebar; select 'Devices'.
.jpg)
This will take you to the ‘Configuration’ page of the Graphiant Portal where you will be able to view all of your Edges. From here you will be able to select among the Active Edges which Edge(s) you would like to configure with BGP.
On the right hand side, select and click ‘Configure’ in tandem with the Edge you wish to manage.
.png)
This will take you to a Configuration page of the Edge you have just chosen.
Here you will see a list of headings along the left hand side of the page, such as ‘Configure Network’, ‘Configure Services’, ‘Configure Policies’, etc.
From here, select and click ‘Configure Services’.
.png)
A drop down menu will appear. Select and click ‘Routing Protocols & Filters’.
.png)
This will take you onto a Routing Protocols & Filters page dedicated to the chosen edge.
On the Routing Protocols & Filters page, you will see a list of available headings along the top, such as ‘Static’, ‘BGP’, ‘OSPFv2’, etc.
Next, select and click ‘BGP’.
.png)
Configuring Local BGP in the Graphiant Portal
Note:
This document is for configuring BGP on your local Edge only.
Graphiant also supports System Object BGP configuration, for ease of creating routing filters once, to be used on as many Edges as desired.
For instructions on System Object BGP configuration, click here.
Step 1: LAN Segment Settings
At the top of the configuration section of BGP, above "Neighbors", is the "LAN Segment Settings" area of BGP, housing BGP Multipath and Aggregations.
Select the desired LAN Segment from any listed to the left of the configuration area.
.png)
BGP Multi-path
Graphiant Edges now support installing multiple eBGP routes for the same prefix for load sharing.
BGP Multi-Path allows these multiple routes to be used simultaneously to reach the same destination.
This applies to all BGP routes learned from the LAN side.
By default Graphiant uses one best path.
If Multi-Path is enabled, Graphiant will use all paths showing as best with matching attributes.
The configuration toggle for BGP Multi-Path is located immediately under the "LAN Segment Settings" heading on the BGP Configuration page.
.png)
BGP Multi-Path needs to be explicitly enabled; by default Multi-Path is OFF.
To enable BGP Multi-Path, toggle the BGP Multi-Path to 'On'.
.png)
This will enable the BGP Multi-Path so that all of the best routes will be used to load-share the data.
Toggling the Multi-Path to 'Off' will disable BGP Multi-Path.
Route Aggregation
Route aggregation is a method to minimize the number of routing tables in an IP network.
BGP Aggregation consolidates selected multiple routes into a single route advertisement, rather than advertising all individual prefixes; thus every route does not need to be listed as a unique entry in the routing table.
BGP Route Aggregation is done on a per LAN Segment basis, not a per neighbor basis.
Note:
Multiple BGP Route Aggregations can be configured per LAN segment on an Edge.
The BGP Route Aggregations configuration is located immediately below the "BGP Multi-Path" toggle.
To configure BGP Route Aggregation, click the (+) icon to the right of the "Aggregation" heading.
.png)
Enter the prefix that encompasses all other prefixes to be included in the aggregation.
Graphiant supports the following optional features; select if desired:
Summary Only: Suppresses the advertisement of more specifics; only the summary is sent, not all individual prefixes.
AS Set: Advertises the list of AS Numbers collected from all component routes that are part of the aggregate address.
Note:
It is highly recommended to NOT configure aggregates that overlap.
.png)
Step 2: Setting Up BGP Neighbors in the Graphiant Portal
To begin, select and click the (+) plus icon in tandem with the section heading ‘Neighbors’.
.png)
Note:
The window for the new Neighbors rule will be at the bottom of the page, below any existing neighbors.
Click anywhere in the 'Create BGP Neighbor' box.
.png)
This will open the Configuration area for creating a BGP neighbor.
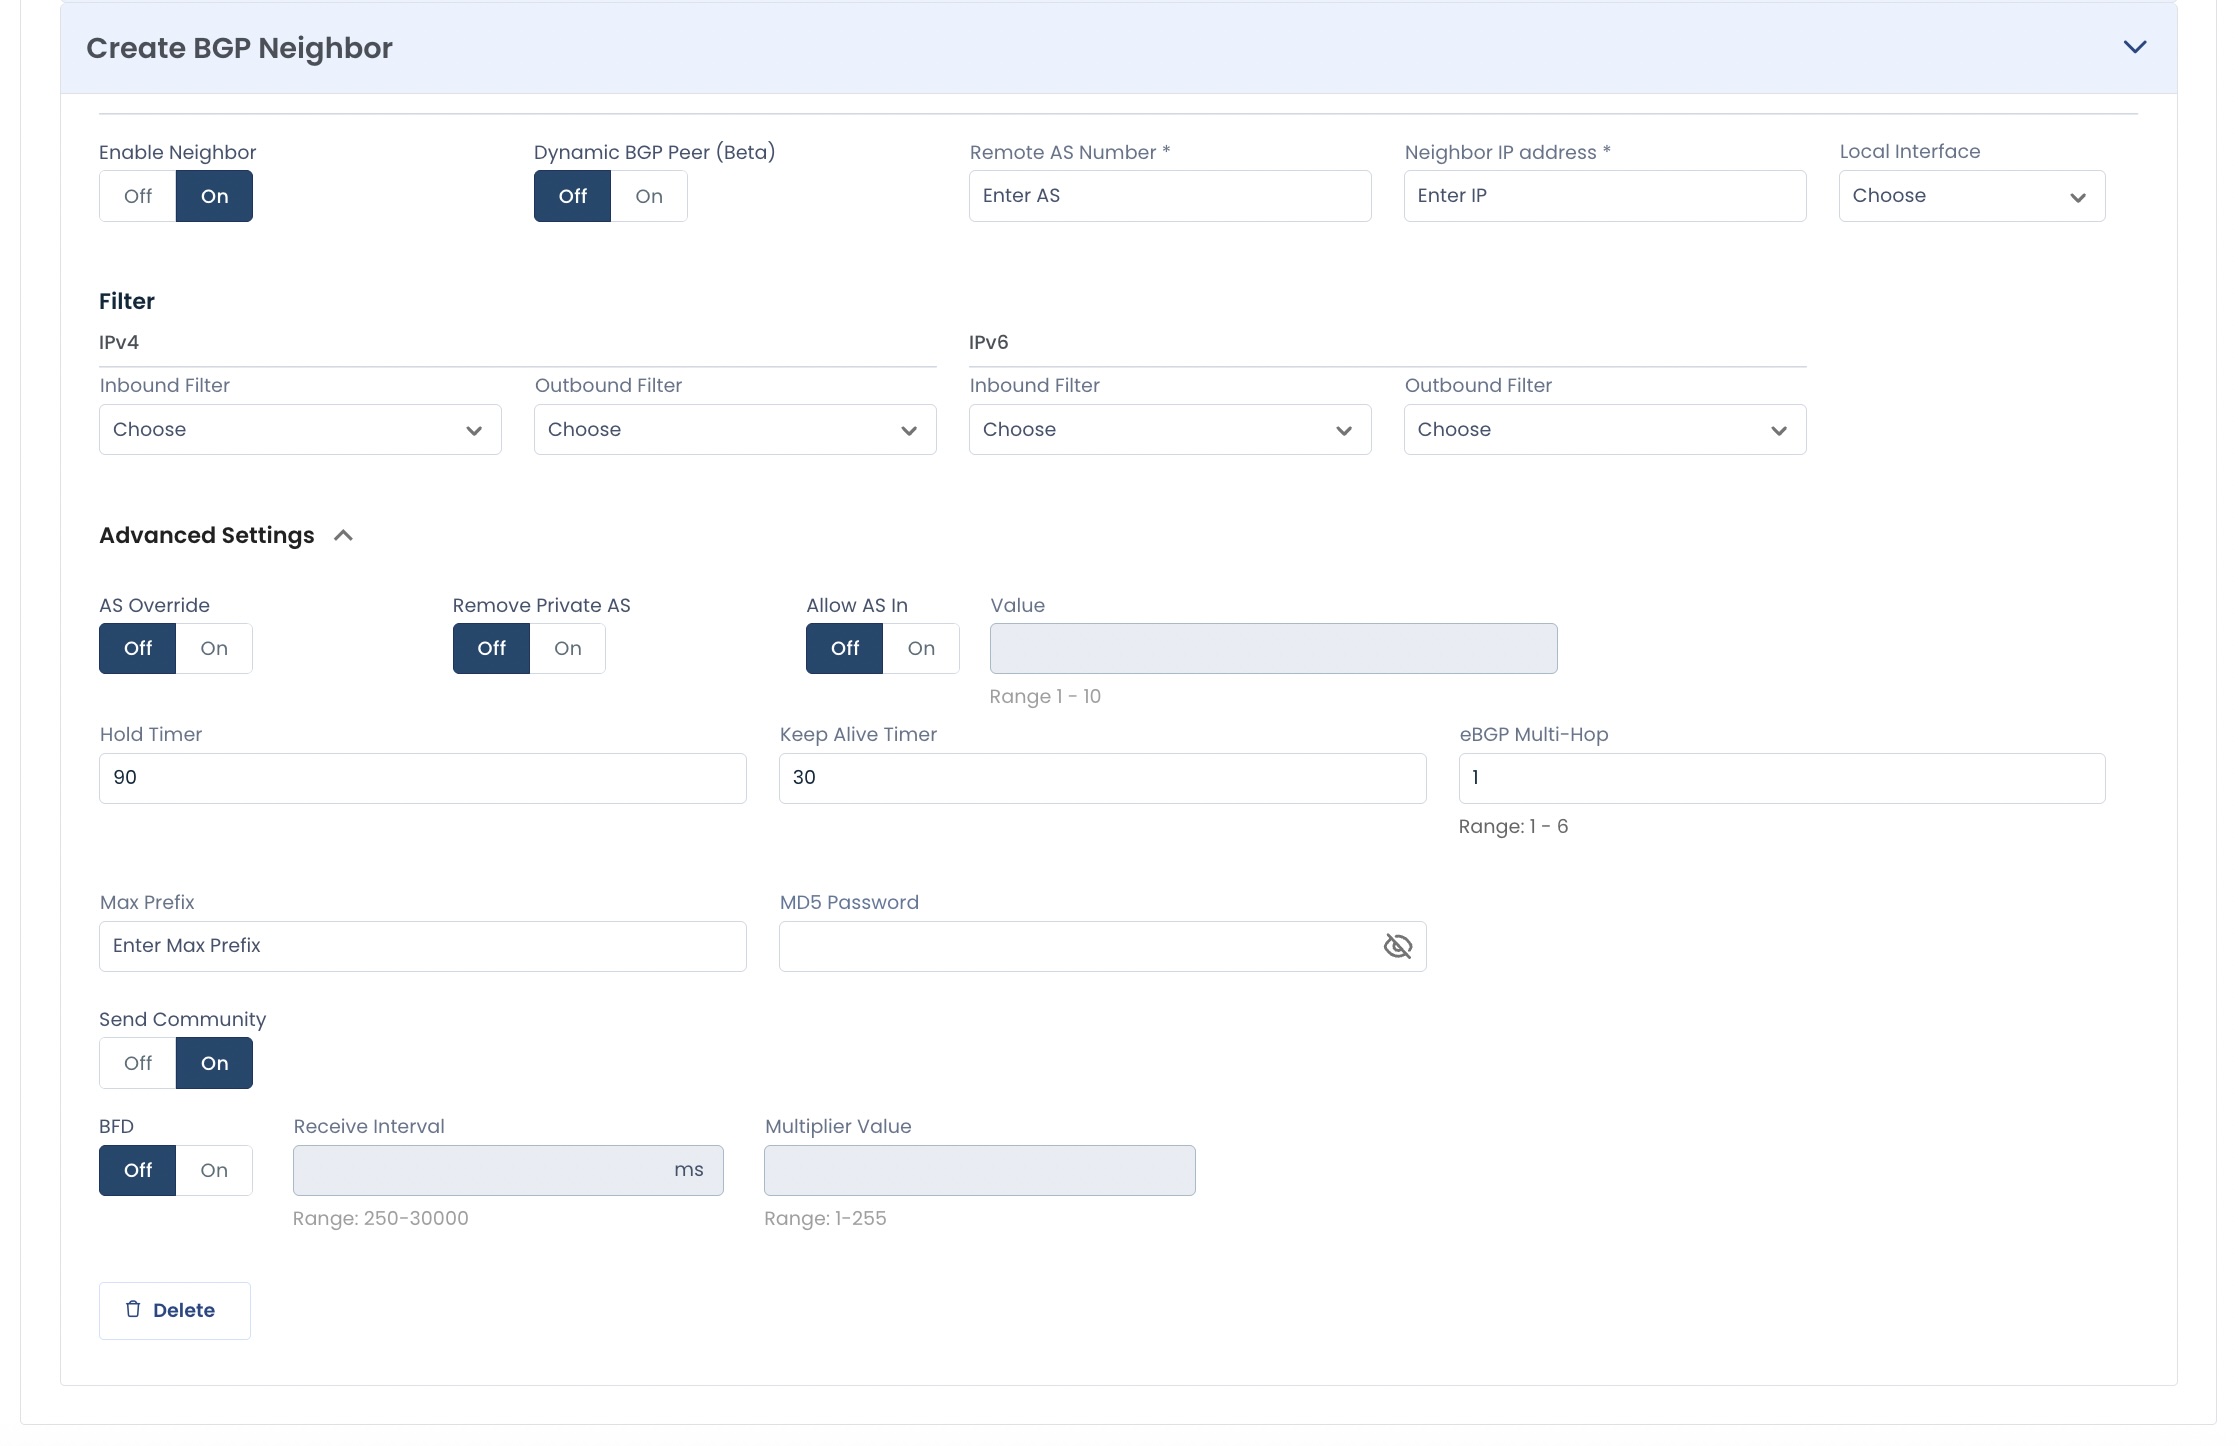
The top of the screen includes the following fields; fill out as described below:
(An * indicated a required field.)
Neighbors
Enable Neighbor: Indicator if the BGP neighbor is enabled; this is toggled to "On" by default.
Dynamic BGP Peer: Select whether to enter:
“On” = Range of IP addresses for the neighbor via subnet mask
“Off” = Individual IP address
Remote AS Number*: Enter the Neighbor’s AS Number
Neighbor IP Address*: Enter the Neighbor’s IP Address
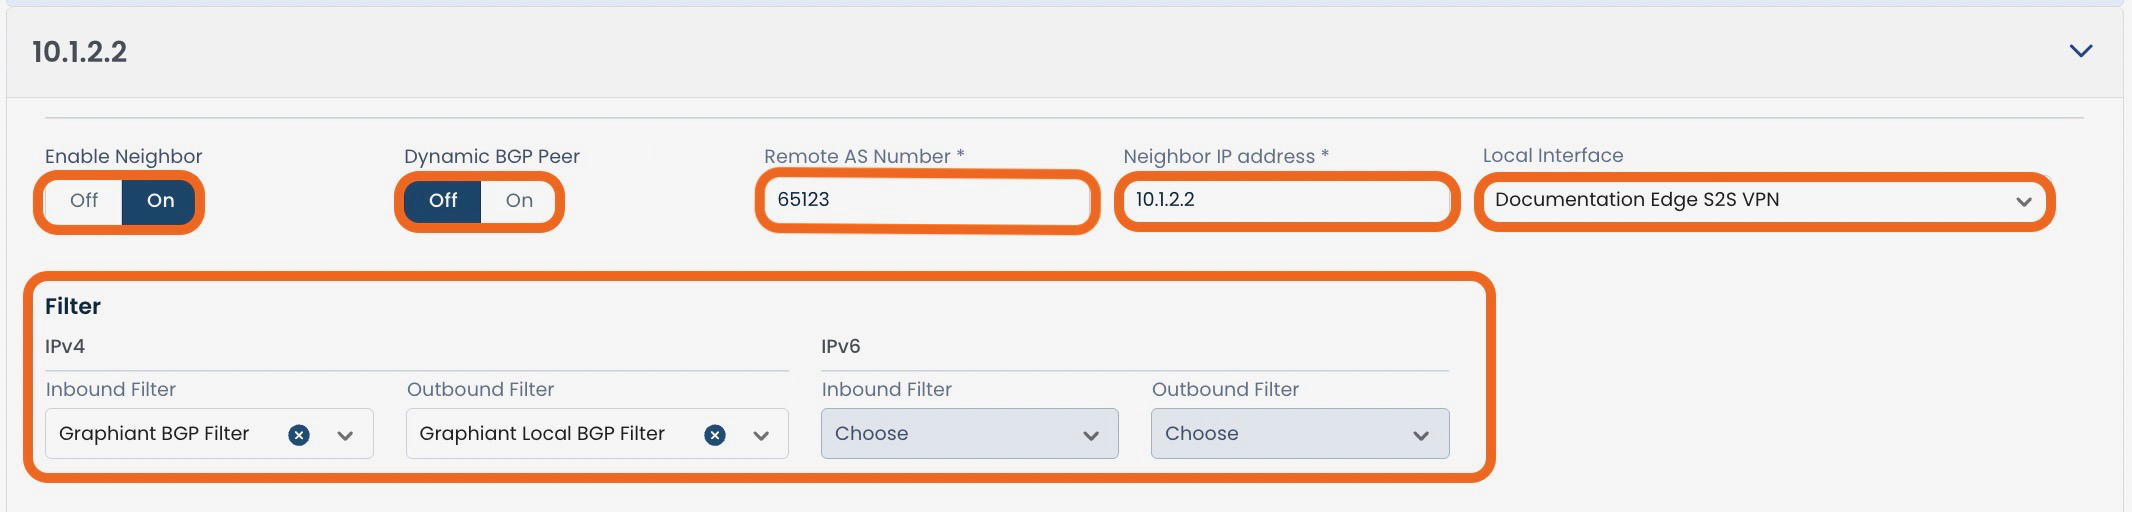
Filter
If using IPv4:
Inbound Filter: From the dropdown menu, choose the desired inbound BGP filter for IPv4. If a new filter is desired, click 'Create New', and follow the instructions here.
Outbound Filter: From the dropdown menu, choose the desired outbound BGP filter for IPv6. If a new filter is desired, click 'Create New', and follow the instructions here.
If using IPv6:
Inbound Filter: From the dropdown menu, choose the desired inbound BGP filter for IPv4. If a new filter is desired, click 'Create New', and follow the instructions here.
Outbound Filter: From the dropdown menu, choose the desired outbound BGP filter for IPv6. If a new filter is desired, click 'Create New', and follow the instructions here.
Advanced Settings
Further configuration can be performed in the "Advanced Settings" section below the "Filter" fields, such as:
Timers
Multi-Hop
Max Prefix
MD5 Password
Send Community
BFD
.png)
Timers
Hold Timer: Enter the period of time to wait for messages from the BGP neighbor before considering that neighbor unreachable; default is 90 seconds.
Keep Alive Timer: Enter the interval at which messages to the neighbor are sent to maintain the BGP session and check that the neighbor is reachable.
eBGP Multii-Hop
eBGP Multi-Hop: Enter the maximum number of connections through non-BGP router(s) that will be permitted from your Edge to the BGP neighbor.
Max Prefix
Max Prefix: Enter the maximum number of prefixes that the Edge will be permitted to receive.
MD5 Password
MD5 Password: Enter the shared password for authentication between the BGP neighbors.
Send Community
A BGP Community is a piece of extra information or a label, that can be added to a prefix that is then advertised to BGP neighbors.
Send Community is by a per neighbor basis, not a per LAN segment basis; communities are sent to the desired neighbor.
The community can be set on the router, or on the Graphiant Edge using a BGP filter that can match on certain criteria. For instructions on configuring a BGP filter on a Graphiant router, click here.
Sending communities is ‘On’ by default; this specifies that the router should support sending BGP communities to that neighbor. Sending Communities is disabled by toggling 'Off'.
BFD
Bidirectional Forwarding Detection (BFD) utilizes fast detection times in finding failures in forwarding paths by a pair of devices periodically transmitting packets over the path between them; should one of the pair stop receiving packets for a specified period of time, it assumes that the other neighbor is unreachable.
Toggle to "On" to enable: by default, BFD is "Off".
Receive Interval: Enter the minimum interval for the system to receive packets.
Multiplier Value: Enter the number of packets that can be missed before the BFD session is declared down.
Note:
BFD must be turned on for both neighbors, with both receive interval and multiplier values matching for each neighbor.
Deleting a BGP Neighbor
Should a BGP neighbor no longer be needed, you can delete the neighbor by clicking 'Delete' within its configuration.
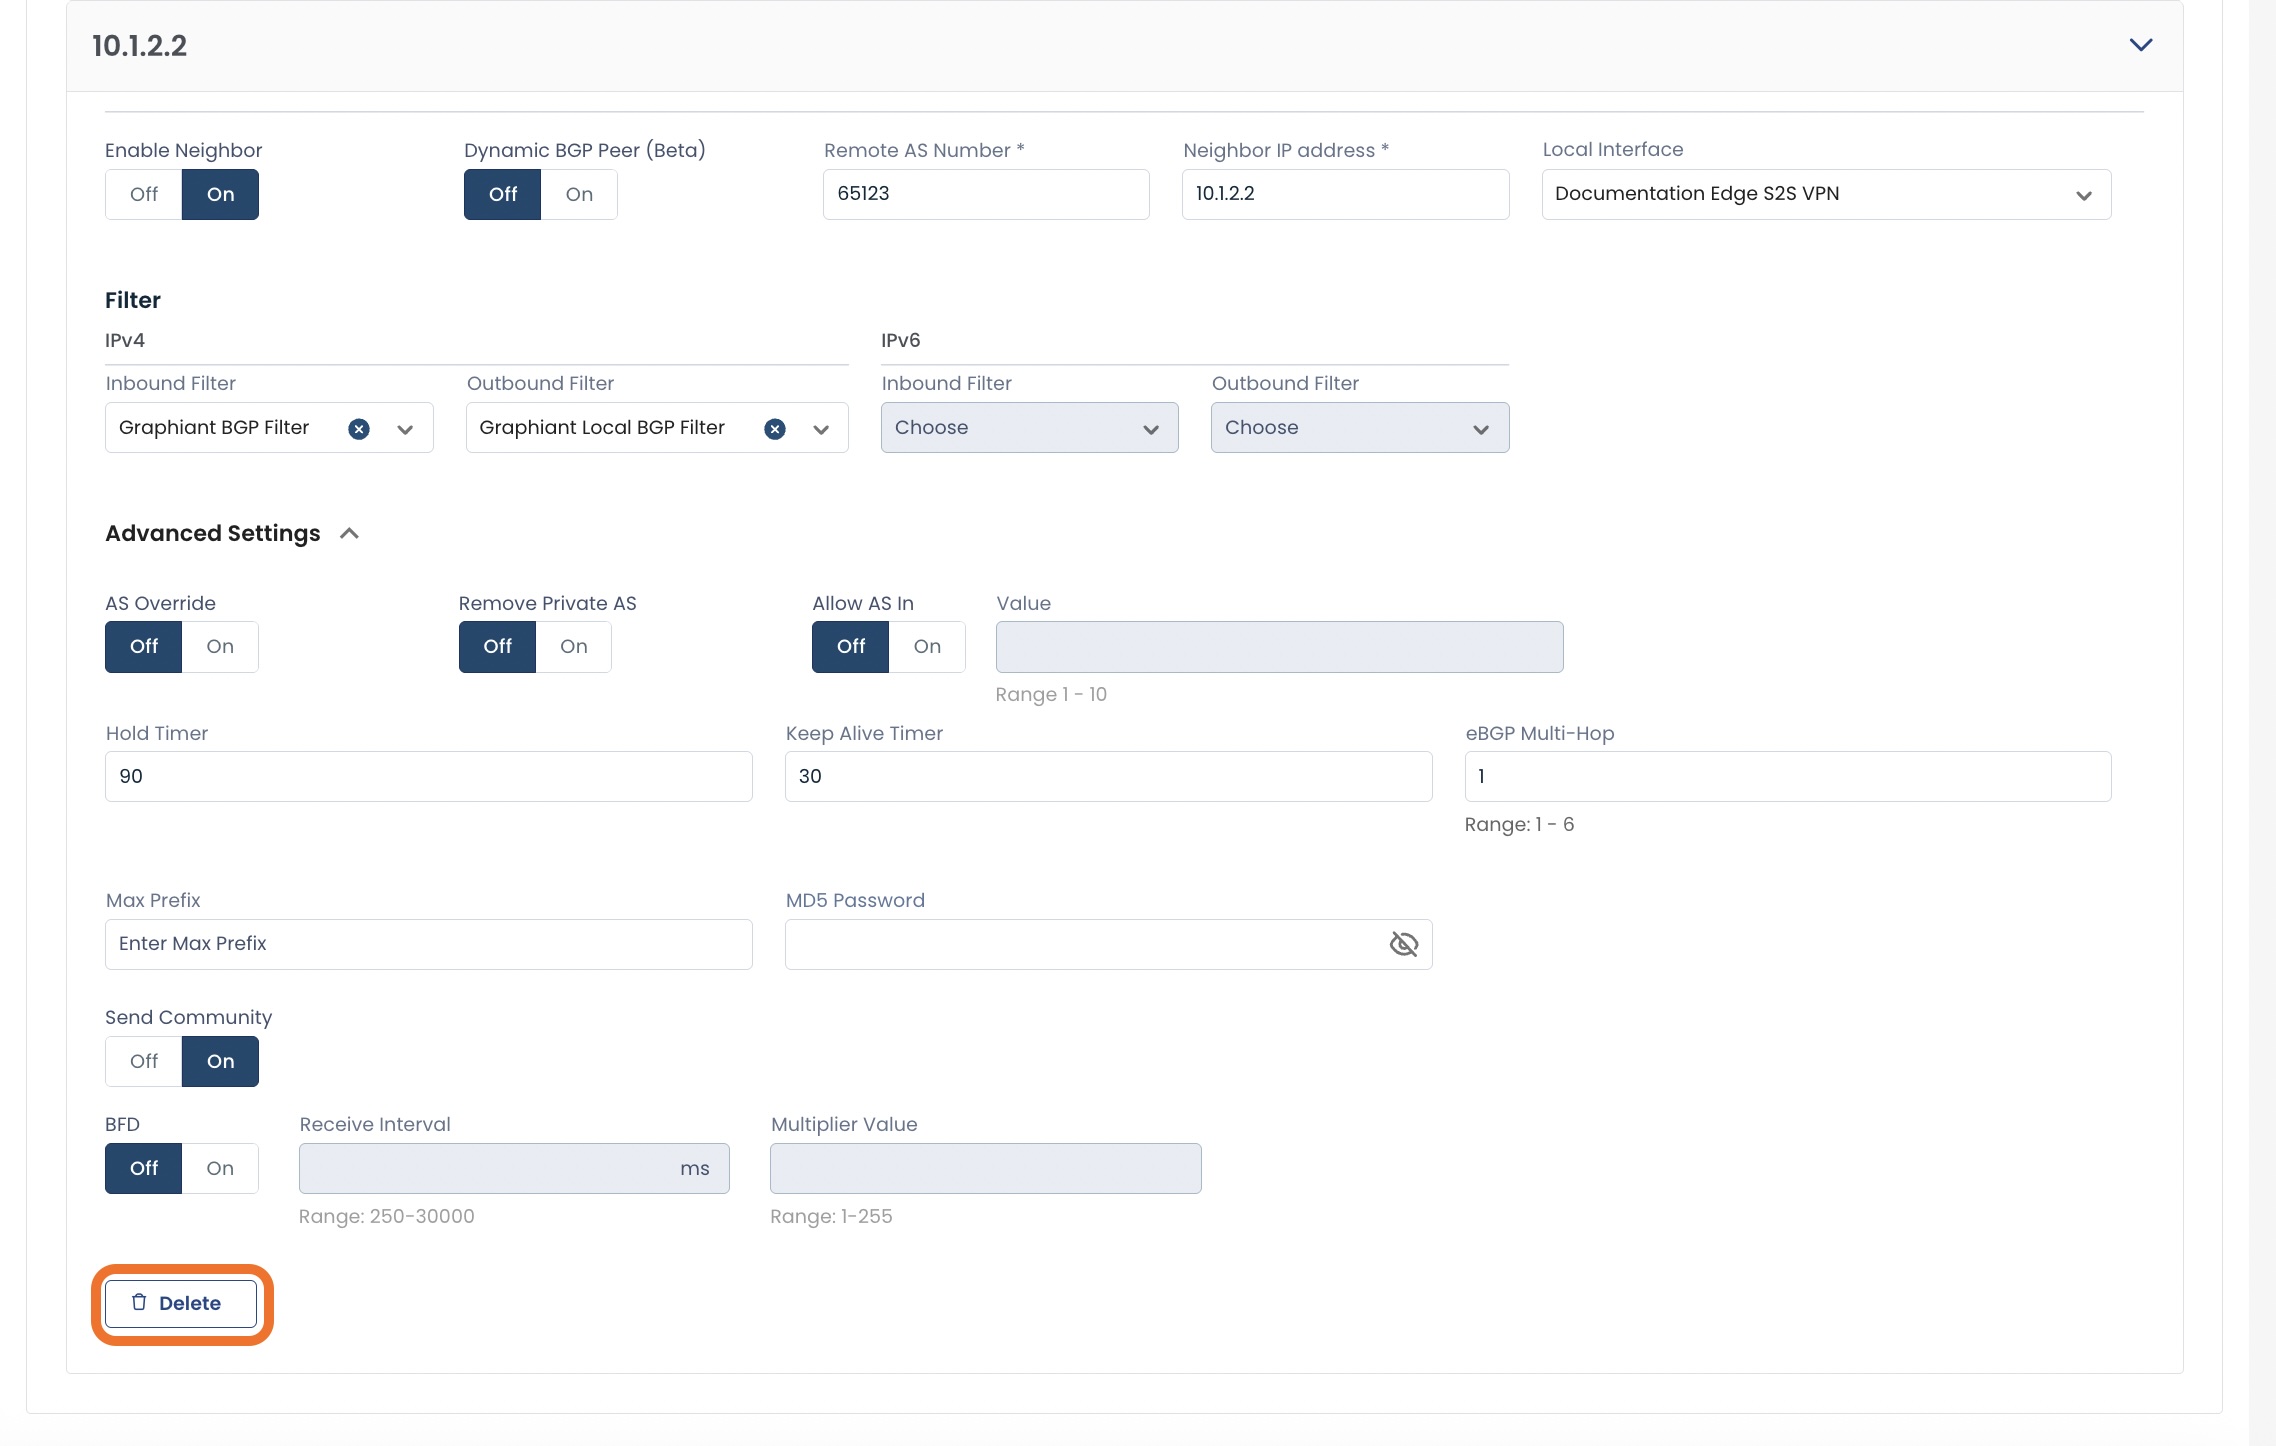
'Review' and 'Apply' to save changes.
The neighbor will no longer be available, nor be in the list for the Edge.
Note:
If Prefixes, Rules, and Filters are not being added, then the BGP configuration is finished. Follow the instructions for Review and Apply.
Otherwise, continue to Creating a Prefix List in the Graphiant Portal.
Creating a Prefix List in the Graphiant Portal
Before configuring BGP filter, you will need to first configure a prefix list to utilize for configuration.
Graphiant prefix lists are part of the global System Object structure, giving users the ability to create each prefix list only once, and subsequently use in any routing policy desired.
Any changes, such as adding/removing prefixes here, will automatically be propagated to every routing filter utilizing that prefix list.
Note:
Graphiant is moving to a global prefix list system within System Objects. As of 10-16-24 Local Prefix Lists will not be able to be created; the instructions below are for prefix lists within System Objects.
Edit & Delete will still be available for the Local Prefix Lists; click here for those instructions.
Locating System Object Prefix Lists in the Graphiant Portal
From the Graphiant Portal home page, click 'Configure' in the sidebar.
Select 'Policies'.
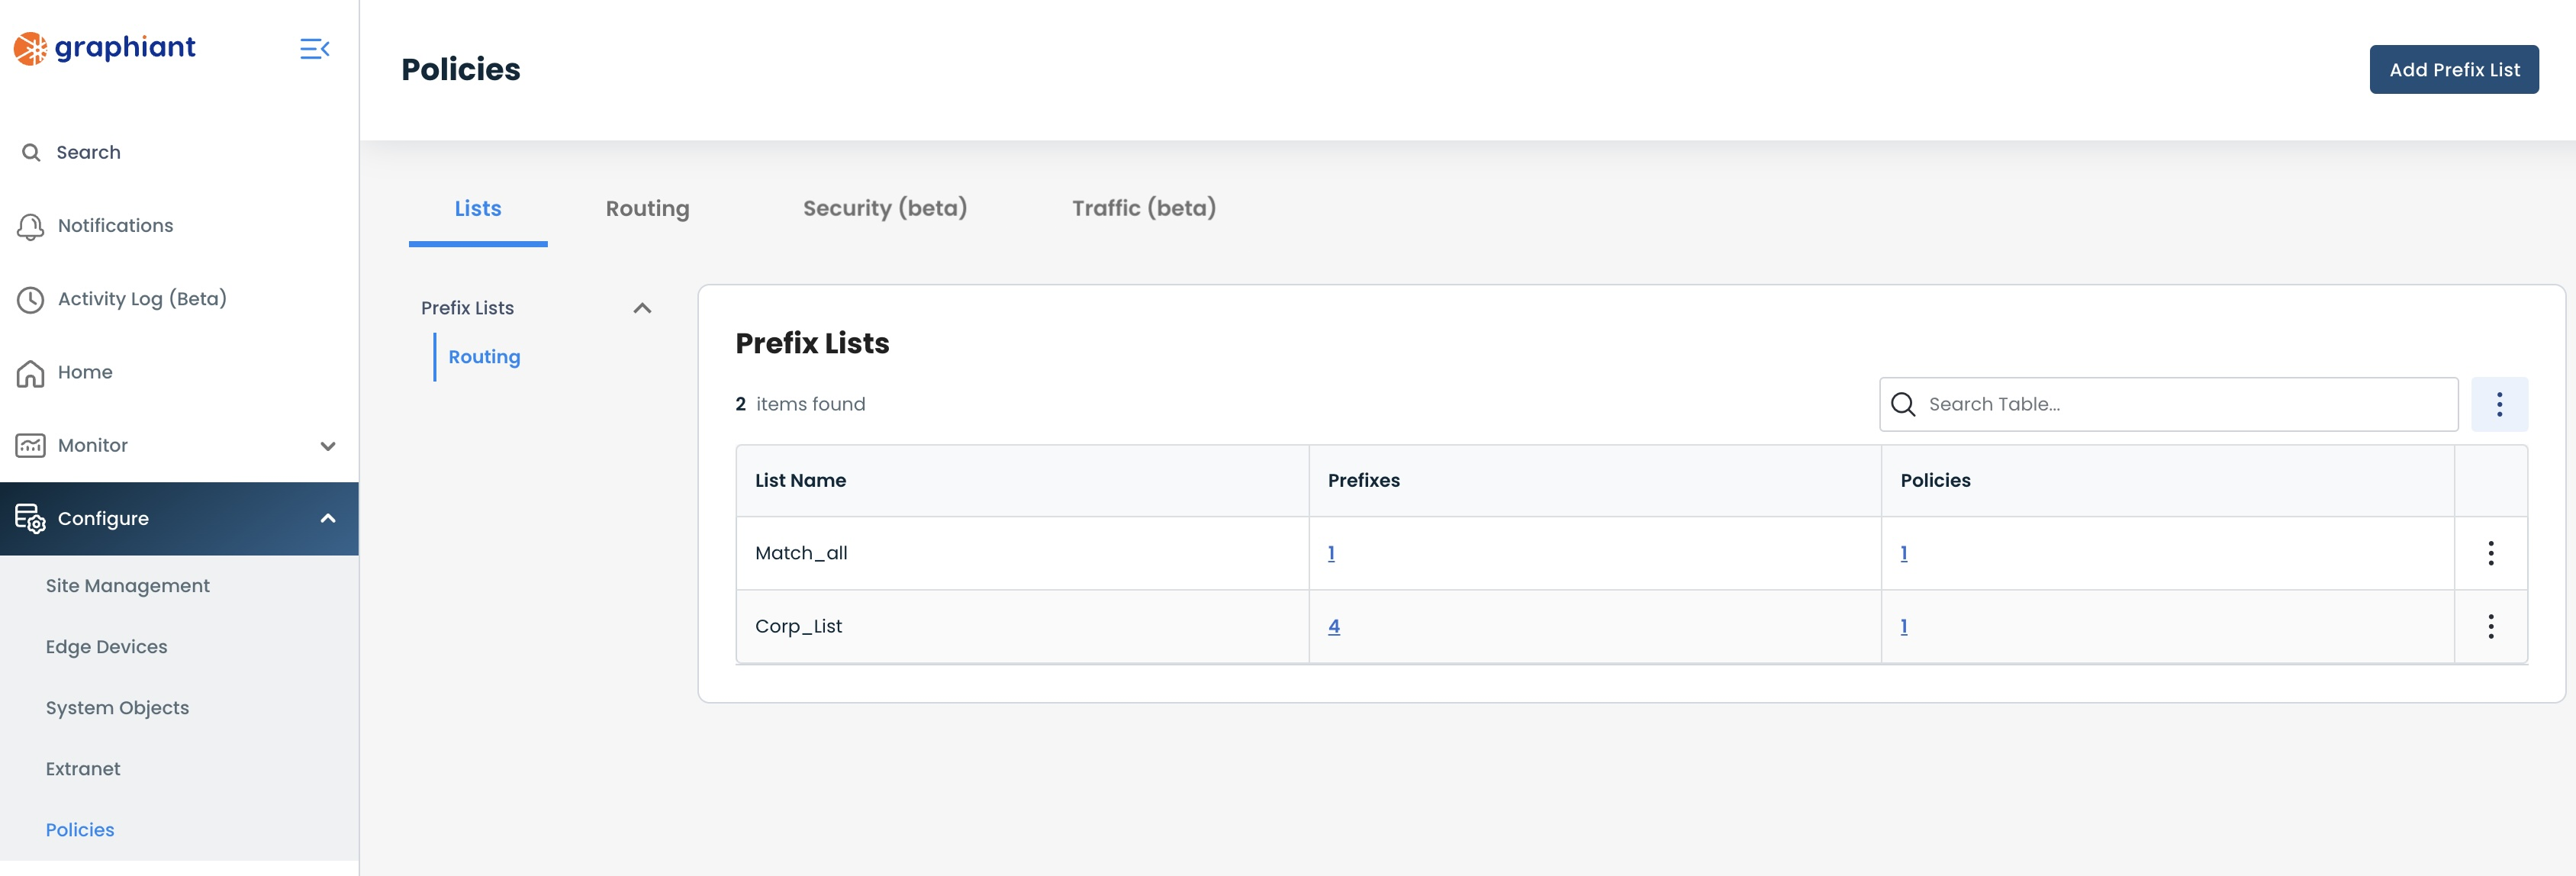
This will open the Prefix List table, which includes the following fields:
List Name: Assigned name of the prefix list
Prefixes: Number of prefixes included in the prefix list
Policies: Number of policies attached to the prefix list
The table search will search for a prefix list name, for ease of finding specific prefix list within a large number of lists.
To see which prefixes are included within a prefix list, click anywhere within the "Prefixes" field of that list.
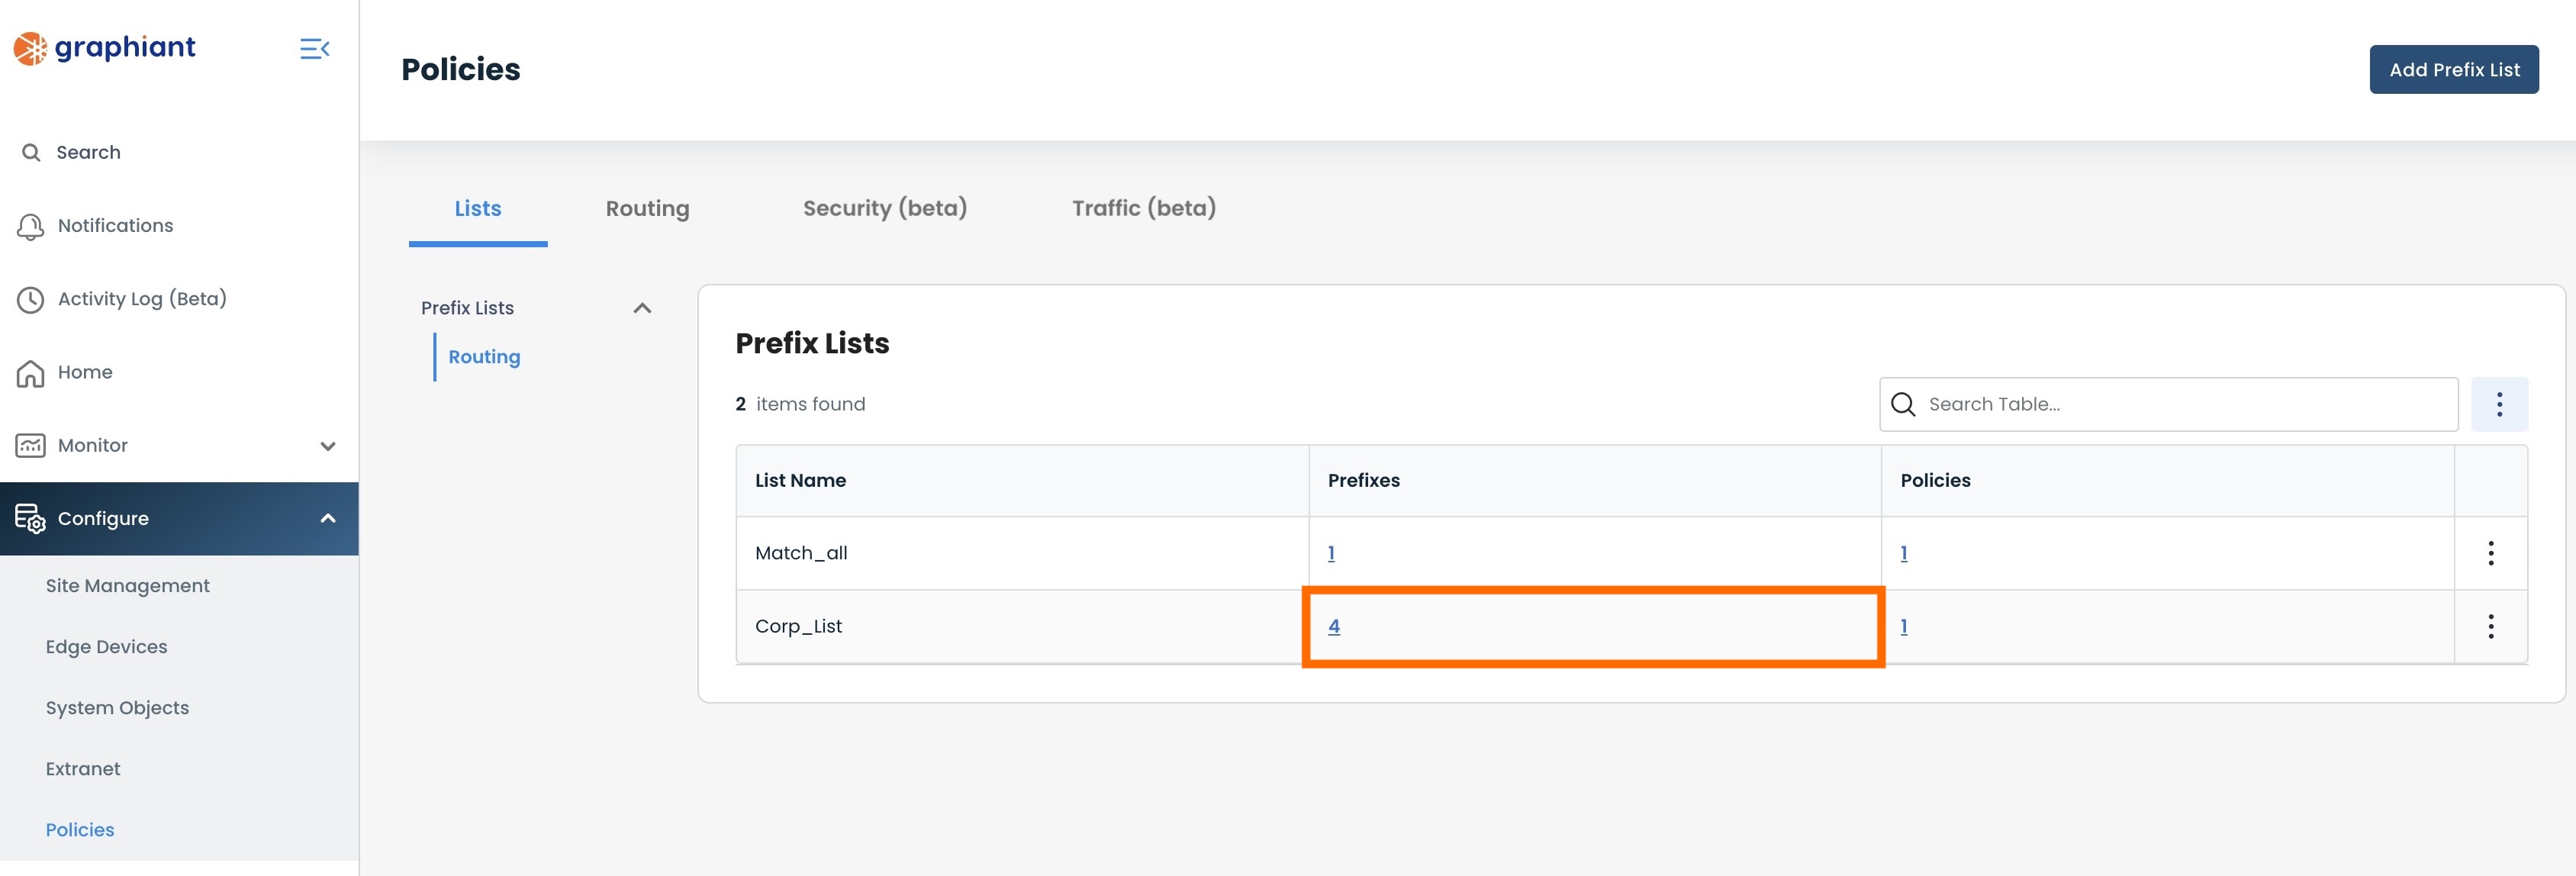
This will open a modal containing all of the prefixes included in the list, along with their subnet mask rules and prefix lengths (also represented as a visual).
.png)
You can see the policies attached to a prefix list by clicking anywhere within the "Policies" field of the list in the Prefix List Table.
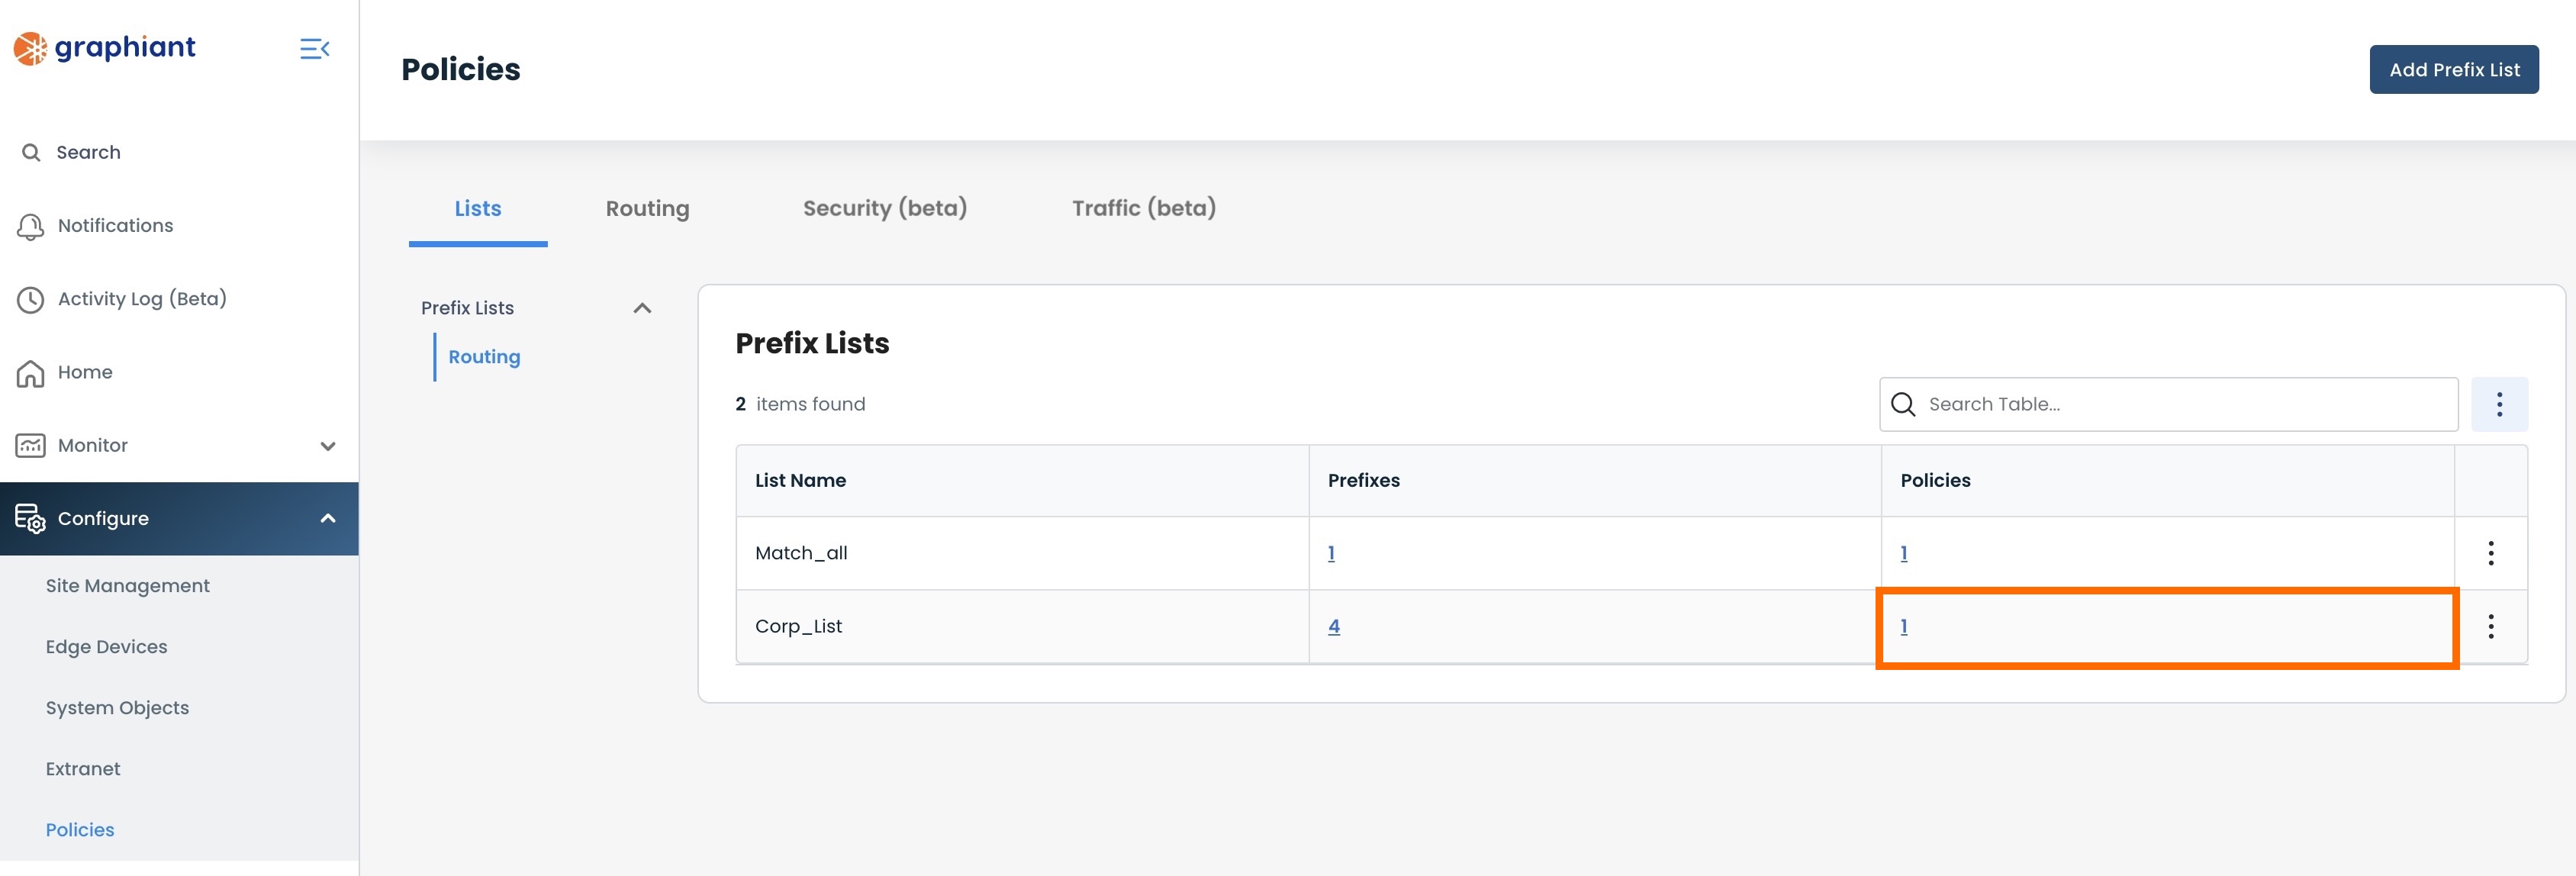
This will open a modal containing all the policies attached to that prefix list, and the type of policy they are - BGP or Graphiant.
.png)
Clicking on either the Policy Name link, or the link icon, will take you to the status information regarding the Edge using the Policy.
.png)
Note:
You can navigate between Prefixes and Policies information from the tabs within the modal.
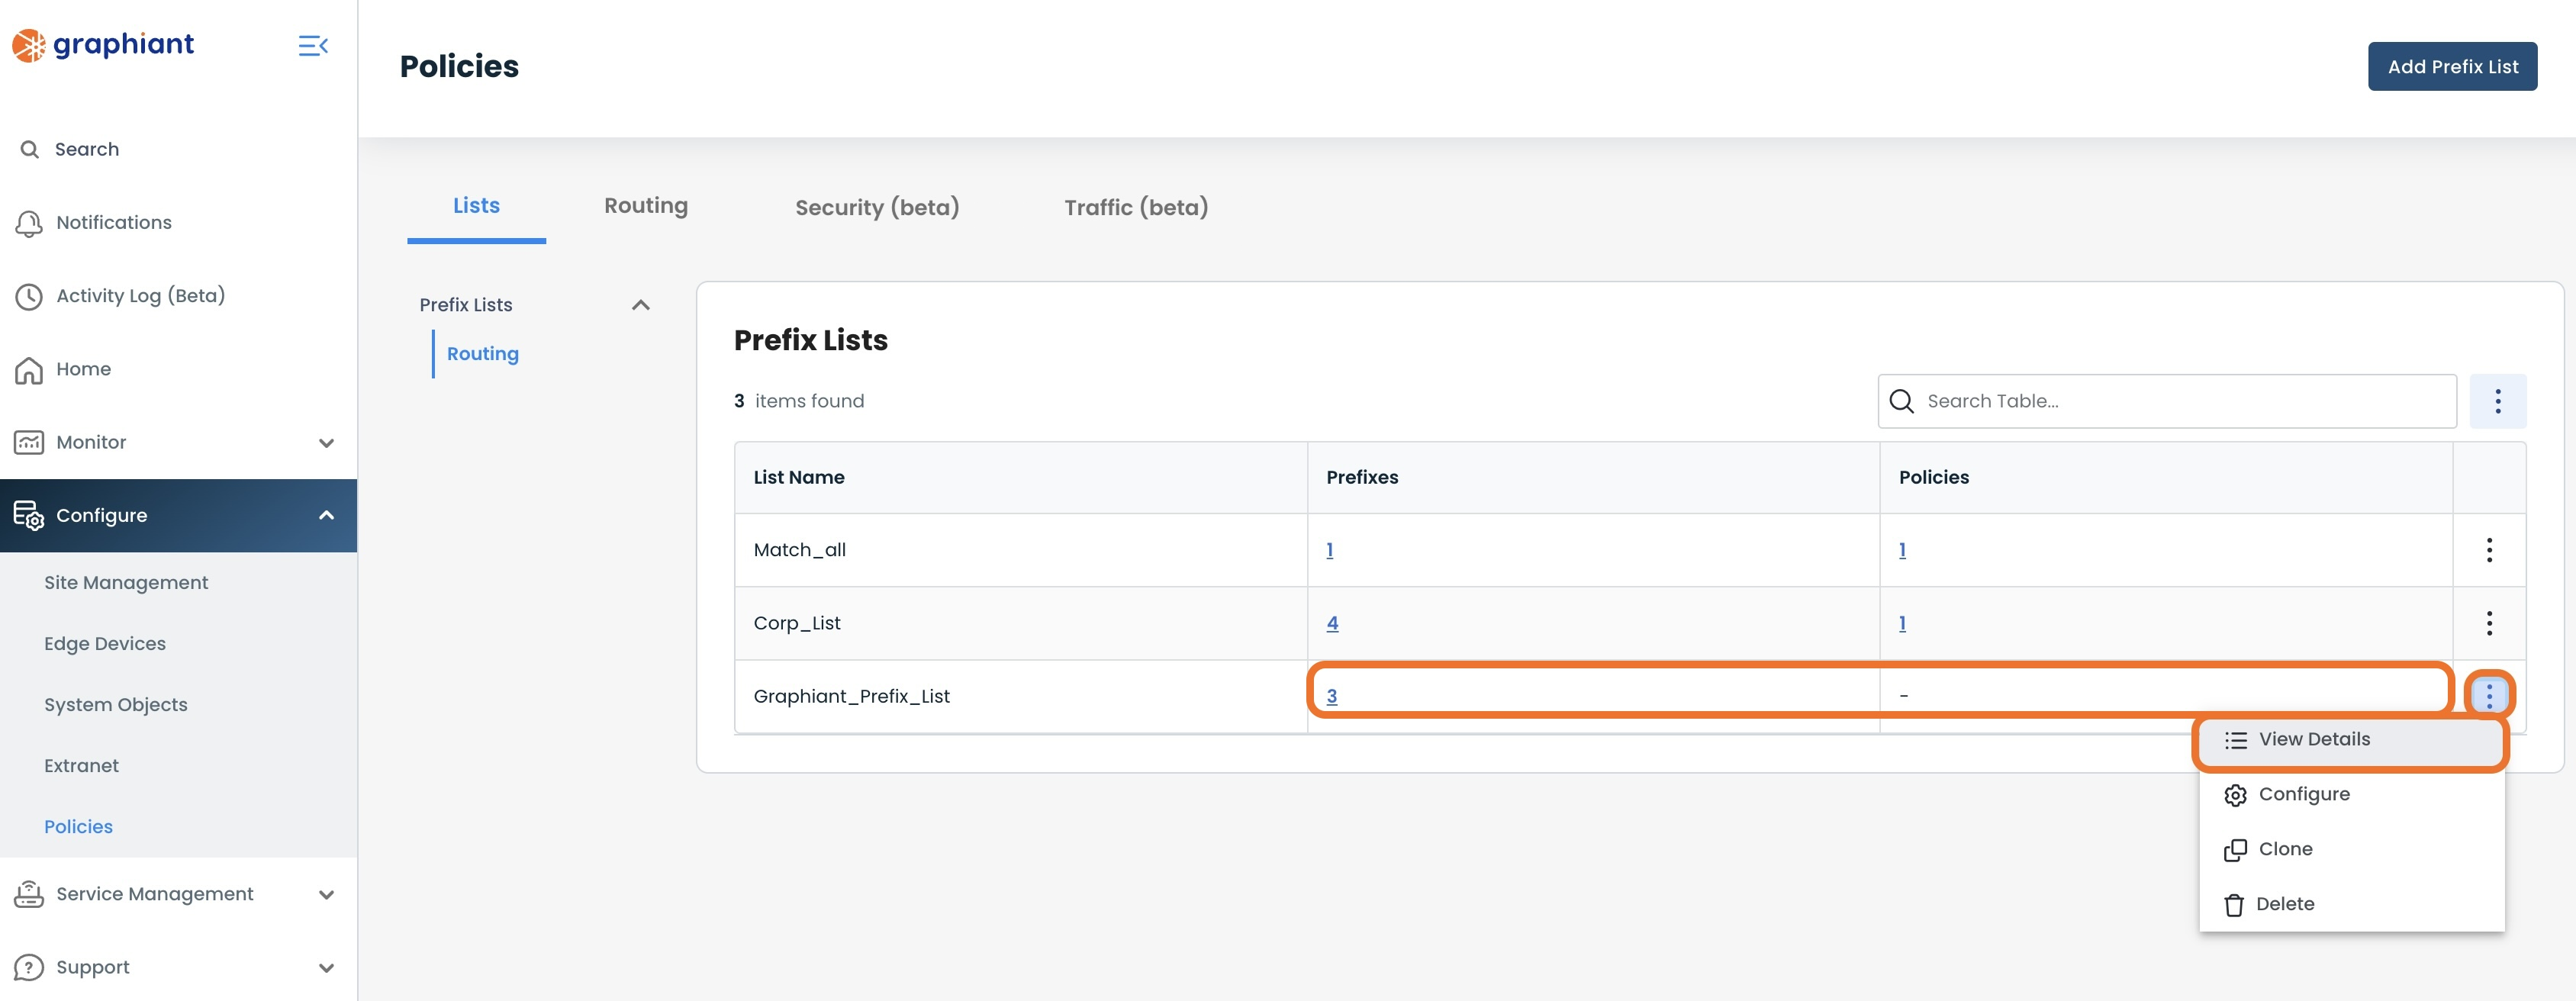
This information is also reachable by clicking 'View Details' from the ellipses to the right of the prefix list.
Adding a Prefix List
To add a Prefix List, navigate to the Prefix List Table; click 'Add Prefix List'.

Complete the following fields:
Name: Enter the desired nomenclature for the new prefix list (spaces are not permitted).
Address Family: Select the desired address family - IPv4 or IPv6.
Description (optional): For future users to know the purpose of the prefix list.
Click ‘Add Prefix’.
.png)
This will open a modal to enter the information for all the prefixes to be included in the list.
Note":
The fields are pre-populated with examples; enter your desired information.
.png)
Fill out the following fields:
IP Prefix: Prefix to be included in the list
Rule: Select whether the prefix length is to be Exact, a custom range, less than or equal to, or greater than or equal to the value in the 'Prefix Length' field.
Prefix Length: Use the slider to choose the desired prefix length, with regards to the rule chosen.
Click 'Add Prefix' to add as many additional prefixes as desired until your list is complete.
.png)
Once all of the prefixes to be included in the list are entered and the list is complete, click 'Save'.
.png)
The newly created Prefix List is shown here for your review.
From here you can perform any of the following actions:
Add Prefix: If any further prefixes are needed
Edit / Delete: To change / remove any prefix in the list
Click 'Confirm' to save the prefix list.
.png)
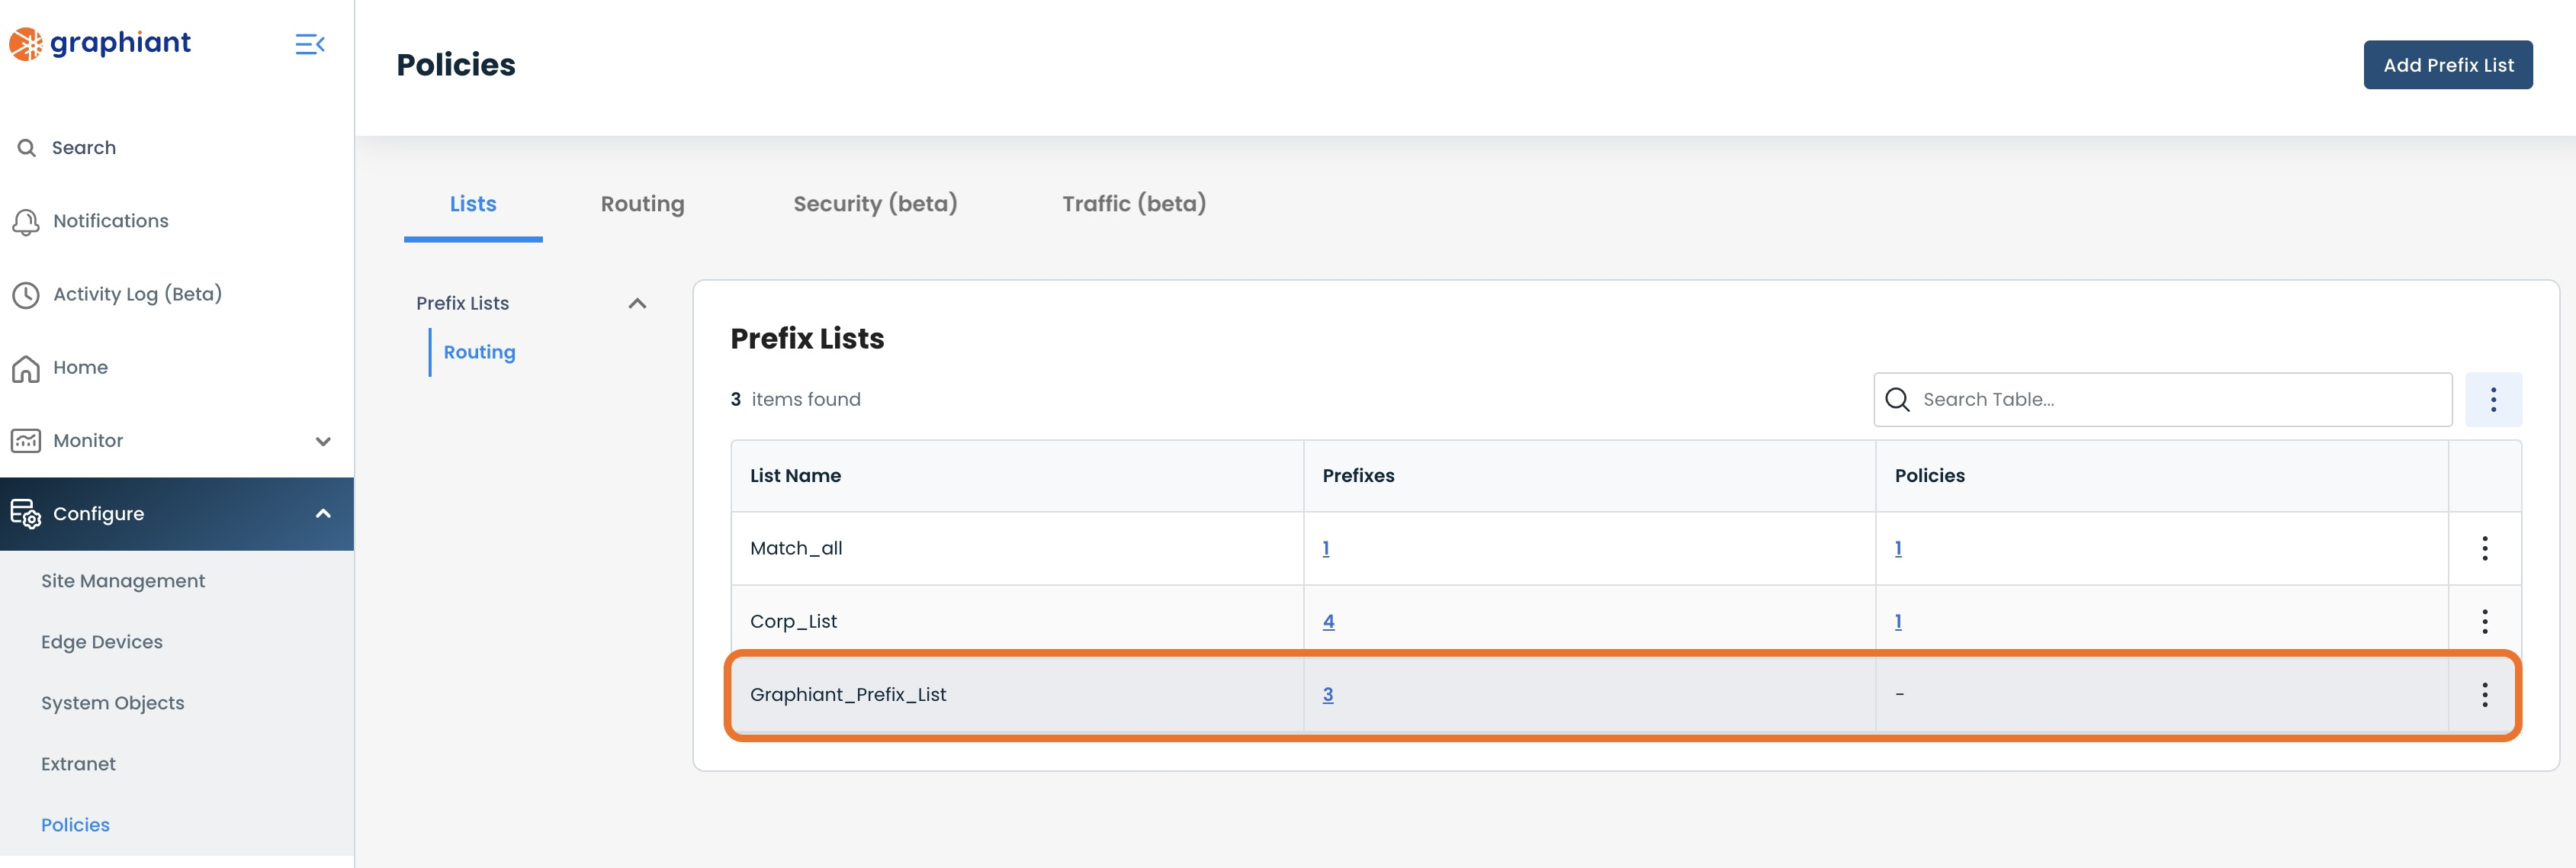
The newly created prefix list is now included in the Prefix List Table.
To View the details of a Prefix List, such as what Prefixes and Policies are attached, you can do either of the following:
Click the ellipses to the right of that prefix list; select 'View Details'.
Click anywhere in either the Prefixes or Policies fields for that prefix list.
Here you can toggle back and forth between prefix and policy information for the prefix list.
.png)
Note:
There will be no filter policies connected to the prefix list at this point; once the filter policies are created, they may be connected to the prefix list.
Editing a Prefix List
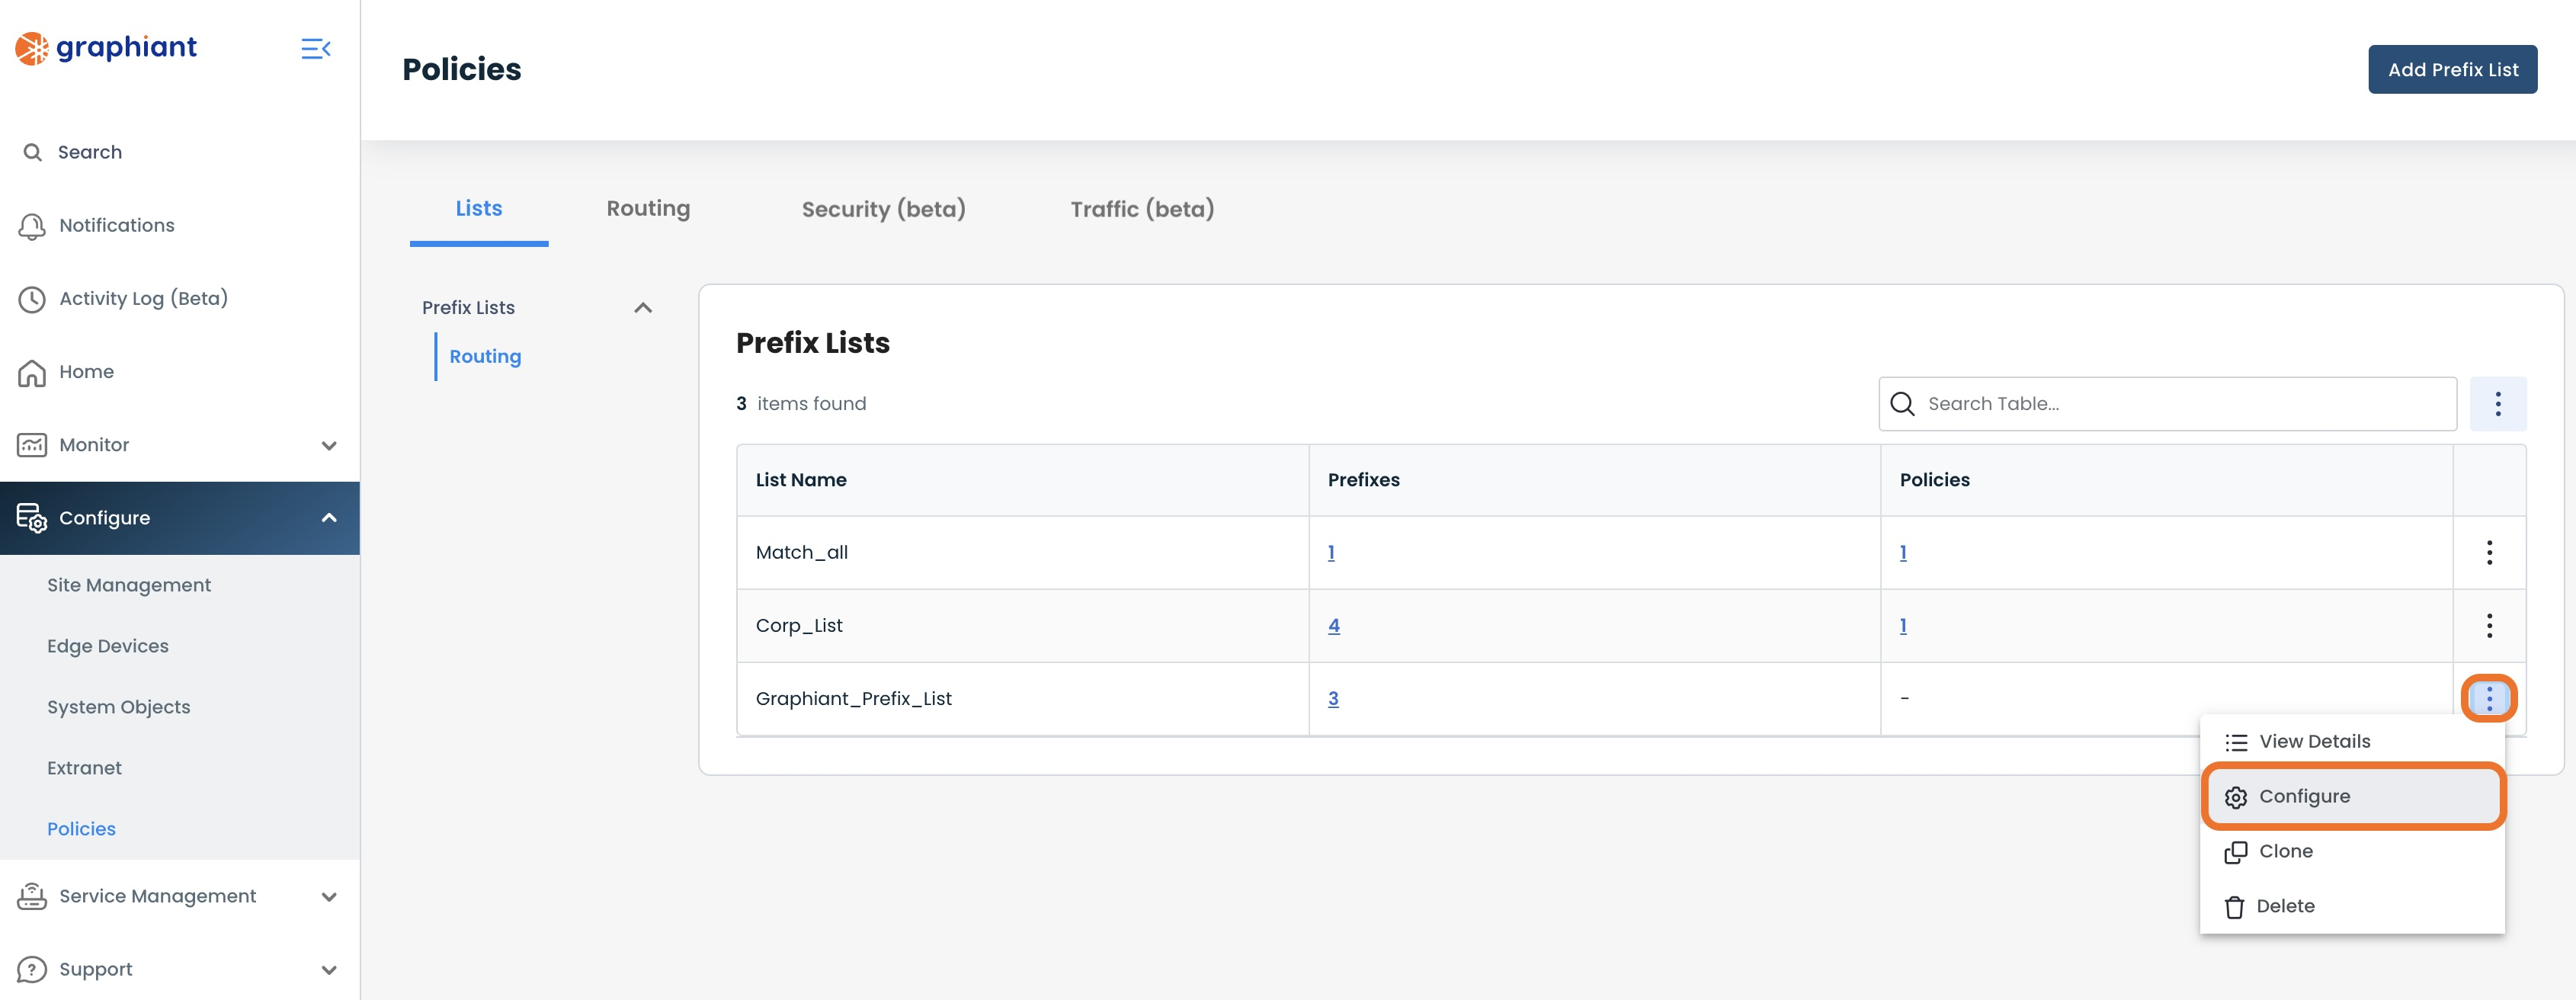
To edit a prefix list, click the ellipses to the right of that prefix list.
Select 'Configure'.
Perform any of the actions as described below.
Editing a Prefix within a Prefix List
Click the pencil icon to the right of the desired prefix to edit a prefix.
.png)
Make the desired changes.
Click 'Save'.
.png)
Click 'Review' and 'Apply'.
.png)
The changes are now complete and reflected in the Prefix List Table.
Removing a Prefix within a Prefix List
Click the trash can icon to the right of the desired prefix to remove a prefix.
.png)
The prefix to be removed is not visible in the table.
Click 'Review' and 'Apply'.
.png)
The changes are now complete and reflected in the Prefix List Table.
Cloning a Prefix List
Sometimes it is helpful to duplicate a prefix list; for instance, to facilitate in creating a new prefix list that contains all of the prefixes contained within an existing prefix list, with just a few additions.
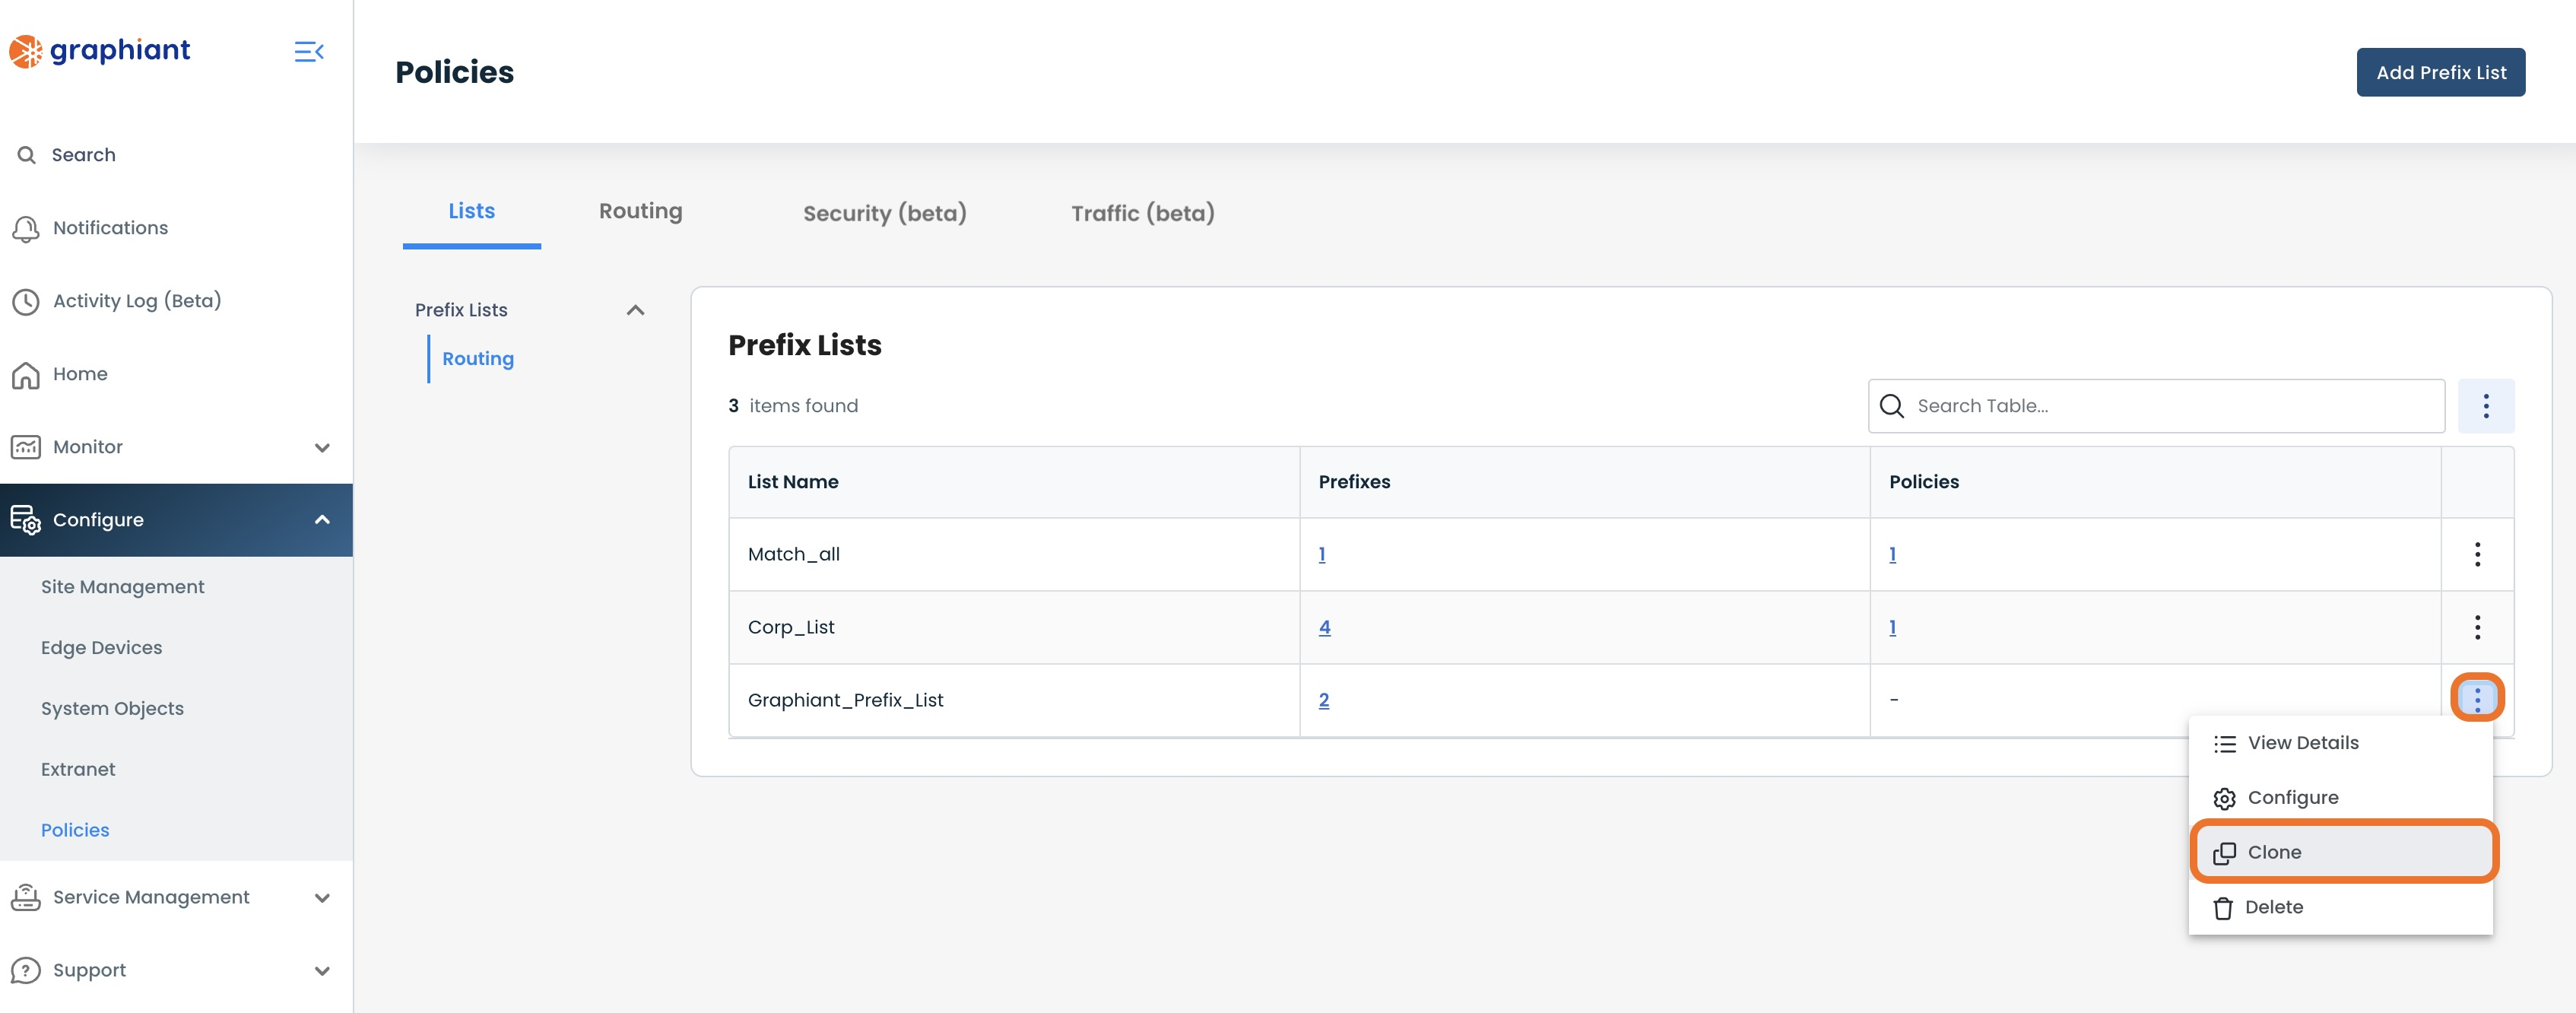
To clone a prefix list, click the ellipses to the right of the prefix list to be duplicated.
Select 'Clone'.
This will open a new Configuration screen for the cloned prefix list.
The name will be listed exactly the same as the original prefix list, with "Copy" immediately preceding it; if desired, change the name of the new prefix list.
Make any additions / edits as desired, by following the previous steps as outlined in this document.
Click 'Confirm'.
.png)
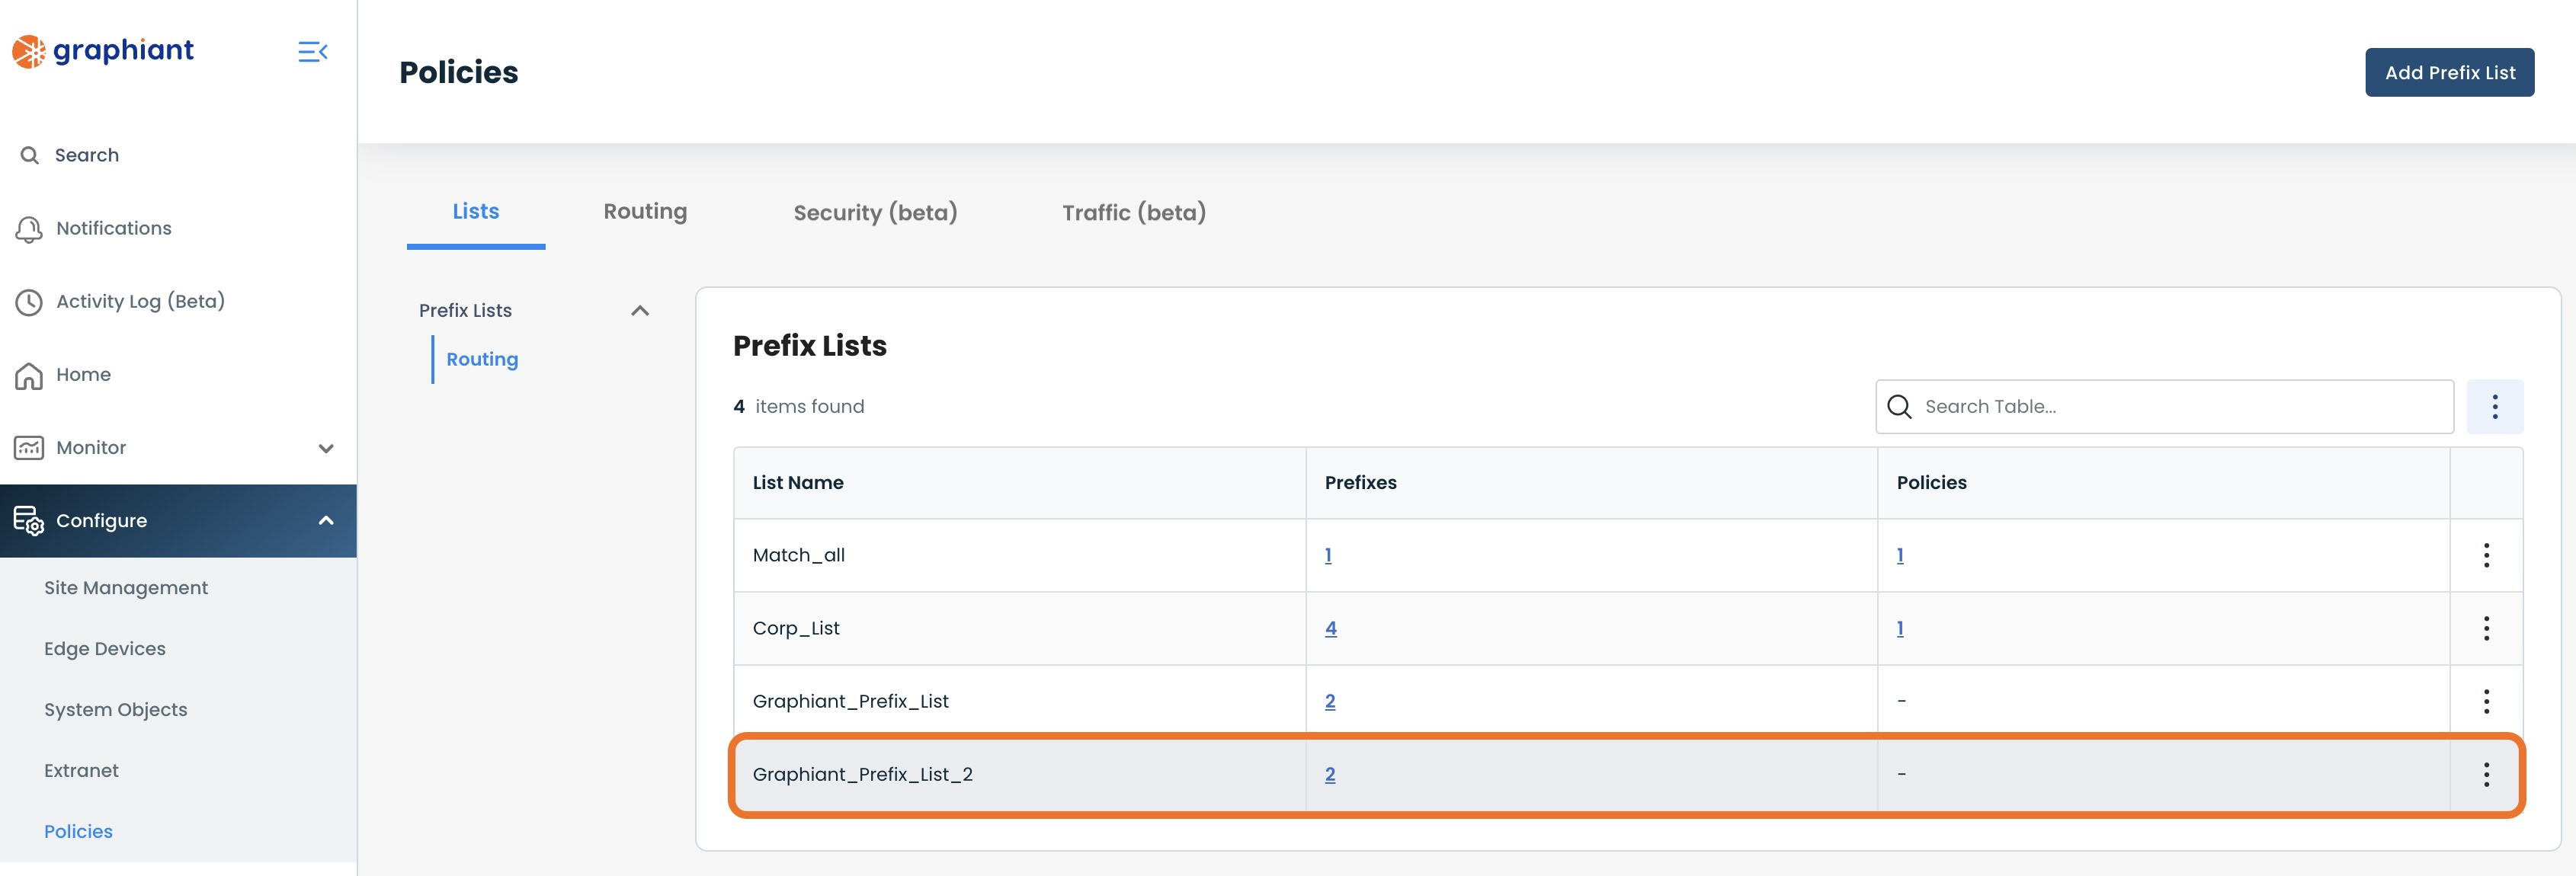
The newly cloned list now appears in the Prefix List Table.
Deleting a Prefix List
Should a prefix list no longer be needed, it may be deleted.
Click the ellipses to the right of the prefix list to be deleted.
Select 'Delete'.
Note:
Only Prefix Lists that are not used in any policy can be deleted.
A confirmation message pops up to verify that you do wish to delete the prefix list.
Click 'Confirm'.
.png)
The prefix list has been deleted and will no longer appear in the Prefix List Table.
You will now be able to begin configuring BGP filters; continue to Setting Up BGP Filters in the Graphiant Portal.
Note:
Should you need to edit or delete a local configuration prefix list, continue with the instructions below.
Editing and Deleting Local Configuration Prefix Lists in the Graphiant Portal
Note:
Graphiant is moving to a global prefix list system within System Objects. As of 10-16-24 Local Prefix Lists will not be able to be created; only Edit & Delete functions will still be available for the Local Prefix Lists.
Locating Local Configuration Prefix Lists in the Graphiant Portal
From the 'Configure' heading in the left sidebar menu, select 'Edge Devices'.
Click 'Configure' on the desired Edge.
.png)
Click the 'Configure Services' drop-down; select 'Routing Protocols & Filters'.
.png)
Click 'Prefix Lists'.
.png)
This will bring up the Local Configuration Prefix Lists table.
.png)
Editing Local Configuration Prefix Lists
In the Local Configuration Prefix List table, click the pencil icon to the right of the desired Prefix List.
.png)
This will bring up a modal to edit the local prefix list.
Make any desired changes by:
Entering new information into existing fields
Using the [+] icon to add rules
Using the [trash can] icon to delete rules.
Click 'Save'.
.png)
'Review' and 'Apply'.
.png)
The Local Prefix Lists table will now include the update prefix list.
.png)
Deleting Local Configuration Prefix Lists
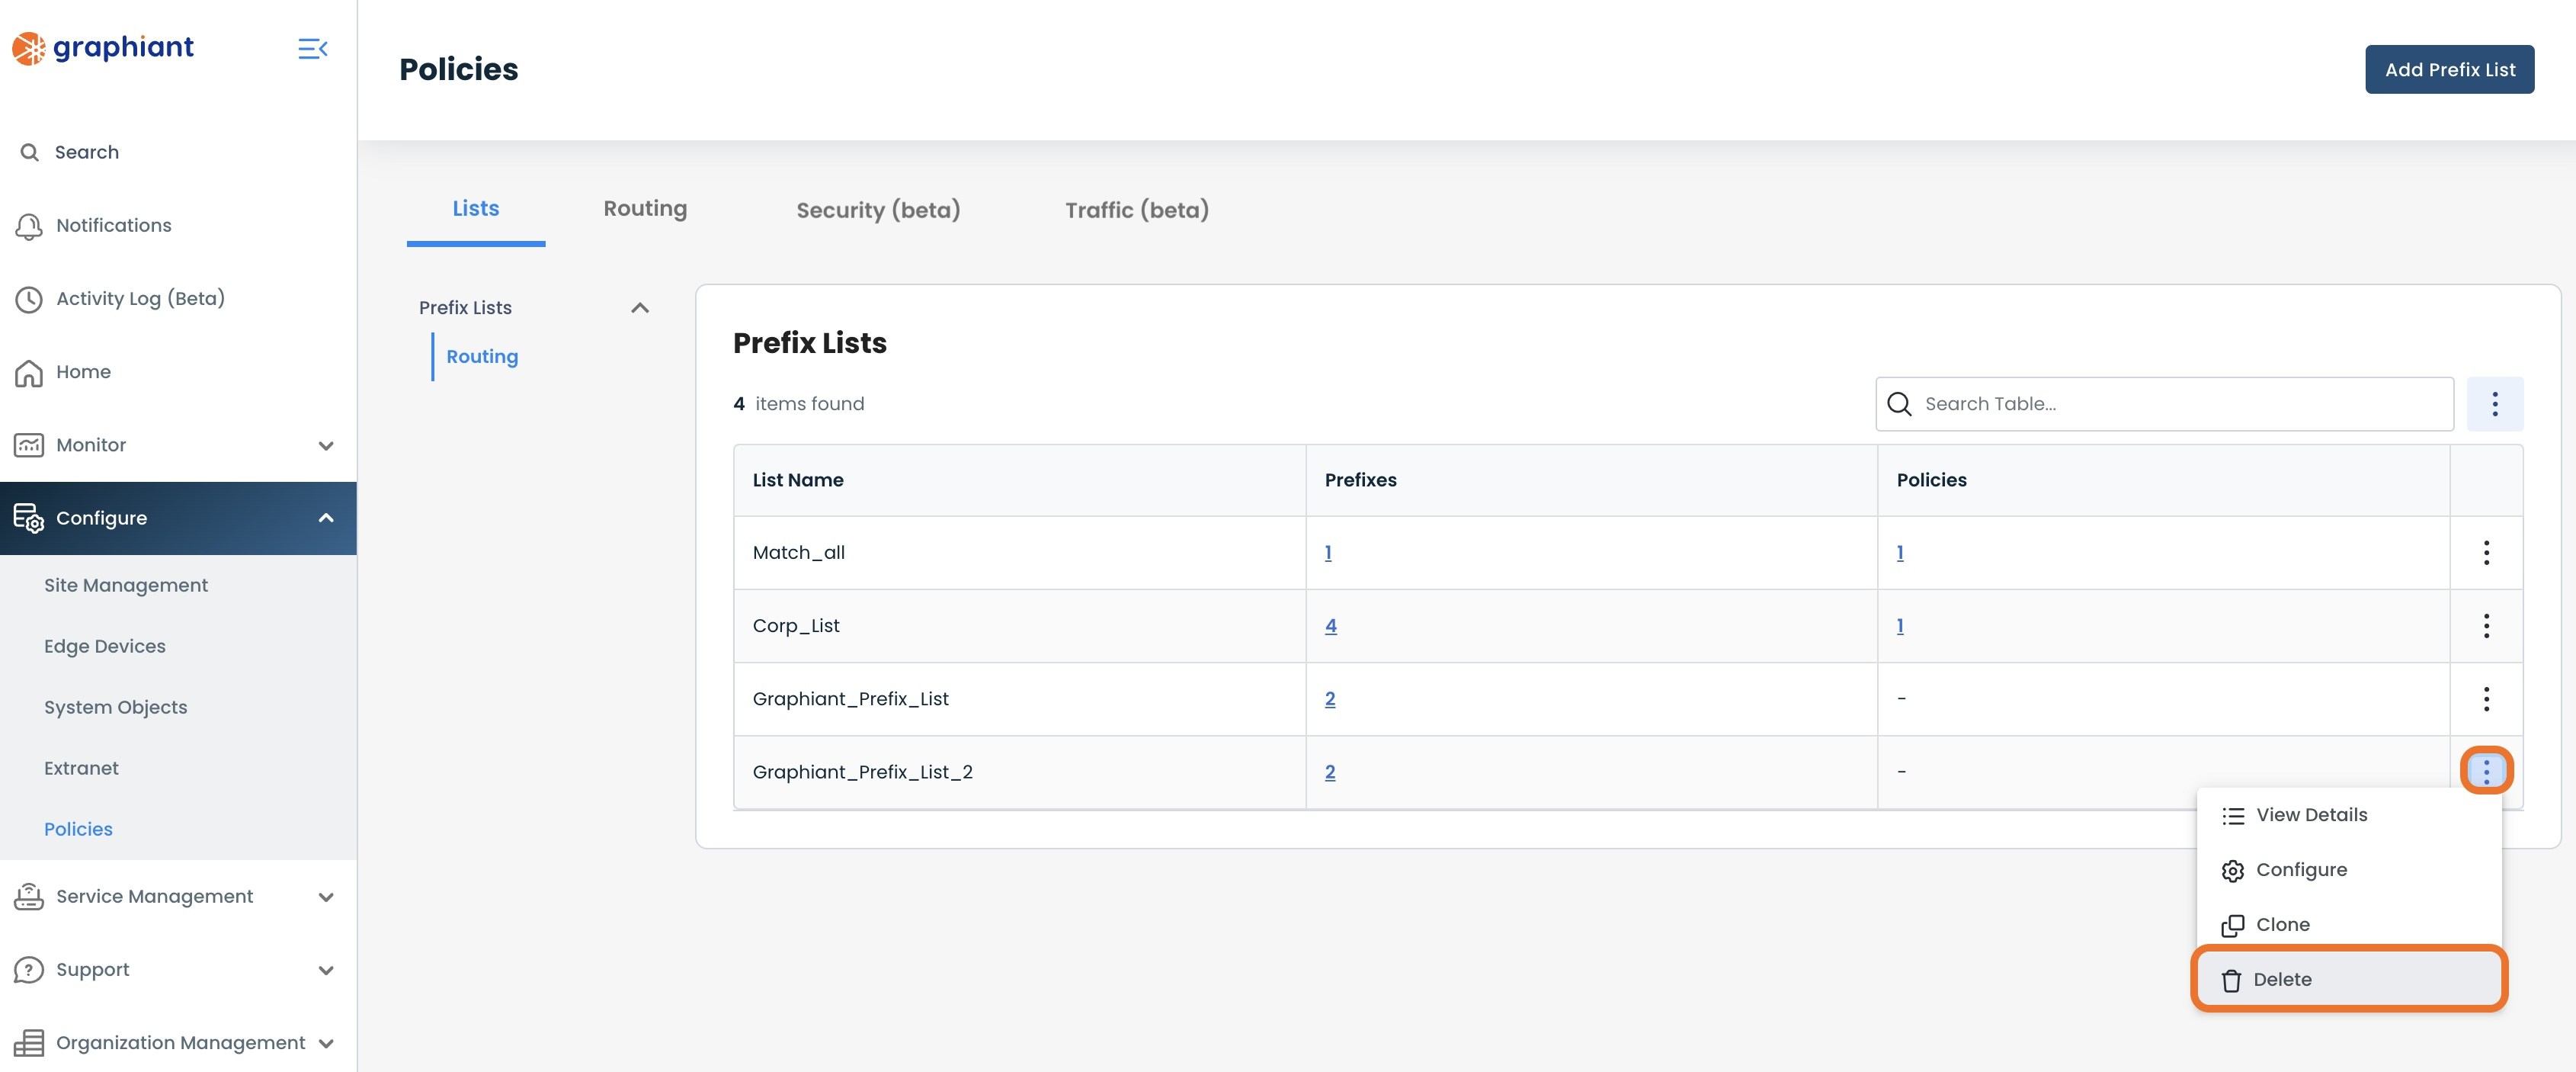
In the Local Configuration Prefix List table, click the trash can icon to the right of the desired Prefix List.
.png)
Note:
Only Prefix Lists that are not used in any policy can be deleted.
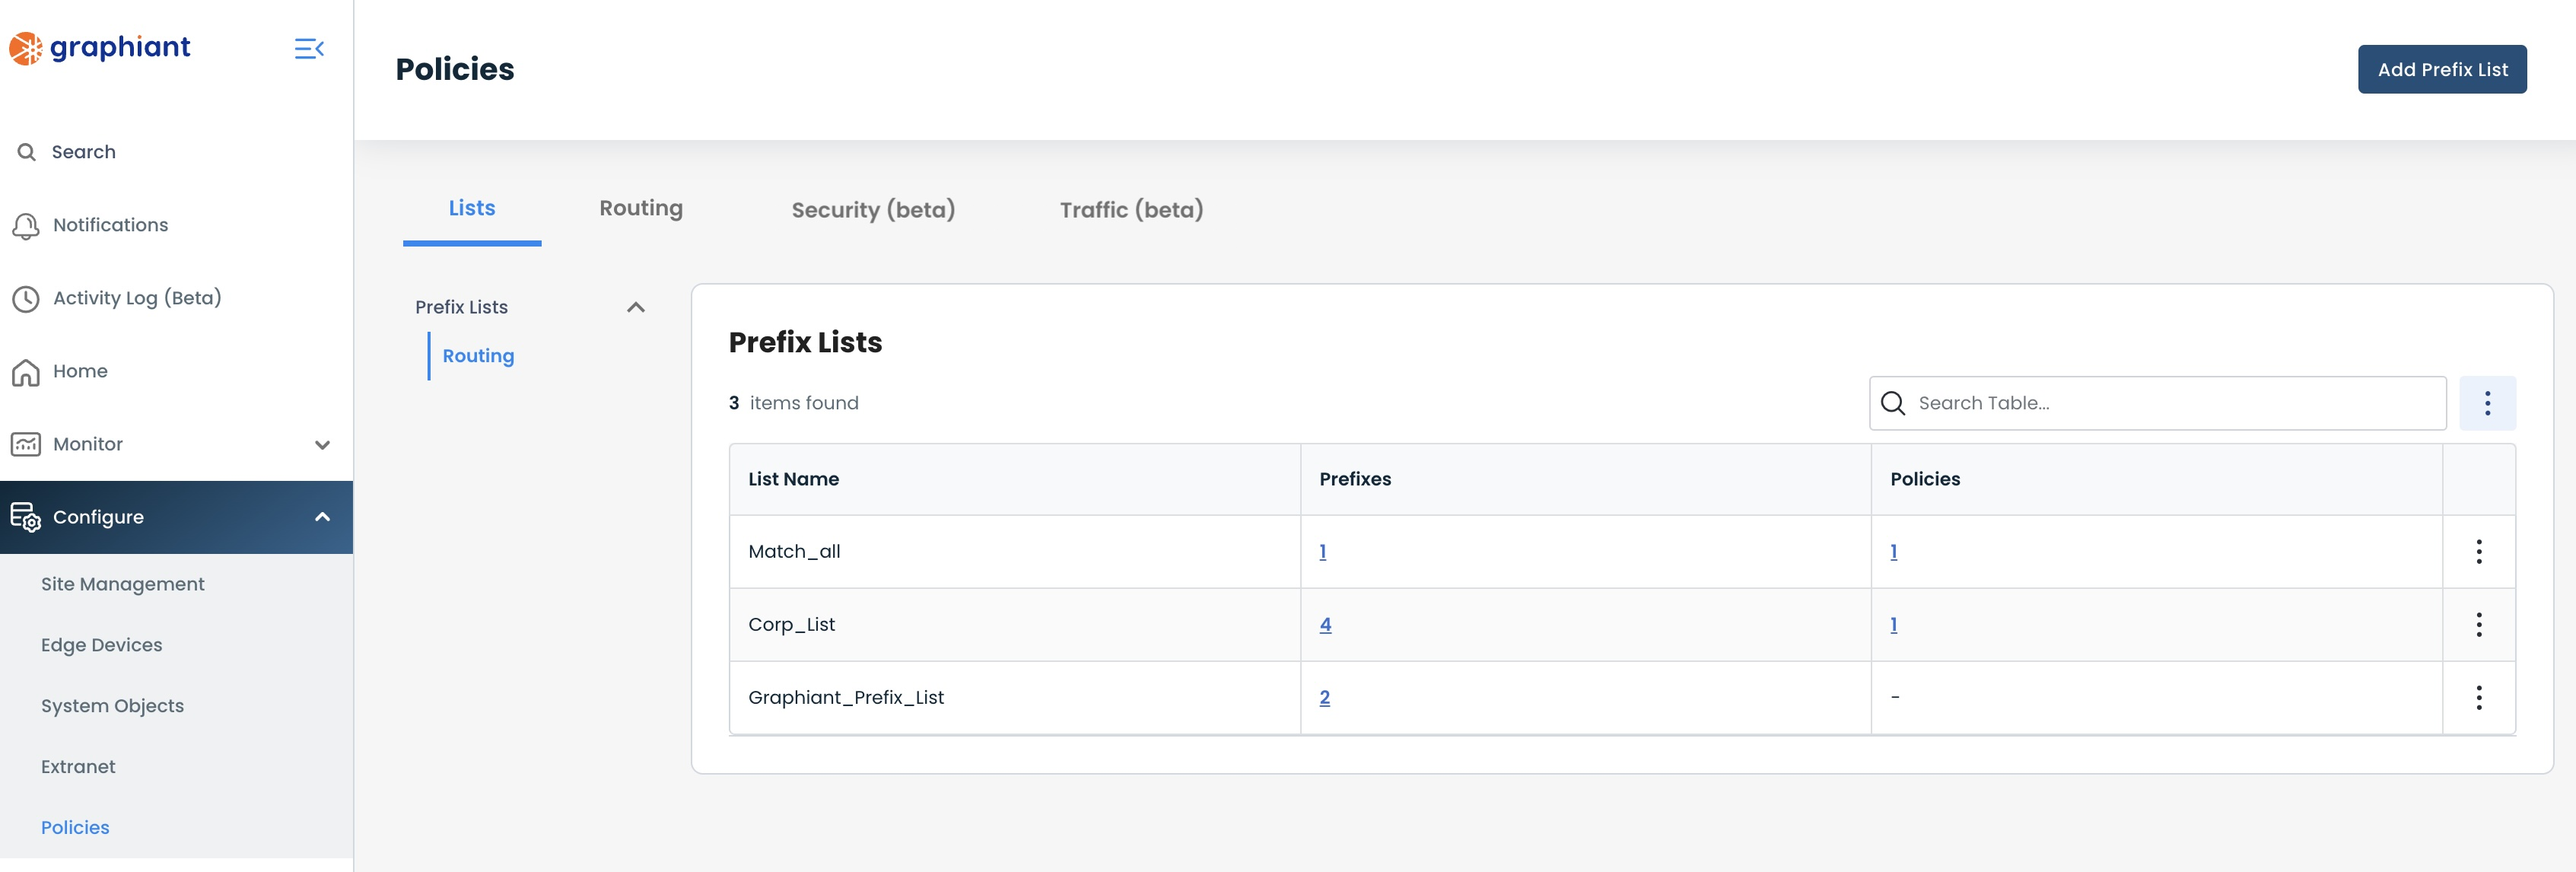
The prefix list will no longer appear in the table; 'Review' and 'Apply'.
.png)
Setting Up BGP Filters in the Graphiant Portal
Now that you have created a Prefix List to utilize, you can configure BGP filters.
Note:
Prefix Lists must be set up before they can be tied to a BGP Filter; there is no ability to create a new prefix list once in the filter configuration.
From within ‘Configure Services’ on the ‘Routing Protocols & Filters’ page, select ‘BGP’ amongst the available headers along the top of the page.
.png)
The first two fields under "Graphiant BGP Information" will be pre-populated and assigned by Graphiant and do not require action.
Next you will scroll down the page to the section header "BGP Filters".
Click the (+) plus icon to the right of the Local Configuration heading to add a new filter.
.png)
This will propagate a new window of required fields of information.
.png)
Complete the following fields:
Filter Name: Enter the desired nomenclature for the new prefix list.
Direction: Select if the filter is inbound / outbound, in relation to the Graphiant Edge
Description (optional): For future users to know the purpose of the Filter.
Implicit Rule: Select if routes are to be accepted or rejected, should they not match on any specific rule within the BGP Filter.
Note:
Filter Names must be unique, regardless of the protocol of the filter (BGP/Graphiant).
Adding Rules to the BGP Filter
To add rules to your BGP Filter, click 'Add Rule'.
.png)
This will bring up the modal to configure a BGP Filter Rule.
Here you will be able to add as many rules as desired in tandem with the BGP Filter.
.png)
The modal is divided into three sections:
General (top of modal): Includes the sequence number of the rule, and optional description fields
Match (middle of modal): Selections here determine what type of matching is used for the filter rule to be applied.
Action (bottom of modal): Selections here tell the routing filter what to do with the matched route(s).
.png)
General Information
Sequence Number
The Sequence Number of the rule is its placement in the order of all of the rules for a BGP filter.
The Sequence Number is pre-populated with 10 for the first rule created; with every subsequent rule increasing by multiples of 10 (20 for the second, 30 for the third, etc.).
These numbers can be edited here, should a different placement be desired.
Description
This field is optional, and can be filled out for future users to know the purpose of the Rule.
.png)
Match
Graphiant Rules can be matched on either one, or both, of the following:
Prefix Lists
Communities
.png)
Matching on a Prefix List
Under "Match", select 'Prefix List' from the dropdown.
.png)
A 'Value' field will appear; select the desired previously created prefix list from the drop-down.
If there are a large number of prefix lists, you can search by name in the search field.
For instructions on adding a prefix list, click here.
.png)
Matching on a Community
Under "Match", select 'Community' from the dropdown.
.png)
A 'Value' field will appear, for which there are two options:
Selecting a pre-existing community(ies): One or both (or none) of the communities in the drop-down may be selected.
Manually entering a community: If manually entering a community, type it in the [(numeral) : (numeral)] format.
As many communities can be entered as desired.
.png)
Matching on Both Prefix List and Community
A match can be performed on both prefix list and community combined.
Enter the information for your first match (in this example a prefix list match has been entered).
Click 'Add Type'.
.png)
Open the drop-down for Type.
Only the remaining option not selected in the first match will appear.
.png)
Complete the second match information as desired.
.png)
Note:
In selecting both Prefix List and Community for a match in the same rule, both must match on a prefix(es).
The rule will function as an "and" instruction, not an "or" instruction.
Action
There are two options for which action the rule can take regarding the prefixes that match the criteria in the 'Match' section:
Accept: This will ensure that all of the matching prefixes are entered into the routing table of the Graphiant Edge.
Reject: This will result in all of the matching prefixes not being added to the routing table of the Graphiant Edge.
Select 'Accept' or 'Reject' as defined below, depending on your need for the rule.
.png)
Accept Action
If the desired action is to permit prefixes to be included in the routing table on the conditions of the match, select 'Accept'.
.png)
Should all of the matches defined previously be blanketly accepted, the action is complete.
Should another attribute(s) be desired, click '+ Add Set'.
.png)
Note:
Set options differ slightly between inbound and outbound filters.
Inbound Set Attributes
Available set attributes include:
MED
Local Preference
Community
Weight
Select the desired attribute from the drop-down.
.png)
When the Set is chosen, a 'Value' field will appear; enter the desired value, as defined below:
MED
Set the BGP Multi Exit Discriminator (MED) value. Supports values from 0 - 4,294,967,295 and can be set for both inbound and outbound filters
Local Preference
Set the BGP Local Preference value. Supports values from 0 - 4,294,967,295 and can be set for both inbound and outbound filters.
Community
Set the Community value. Supports values from 0 - 65535; should be in the format [a:b]. Can be set for both inbound and outbound filters.
Community Additive:
Select Community Additive if you want to add the new community in addition to any existing community(ies).
If not checked, the new community will replace any existing community(ies).
Weight
Set the Weight value. Supports values from 0 - 65535. Can be set for inbound filters only.
.png)
Every set may be added once to the same rule if desired.
Simply click 'Add Set' again to continue to add other types of sets.
Outbound Set Atributes
Available sets include:
MED
Local Preference
AS Path Prepend
Community
Select the desired Set from the drop-down.
.png)
When the Set is chosen, a 'Value' field will appear; enter the desired value, as defined below:
MED
Set the BGP Multi Exit Discriminator (MED) value. Supports values from 0-4,294,967,295 and can be set for both inbound and outbound filters
Local Preference
Set the BGP Local Preference value. Supports values from 0-4,294,967,295 and can be set for both inbound and outbound filters
AS Path Prepend
Prepend the AS Number of the Graphiant Edge to the AS-Path of the routes matching the filter. Supports values: 1-10. The value is the number of times the AS Number should be prepended to the AS-Path. Prepending the AS-Path is only supported for outbound filters
Community
Set the Community value. Supports values from 0 - 65535; should be in the format [a:b]. Can be set for both inbound and outbound filters.
Community Additive:
Select Community Additive if you want to add the new community in addition to any existing community(ies).
If not checked, the new community will replace any existing community(ies).
.png)
Every set may be added once to the same rule if desired.
Simply click 'Add Set' again to continue to add other types of sets.
Saving the Rule
Once all matches and sets are complete, click 'Done'.
.png)
The newly created rule is attached to the BGP filter and highlighted in yellow.
.png)
Reject Action
If the desired action is to not permit prefixes to be included in the routing table on the conditions of the match, select 'Reject'.
.png)
Note:
Since the prefixes in a "Reject" rule are to be ignored, there are no Sets applicable.
If the matches are complete, Click 'Done'.
.png)
The newly created rule is attached to the BGP filter and highlighted in yellow.
.png)
Saving the BGP Filter
Once all rules are added, click 'Save' to confirm the BGP Filter.
.png)
The new BGP filter appears in the BGP Filter table, highlighted in yellow.
Review & Apply
Once saved, the selected Edge Interface is almost ready to begin utilizing BGP; you simply first need to review and apply all changes made.
'Review' and 'Apply'.
.png)
Navigating Your Newly Created BGP Filters
After the BGP Filter configuration is applied, the Portal will take you to the Configuration Versions page.
To get back to the BGP Filter you just created, click 'Routing Protocols & Filters' in the sidebar.
.png)
Select the 'BGP' tab.
The newly created filter(s) is confirmed, and in the BGP Filter Table.
.png)
To see the rules attached to any given BGP Filter from this table, click the caret next to the desired filter.
.png)
Any and all rules are shown in the nested table beneath their filter.
.png)
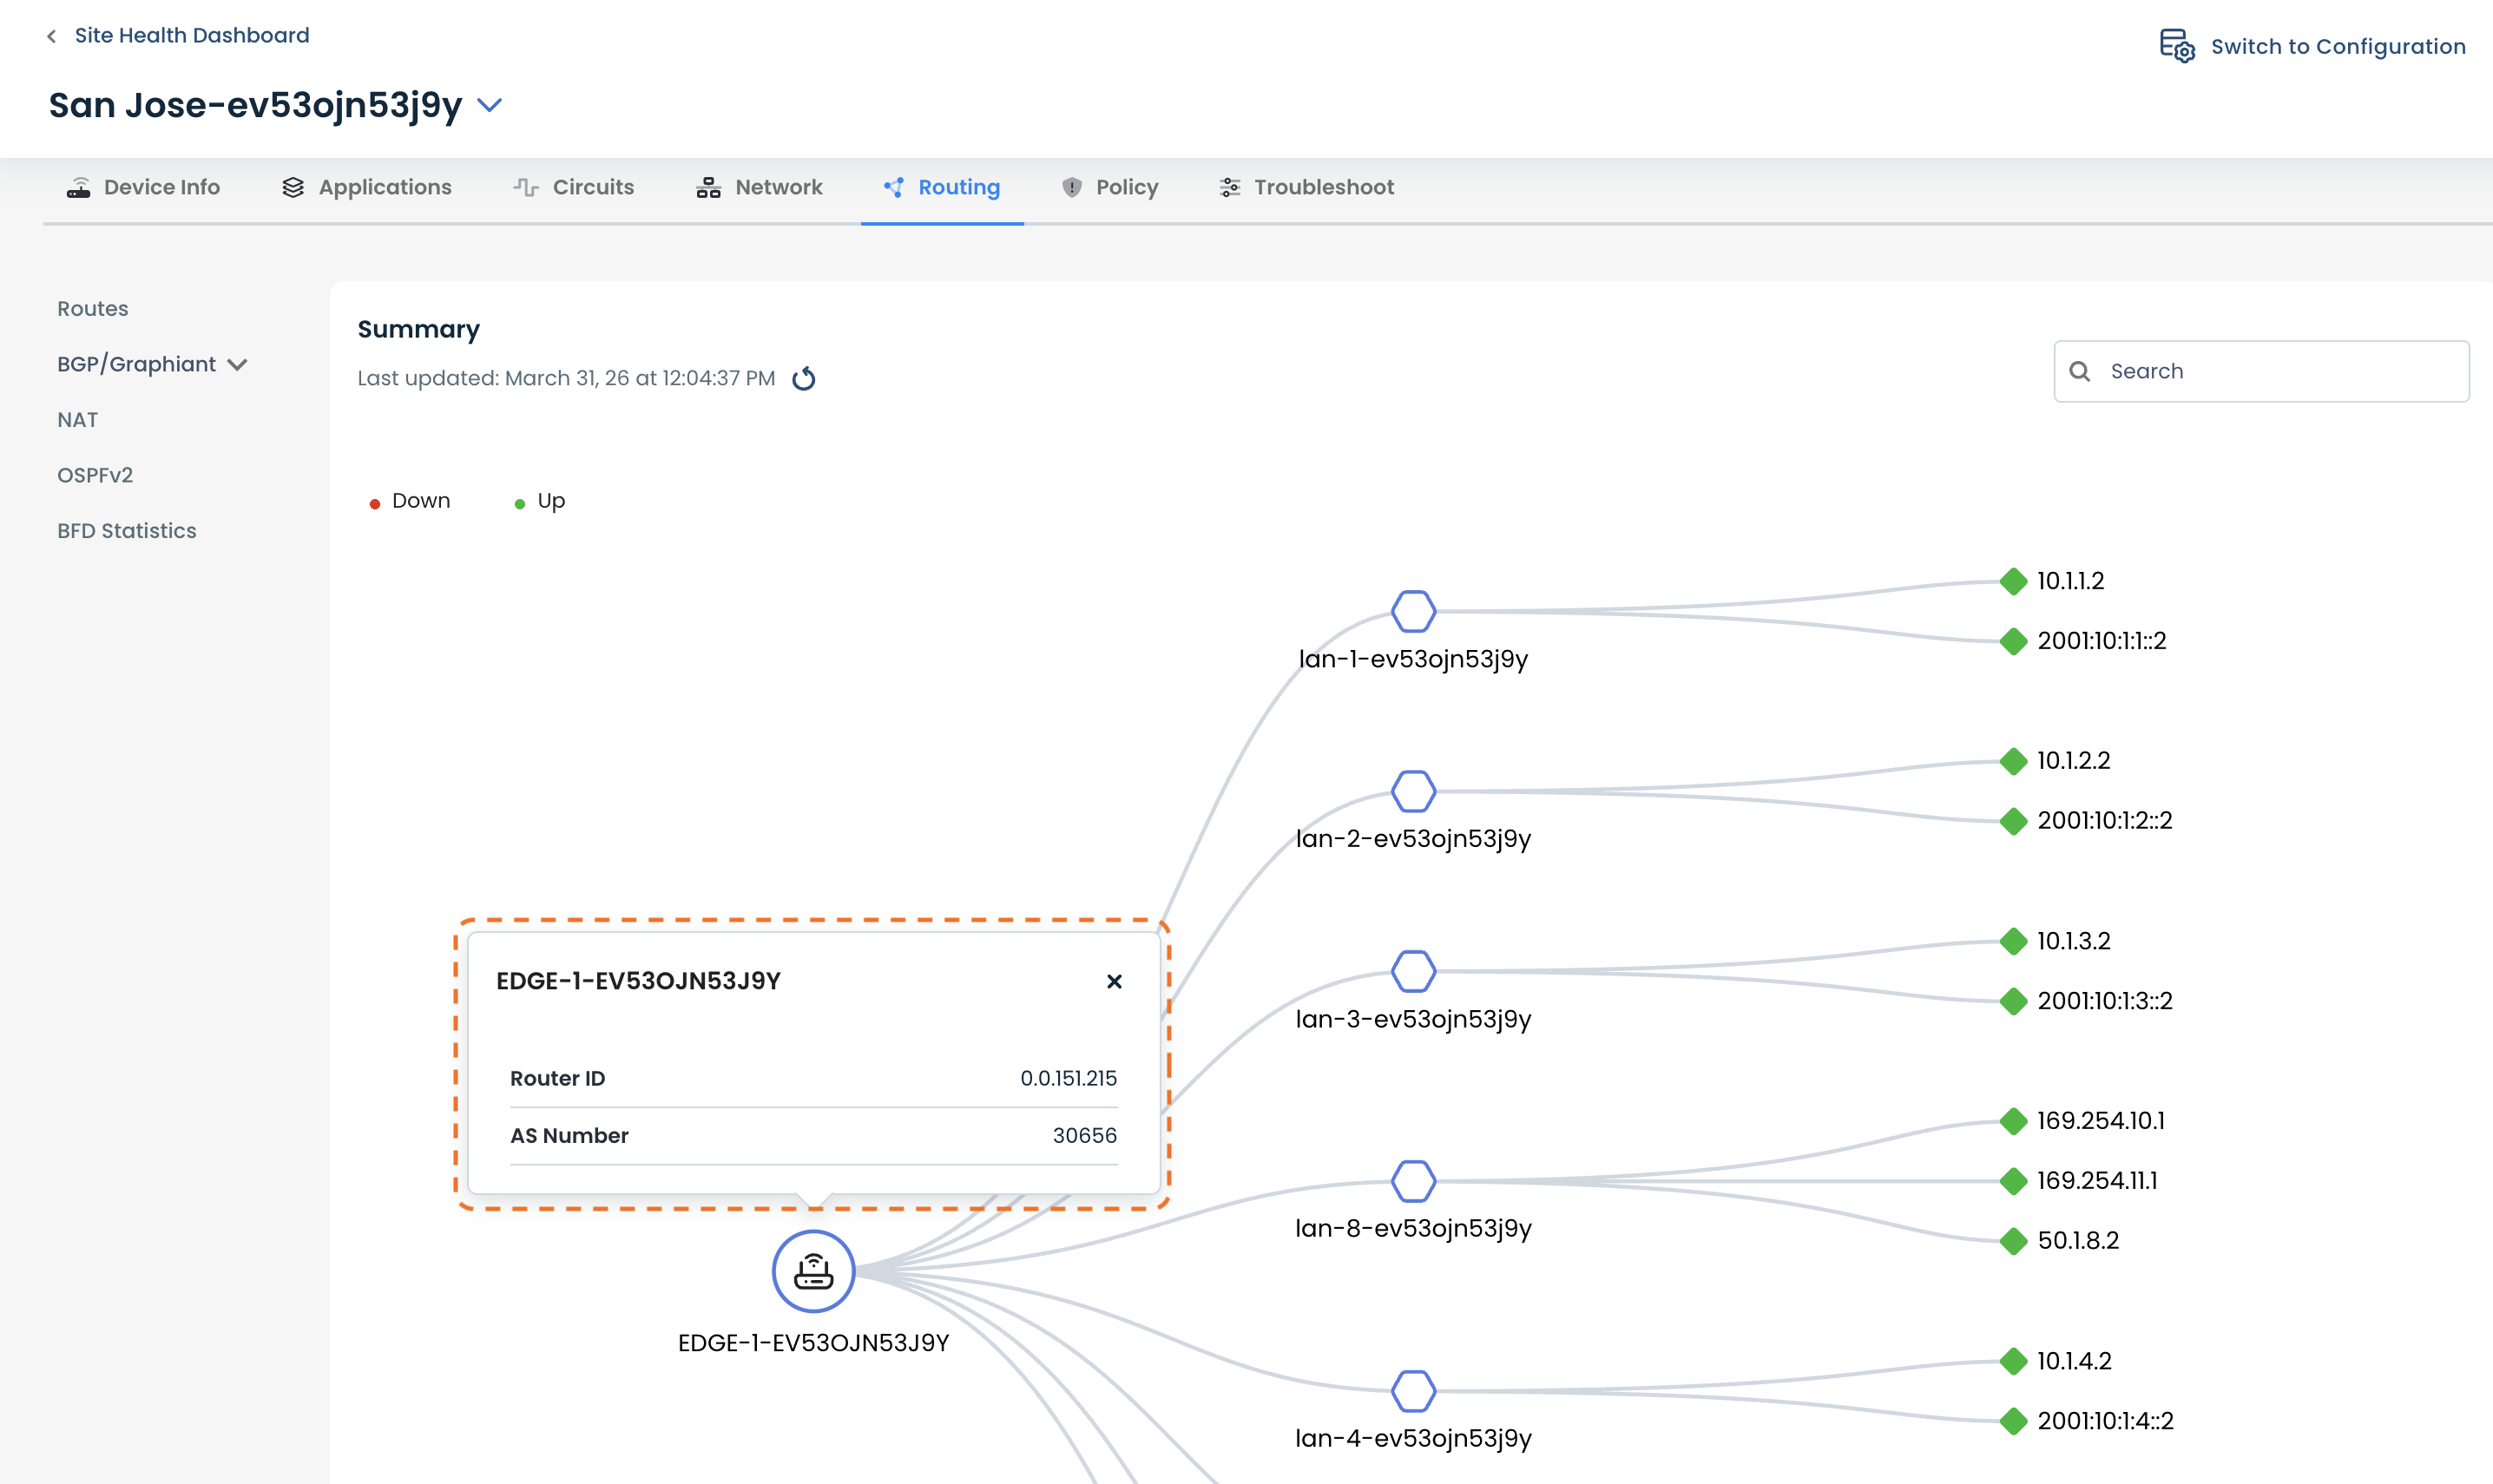
Viewing Your BGP Route Connectivity
To get details on the connectivity of your BGP route, from the top right of the BGP tab, click ‘Switch to Monitoring’.
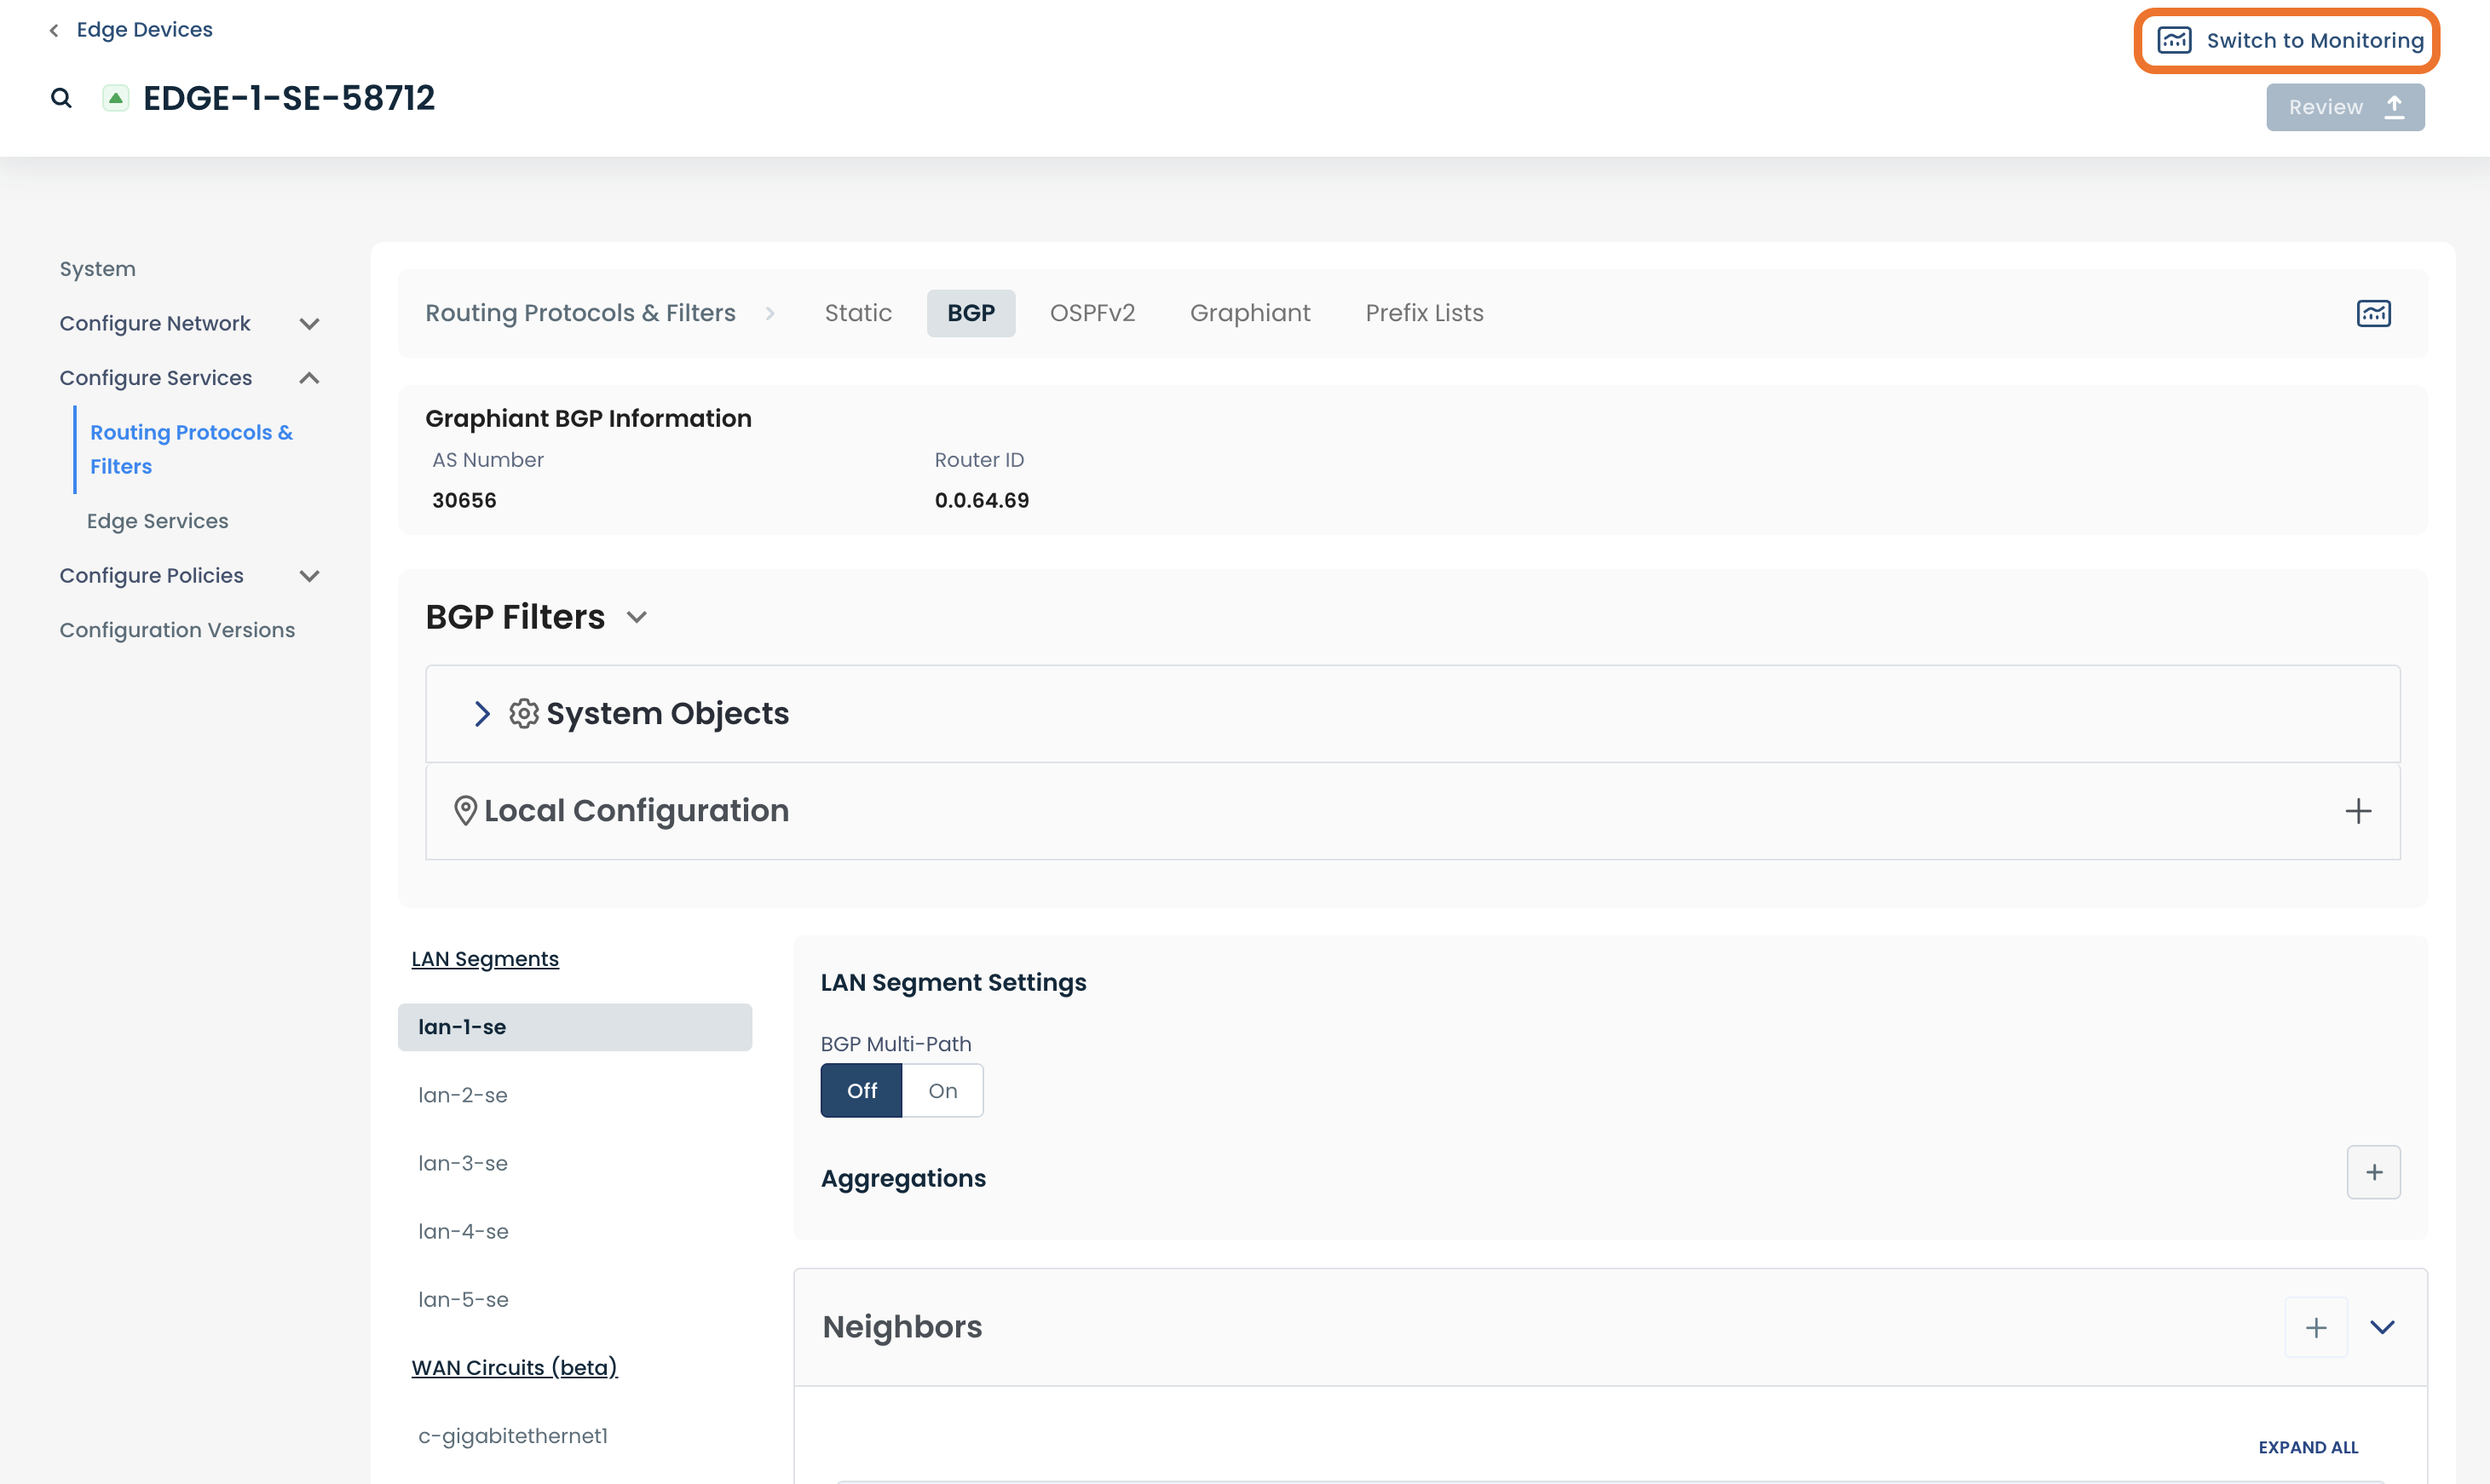
The monitoring page will show your Edge, all connected LAN segments, and their neighbors.
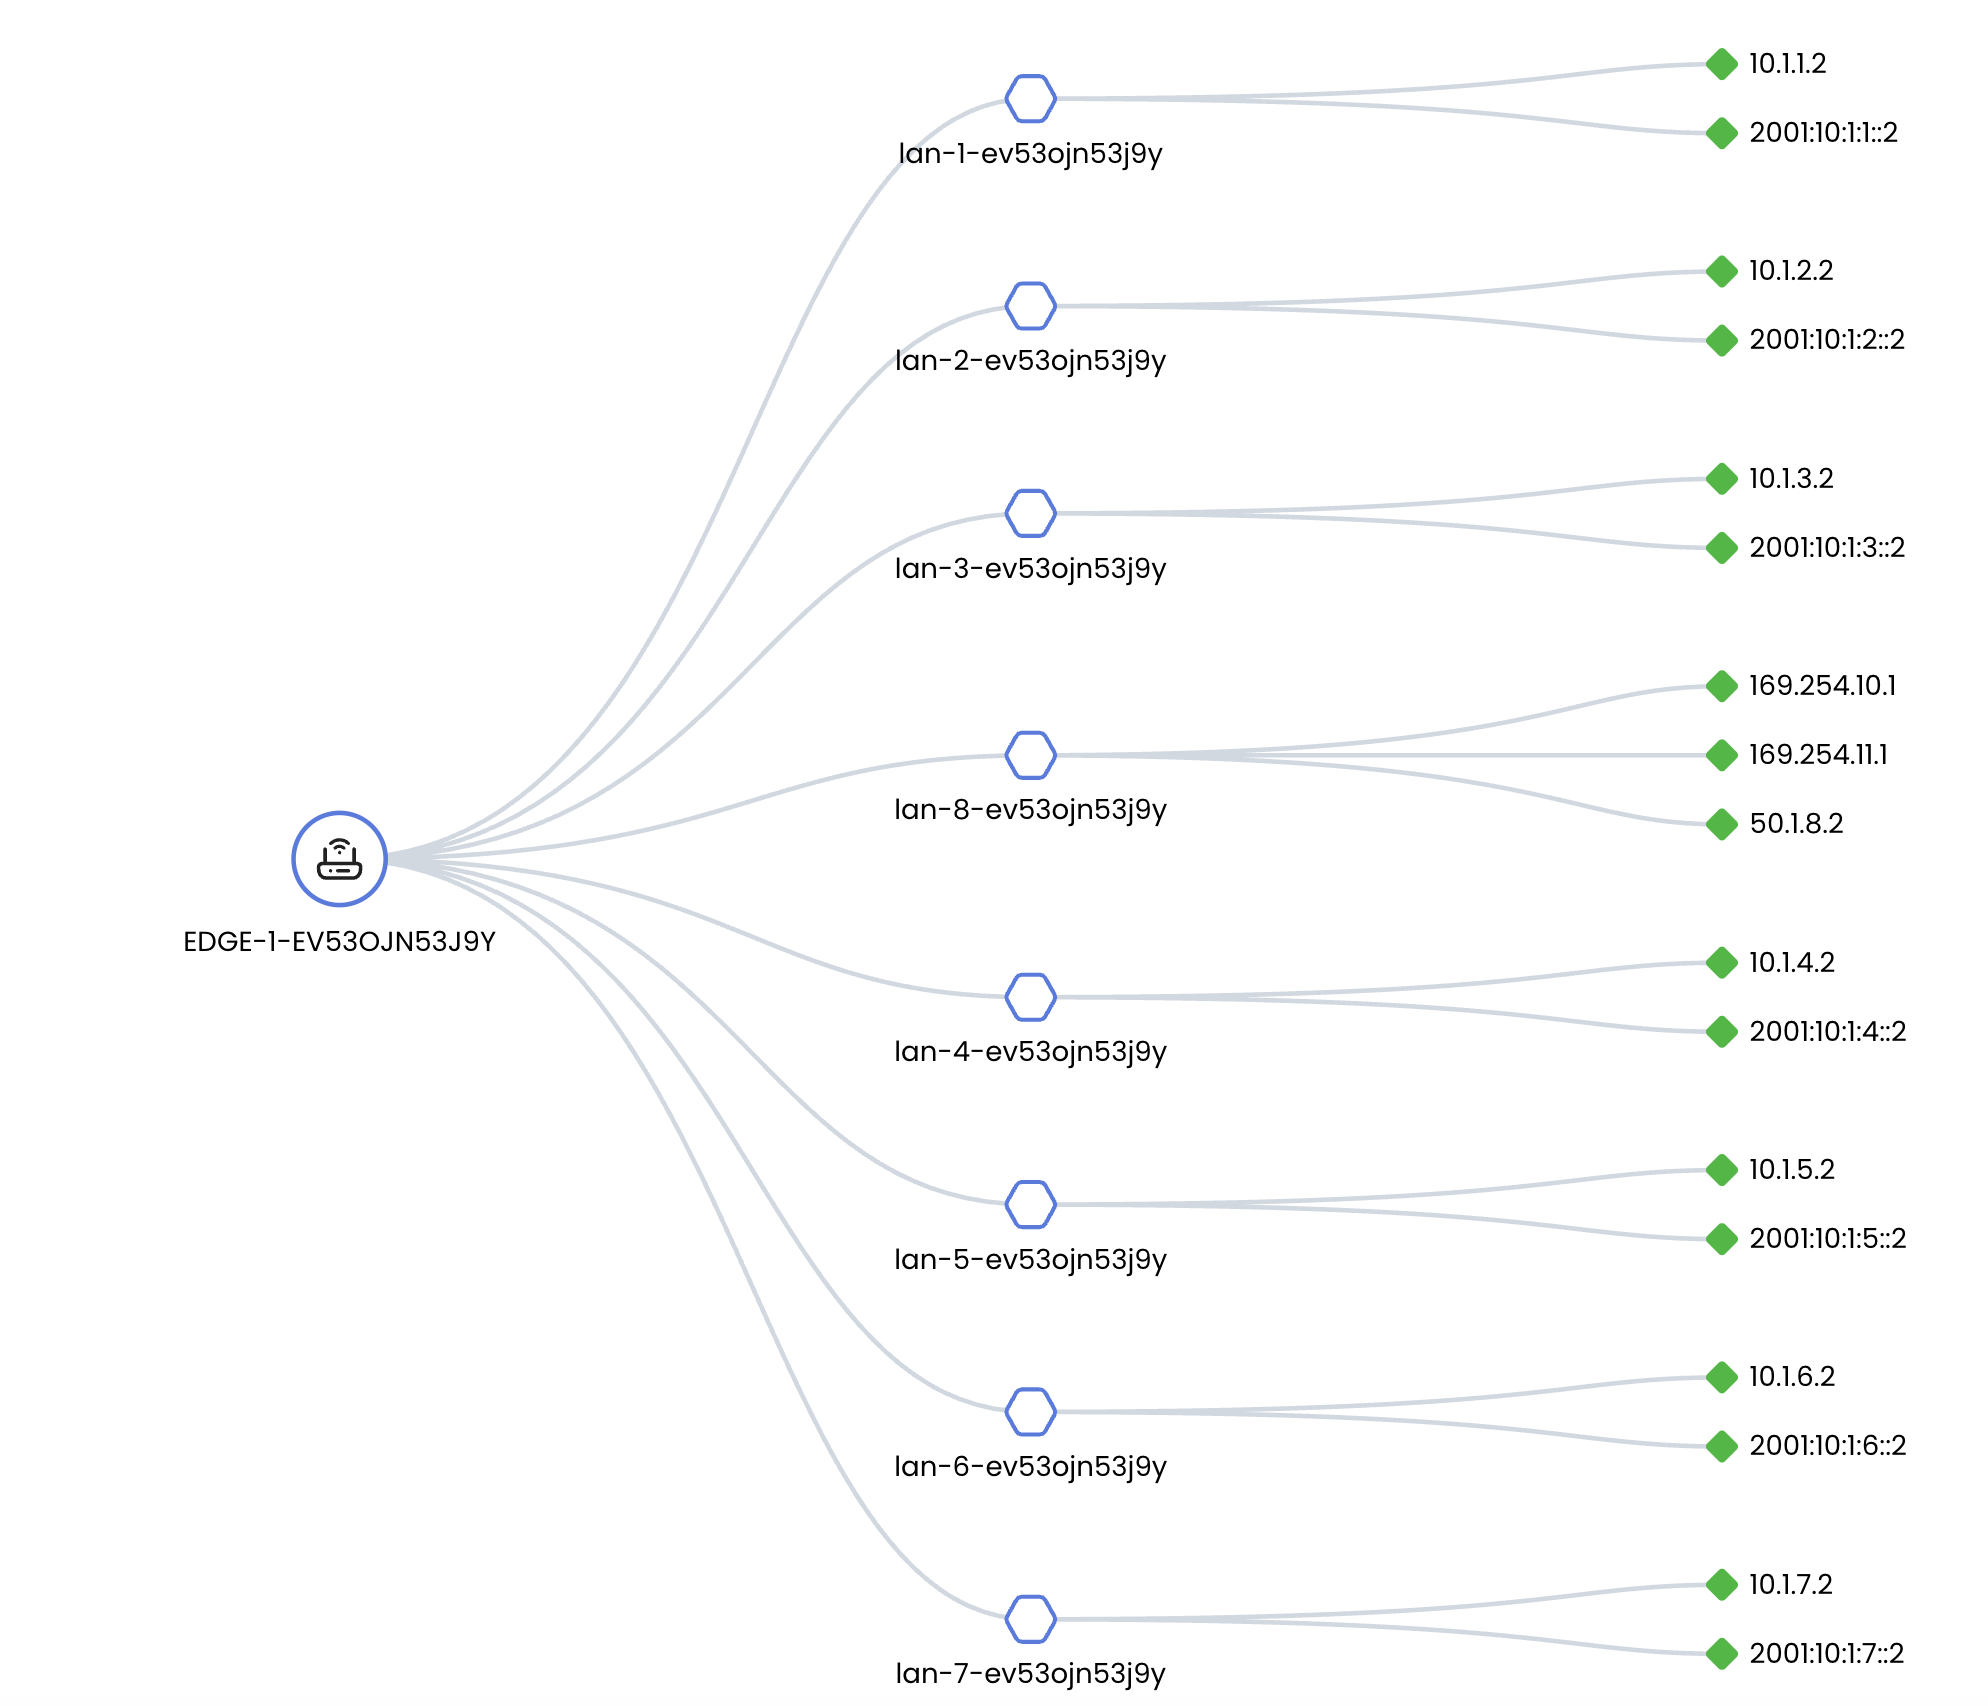
By clicking the icon for your Edge, a modal will appear with the Edge’s:
Router ID
AS Number
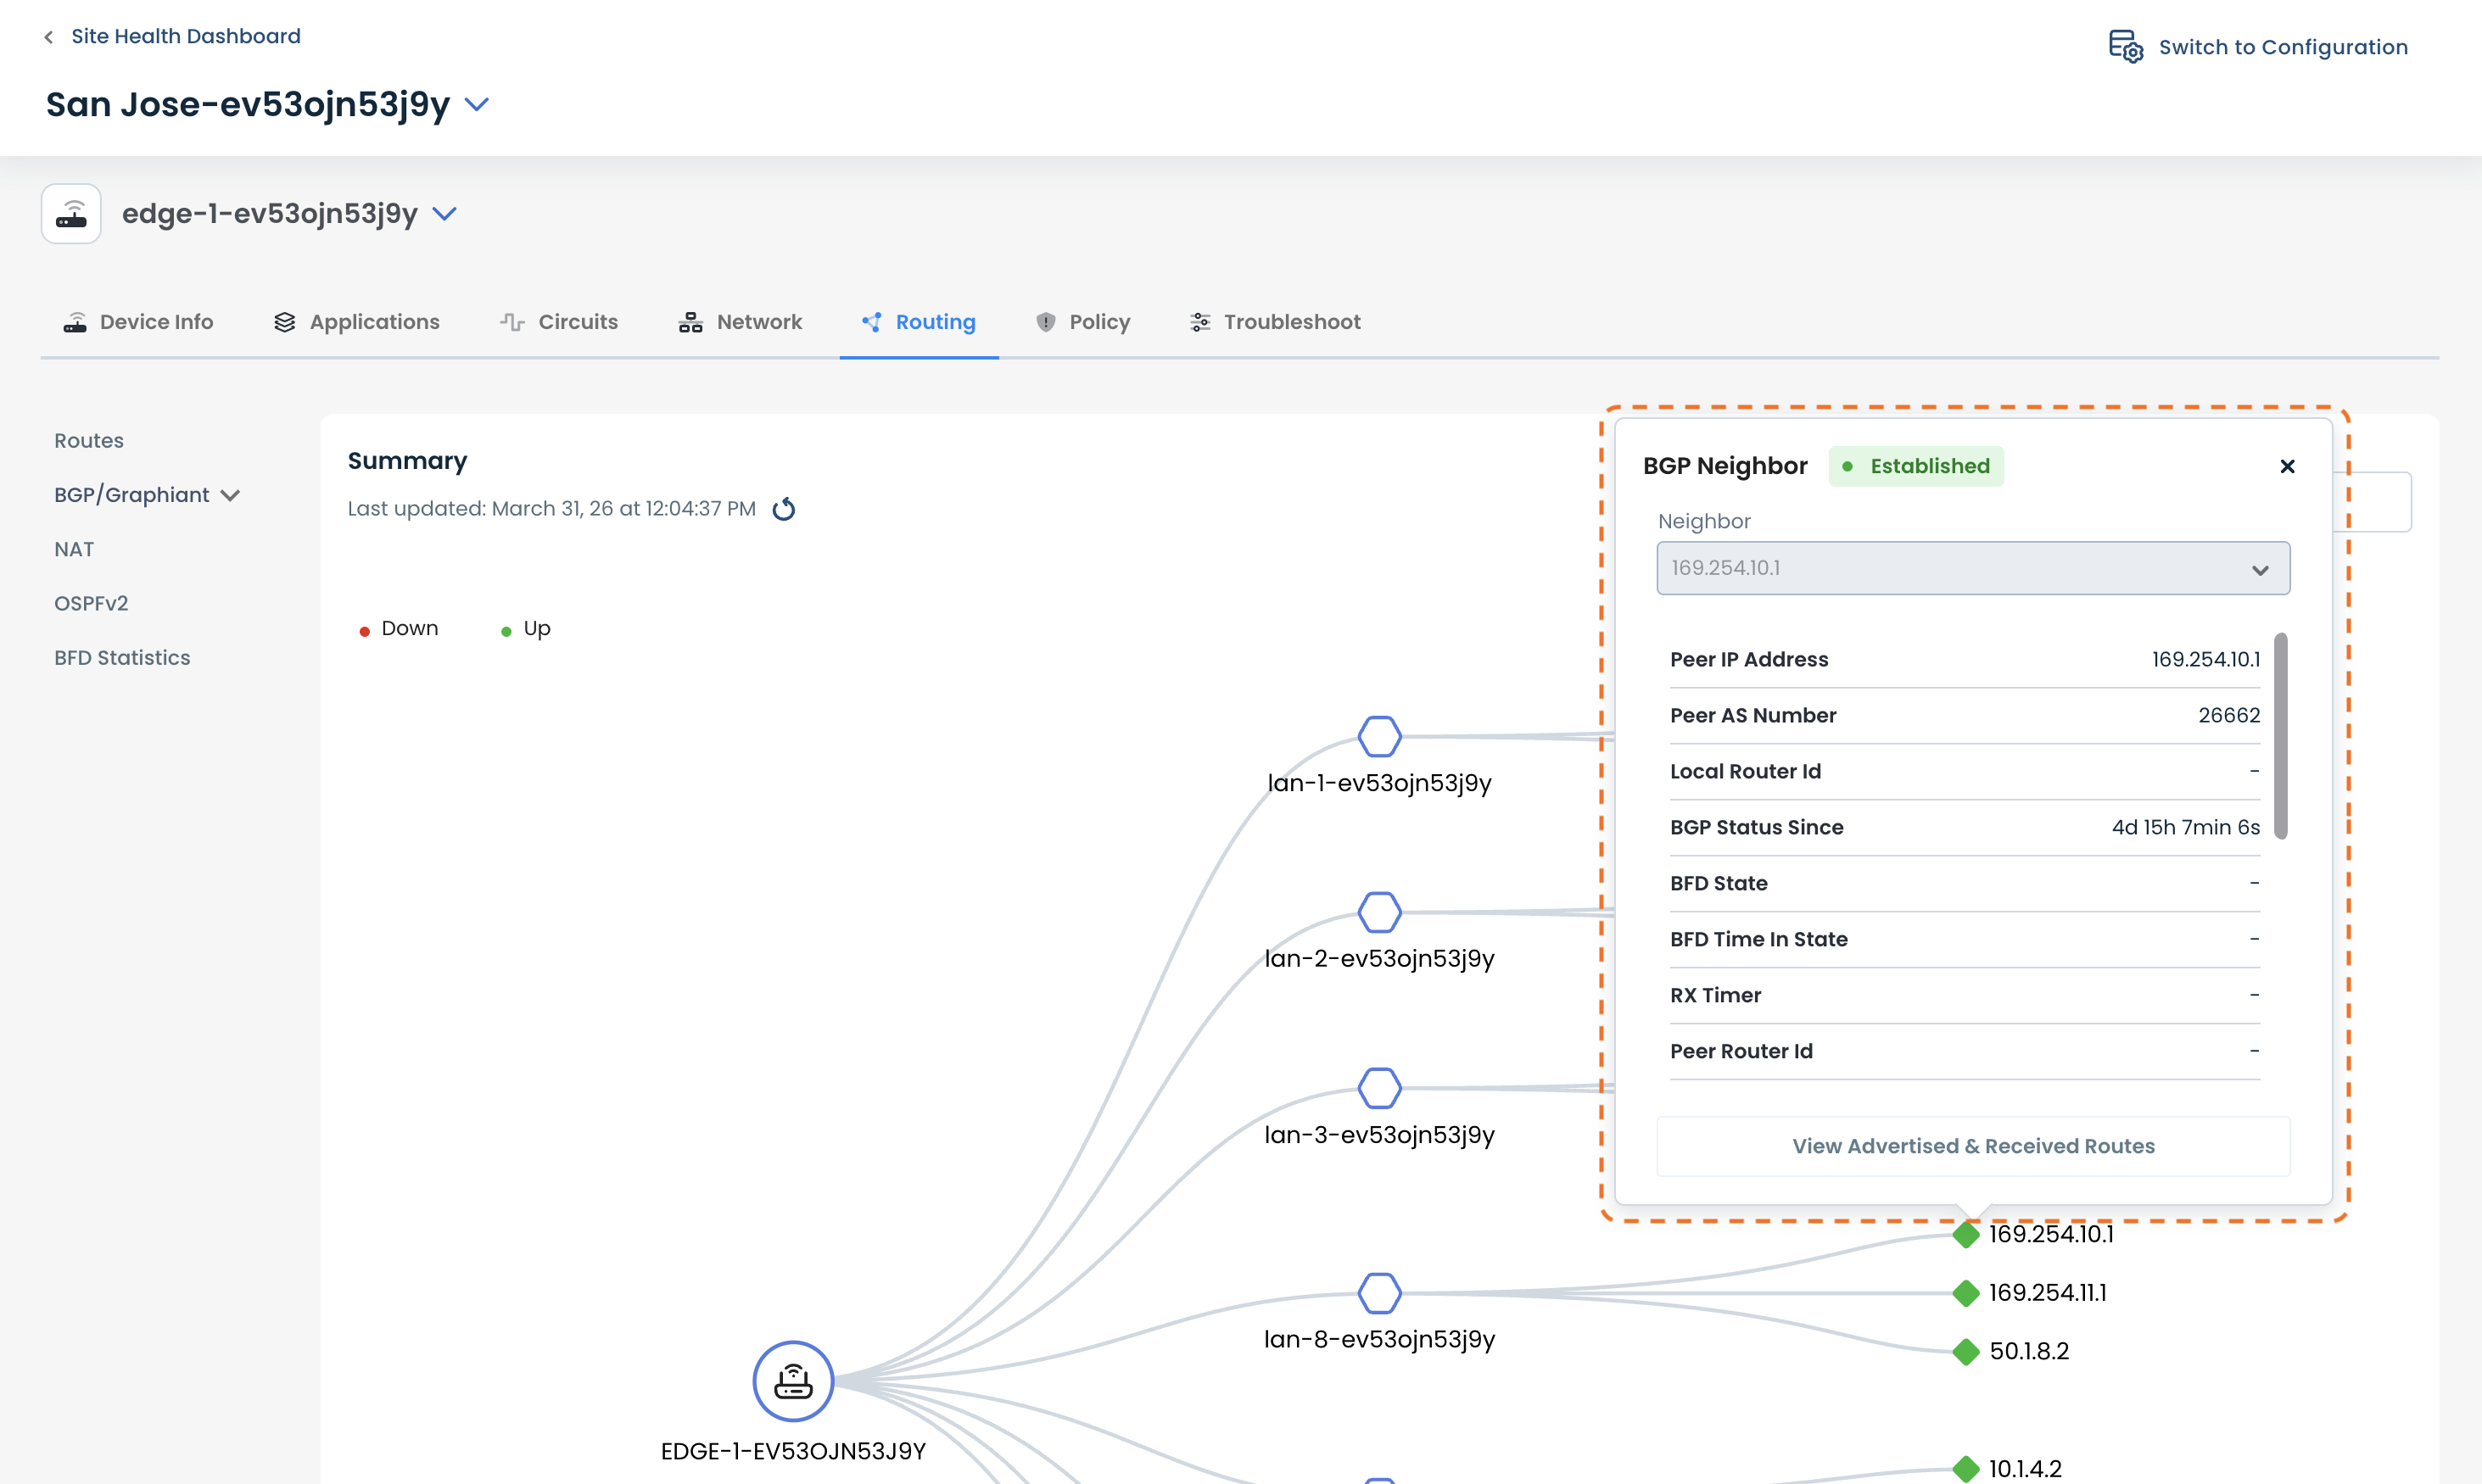
By clicking the icon for a neighbor, a modal will appear with its:
Peer IP Address: The IP address of the remote BGP neighbor
Peer AS Number: The Autonomous System (AS) number of the remote neighbor
Local Router ID: The unique identifier for the local router in the BGP session
BGP Status Since: The time when the current BGP session state was established
BFD State: The current status of Bidirectional Forwarding Detection (BFD) for this neighbor
BFD Time in State: How long the BFD session has been in its current state
RX Timer: The time remaining before the session is considered down if no messages are received
Peer Router ID: The BGP router ID of the remote neighbor
Local IP Address: The IP address used by the local router for this BGP session
Local AS Number: The Autonomous System (AS) number of the local router
Hold Time: The maximum time the session can remain idle before being declared down
Keep Alive Interval: The frequency at which keepalive messages are sent to maintain the session
Uptime: The duration the BGP session has been continuously established
IPv4 Prefixes Sent: The number of IPv4 routes advertised to the neighbor
IPv4 Prefixes Received: The number of IPv4 routes received from the neighbor
IPv6 Prefixes Sent: The number of IPv6 routes advertised to the neighbor
IPv6 Prefixes Received: The number of IPv6 routes received from the neighbor
Address Families Advertised: The types of network address families (e.g., IPv4, IPv6) being advertised to the neighbor
Editing a BGP Filter
To edit a BGP Filter, click the [pencil] icon to the right of the filter being edited.
.png)
This will open the Configuration page of the BGP Filter.
.png)
Here you can make edits to the Filter itself, or to any of the rules. For instructions on editing BGP filter rules, click here.
Note:
Just as with after creating a Local BGP Filter, once any edits are completed with 'Review and 'Apply' the Portal will take you to the Configuration Versions screen.
Filter edits can include:
Filter name: Enter the new name in the field.
Description: Enter the new description in the field.
Implicit Rule: Toggle to the other option to change.
Make any edits desired; the fields containing changes will be highlighted in yellow (here, the implicit rule was switched to "Reject").
Click 'Save'.
.png)
The edits are now saved.
If no other edits are necessary, 'Review' and 'Apply'.
Editing a BGP Filter Rule
Making Configuration Changes to a BGP Filter Rule
To edit an existing BGP rule, click on the pencil icon to the right of that rule.
.png)
This will open a modal where you can edit any of the information for the rule.
Make the desired changes; any field that now has a change will be highlighted in yellow.
Click 'Done'.
.png)
The edited portion of the rule will be indicated by a yellow bar to the left of the field changed.
Click 'Save'.
.png)
The edits are now saved.
If no other edits are necessary, 'Review' and 'Apply'.
Note:
When hovering over an individual field of the BGP Rule table, a pencil icon will appear allowing a quick edit of just that information from the table without having to go into the rule configuration itself.
.png)
Ordering BGP Filter Rules
The Sequence Number of the rule is its placement in the order of all of the rules for a BGP filter.
The Sequence Numbers are pre-populated as such: 10 for the first rule created, and every subsequent rule increasing by multiples of 10 (20 for the second, 30 for the third, etc.).
Should an order change be desired, there are multiple methods to achieve this:
Edit the rule and change the sequence number (see instructions for editing a rule here)
'Add Rule Above'
'Add Rule Below'
'Move'
Adding a Rule Above an Existing Rule
Should you want to insert a rule that would have a sequence number prior to an existing rule, click the ellipses; select 'Add Rule Above'.
.png)
This will open a modal to create the new rule, with the Sequence Number pre-populated with a smaller number than the rule from which you started. This number can be edited if desired.
Enter the desired information for configuring the rule as outlined here; click 'Done'.
.png)
The newly created rule will appear in the table, highlighted in yellow.
Click 'Save'.
.png)
The edits are now saved.
If no other edits are necessary, 'Review' and 'Apply'.
The Rule table is now up to date with the added rule.
.png)
Adding a Rule Below an Existing Rule
Should you want to insert a rule that would have a sequence number following that of an existing rule, click the ellipses; select 'Add Rule Below'.
.png)
This will open a modal to create the new rule, with the Sequence Number pre-populated with a larger number than the rule from which you started. This number can be edited if desired.
Enter the desired information for configuring the rule as outlined here; click 'Done'.
.png)
The newly created rule will appear in the table, highlighted in yellow.
Click 'Save'.
.png)
The edits are now saved.
If no other edits are necessary, 'Review' and 'Apply'
The Rule table is now up to date with the added rule.
.png)
Moving a Rule
Should an existing rule be needed elsewhere in the order, click the ellipses; select 'Move'.
.png)
A modal will appear with simply the option to change the sequence number of the rule.
The current sequence number will be pre-populated in the field.
.png)
Enter the desired sequence number; click 'Move'.
.png)
The rule now appears in the new position.
Click 'Save'.
.png)
The edits are now saved.
If no other edits are necessary, 'Review' and 'Apply'.
The Rule table is now up to date with the moved rule in the new order.
.png)
Cloning a Rule
Sometimes it is helpful to duplicate a rule; for instance, to facilitate in creating a new rule that contains the same configuration as an existing rule, with just a few changes.
To clone a rule, click the ellipses to the right of the rule to be duplicated.
Select 'Clone'.
.png)
The cloned rule will have the same name, and will be added to the table as the next pre-populated sequence number, highlighted in yellow.
Make any additions/edits as desired, by following the previous steps as outlined in this document.
Click 'Save'.
.png)
If no other edits are necessary, 'Review' and 'Apply'.
The Rule table is now up to date with the cloned rule added.
.png)
Deleting a Rule
Should a rule no longer be needed, it may be deleted.
Click the ellipses to the right of the rule to be deleted.
Select 'Delete'.
.png)
At this point, the rule will not be visible in the table.
Click 'Save'.
.png)
If no other edits are necessary, 'Review' and 'Apply'.
The rule has been deleted and no longer will appear in the table.
Deleting a BGP Filter
Should a BGP Filter no longer be needed, it may be deleted.
Click the [trash can] icon to the right of the filter to be deleted.
.png)
A confirmation message pops up to verify that you do wish to delete the BGP filter.
Click 'Confirm'.
.png)
The rule will not be visible in the table.
'Review' and 'Apply'.
.png)
The BGP Filter has been deleted and will no longer appear in the BGP Filter Table.
.png)