What is Data Exchange Partner Services?
Graphiant’s Data Exchange Partner Services securely connects your peers to your services .
With Data Exchange, you can pick and choose any of your inventory of services to be available by private invitation only to any of your inventory of peers, or “customers”.
Whether your business is looking to share knowledge, collaborate on projects, or explore partnerships that will lead to mutual growth and new opportunities, Data Exchange is here to connect you!
Video Overview
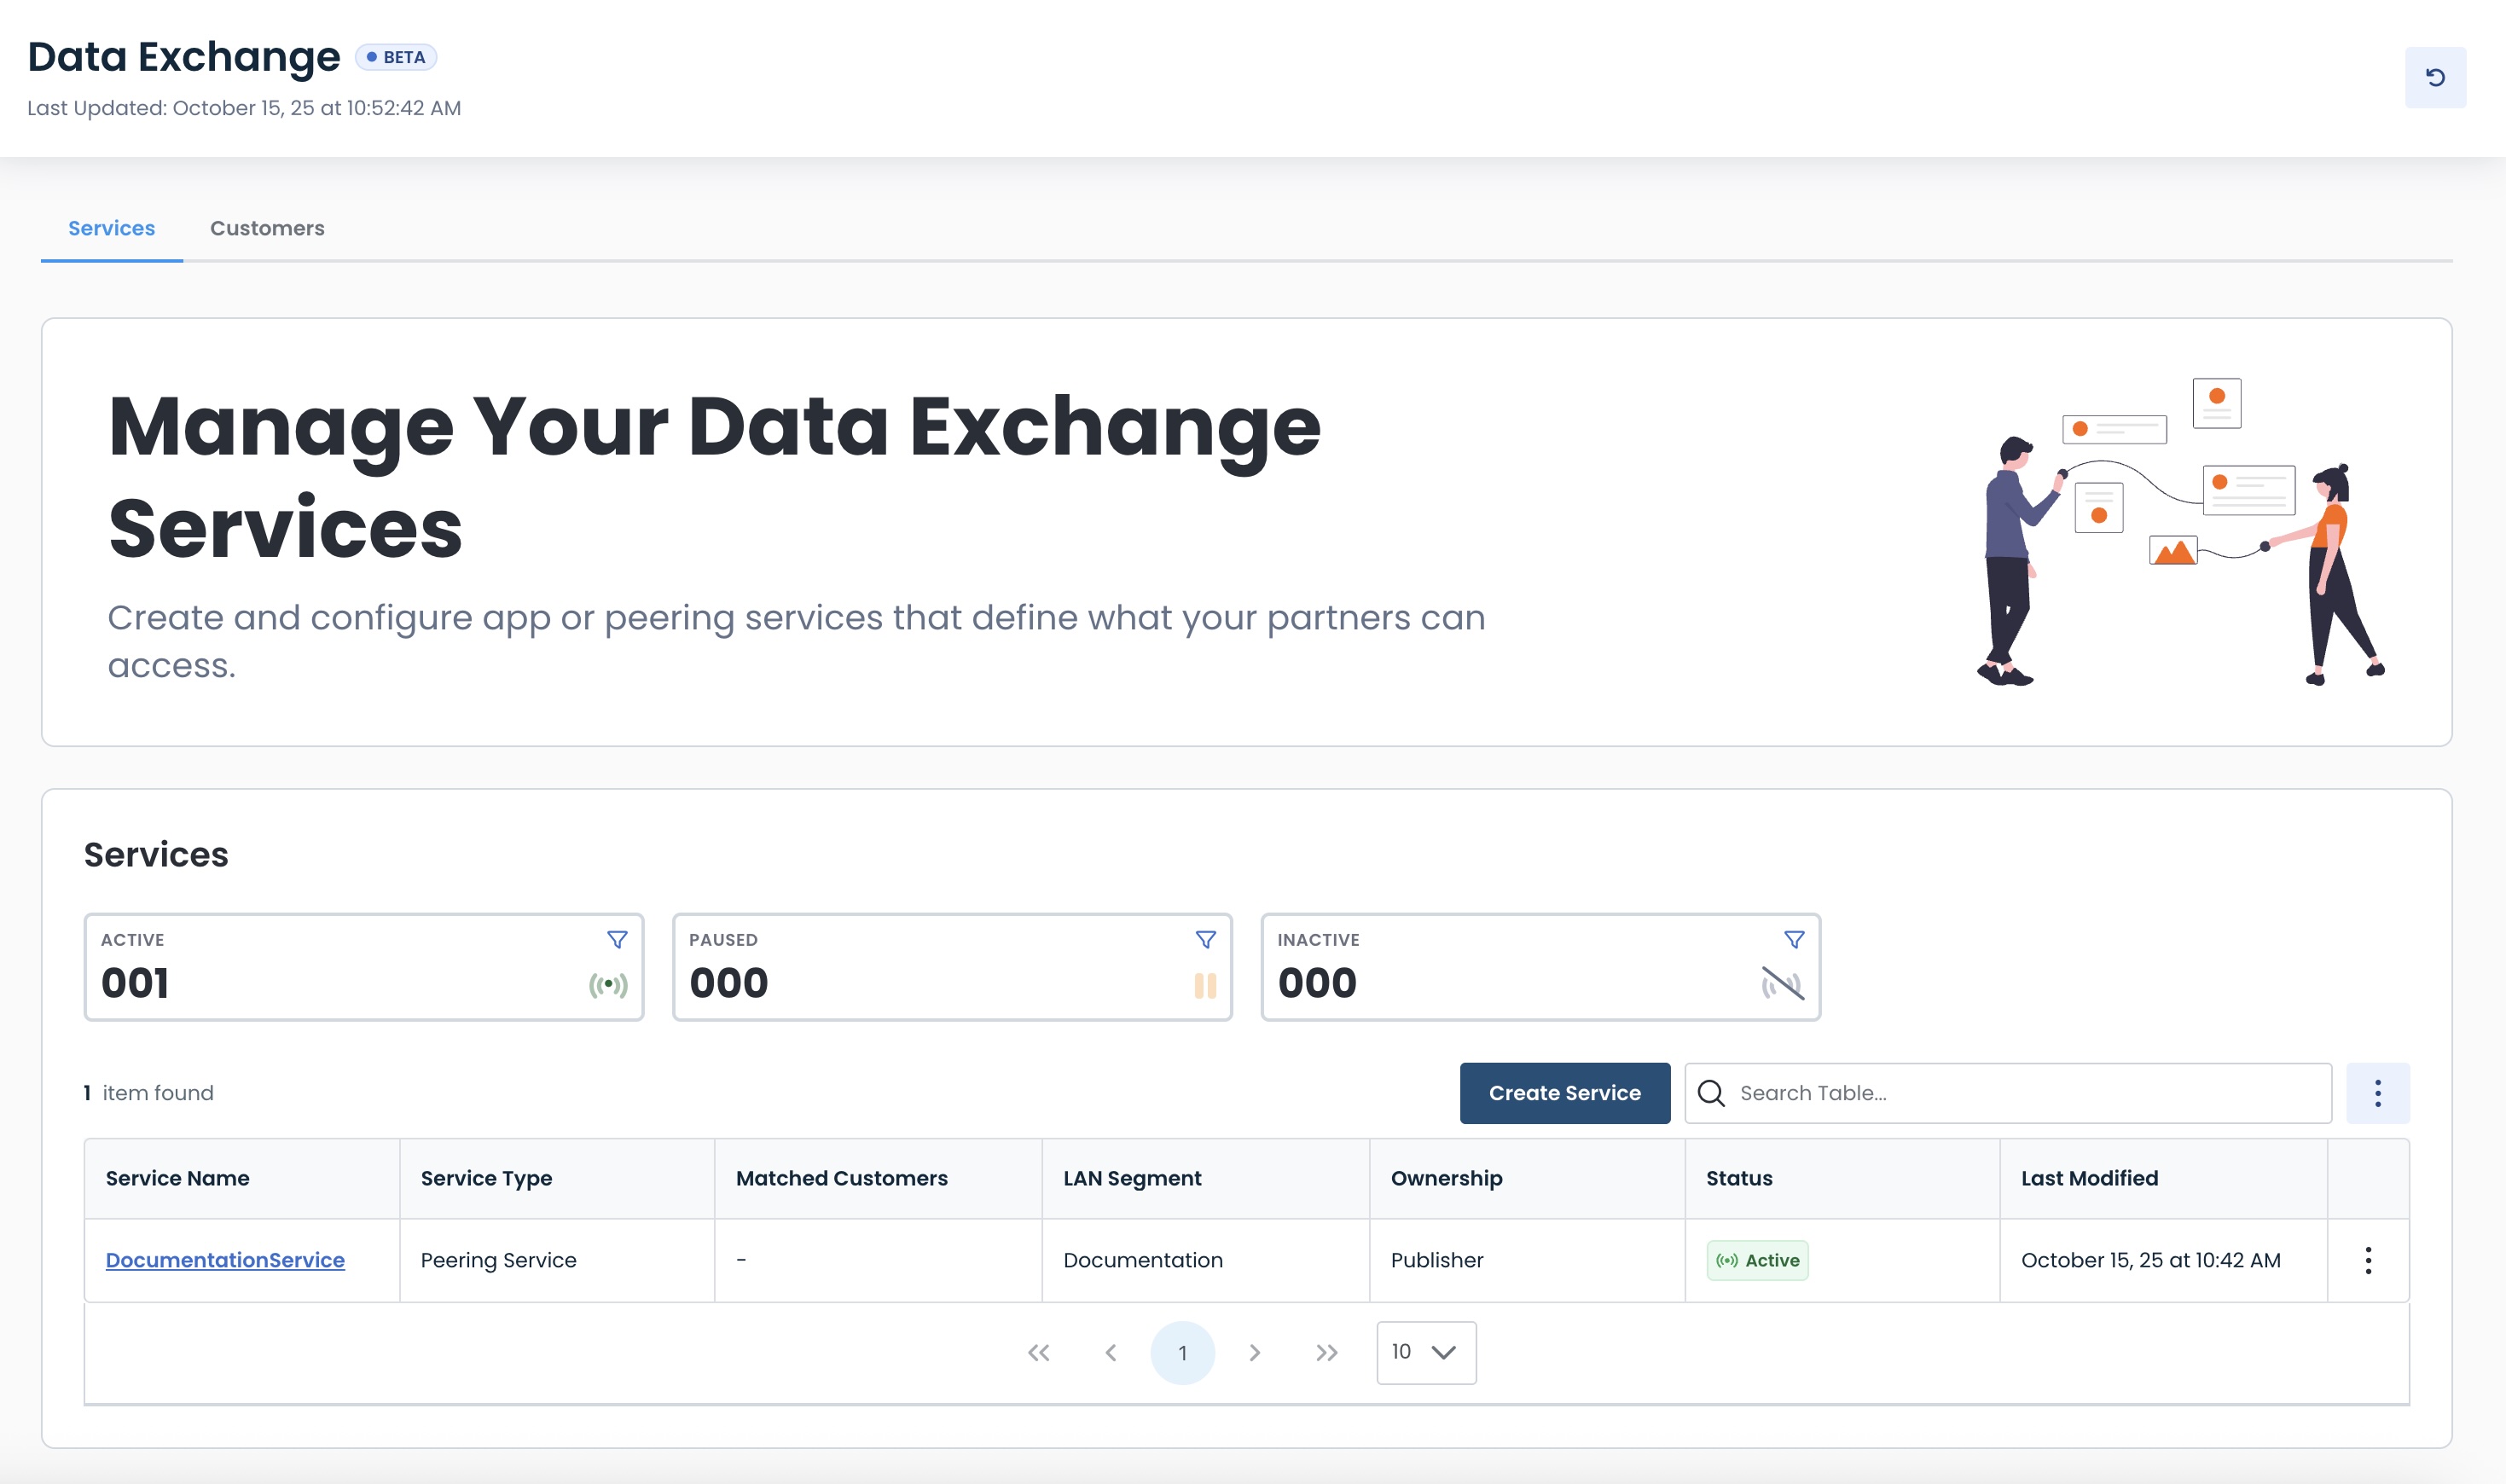
Locating Data Exchange Partner Services in the Graphiant Portal
From the Graphiant Portal Landing Page, click ‘Services’ in the sidebar; select ‘Data Exchange’; choose ‘Partner Services’.
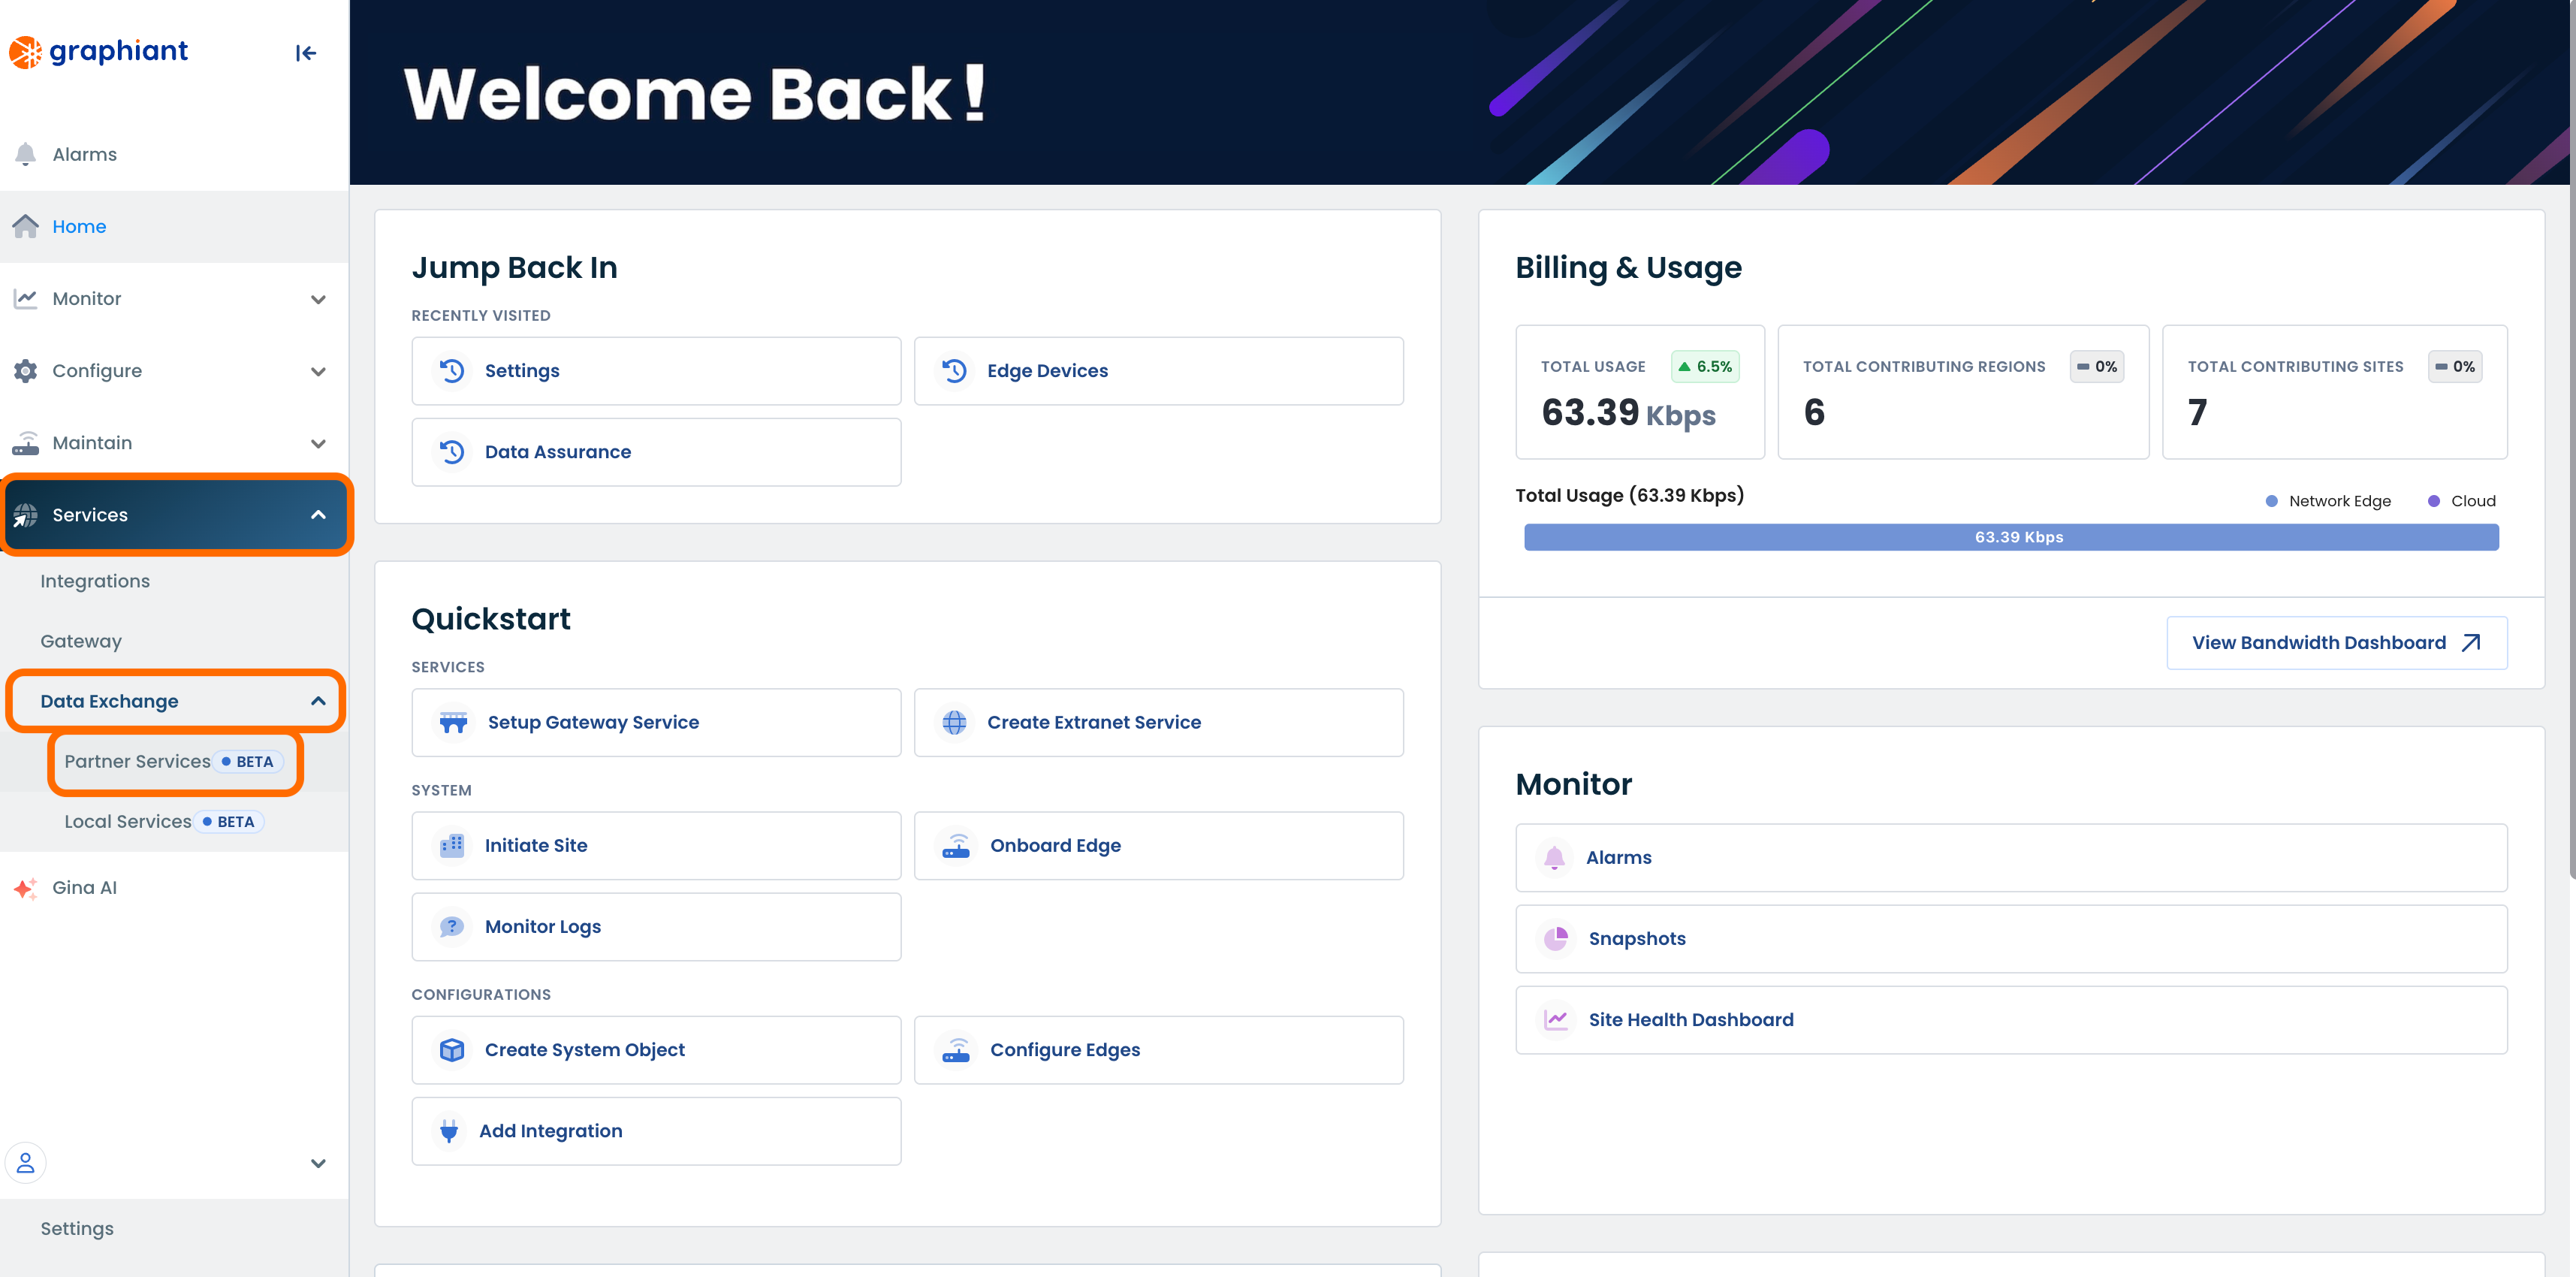
This will open the Data Exchange Landing Page.
From here, you can publish and edit your services and customers.
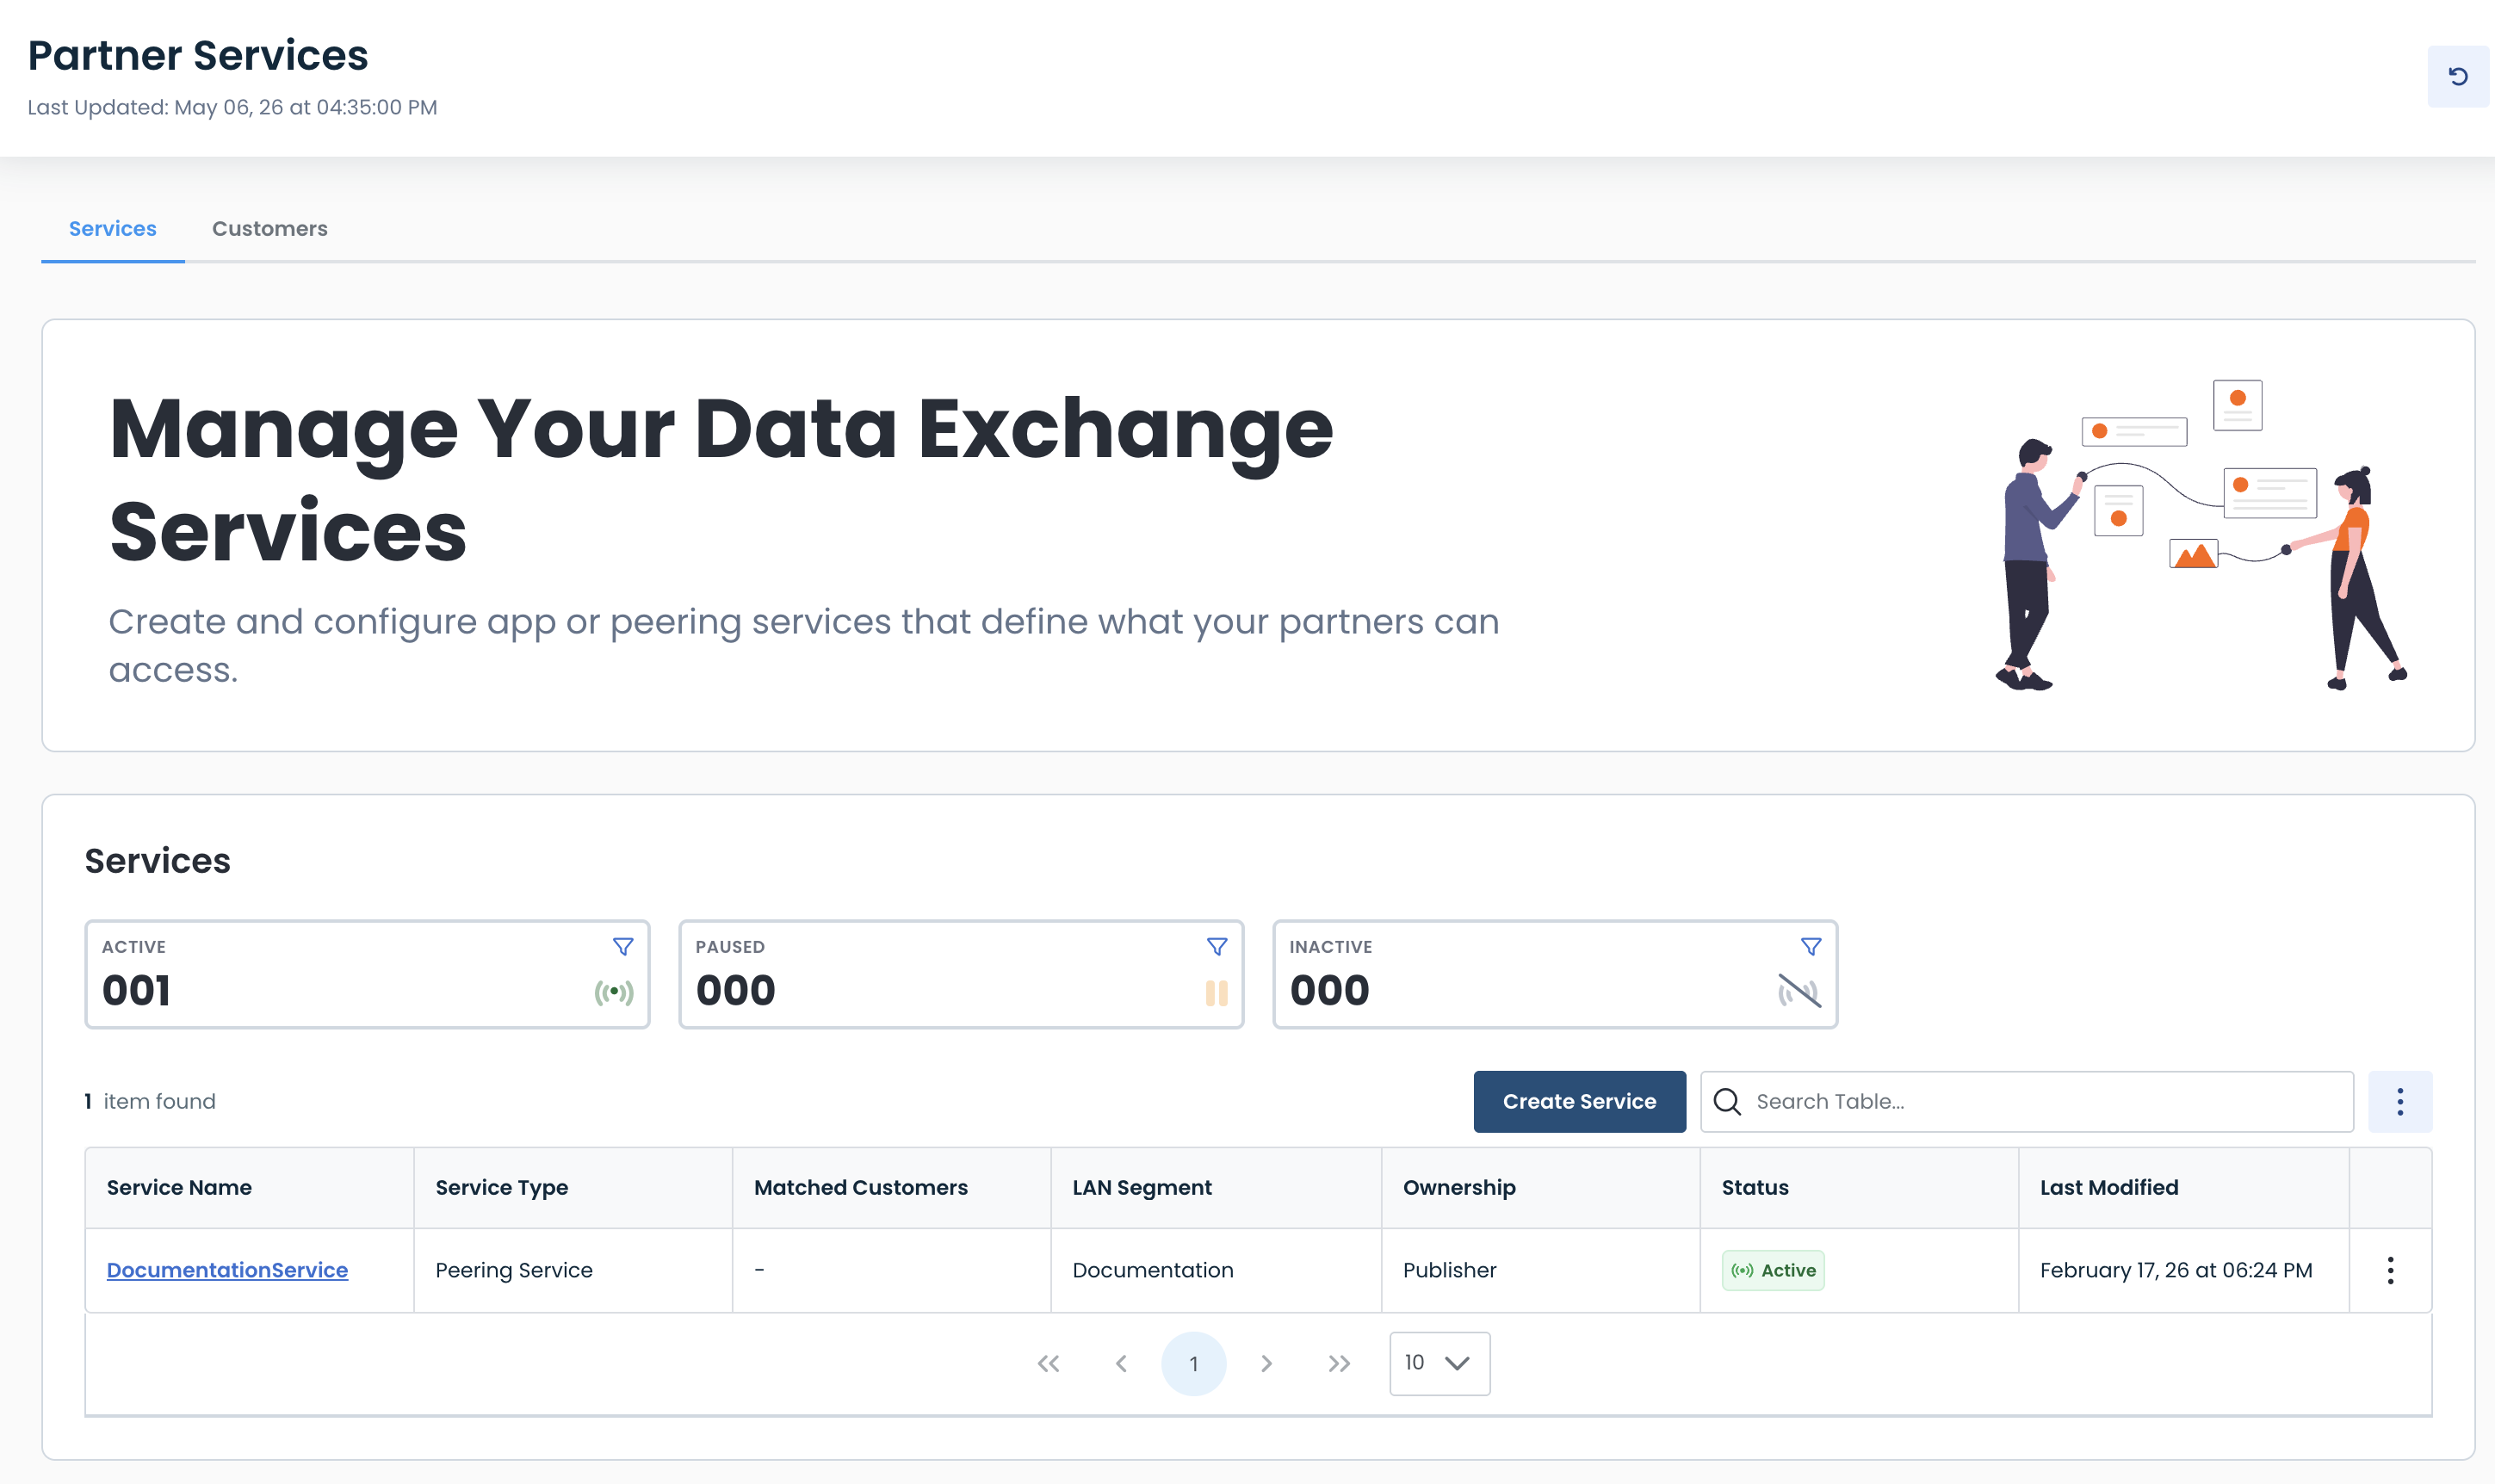
Creating a Data Exchange Partner Service
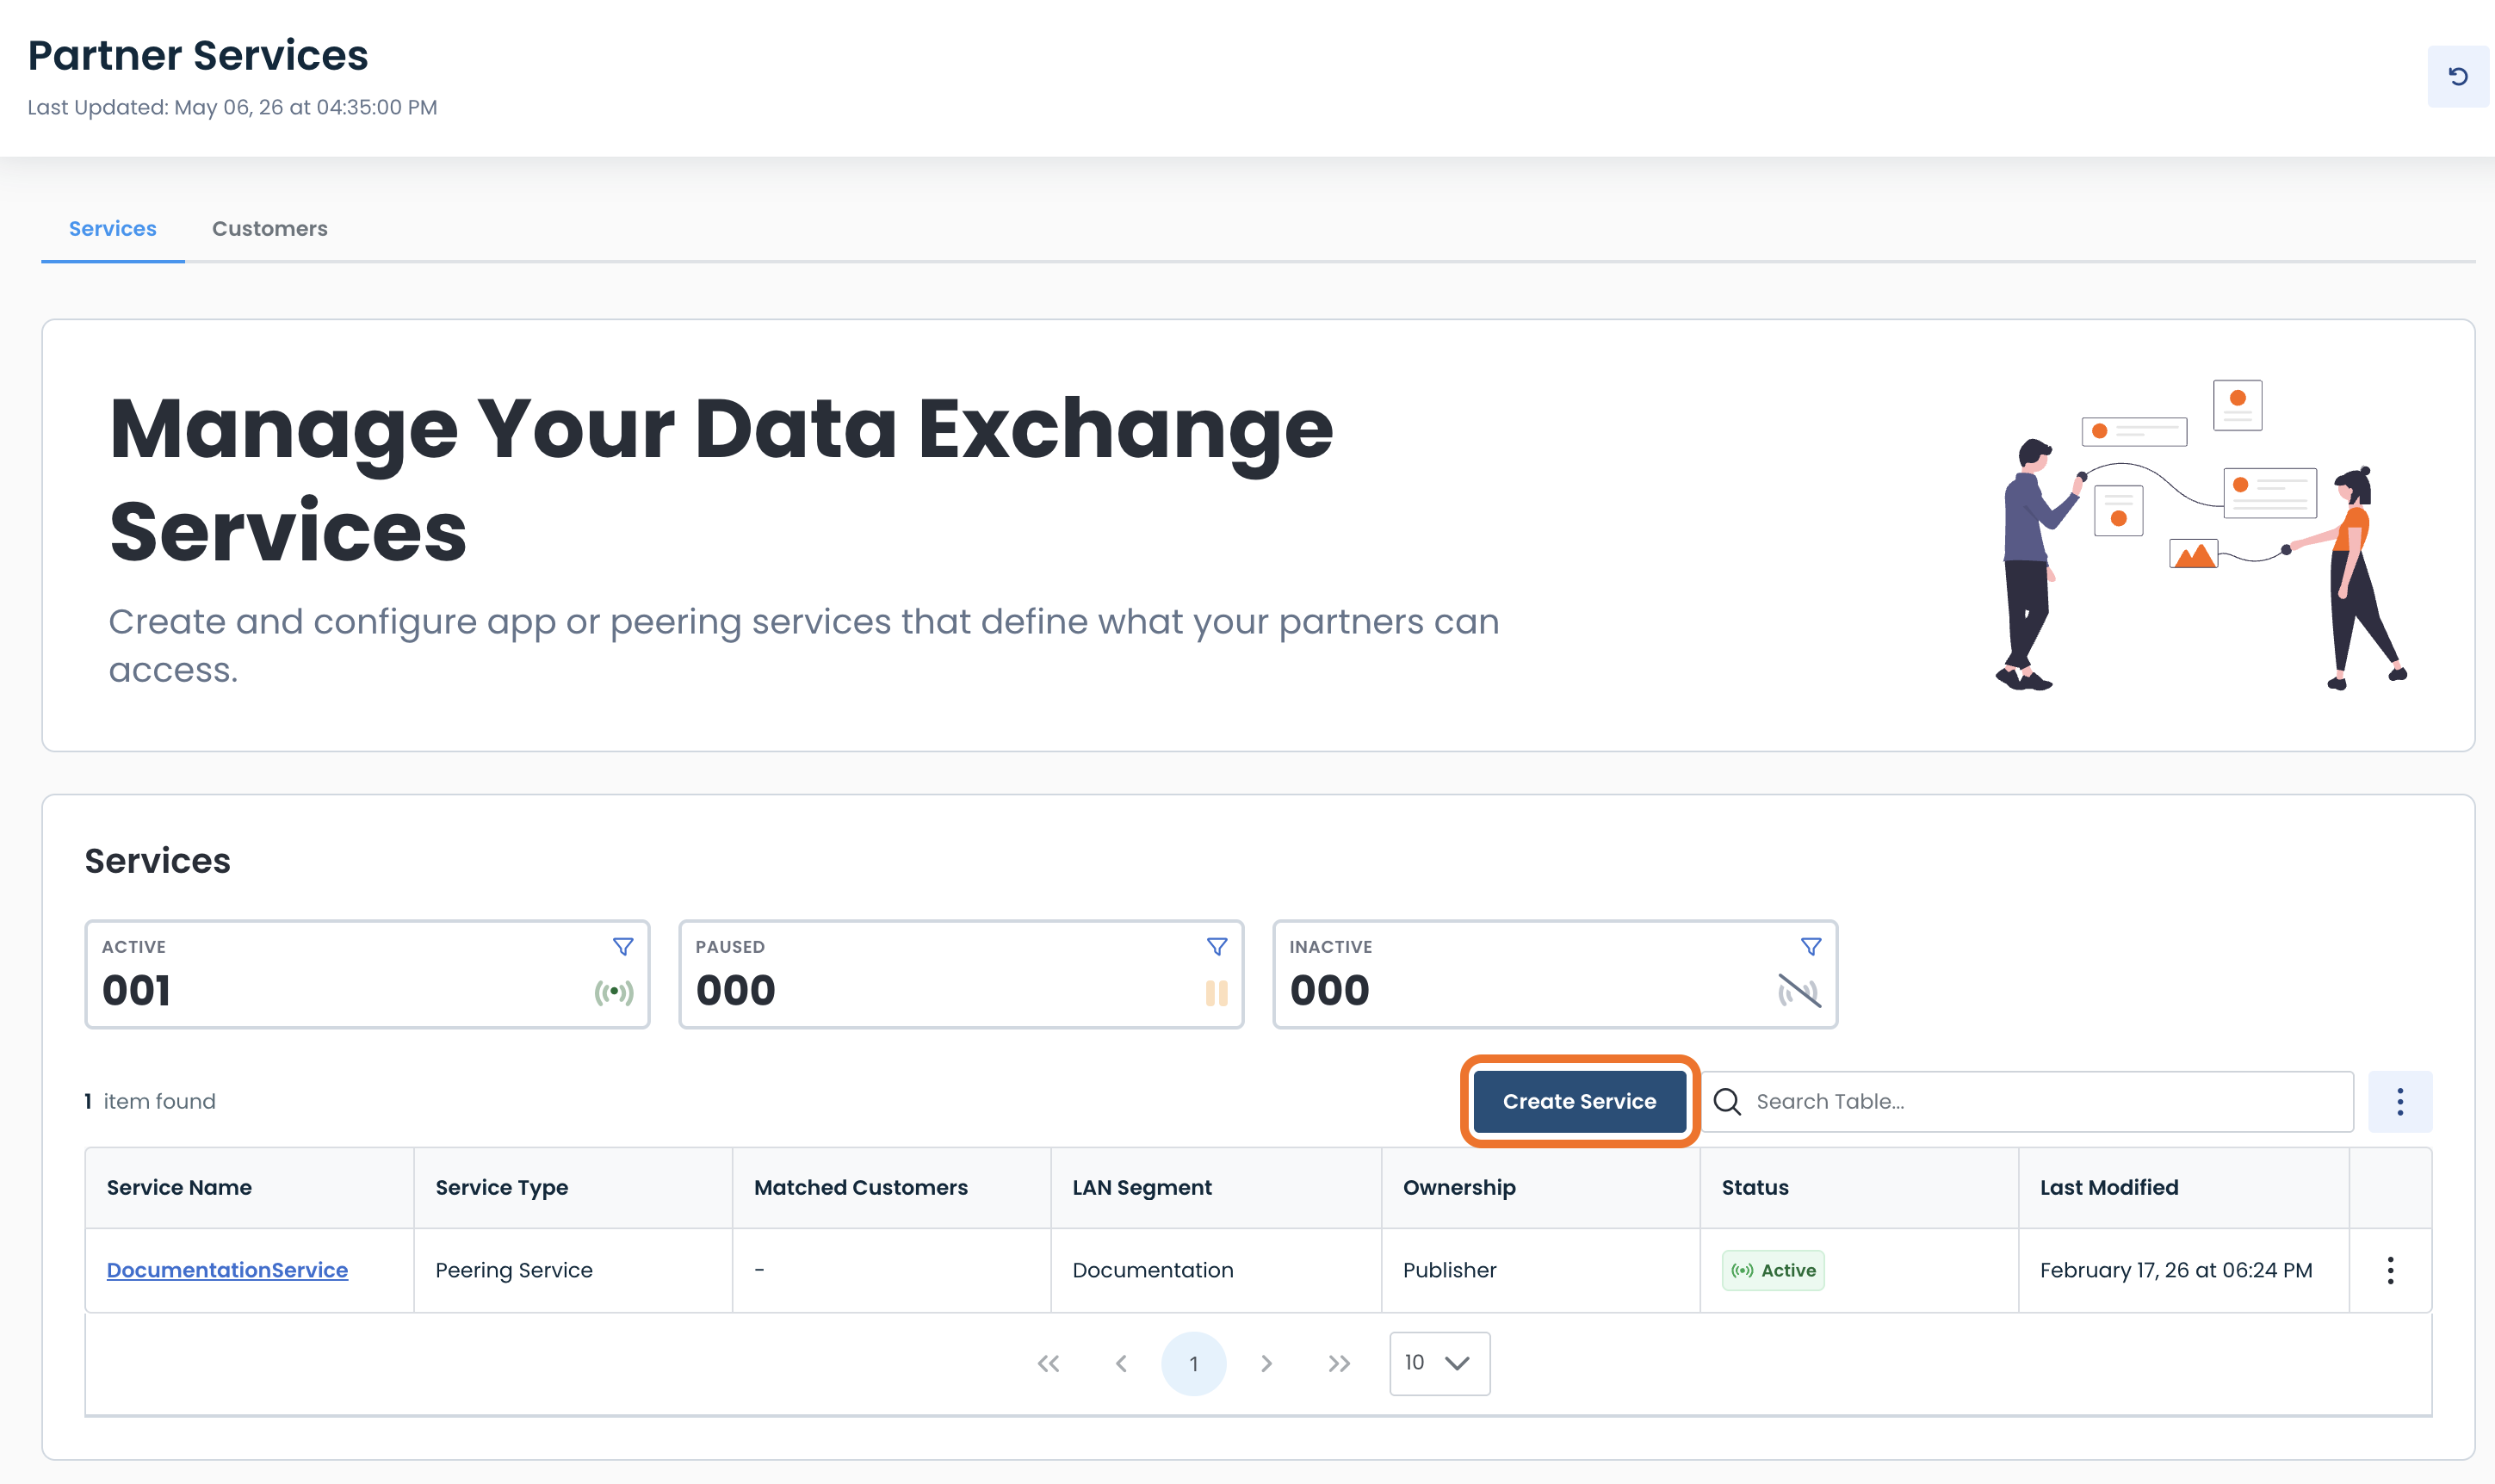
To add to your inventory of Data Exchange services, click ‘Create Service’ in the middle of the screen, above the table.
You will now see the configuration page for creating your Data Exchange service.
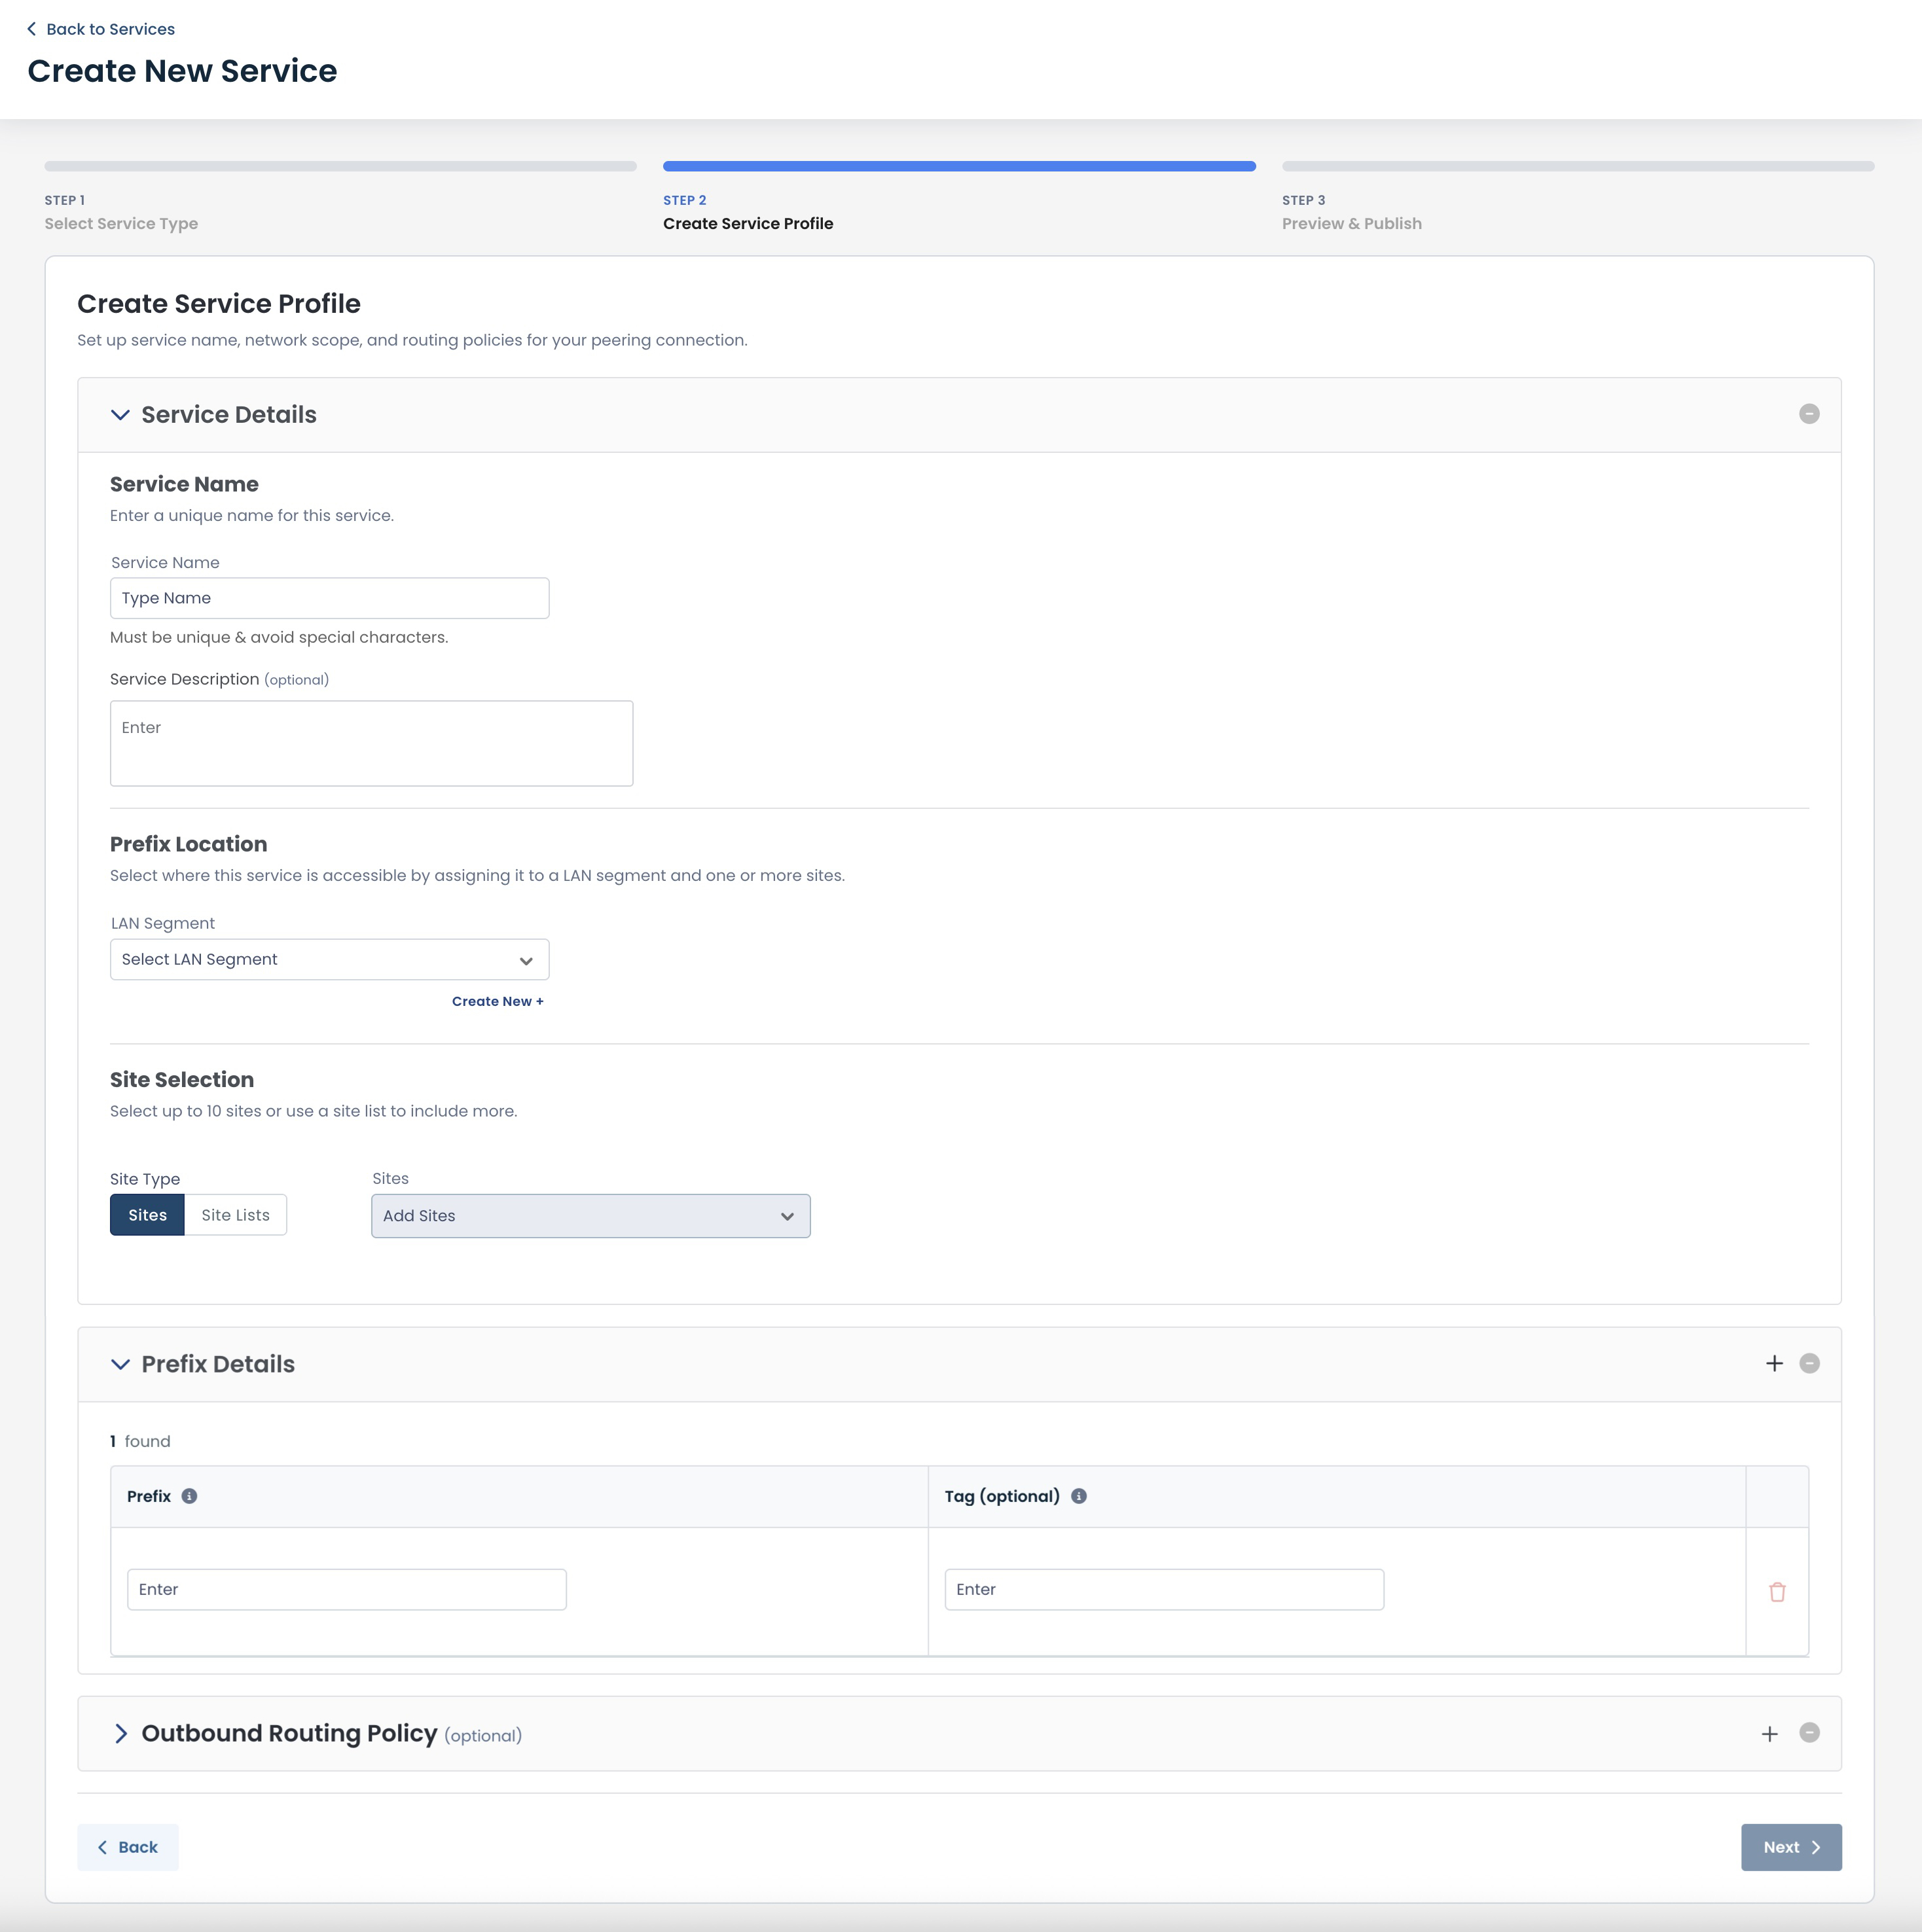
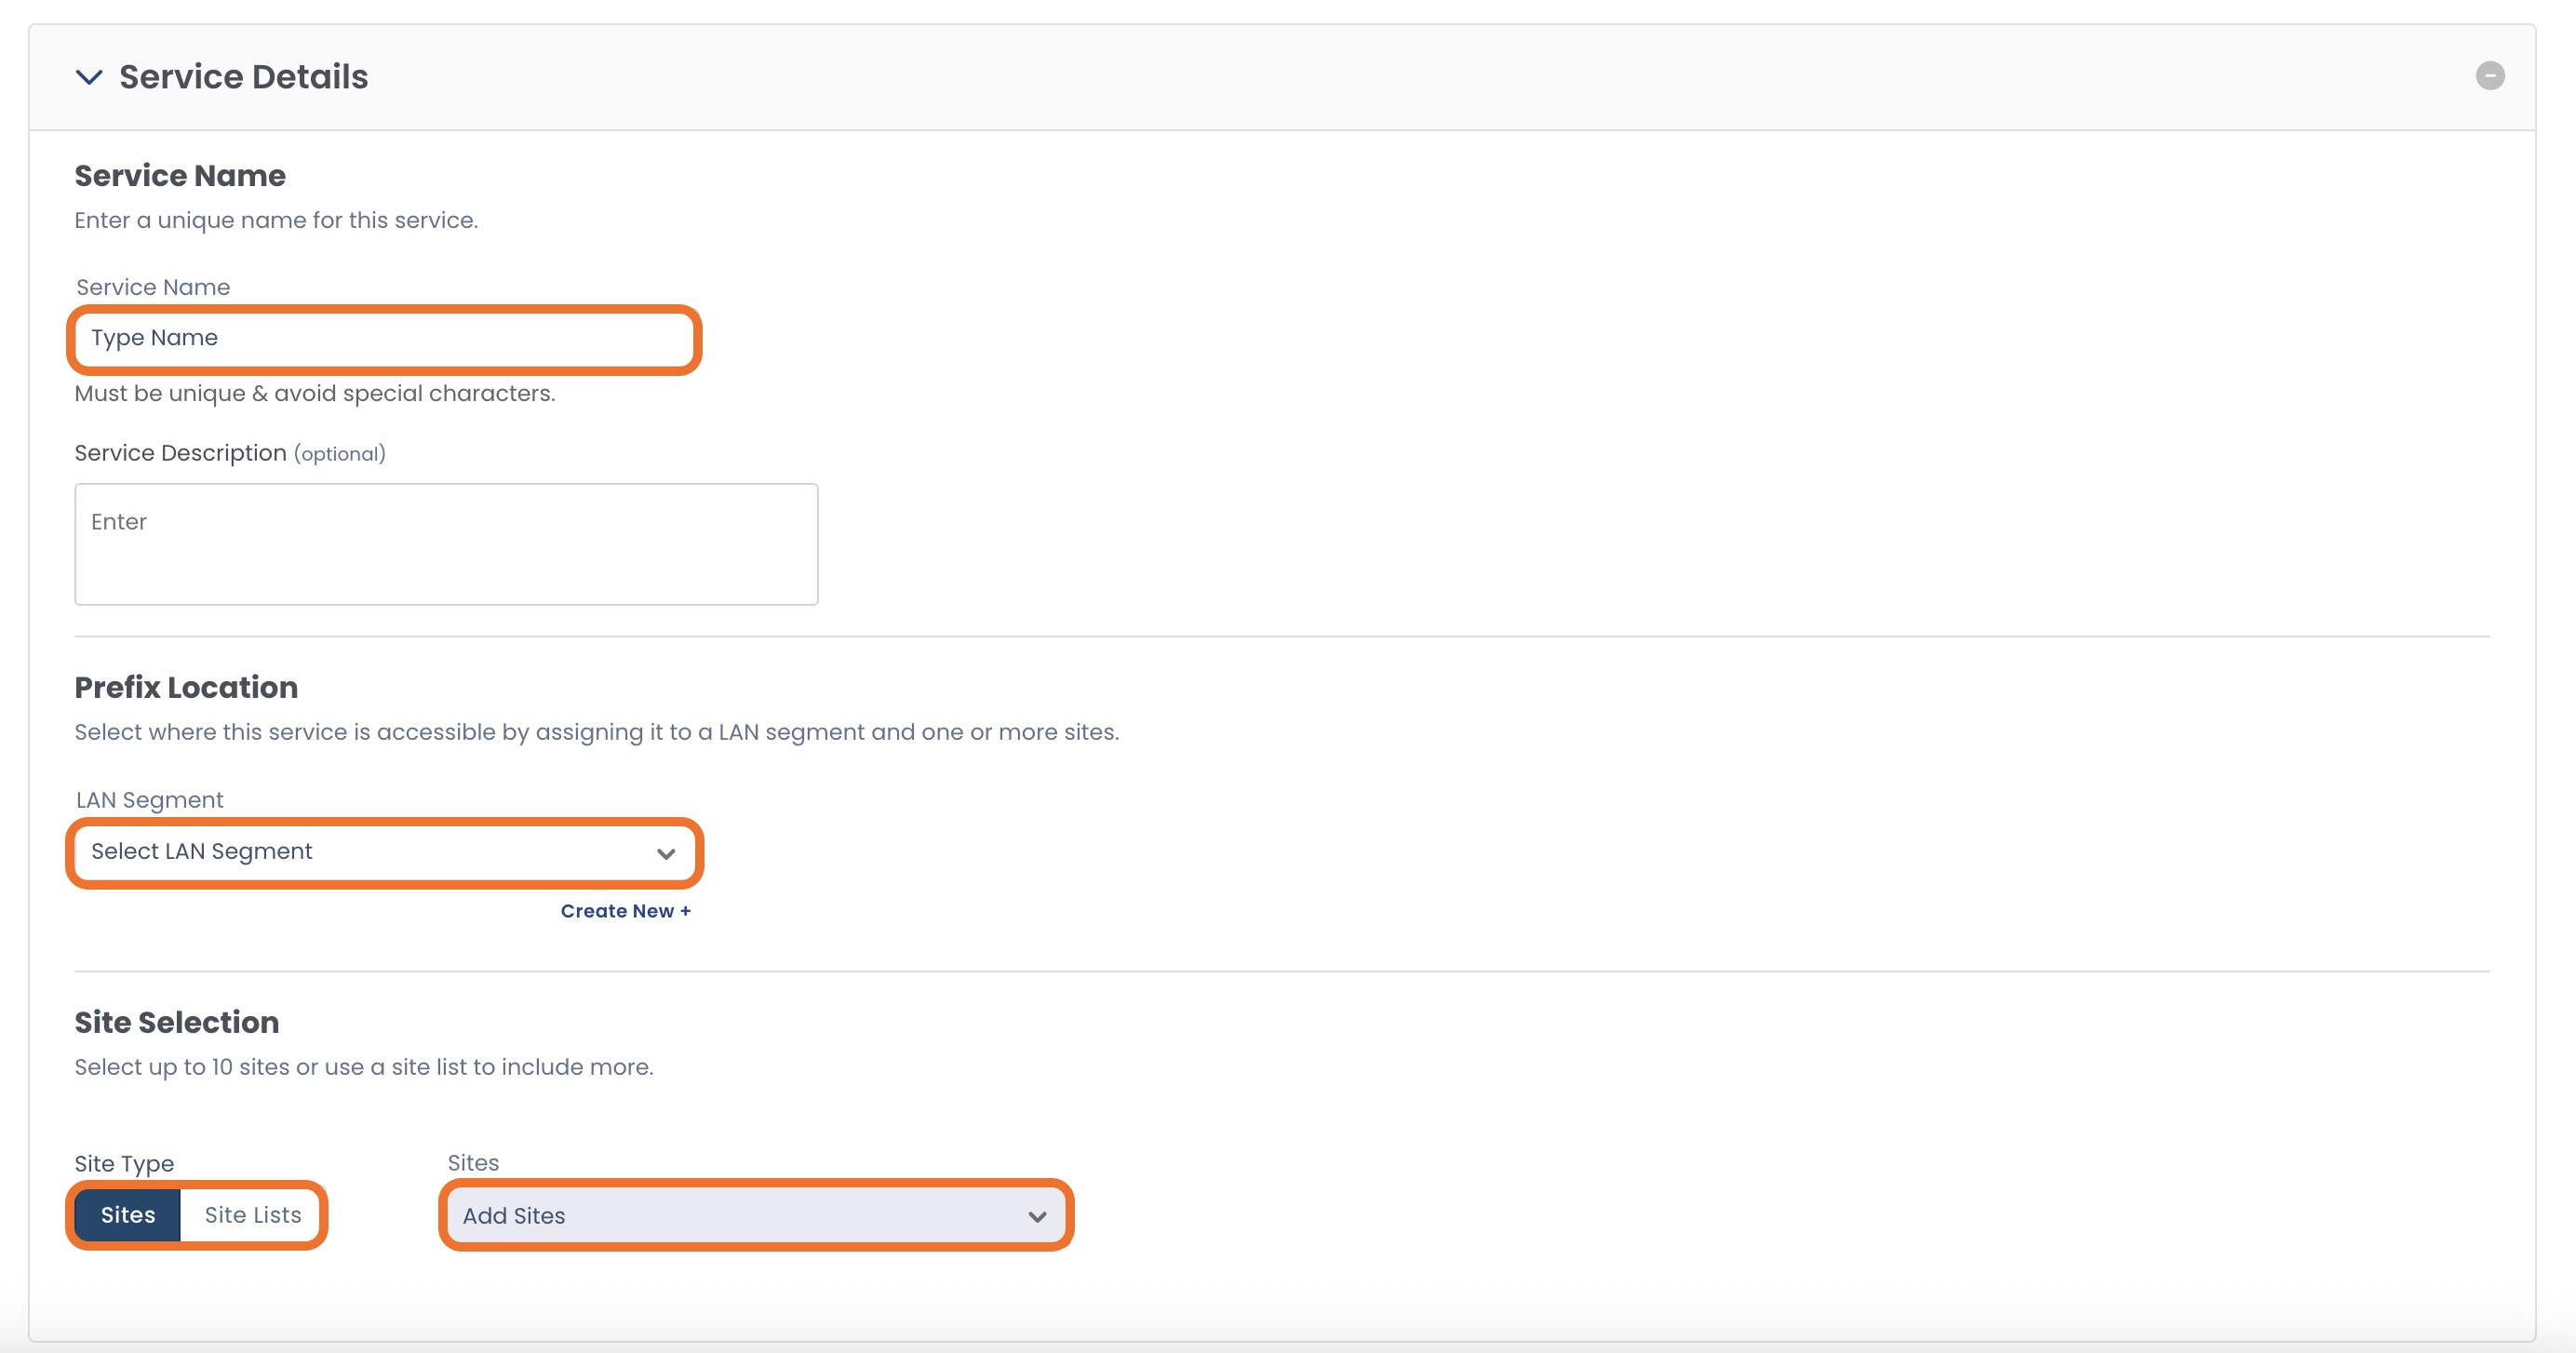
Service Details
This section includes all of the information regarding the name and location of your service.
Enter the following information:
Service Name
Service Name: The unique name you are assigning to the data exchange service
Service Description (optional): Information for your reference
Prefix Location:
LAN Segment: The LAN segment to share with the customer
You can also create a new LAN segment right from here
For information on LAN segments, click here
LAN Segments:
Must be selected before Site Selection.
Site Selection
Site Type: Choose either to enter your sites individually, or by site lists.
Site: You may enter up to 10 sites
Site List: Can contain as many sites as are in the list(s)
You can also create a new Site List right from here
For information on Site Lists, click here
Site / Site List options:
Are dependent on the LAN segment chosen; the Sites / Site Lists that contain the selected LAN segment will be the only ones offered in the dropdown.
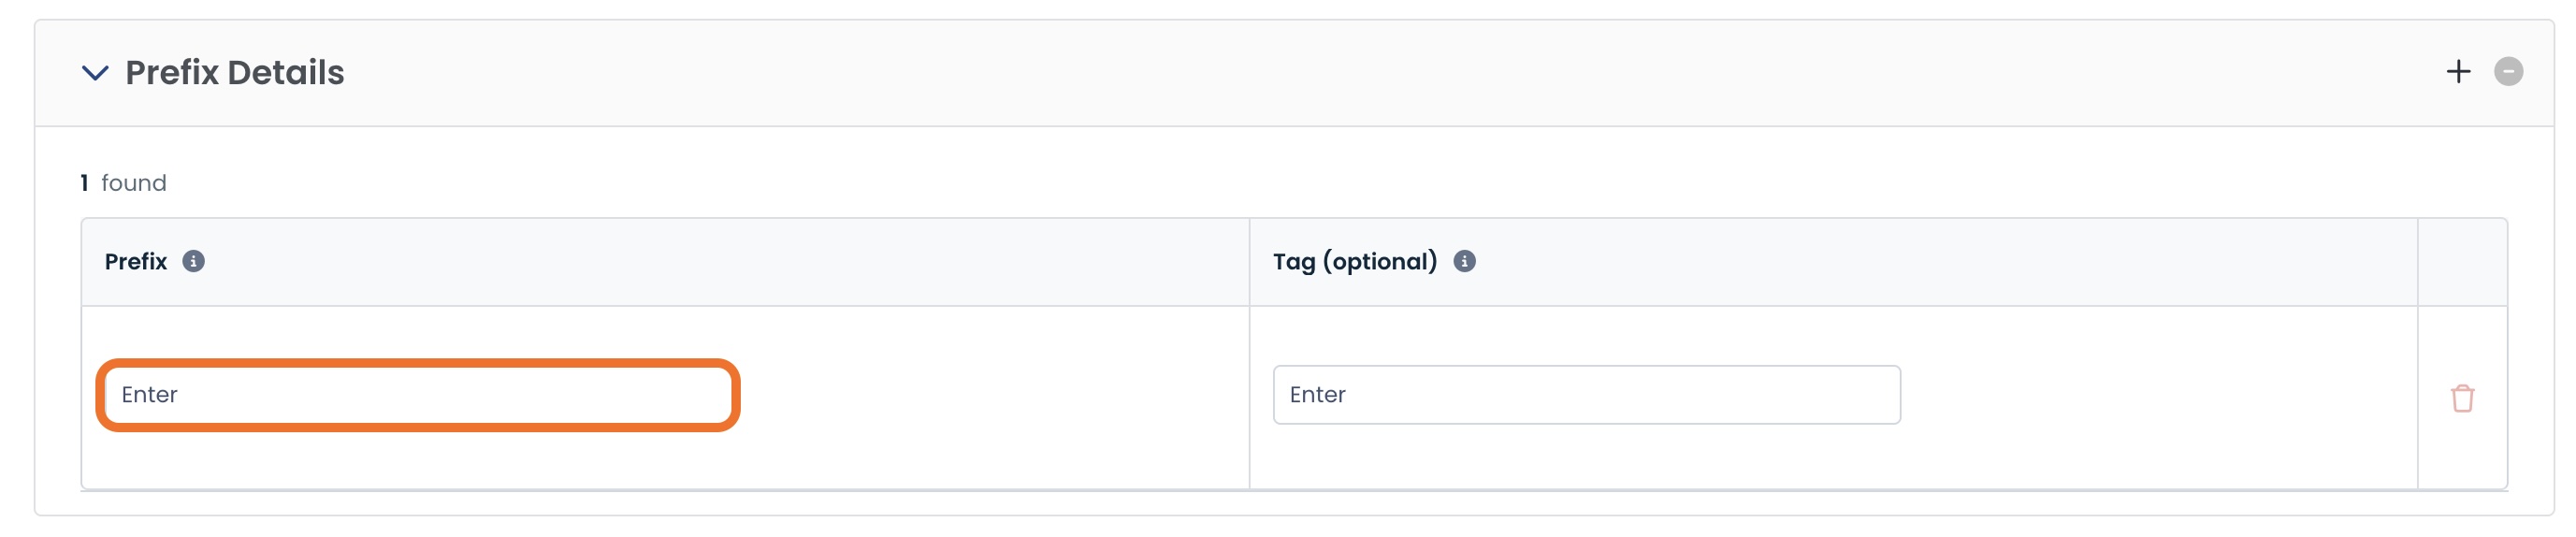
Prefix Details
This will contain all of your prefixes that you want to be a part of this service.
For each prefix, enter the following:
Prefix: Enter in a.b.c.d/n format
Tag (optional): Any internal terminology you would like for quick reference later
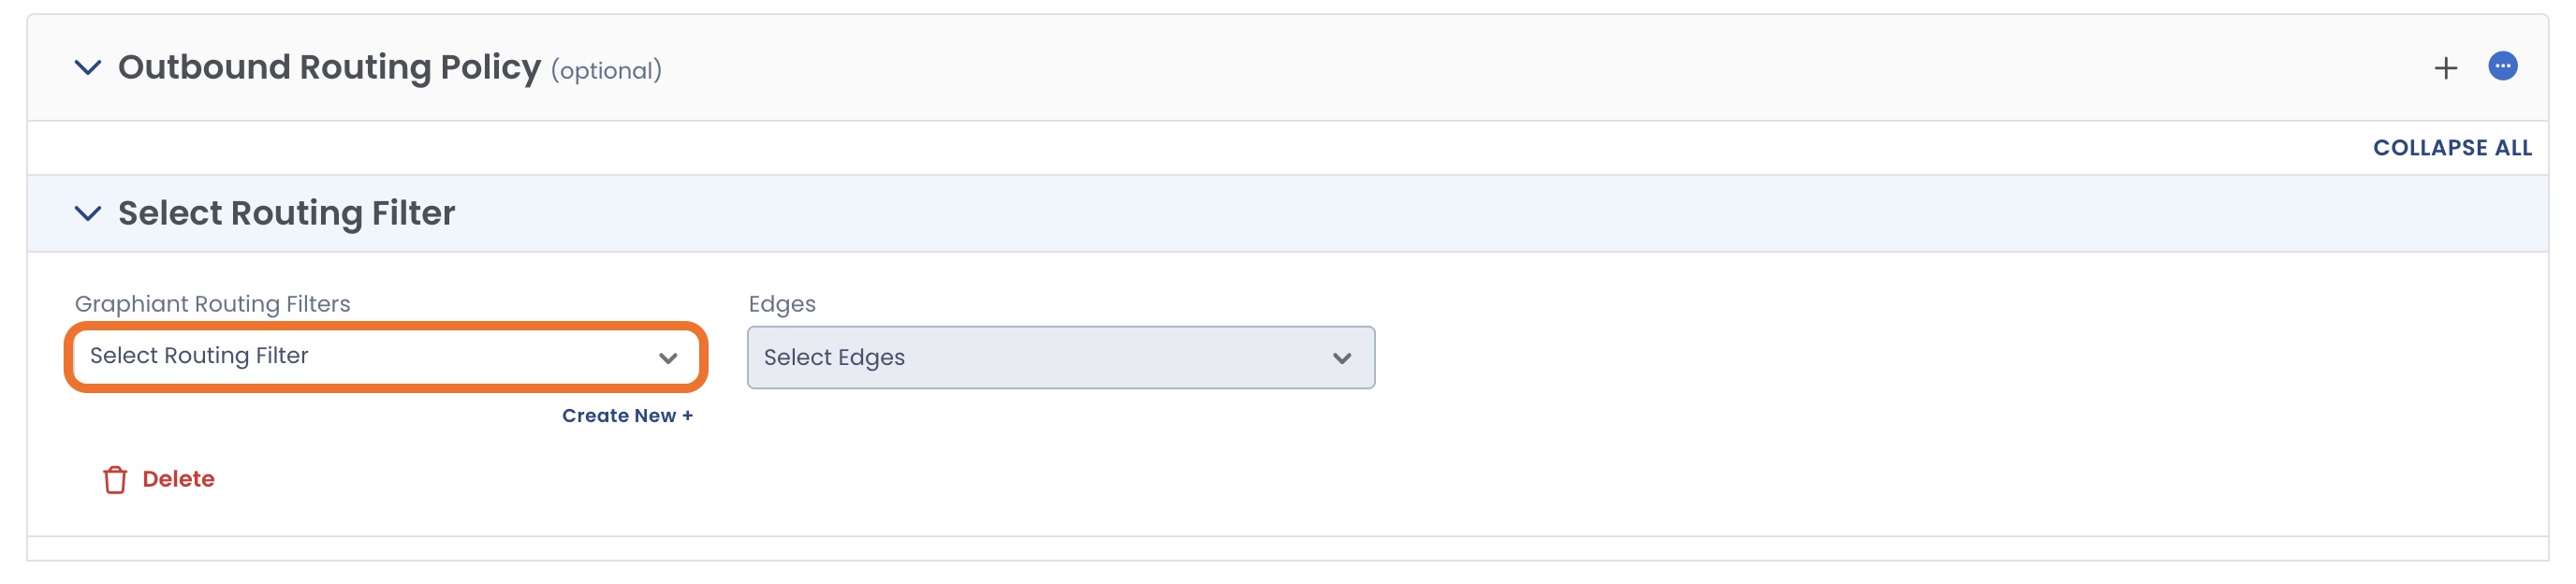
Outbound Routing Policy (optional)
If you would like to add a routing policy to your service, you can do so here.
By default, no routing policy is present.
To add one, click ‘Add Routing Policy’.

Select a routing filter.
You can also create a new routing filter right from here.
For information on routing filters, click here.
Select the Edges to which this policy will be applied.
When all information has been entered, click ‘Next’.
.jpg)
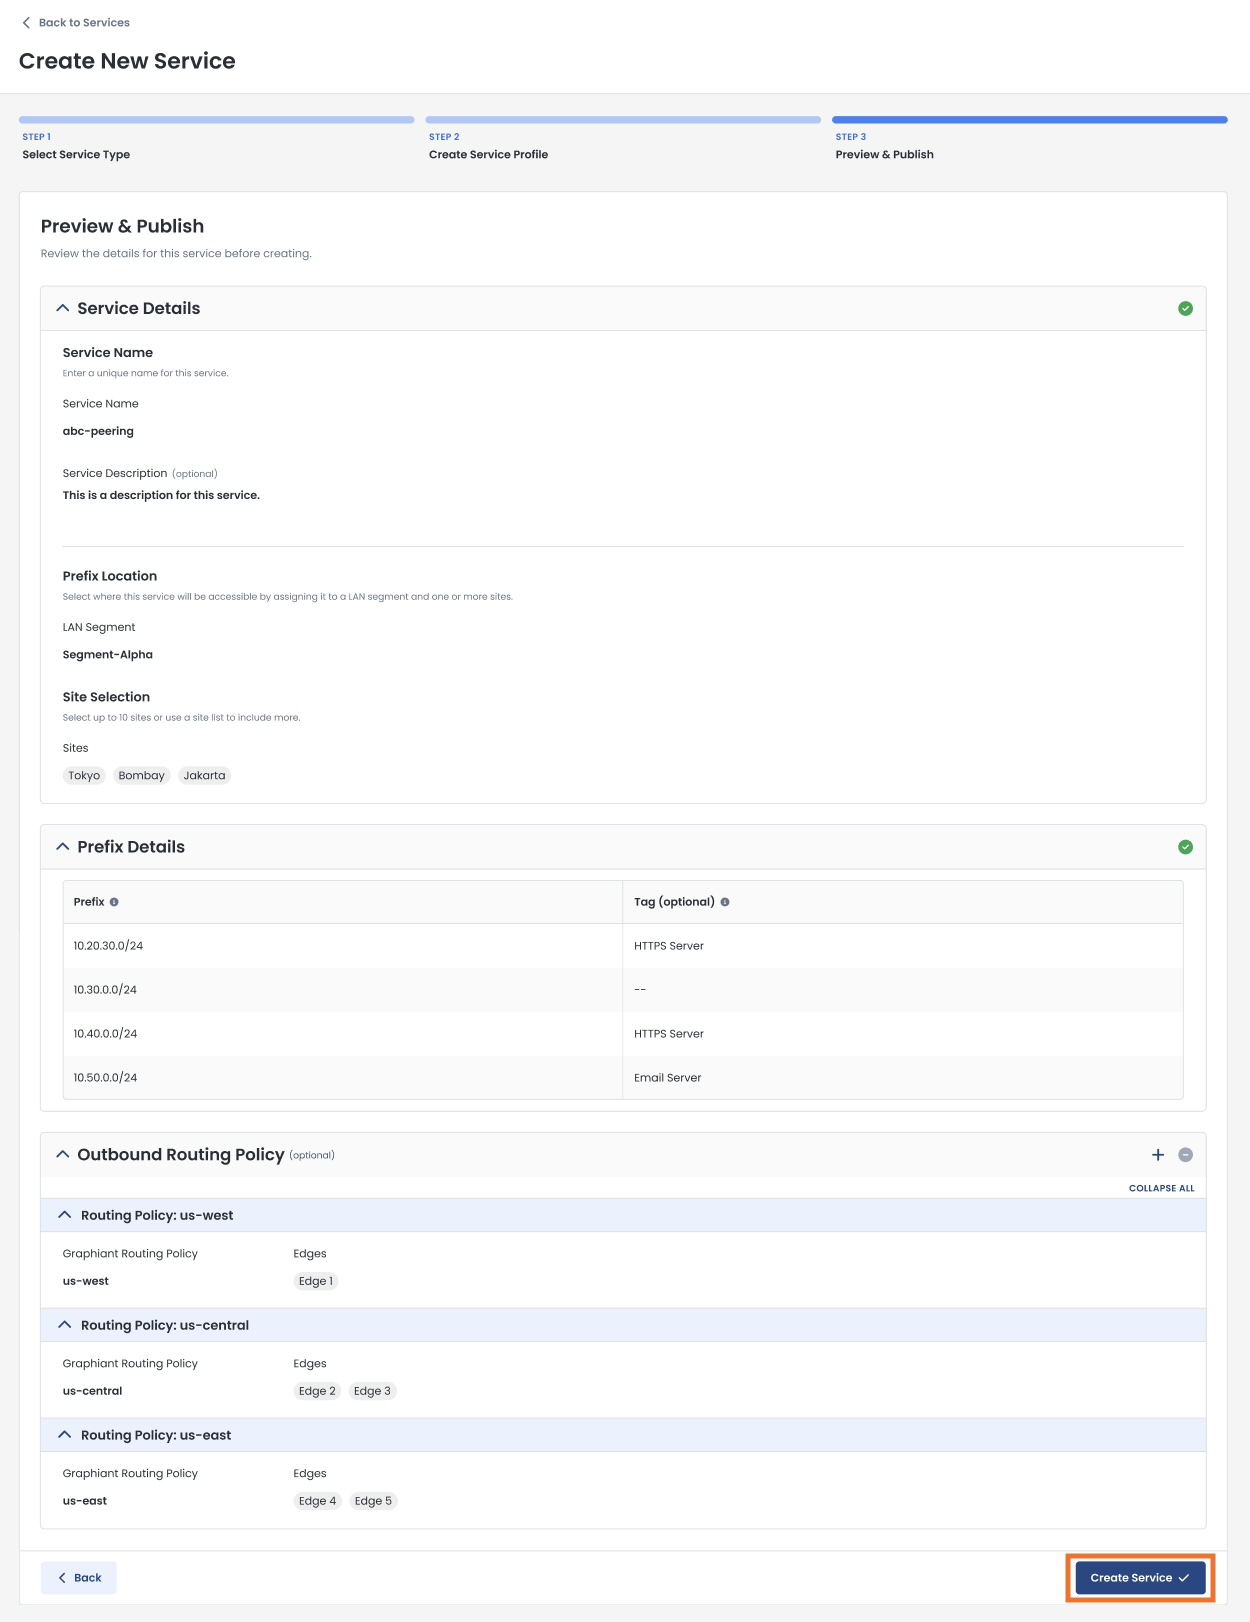
Preview & Publish
Review your selections.
Once you have ensured that everything is correct, click ‘Create Service’.
You will receive a confirmation that your service was created!
From here, you can either:
Exit to the Data Exchange service inventory page
Create a Customer to add to your customer inventory
.jpg)
Exiting to Data Exchange Partner Services
If you exit to the Data Exchange Services page, you will see your new Service listed in the table.
To later add a customer, click on the ‘Customers’ tab.
Then follow the instructions to create a customer.

How Can I Edit Prefix Details within a Data Exchange Partner Service?
At any time, you can add a new, or delete an unneeded, Data Exchange prefix.
Note:
Prefixes can only be added or deleted; not changed.
Click the ellipses to the right of the desired service, and select ‘Edit Service’.
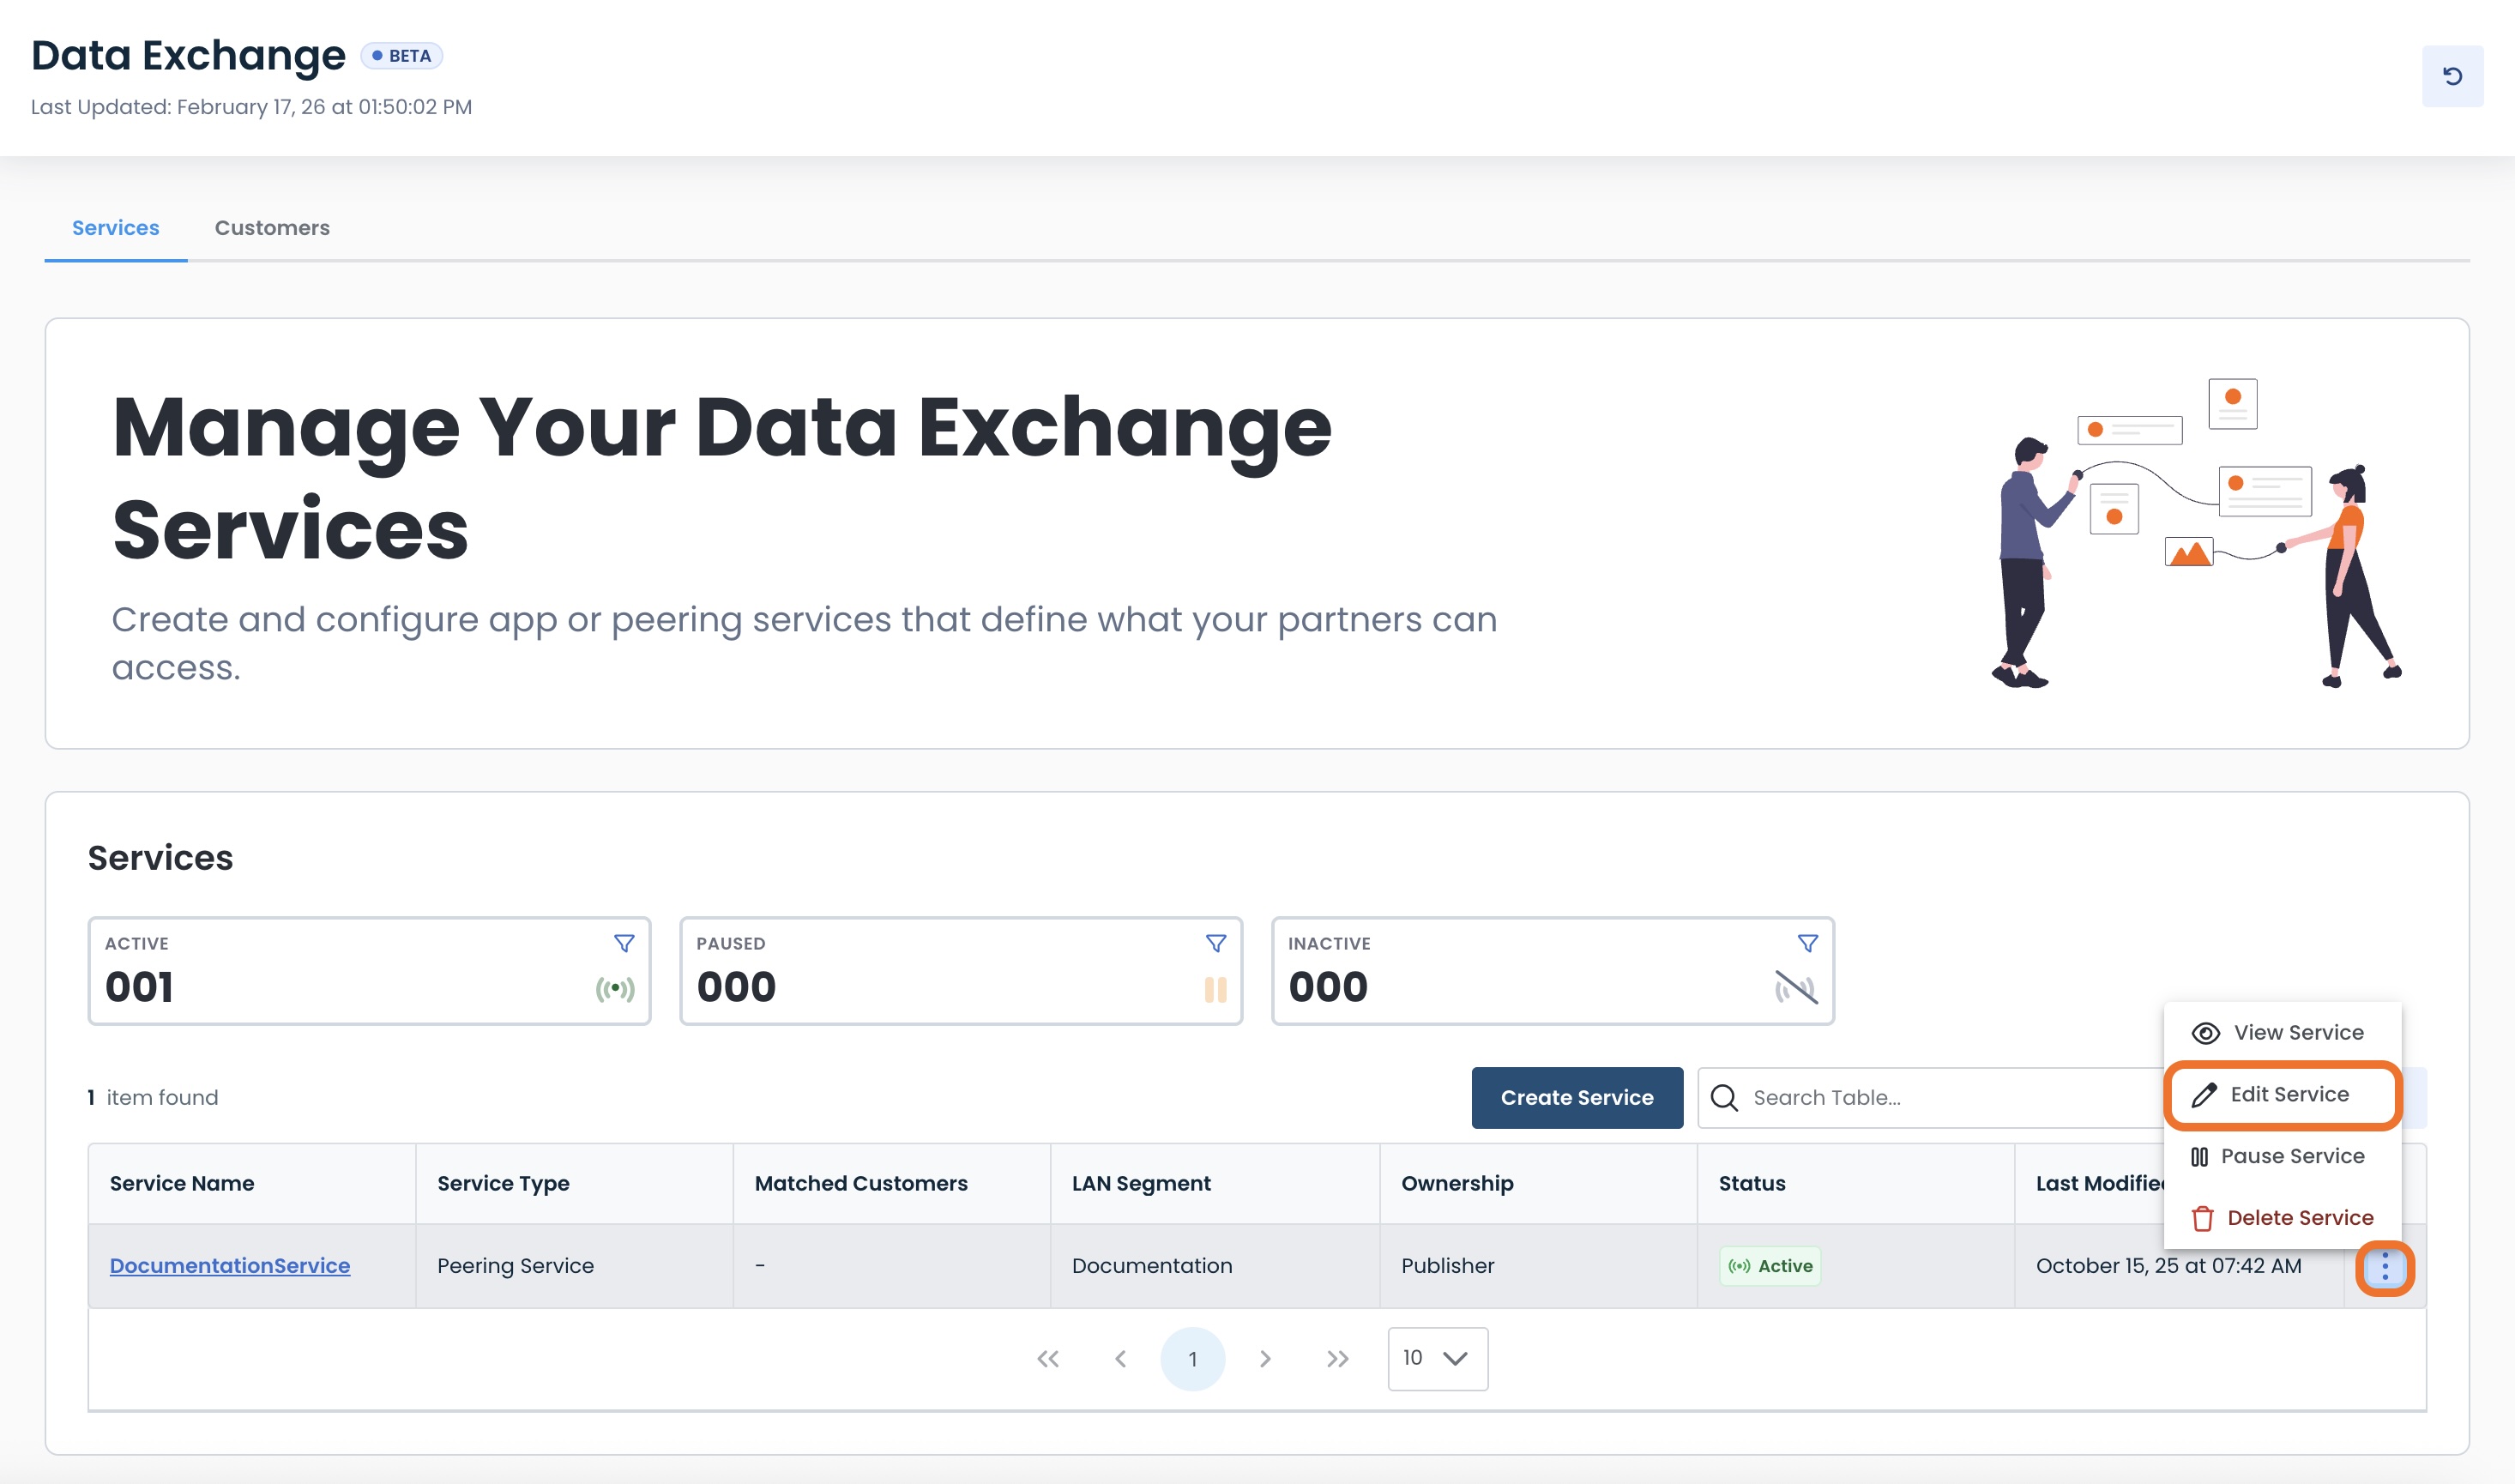
This will open the Data Exchange Service for you to add or delete a prefix.
The Prefix Details section is towards the bottom of the page.
.jpg)
Adding a New Prefix to a Data Exchange Partner Service
To add an additional prefix to an existing Data Exchange service, click the ‘+’ at the top right of the Prefix Details section.

Enter the new information.
The new prefix will be notated with a yellow bar to the left.
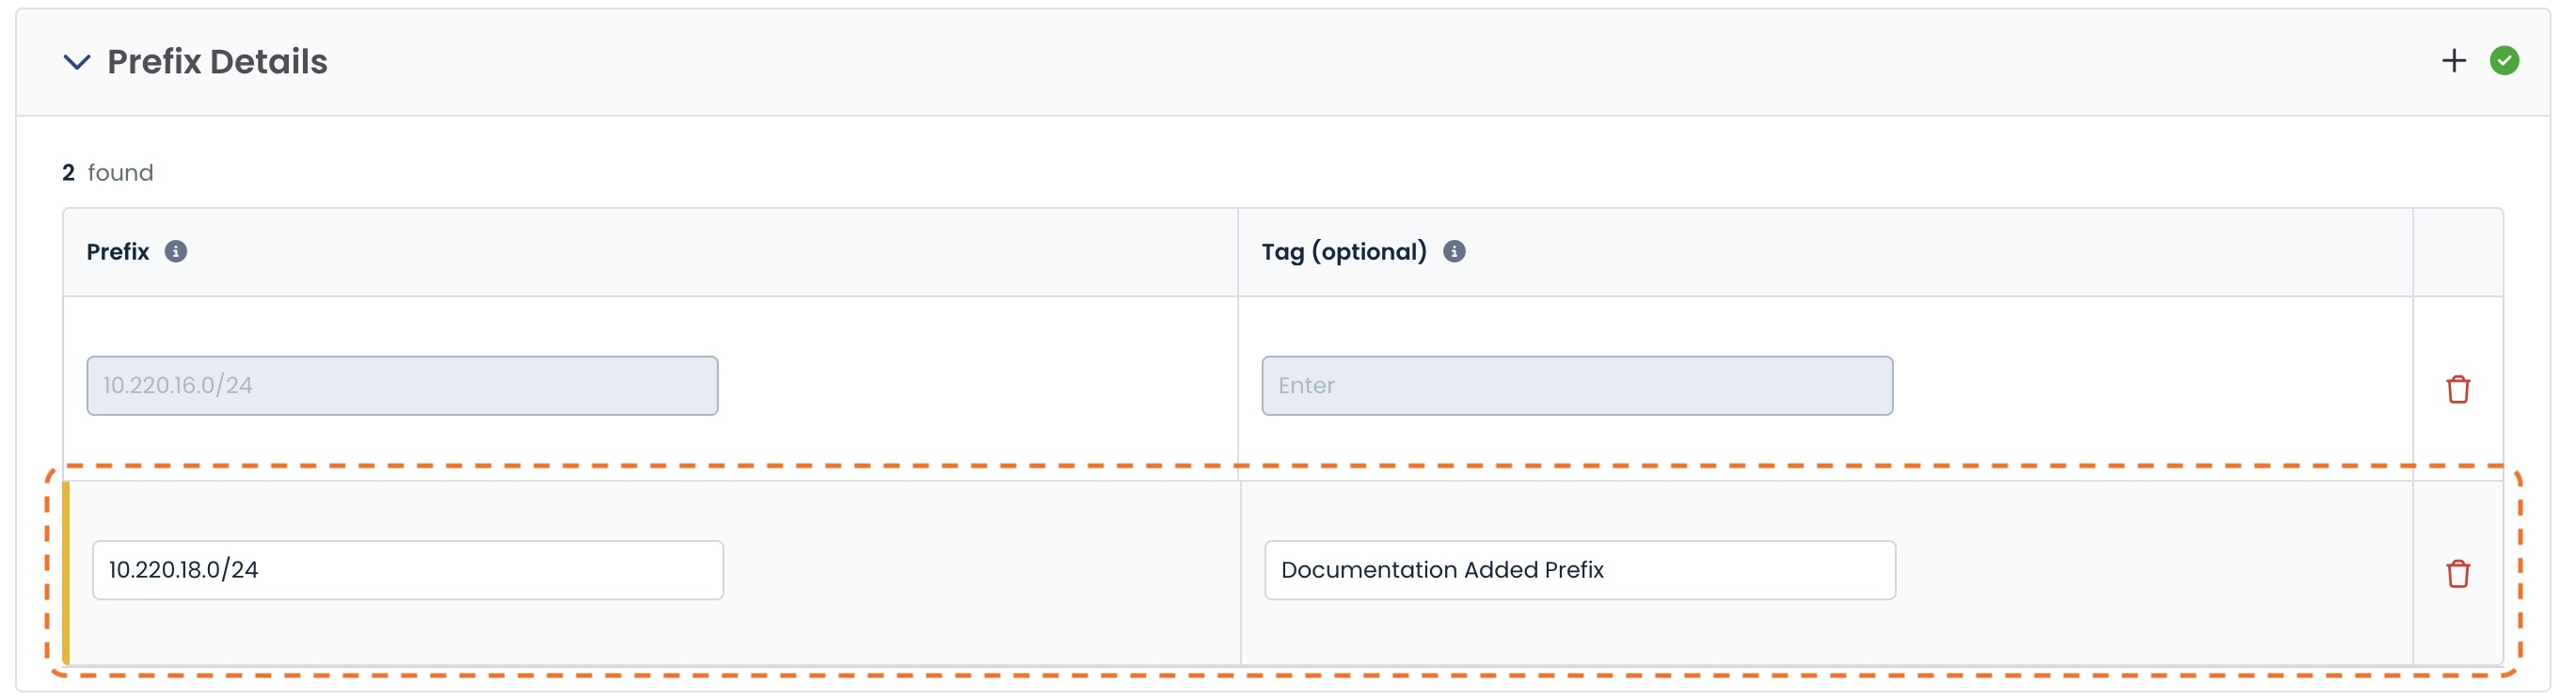
Click ‘Save Changes’.
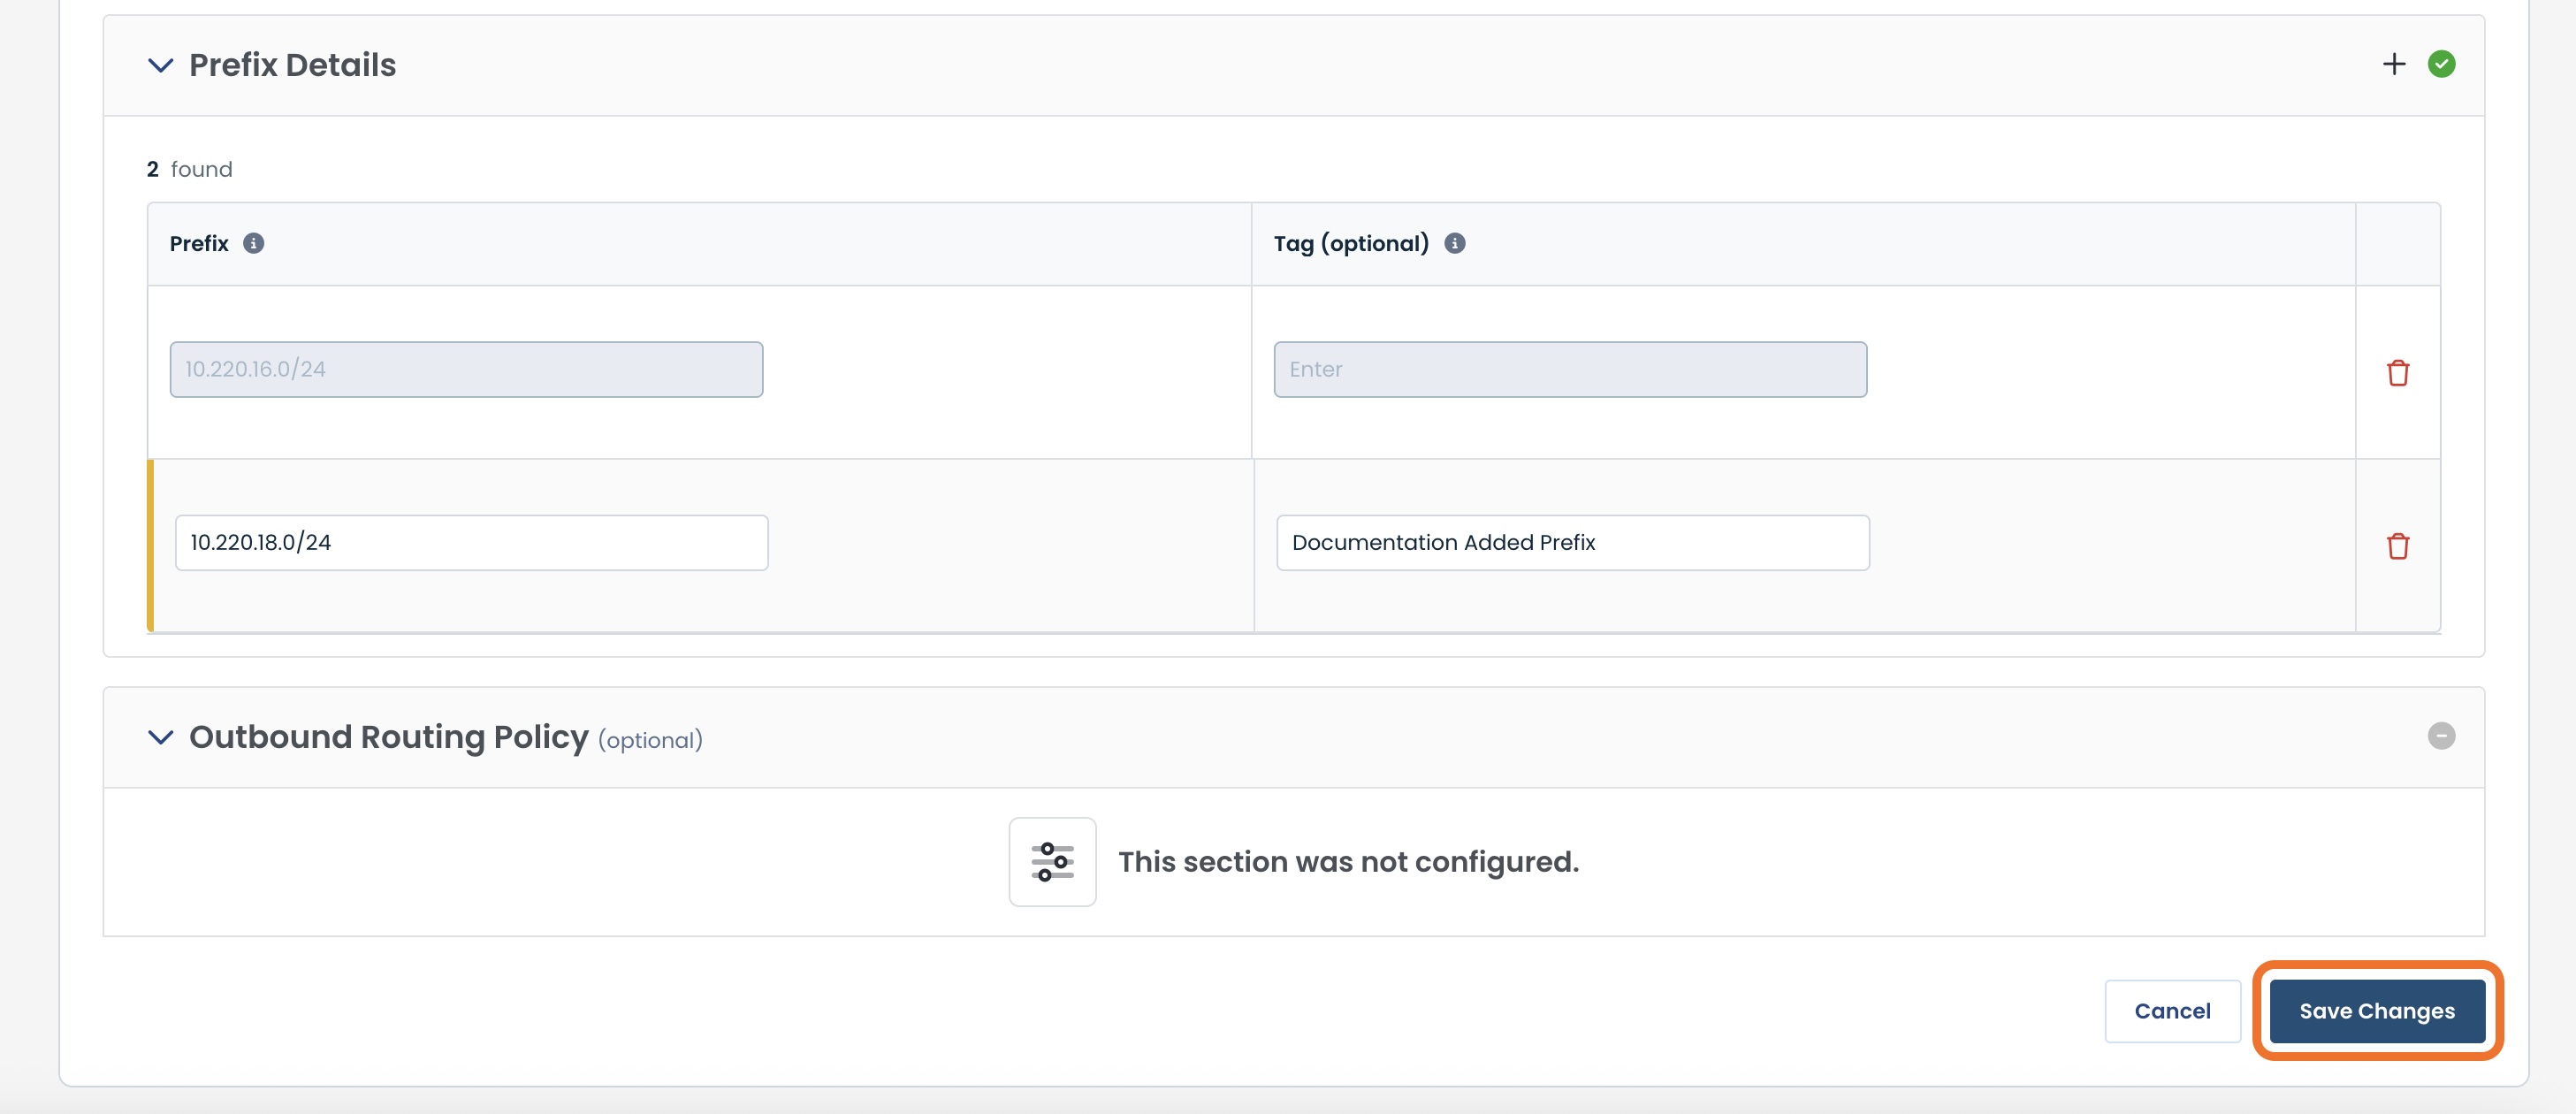
The prefix will be added, and a green banner will appear stating that the service was updated successfully.
Note:
The customer will not receive an automated notification of this change.
.jpg)
Deleting a Prefix from a Data Exchange Partner Service
Should you no longer need a prefix to be part of a Data Exchange service, click the <trash> icon to the right of that prefix.
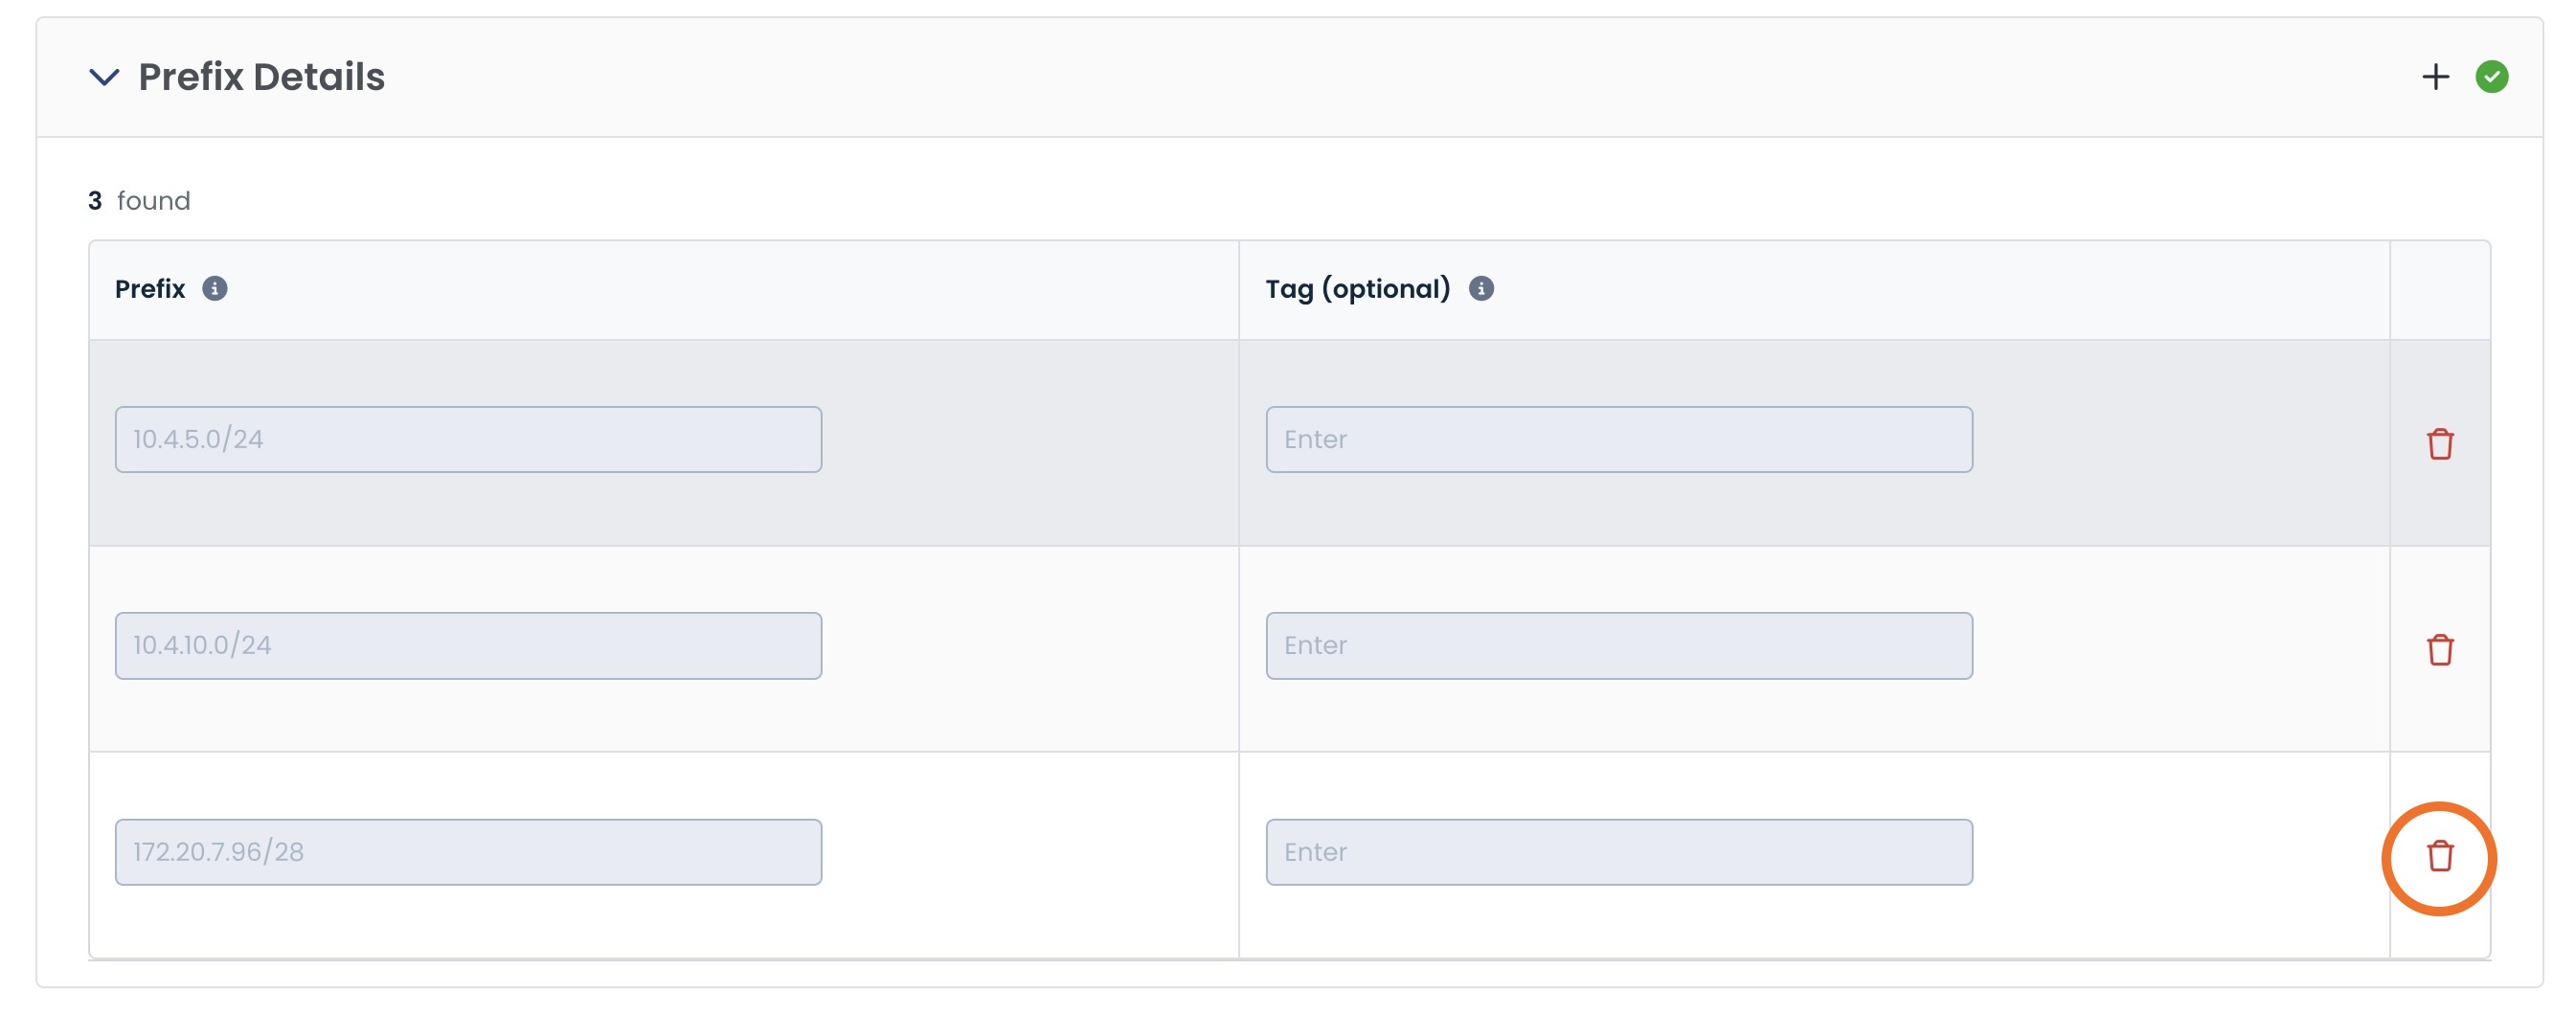
After you click the <trash> icon, that prefix will no longer appear under “Prefix Details”.
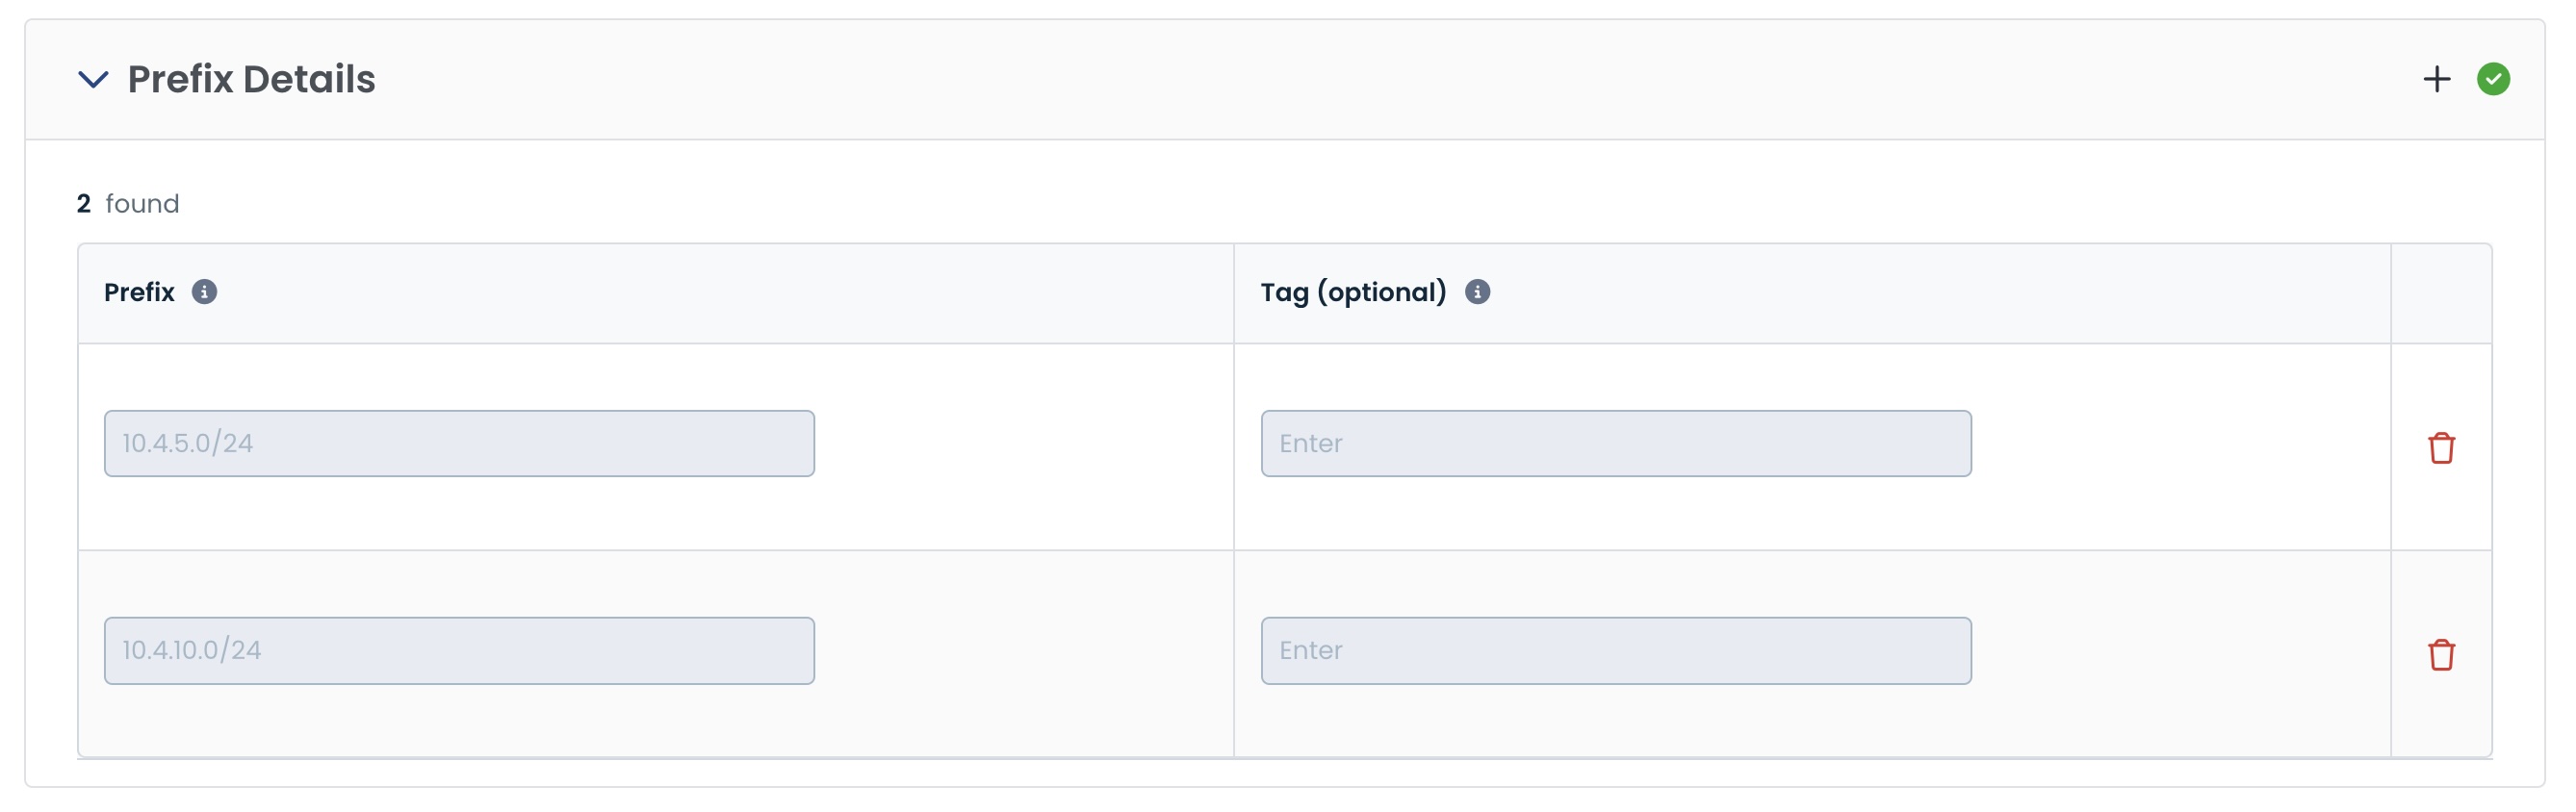
Click ‘Save Changes’.

The prefix will be deleted, and a green banner will appear stating that the service was updated successfully.
Any customers using that service will receive an email stating that changes were made to their Data Exchange service with a link for them to view the configuration changes.
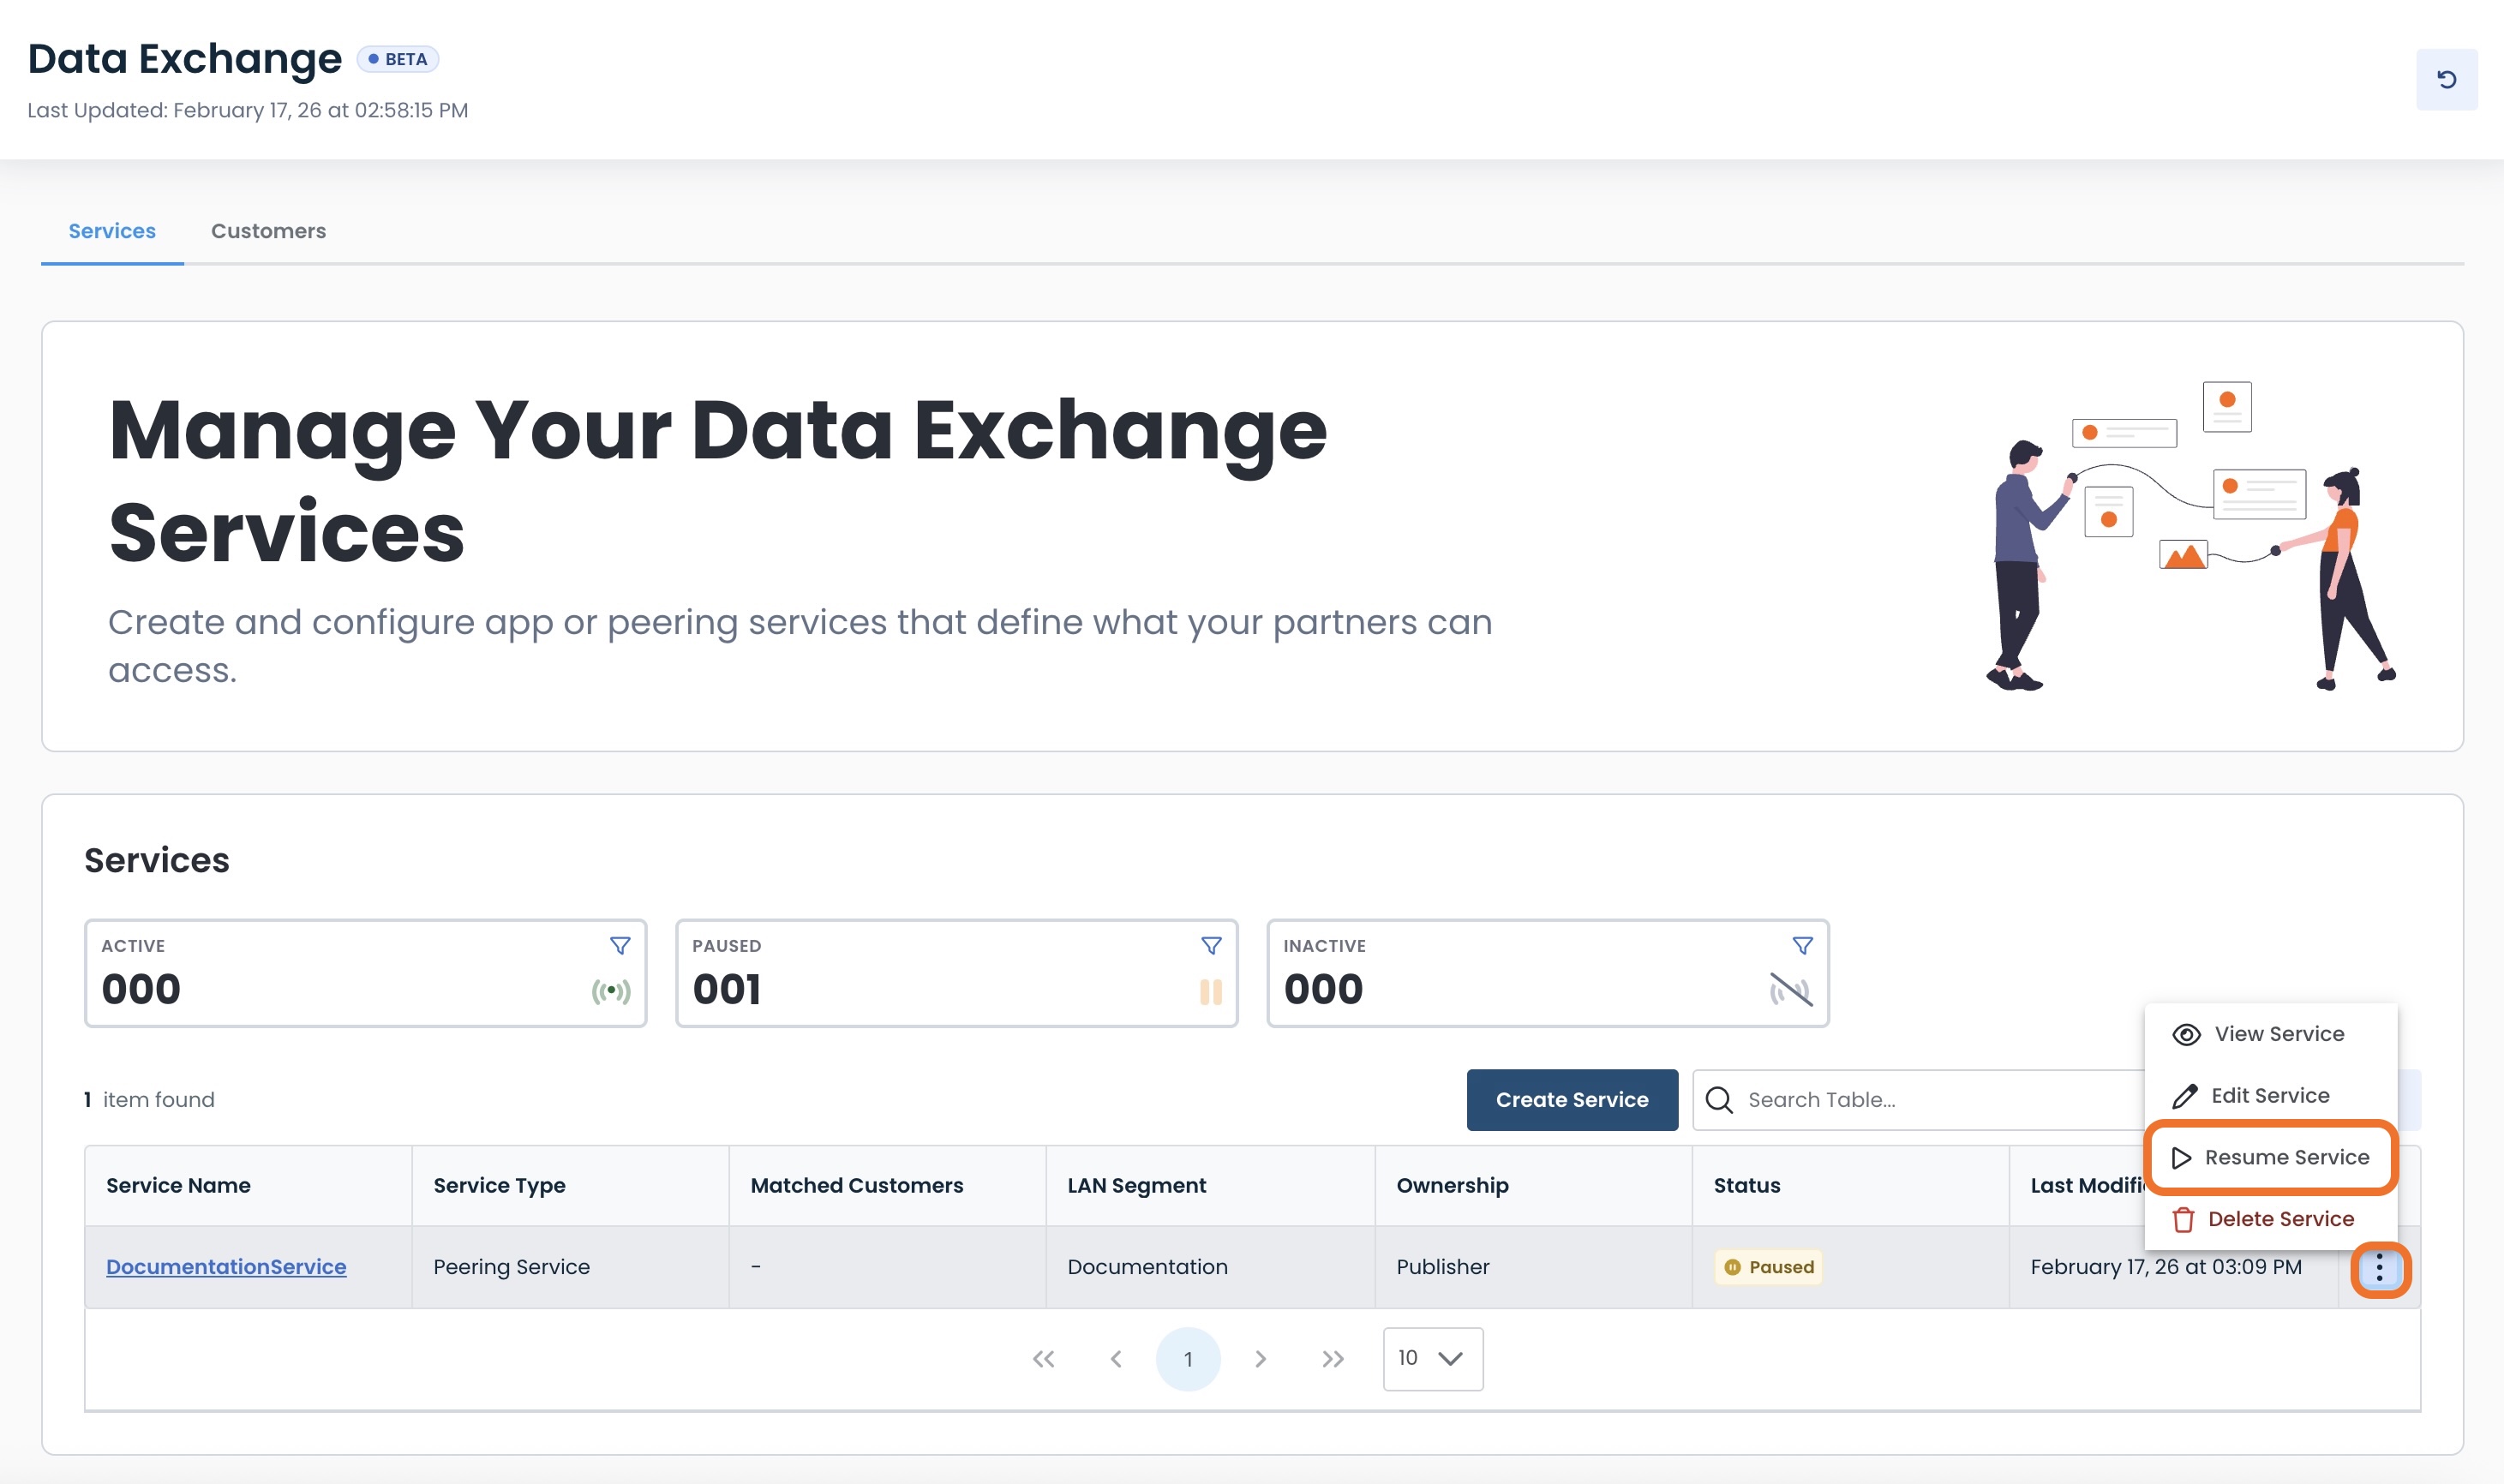
How Can I Pause a Data Exchange Partner Service?
Should you need to temporarily pause a Data Exchange service but not delete it, click the ellipses to the right of the desired service; select ‘Pause Service’.
Pausing the Data Exchange Service will stop all active connections for its assigned customers:
Those customers will not be able to access the service until it is resumed
Configurations will not be deleted
Customer associations will not be deleted
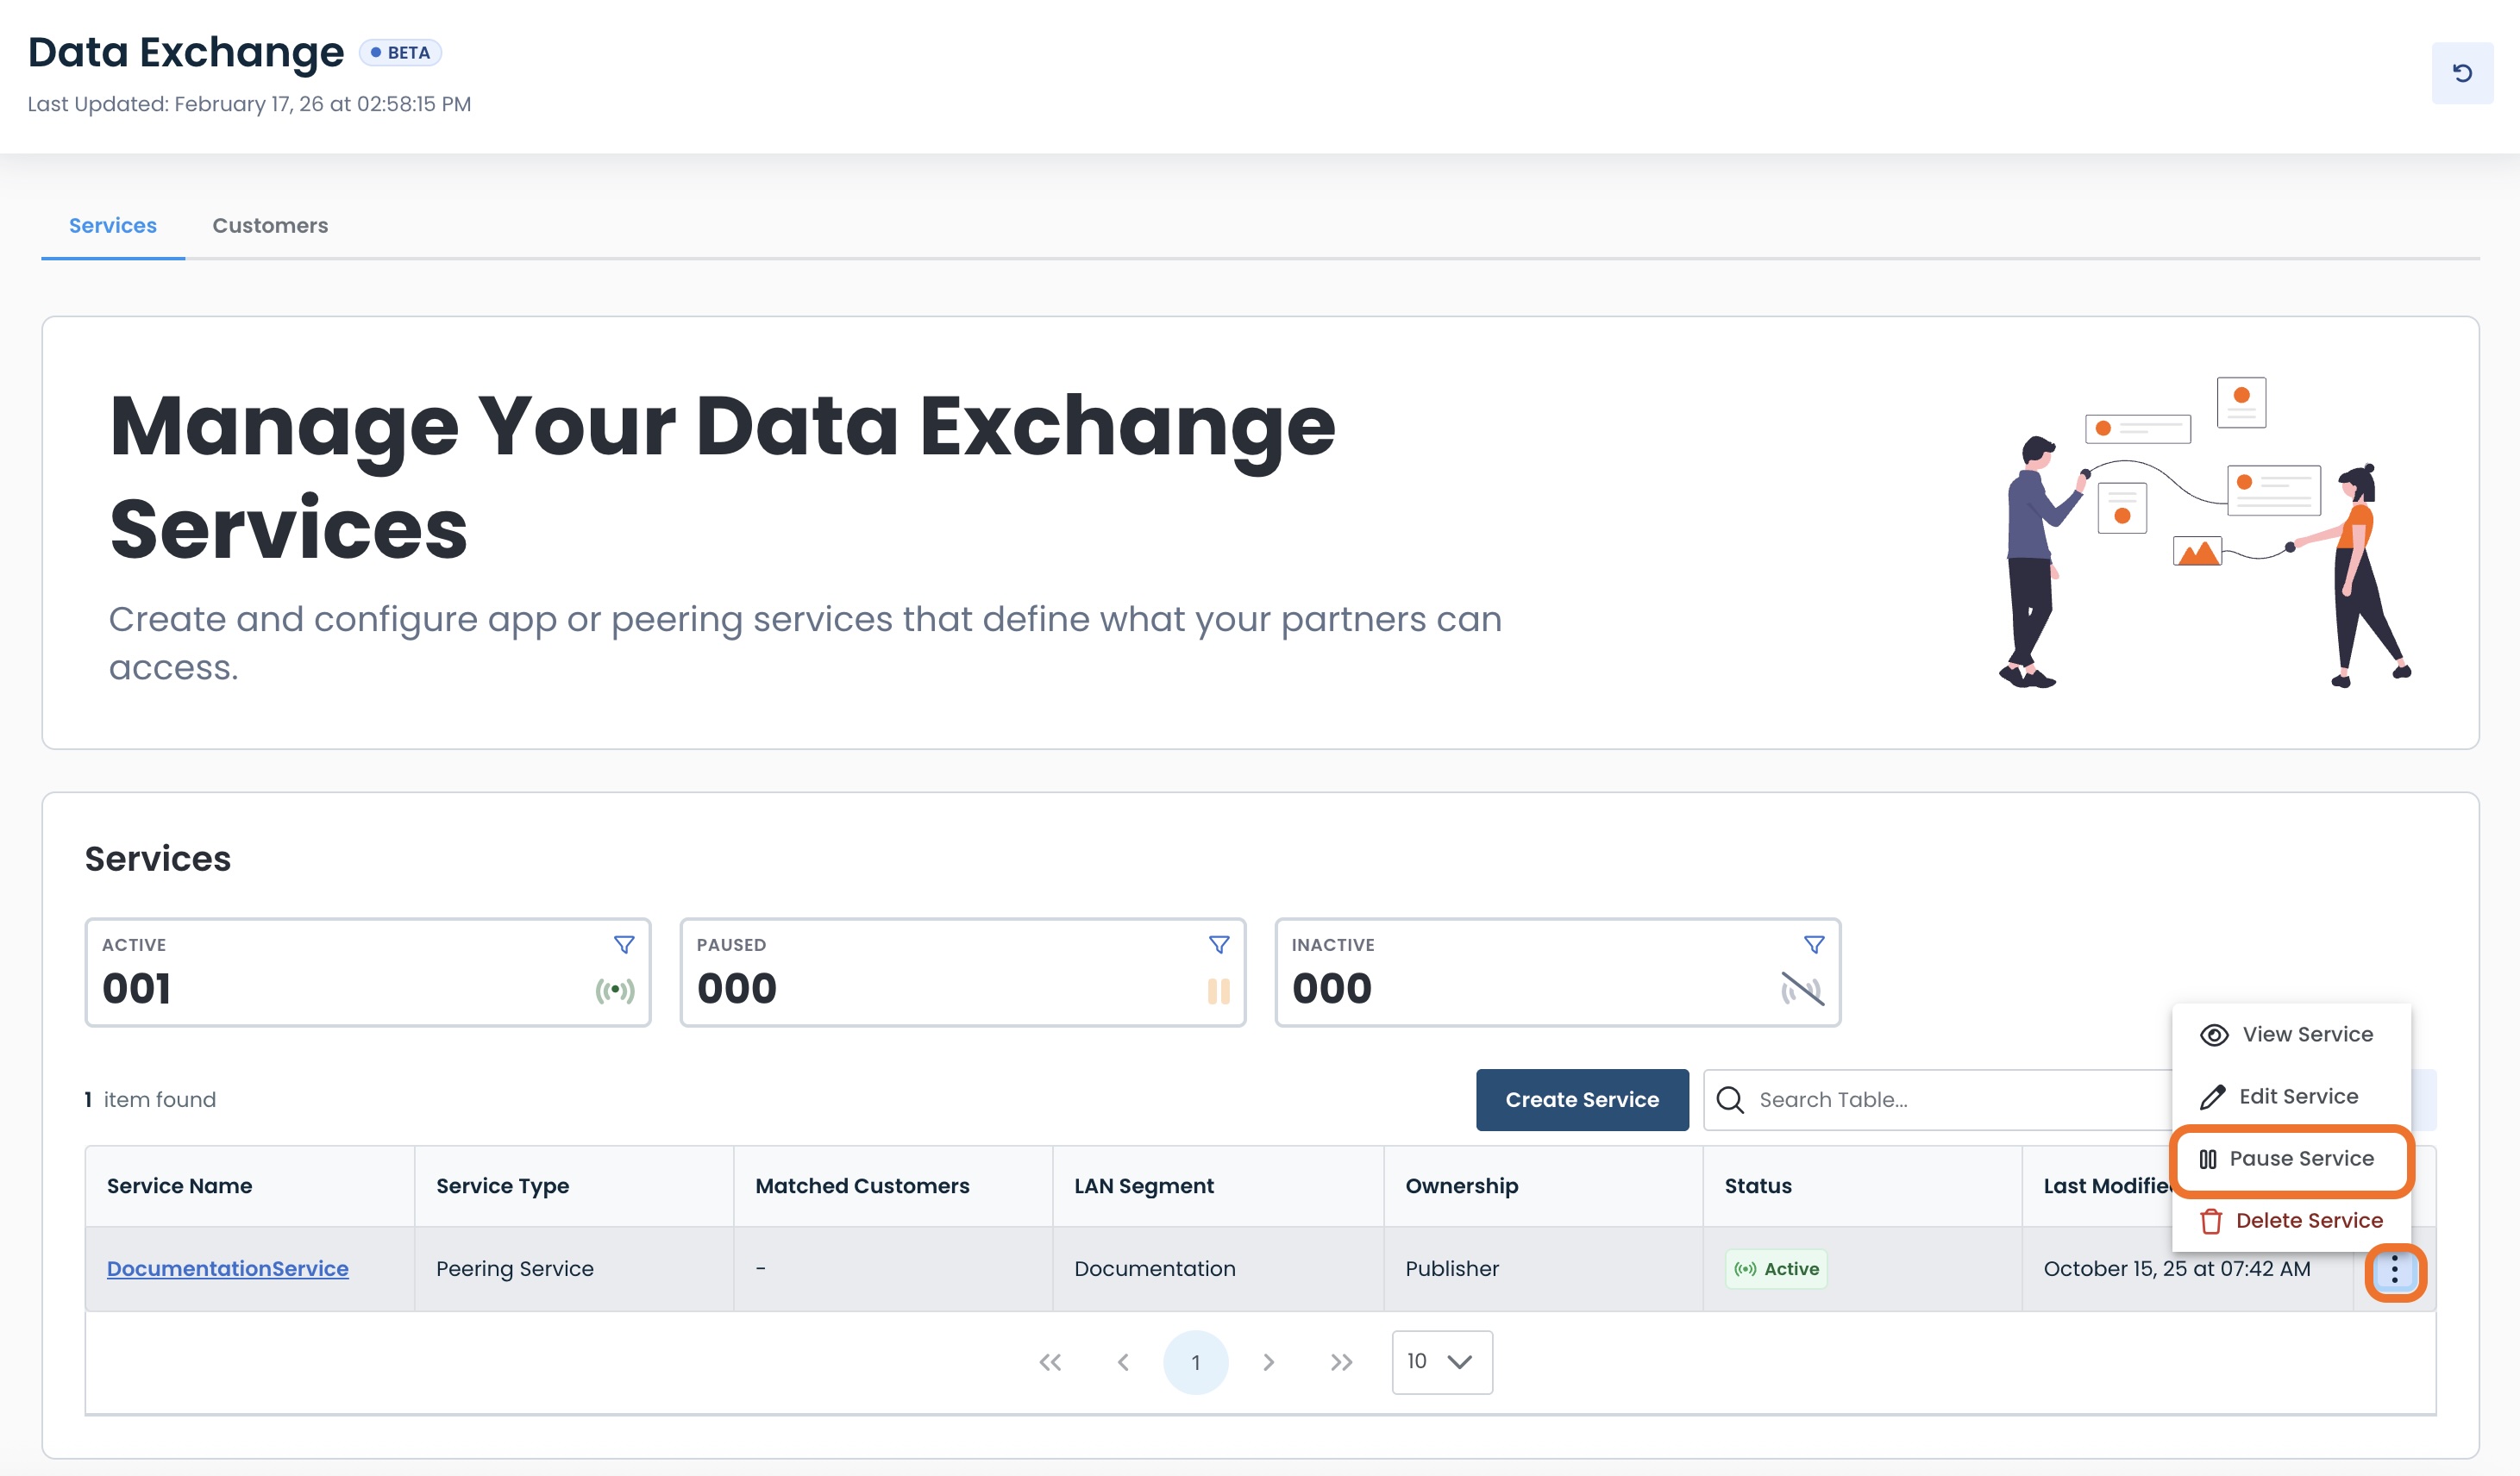
A modal will appear to confirm that you do want to stop all active connections for assigned customers.
Click ‘Pause Service’.
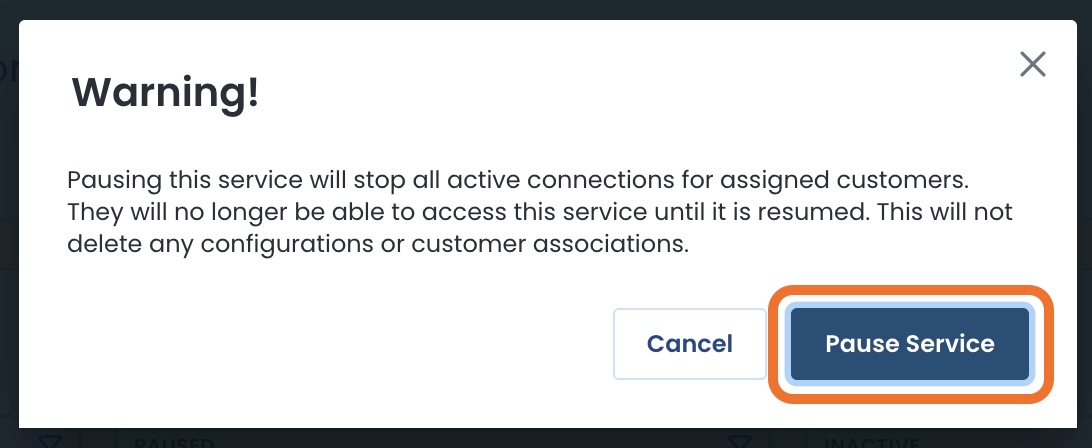
The Data Exchange Service will now show as '“Paused”, and a green banner will appear stating that the service was paused successfully.
.jpg)
How Do I Resume a Paused Data Exchange Partner Service?
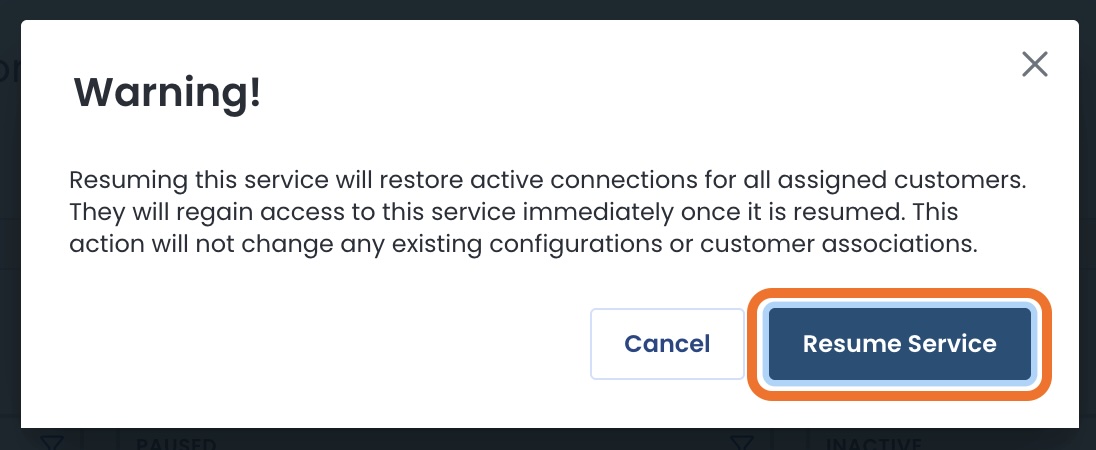
To resume a Data Exchange Service that was previously paused, click the ellipses next to the paused service; select ‘Resume Service’.
Note:
Once resumed, the Data Exchange Service will be active immediately for all assigned customers.
A modal will appear to confirm that you do want to restore all active connections for assigned customers.
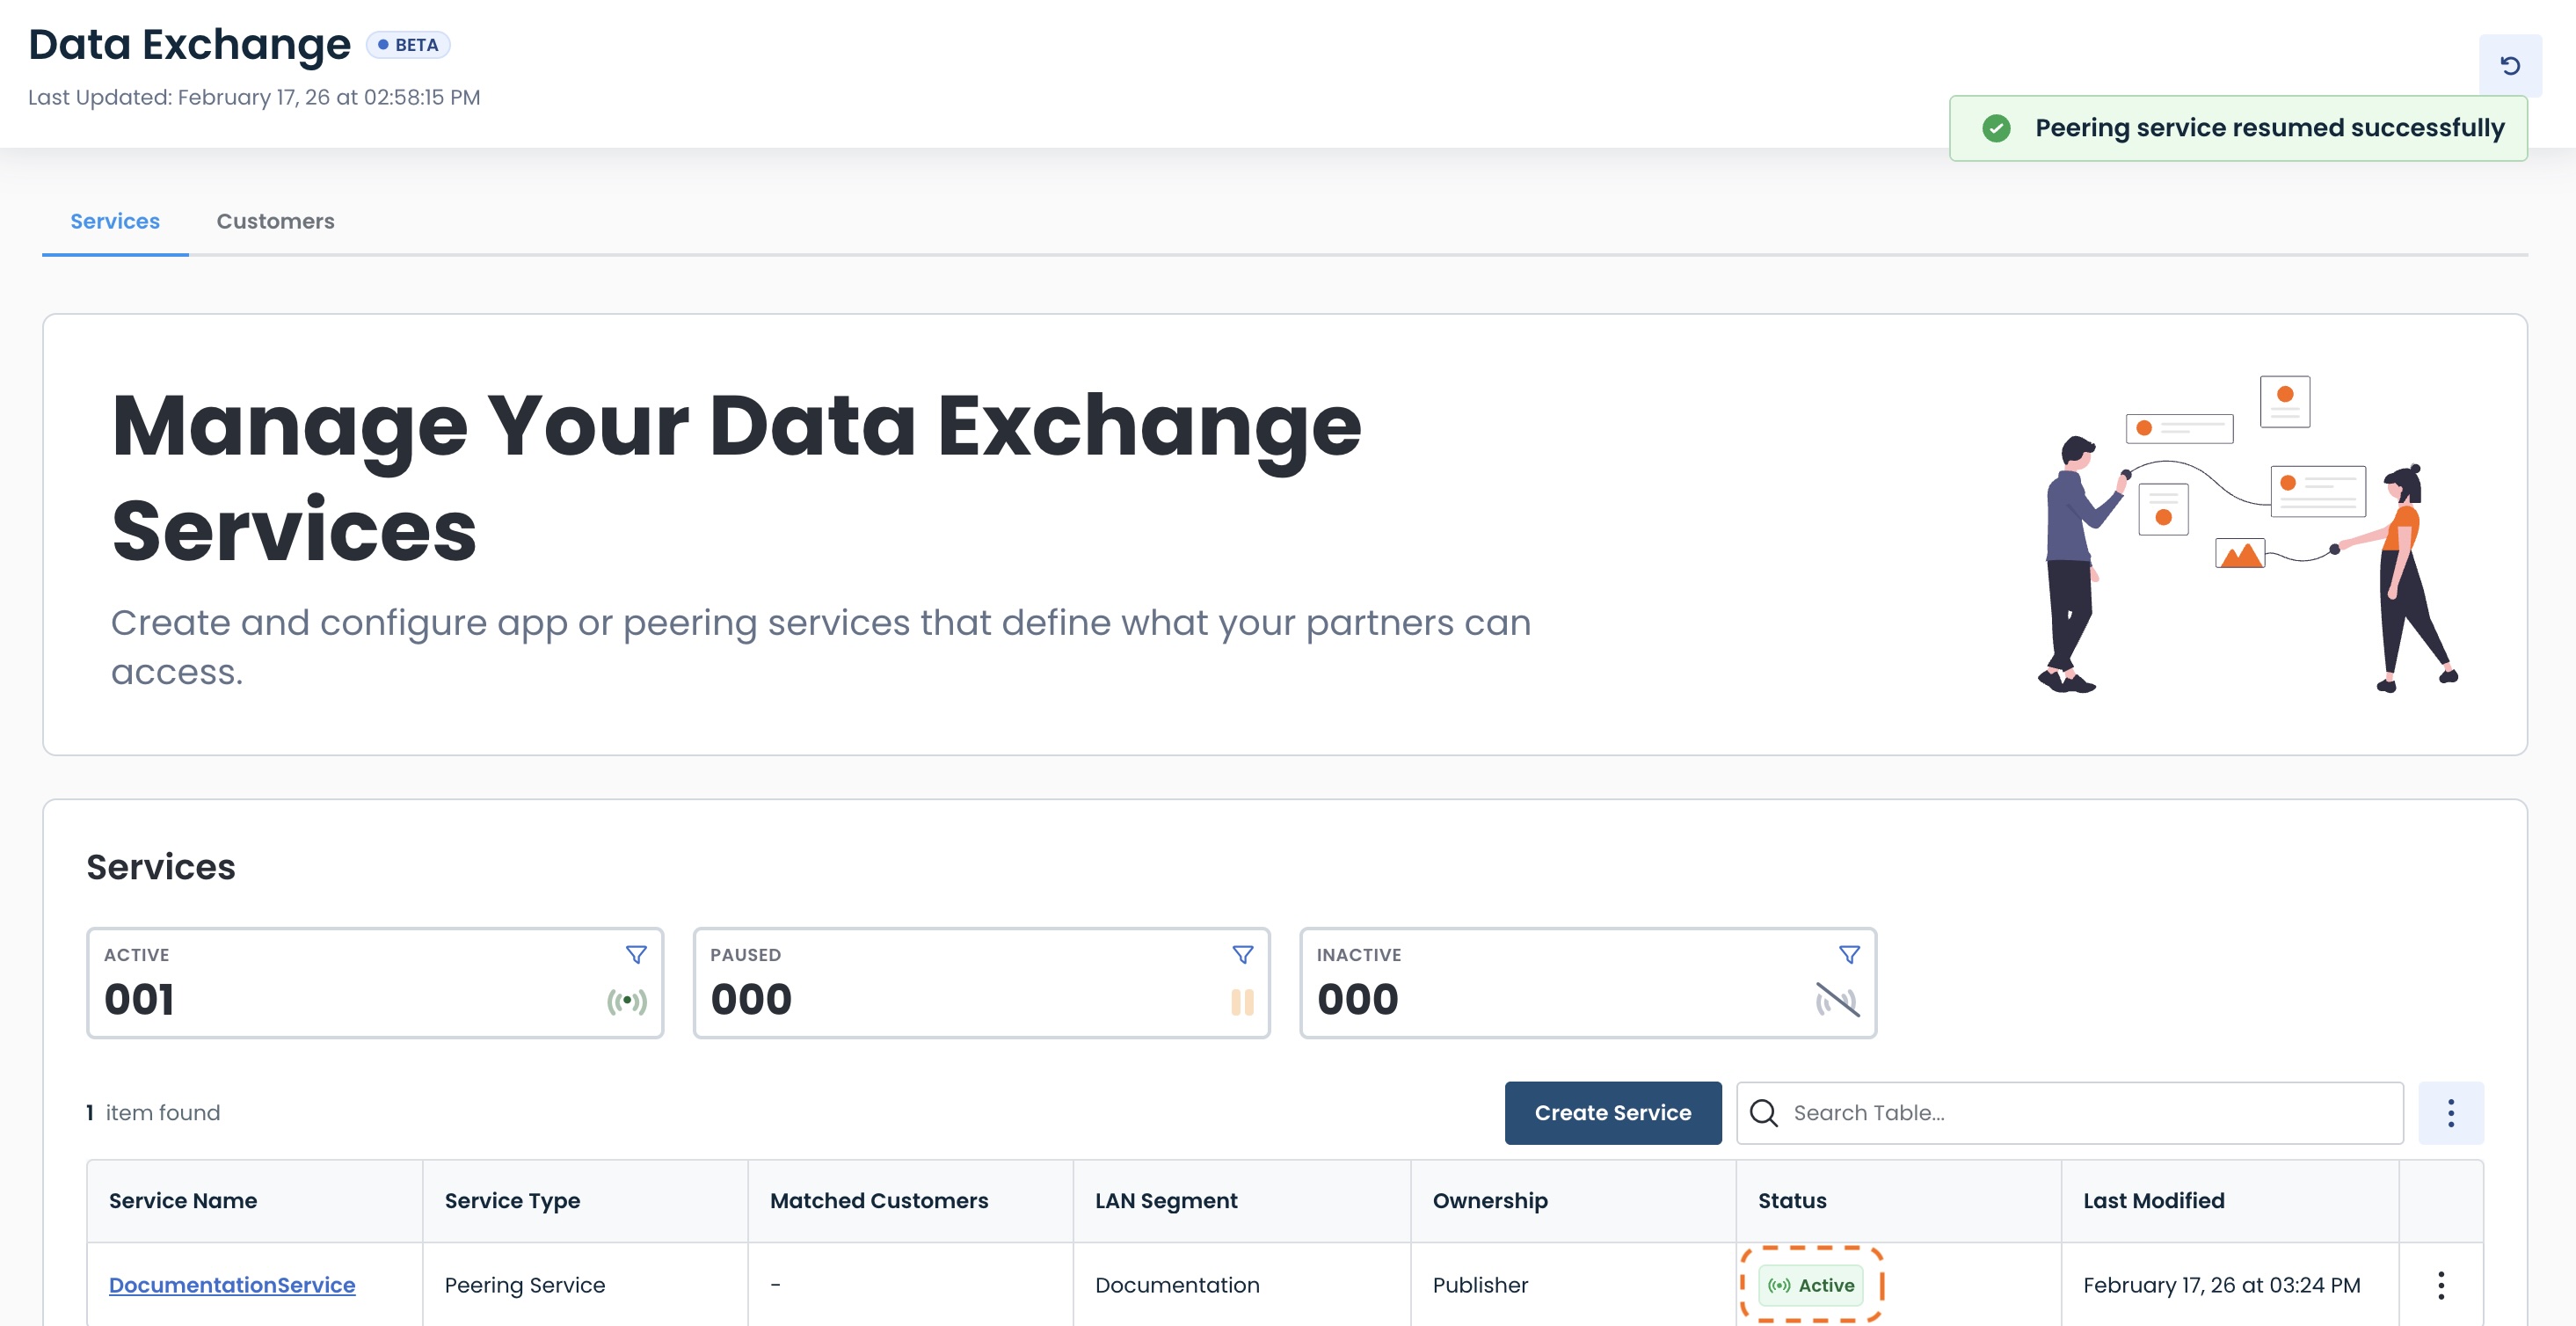
The Data Exchange Service will again now show as '“Active”, and a green banner will appear stating that the service was resumed successfully.
Creating a Customer
Now it is time to add to your customer inventory, from which you can select to permit access to your services.
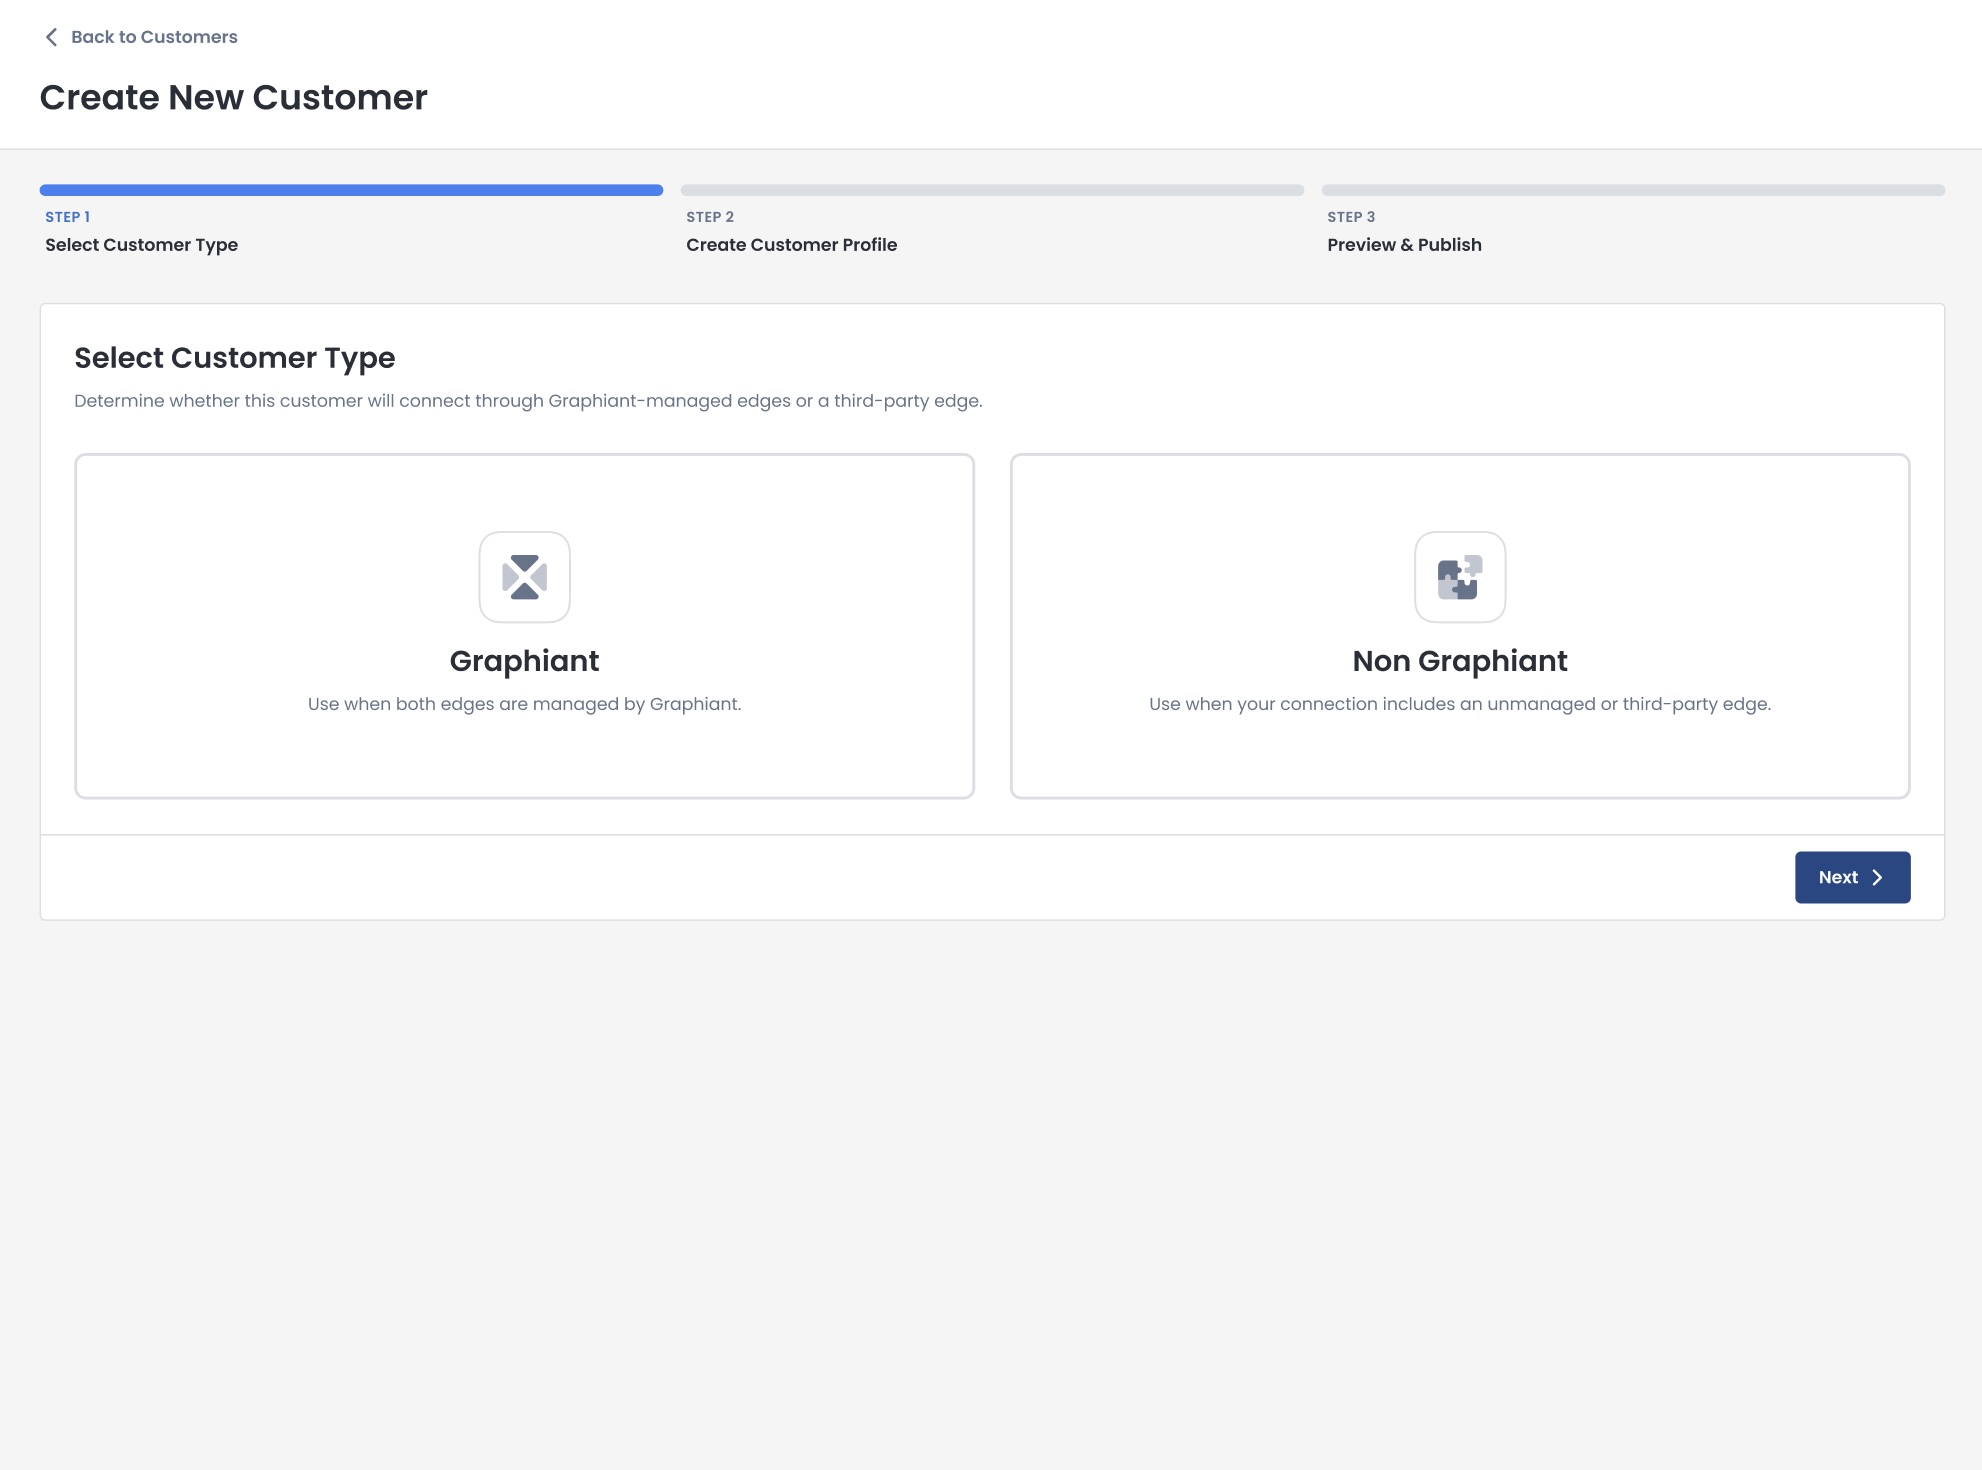
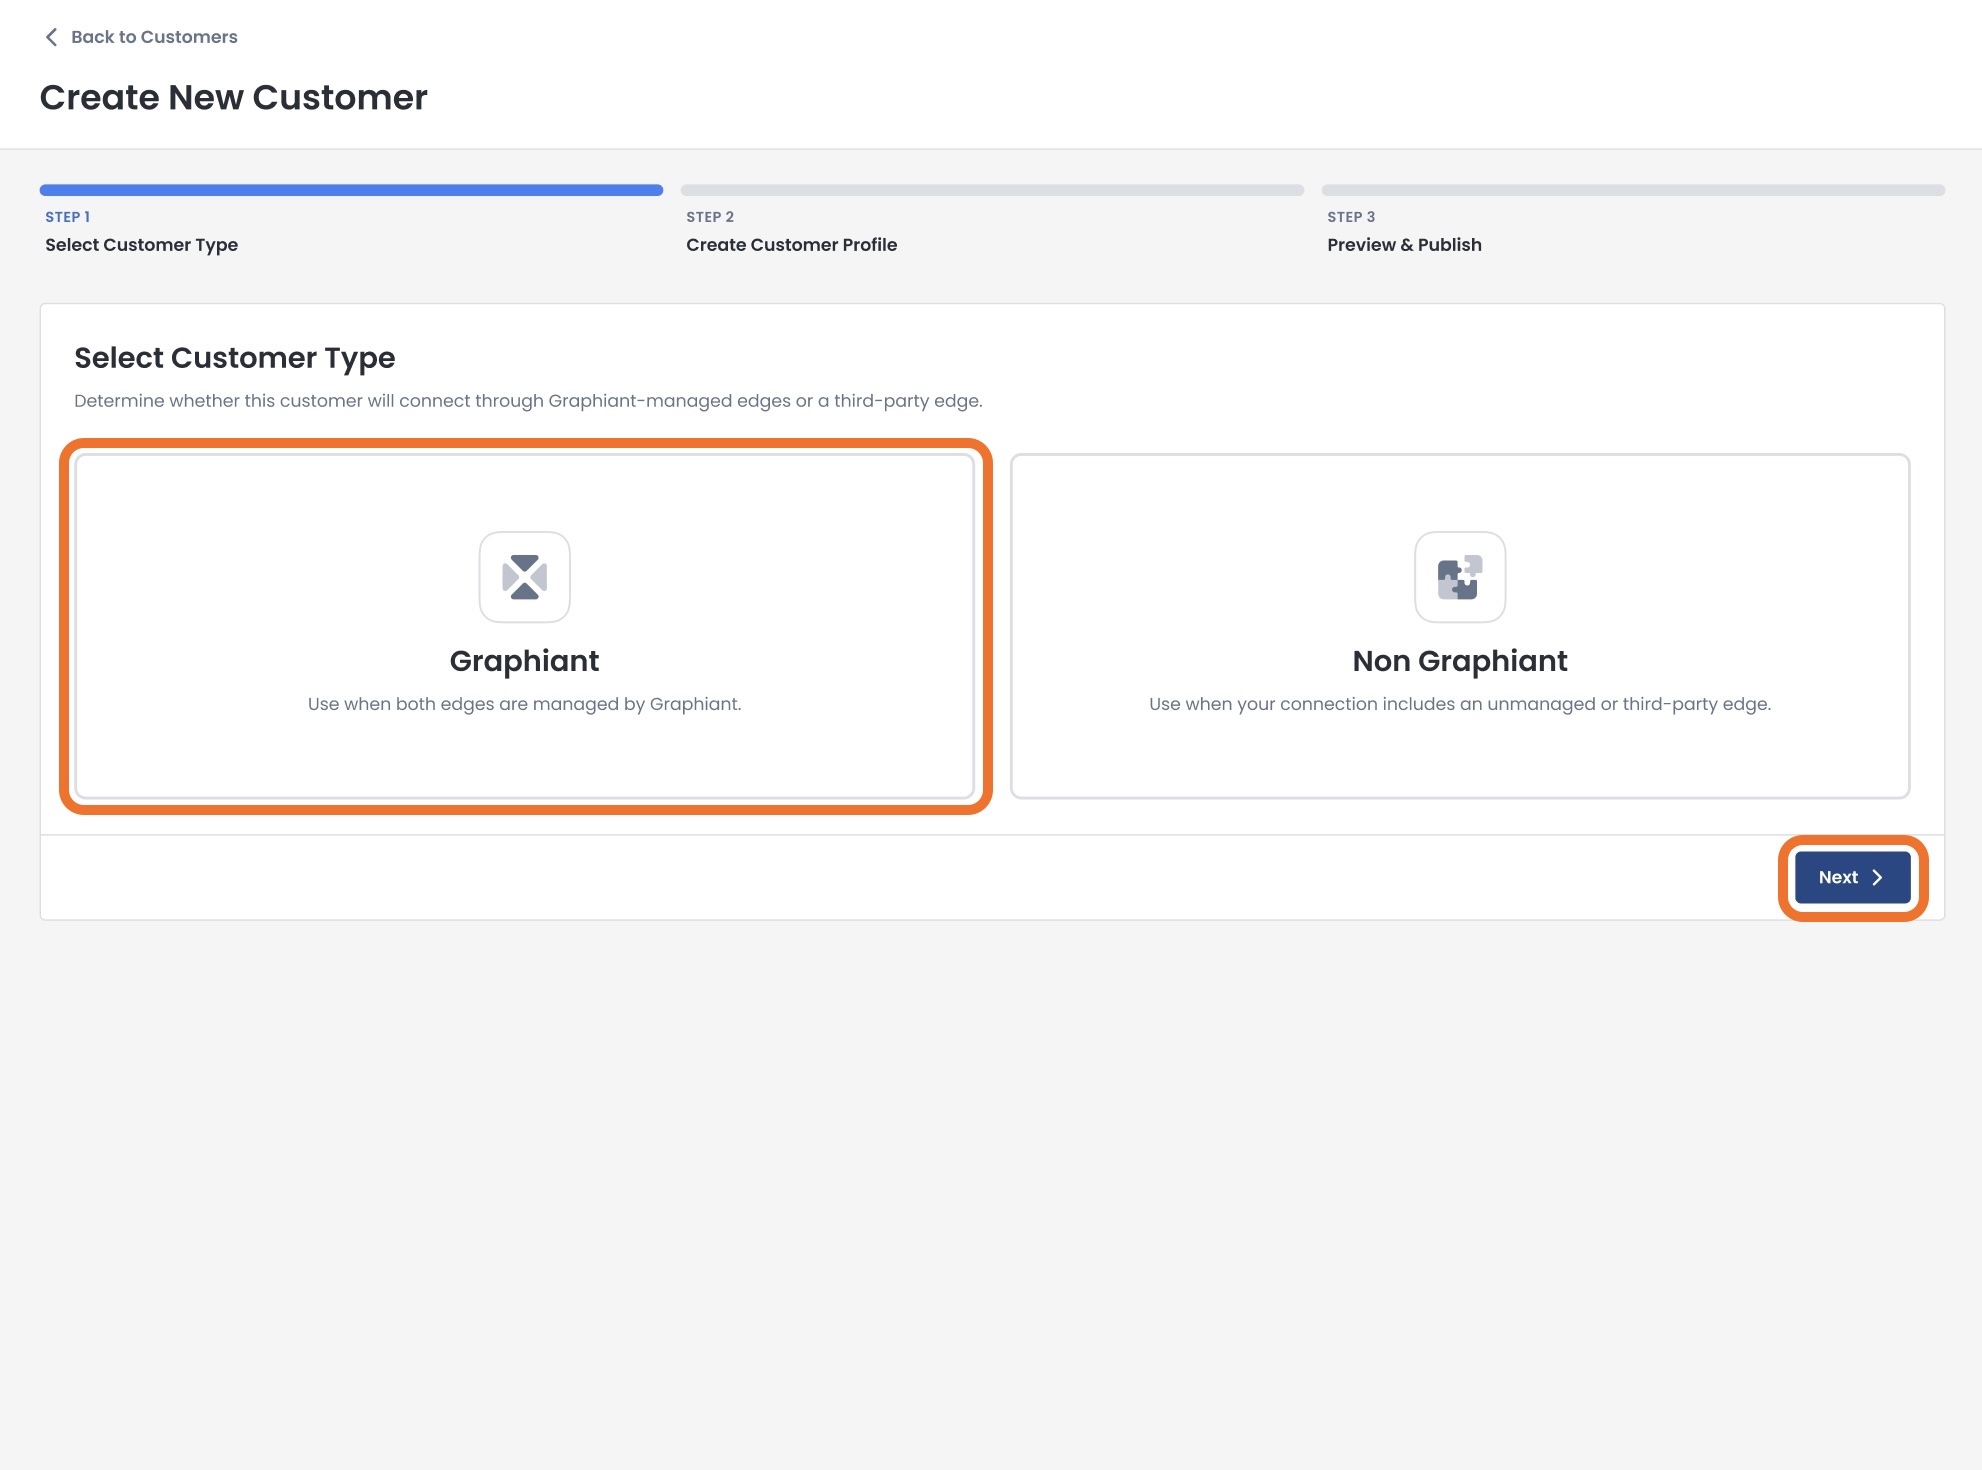
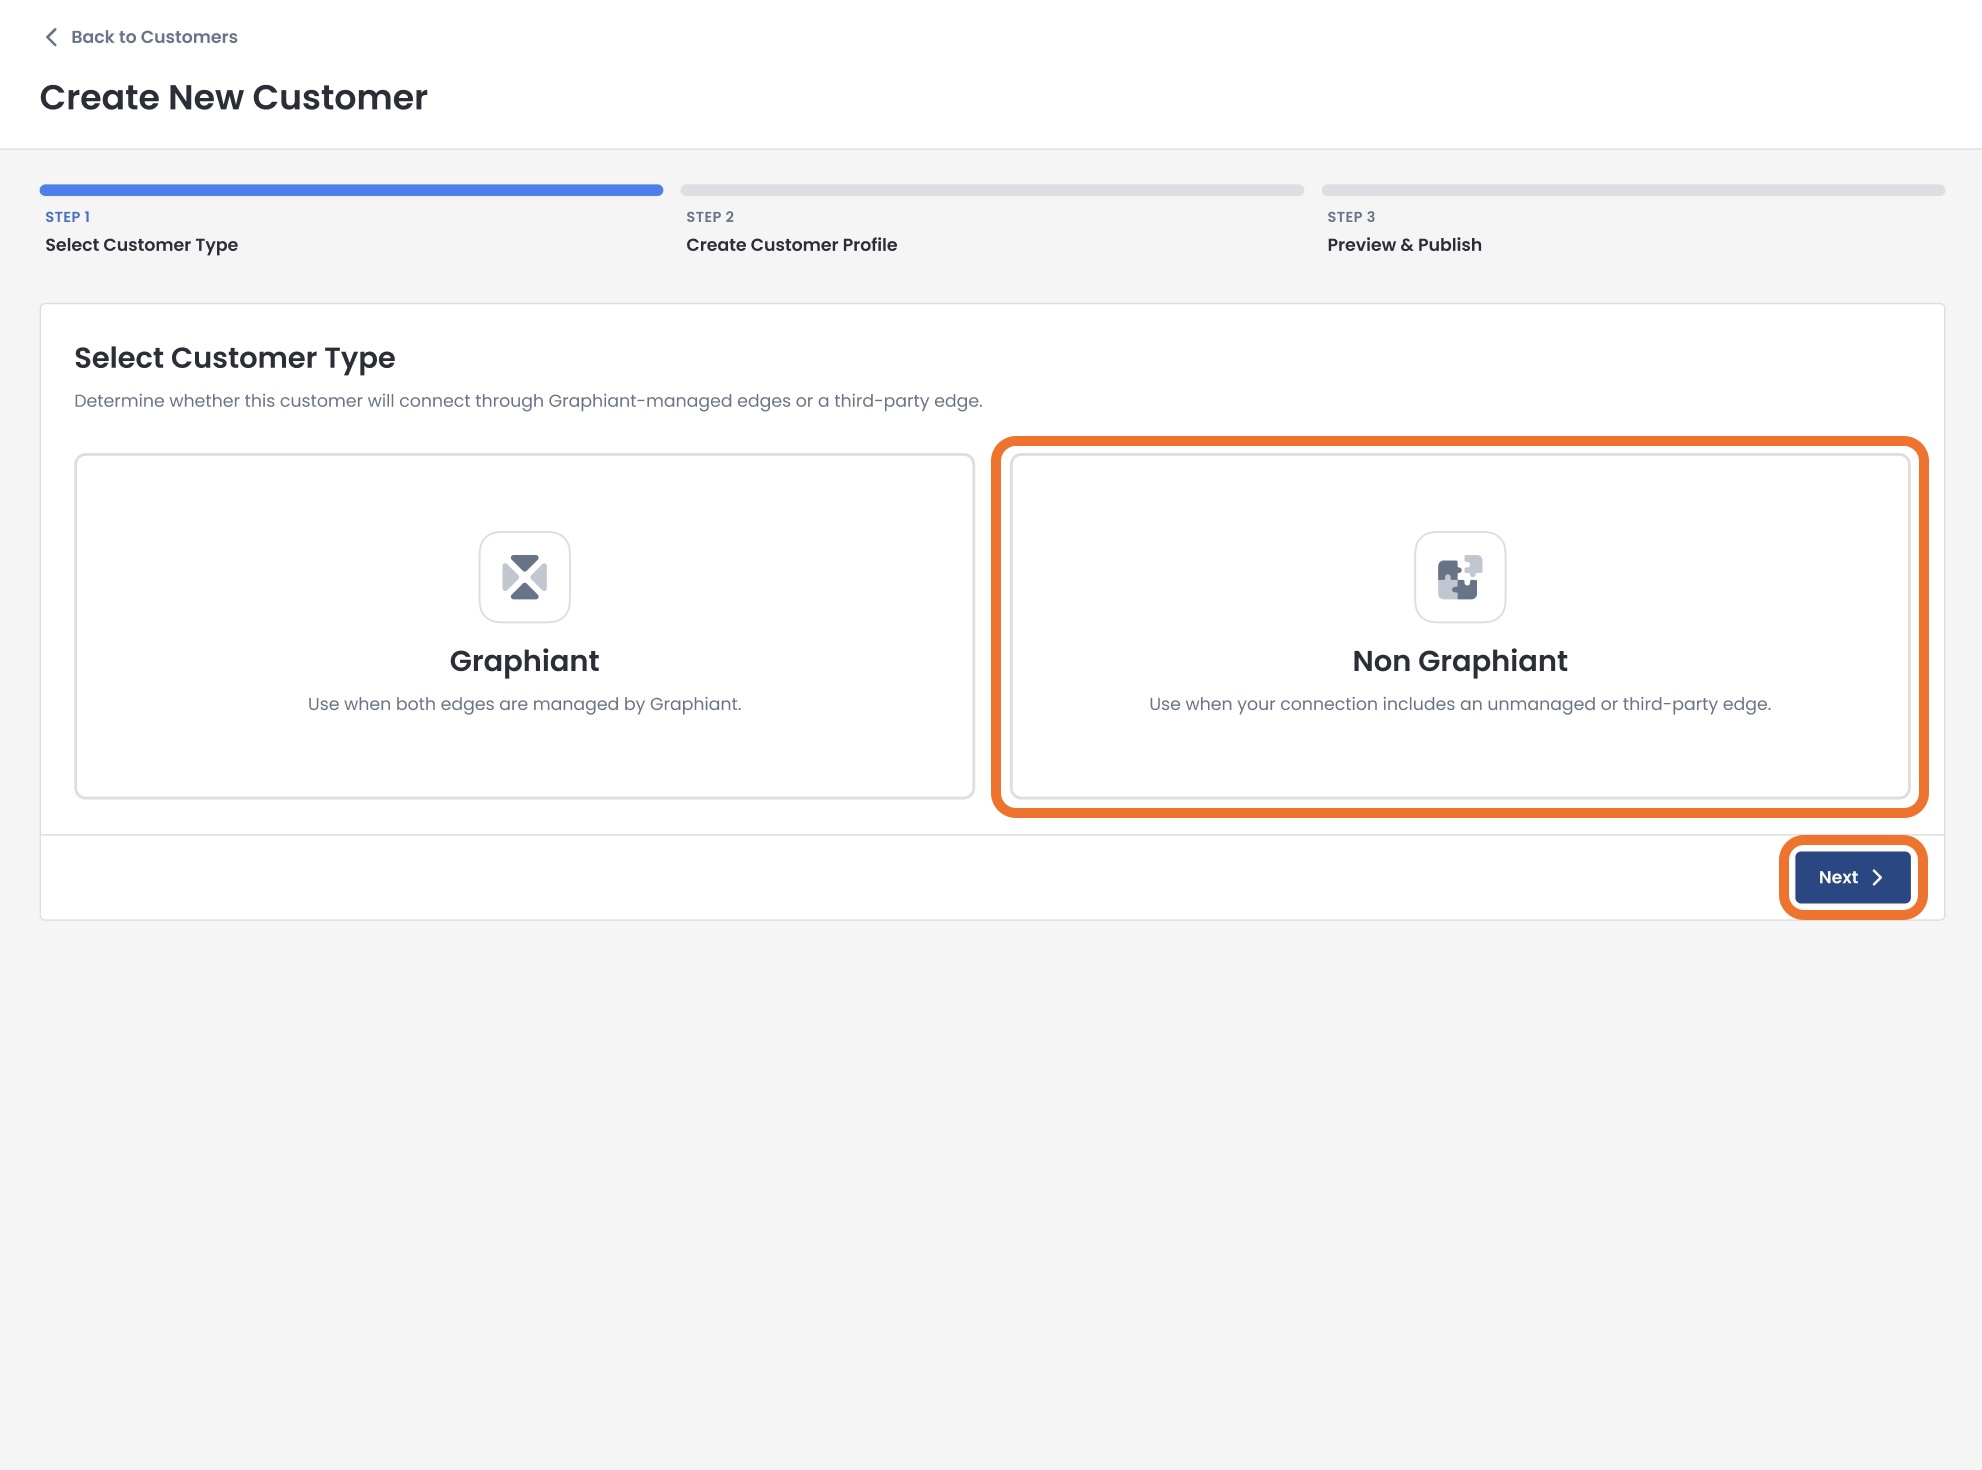
When you start the process of creating a customer, you can choose to connect to:
Graphiant customer: Business who is also on the Graphiant network
Non-Graphiant customer: Business who has an unmanaged or third-party edge device
Creating a Graphiant Customer
To begin the process of adding a customer who is also on the Graphiant network, select Customer Type of ‘Graphiant’; click ‘Next’.
Enter the following information:
Customer Name: Unique name for this customer
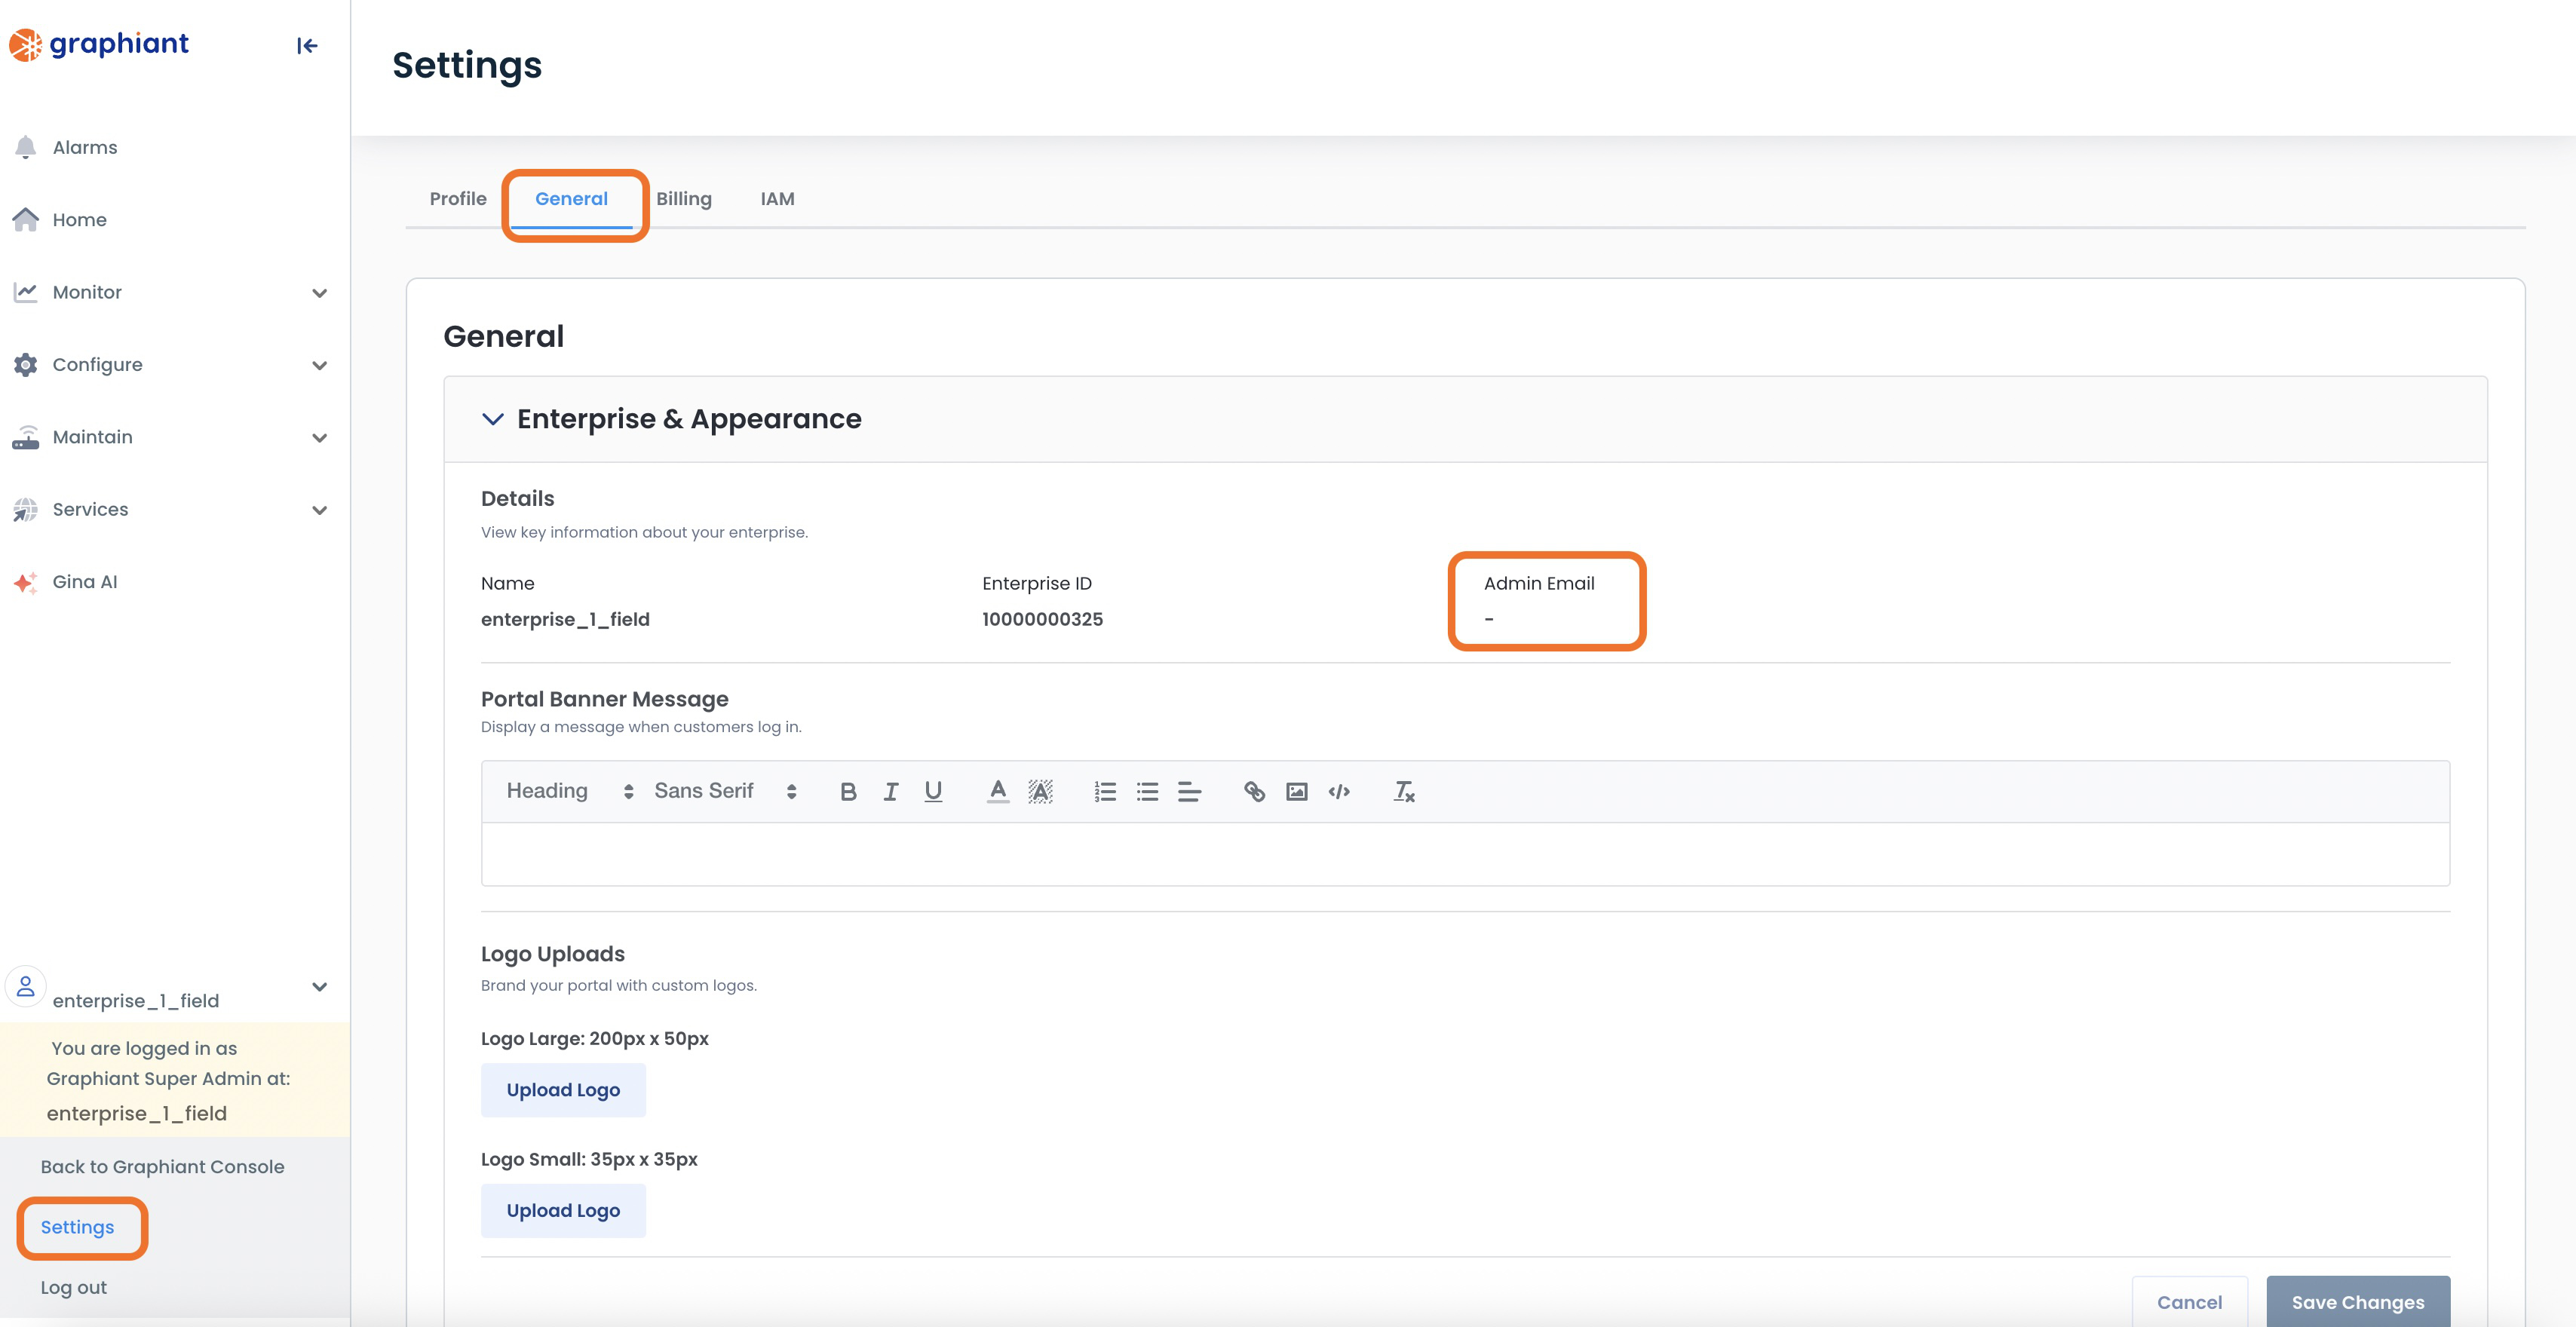
Email(s): Owner admin contact email(s)
Only the owner of the tenant will be able to accept the Data Exchange invitation:
Ensure that you enter the correct email for that individual.
You can find it in this location in your Settings:
Settings => General => ‘Admin Email’ field
Max # of Sites: Limited number of sites you will allow this customer to onboard
Click ‘Next’.
Review your selections.
Once you have ensured that everything is correct, click ‘Create Customer’.
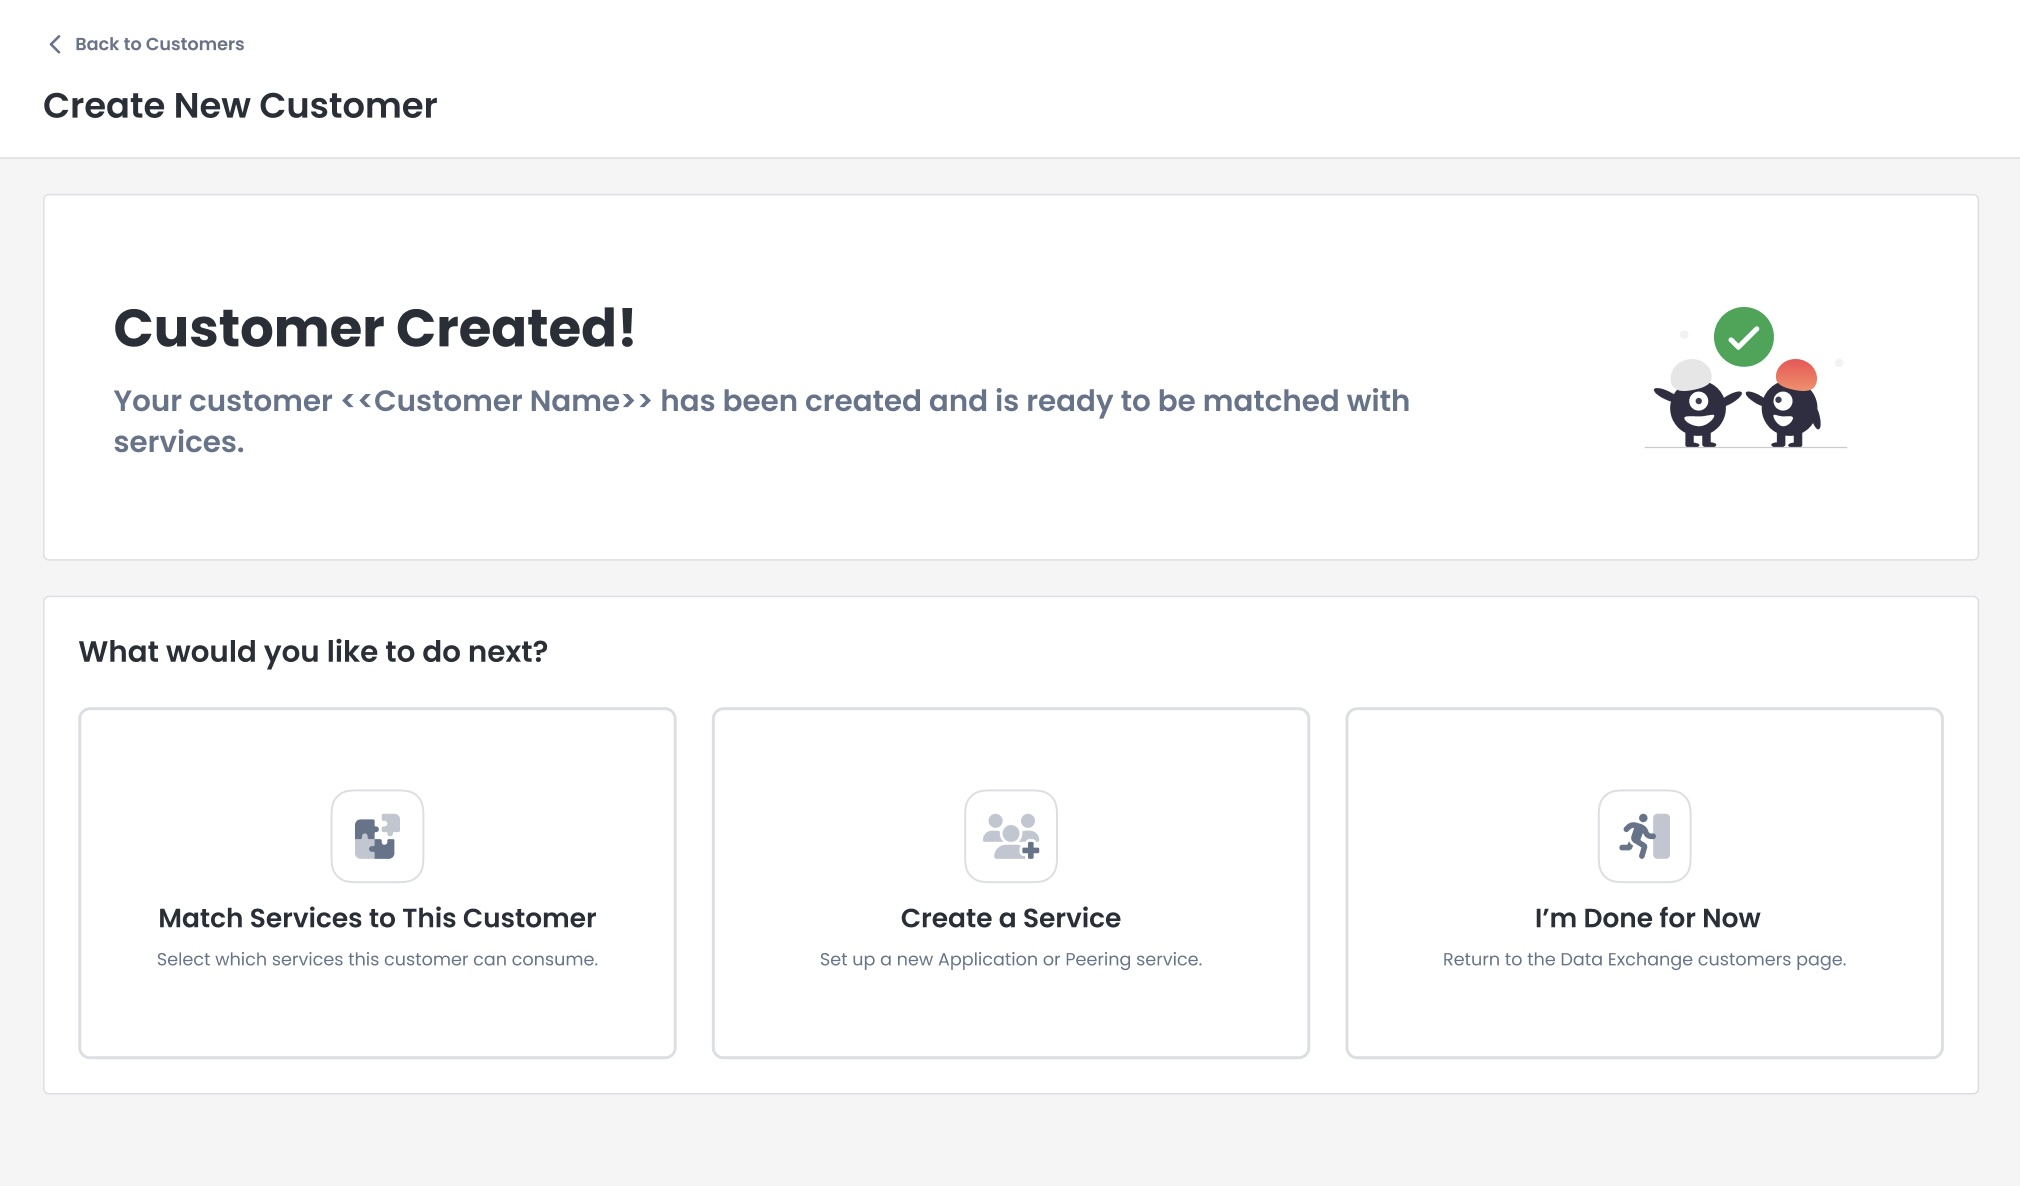
You will receive a confirmation that your customer was created!
From here, you can either:
Exit to the Data Exchange customers page
Match Services to this customer
Create another service for your inventory
Creating a Non-Graphiant Customer
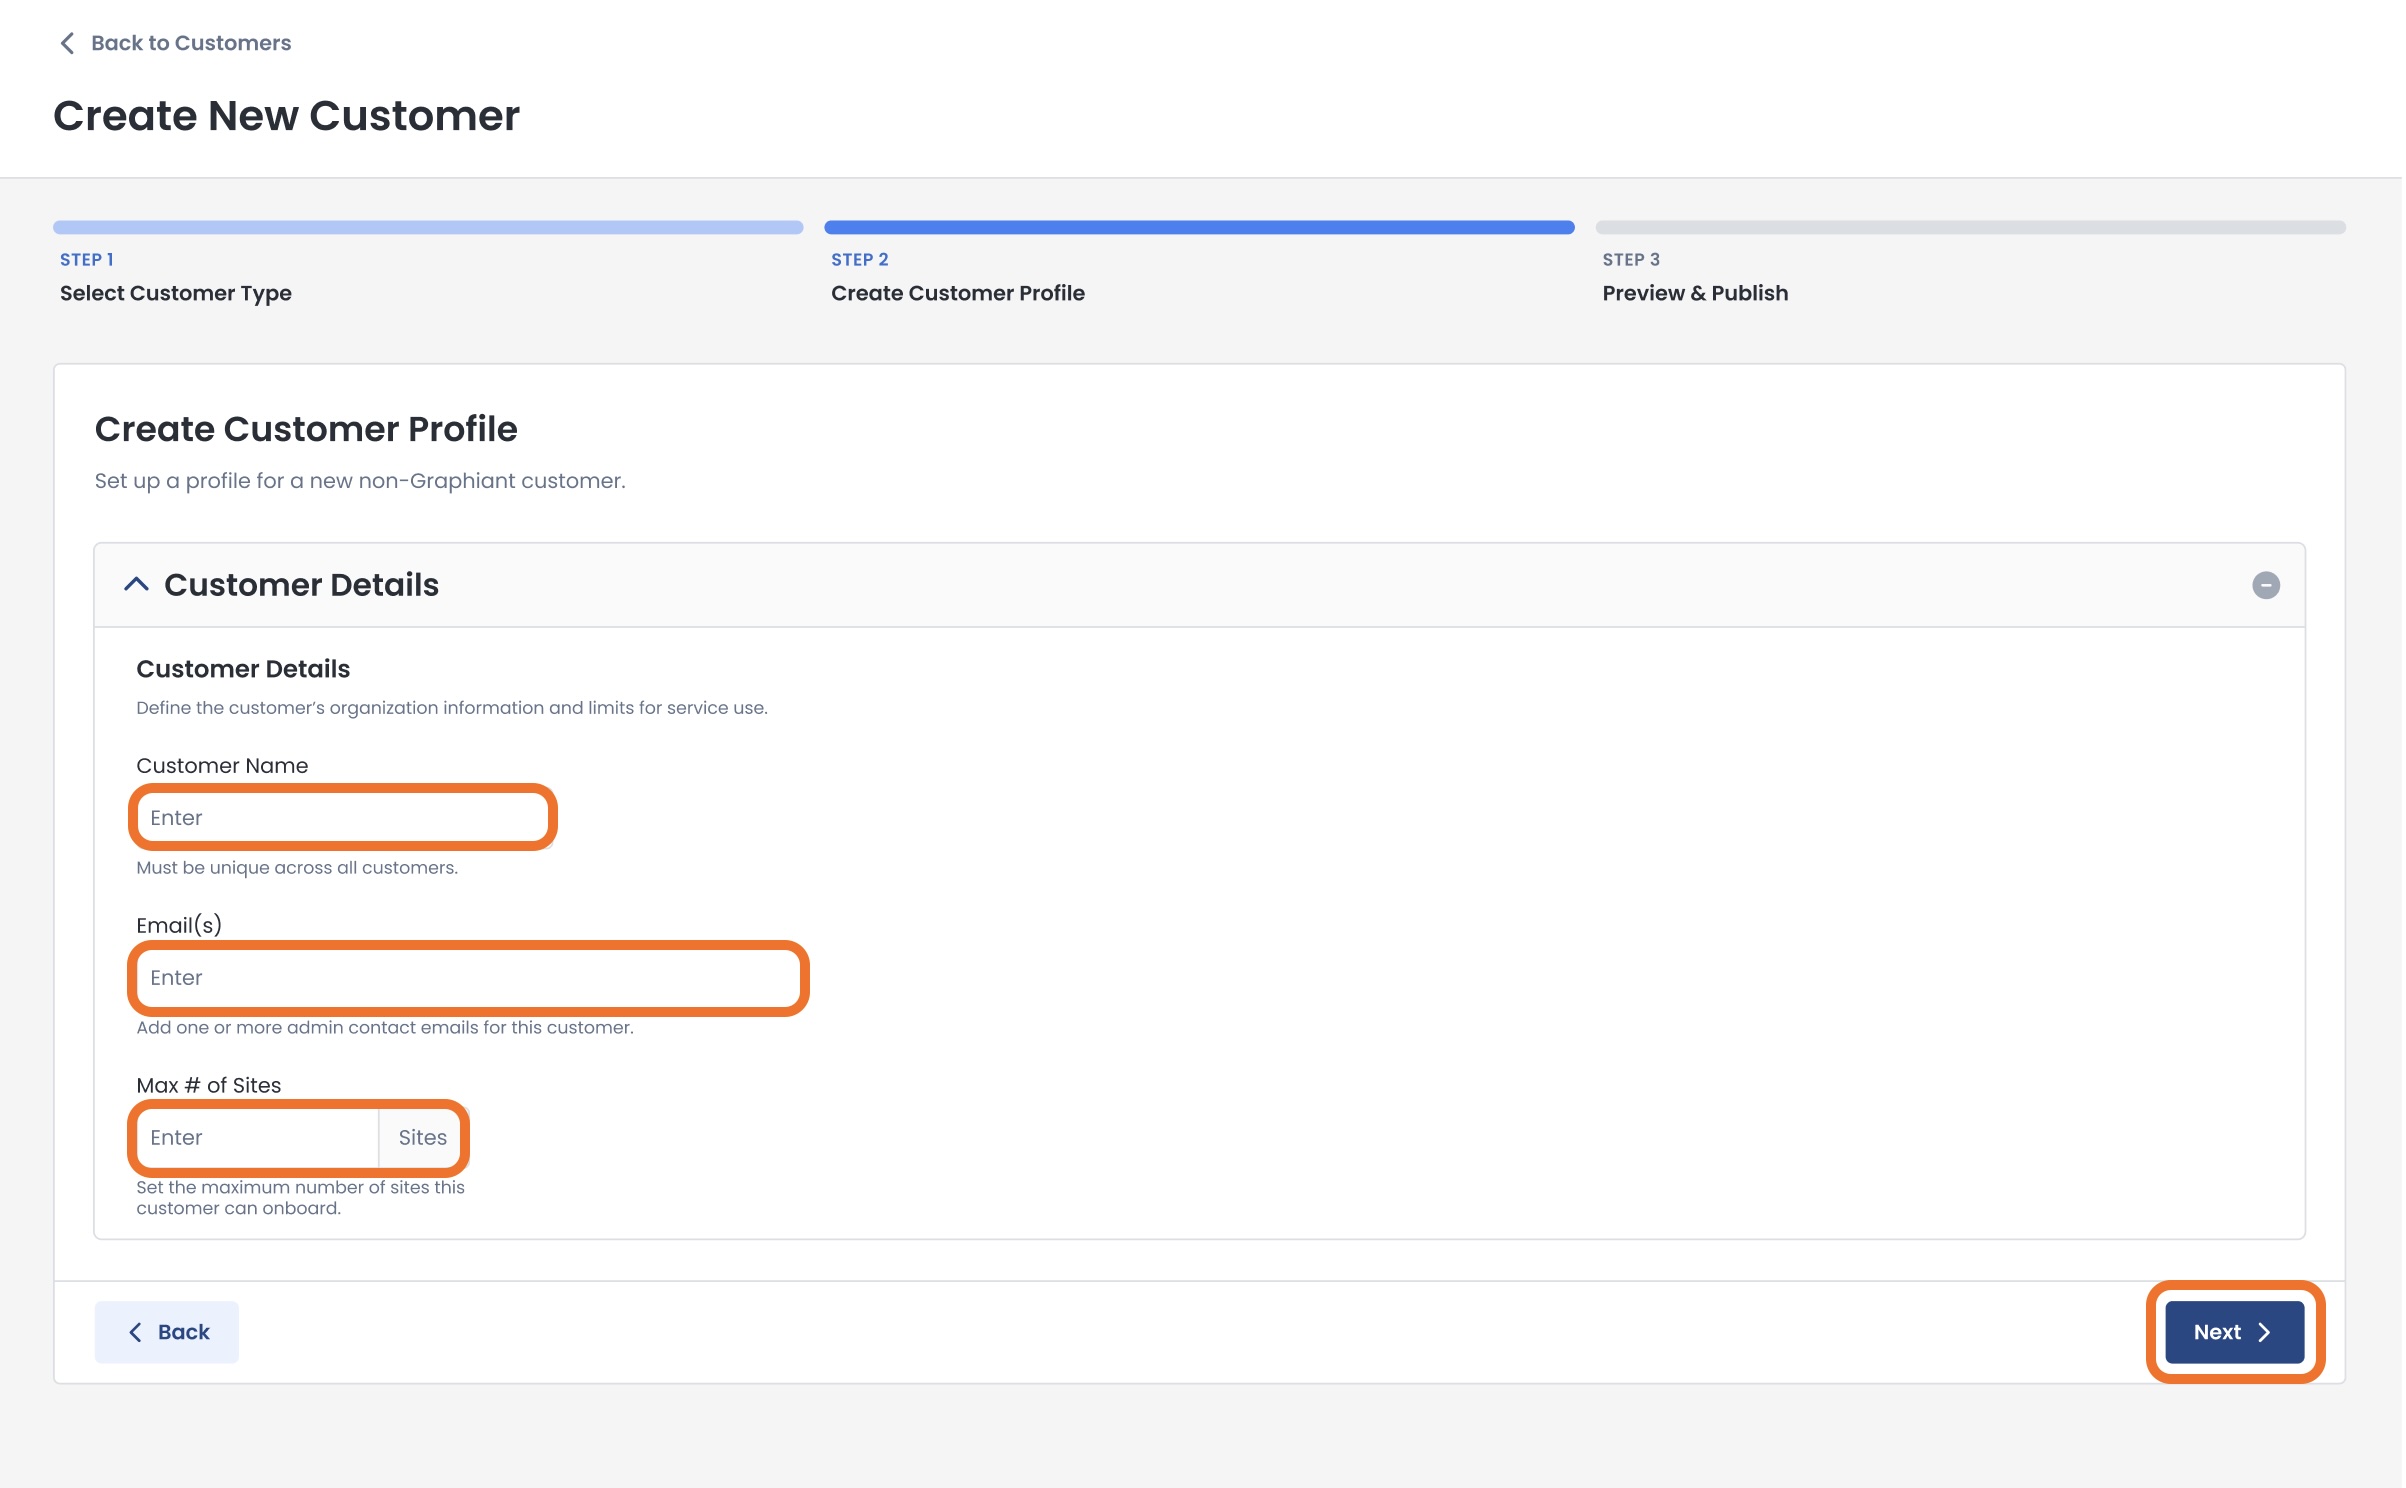
To begin the process of adding a customer who has an unmanaged or third-party edge device, select Customer Type of ‘Non-Graphiant’; click ‘Next’.
Enter the following information:
Customer Name: Unique name for this customer
Email(s): Admin contact email(s)
Max # of Sites: Limited number of sites you will allow this customer to onboard
Note:
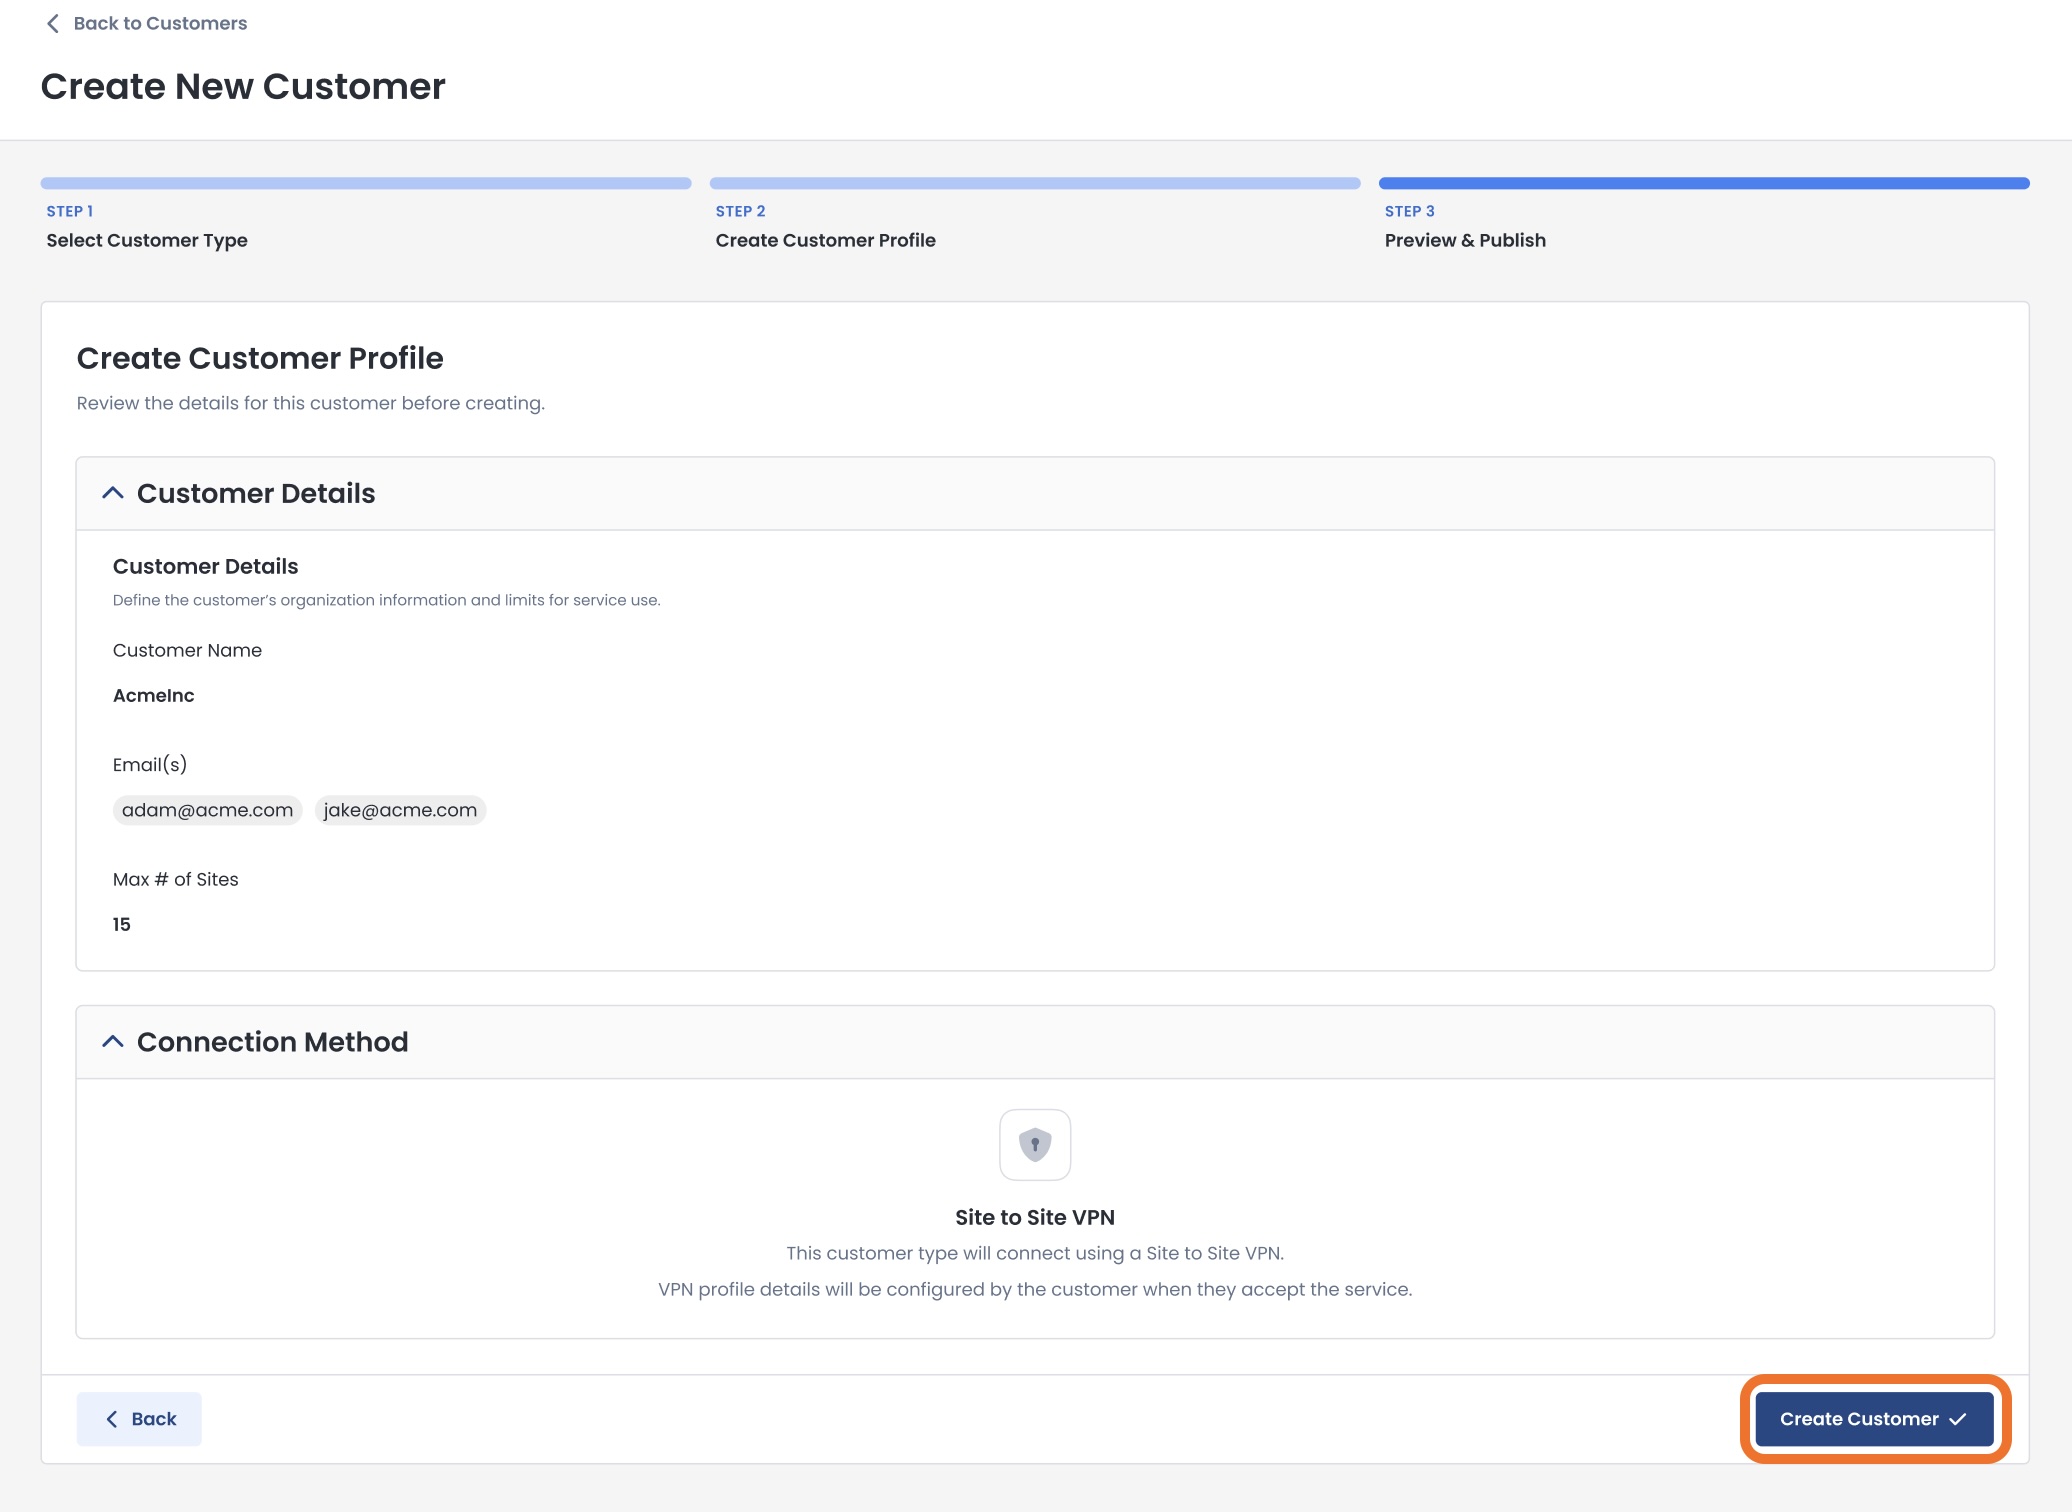
Non-Graphiant customers will be connected via Site-to-Site VPN Connection
Click ‘Next’.
.jpg)
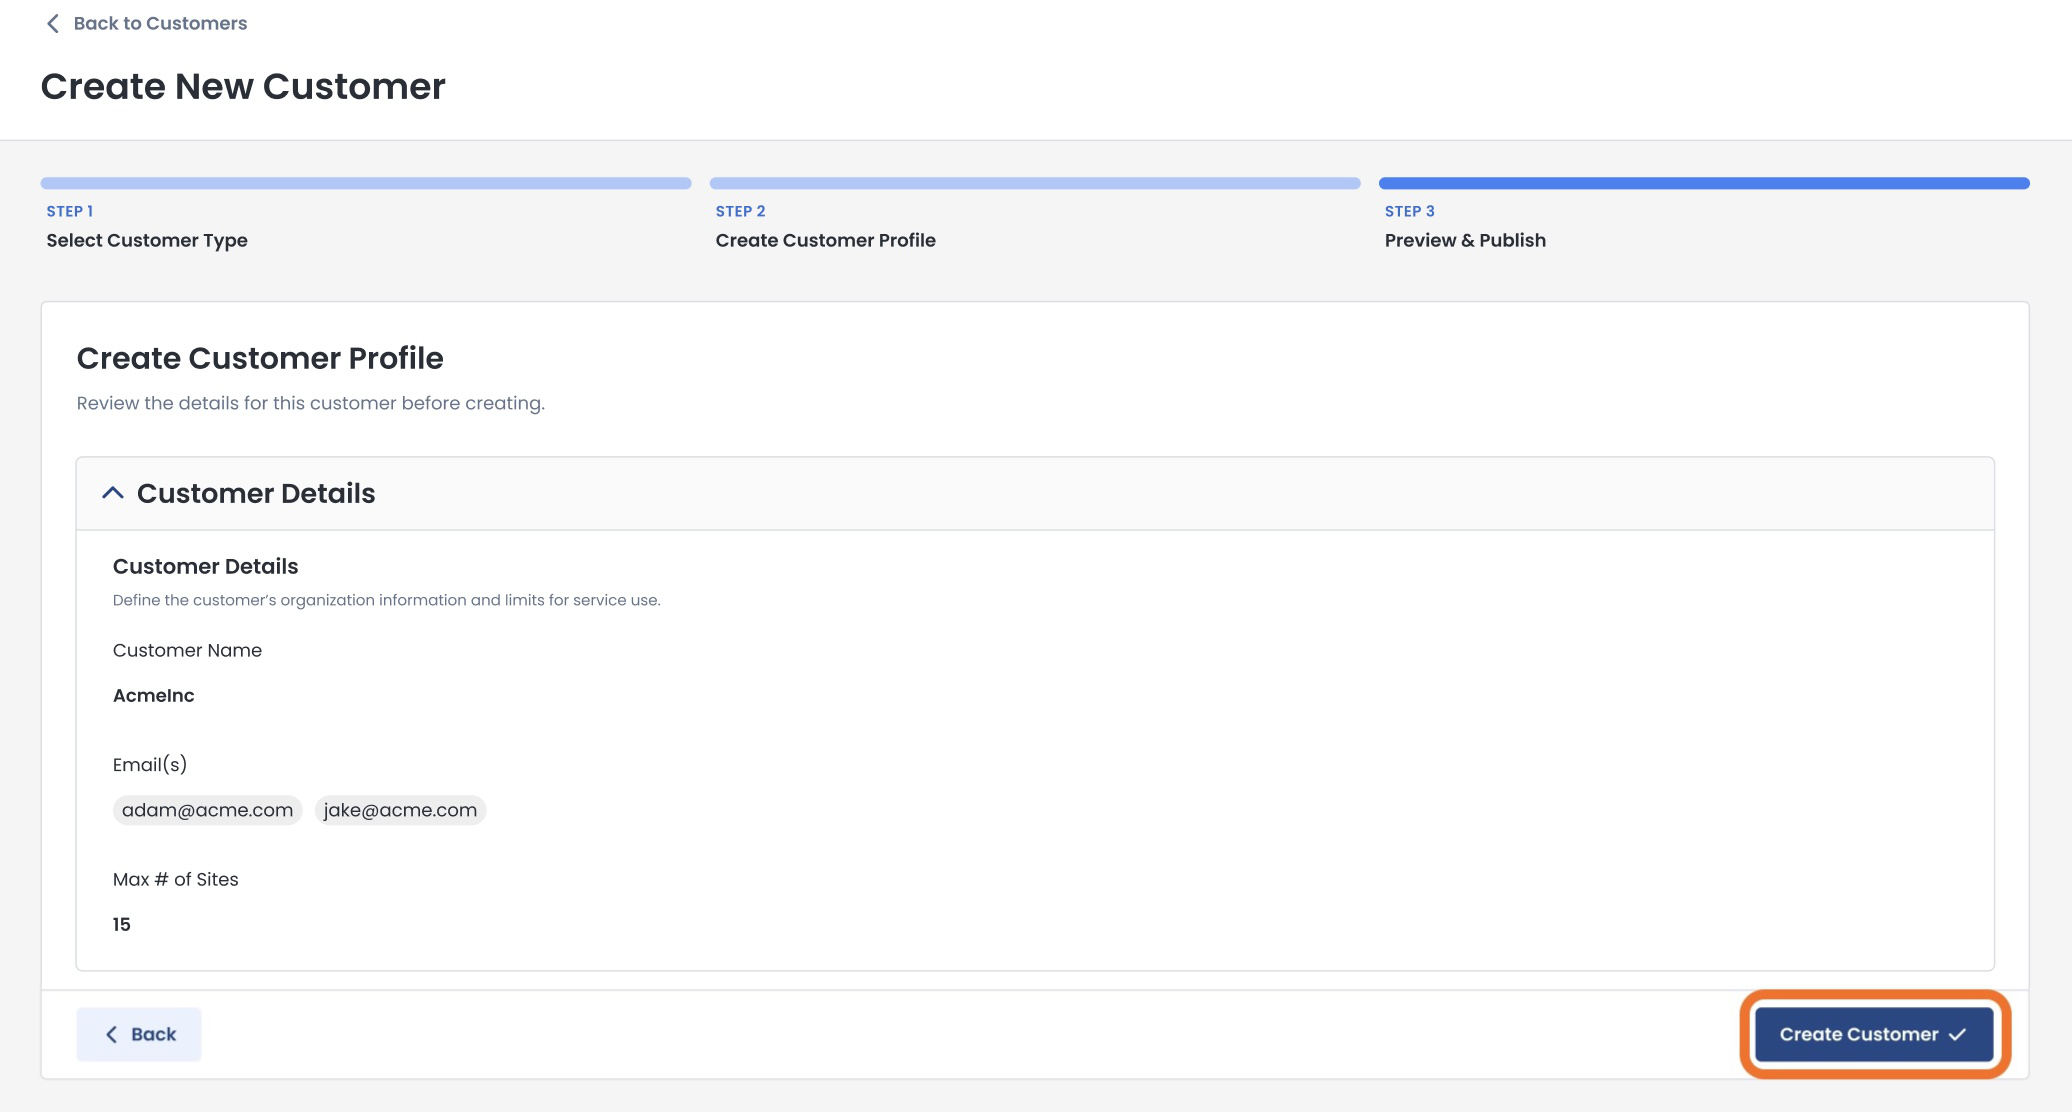
Review your selections.
Once you have ensured that everything is correct, click ‘Create Customer’.
You will receive a confirmation that your customer was created!
From here, you can either:
Exit to the Data Exchange customers page
Match Services to this customer
Create another service for your inventory
Exiting to Data Exchange Customers
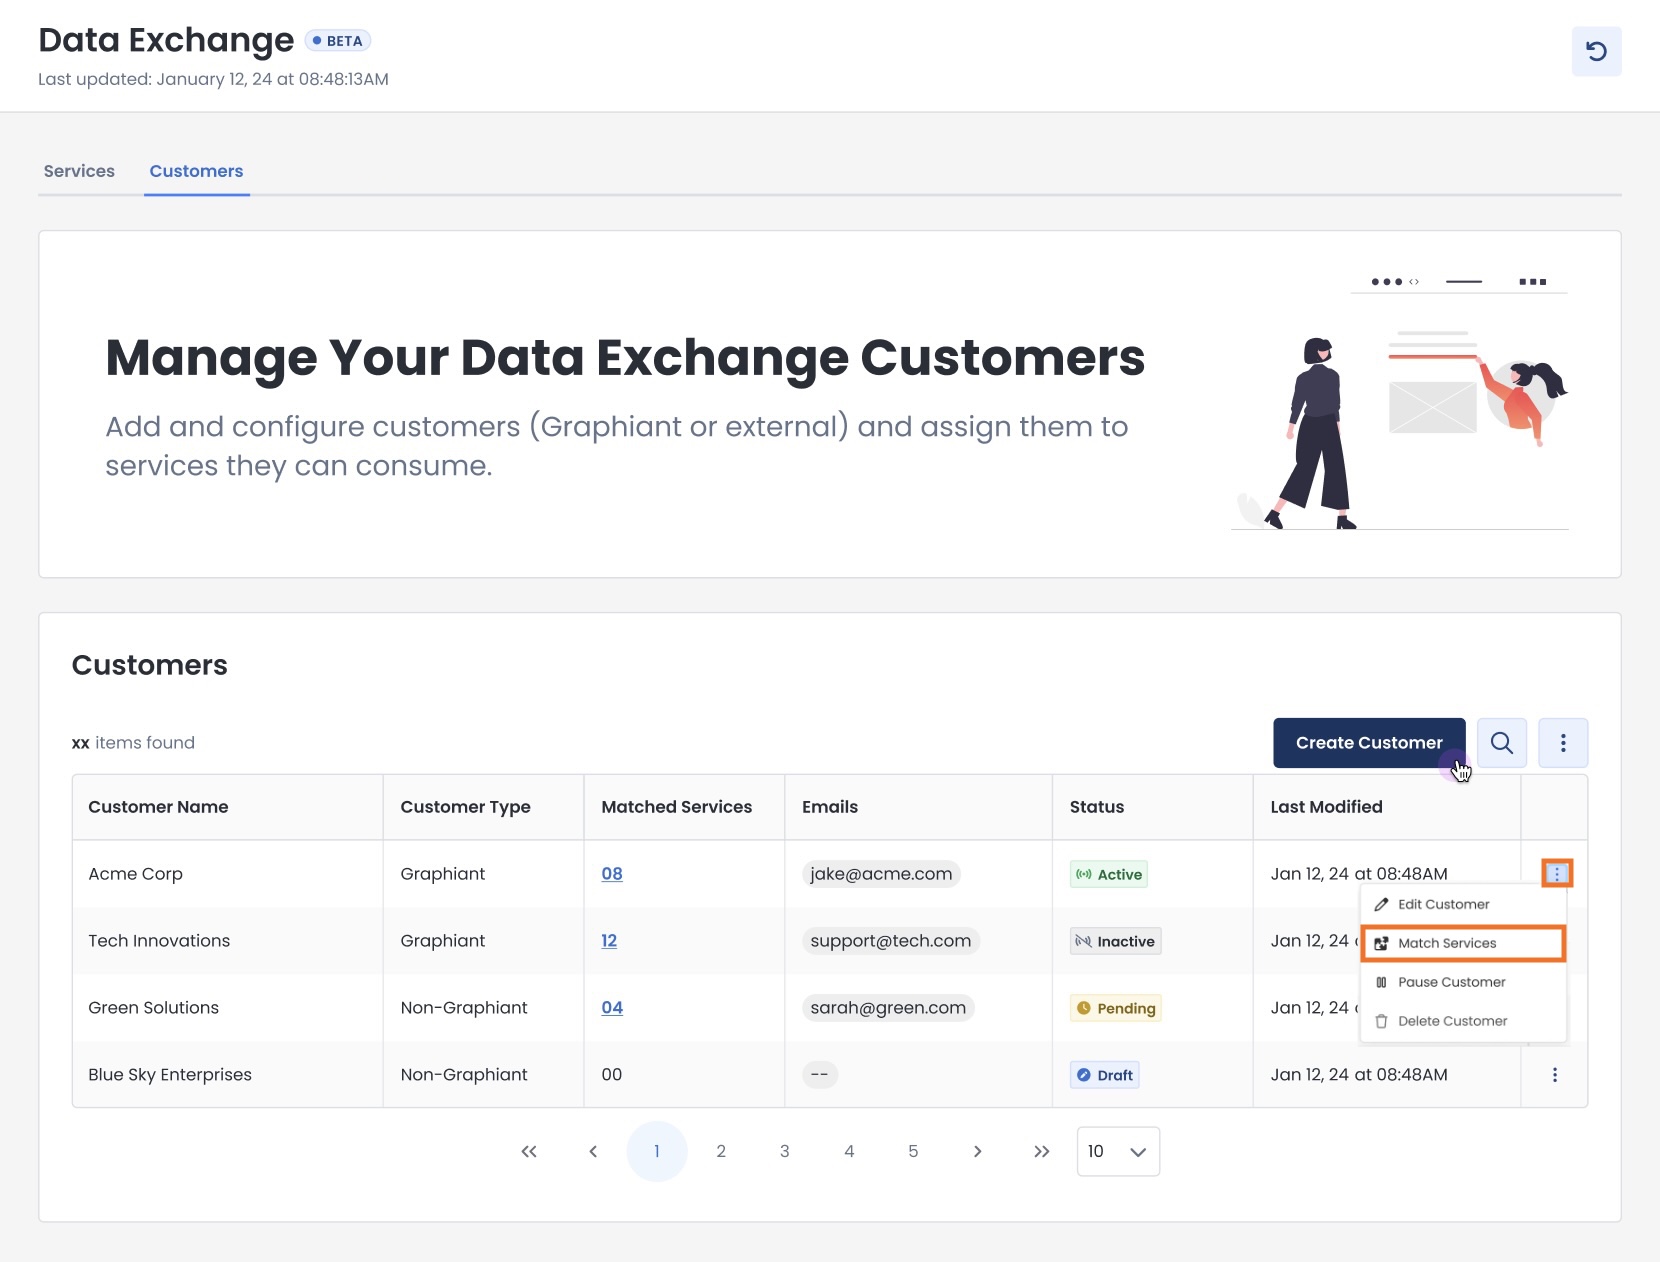
If you exit to the Data Exchange Customers page, you will see your new Customer listed in the table.
.jpg)
To later match a service to this customer, click the ellipses to the right of that customer; select ‘Match Services’.
Then follow the instructions to publish a service to a customer.
How Do I Edit My Customer’s Email Address(es)?
You are able to edit email addresses for your customer by clicking the ellipses to the right of that customer name, and selecting ‘Edit Customer’.
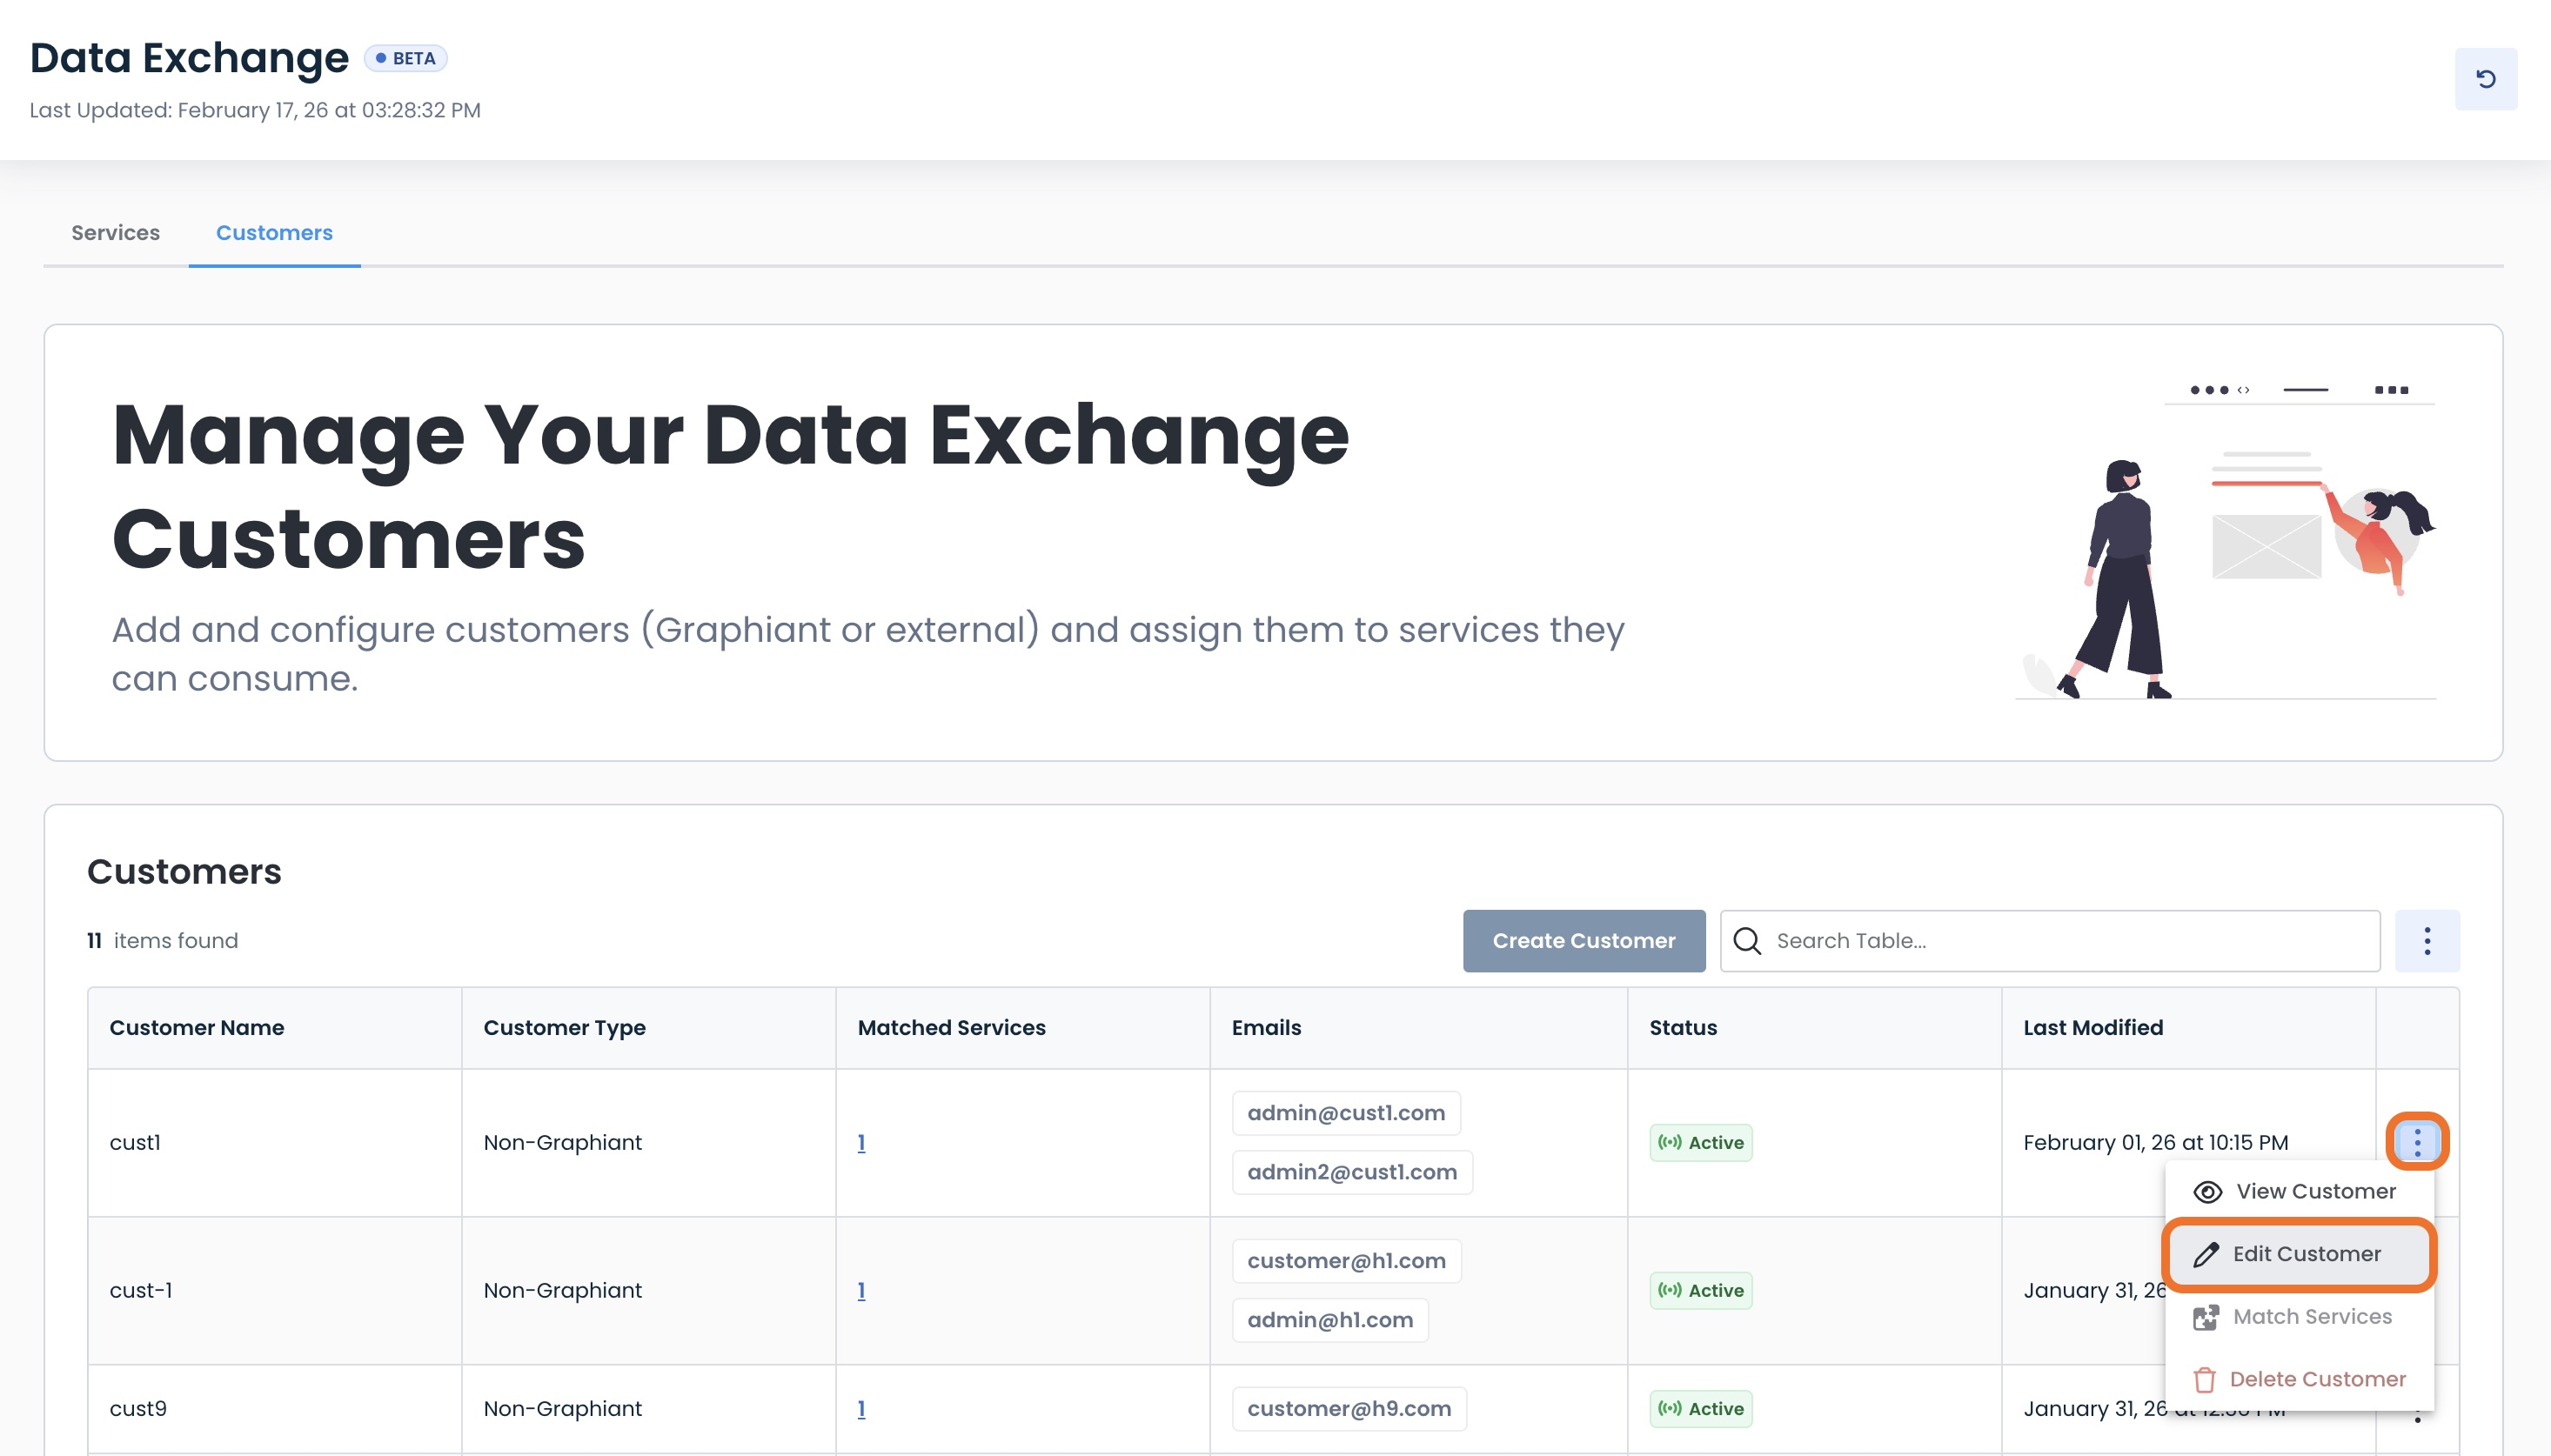
This will open the customer profile page for edit.
Here you can add, remove, or change email addresses.

The changes will be highlighted in yellow.
Click ‘Save Changes’.
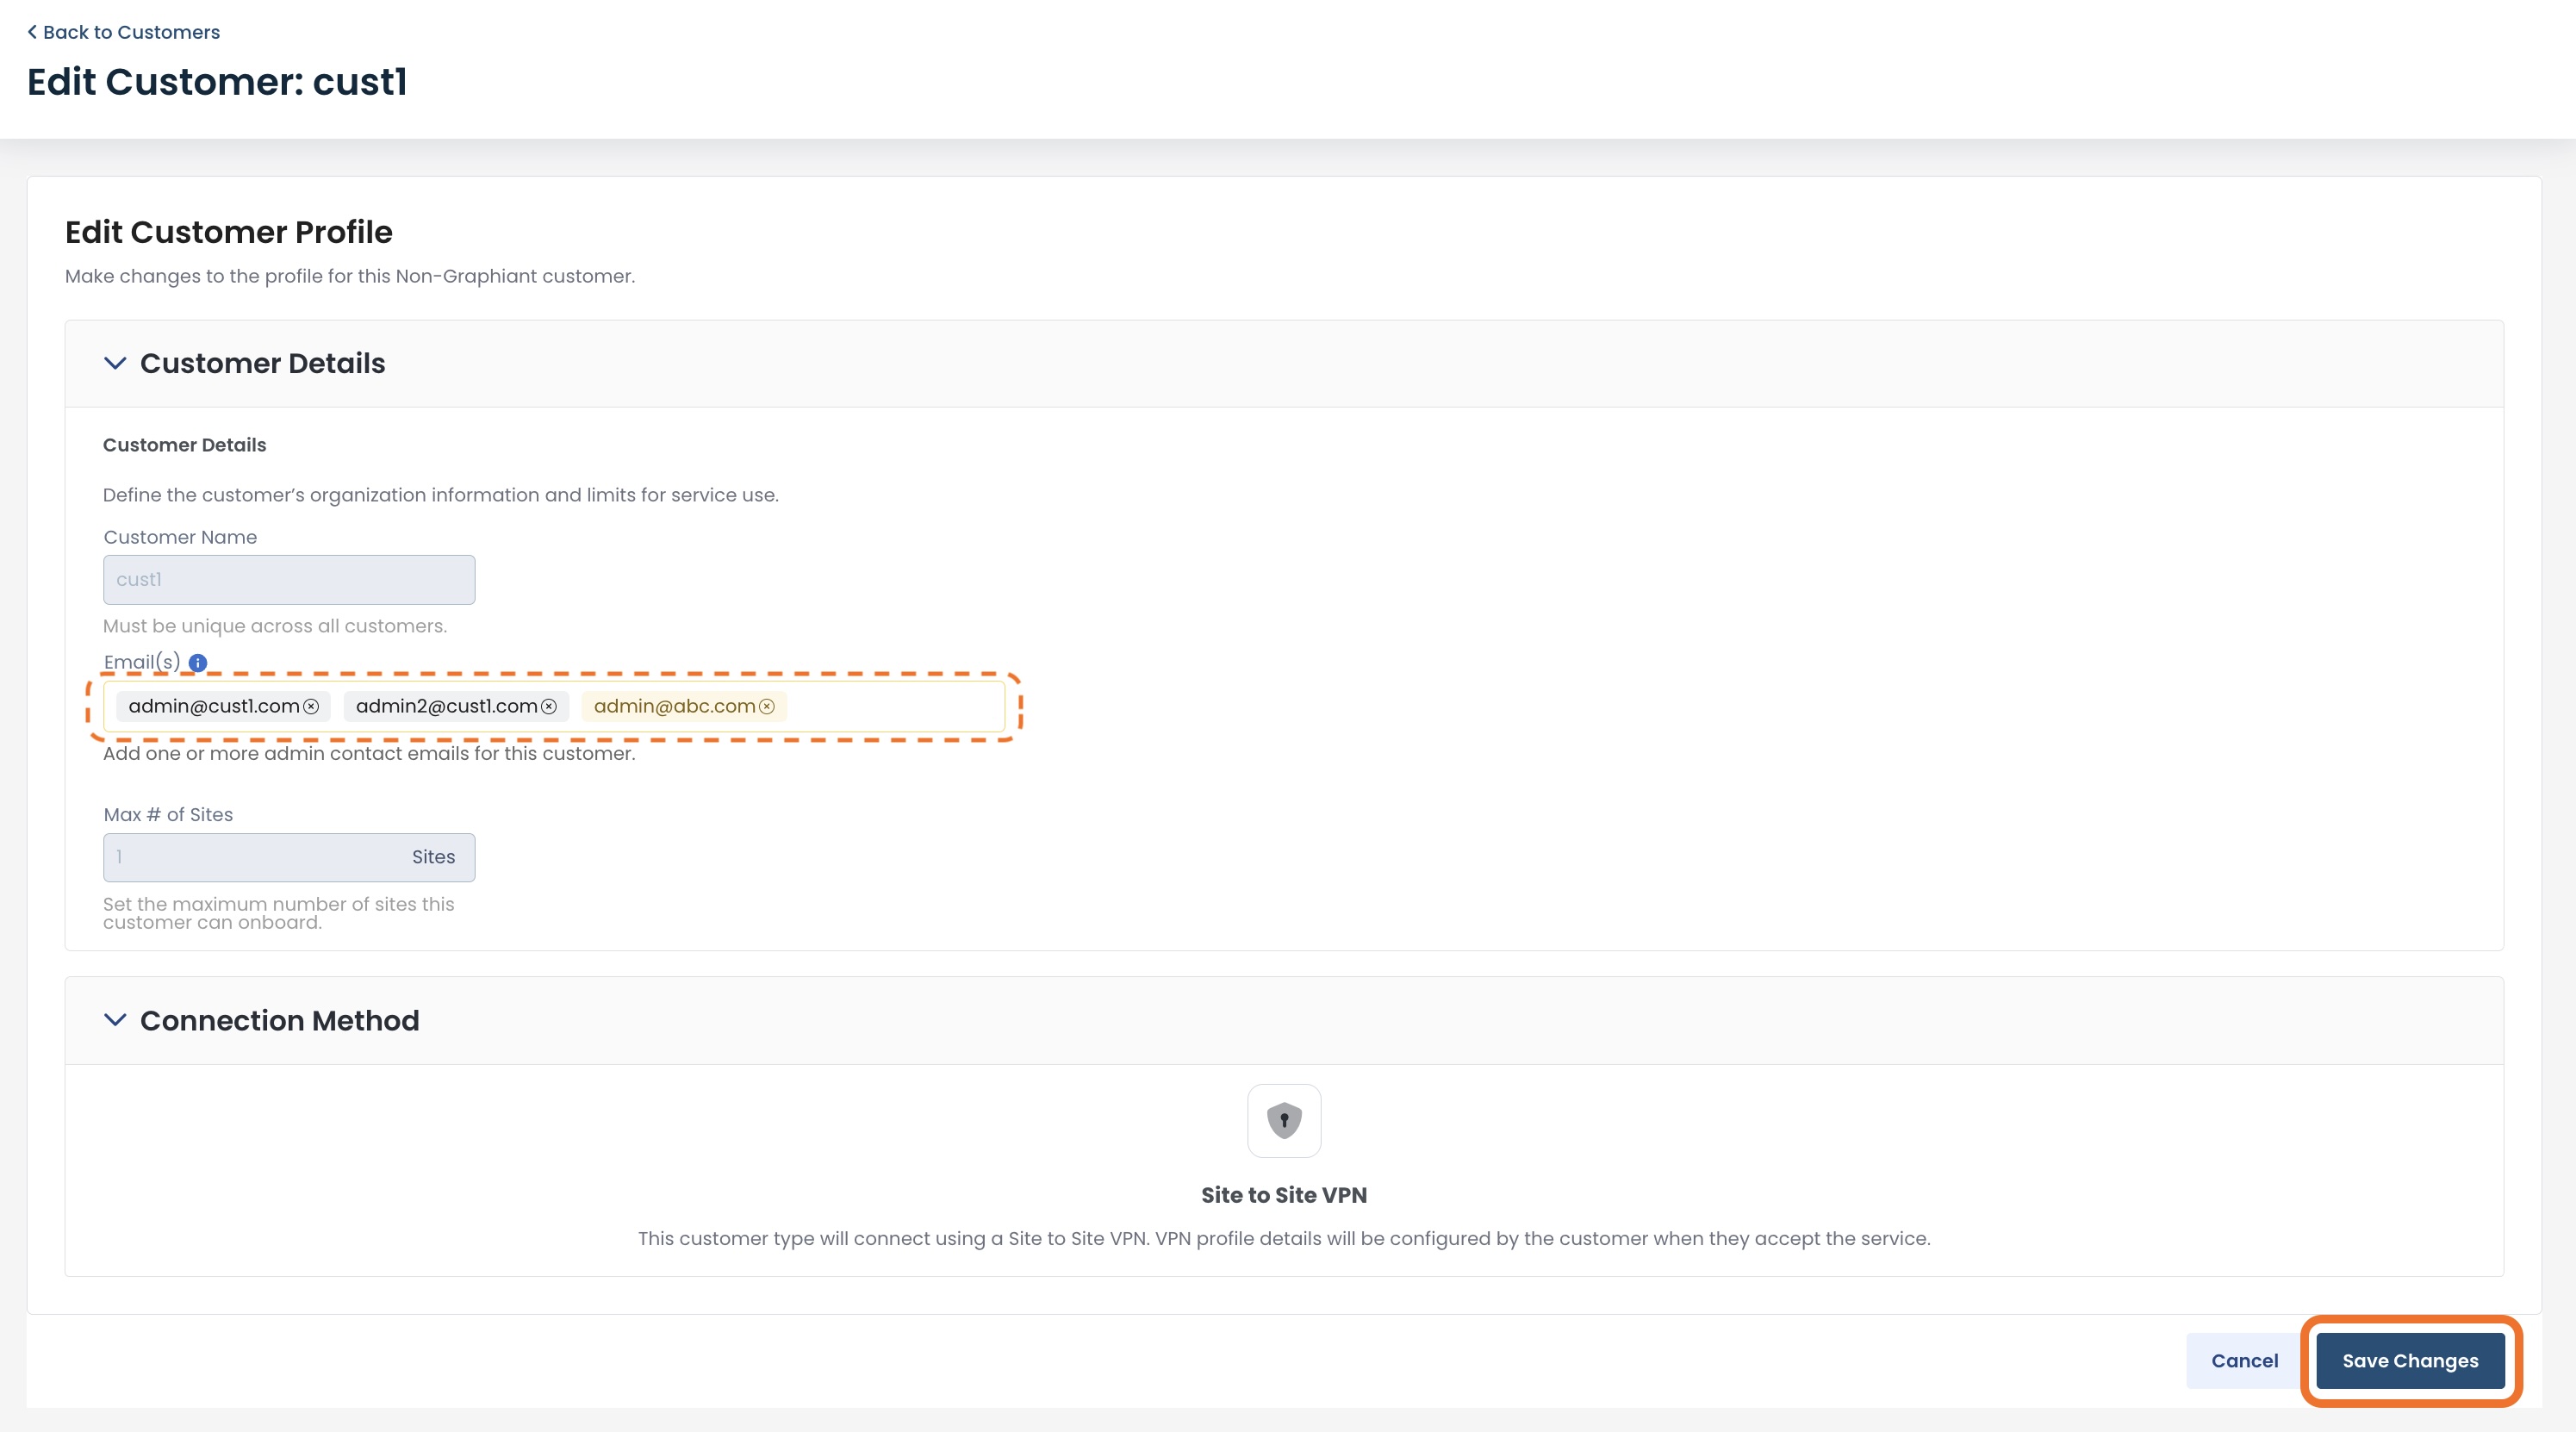
The customer information will now be updated.
Publishing Your Service with Your Customer
Now that you have inventories of both services and customers, you can match up which service(s) you would like to offer to your customers.
This process is done one customer at a time, to ensure individual secure access.
Depending on your end customer, follow the steps accordingly for:
Publishing your service to a customer on the Graphiant network
Publishing your service to a customer with a third-party device
The processes are different for each type of customer:
Ensure that you are following the indicated instructions for the customer that you need.
Publishing Your Service to a Customer on the Graphiant Network
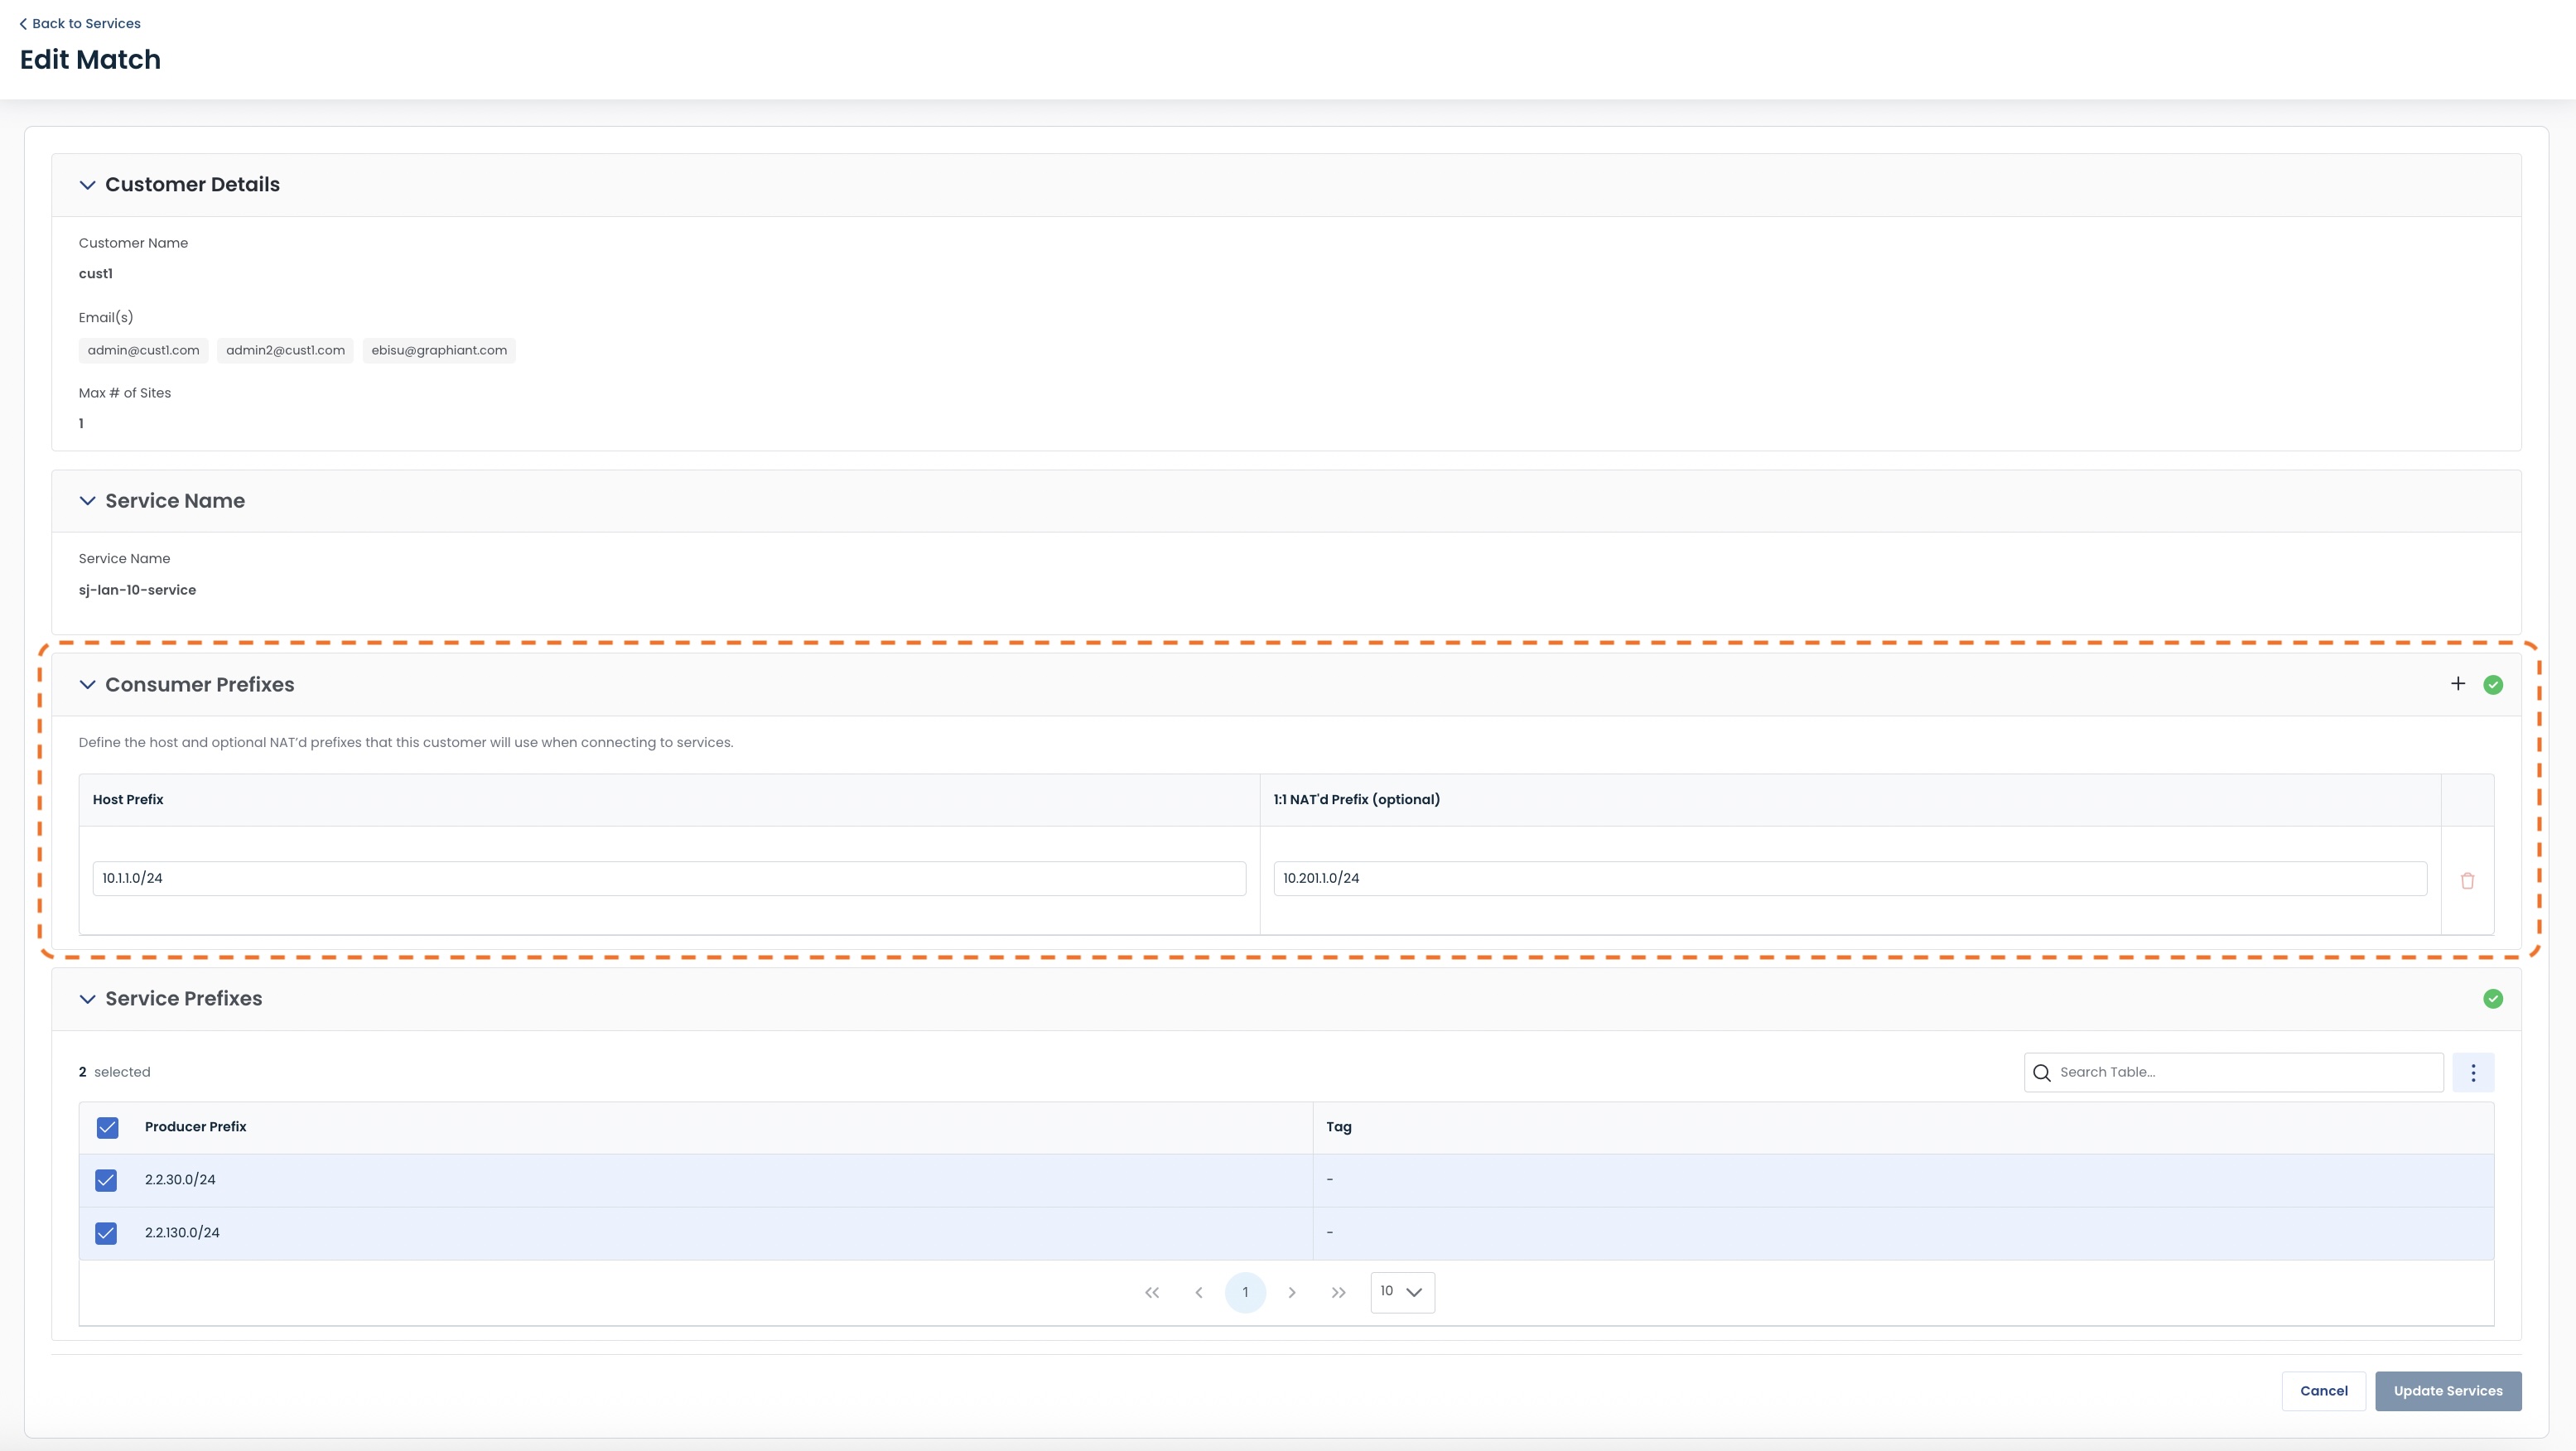
Under the “Define Match” page, fill out each section as described.
Each step here will be marked with a green check mark when completed.
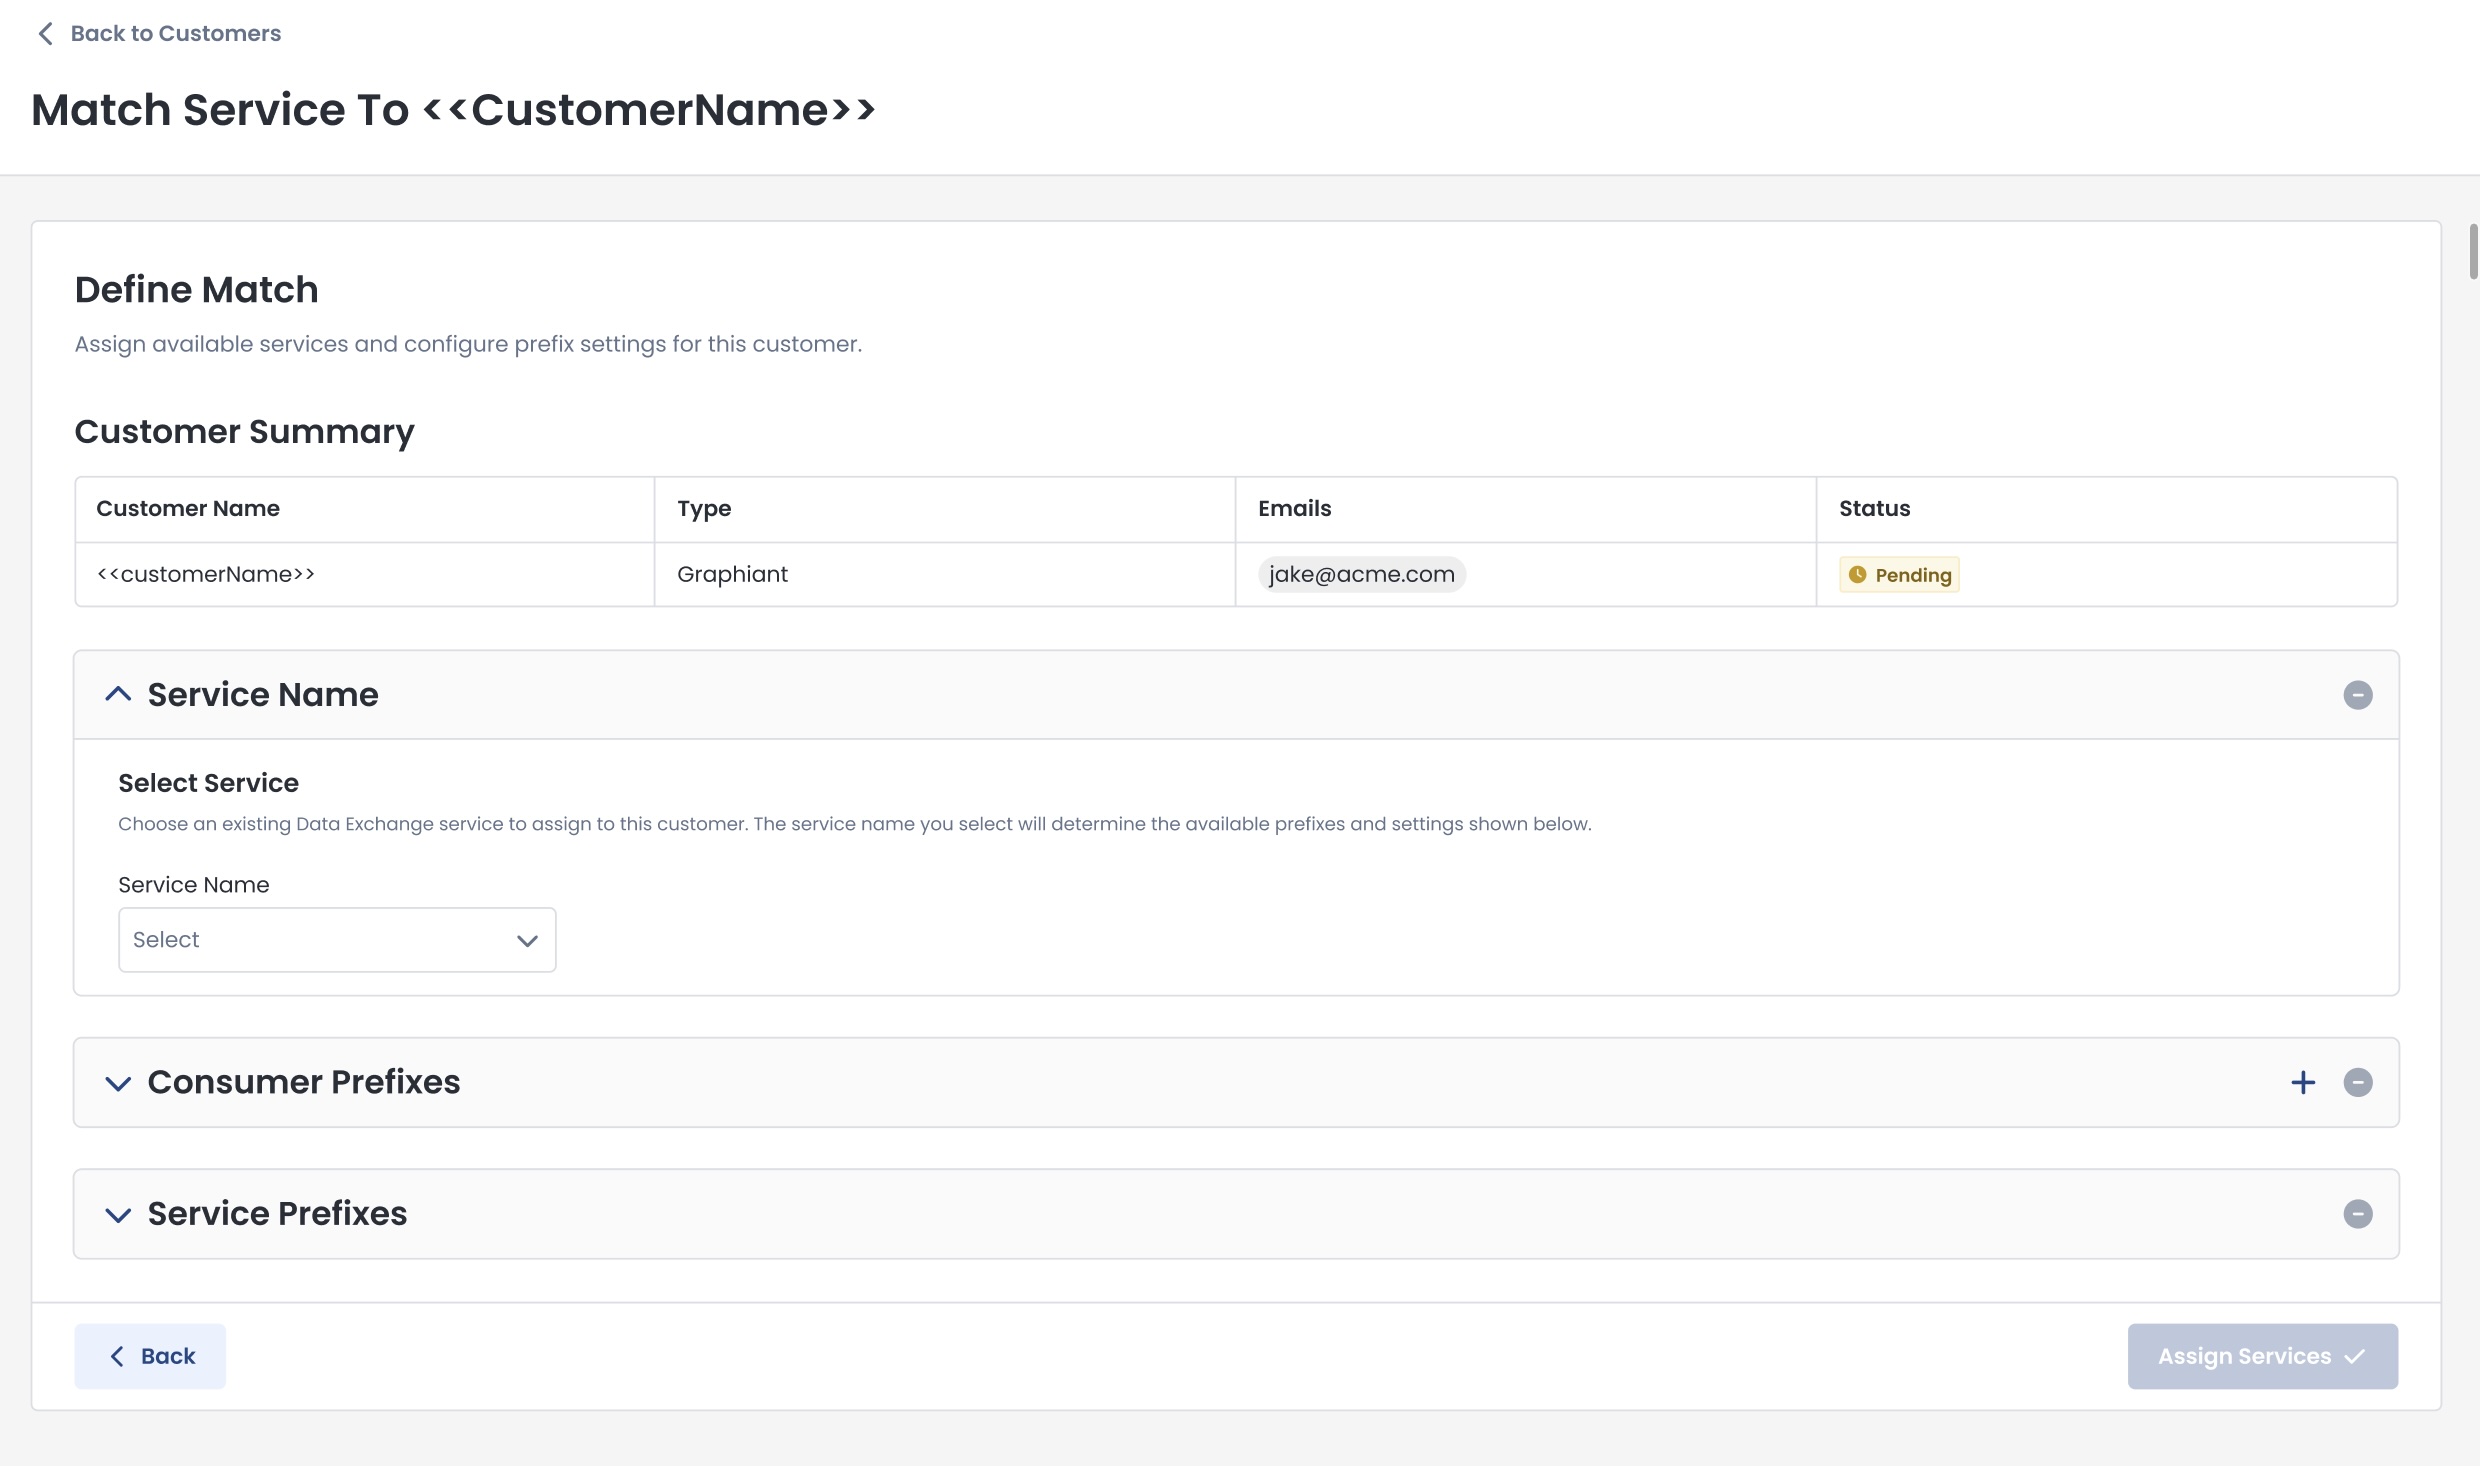
Service Name
From the dropdown, select the service from your inventory to which you will allow the customer access.
The Service Name you select:
Will determine the prefixes and settings available below.

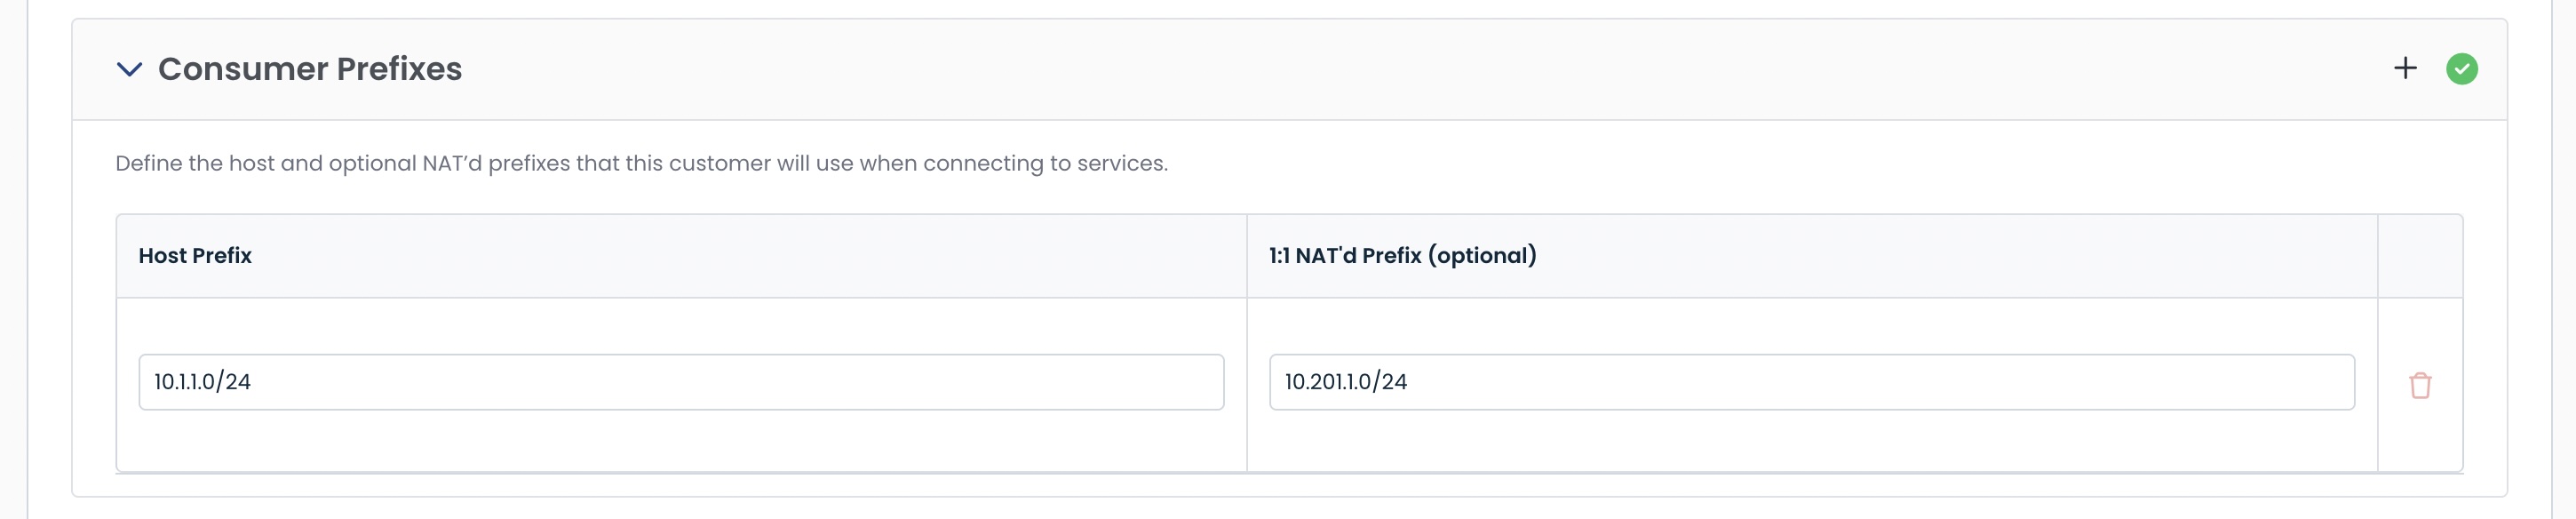
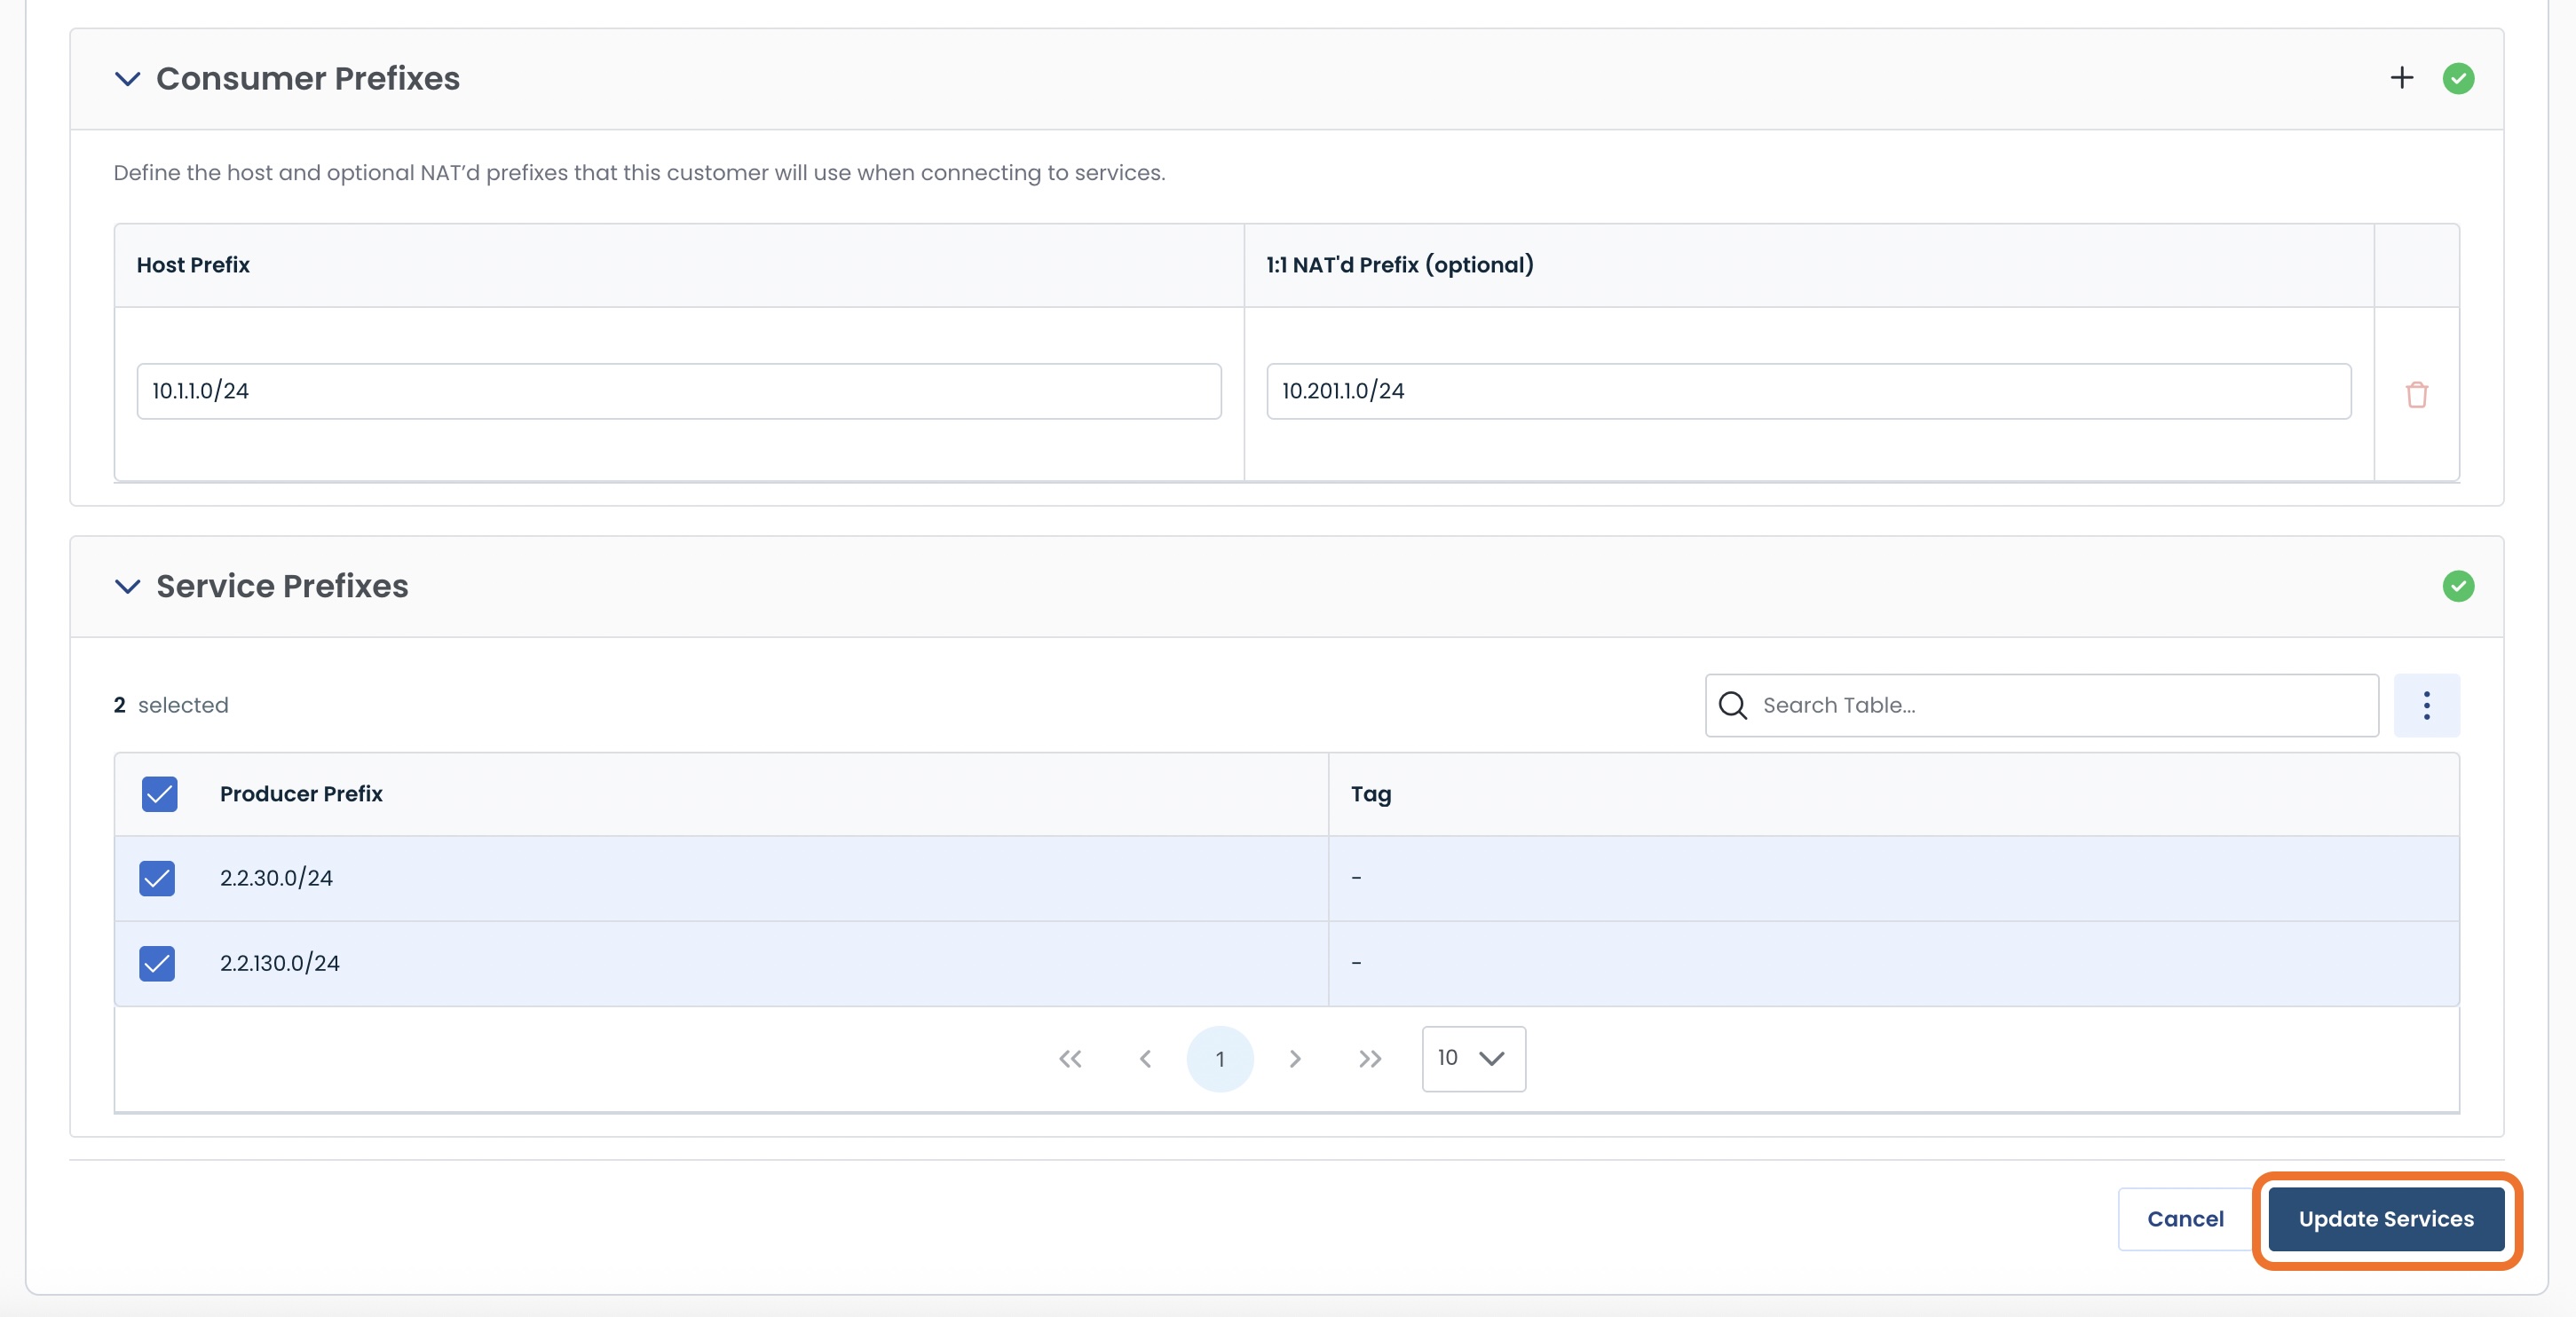
Consumer Prefixes
These are the prefixes that your customer has given you, so that you may grant them access to your service.
Host Prefix: Enter the customer’s prefix; more can be added as necessary
NAT’d Prefix (Optional): If they have provided NAT translation, enter it here
To add more prefixes, click the [+] icon at the top of this section
Caution:
Any traffic that doesn’t have one of these prefixes associated with it will be dropped.

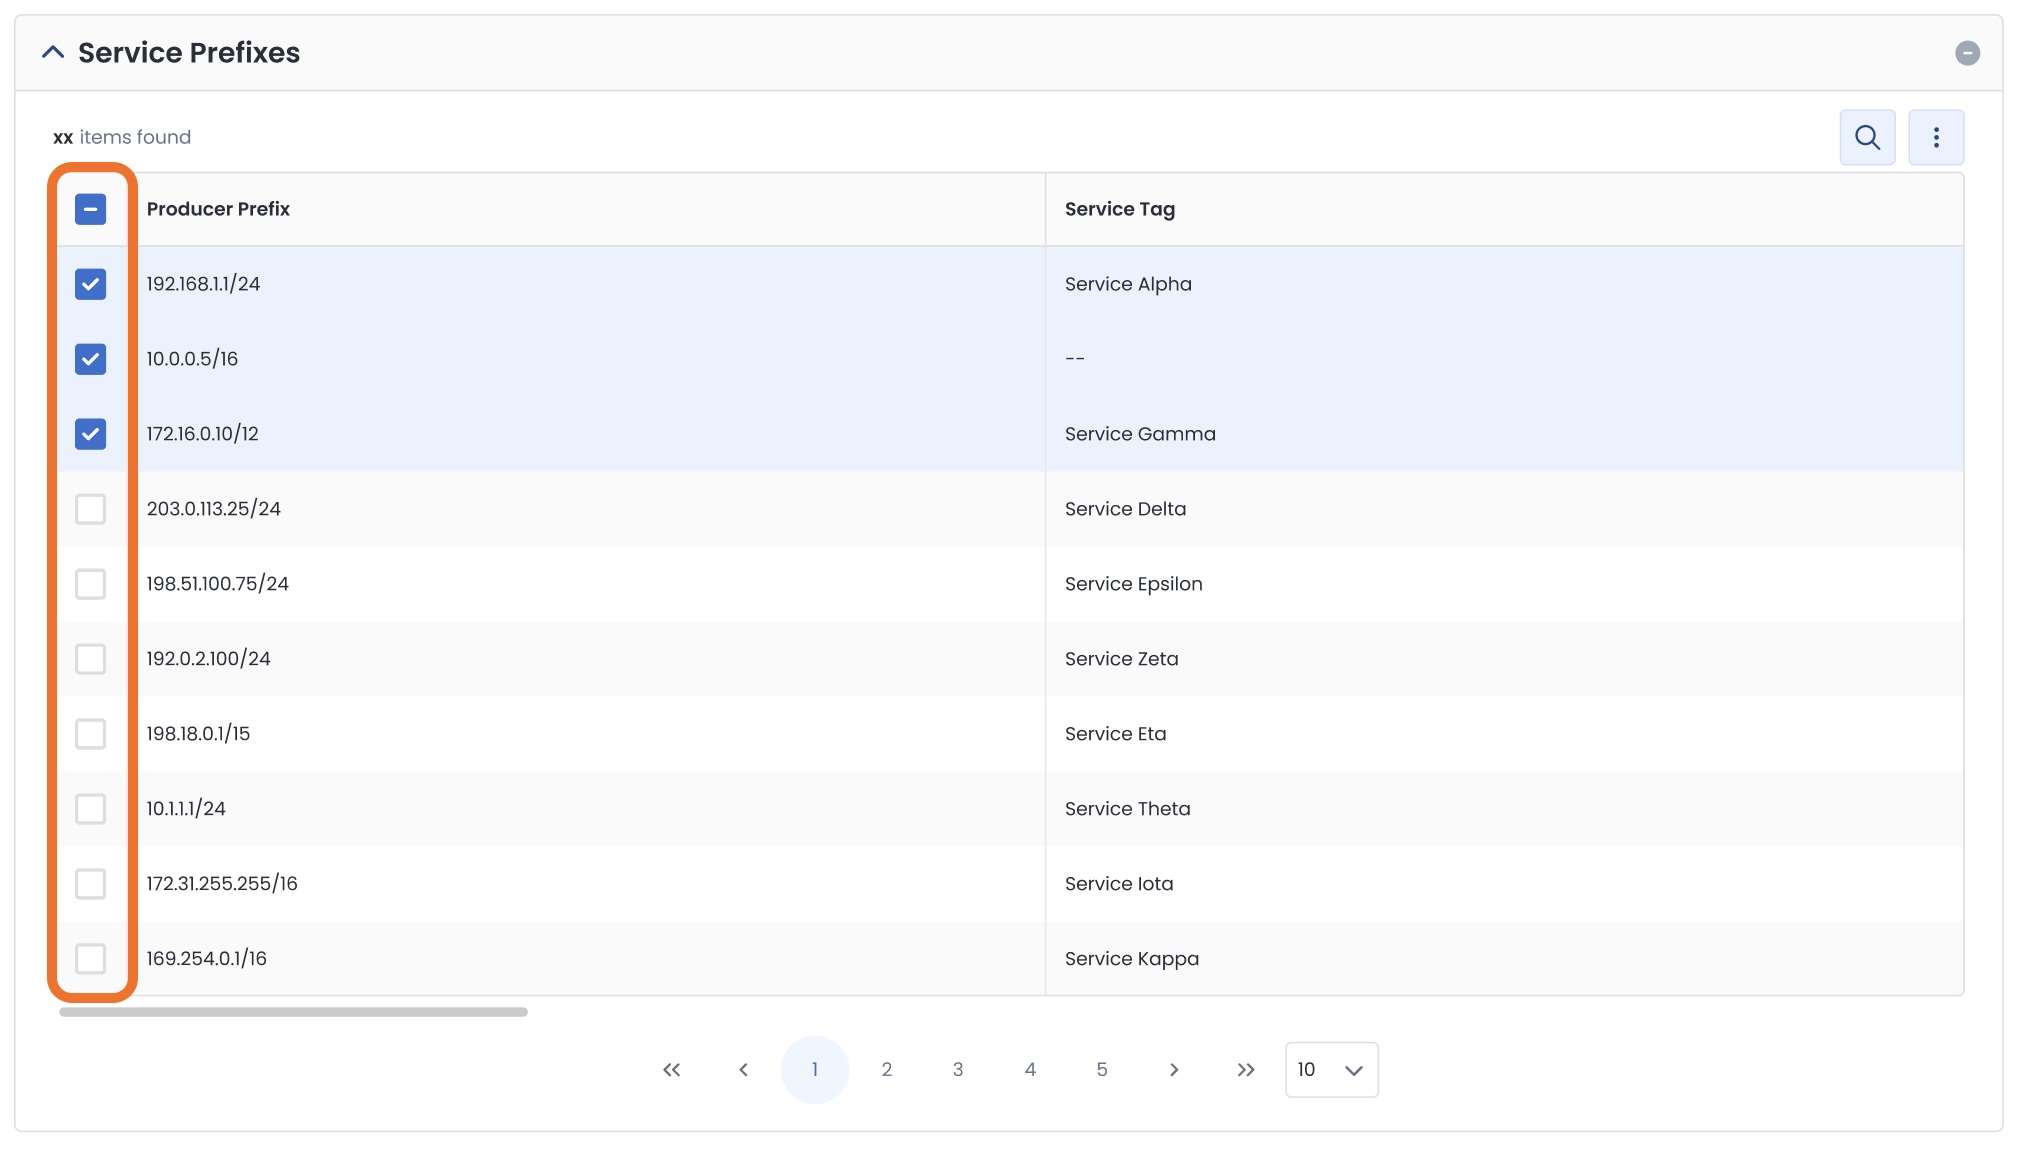
Service Prefixes
These are all of the prefixes that are available for you to advertise with this particular service (entered when creating the service).
Select the prefixes that you would like this customer to be able to utilize.
Once all sections are completed and marked with a green checkmark, confirm that all entered information is correct.
Click ‘Assign Services’.
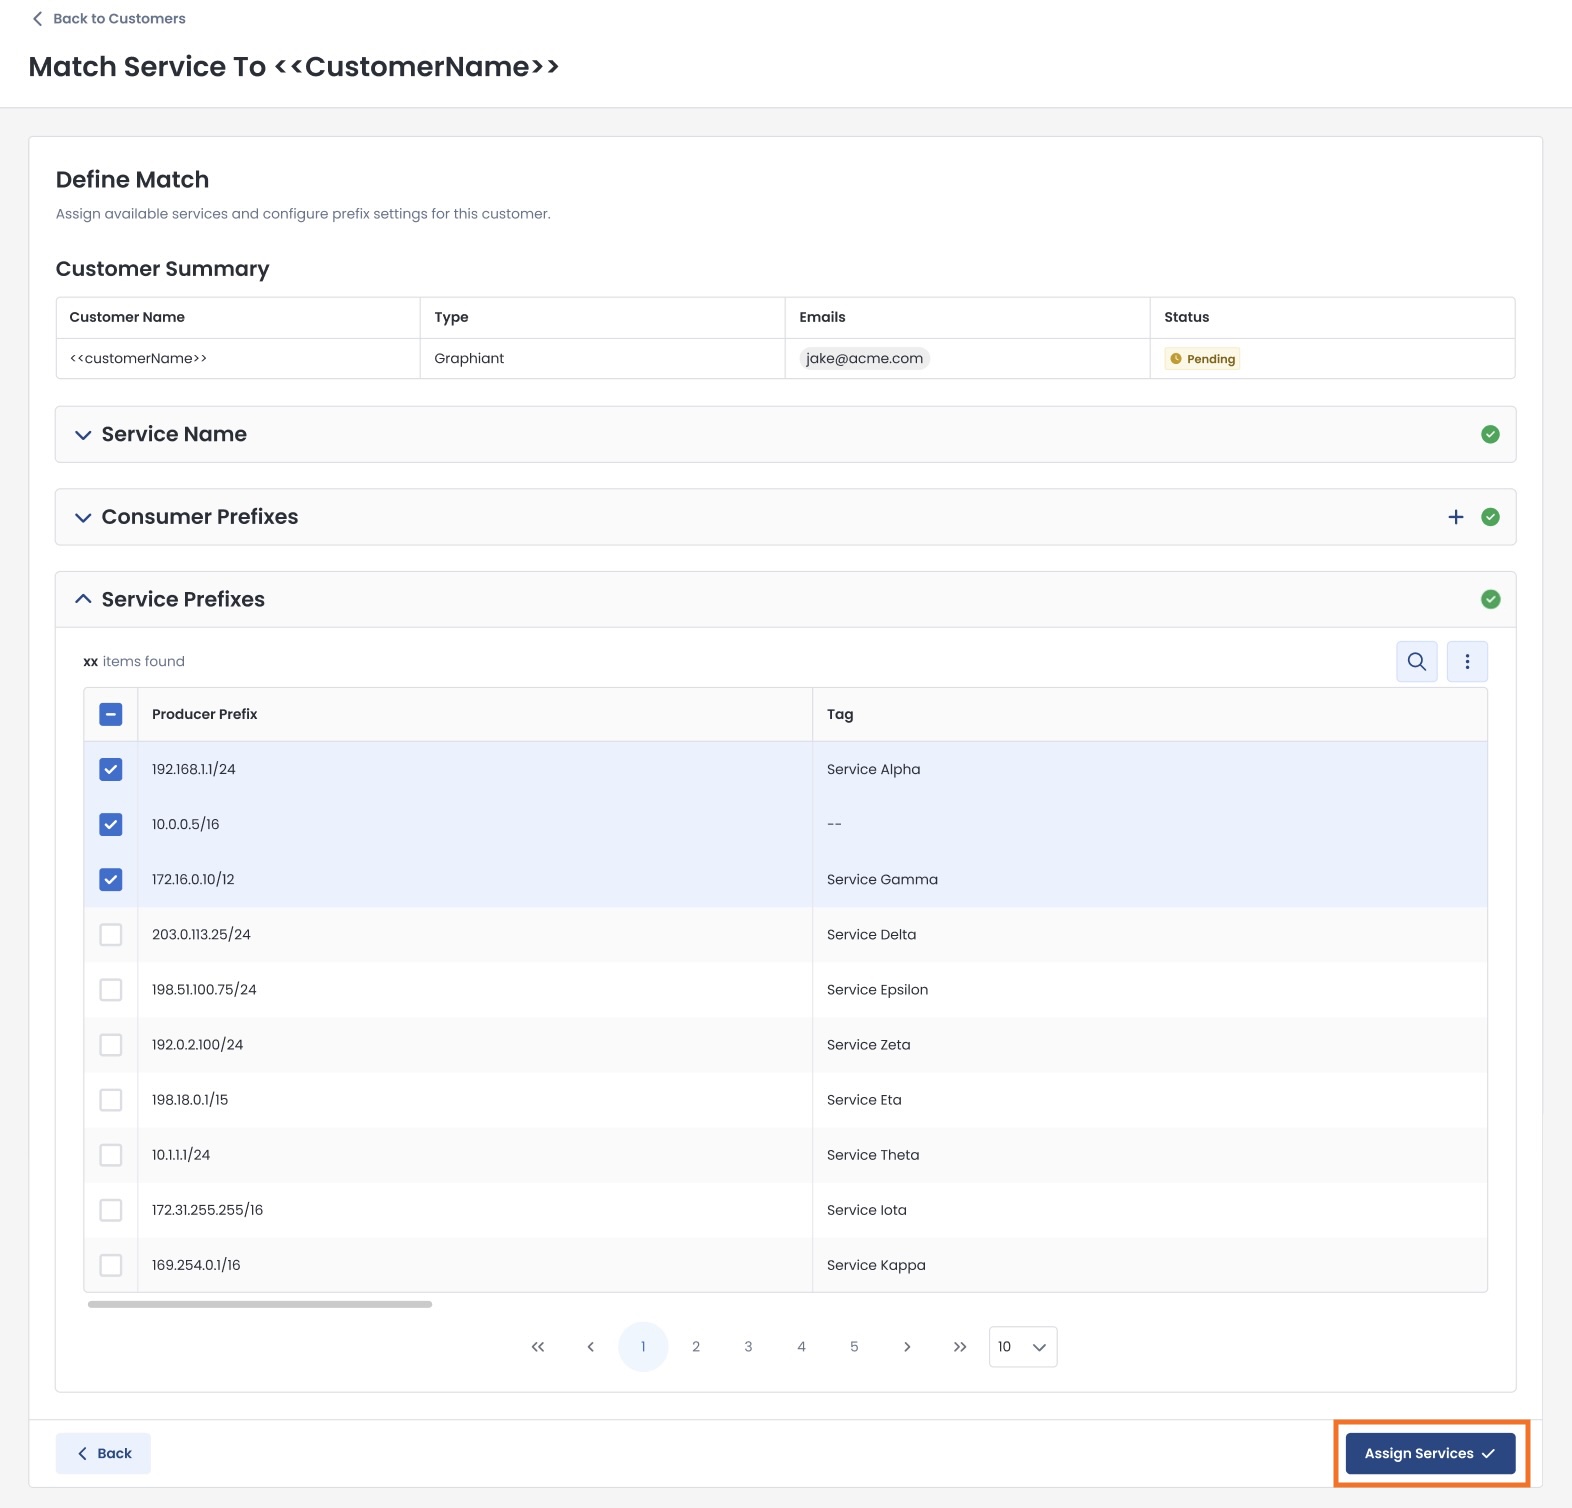
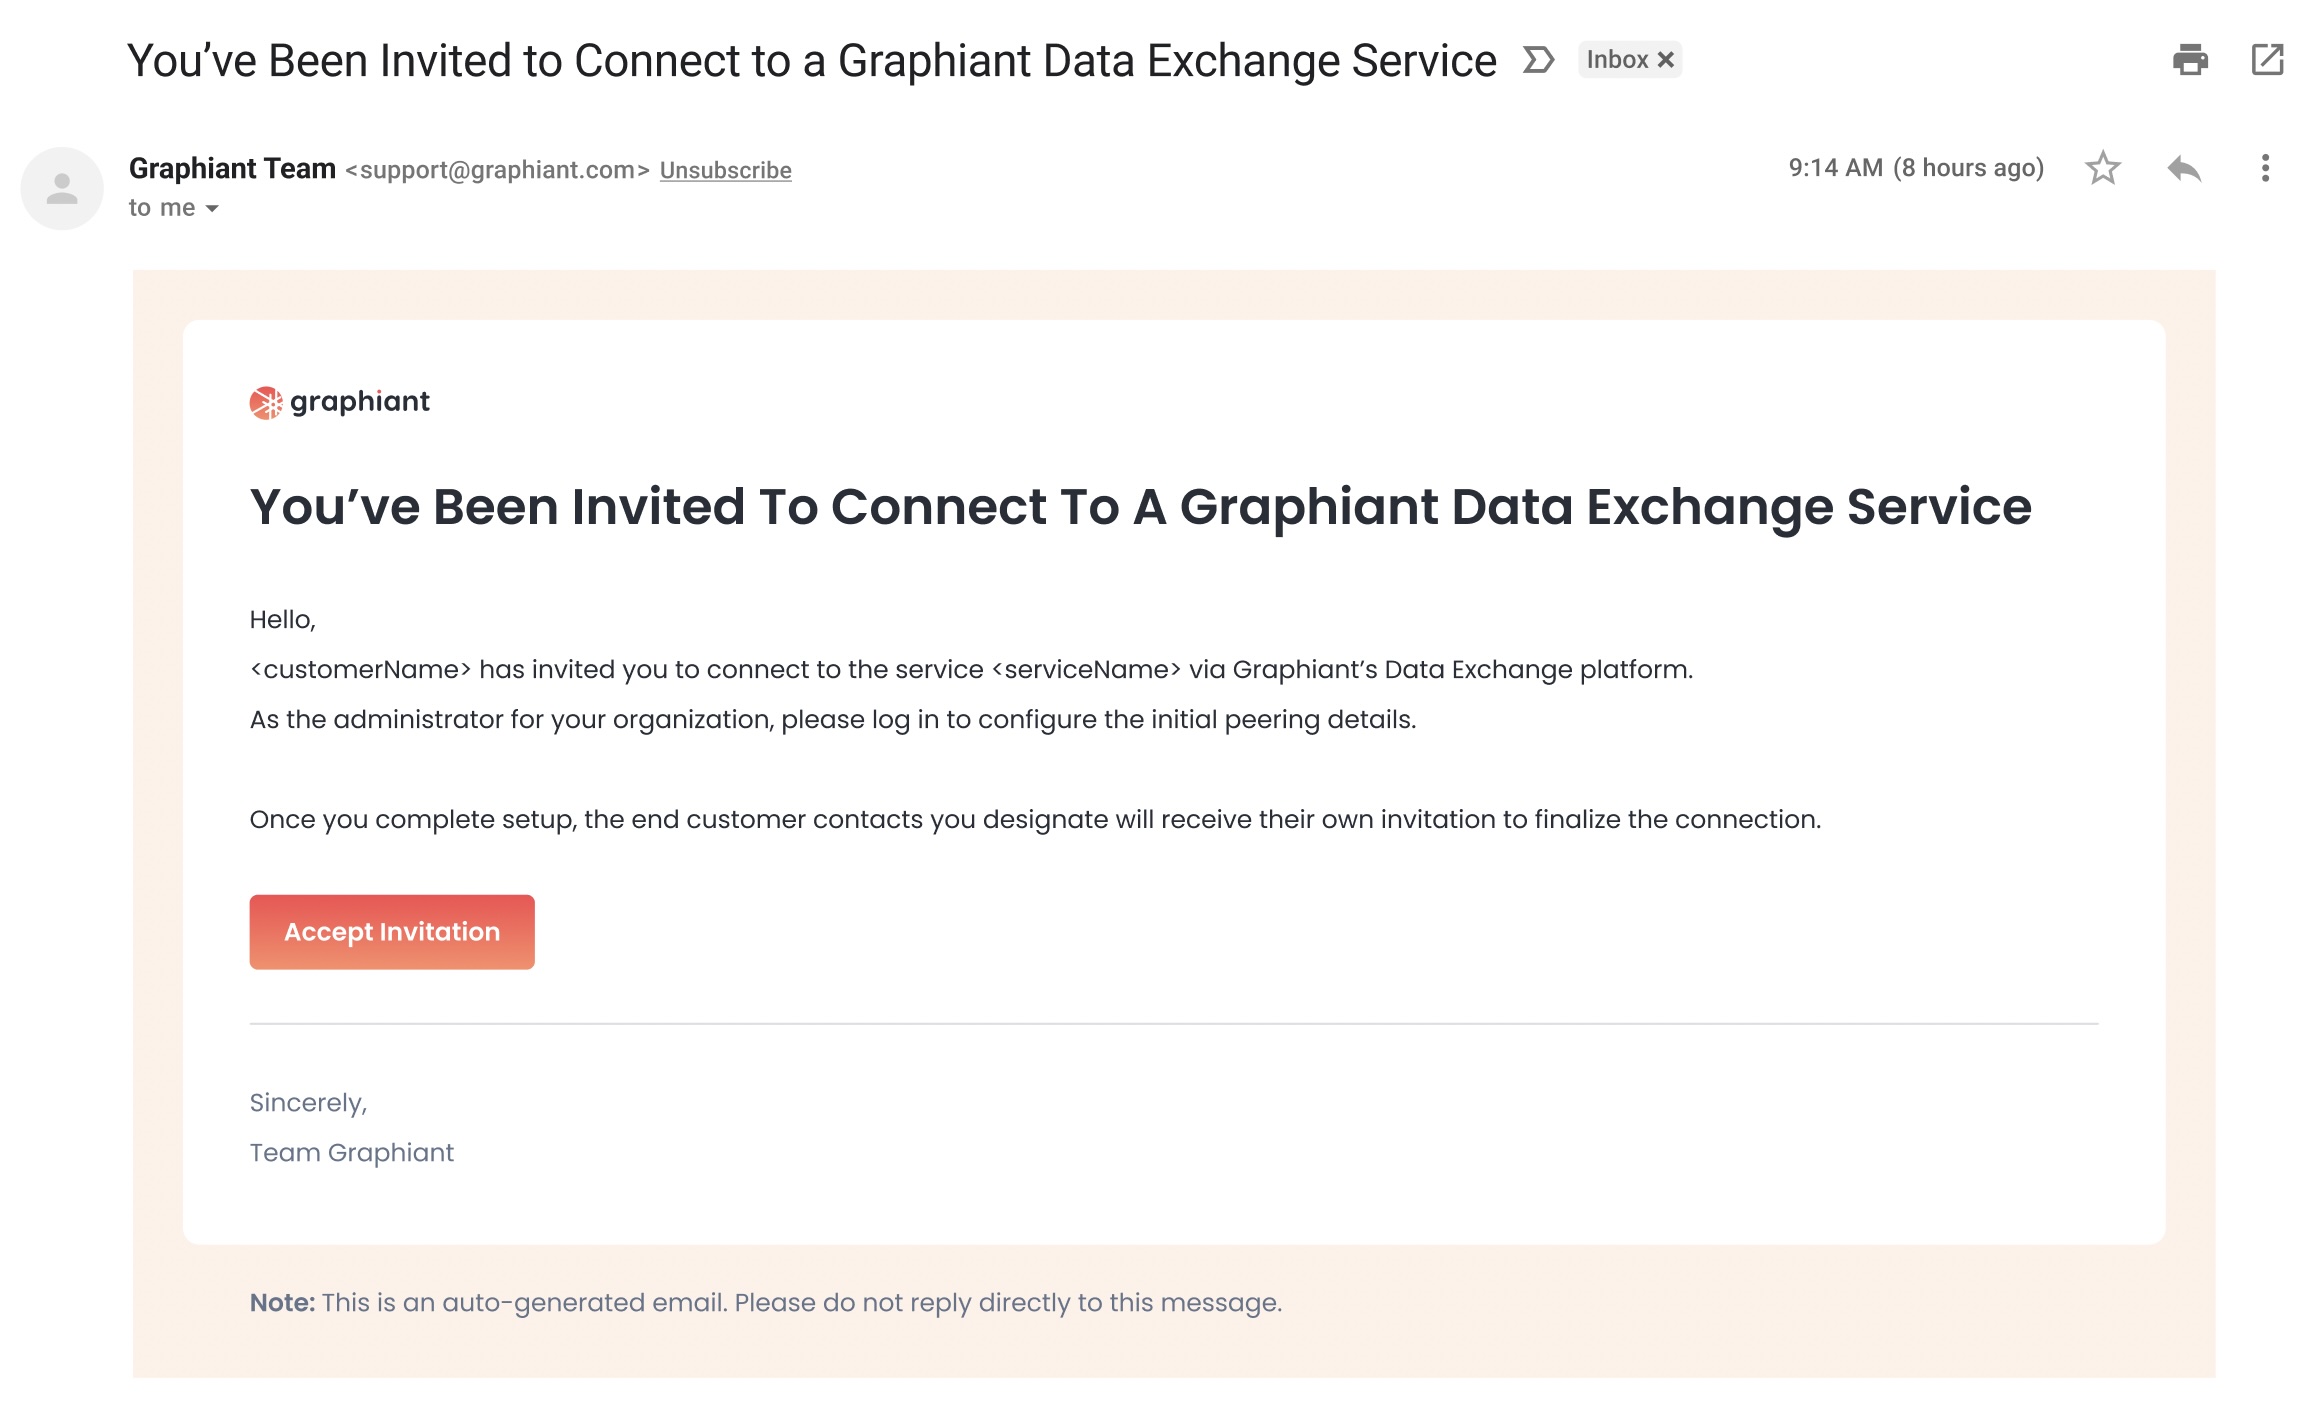
The customer will receive an email invitation to connect to your Graphiant Data Exchange Service.
They can follow these instructions on how to accept the invitation to connect to your Data Exchange Service.
Publishing Your Service to a Customer with a Third-Party Edge Device
Under the “Define Match” page, fill out each section as described.
Each step here will be marked with a green check mark when completed.
Service Name
From the dropdown, select the service from your inventory to which you will allow the customer access.
The Service Name you select:
Will determine the prefixes and settings available below.
Consumer Prefixes
These are the prefixes that your customer has given you, so that you may grant them access to your service.
Host Prefix: Enter the customer’s prefix; more can be added as necessary
NAT’d Prefix (Optional): If they have provided NAT translation, enter it here
To add more prefixes, click the [+] icon at the top of this section
Caution:
Any traffic that doesn’t have one of these prefixes associated with it will be dropped.
Service Prefixes
These are all of the prefixes that are available for you to advertise with this particular service (entered when creating the service).
Select the prefixes that you would like this customer to be able to utilize.
Once all sections are completed and marked with a green checkmark, confirm that all entered information is correct.
Click ‘Assign Services’.
A customer who is not on the Graphiant network will not have access to the Graphiant Portal directly.
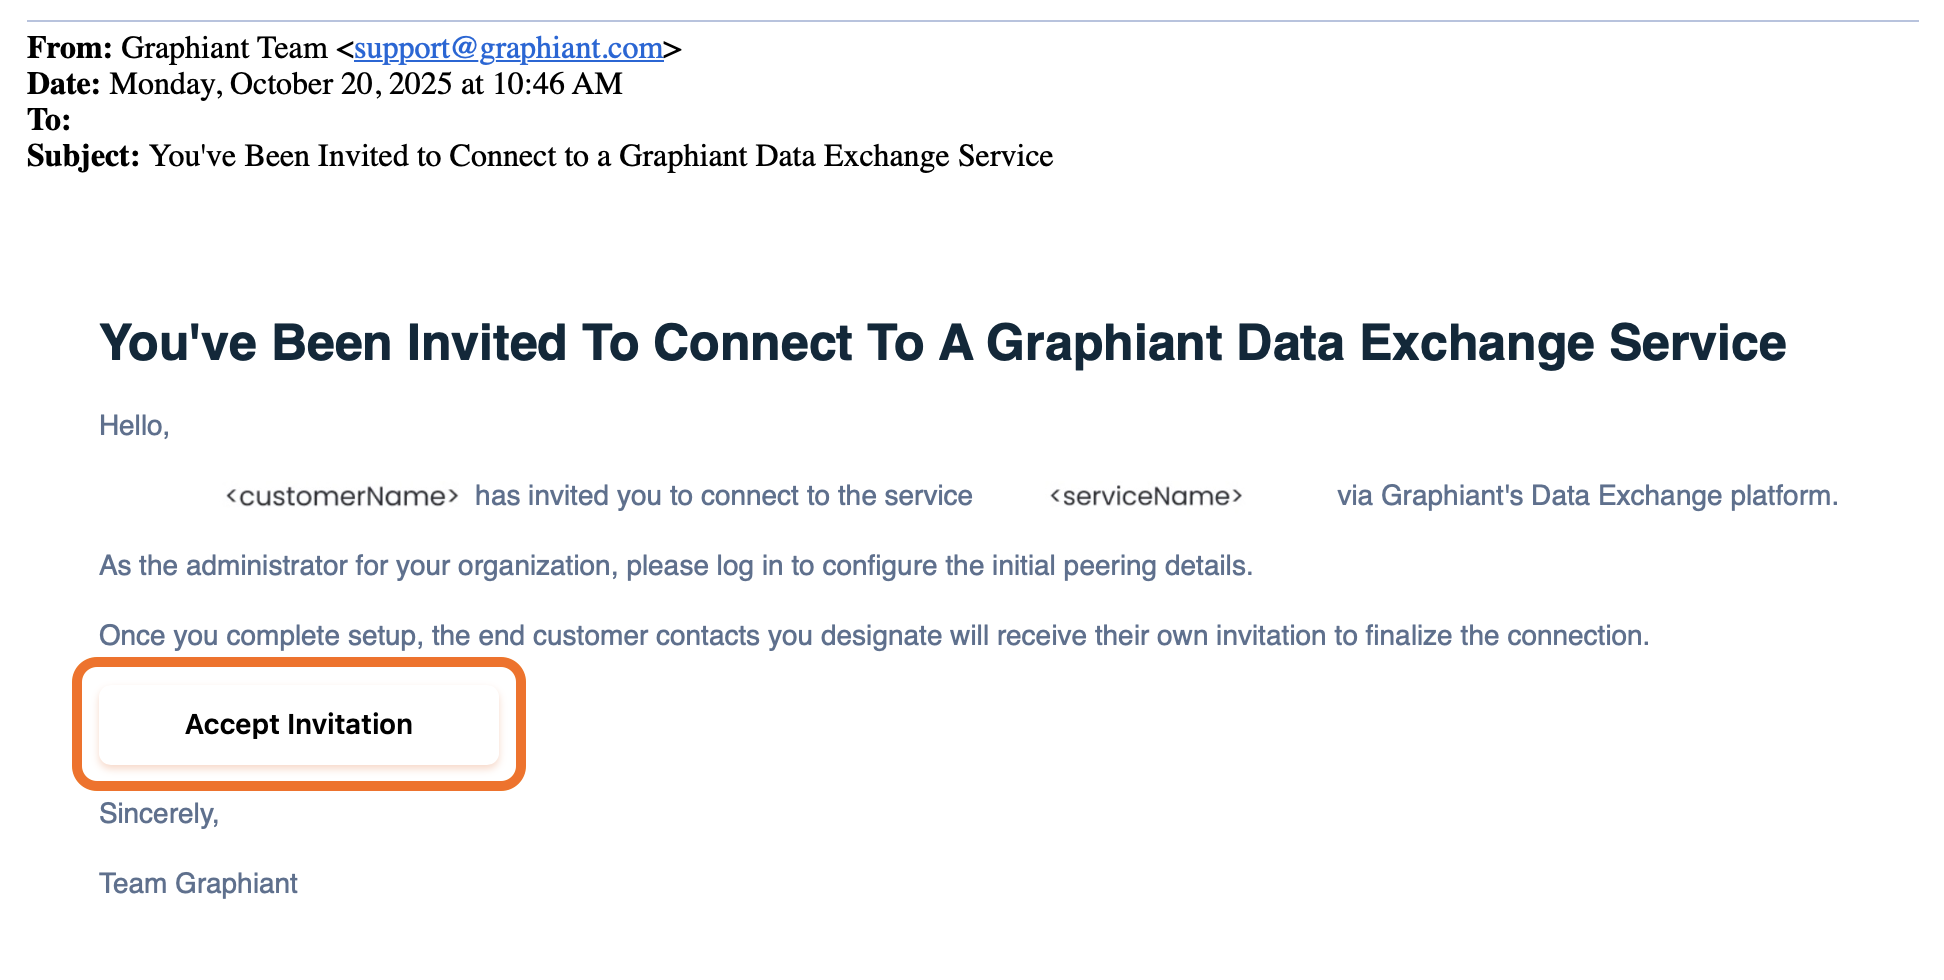
You will receive an email invitation to setup your intermediary configuration within the portal for them to connect.
Click ‘Accept Invitation’ to begin the process.
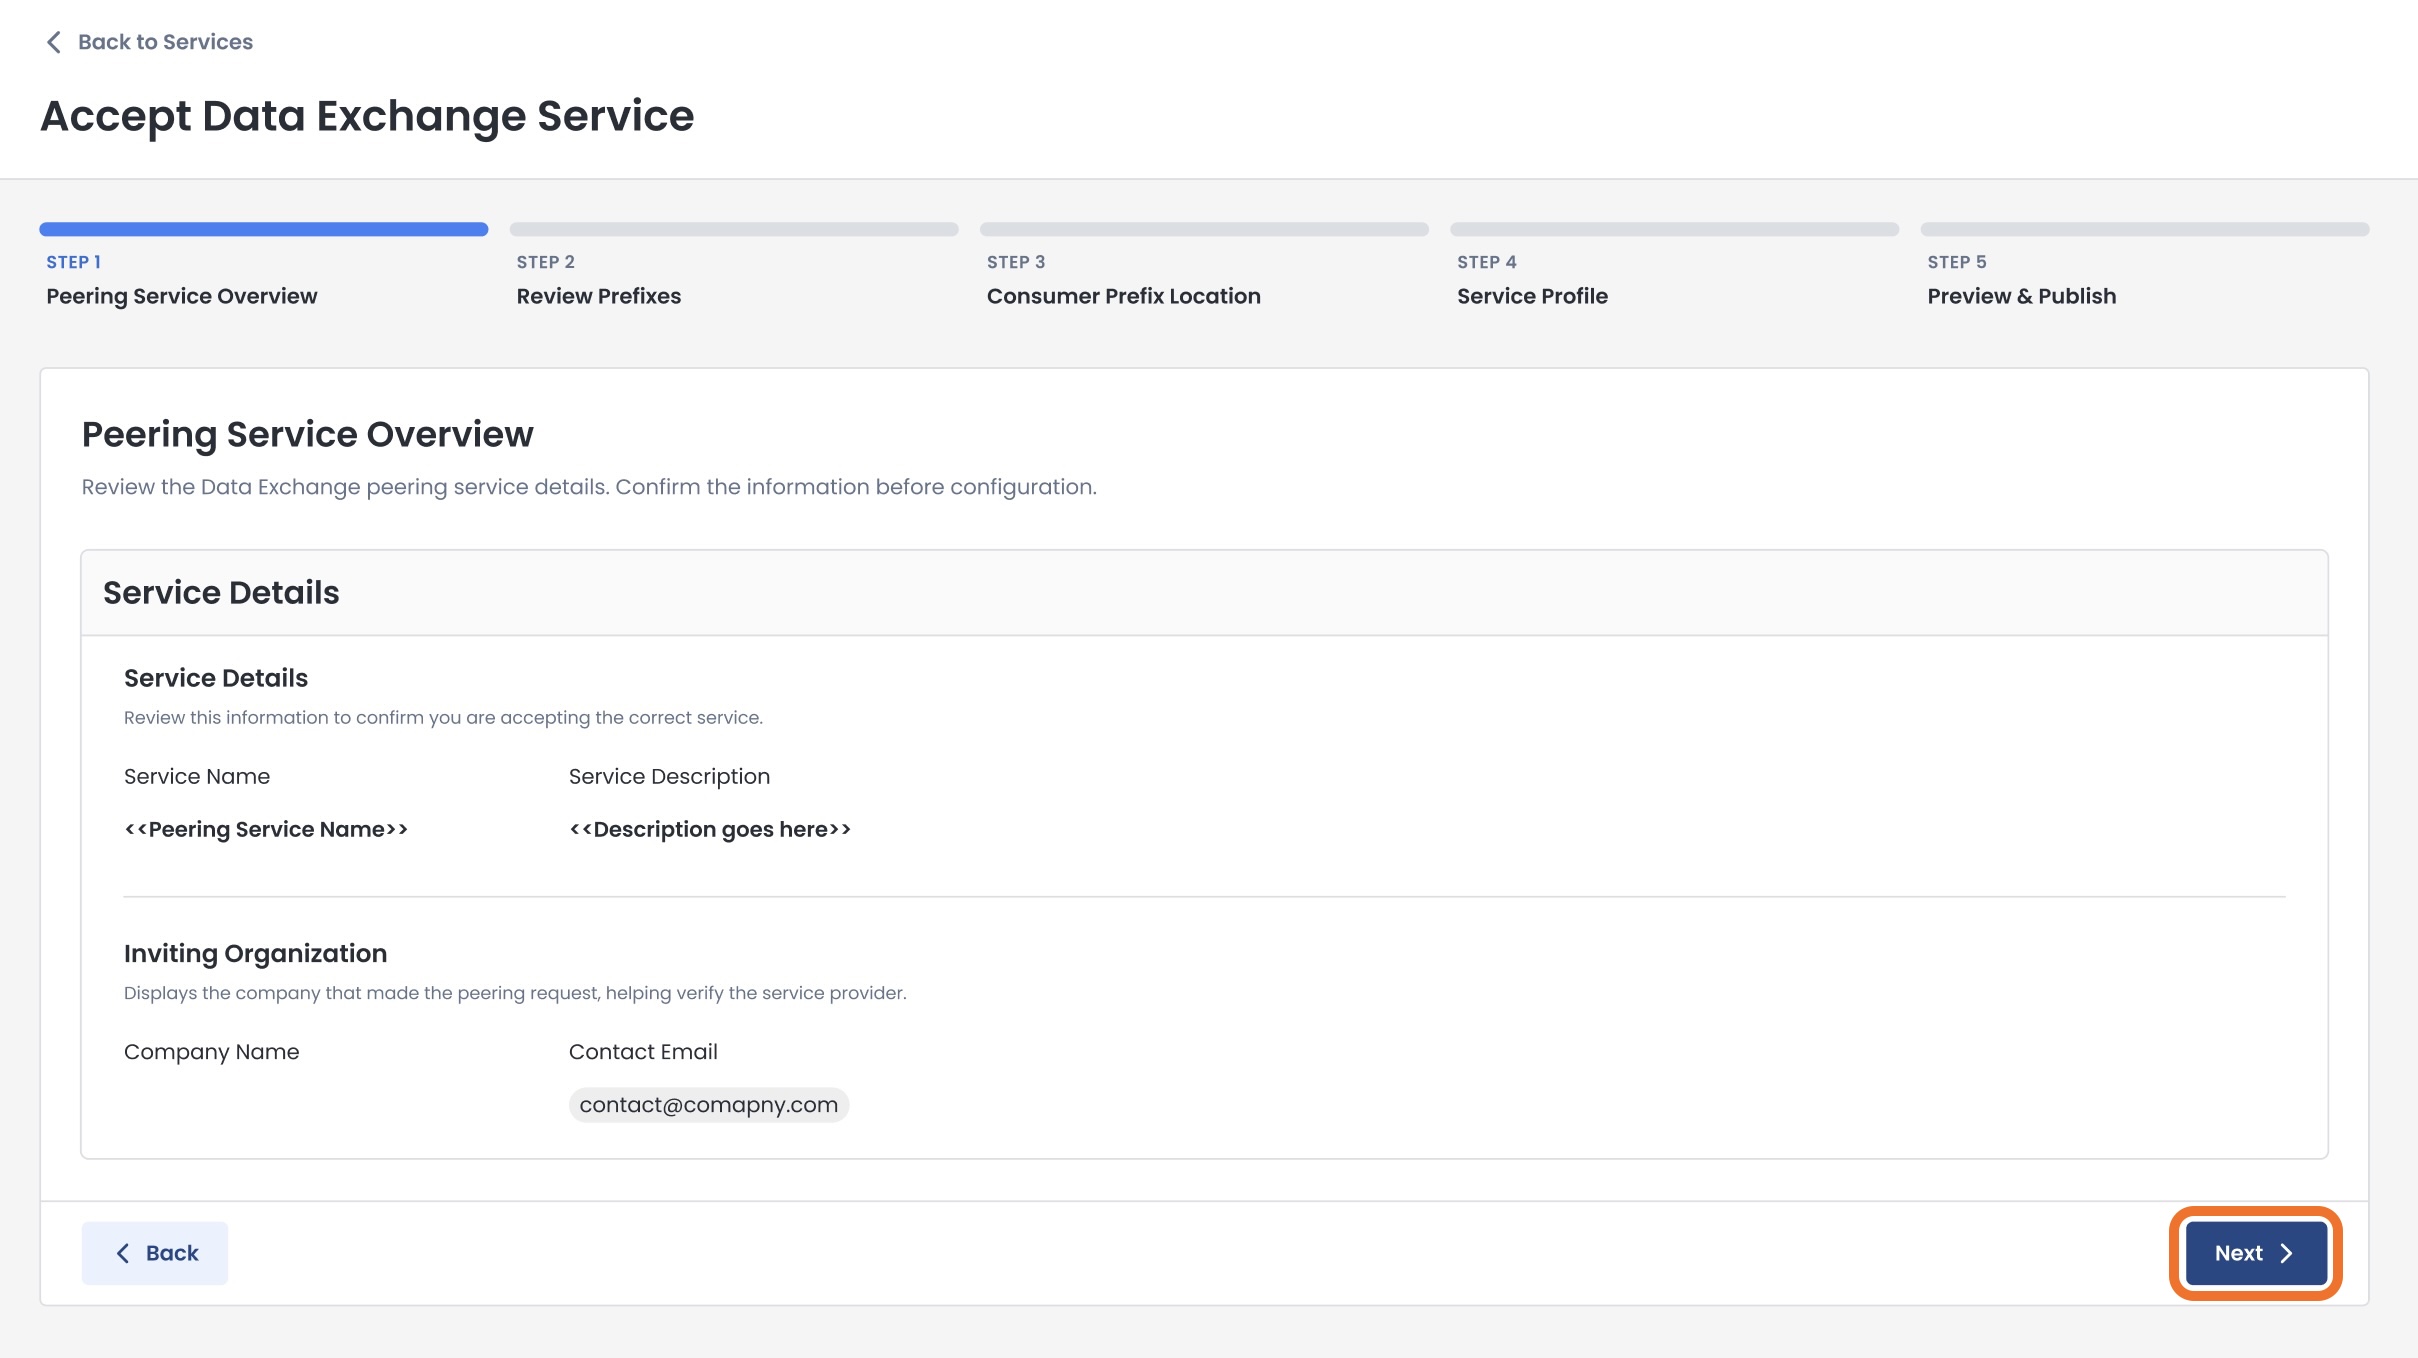
Setting Up the Data Exchange Connection for Your End Customer on a Third-Party Edge Device
You will be acting as a proxy tenant for your end customer:
This tenant will be the location where the service will land for any of your end customers who will use third-party edge devices.
Fill out all information below from the perspective of you being the customer.
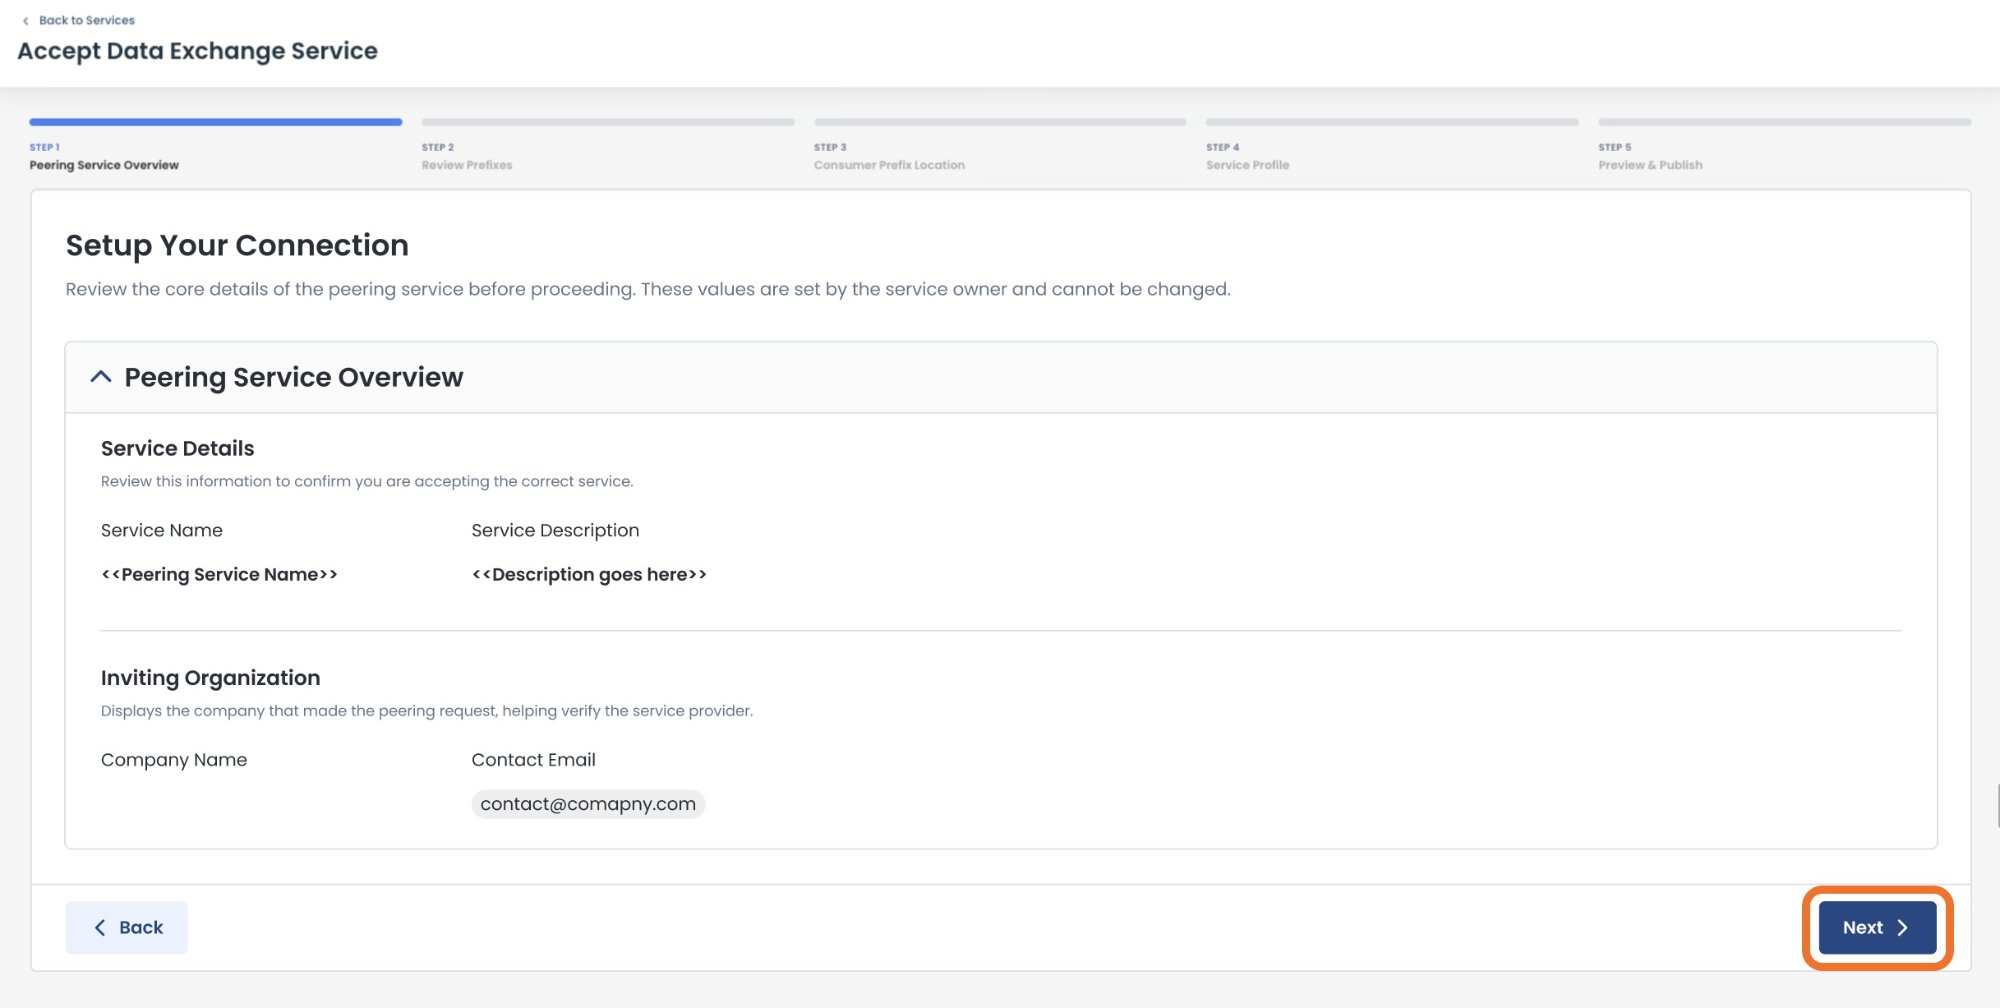
After logging in to the Graphiant Portal, you will be landed on the Peering Service Overview page for Step 1.
Step 1: Peering Service Overview
Verify that the information regarding the service and the inviting organization is correct.
Click ‘Next’.
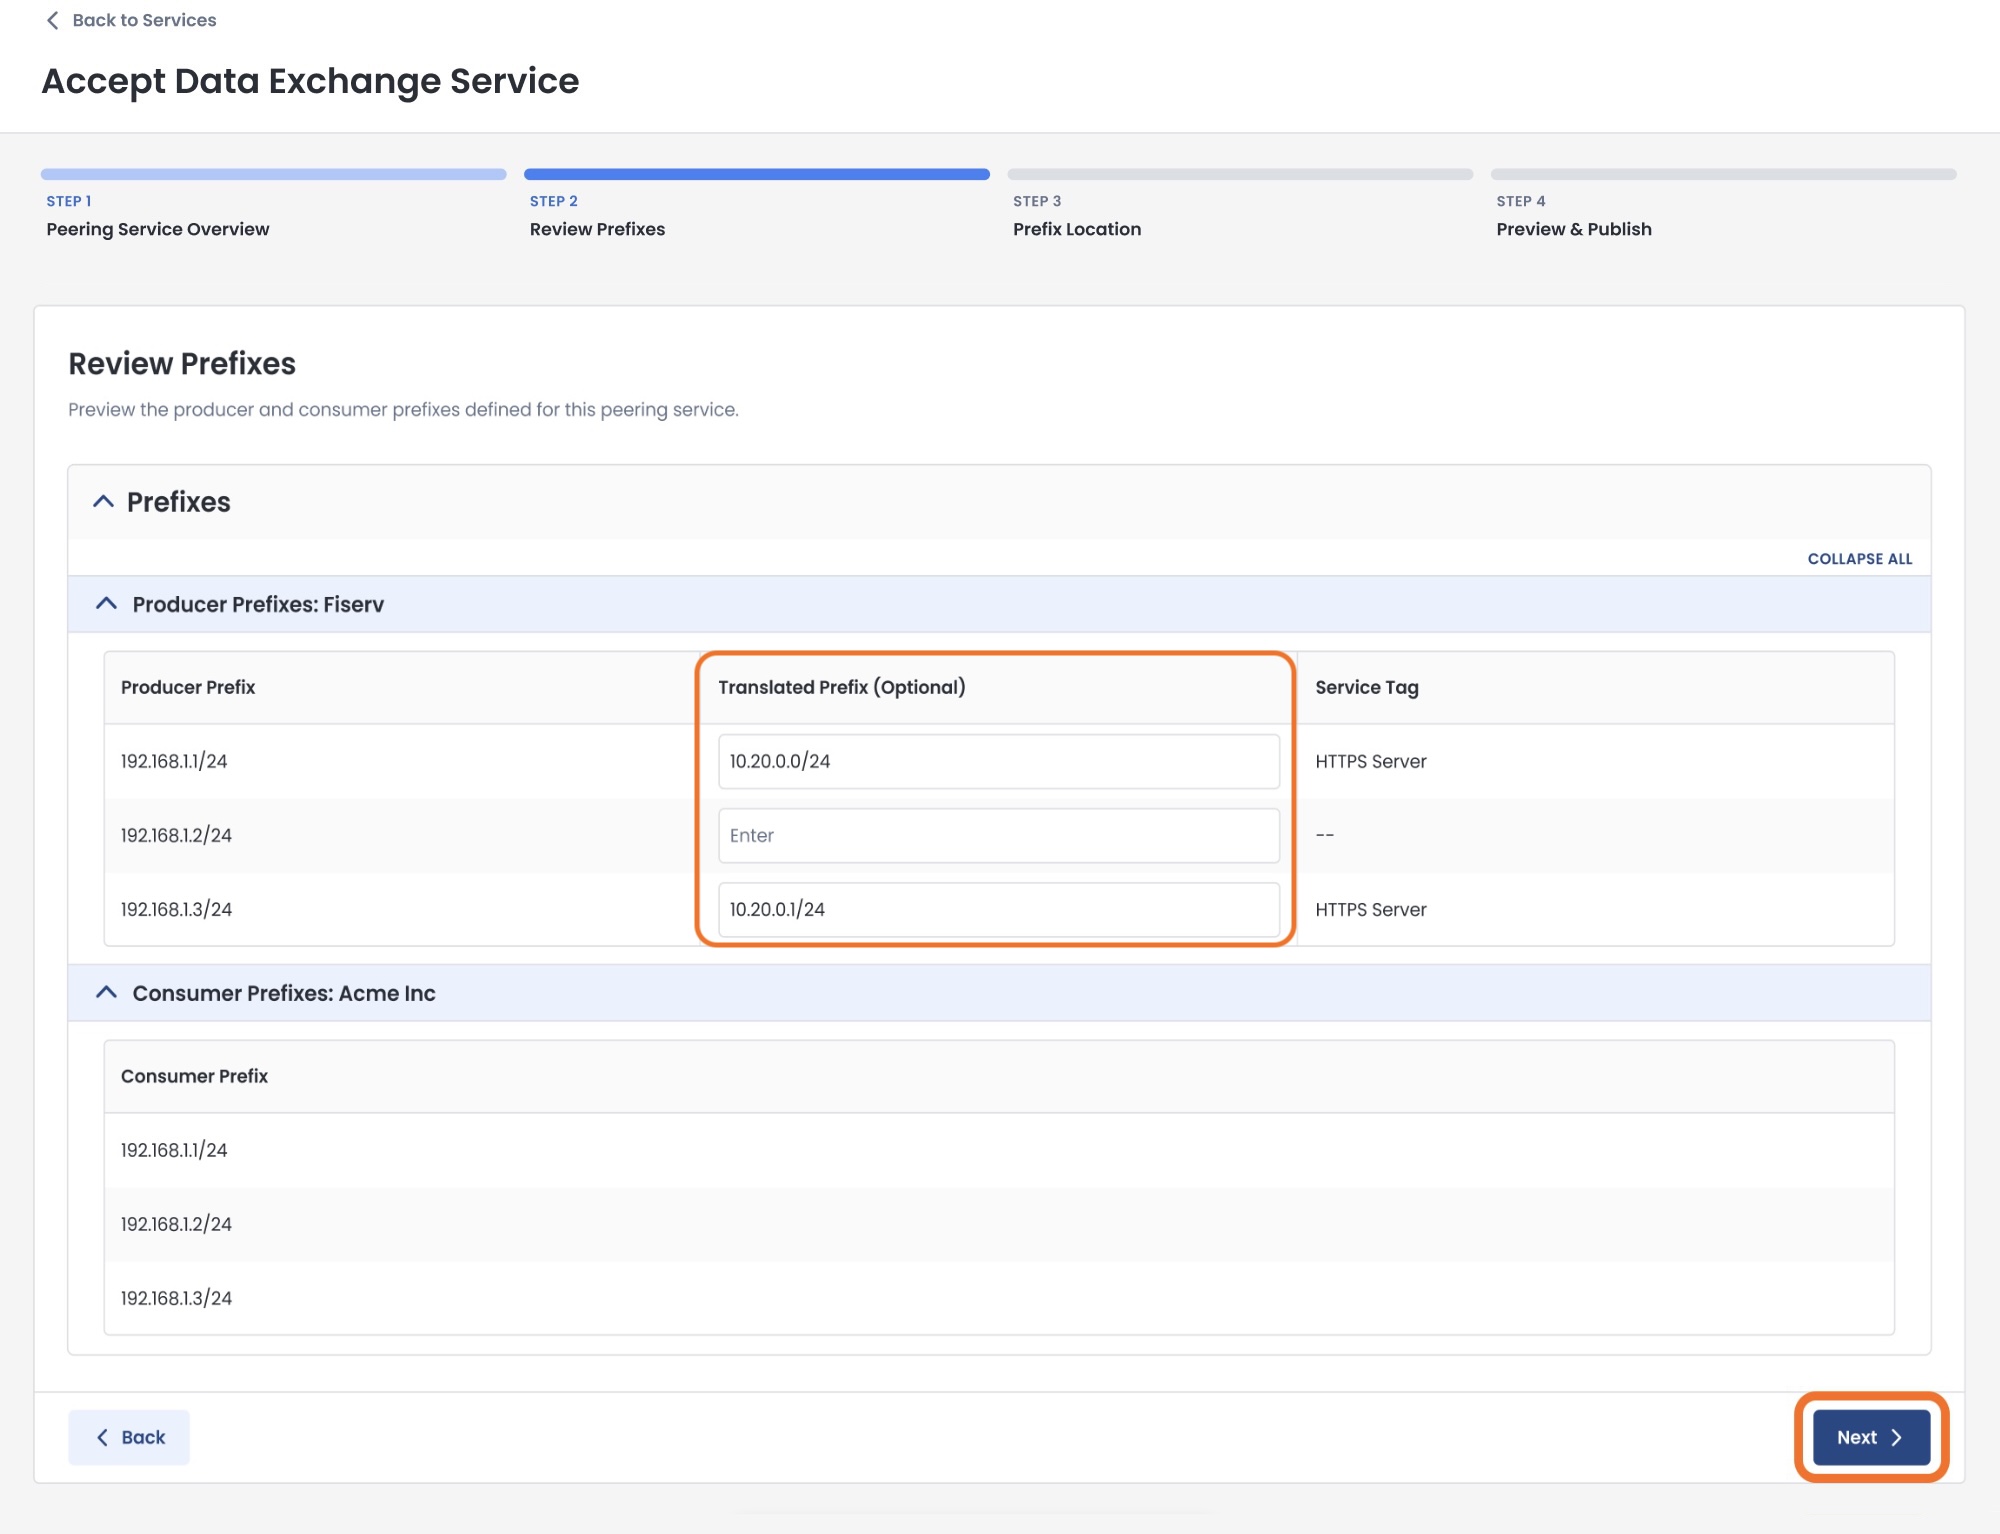
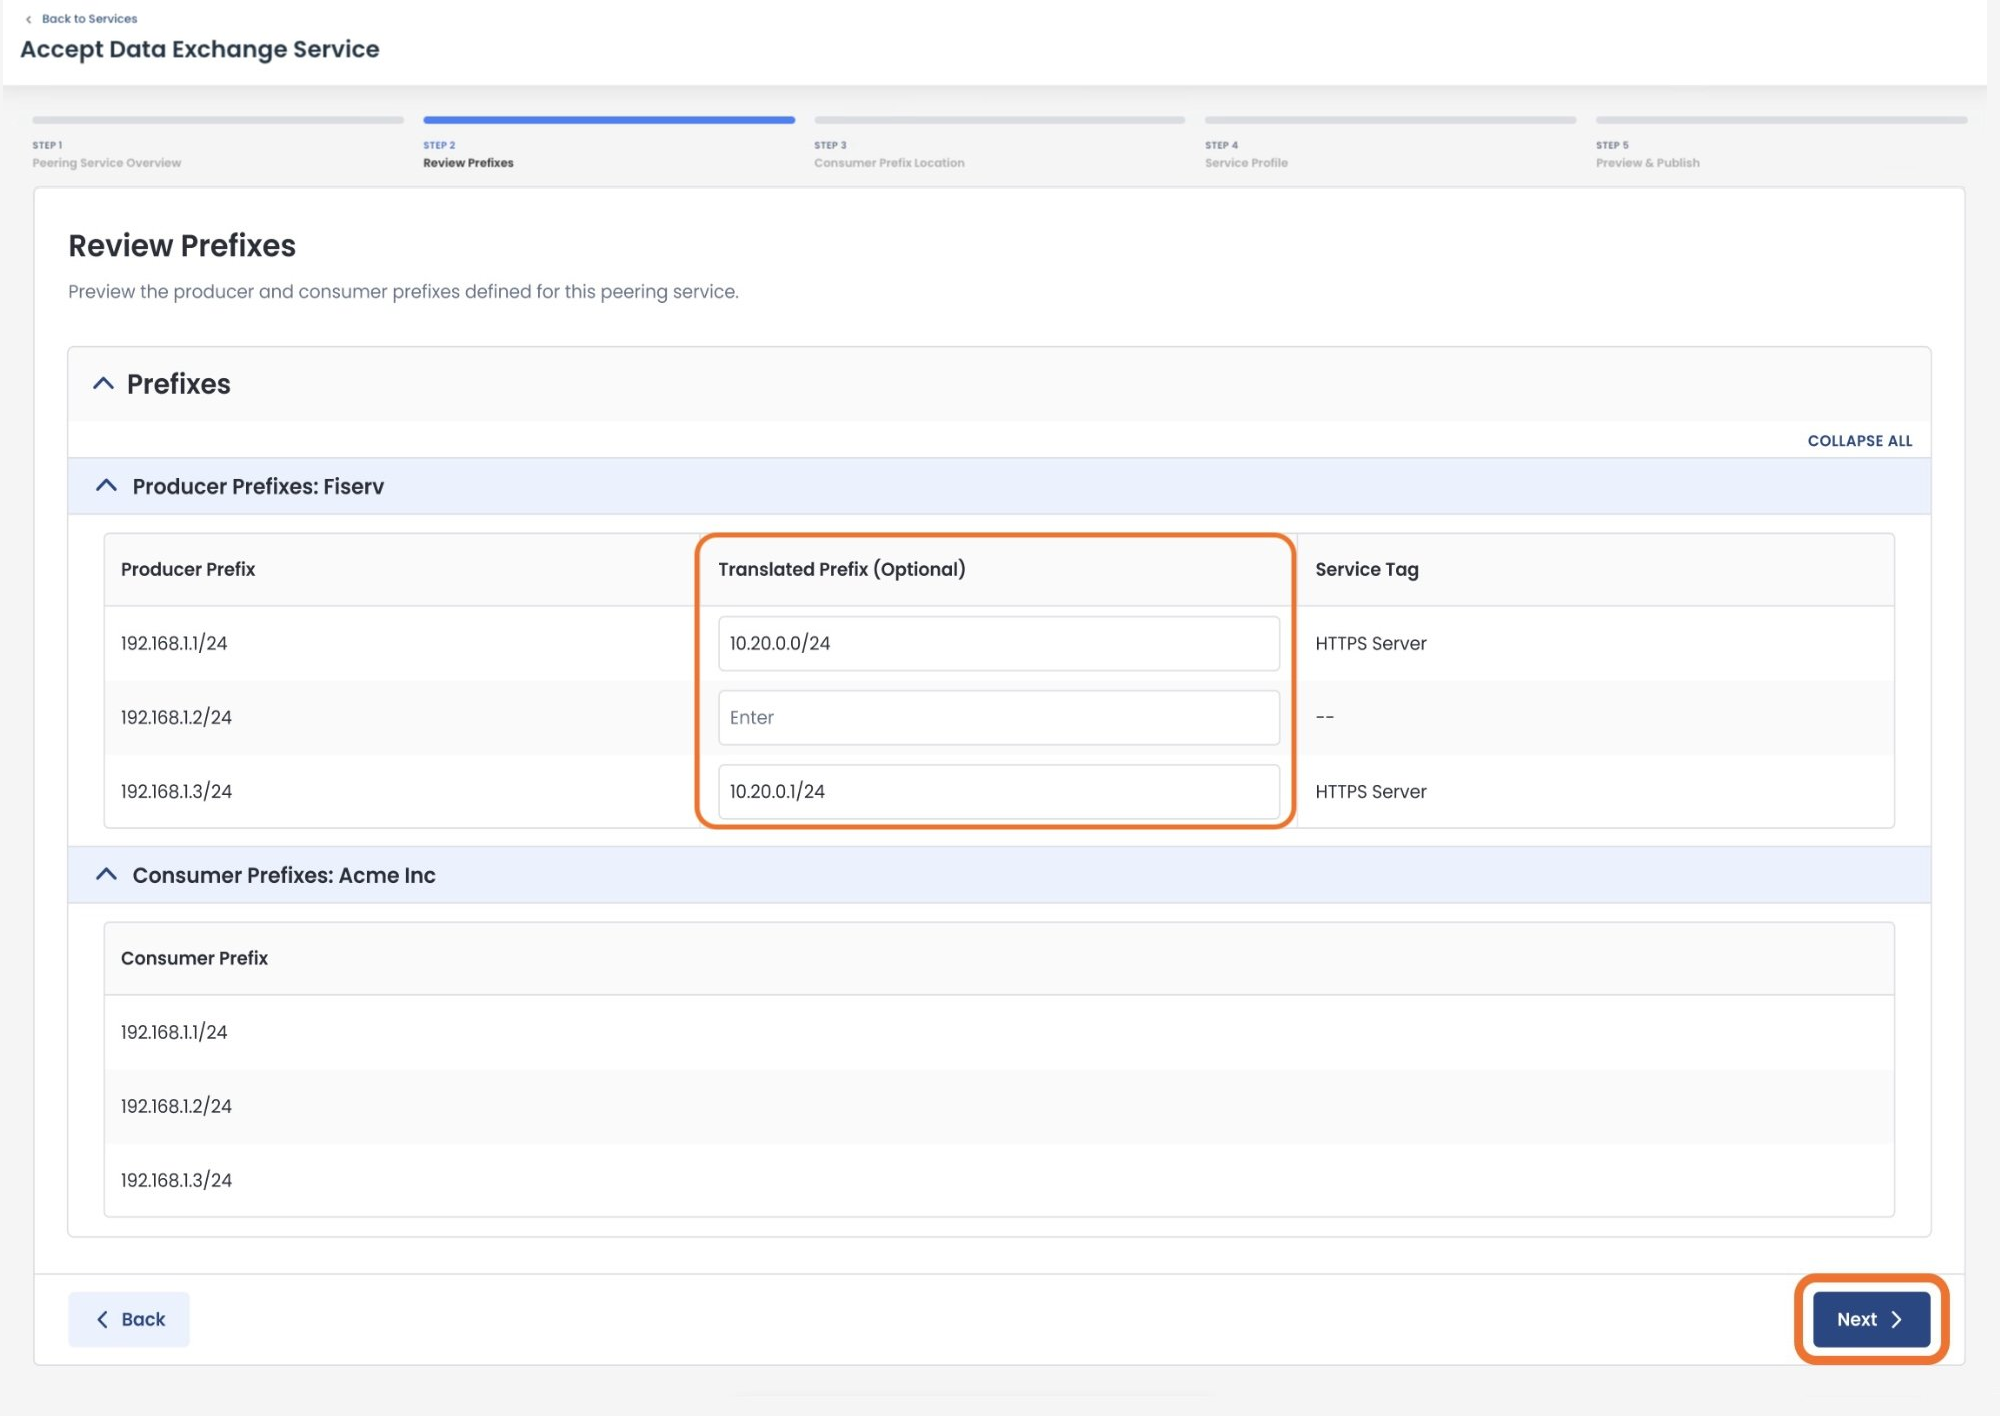
Step 2: Review Prefixes
Now you will be able to confirm the information regarding the prefixes for both sides of the connection.
Producer Prefixes: Prefixes that will be advertised from the service
Translated Prefix (Editable and optional): Should you prefer to use different values to ensure no conflicts within your own routing domain, enter the translated prefixes here
Consumer Prefixes: Prefixes that will be allowed access to the service
Verify that the information is correct; click ‘Next’.
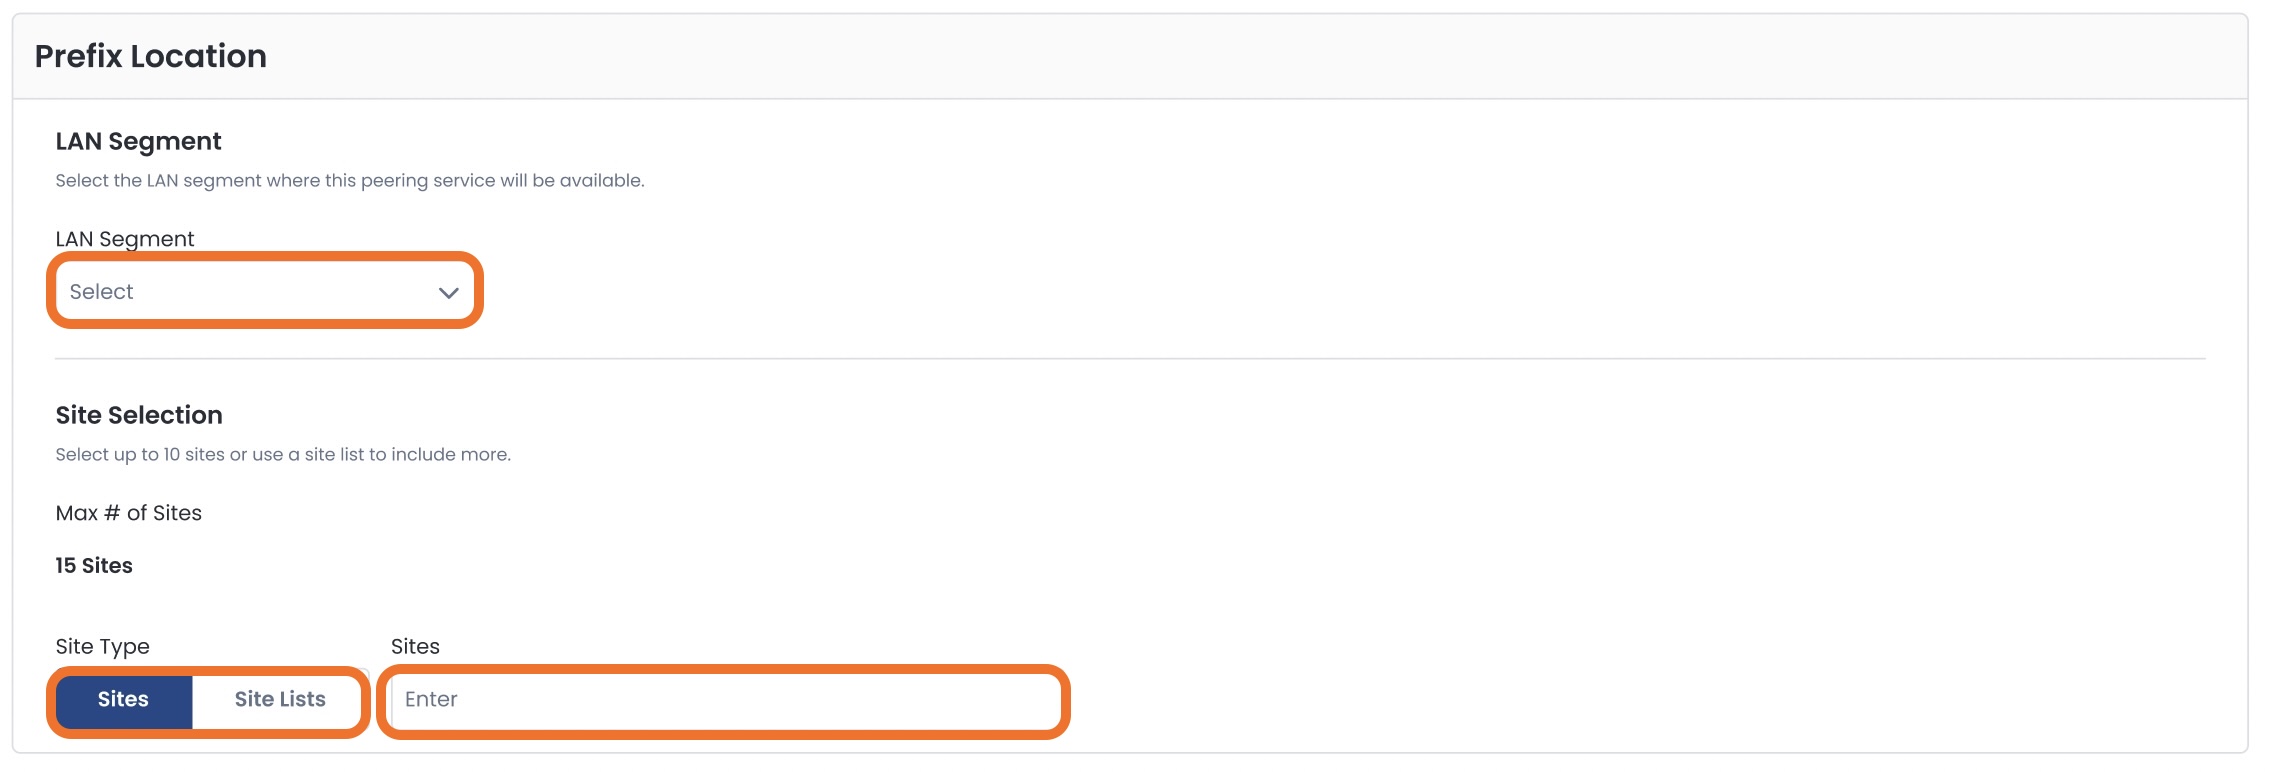
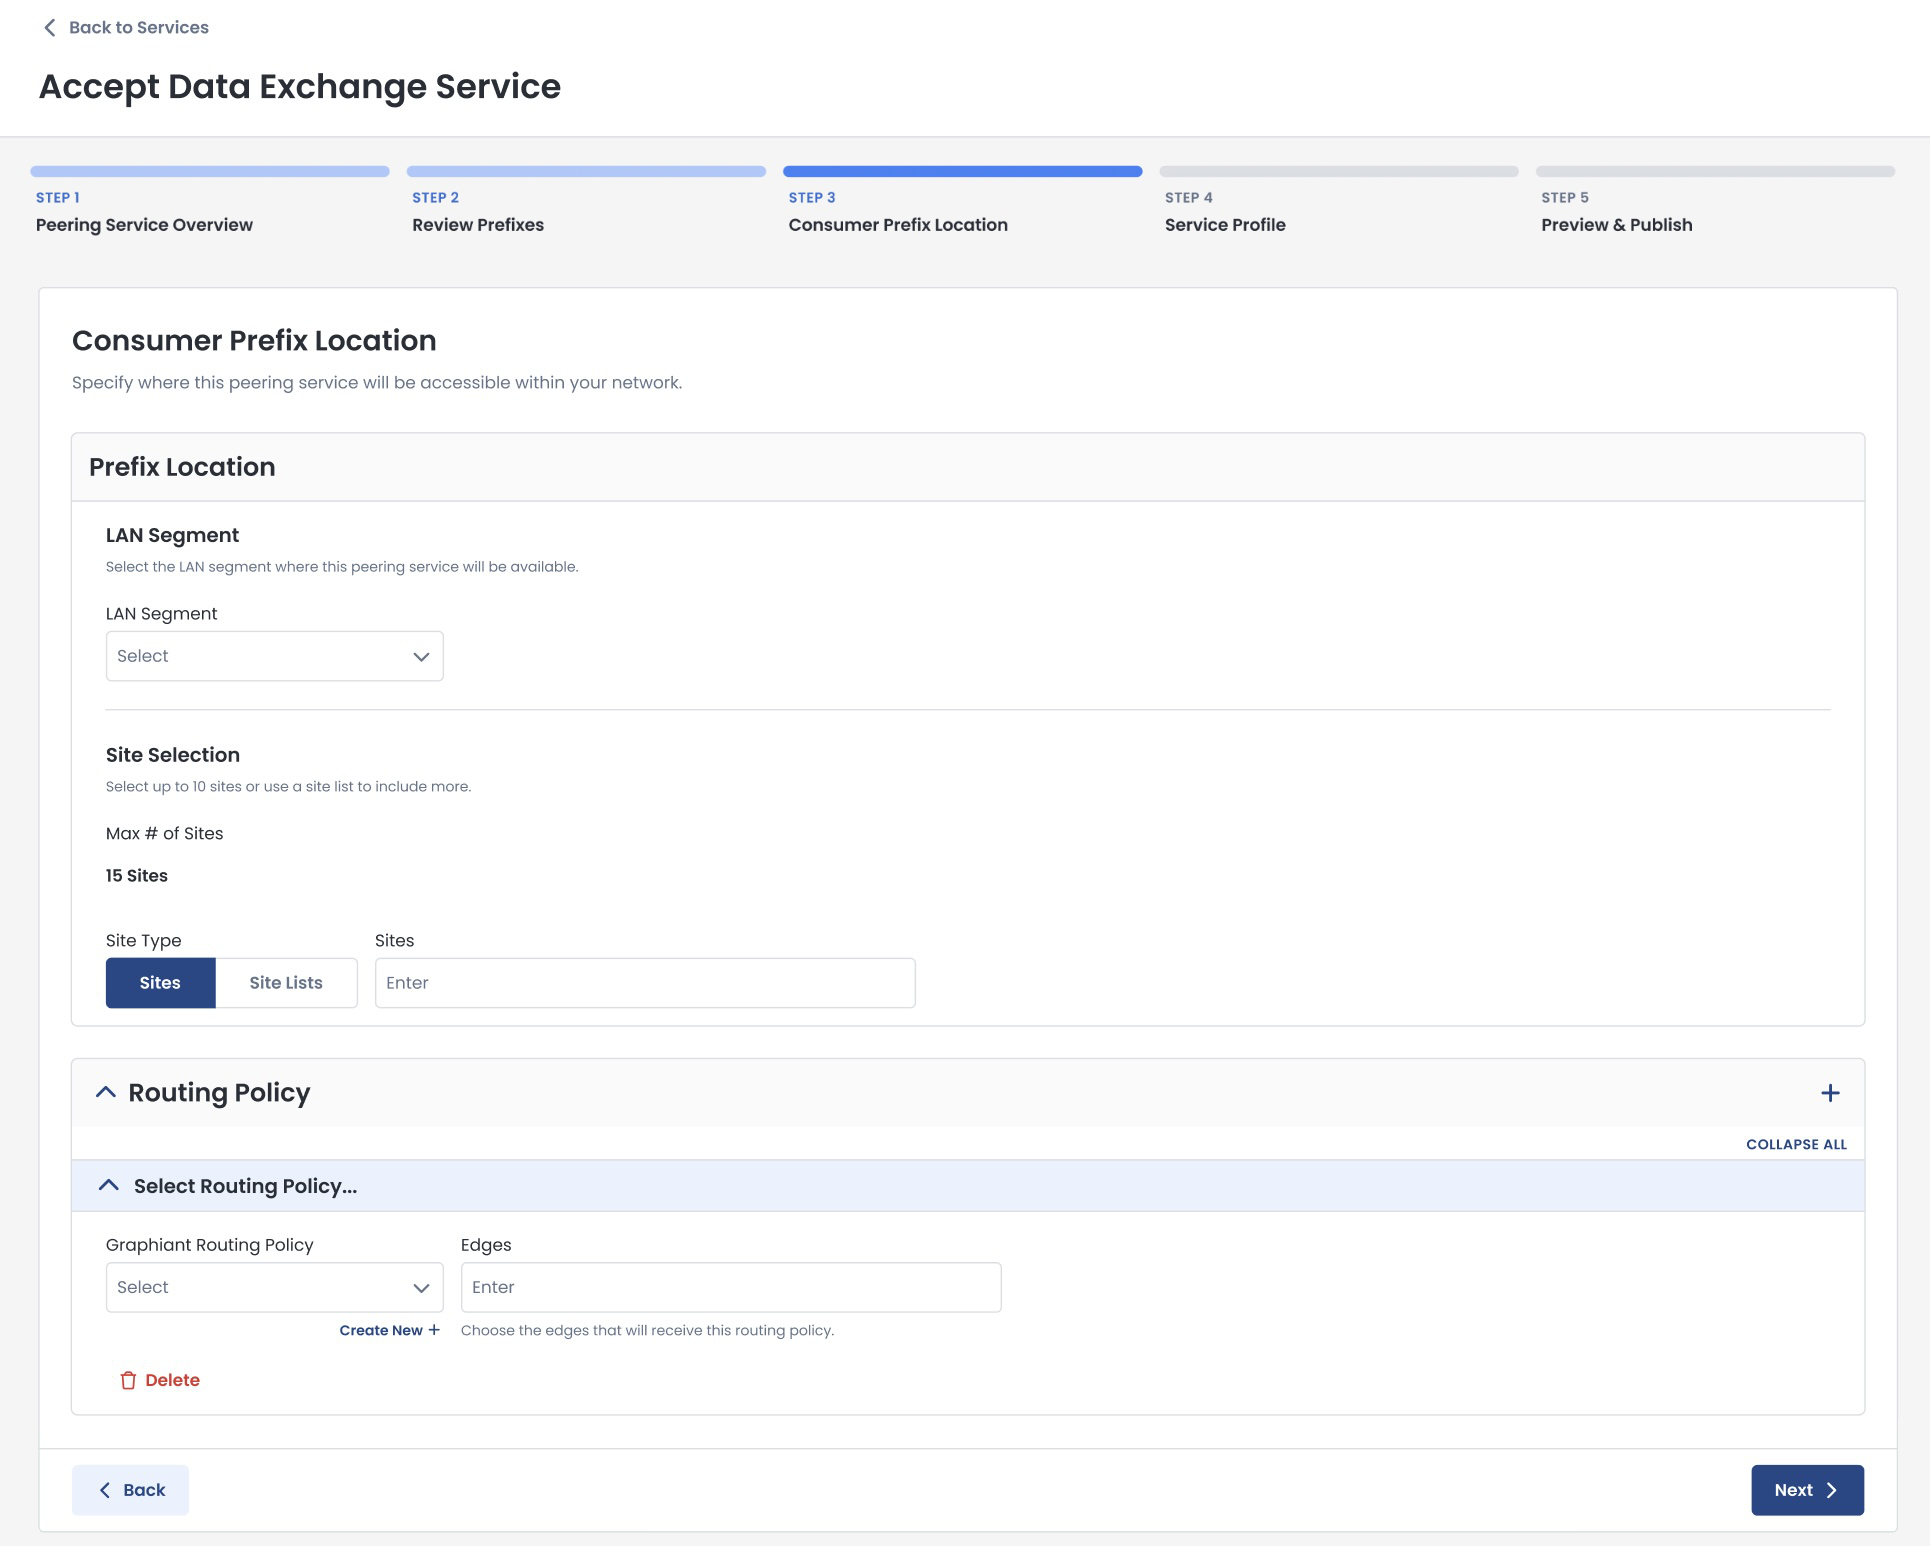
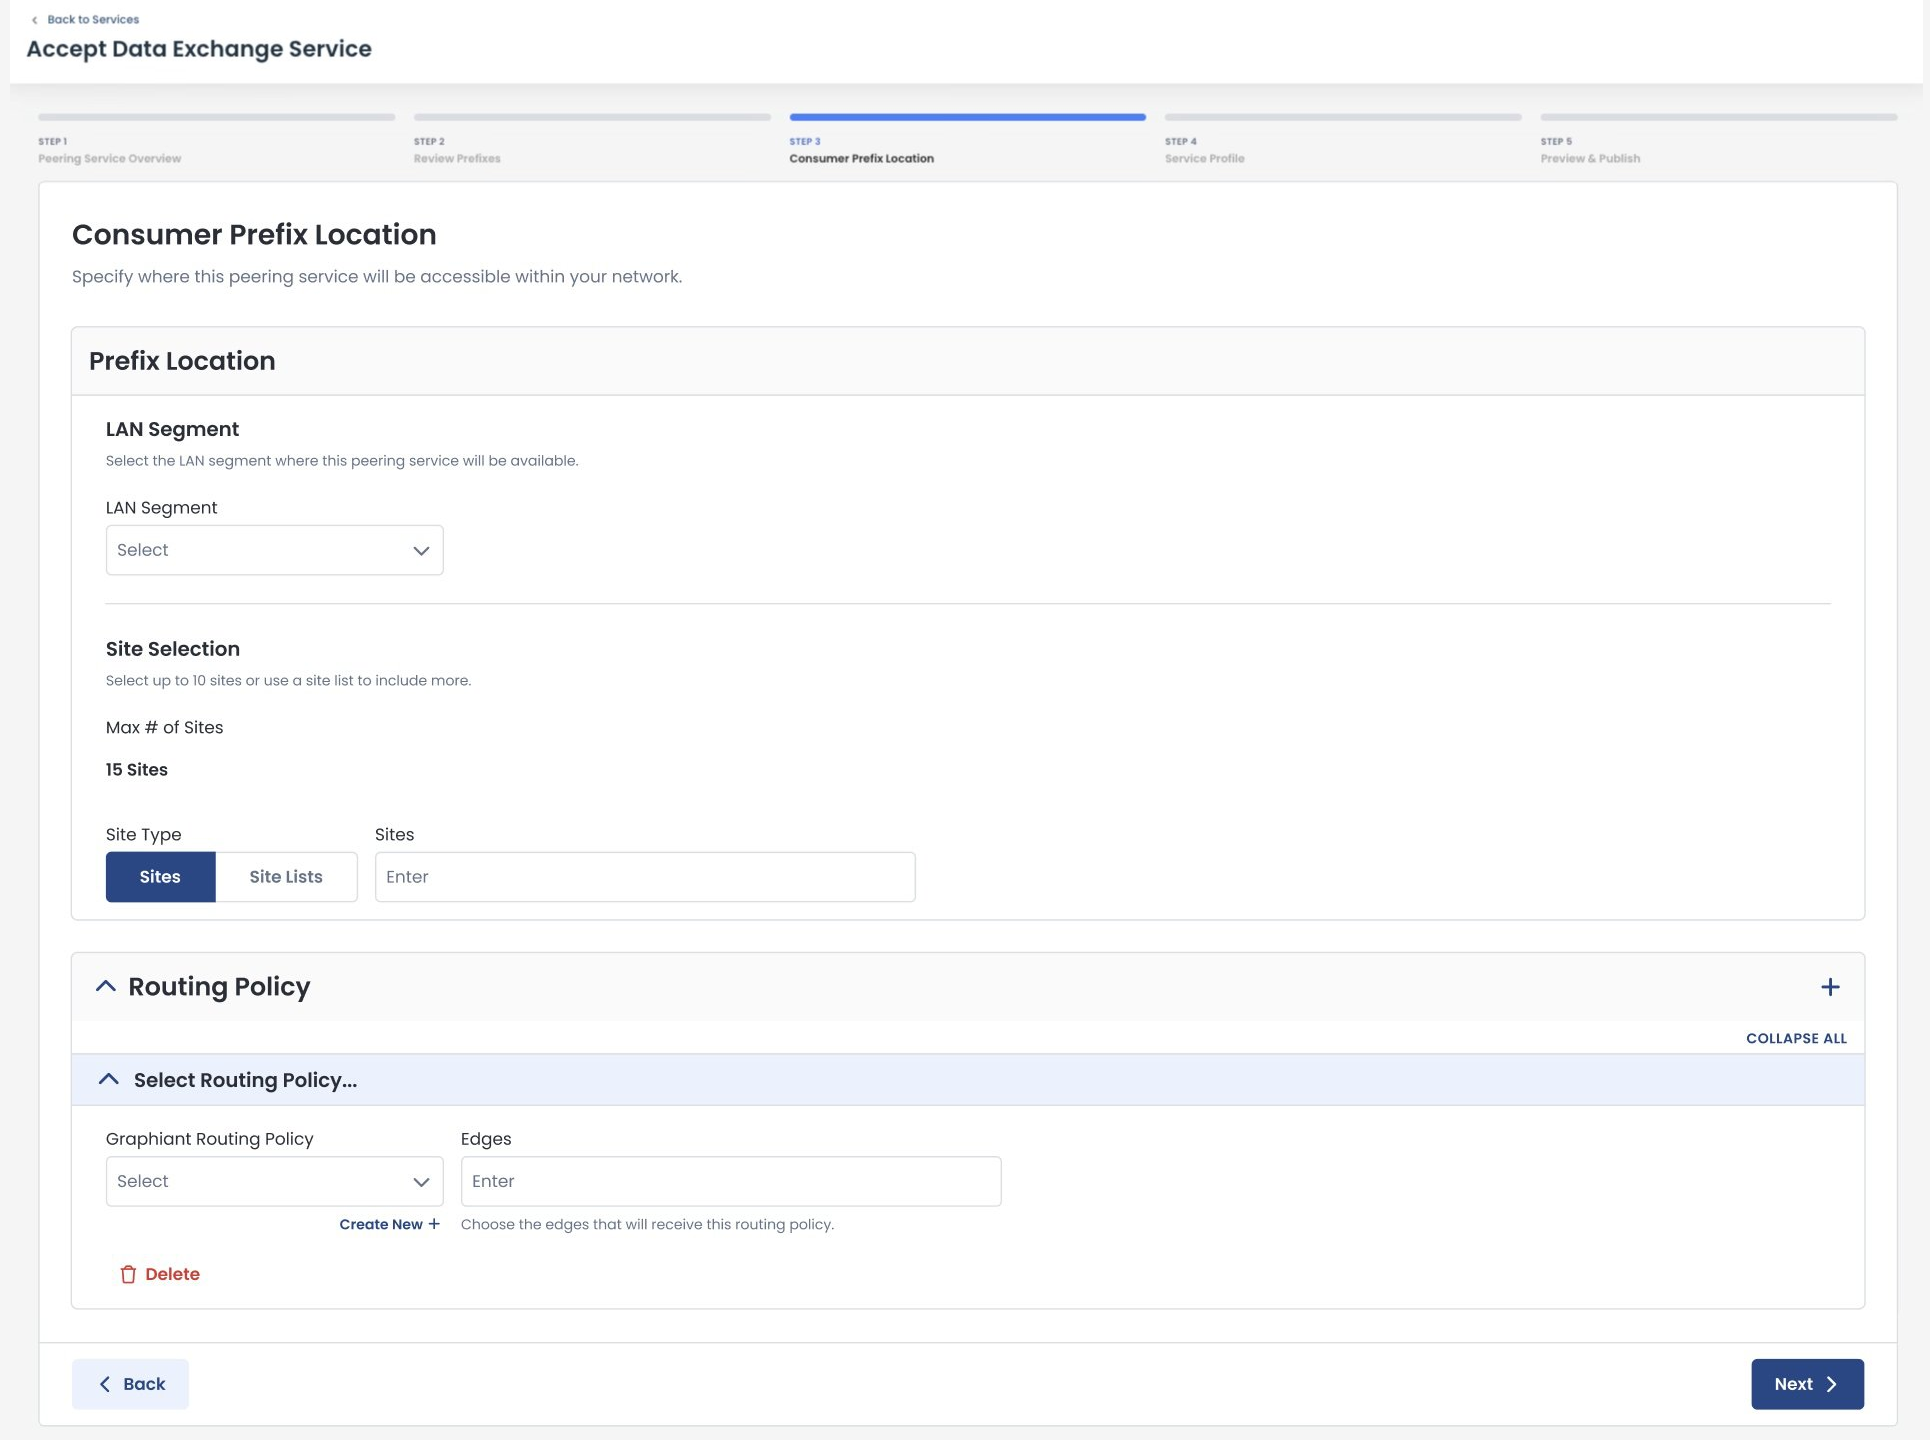
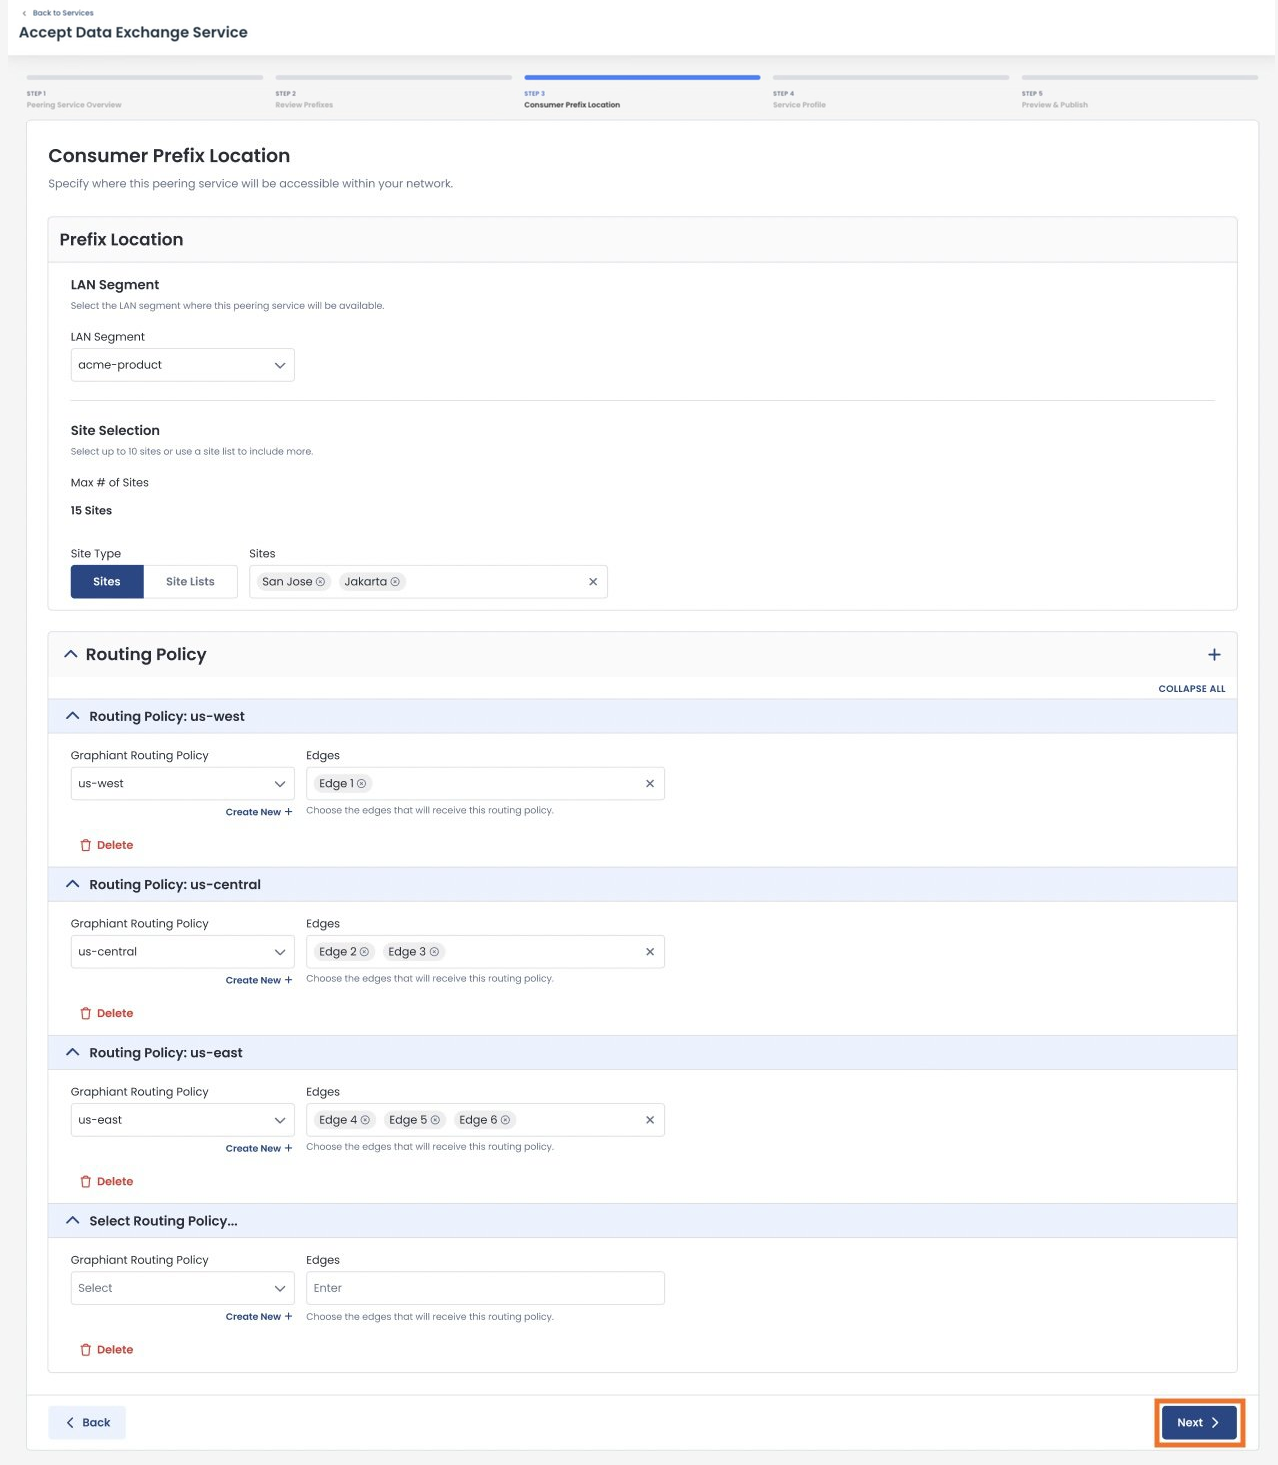
Step 3: Prefix Location
This is the configuration page for where this Data Exchange Service will be accessible within your network.

Complete the following sections:
Prefix Location:
LAN Segment: The LAN segment where this service will be available.
LAN Segments:
Must be selected before Site Selection.
Site Selection
Site Type: Choose either to enter the sites individually, or by site lists.
Site: You may enter up to 15 sites
Site List: Can contain as many sites as are in the list(s)
Site / Site List options:
Are dependent on the LAN segment chosen; the Sites / Site Lists that contain the selected LAN segment will be the only ones offered in the dropdown.
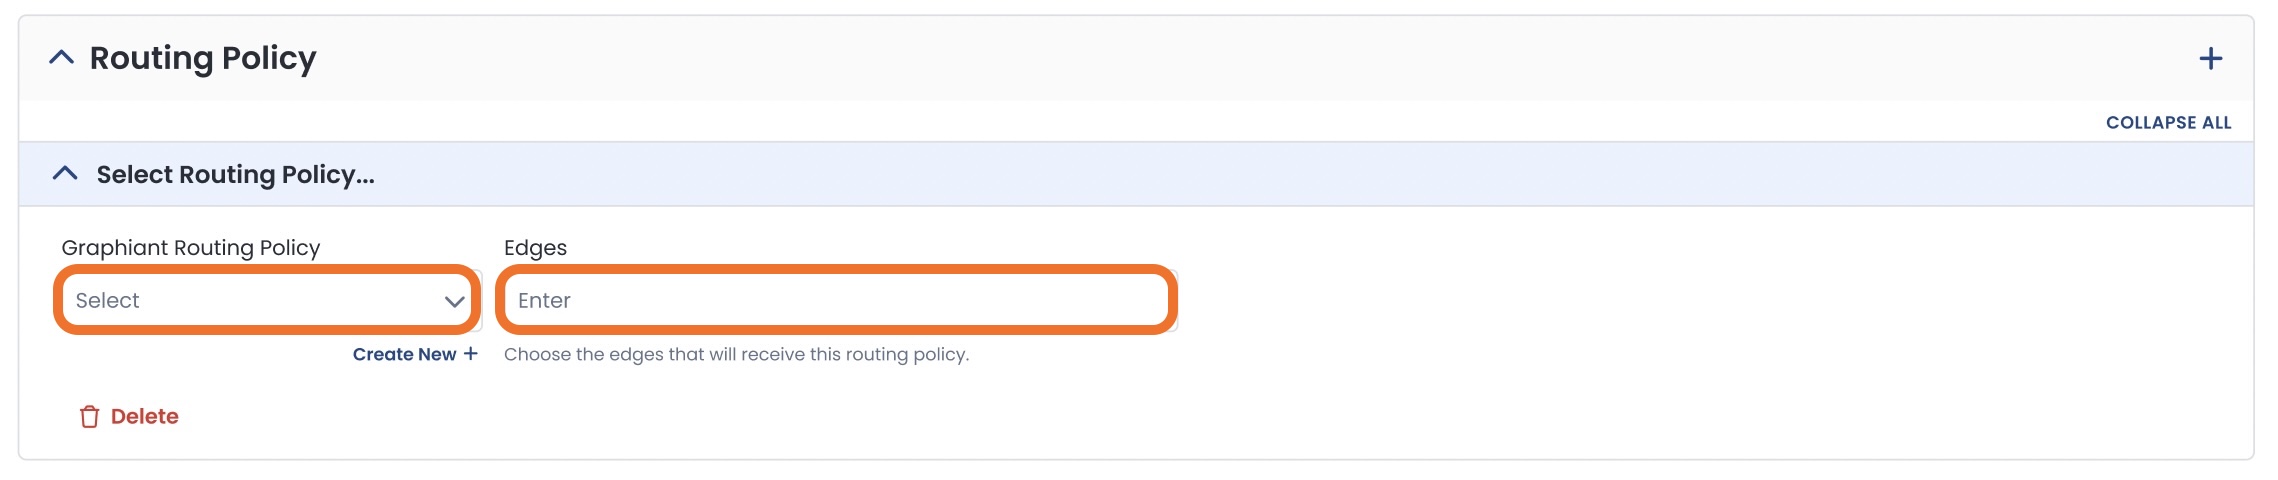
Routing Policy
Select a routing policy.
You can also create a new routing policy right from here.
For information on routing policies, click here.
Select which Edges will receive this policy.
Once you have verified that all of the information is correct, click ‘Next’.
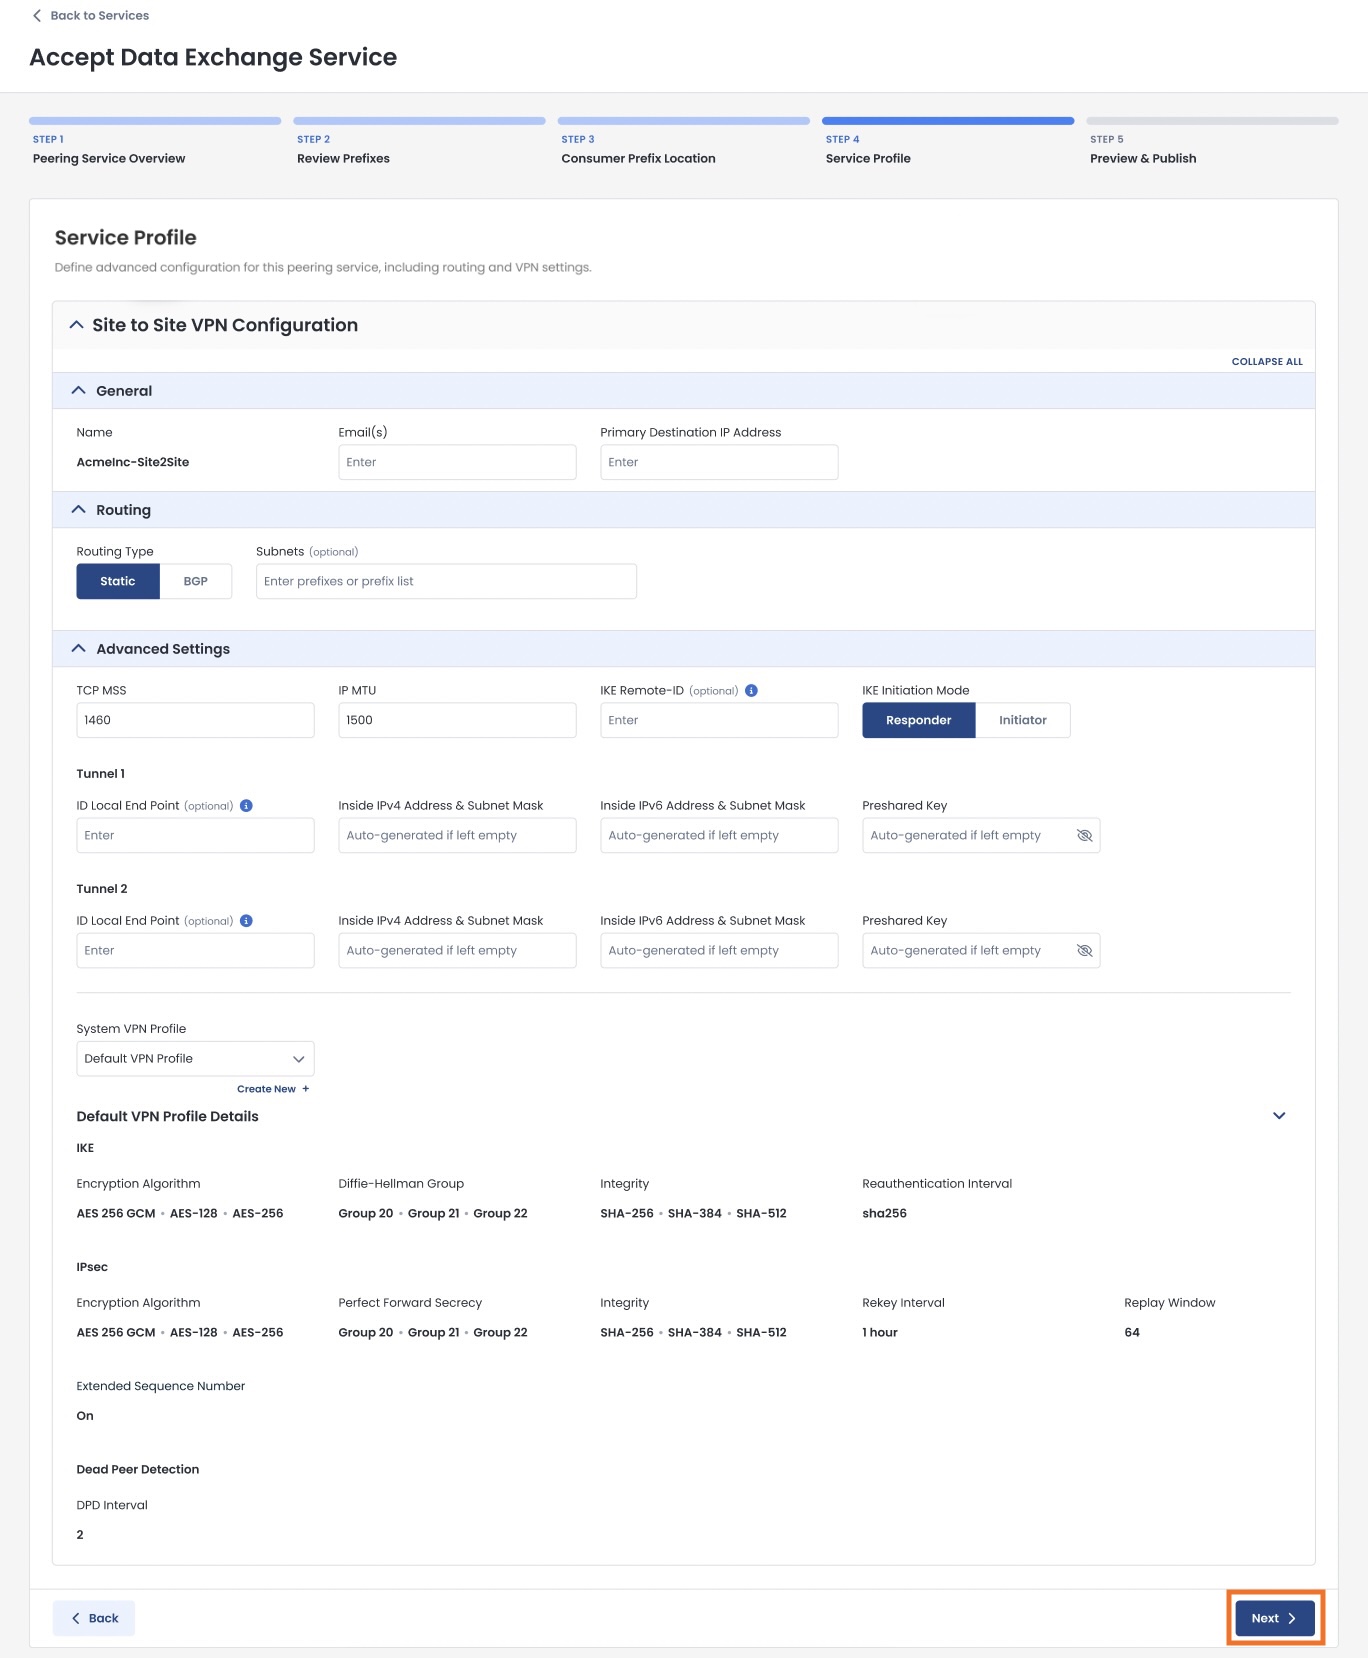
Step 4: Service Profile
This page contains the detailed configuration of how your end customer will connect to your Data Exchange Service using Site-to-Site VPN.
.jpg)
Complete the information for the following sections:
General
Email(s): Network administrator for your end customer that will need access to this subscription
Primary Destination IP Address: IP Address that will be allowed access to the service

Routing
In the routing section, you have a choice of Static or BGP routes.
Static Routes
The default Routing Type is “Static”.
For Static routes:
Although it’s not required to include a return route to your Graphiant LAN network, if you need such a route, be sure to include one under ‘Subnet’.
Subnet (optional): Enter the remote subnet(s) that your devices on the prior selected Graphiant LAN Segment will need to reach via the VPN
.jpg)
BGP Routes
Should you choose to utilize BGP routes for your VPN connection, the “Routing” section will expand to include the fields shown below.
Click the toggle to turn on ‘BGP’.
Enter the AS Number from the 3rd party device’s BGP setting.
The remaining fields are optional, and if left blank will be populated with default values.
Hold Timer: The period of time to wait for messages from the BGP neighbor before considering that neighbor unreachable; default is 90 seconds.
Keep Alive Timer: The interval at which messages to the neighbor are sent to maintain the BGP session and check that the neighbor is reachable.
MD5 Password: The shared password for authentication between the BGP neighbors.
Send Community: Specifies that the router should support sending BGP communities to that neighbor. Sending Communities is 'Off' by default.
Inbound Filters: Control what routes you accept from a neighbor
Outbound Filters: Control what routes you advertise to a neighbor
.jpg)
Advanced Settings
The fields are as follows, and if left blank will be populated with default values.
TCP MSS: Maximum TCP segment size allowed through the VPN to prevent fragmentation
IP MTU: Largest IP packet size (including headers) that can be transmitted without fragmentation
IKE Remote ID (Optional): Identifier for the remote VPN device used during IKE authentication
IKE Initiation Mode: Determines whether this gateway starts the VPN negotiation (Initiator) or waits for the remote side (Responder)
ID Local End Point (Optional): Identifier for the local VPN device used in IKE authentication
Inside Subnets (Auto-generated if left empty): The internal network behind this VPN endpoint that should be reachable over the tunnel
Preshared Key (Auto-generated if left empty): Shared secret used to authenticate both ends of the VPN tunnel
System VPN Profile: The VPN Profile that best matches your encryption needs.
Note:
The System VPN Profile will be prefilled with the default profile, but you can also:
Select any profile you have created by using the drop-down menu.
Create a new profile by clicking ‘Create New +’. This will open a modal to configure a new VPN profile. For more information regarding creating VPN Profiles, click here.
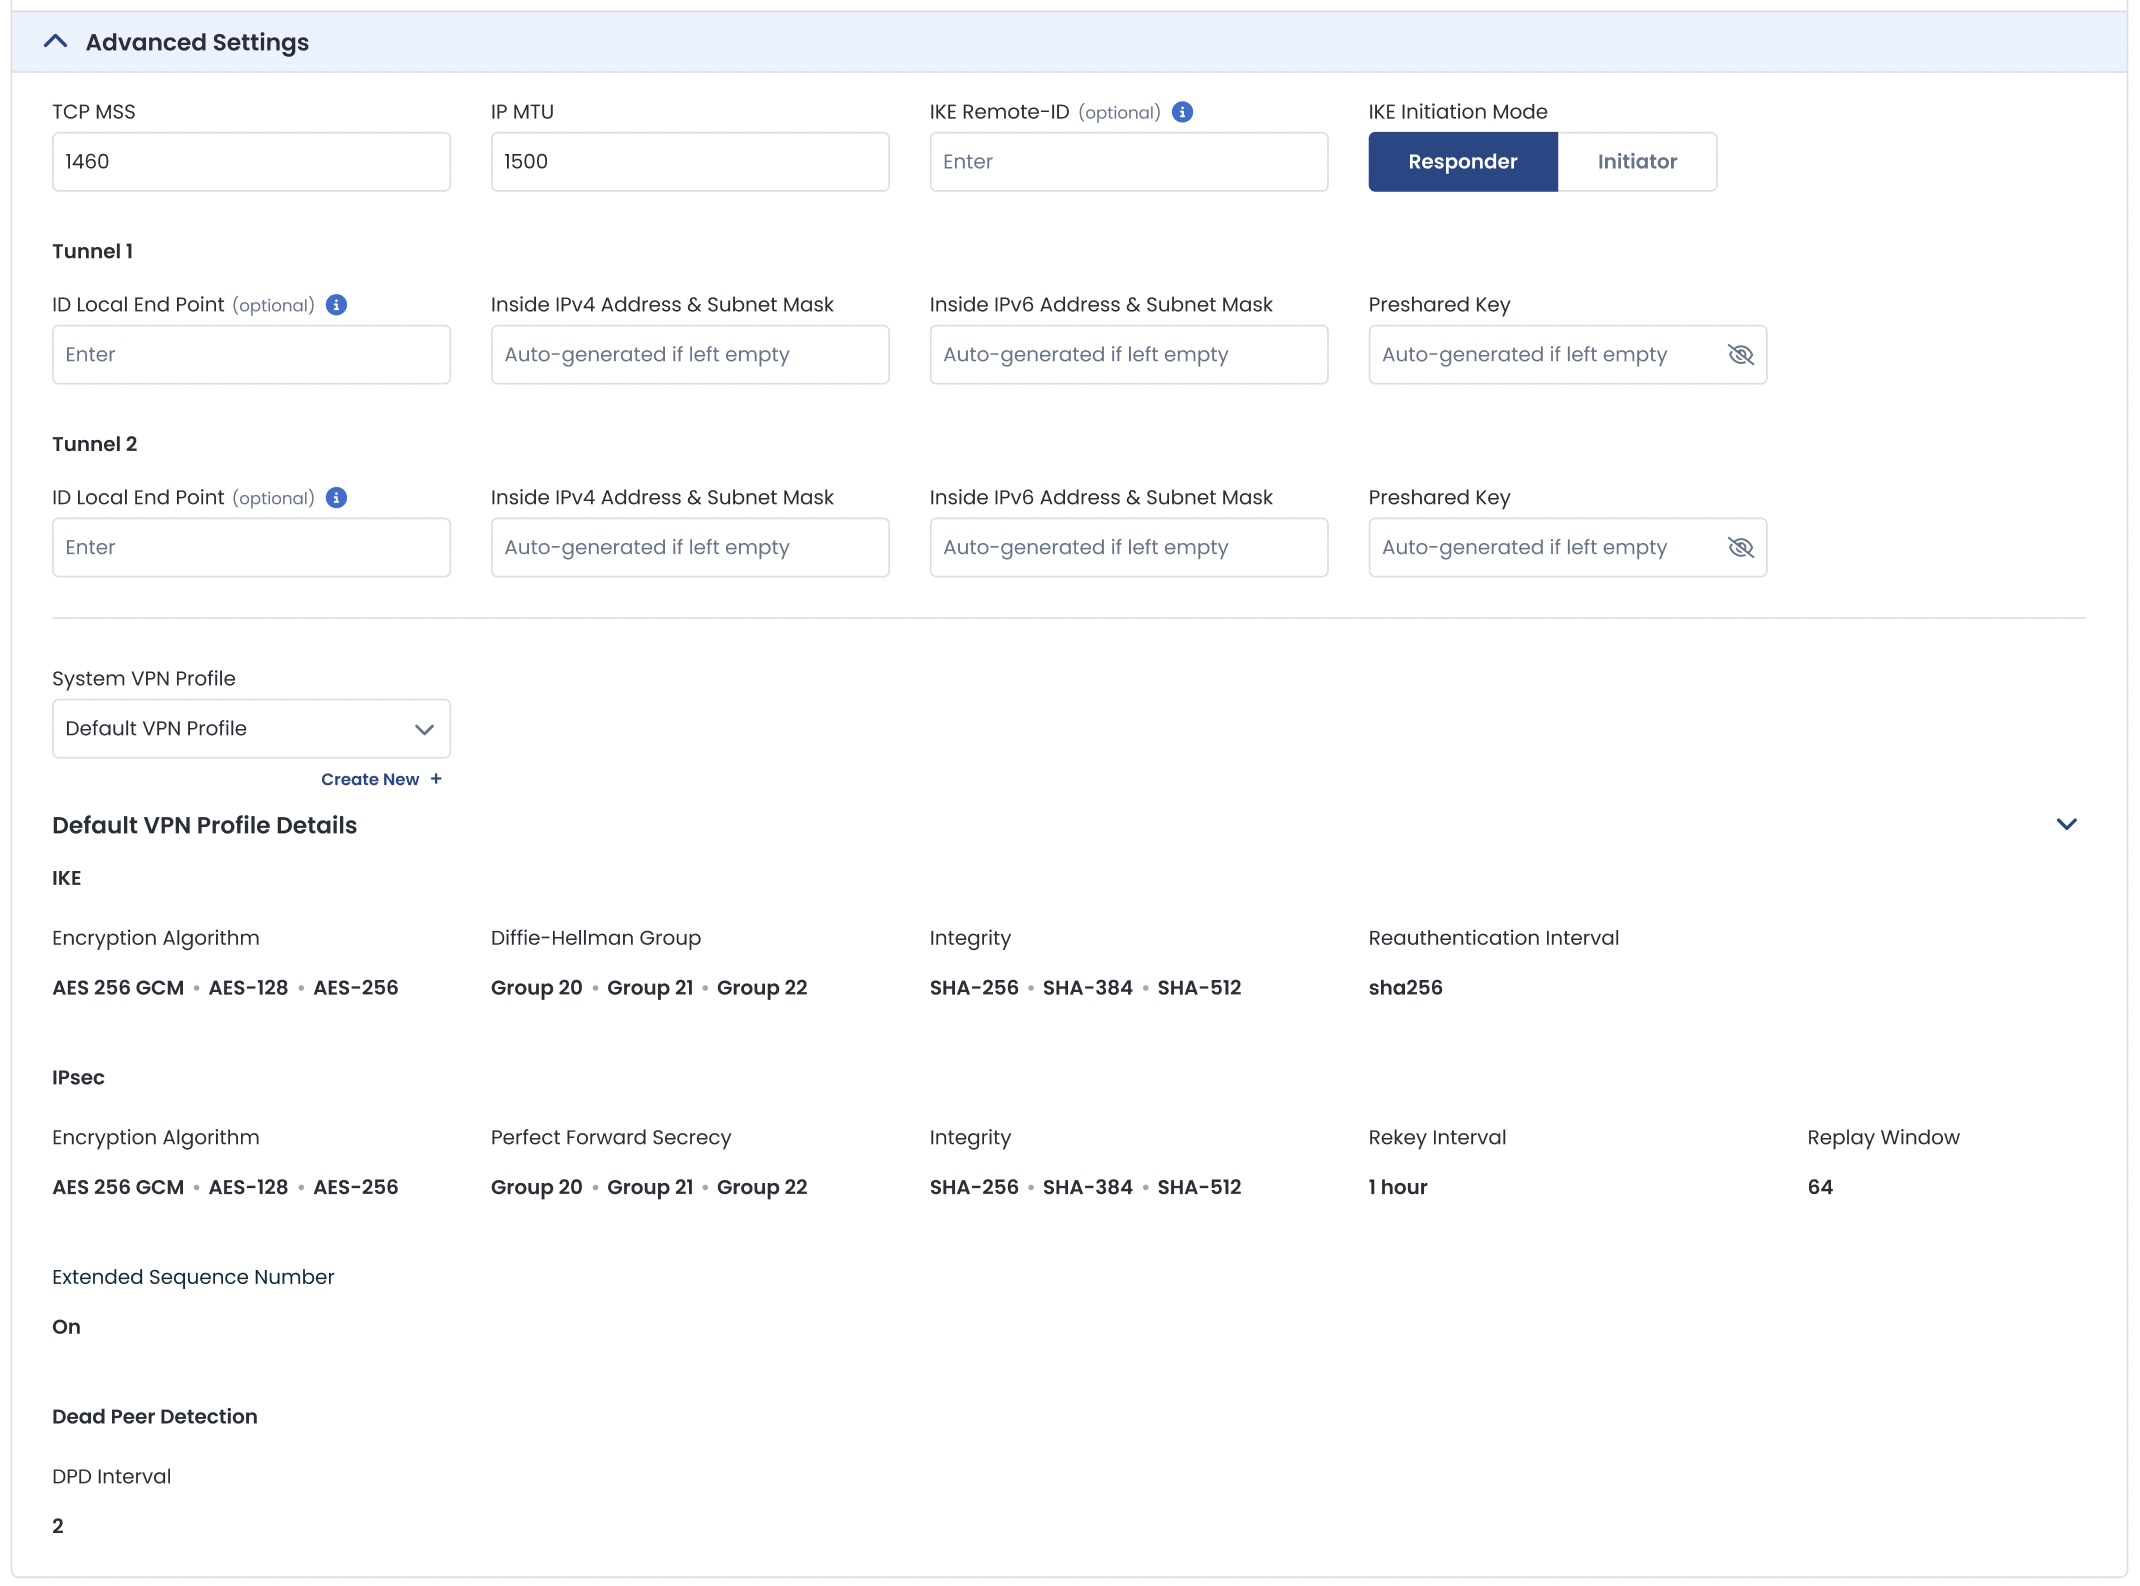
Ensure that all of the fields are correct; click ‘Next’.
Step 5: Preview & Publish
This is the final step before the invitation will be sent for your end customer to subscribe to the Graphiant Data Exchange Service.
Ensure that all information is correct in this summary page.
Click ‘Accept & Connect’.
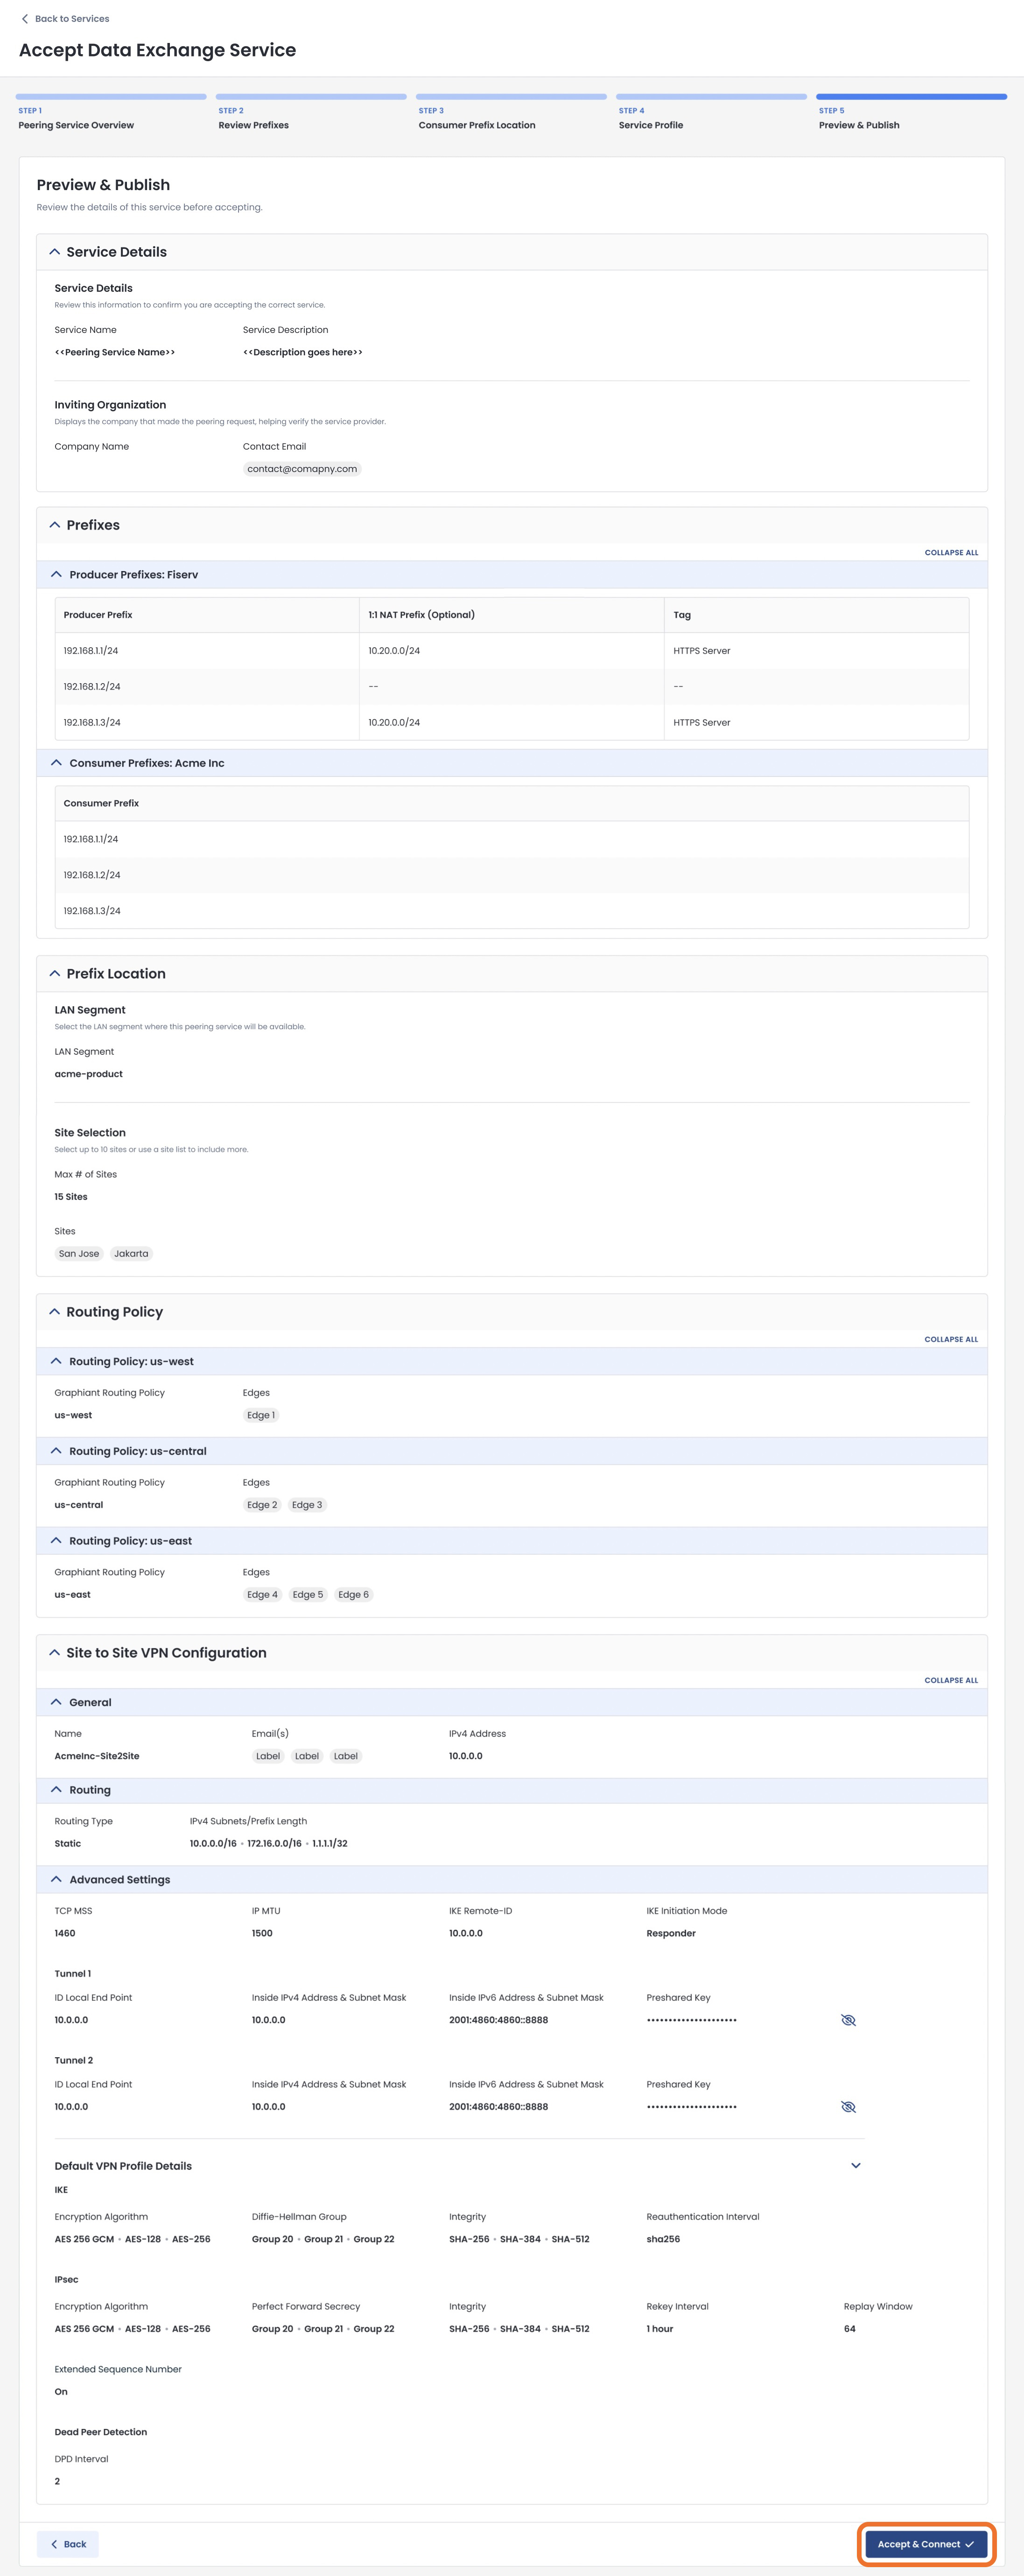
The customer will receive an email invitation to download their private security profile for their device that will connect them to your Graphiant Data Exchange Service.
They can follow these instructions on how to accept the invitation to connect to your Data Exchange Service.
Viewing Your Service’s Customer Details
You can view the details of the customers that are subscribing to any of your services.
From your Services tab, locate the service you wish to view.
Click the number in the “Matched Customers” column for that service.
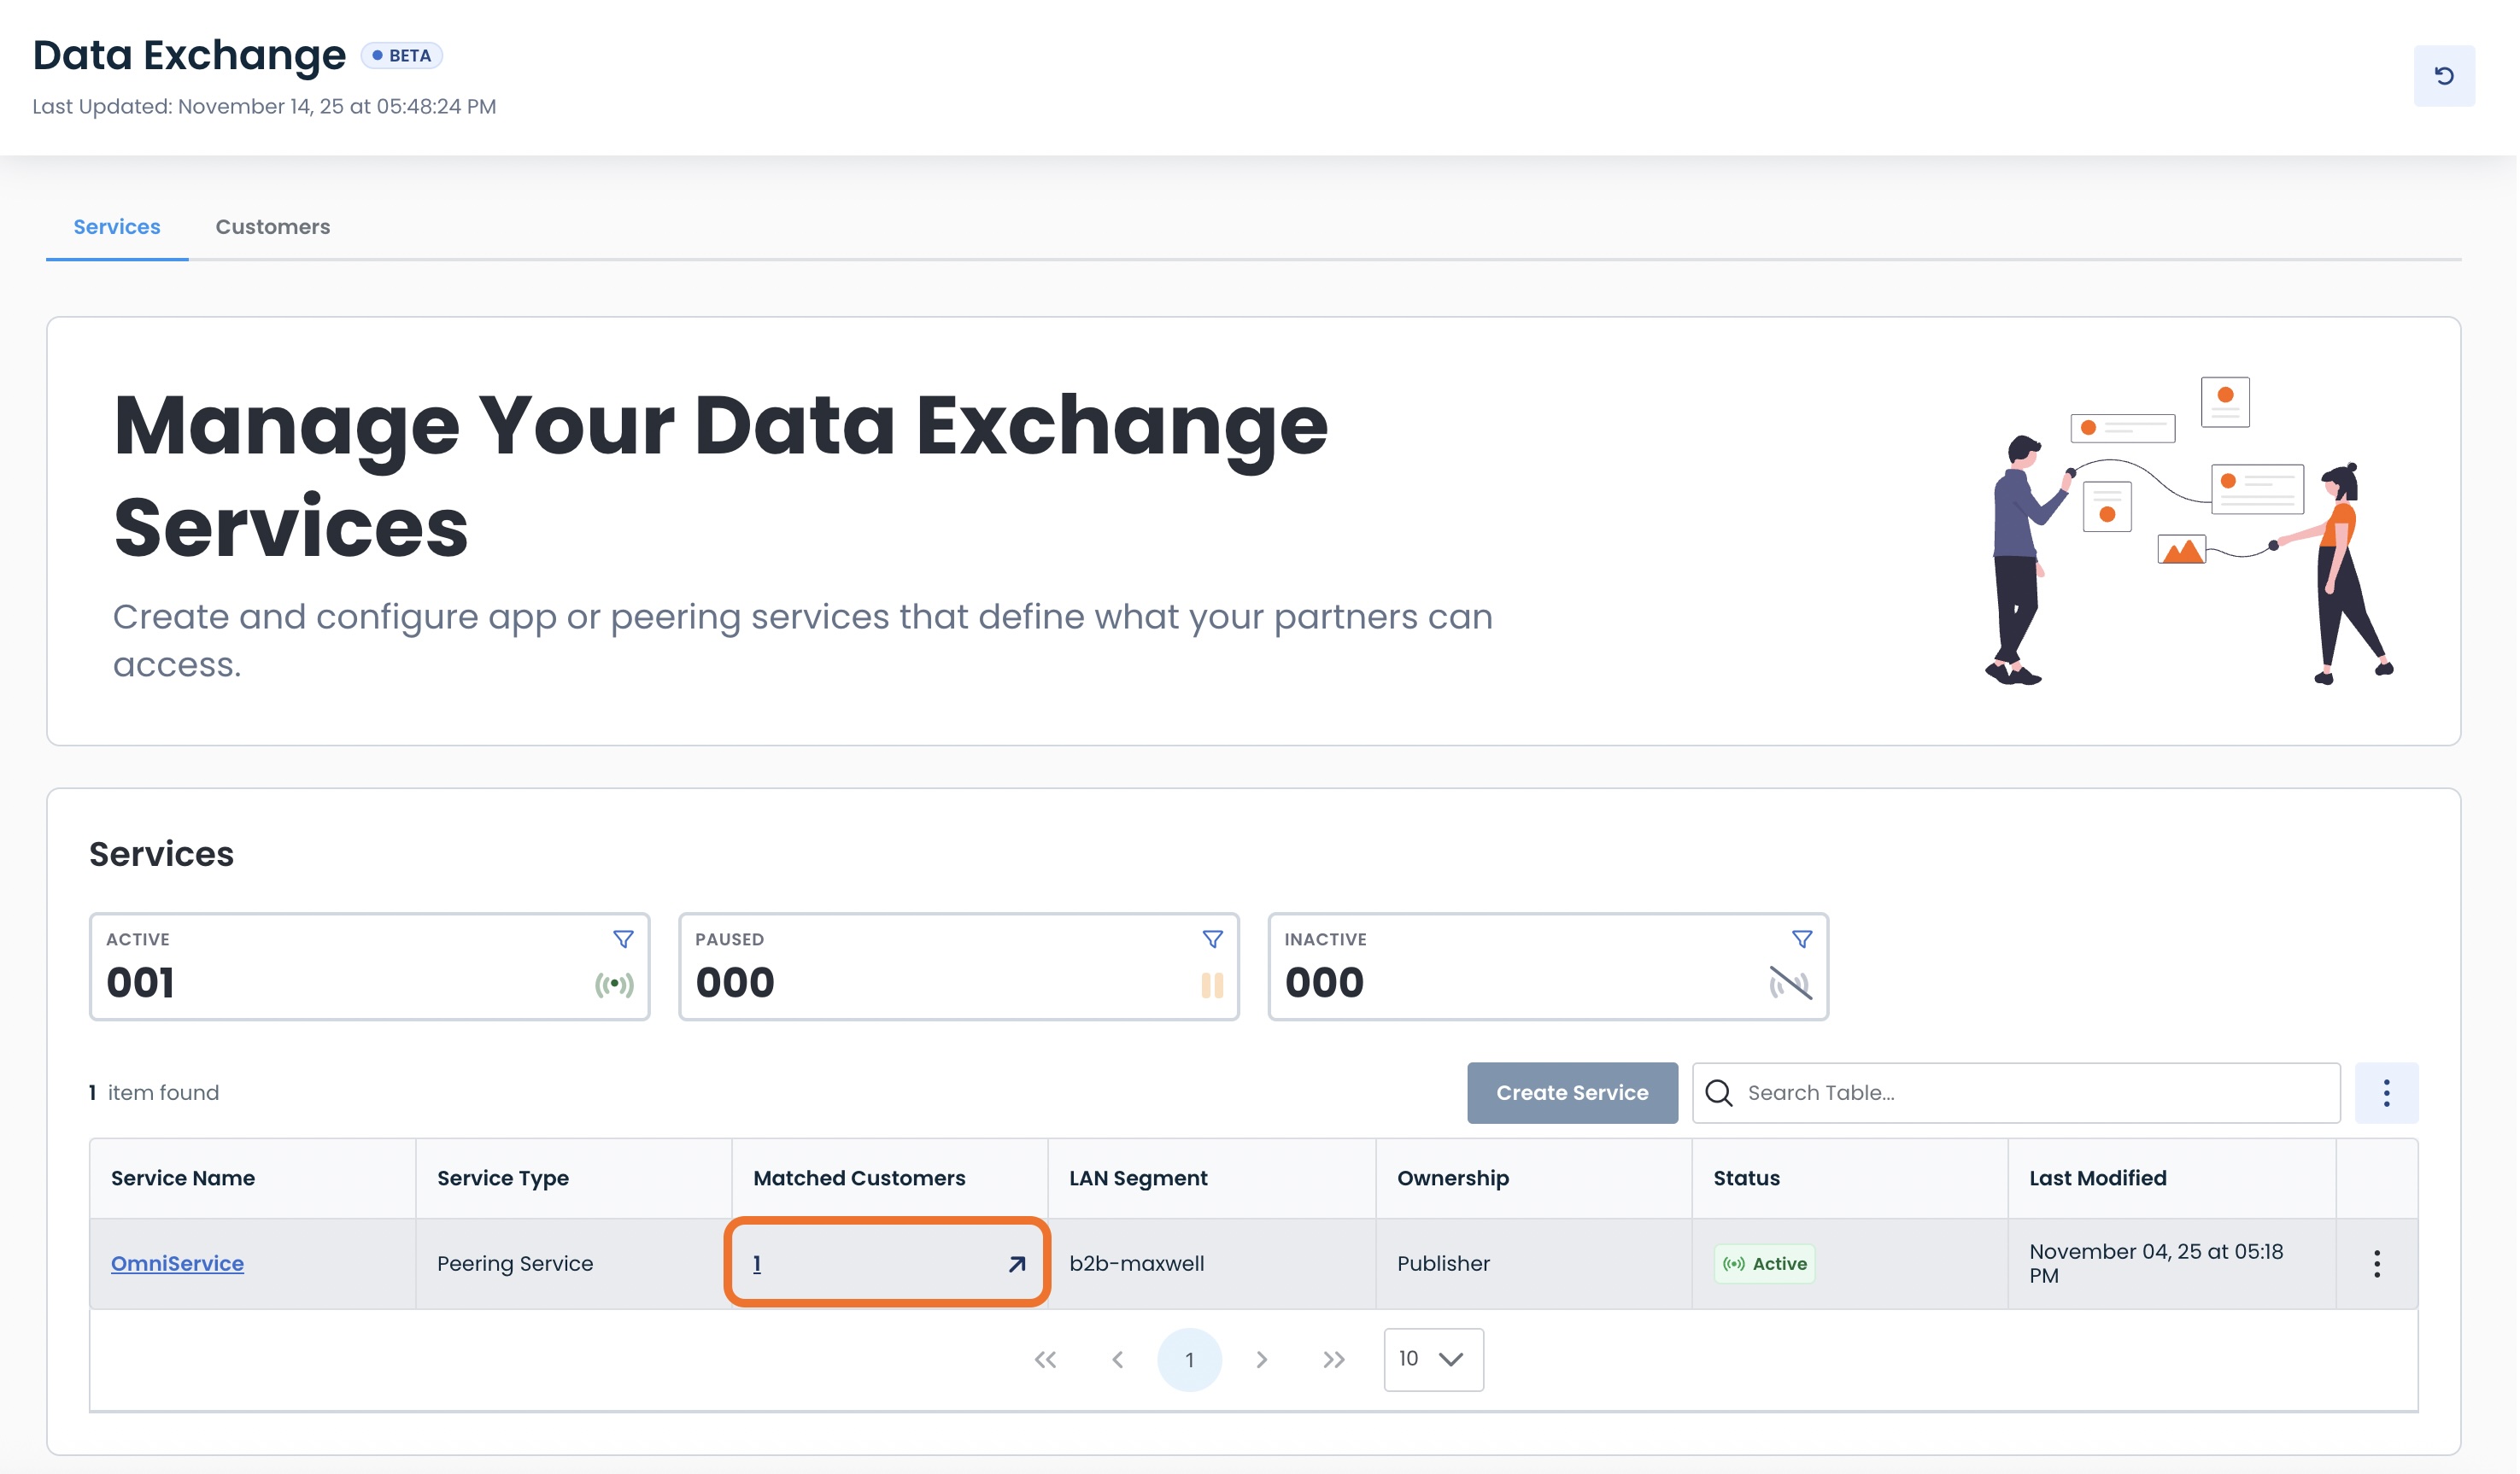
A modal will open up allowing you to view:
Customer Name: Unique name for this customer
Customer Type: Graphiant / Non-Graphiant
Emails: Admin contact email(s)
Status: Active / Inactive
Last Modified: Date/Time this customer match was edited
Resending a Customer Data Exchange Invitation
Should a customer need an invitation to connect to your service resent, from this Matched Customer Modal click the ellipses; select ‘Resend Invite’.

Viewing a Customer and Matching to Another Service
To view your customer details and match them to additional services, from this Matched Customer Modal click the ellipses; select ‘View Customer & Match’.

This will take you to the customer’s details page, where you can match them to additional services as shown here.
Unsubscribing a Customer
To remove a customer from a service, from this Matched Customer Modal click the ellipses; select ‘Unsubscribe Customer’.

You will now be able to unsubscribe that customer from this particular service.
They will still be able to be subscribed to any other service.
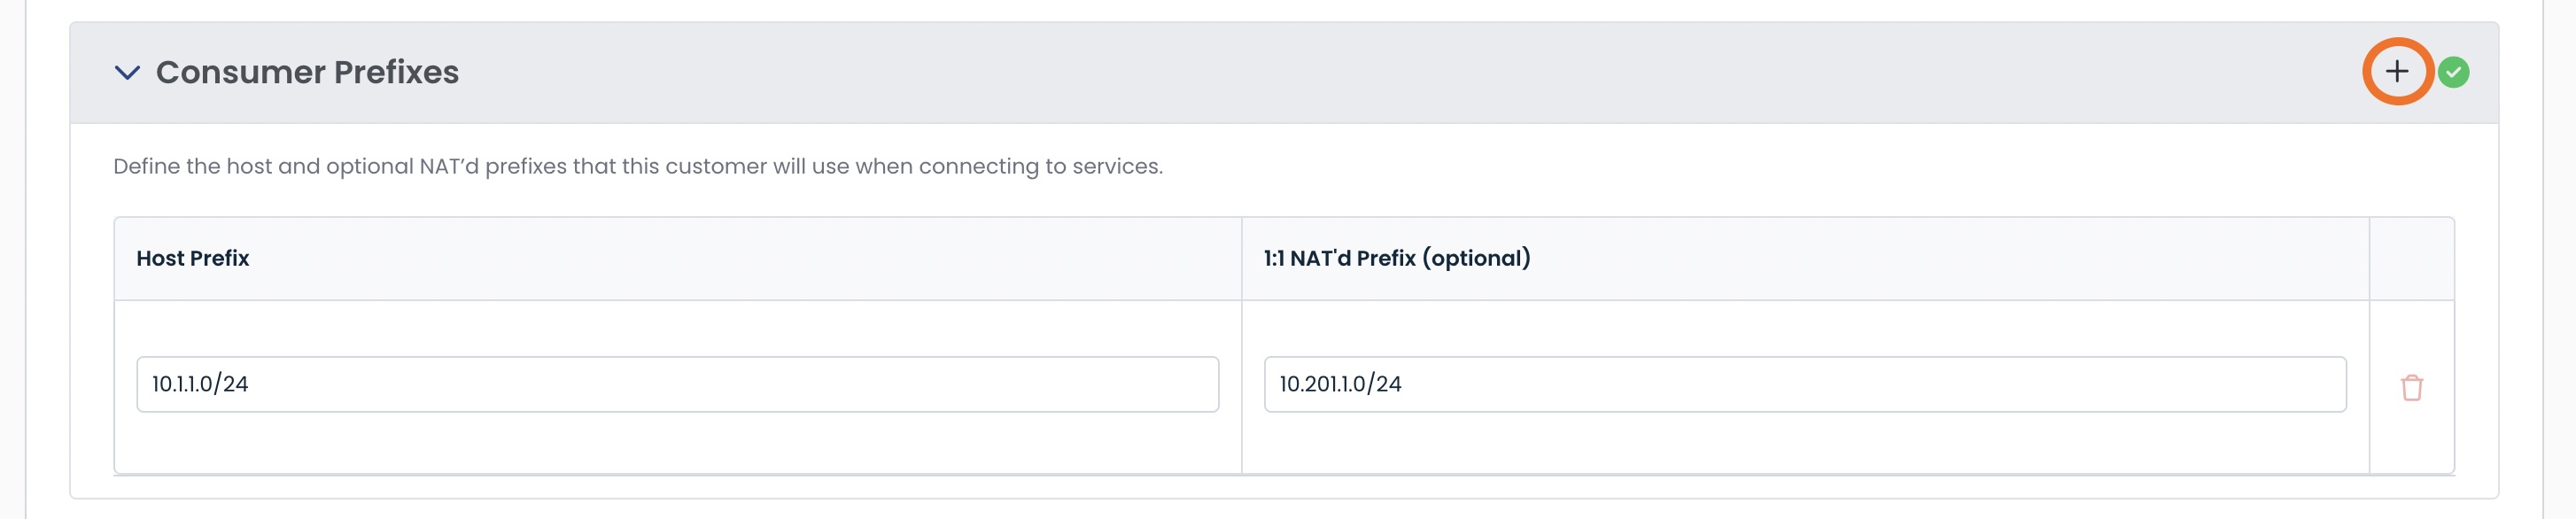
How Can I Edit the Prefixes Matched to My Customer?
At any time, you can edit, add a new, or delete a Data Exchange prefix for your customers within a service.
Click within the “Matched Customers” field of the desired service.
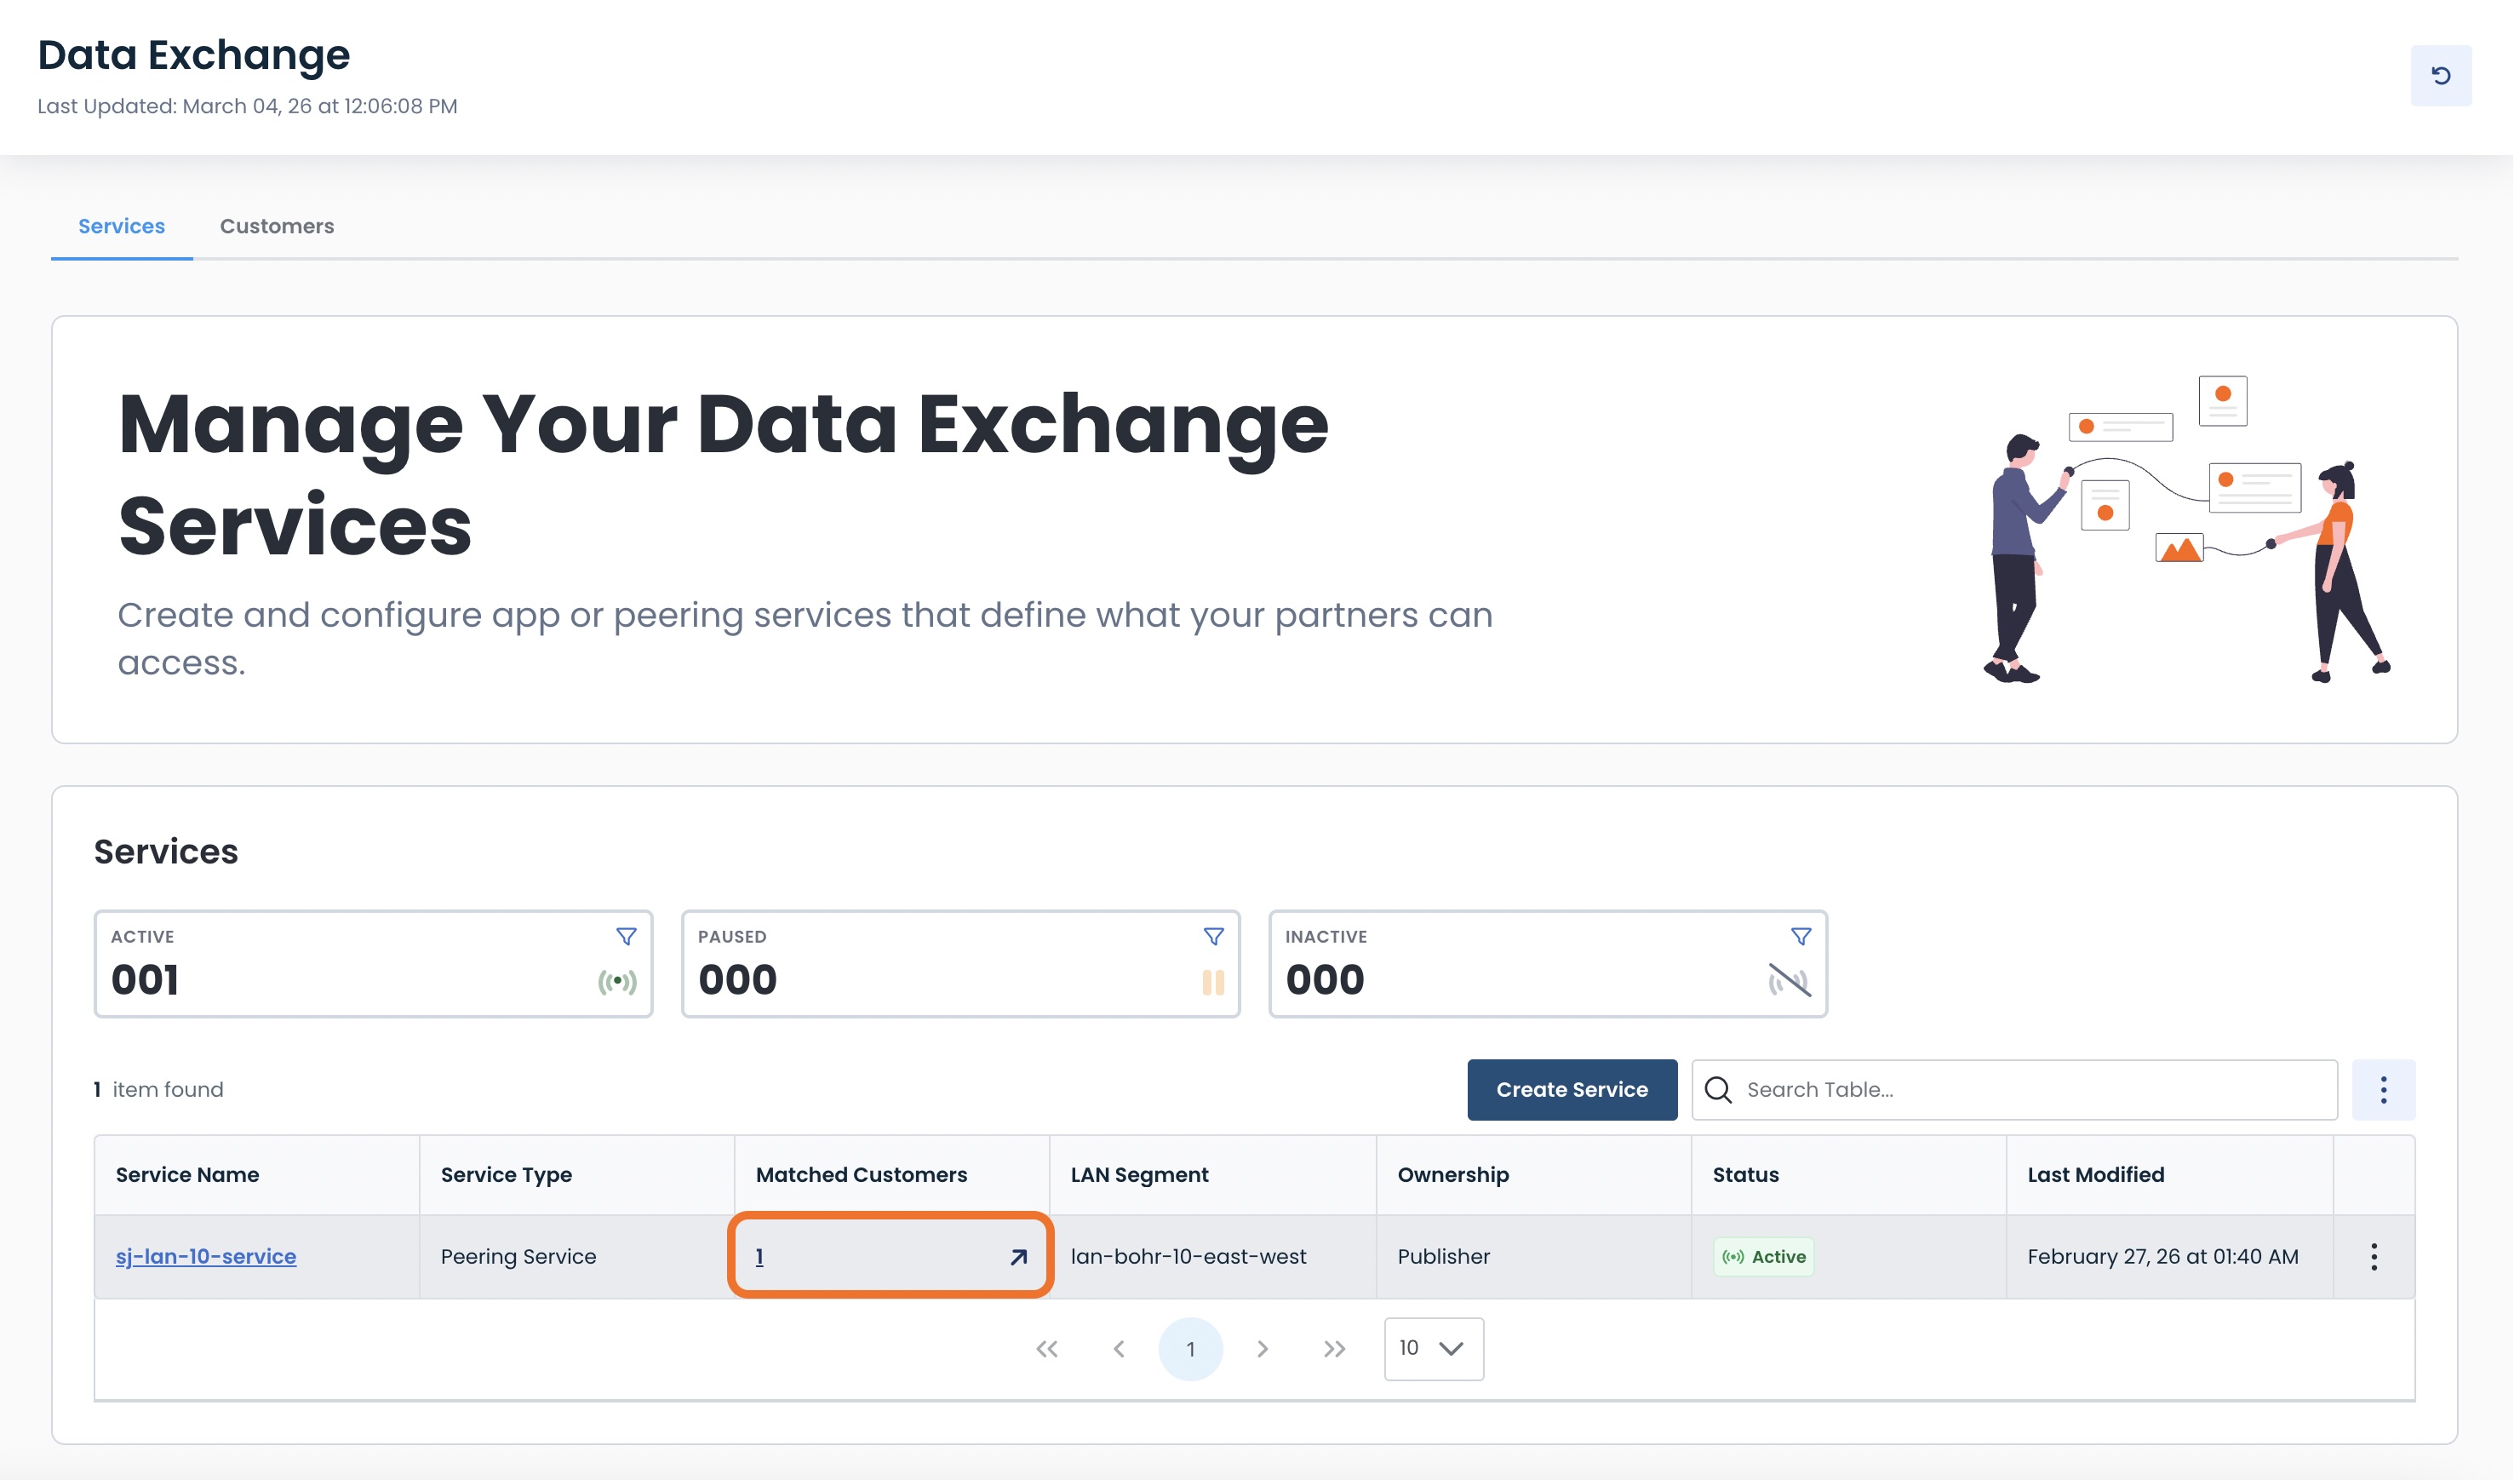
A modal will open containing the information for the matched customers to that service.
Click the ellipses for the desired customer; select ‘Edit Match’.
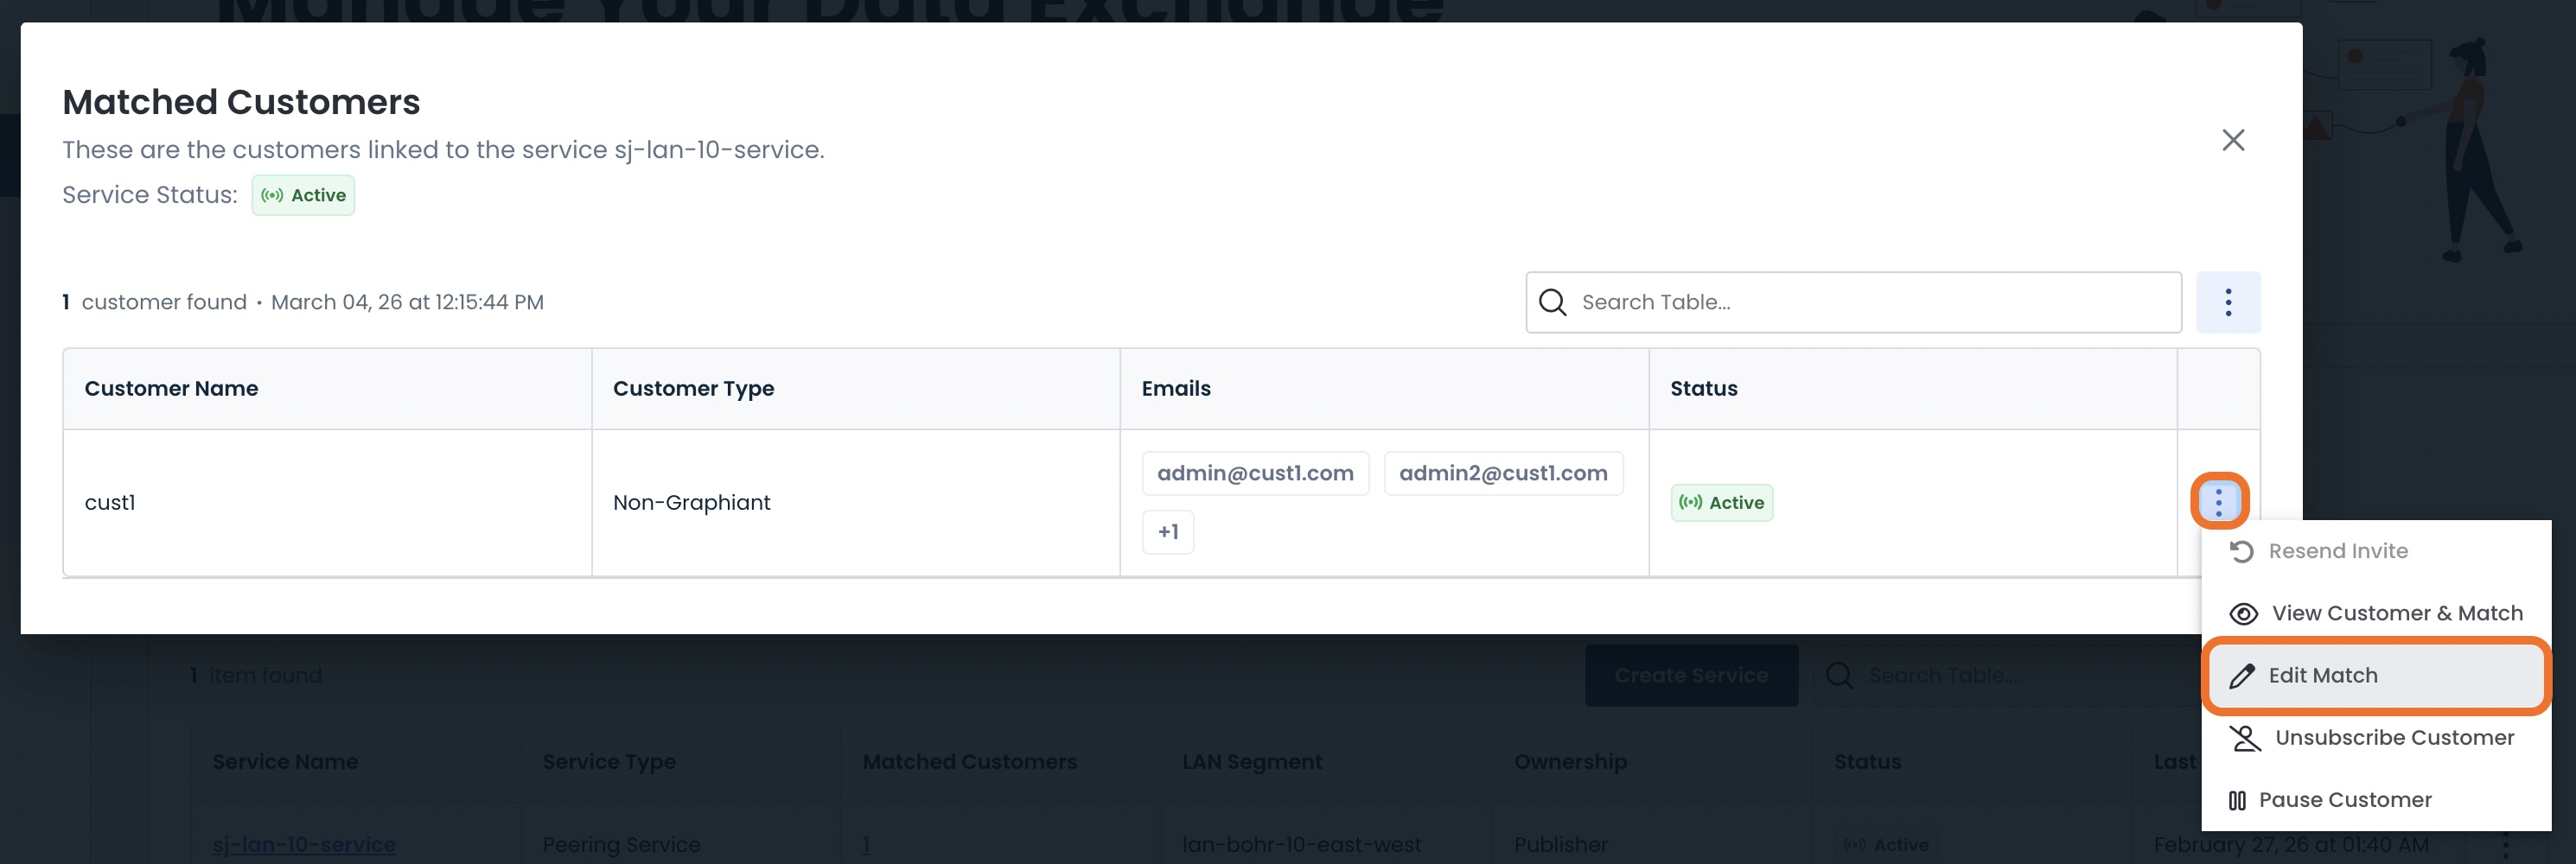
This will open the Edit Match page for you to add or delete a prefix to that customer.
The “Consumer Prefixes” section is towards the bottom of the page.
Editing an Existing Prefix of a Customer Match
To edit an existing prefix for an customer match, simply type your changes within the fields of the prefix.
The edited prefix will be notated with a yellow bar to the left, and any fields that have been changed will be outlined in yellow.
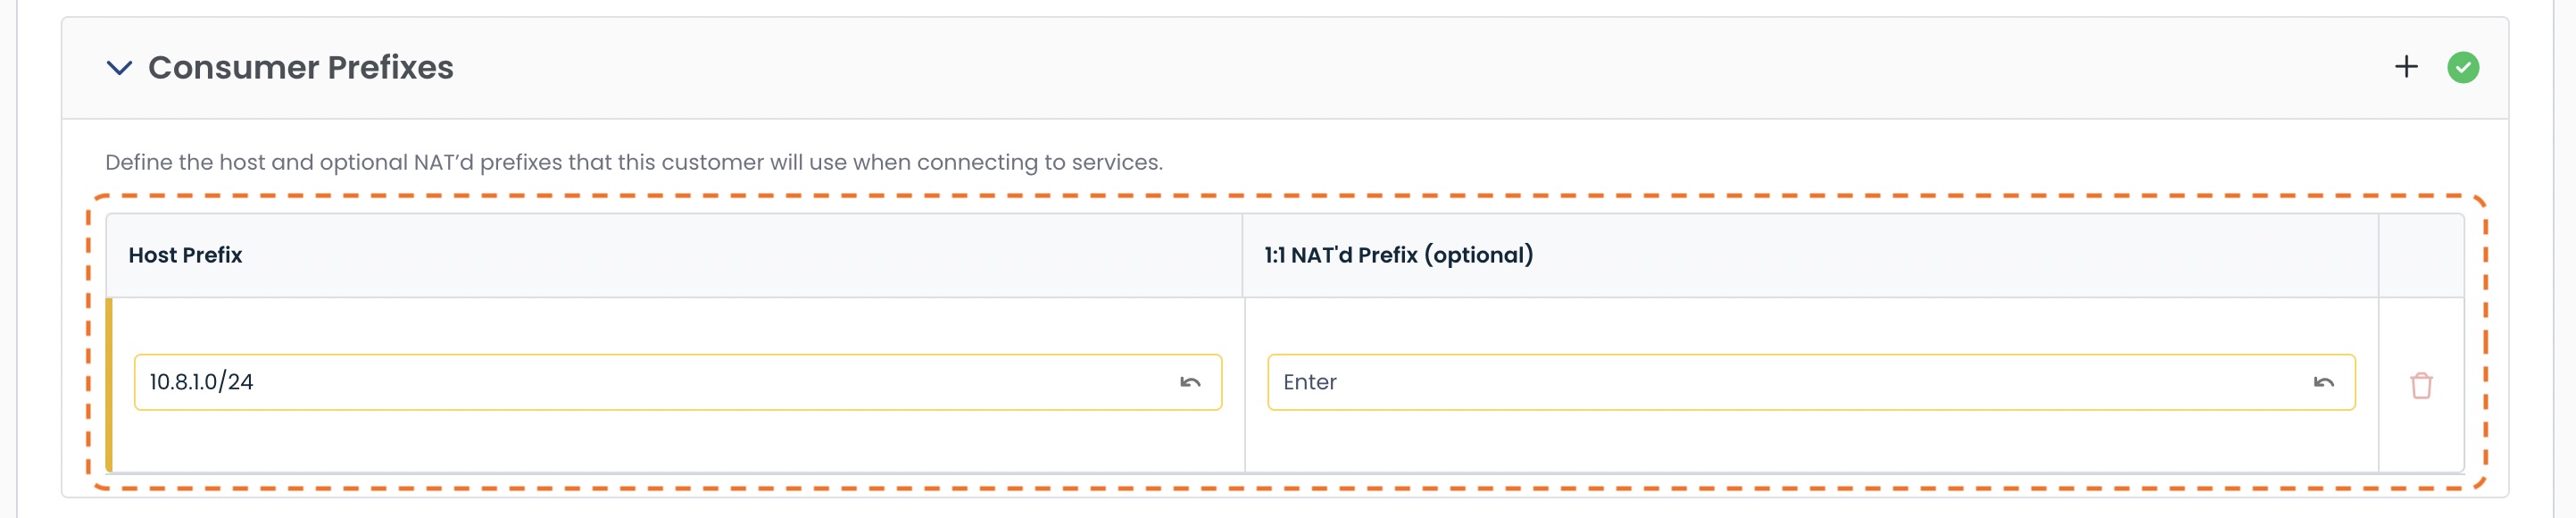
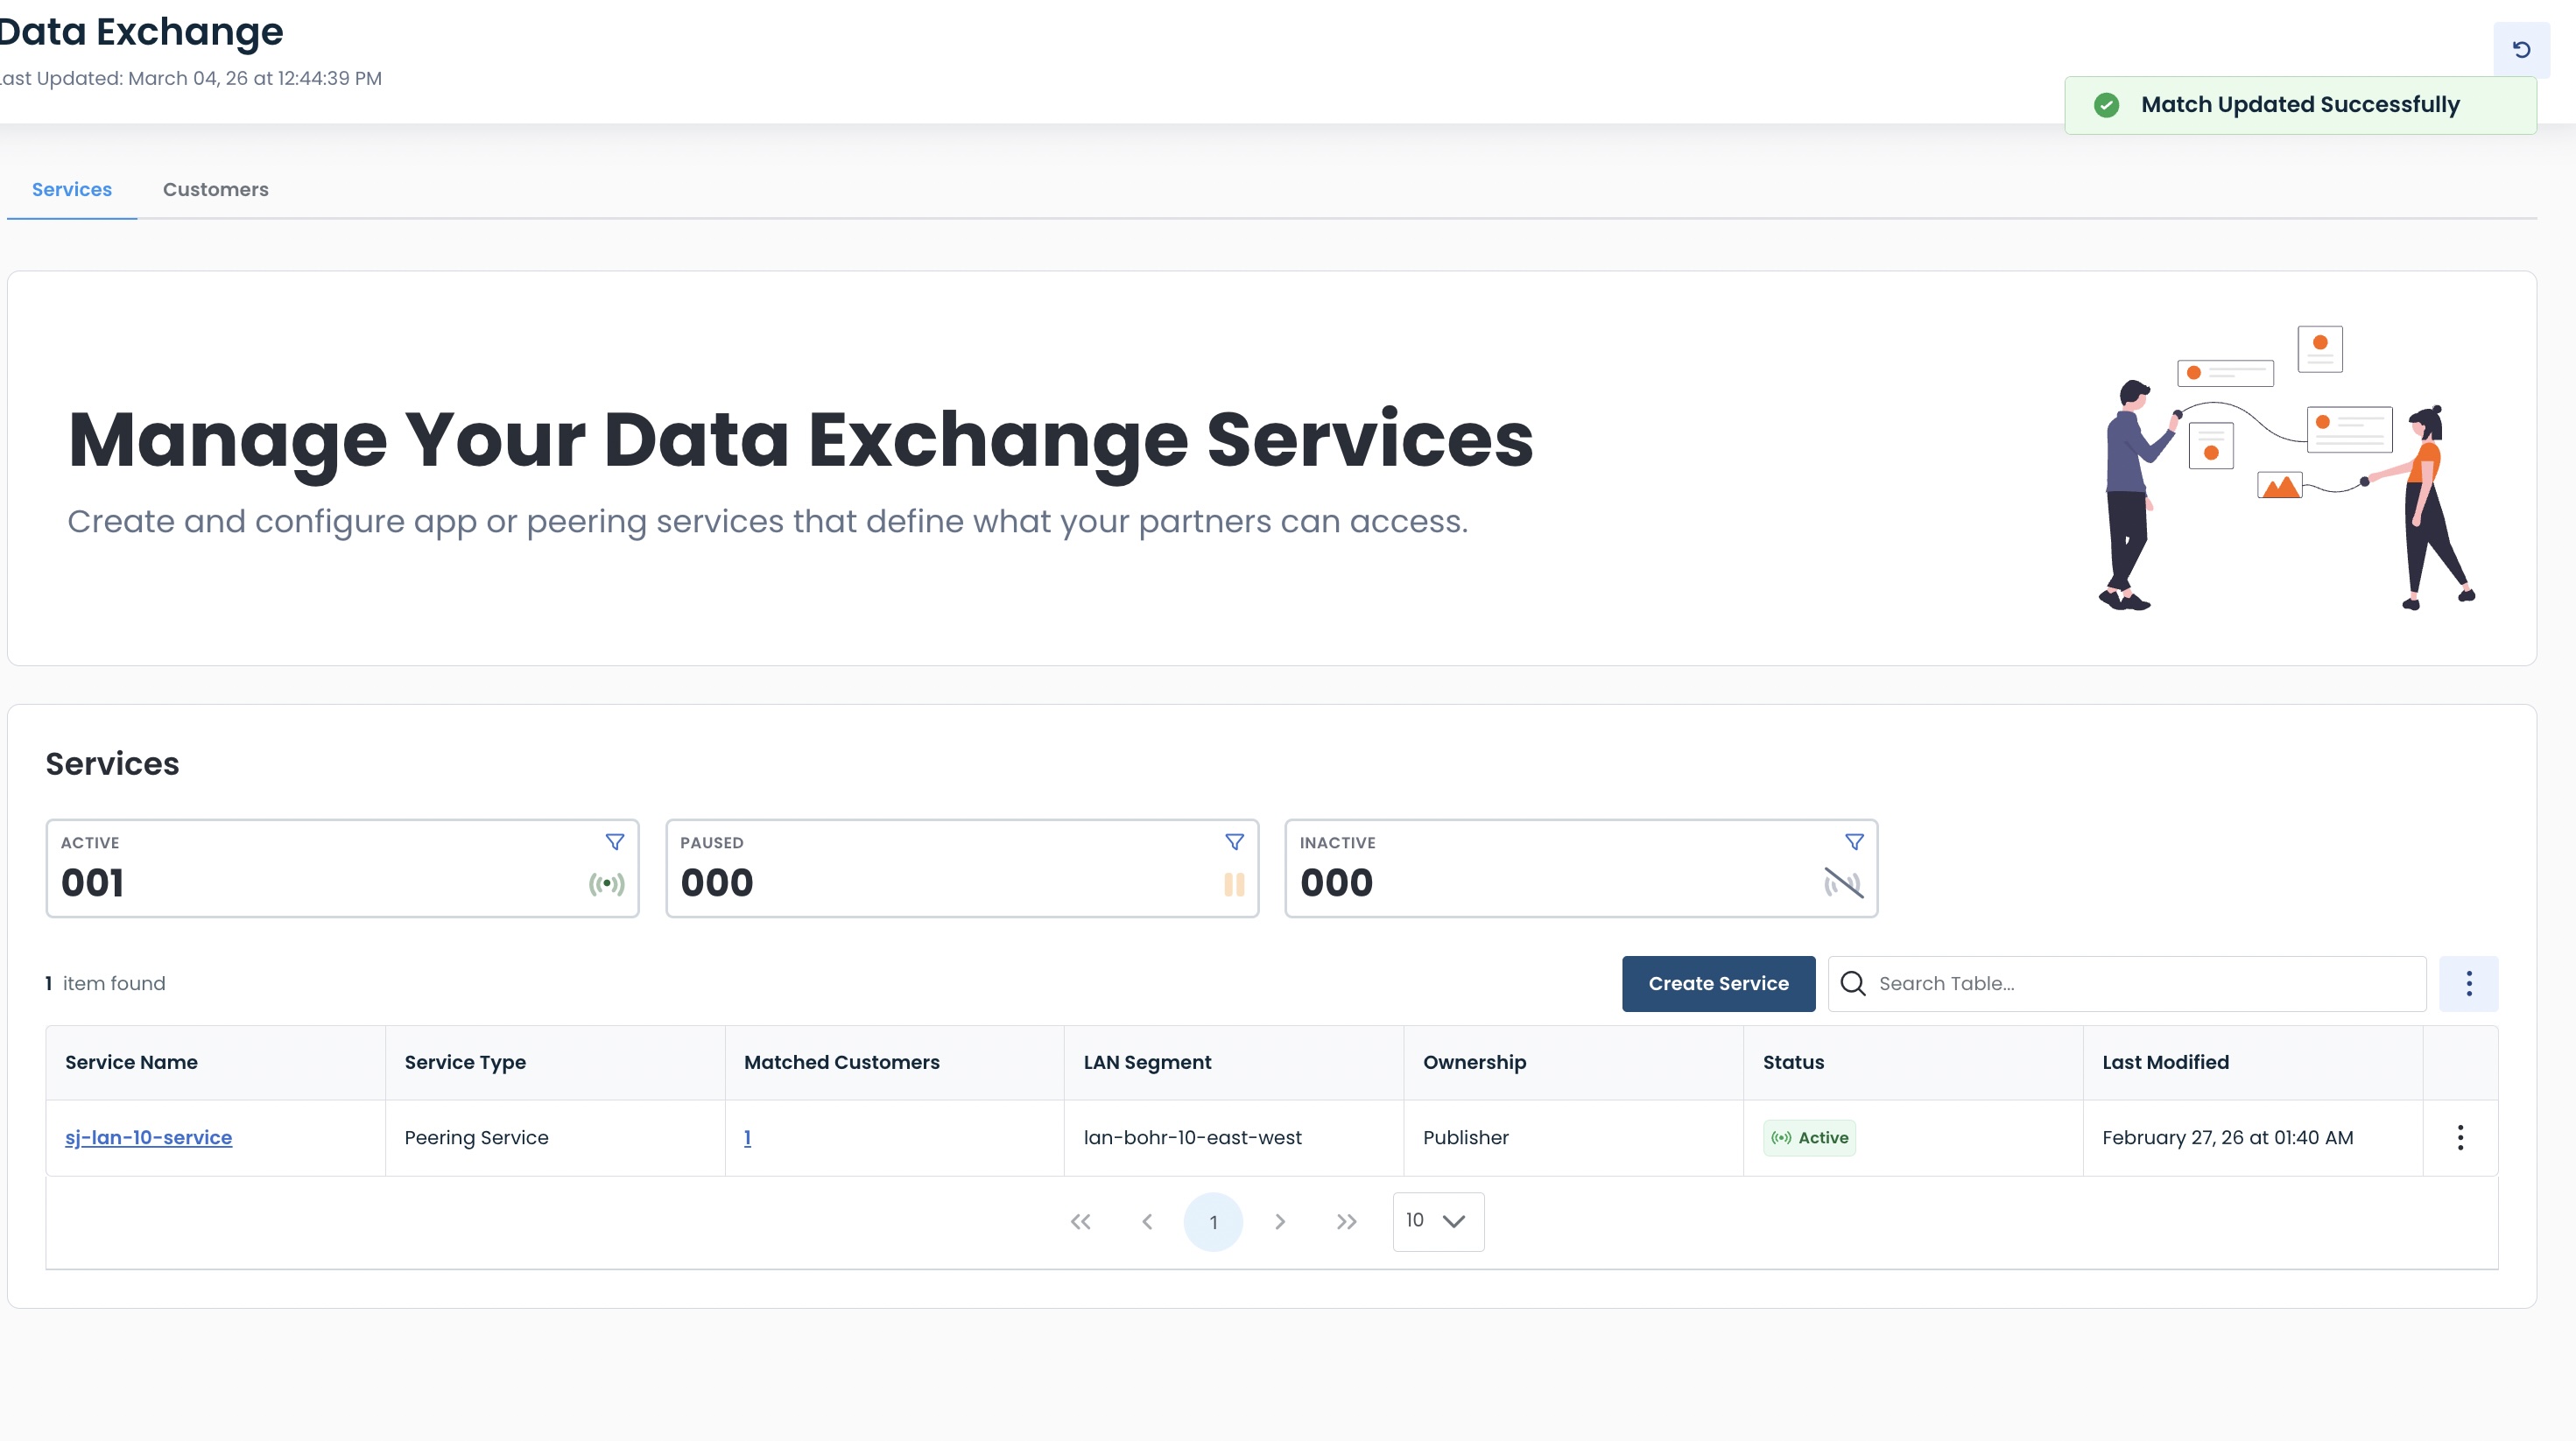
Click ‘Update Services’.
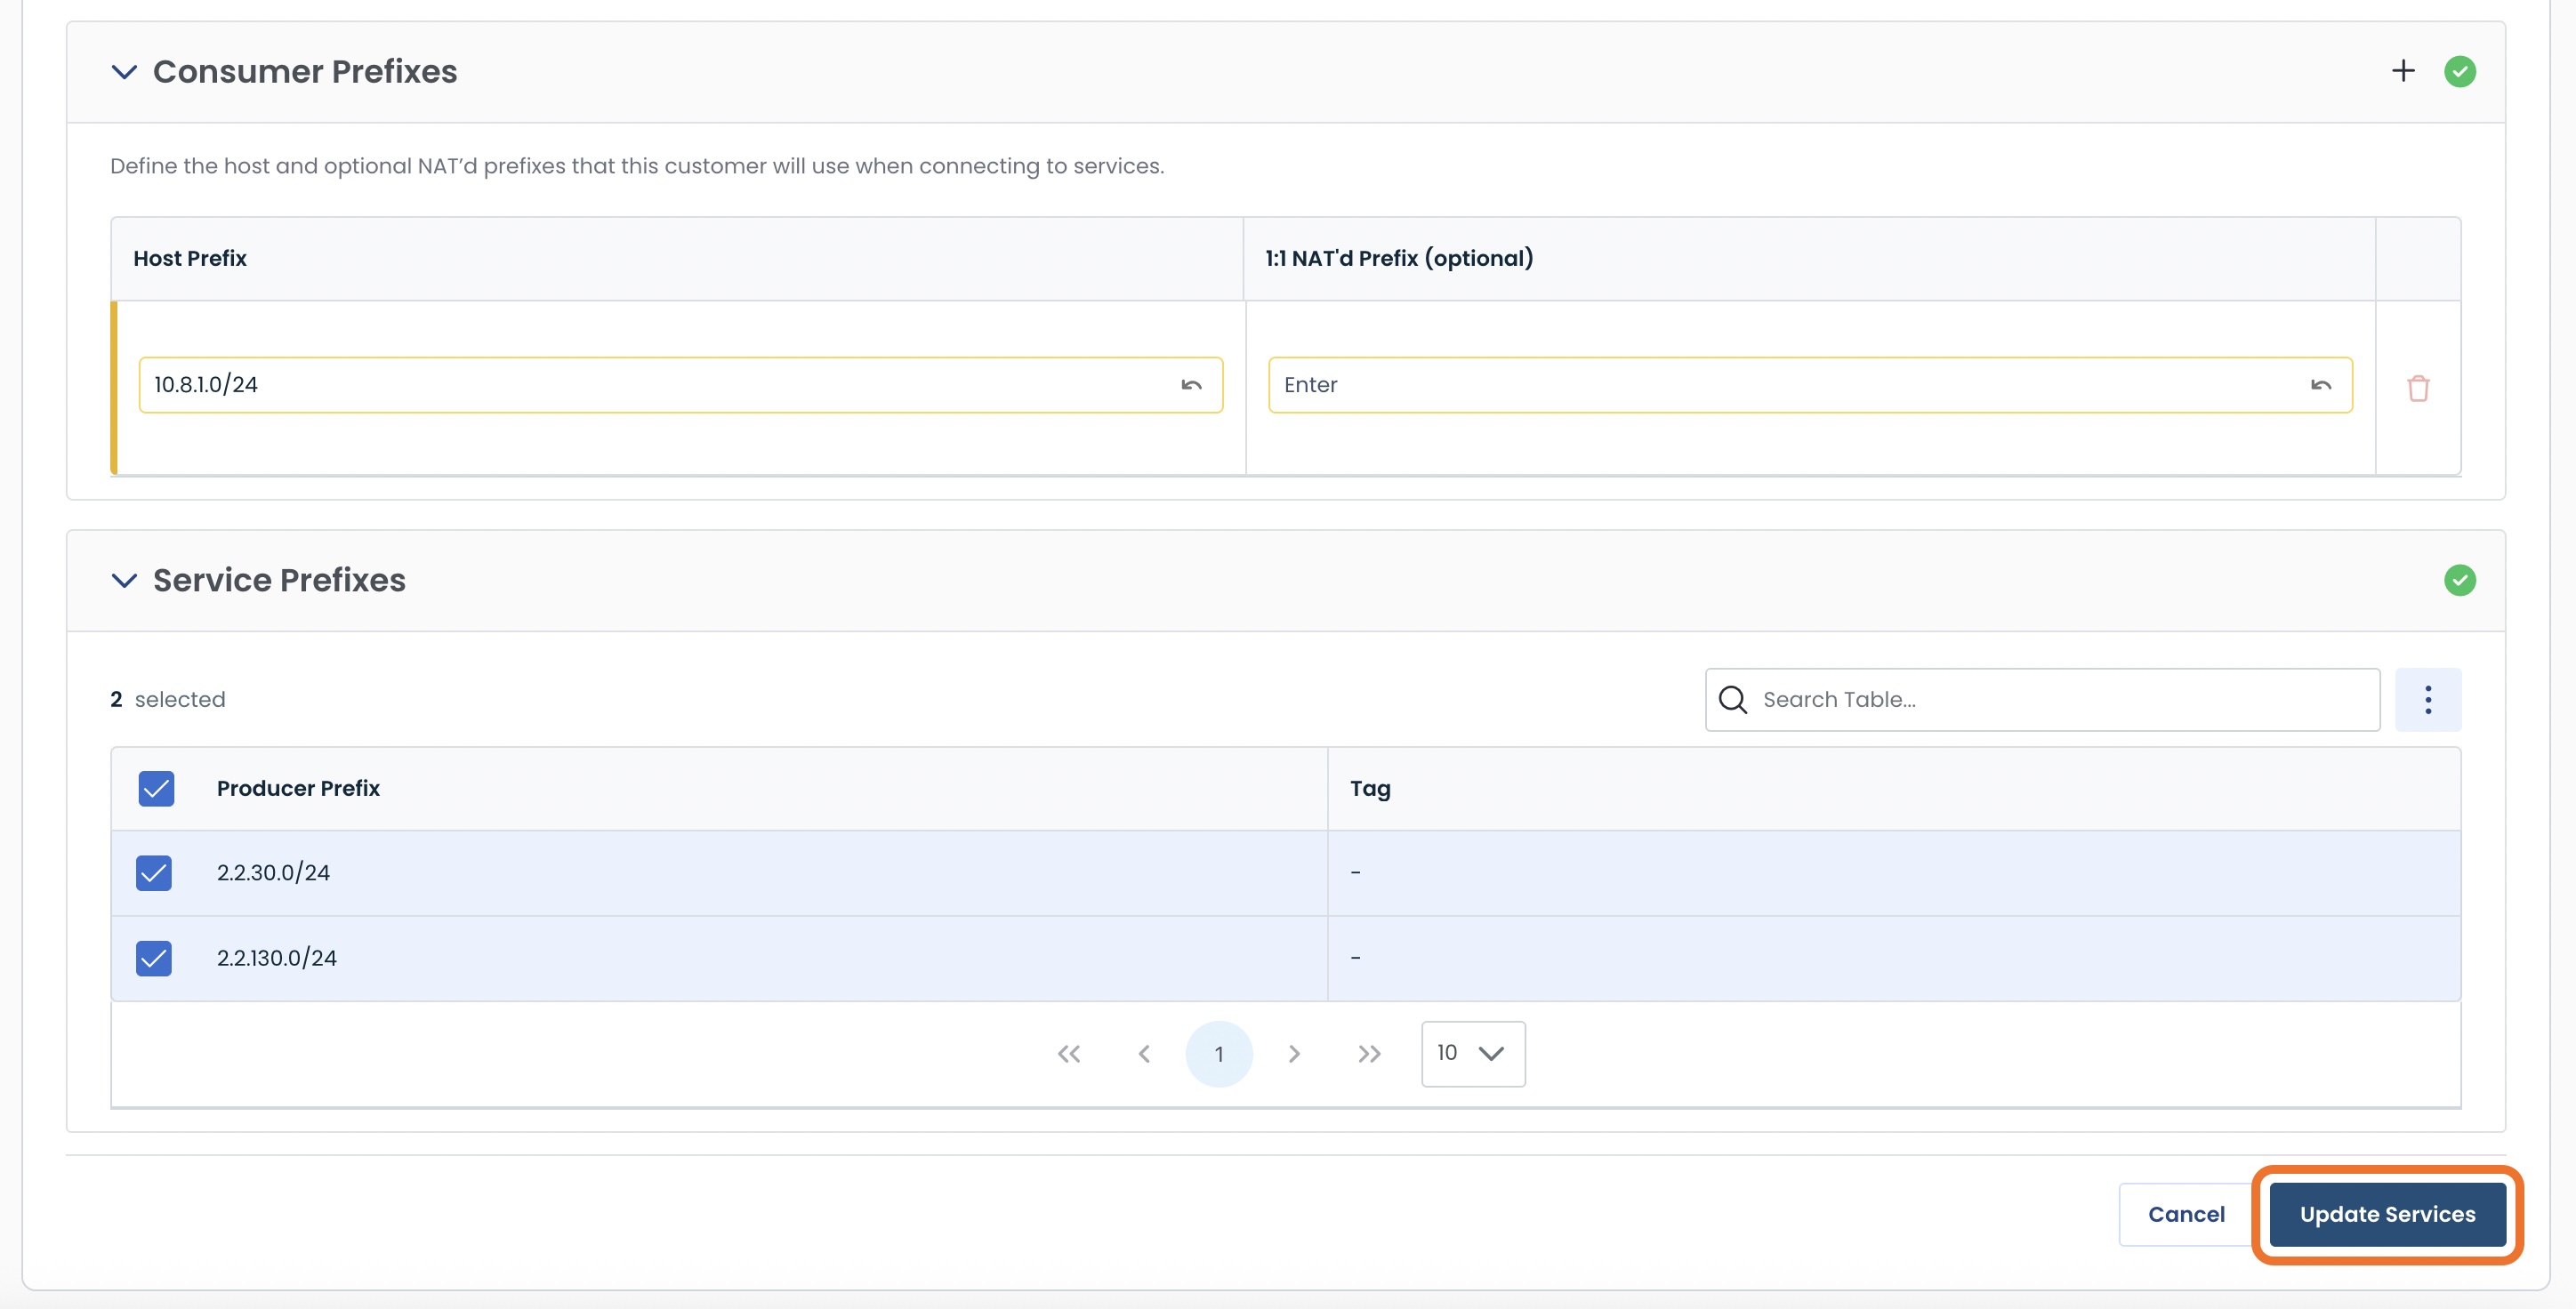
The prefix will be updated, and a green banner will appear stating that the service was updated successfully.
The customer will receive an email stating that changes were made to their Data Exchange service, including a link for them to view the configuration changes.
Adding a New Prefix to a Customer Match
To add an additional prefix for an existing customer, match click the ‘+’ at the top right of the Consumer Prefixes section.
Enter the new information.
The new prefix will be notated with a yellow bar to the left.
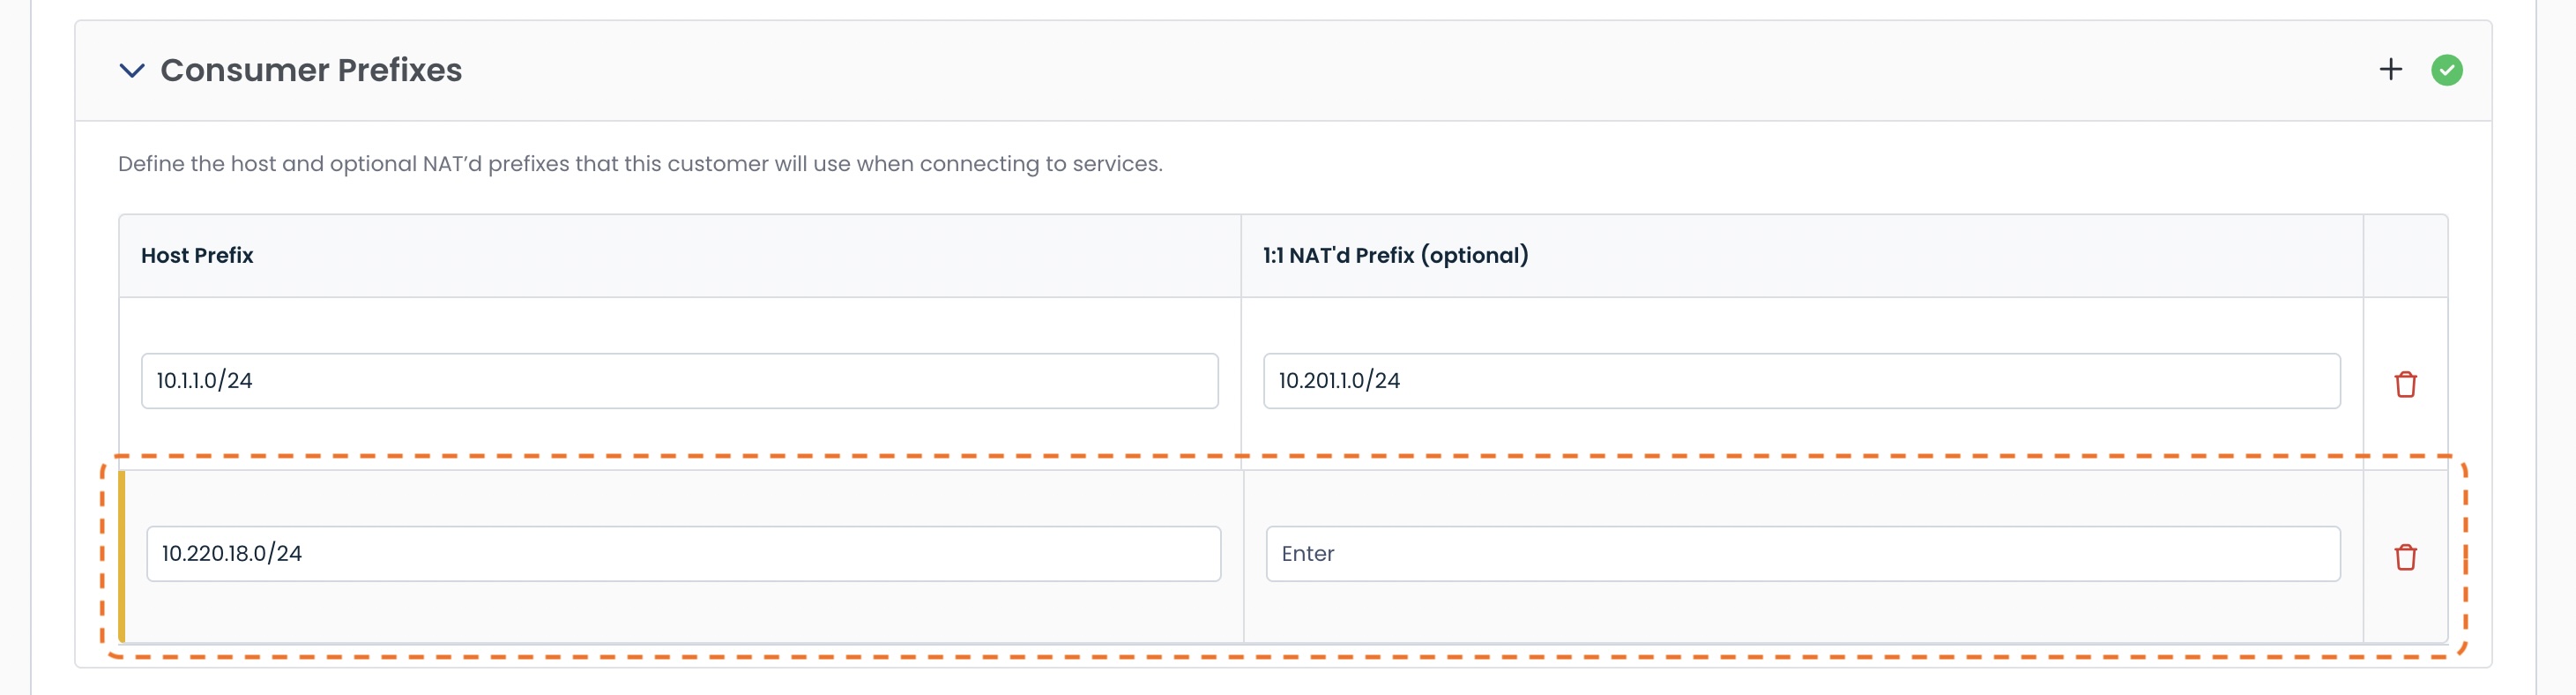
Click ‘Update Services’.
The prefix will be added, and a green banner will appear stating that the match was updated successfully.
The customer will receive an email with a link to accept this new prefix. They will follow the same steps documented here for accepting a service.
Deleting a Prefix from a Customer Match
Should you no longer need a prefix to be part of a customer’s match, click the <trash> icon to the right of that prefix.
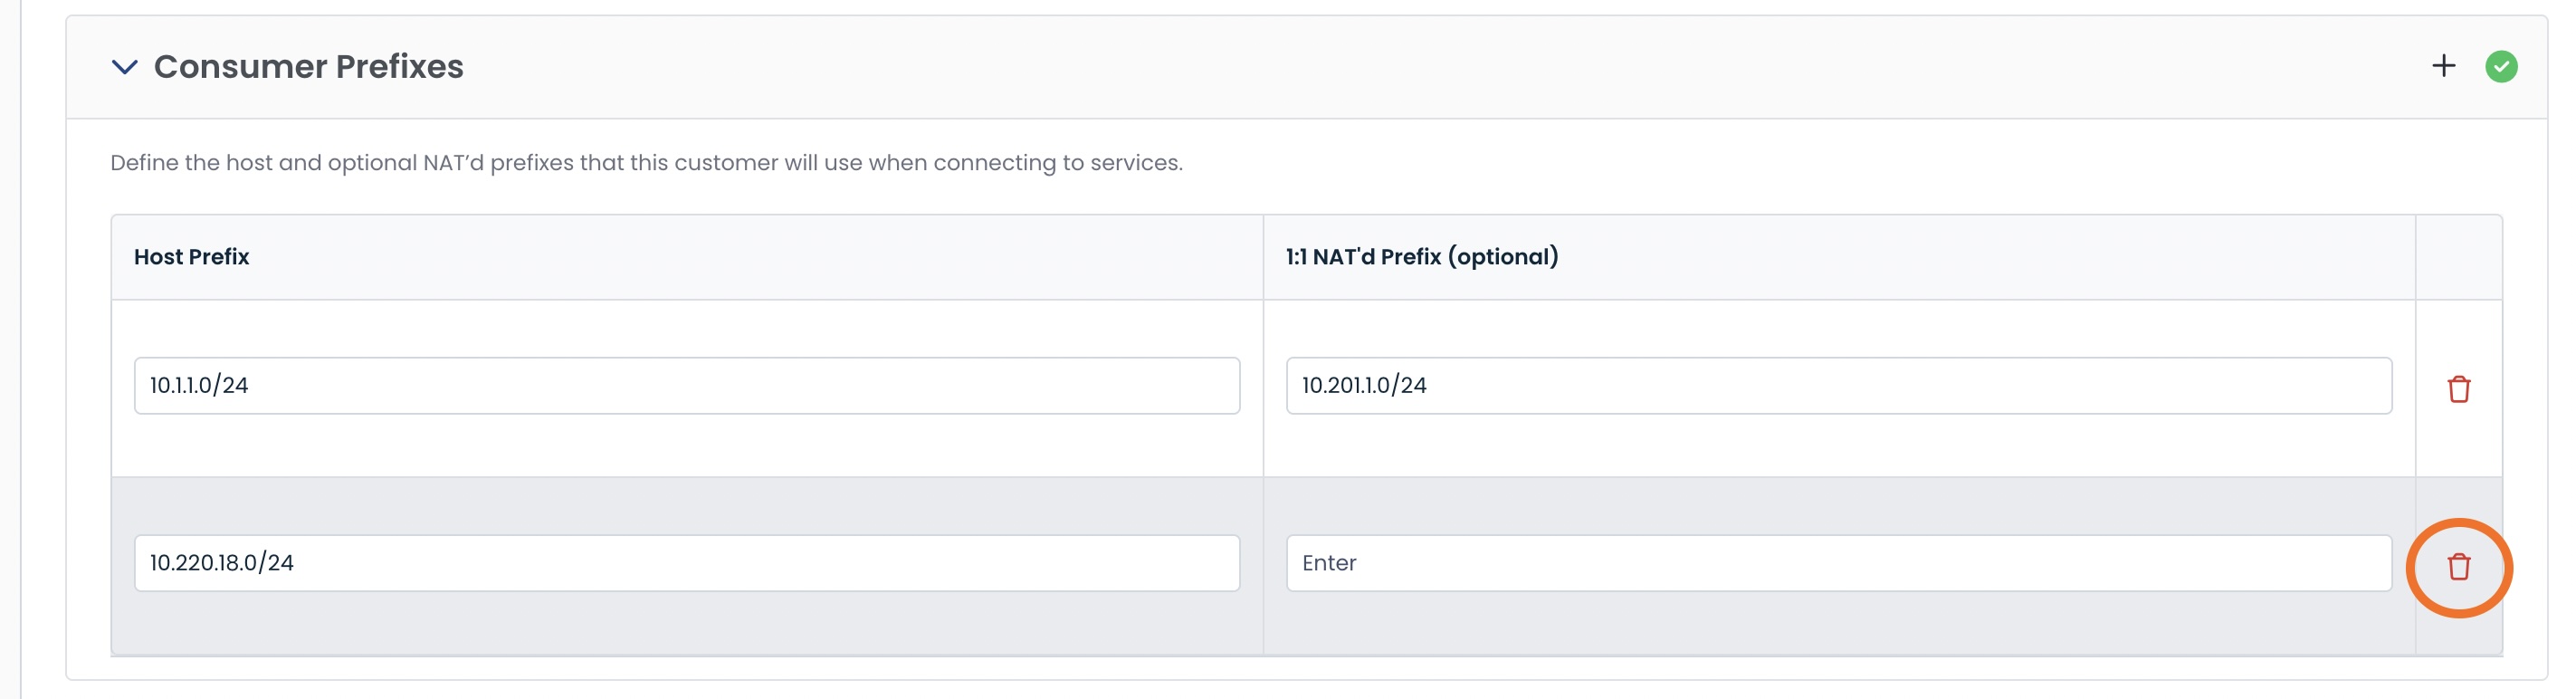
After you click the <trash> icon, that prefix will no longer appear under “Consumer Prefixes”.
Click ‘Update Services’.
The prefix will be deleted, and a green banner will appear stating that the service was updated successfully.
The customer will receive an email stating that changes were made to their Data Exchange service, and a link for them to view the configuration changes.
Accepting an Invitation to Connect to a Graphiant Data Exchange Service
You are able to connect to a publisher’s Data Exchange Service, independent of whether you are currently a Graphiant customer, or are using a third-party device for your networking needs.
Simply follow the appropriate instructions on accepting the invitation from a Graphiant Data Exchange Service publisher:
If you are a current Graphiant customer, follow these instructions on how to connect to a Data Exchange Service invitation using your Graphiant Edge.
If you are not a current Graphiant customer, follow these instructions on how to connect to a Data Exchange Service invitation using your third-party device.
Accepting an Invitation to Connect to a Data Exchange Service Using Your Graphiant Edge
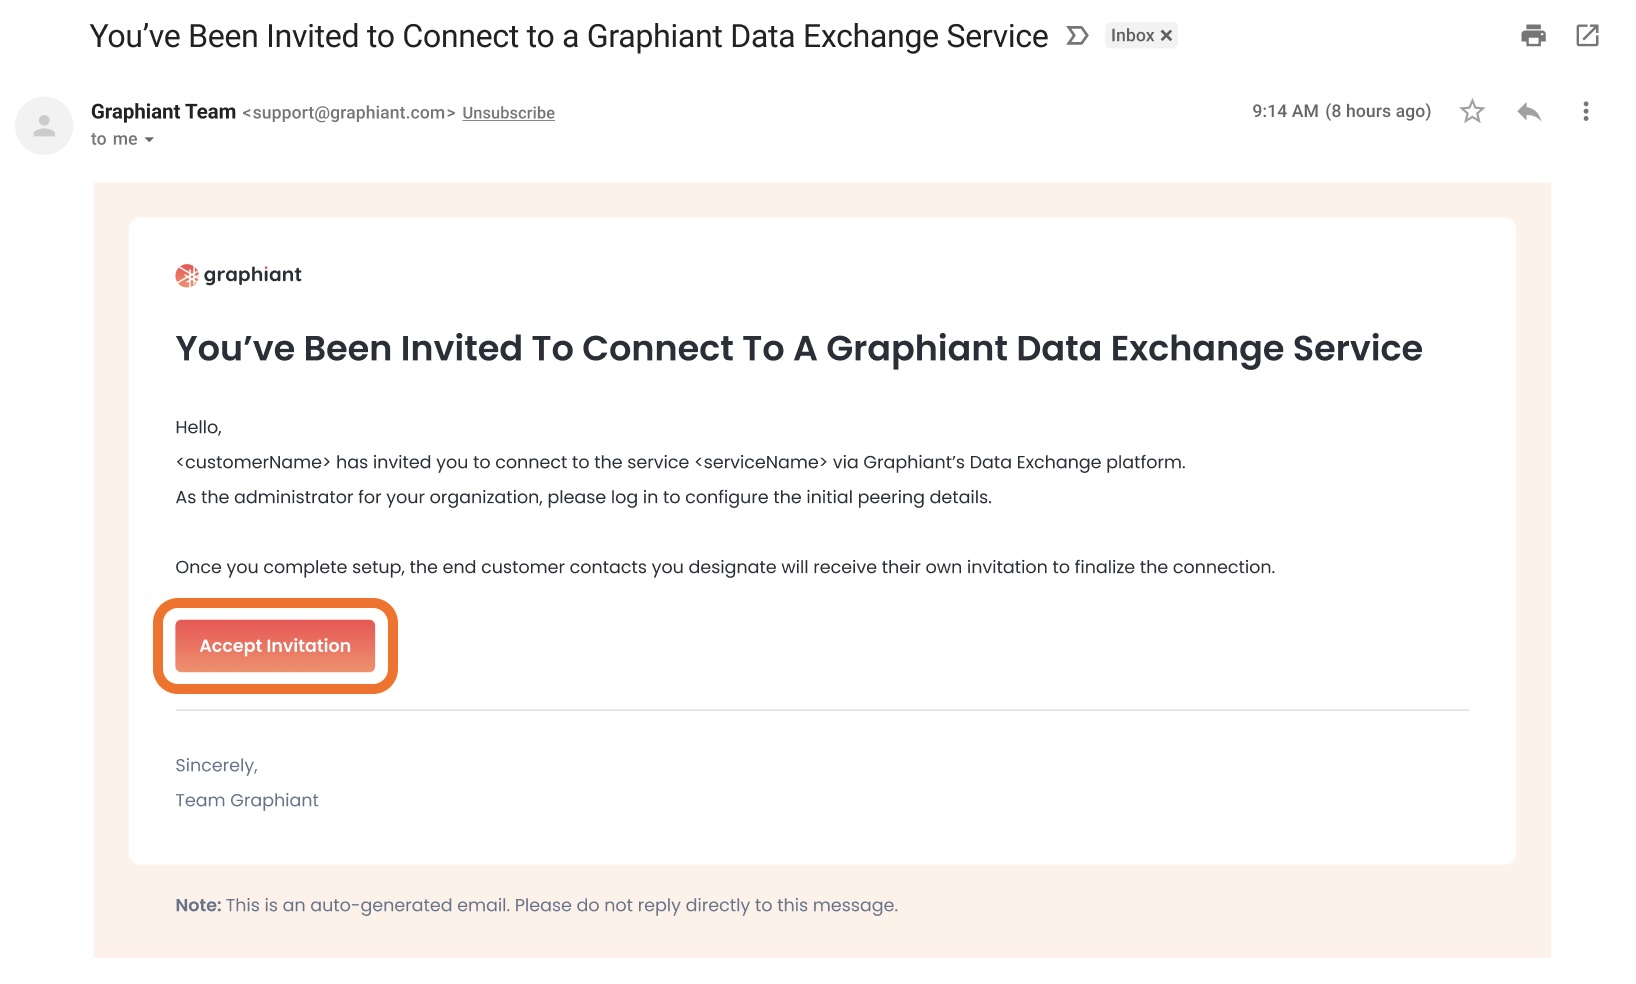
When a publisher of a Graphiant Data Exchange Service invites you to connect with that service, you will receive an email invitation.
Click ‘Accept Invitation’ to begin the process.
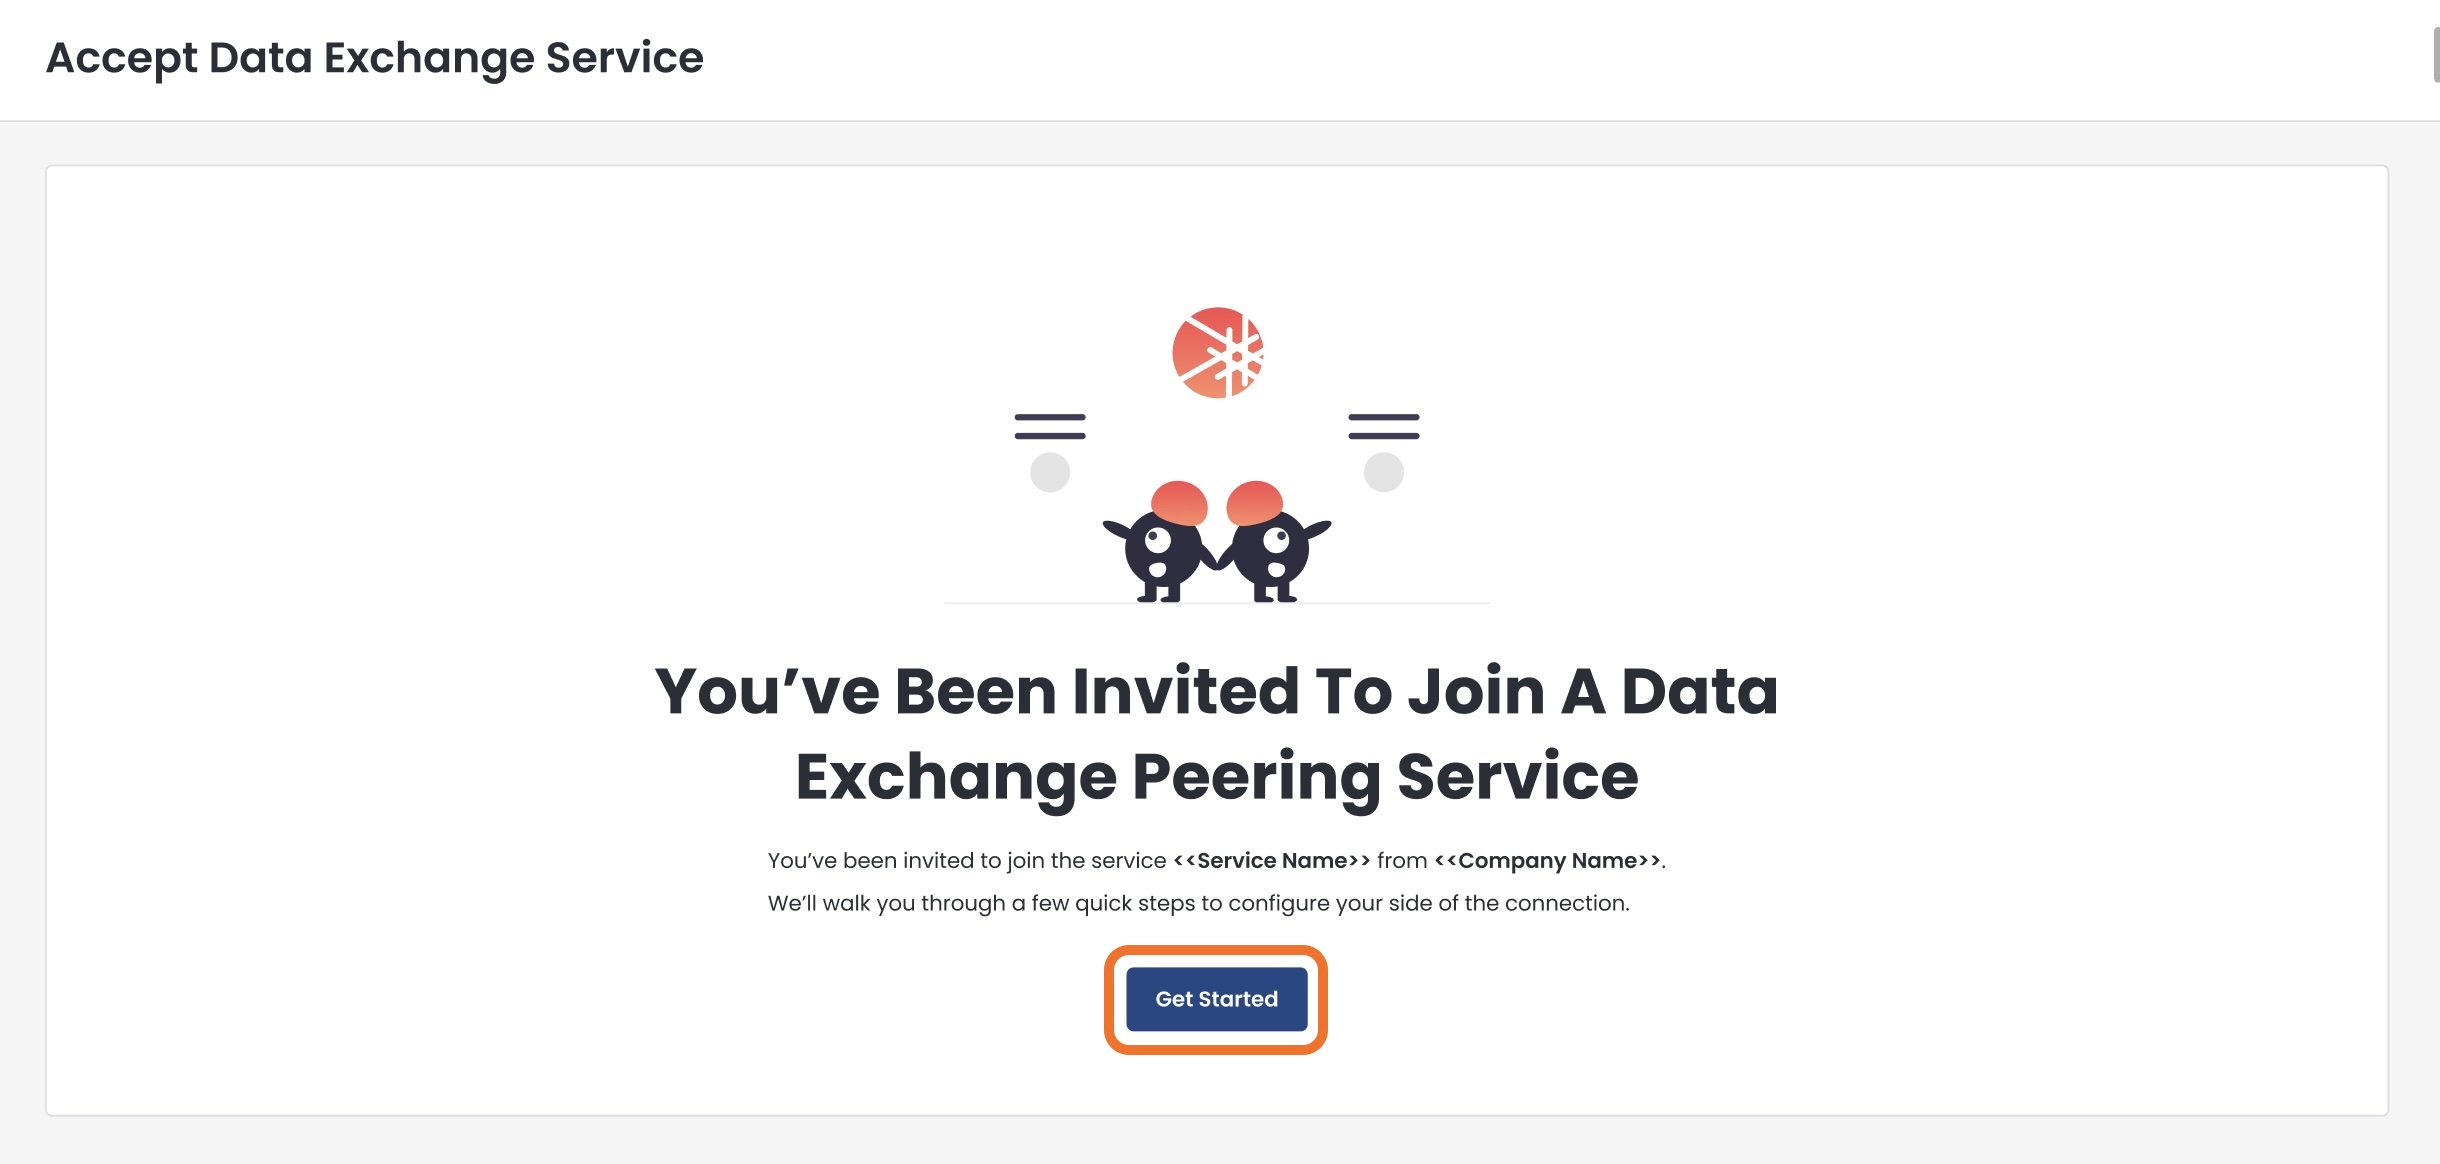
You will be directed to the Graphiant Portal, where we will walk you through the steps you need to start your service.
Click ‘Get Started’.
Subscribing to Your Data Exchange Connection Using Your Graphiant Edge
After logging in to the Graphiant Portal, you will be landed on the Peering Service Overview page for Step 1.
Step 1: Peering Service Overview
Verify that the information regarding the service and the inviting organization is correct.
Click ‘Next’.
Step 2: Review Prefixes
Now you will be able to confirm the information regarding the prefixes for both sides of the connection.
Producer Prefixes: Prefixes that you will see from the service
Translated Prefix (Editable and optional): Should you prefer to use different values to ensure no conflicts within your own routing domain, enter the translated prefixes here
Consumer Prefixes: Your prefixes that will be allowed access to the service
Verify that the information is correct; click ‘Next’.
Step 3: Prefix Location
This is the configuration page for where this Data Exchange Service will be accessible within your network.
Complete the following sections:
Prefix Location:
LAN Segment: The LAN segment where this service will be available
LAN Segments:
Must be selected before Site Selection.
Site Selection
Site Type: Choose either to enter your sites individually, or by site lists.
Site: You may enter up to 15 sites
Site List: Can contain as many sites as are in the list(s)
Site / Site List options:
Are dependent on the LAN segment chosen; the Sites / Site Lists that contain the selected LAN segment will be the only ones offered in the dropdown.
Routing Policy
Select a routing policy.
You can also create a new routing policy right from here.
For information on routing policies, click here.
Select which Edges will receive this policy.
Once you have verified that all of the information is correct, click ‘Next’.
Step 4: Service Profile
From the dropdown, select your VPN Gateway Region; this is the region where the Gateway Service for this Data Exchange service is deployed, and determines the Graphiant gateway used for the VPN connection..
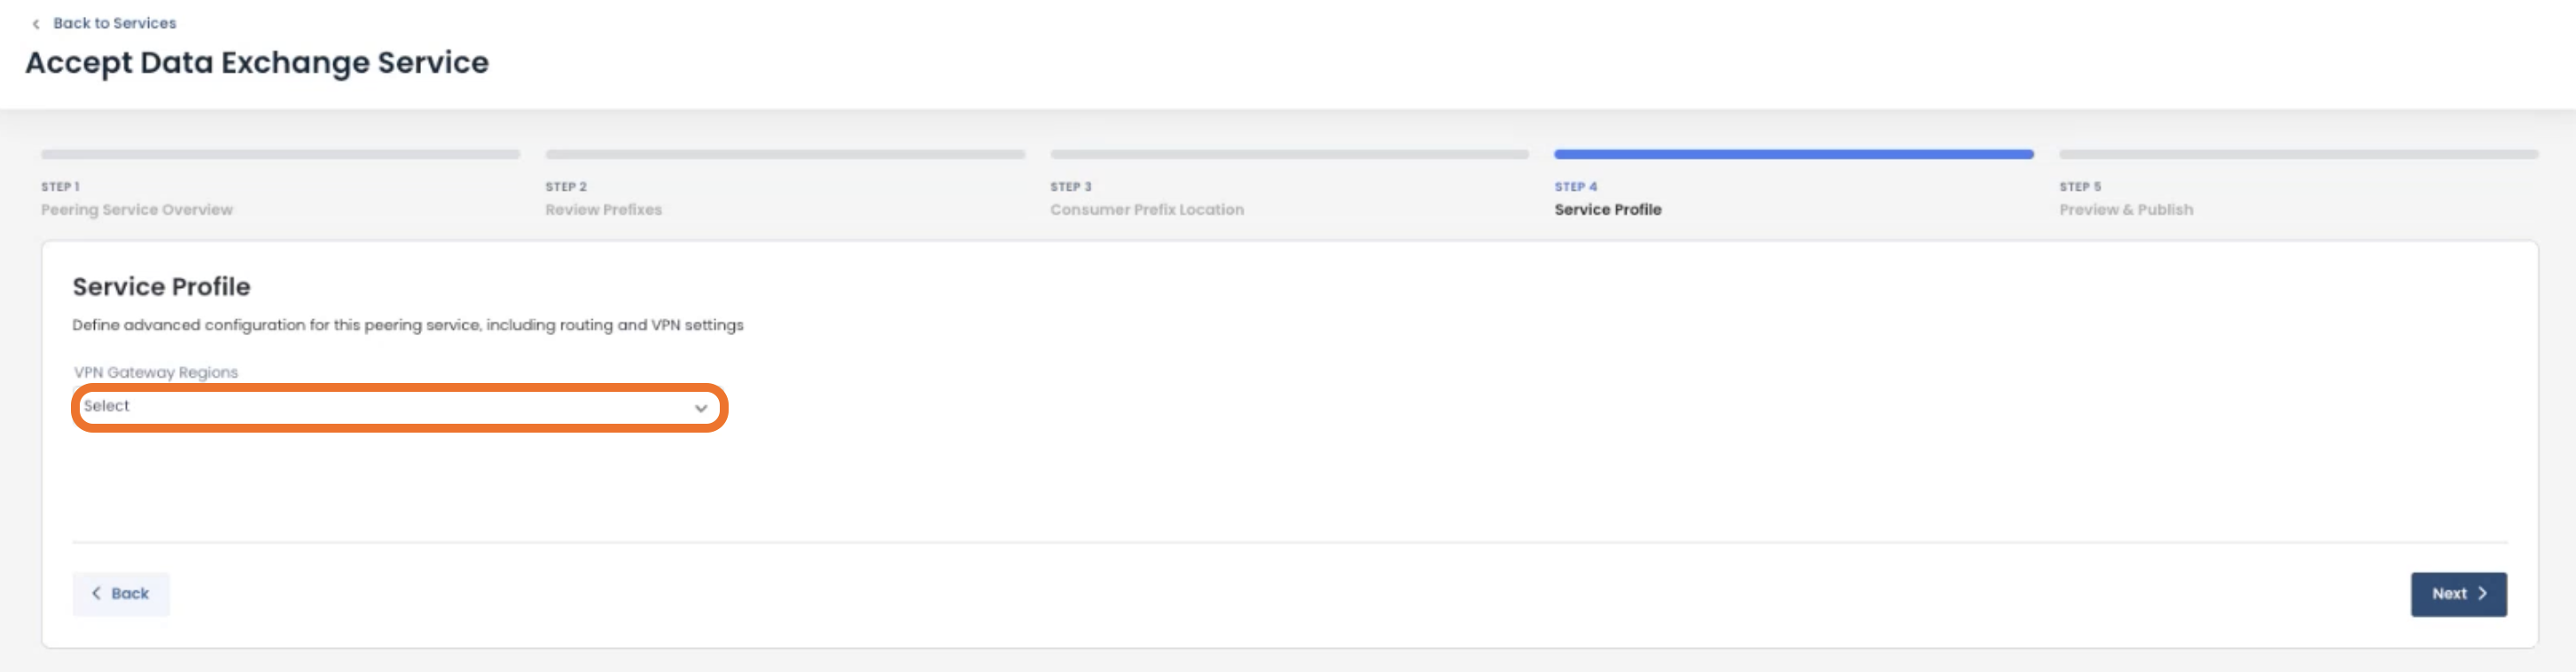
Once you select your VPN Gateway Region, the screen will expand for full configuration.
Complete the following fields to configure the VPN connection with your environment:
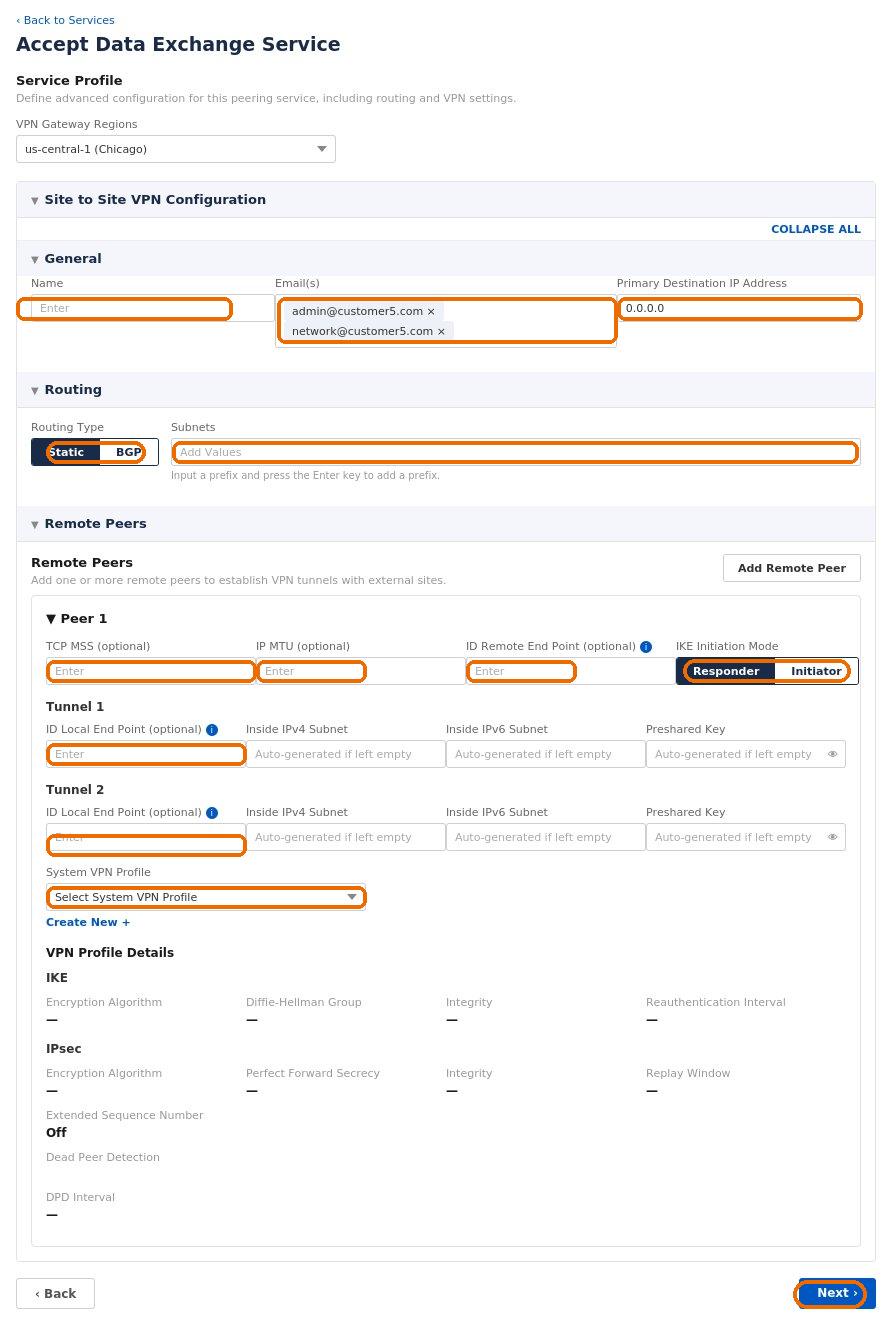
General:
Name: Enter a descriptive name for the VPN connection.
Email(s) (if needed): Enter one or more email addresses to receive notifications related to this VPN.
Primary Destination IP Address: Enter the public IP address of your VPN endpoint, or leave as default “0.0.0.0”.
When configuring multiple remote peers, this address will pre-populate with “0.0.0.0”.
Routing:
Routing Type: Select whether to use Static or BGP routing.
Subnets: Enter the network prefixes that should be reachable through the VPN.
Remote Peer:
TCP MSS (optional): Specify a TCP Maximum Segment Size (MSS) if required by your network.
IP MTU (optional): Specify a Maximum Transmission Unit (MTU) if your environment requires a non-default value.
ID Remote End Point (optional): Enter the remote IKE identity if required by your VPN device.
IKE Initiation Mode: Select whether Graphiant initiates the VPN connection (Initiator) or waits for the remote peer to initiate it (Responder).
When configuring multiple remote peers, only Responder mode is supported.
Tunnel 1 ID Local End Point (optional): Enter a local IKE identity for the first tunnel if required.
Tunnel 2 ID Local End Point (optional): Enter a local IKE identity for the second tunnel if required.
System VPN Profile: From the dropdown, select the VPN profile that defines the IKE and IPsec security settings for this connection.
If needed, you can create a new profile by clicking ‘Create New +’. This will open a modal to configure a new VPN profile. For more information regarding creating VPN Profiles, click here.
If you would like to add additional peers, click ‘Add Remote Peer’ to the right of the “Remote Peer” area. You can add as many total remote peers as necessary.
Note:
All remaining VPN settings, including the tunnel subnets, pre-shared ketys, and IKE/IPSec security parameters, are automaticlly populated based on the selected VPN profile or generated by the Graphiant portal.
Click ‘Next’.
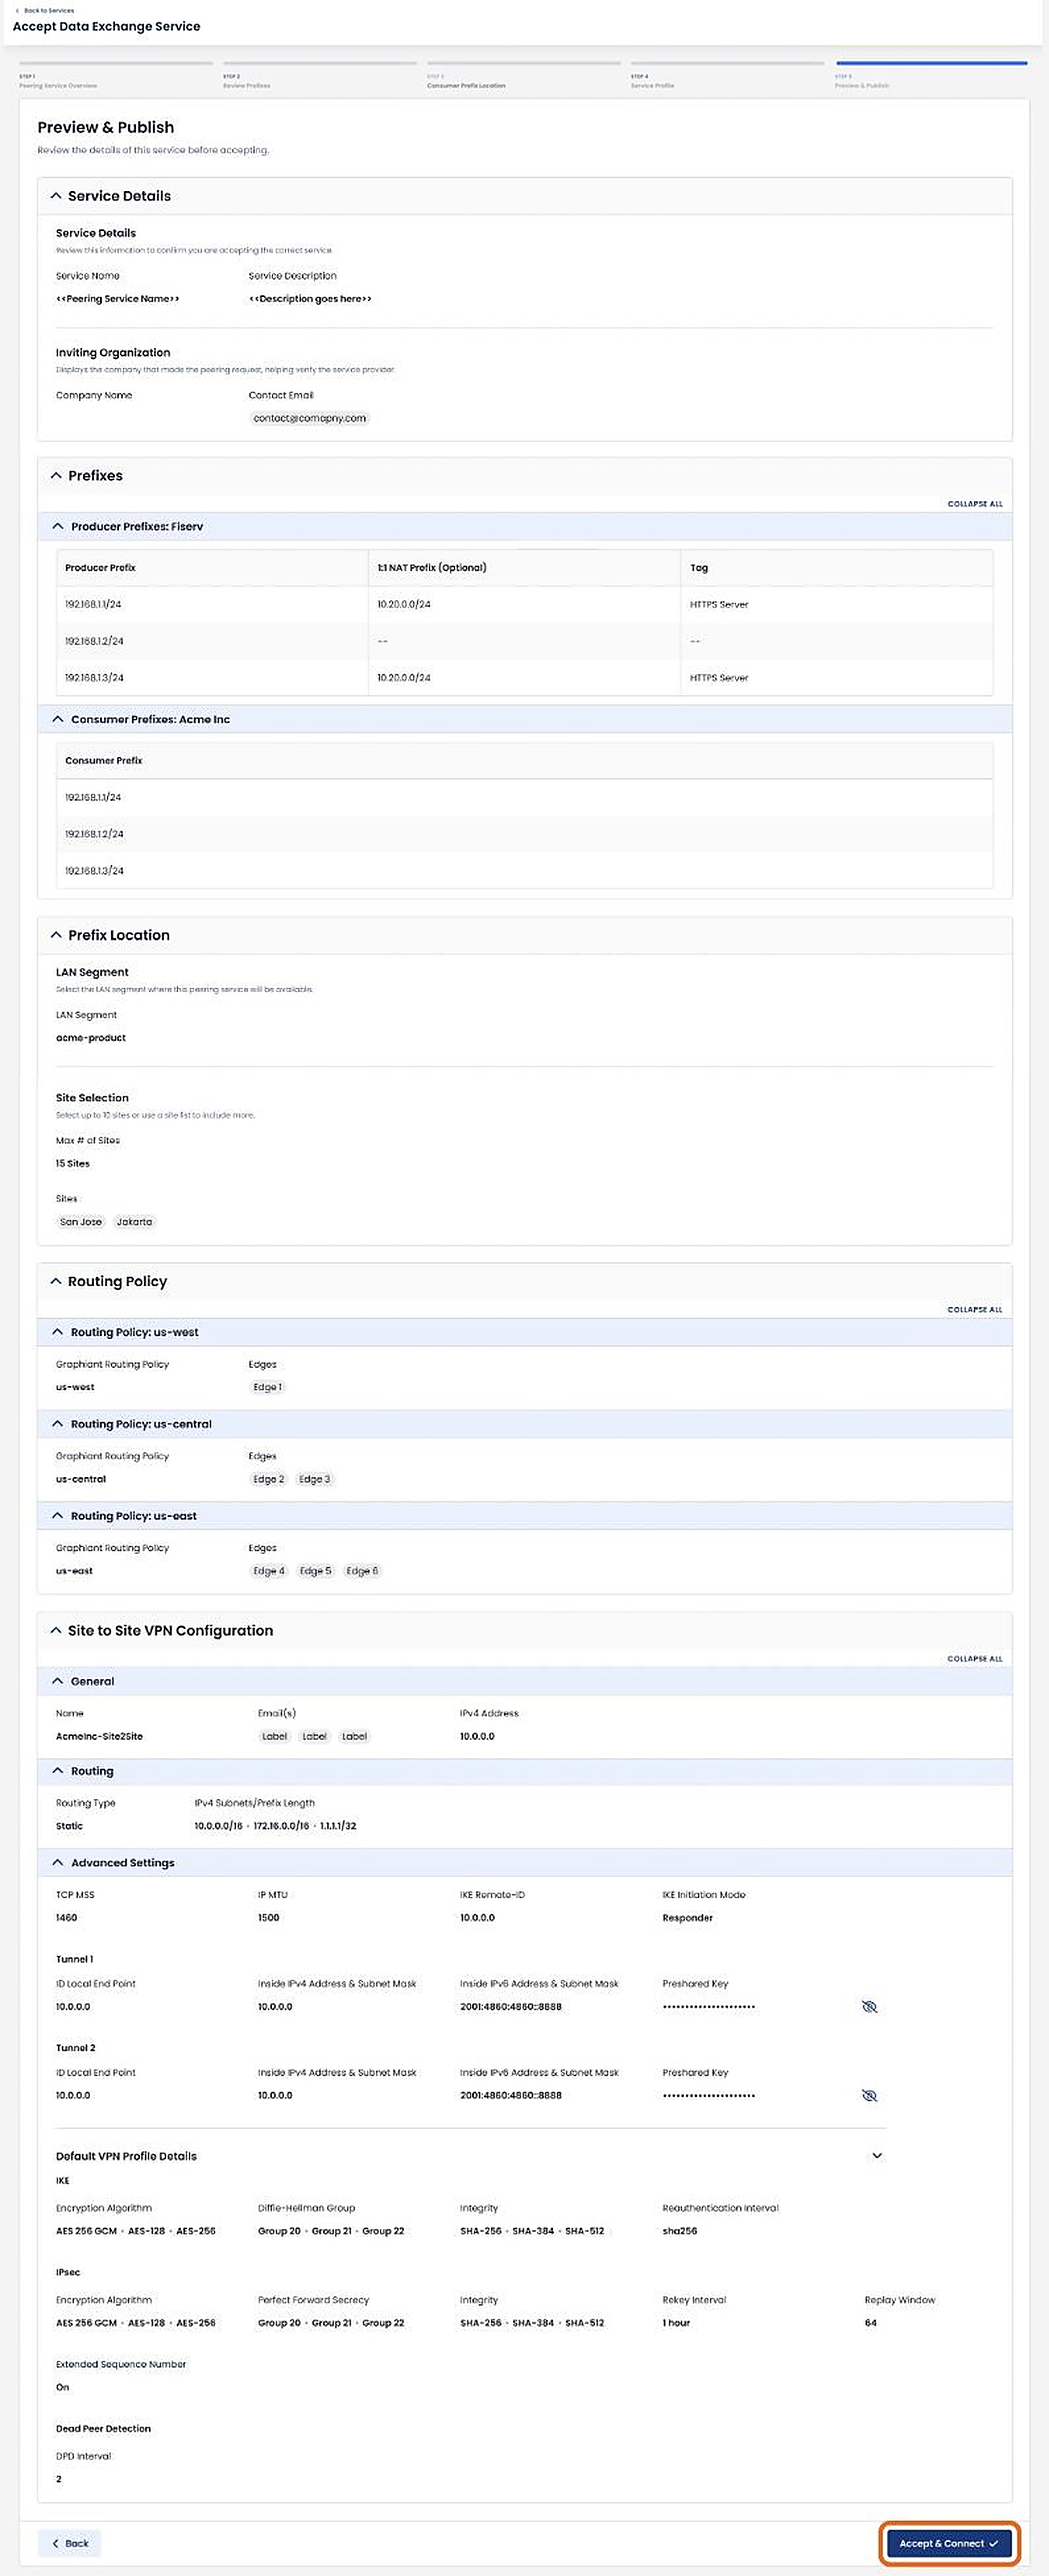
Step 5: Preview & Publish
This is the final step before connecting and subscribing to the Graphiant Data Exchange Service.
Ensure that all information is correct in this summary page.
Click ‘Accept & Connect’.
You will receive a confirmation that your Data Exchange Service has been accepted.
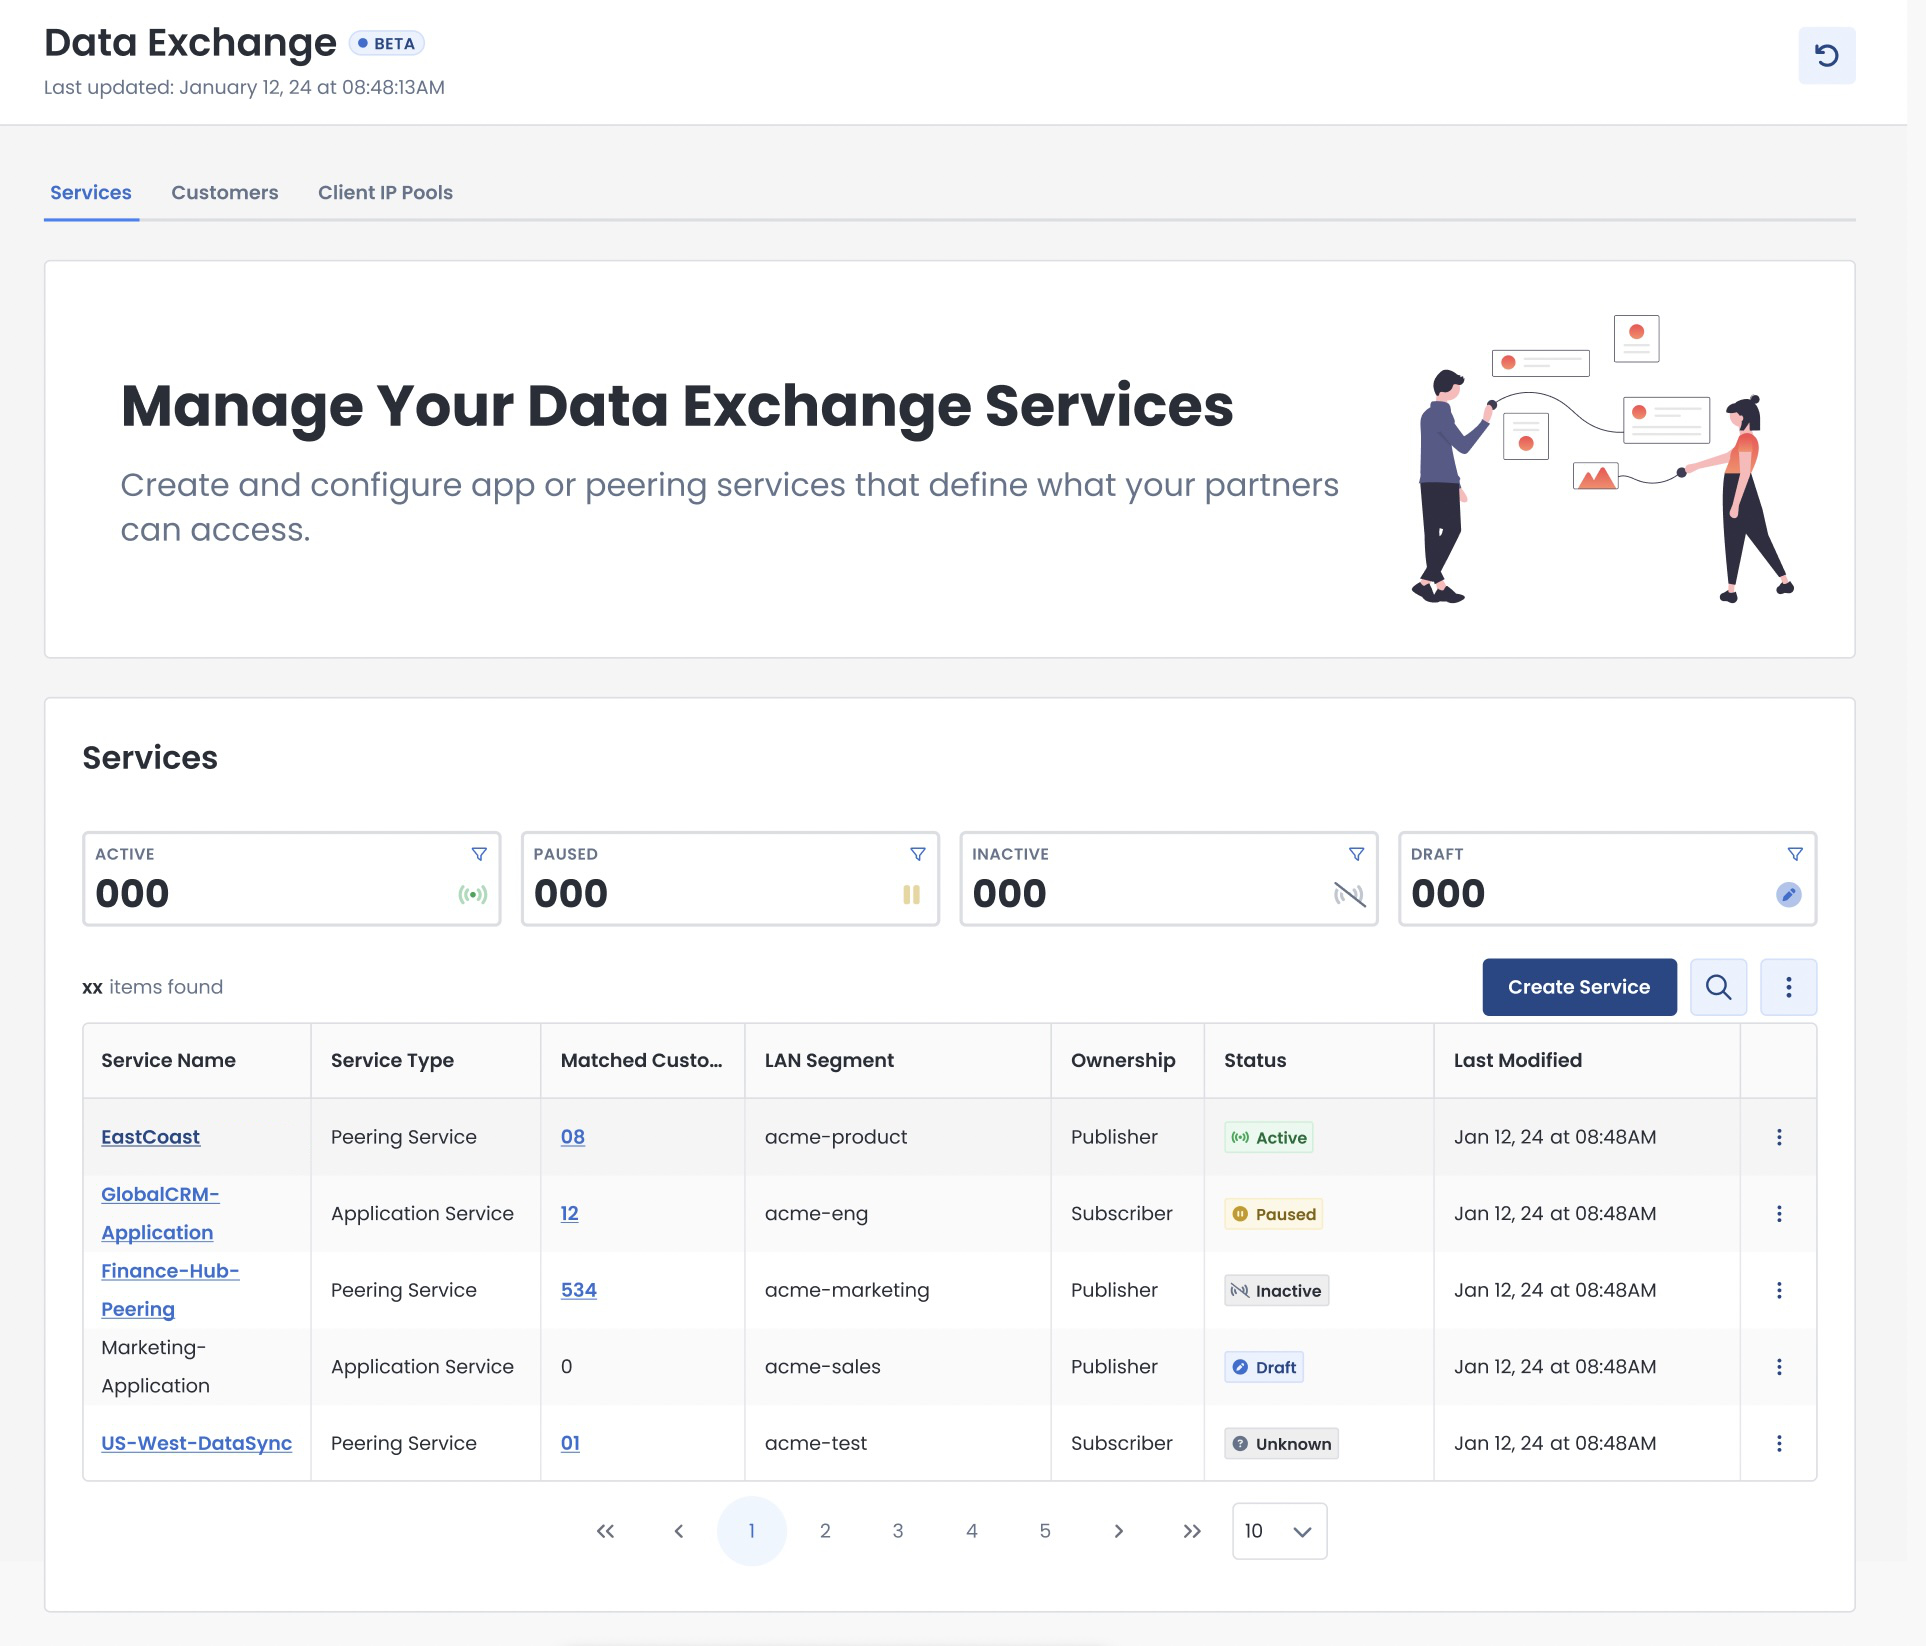
To view and manage your service, click ‘Go to My Services’.
.jpg)
Here you can monitor and manage any services to which you have subscribed.
Accepting an Invitation to Connect to a Data Exchange Service Using Your Third-Party Edge Device
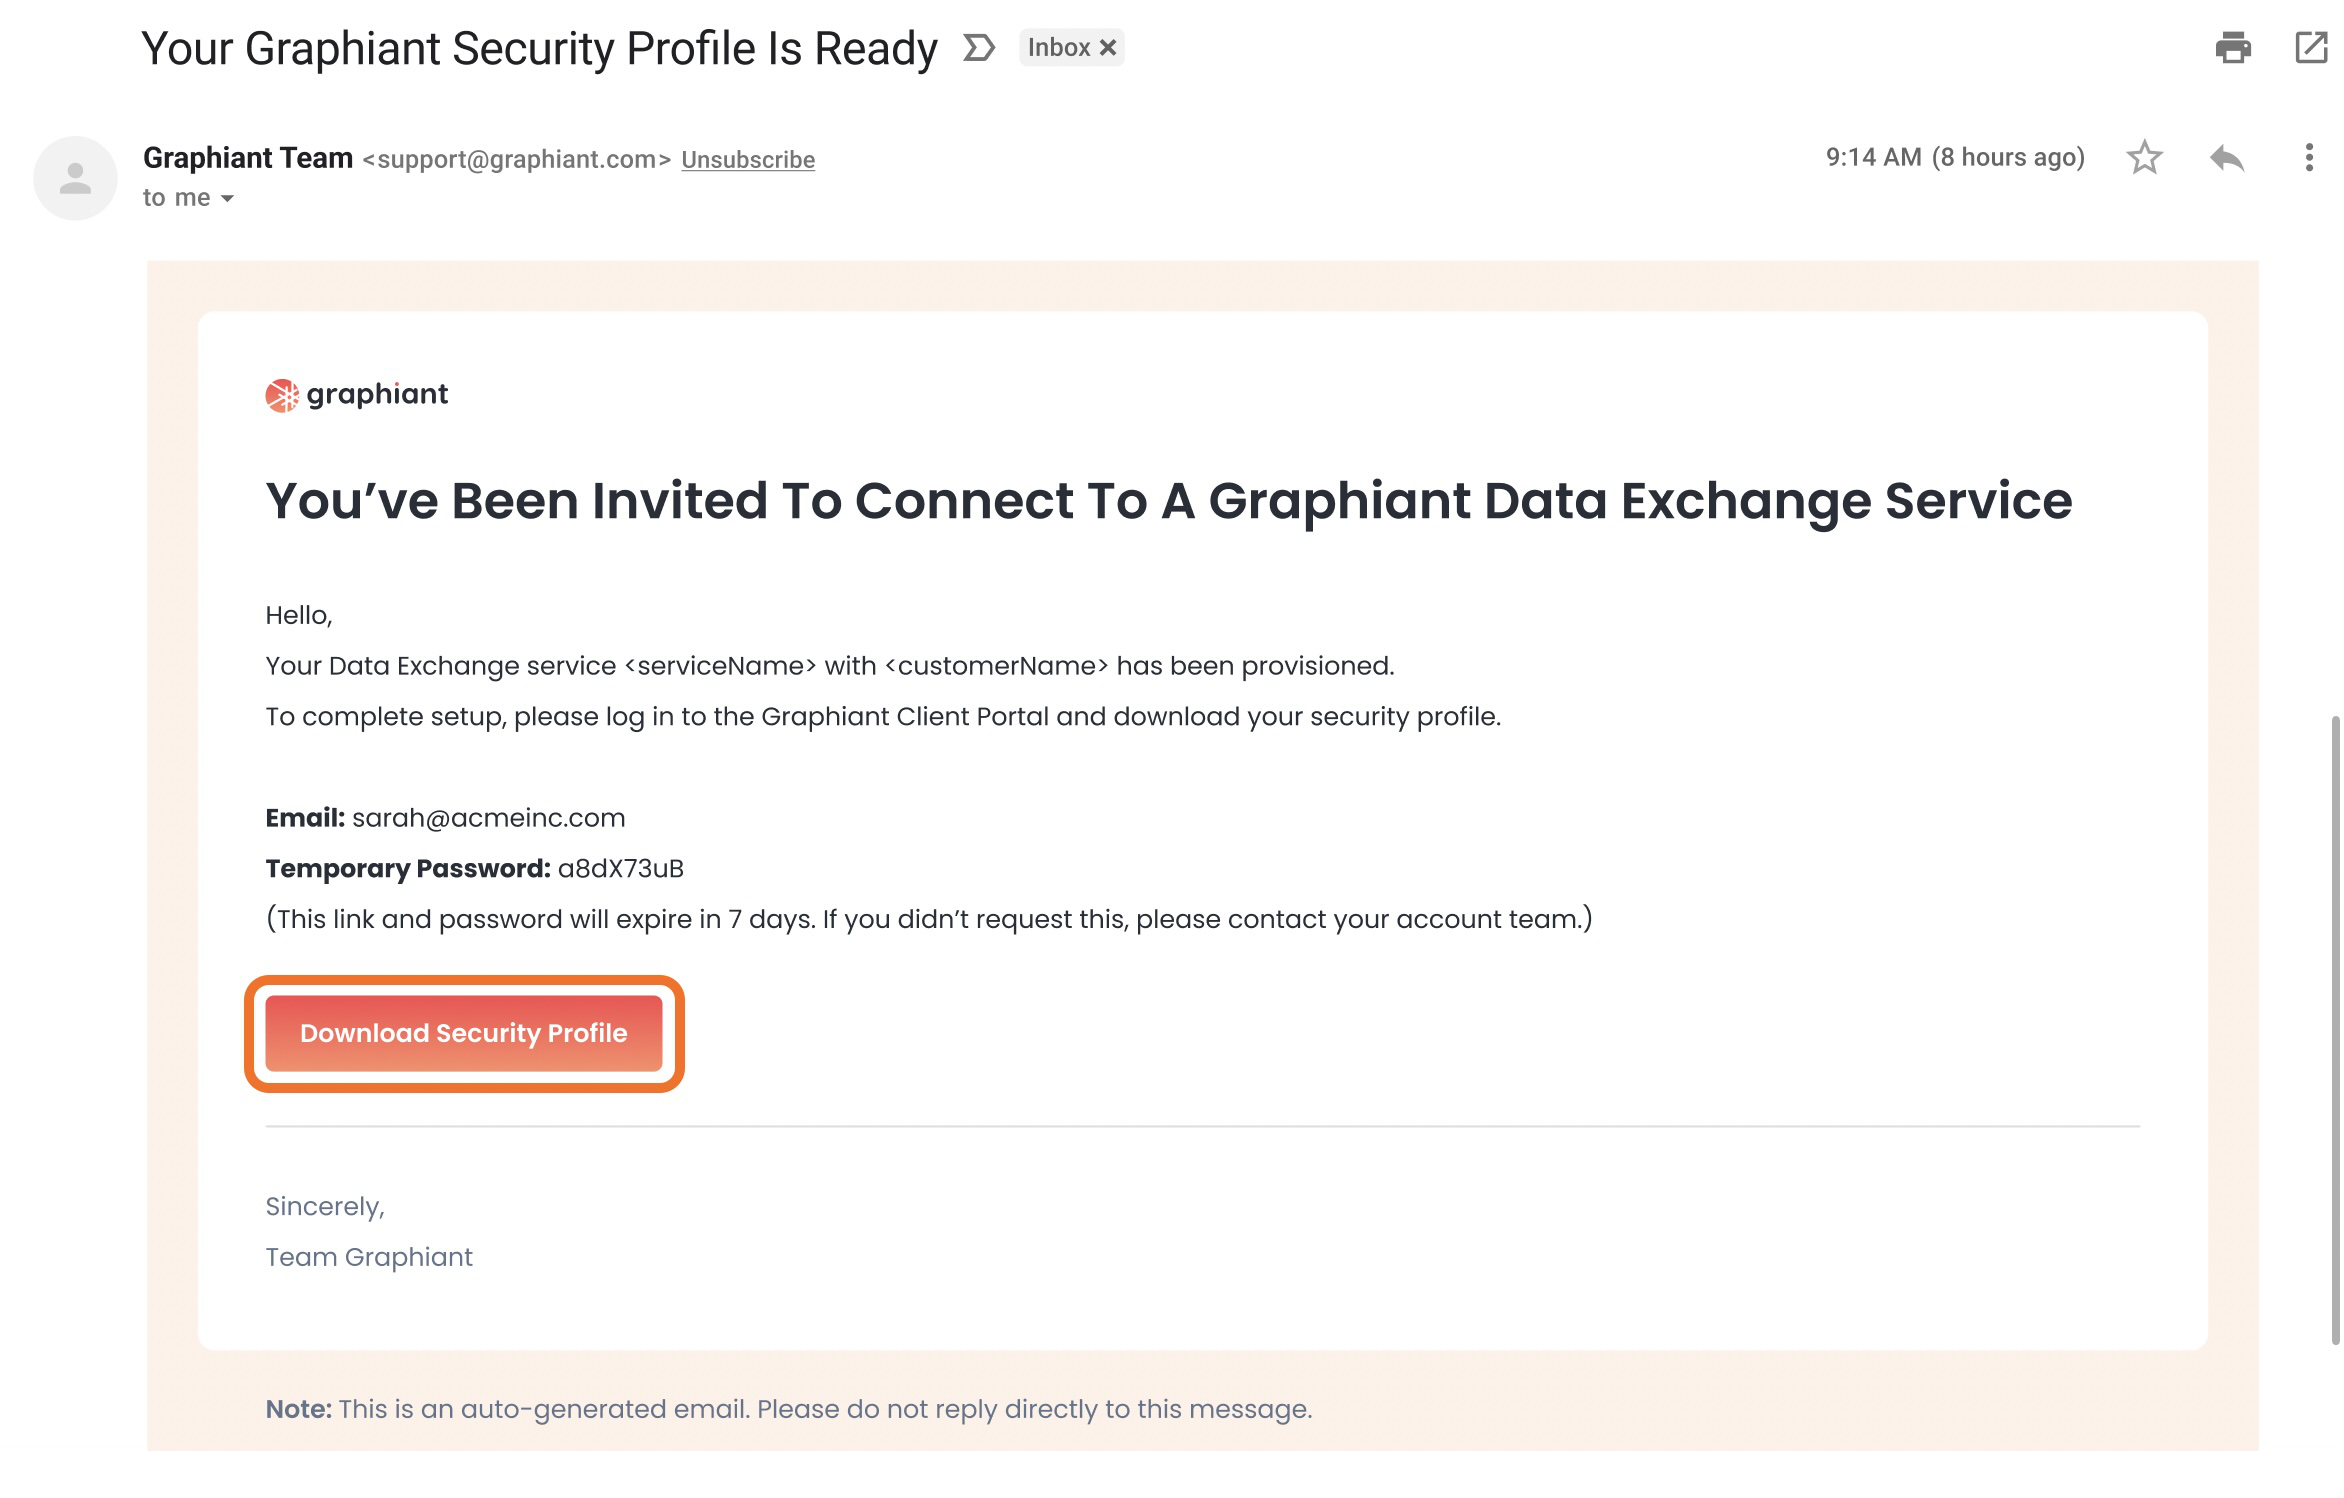
When a publisher of a Graphiant Data Exchange Service invites you to connect with that service, you will receive an email invitation to download the security profile that has been provisioned for you.
You will then have all of the information to configure your third-party edge device so that it may connect you to the subscription service using a 3rd party VPN.
Click ‘Download Security Profile’ to begin the process.
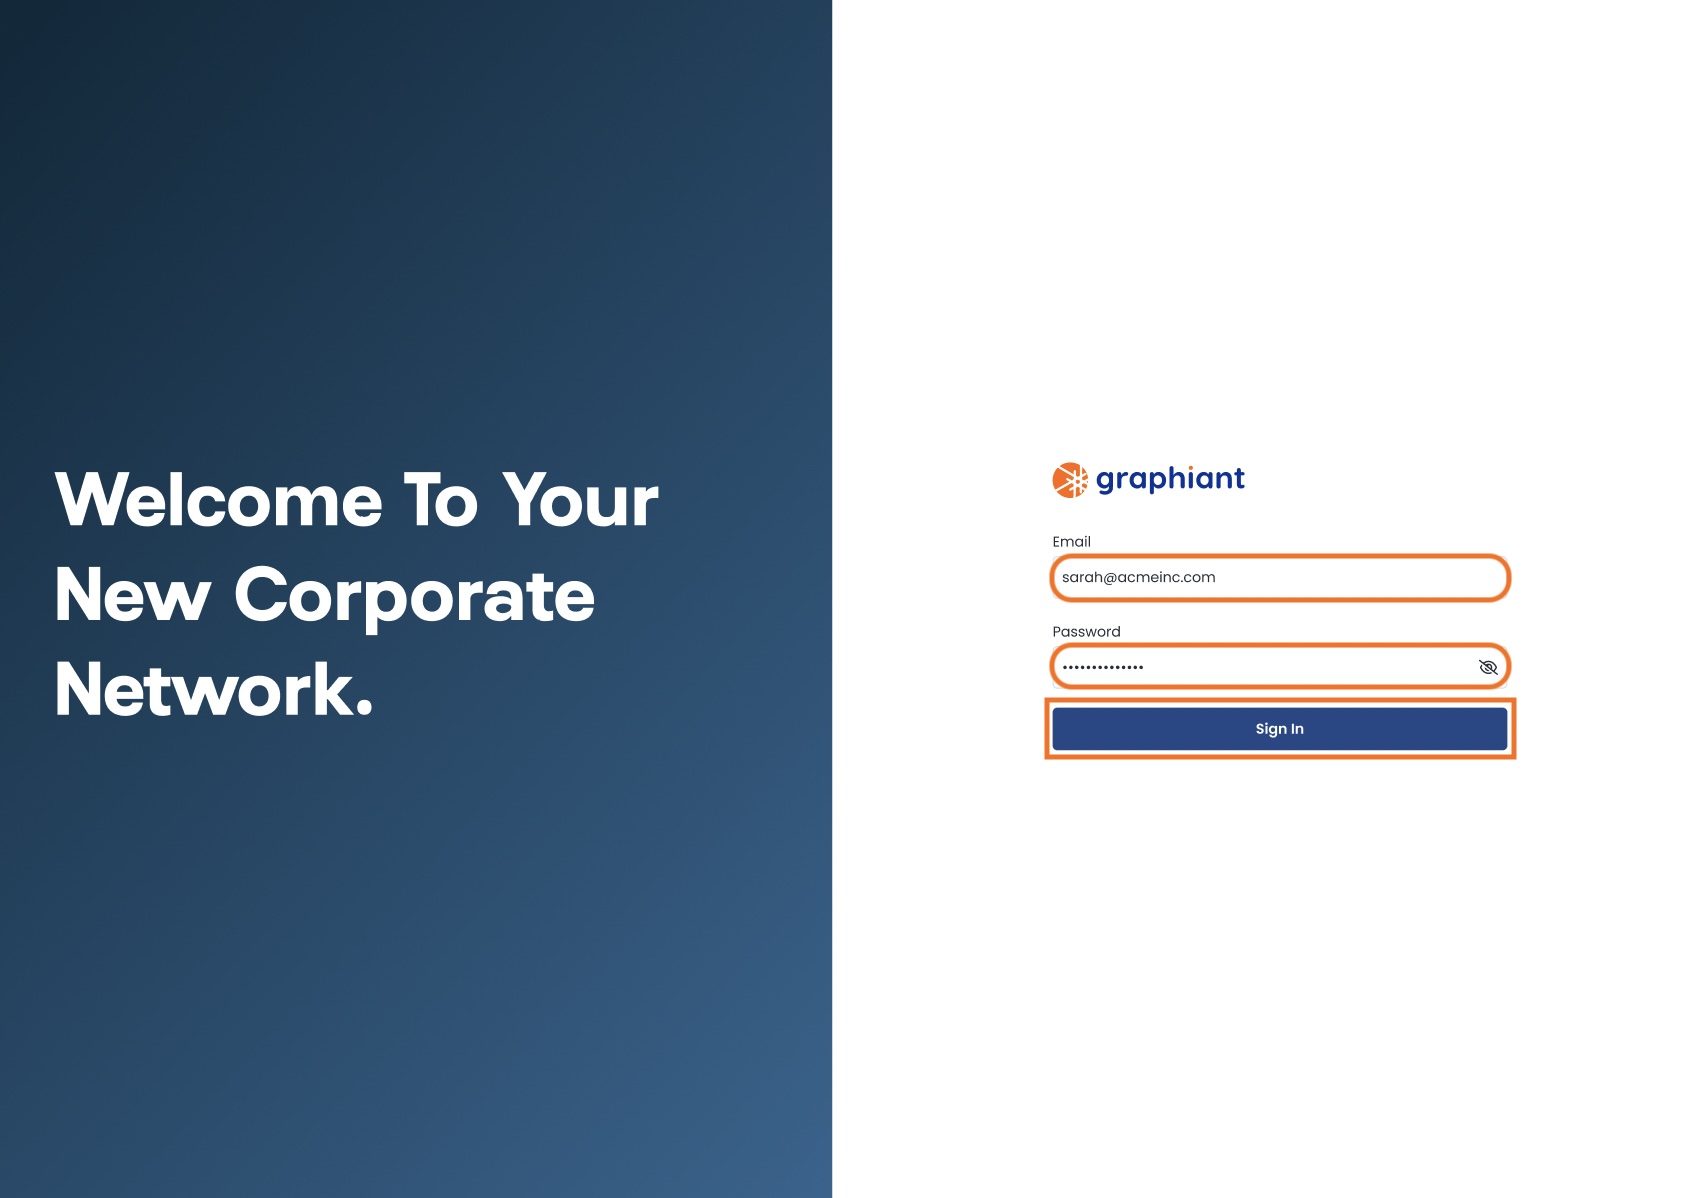
You will be provided a temporary password:
Take note of this password as you will need it to log in to your Graphiant Portal.
Login using the email to which the invitation was sent, and the temporary password provided to you there.
Click ‘Sign In’.
Click ‘Download’ to receive your personalized security profile for your Data Exchange Service subscription.
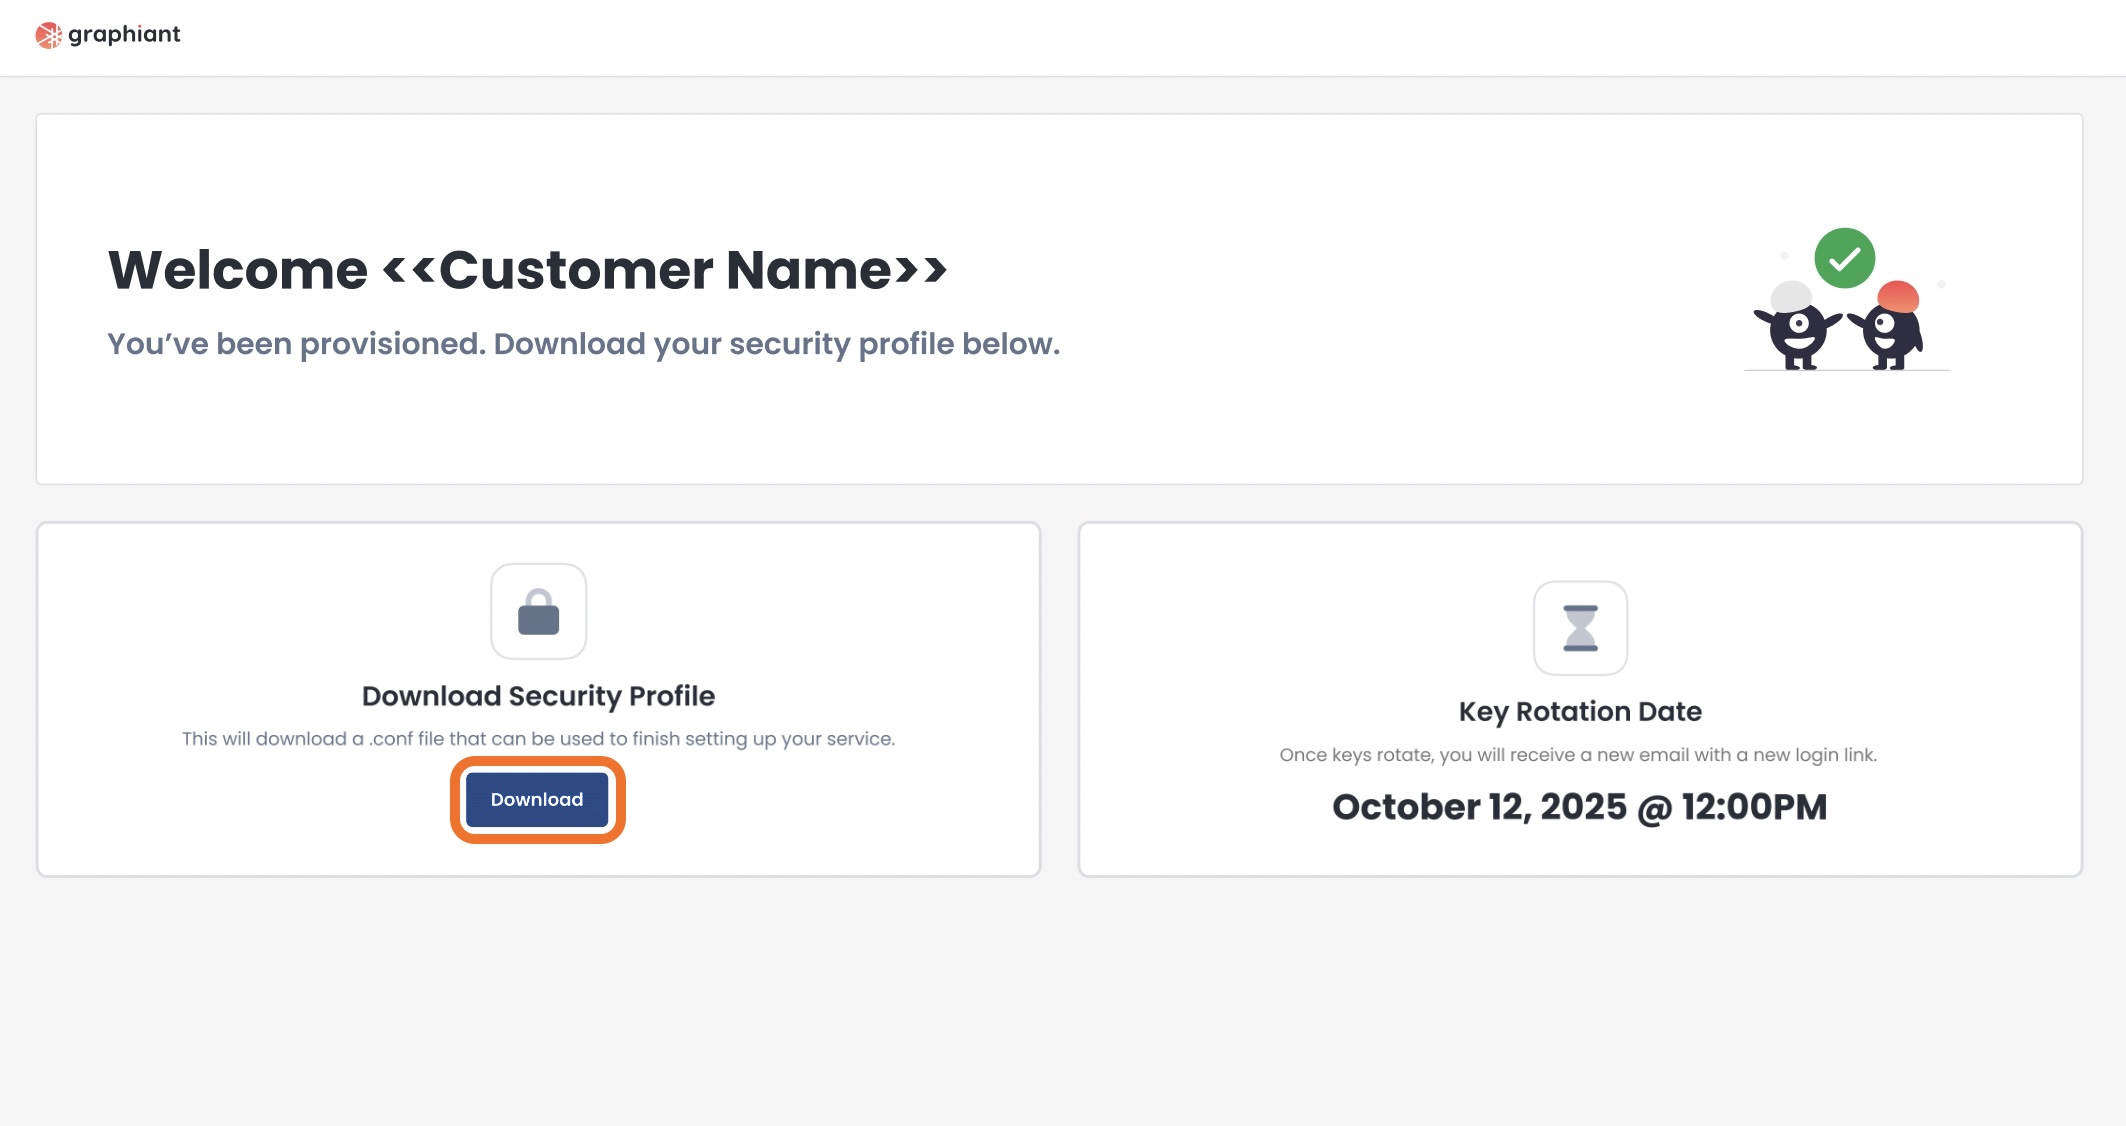
You can now configure your third-party device to connect to the service that is ready for you!