With Graphiant, it’s easy to navigate all of your device service and maintenance needs in one place.
From viewing the states of your Edges, to creating bootstrap tokens for onboarding, it’s easy to manage all of your devices in the Device Lifecycle center.
Locating the Device Lifecycle in the Graphiant Portal
From the Graphiant Portal home screen, click ‘Maintain’ in the left sidebar; select ‘Device Lifecycle’.

This will take you to the Device Lifecycle area of the Graphiant Portal.
Devices Information
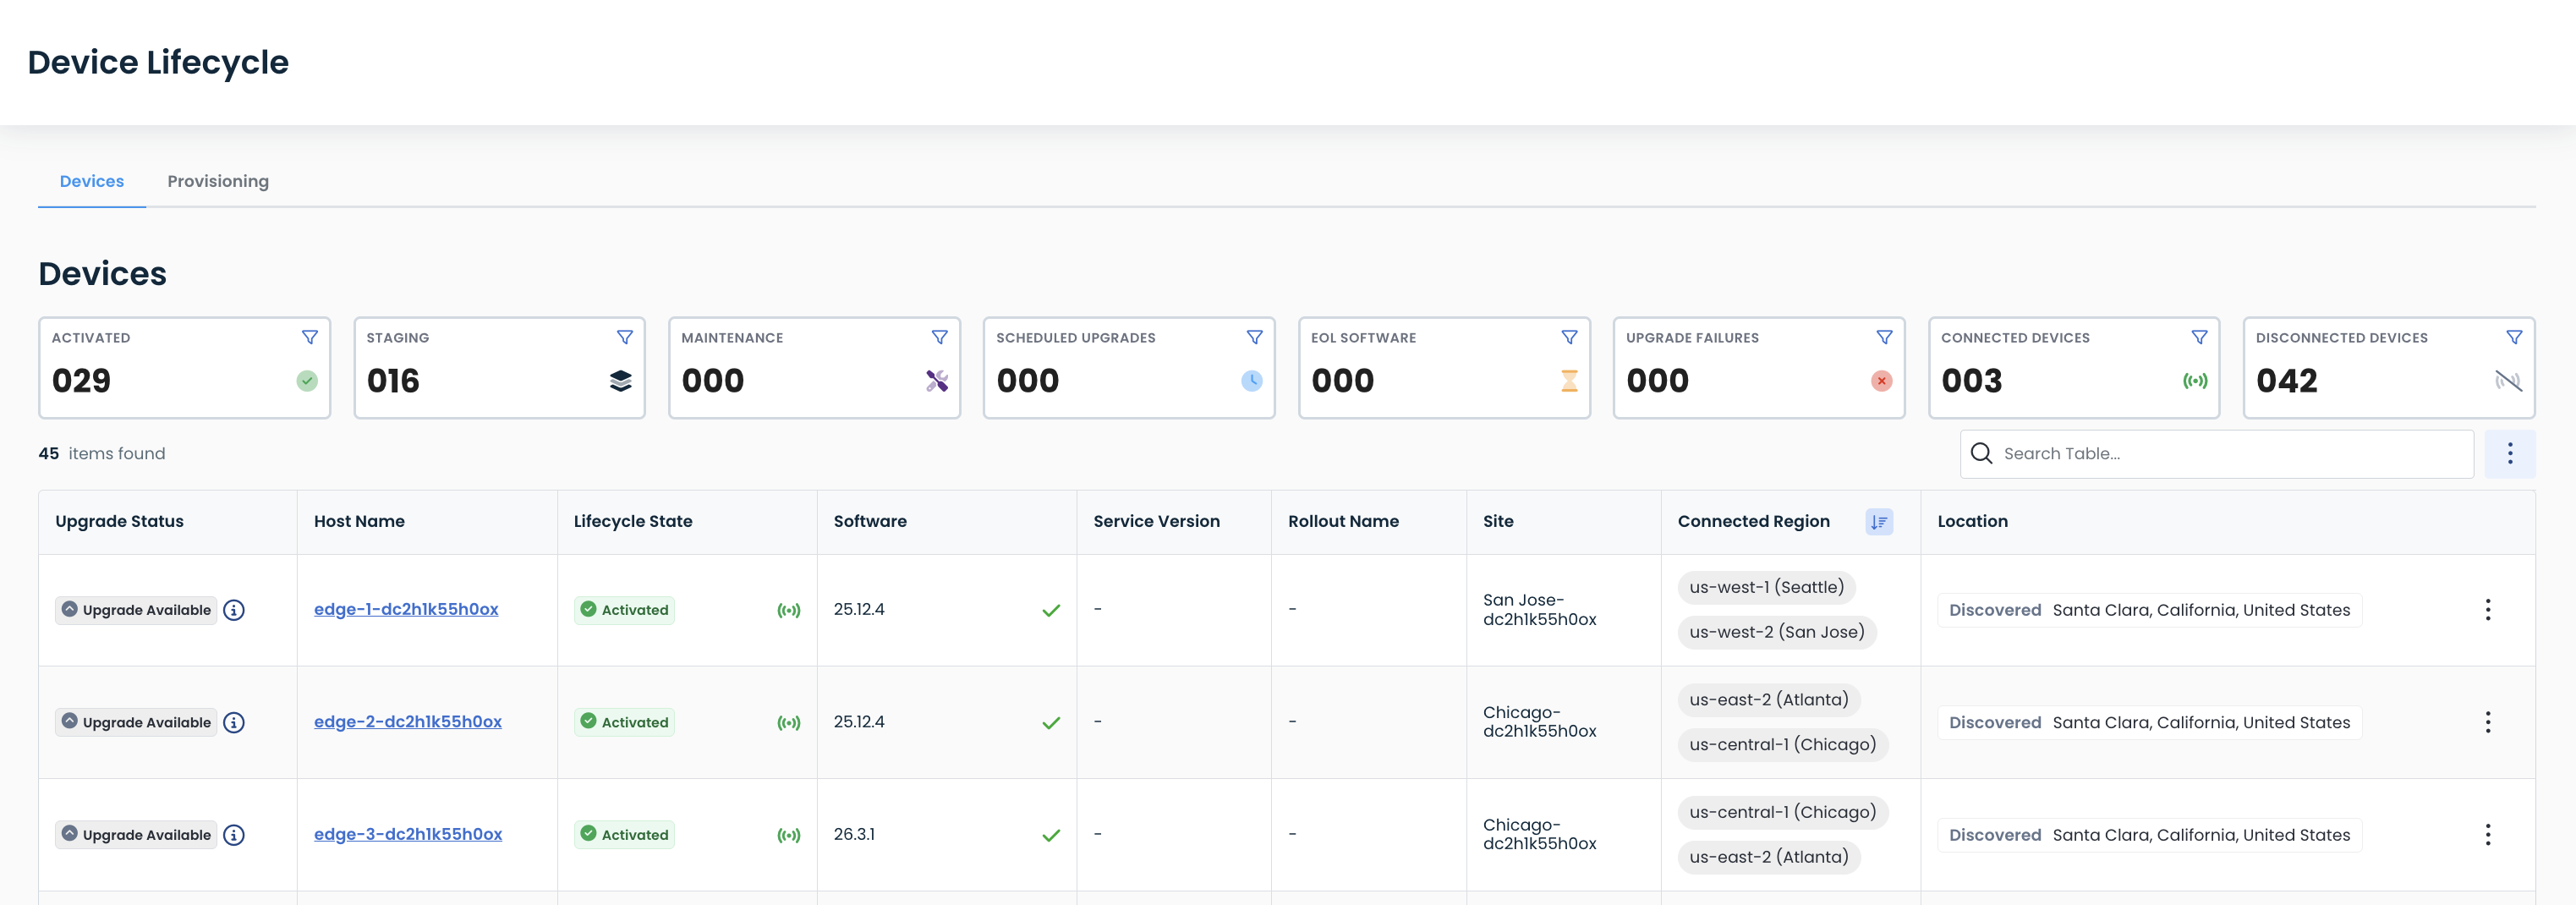
The Landing page for the Device Lifecycle area is the “Devices” tab.
Here you can:
Visualize:
The states of your Graphiant devices
What devices are scheduled to be upgraded
Any devices whose software is End-Of-Life
Any failed upgrades
Change the state of your devices
Schedule an upgrade
The filters at the top are clickable and will show you which devices currently fall into the following categories:
Activated: Up and running and connected to the Graphiant Core
Staging: Provisioned but not currently connected to the Graphiant Core
Maintenance: Online but not receiving traffic; possibly due to undergoing configuration changes (click here for further information on Maintenance Mode)
Scheduled Upgrades: Marked to receive a software release upgrade
EOL Software: Configured with a software release that is at End-Of-Life for support
Upgrade Failures: Experiencing a failure at upgrade
Connected Devices: Connected to the Graphiant Core
Disconnected Devices: Not connected to the Graphiant Core
To deselect a filter, simply click that filter box again.
Note:
Only one filter at a time may be activated; filters are not stackable.

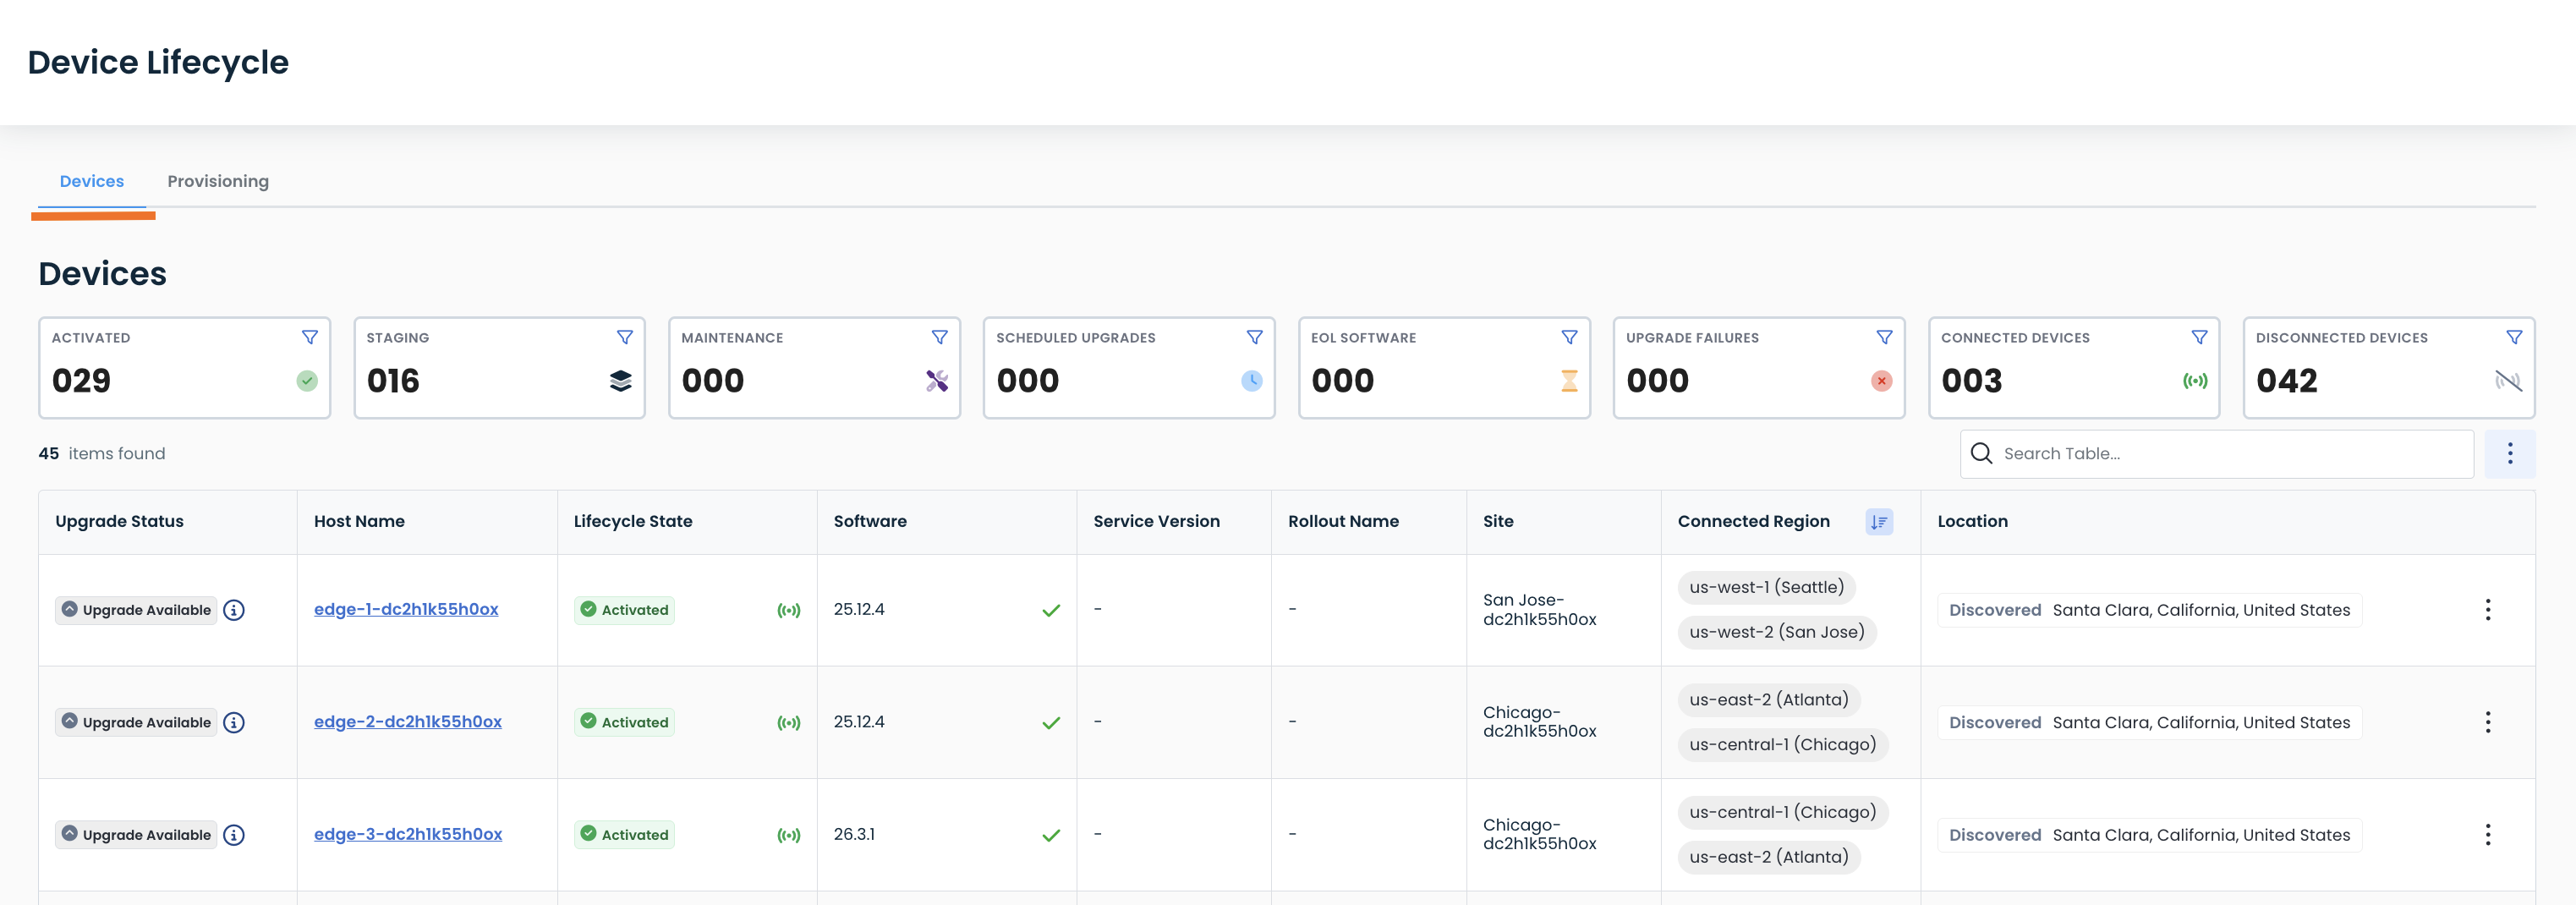
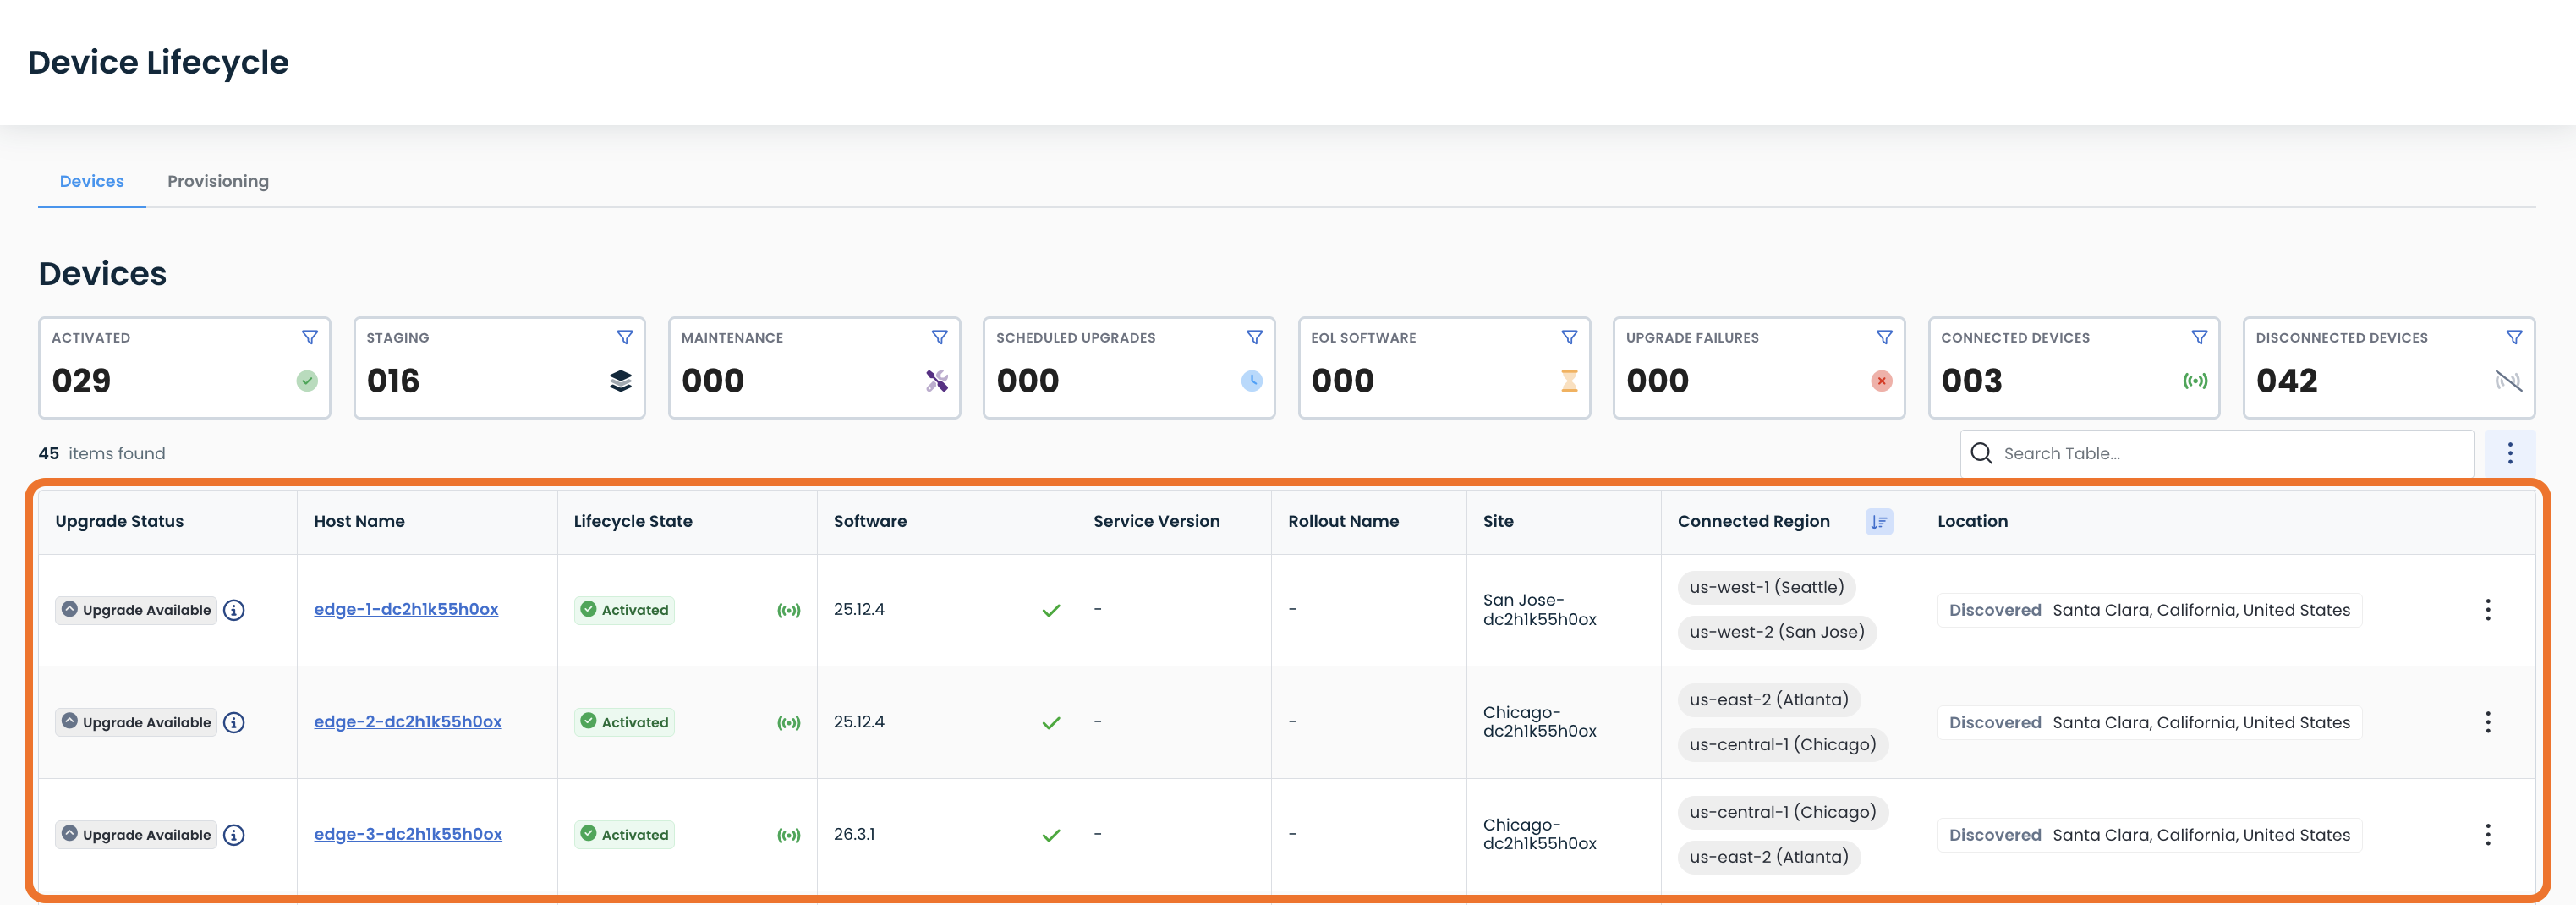
The Devices table shows the following:
Upgrade Status: Whether the device is up to date, or an upgrade is available
Upon hover, you will see:
The Release Train you are on (Latest or Recommended)
The Version currently installed
For “Up to Date” devices, the date that version was installed
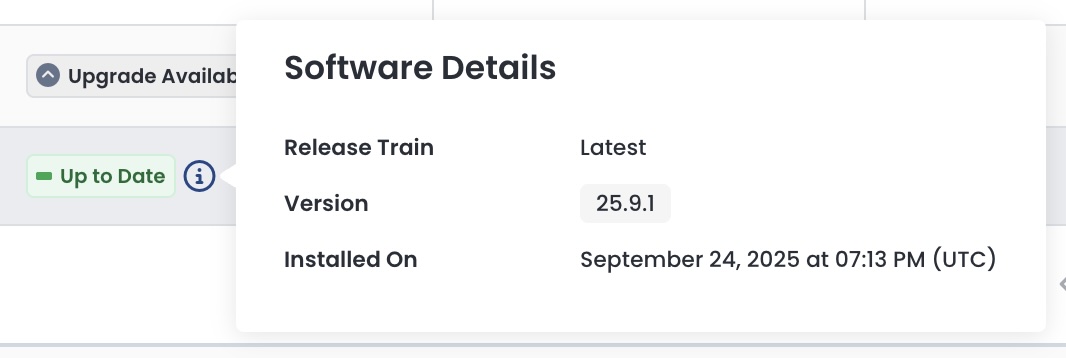
For “Upgrade Available” devices, the version that is available

Host Name: The name of your device
Lifecycle State: Whether the device is:
Activated: Up and running and connected to the Graphiant Core
Staging: Provisioned but not currently connected to the Graphiant Core
Maintenance: Having configurations performed on them; online but not receiving traffic (click here for further information on Maintenance Mode)
Software Version: Which software is currently running on the device
Rollout Name: [**coming soon]
Site: Where the device is located and configured
Connected Regions: Regions through which the device is connected to the Graphiant Core
Location: Estimated location based on IP address
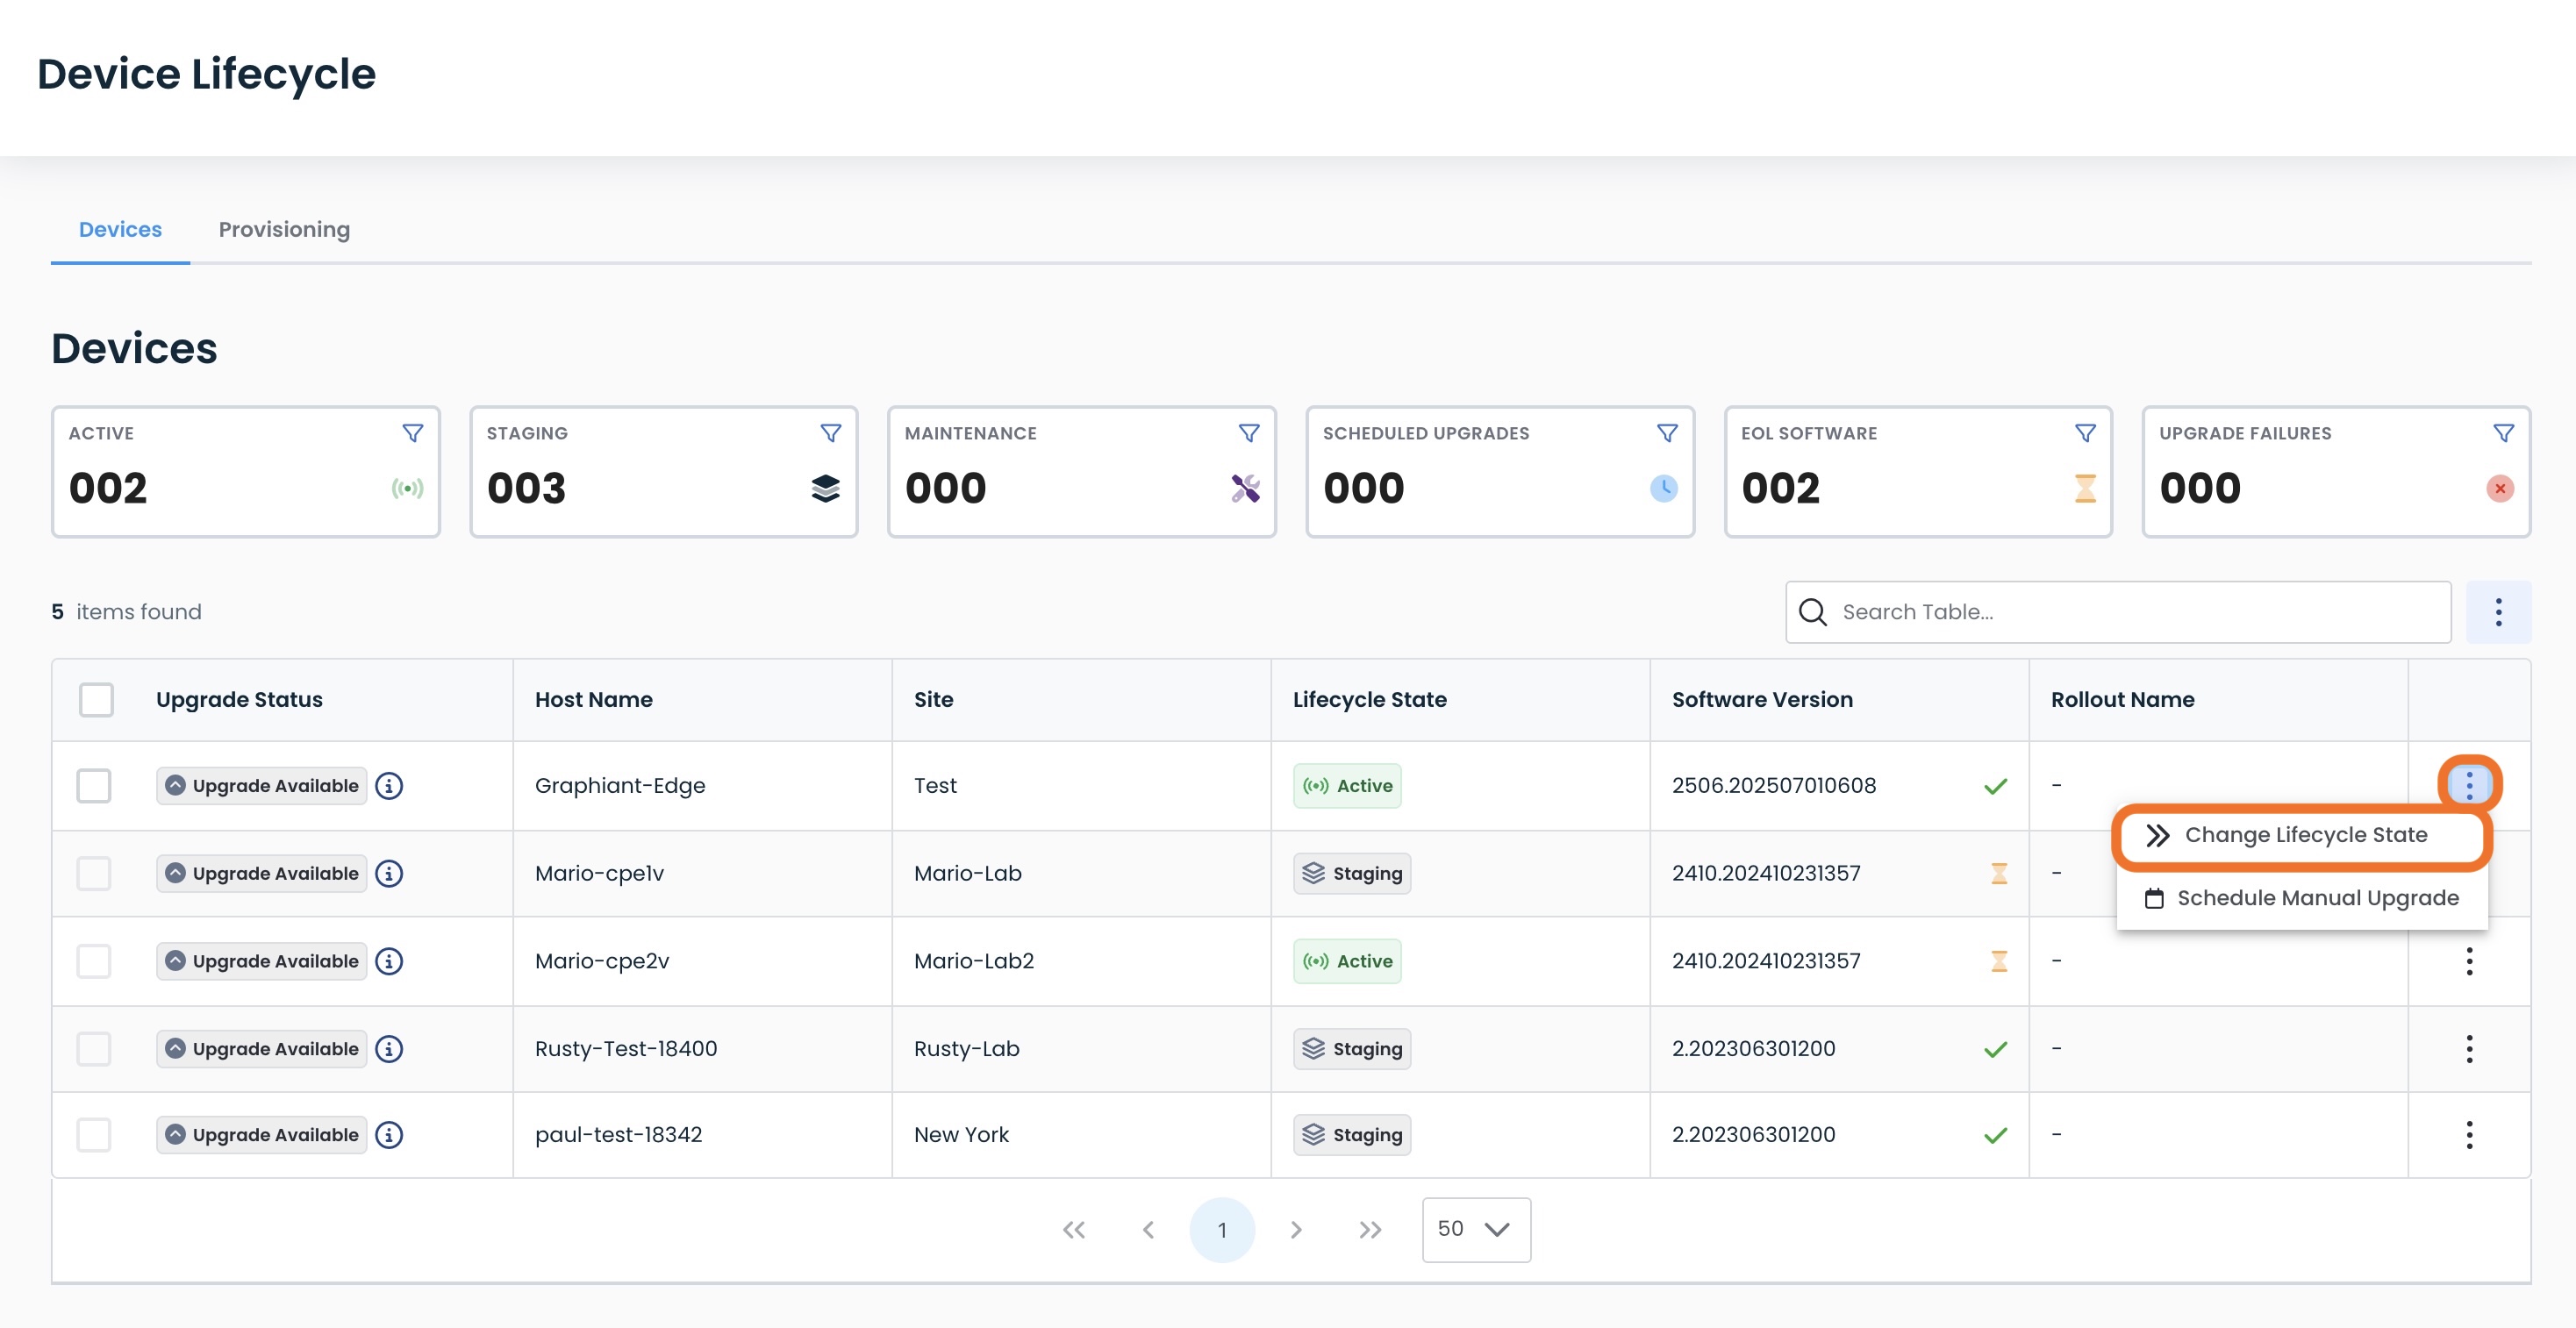
Changing the Lifecycle State of Your Graphiant Device
Should you need to change the lifecycle of your device, click on the ellipses to its right; select ‘Change Lifecycle State’.
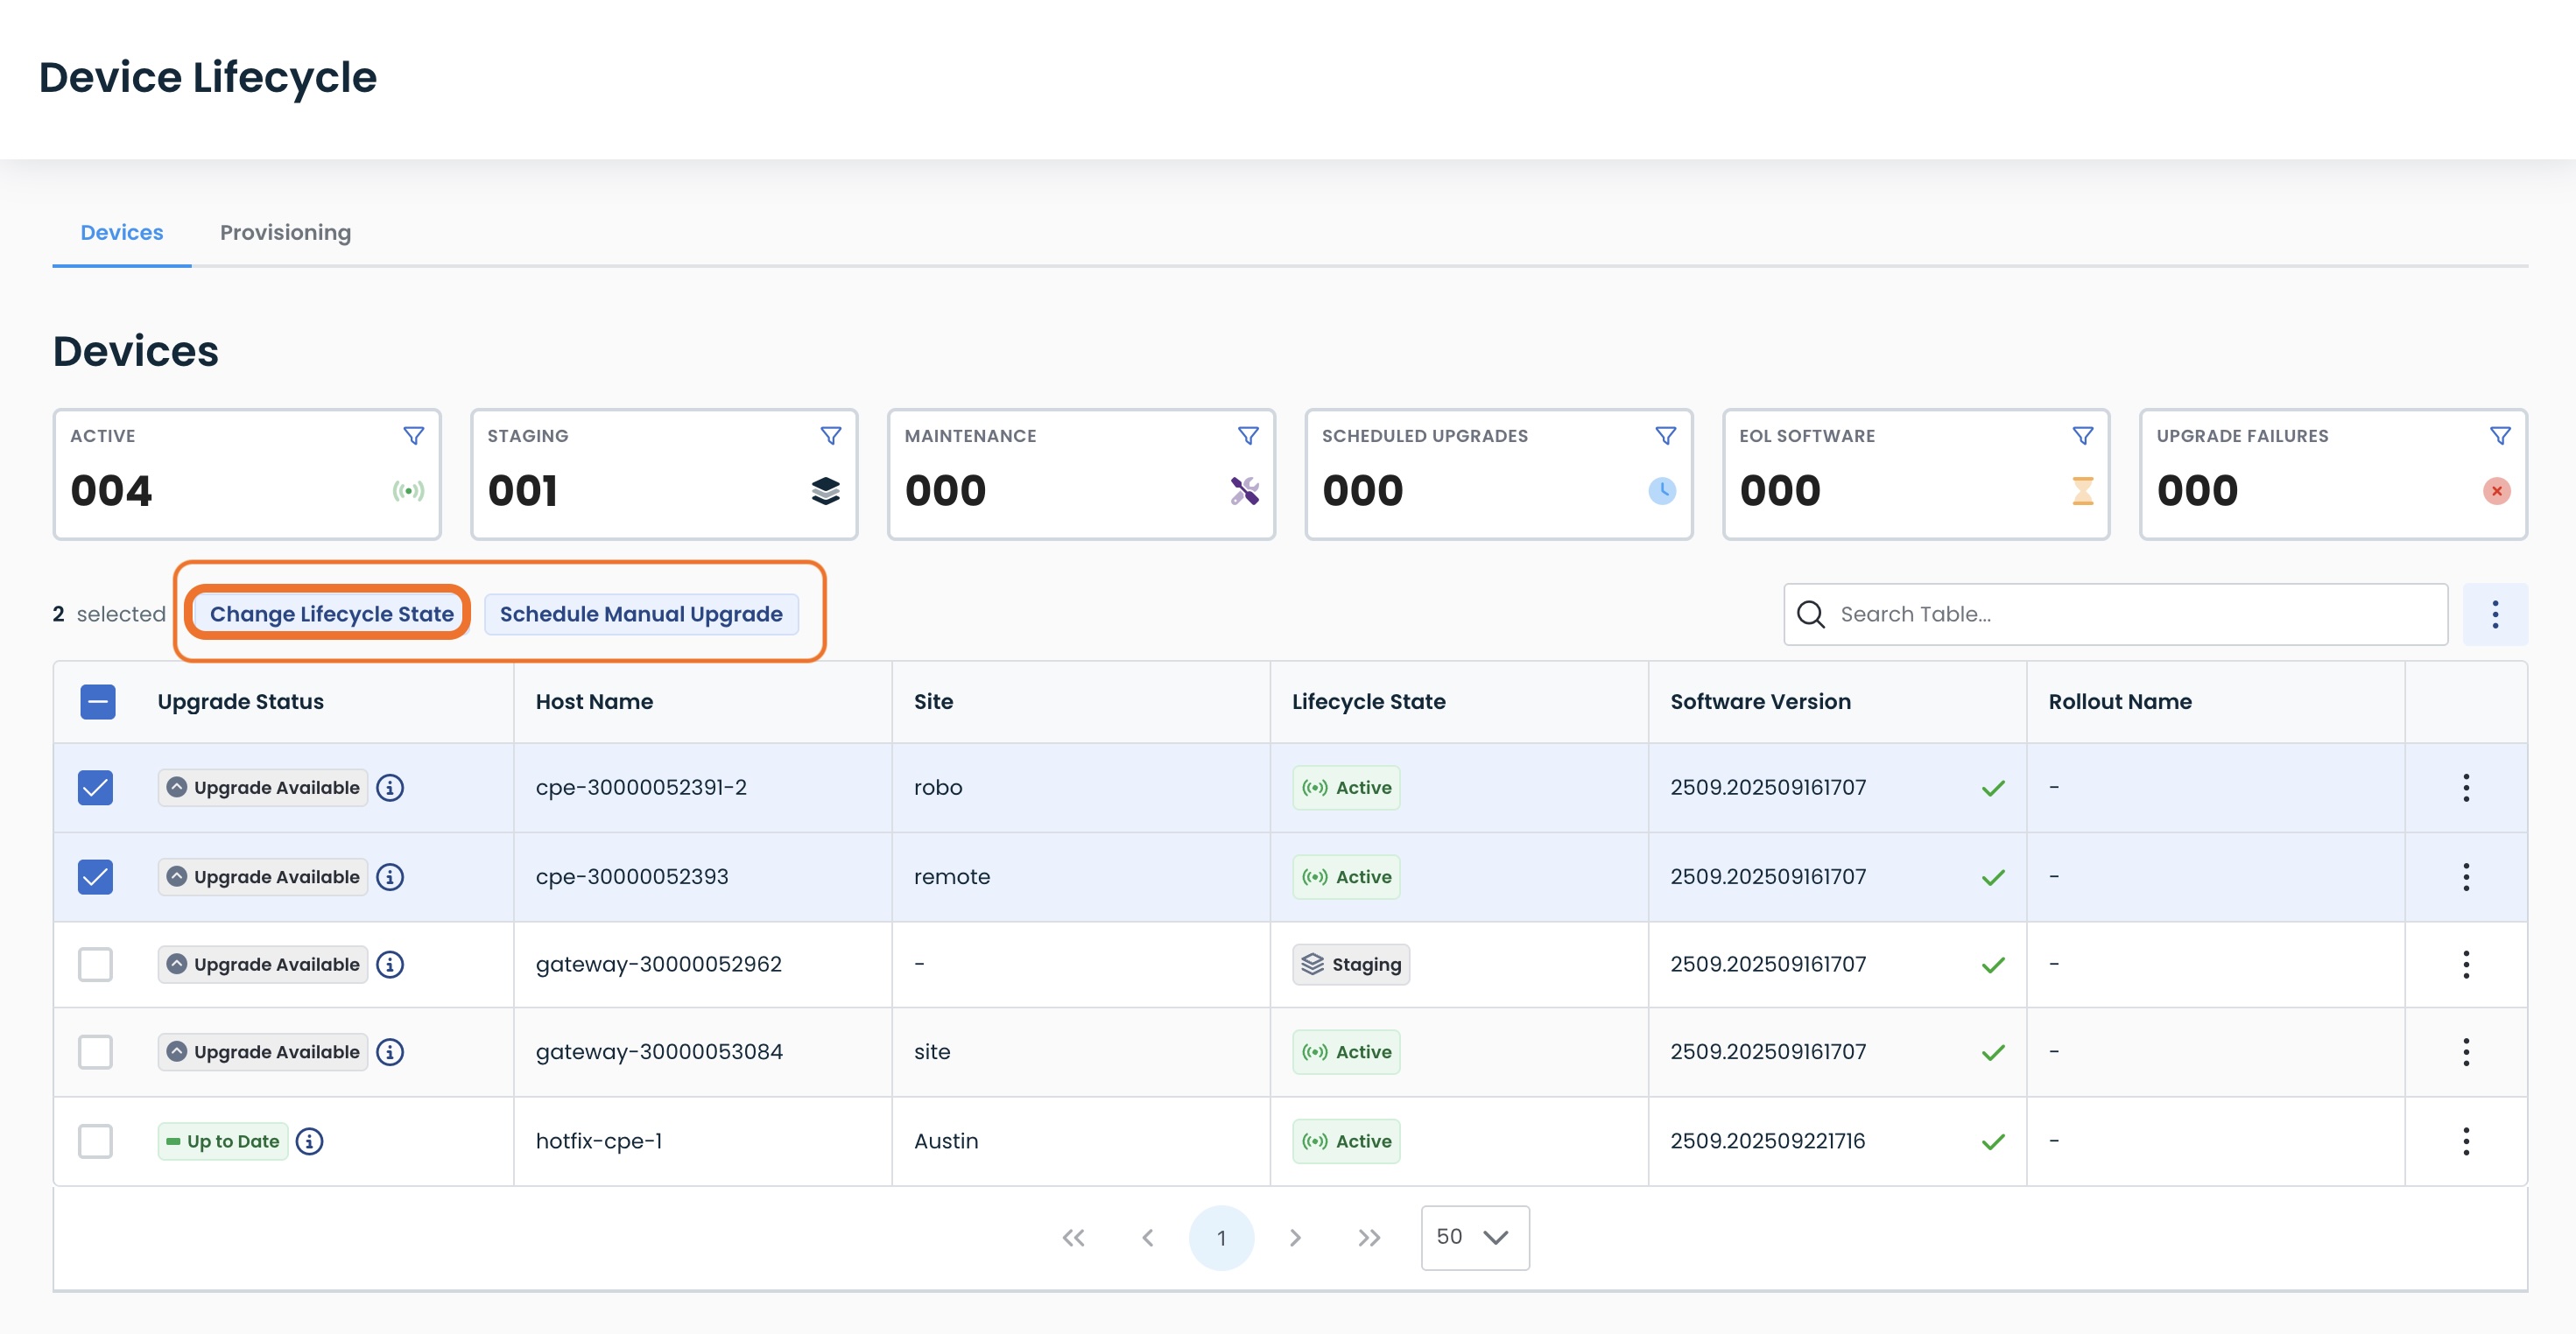
Alternatively, if multiple devices are selected, the actions are listed at the top of the table.
Select ‘Change Lifecycle State’.
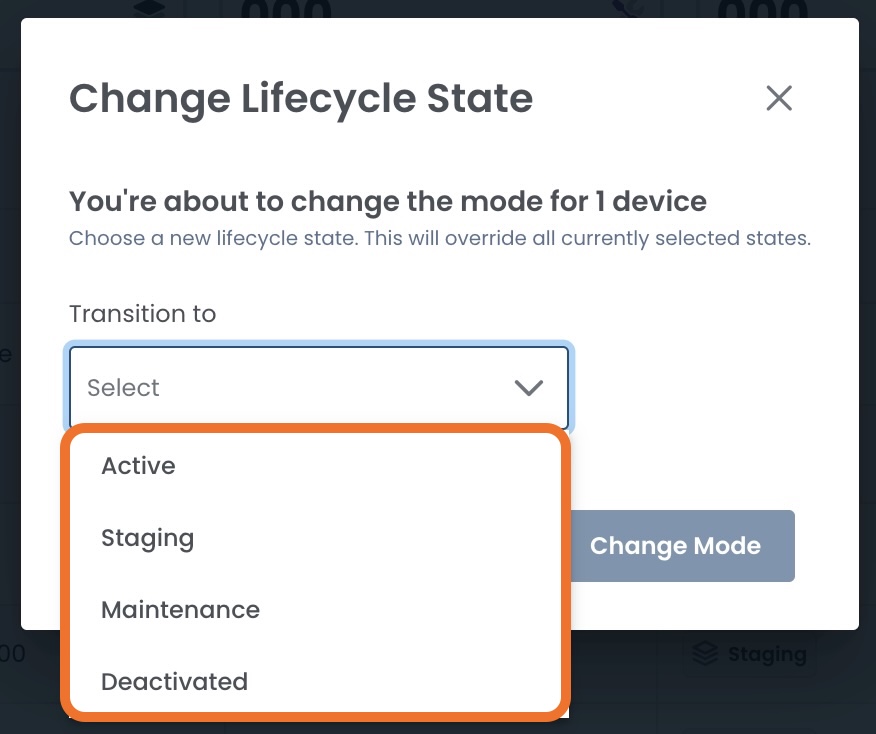
A modal will appear to set the state change, along with the number of devices selected that will receive the change.
Click the carat to see the state options.
![]()
Select the desired state from the dropdown.
Confirm the selection; click ‘Change Mode’ to proceed.
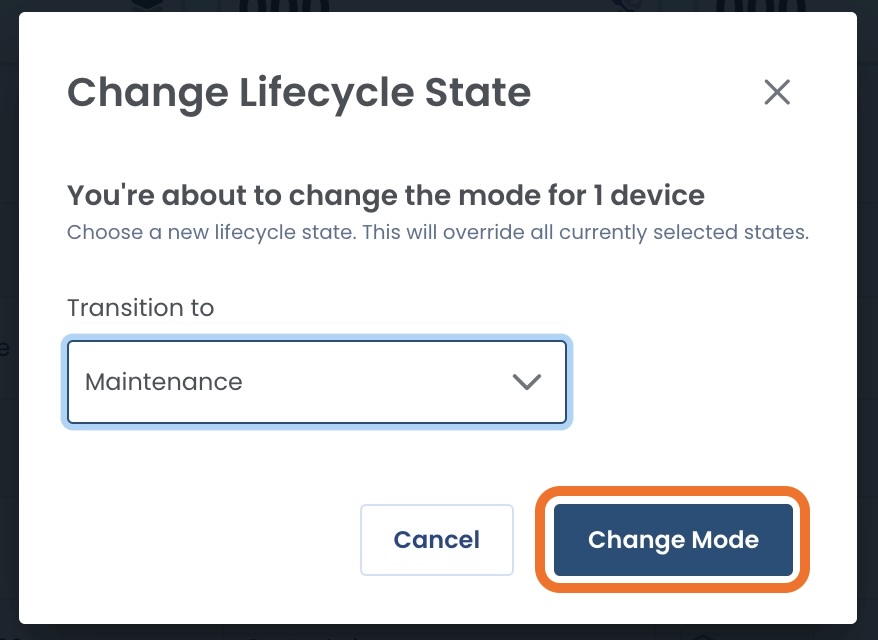
You will receive a notification that the state change was successful, and the table will be updated to reflect the new lifecycle state.

Upgrade Rollouts
Upgrade Rollouts provide flexible control over edge software updates, allowing you to either schedule recurring batches of upgrades or initiate immediate upgrades on demand.
From the Device Lifecycle page, click the ‘Upgrade Rollouts’ tab.

This will open the Upgrade Rollout table.
Here you will see the following:
Status:
Upgrade Scheduled: Upgrade will be performed at a later date/time
Failed: At least one Edge in the rollout failed to upgrade
Note:
More status options will be coming soon.
Name: Assigned name of the rollout
# of Devices: How many devices are included in the rollout.
Clicking this link will open up the list of all edges included.
Release Train: Which software the upgrade will select from: Latest, Recommended, or Stable
Upgrade Type: Whether the upgrade is download only, download & install, or install only
Trigger: Whether the upgrade was a single user-triggered event, or on a schedule to repeat
Next Run:
If scheduled, when the next upgrade will occur
If User-triggered, when the upgraded did occur
Description: Optional user-defined information for ease of reference
.png)
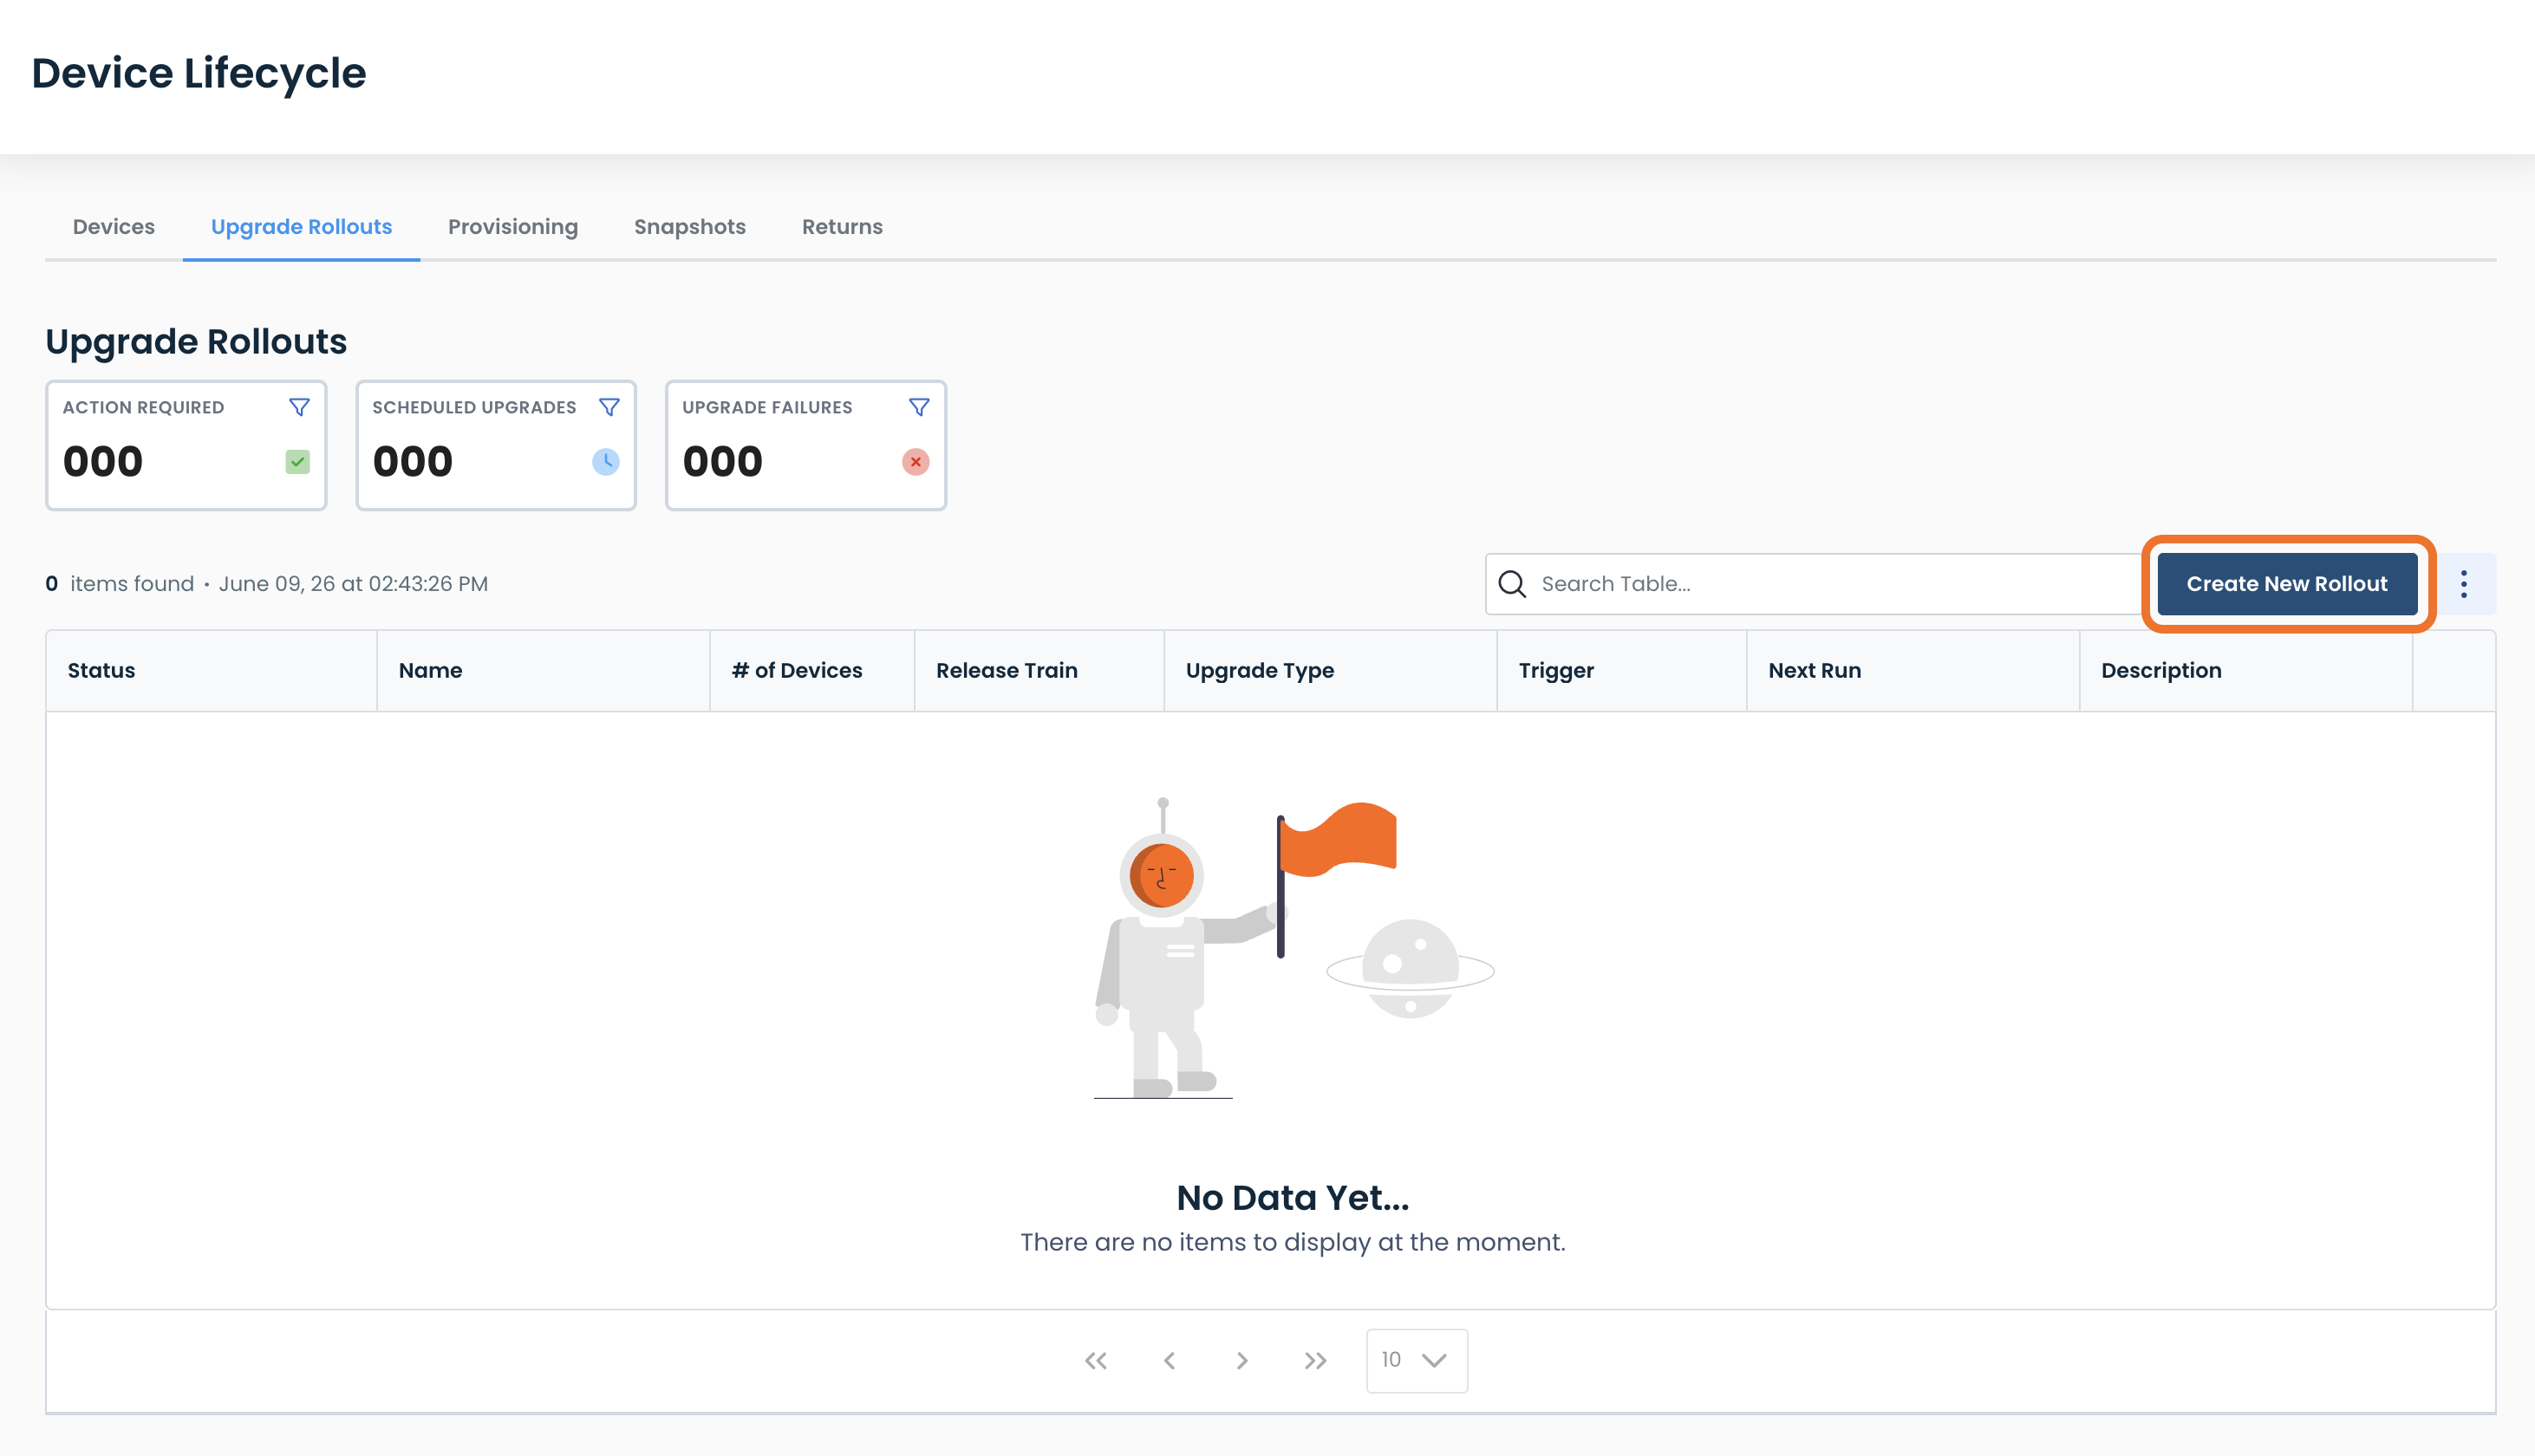
Creating an Upgrade Rollout
To create a new rollout of Graphiant Edges, click ‘Create New Rollout’.
Fill out the following fields:
Name: User-defined name of rollout
Description (optional): User-defined for future reference if desired
Rollout Type: click the button that best suits your needs
Download Only
Download and Install
Install Only
Release:
Install Timing:
User Triggered Disabled
If toggled “On”:
This will be a scheduled rollout, and a calendar will appear. Select your date & time, the frequency of the rollout schedule, and whether the rollout will repeat on a specific date / day of the week.
If toggled “Off”:
This will be a one-time rollout, and it will occur immediately upon rollout creation; there will be no calendar option.
Select Devices:
Select all devices to be included in this rollout
A device can only be included in ONE upgrade rollout:
If the same device is added to a new upgrade rollout, that device will be removed from its prior upgrade rollout.
Confirm that all information is correct.
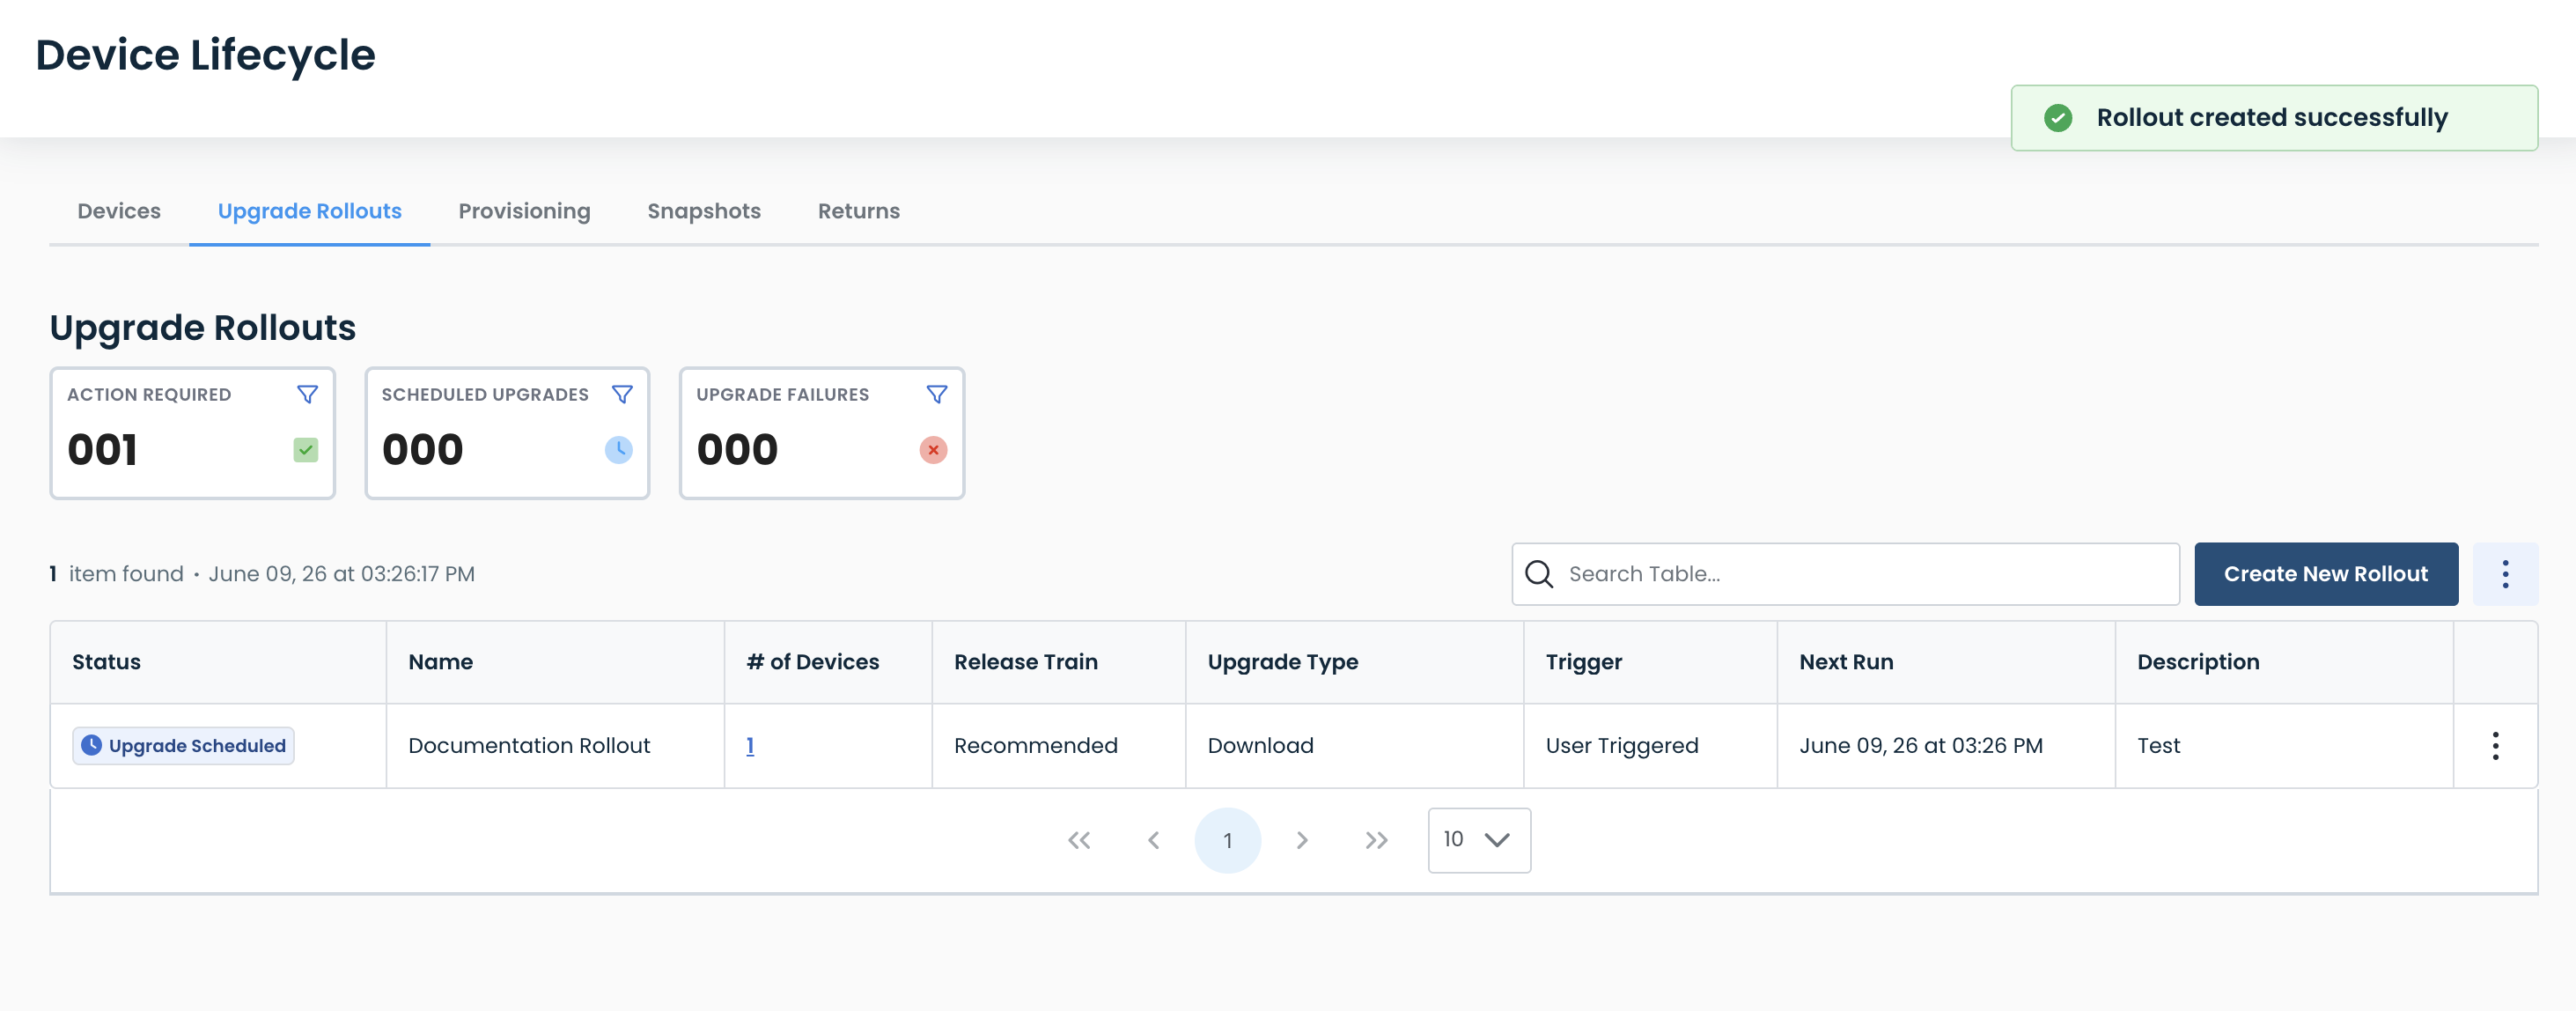
Click ‘Create Rollout’.

A green banner will appear stating that the rollout creation was successful, and the new rollout will appear in the table.
Note:
You will need to approve the rollout before it can begin.
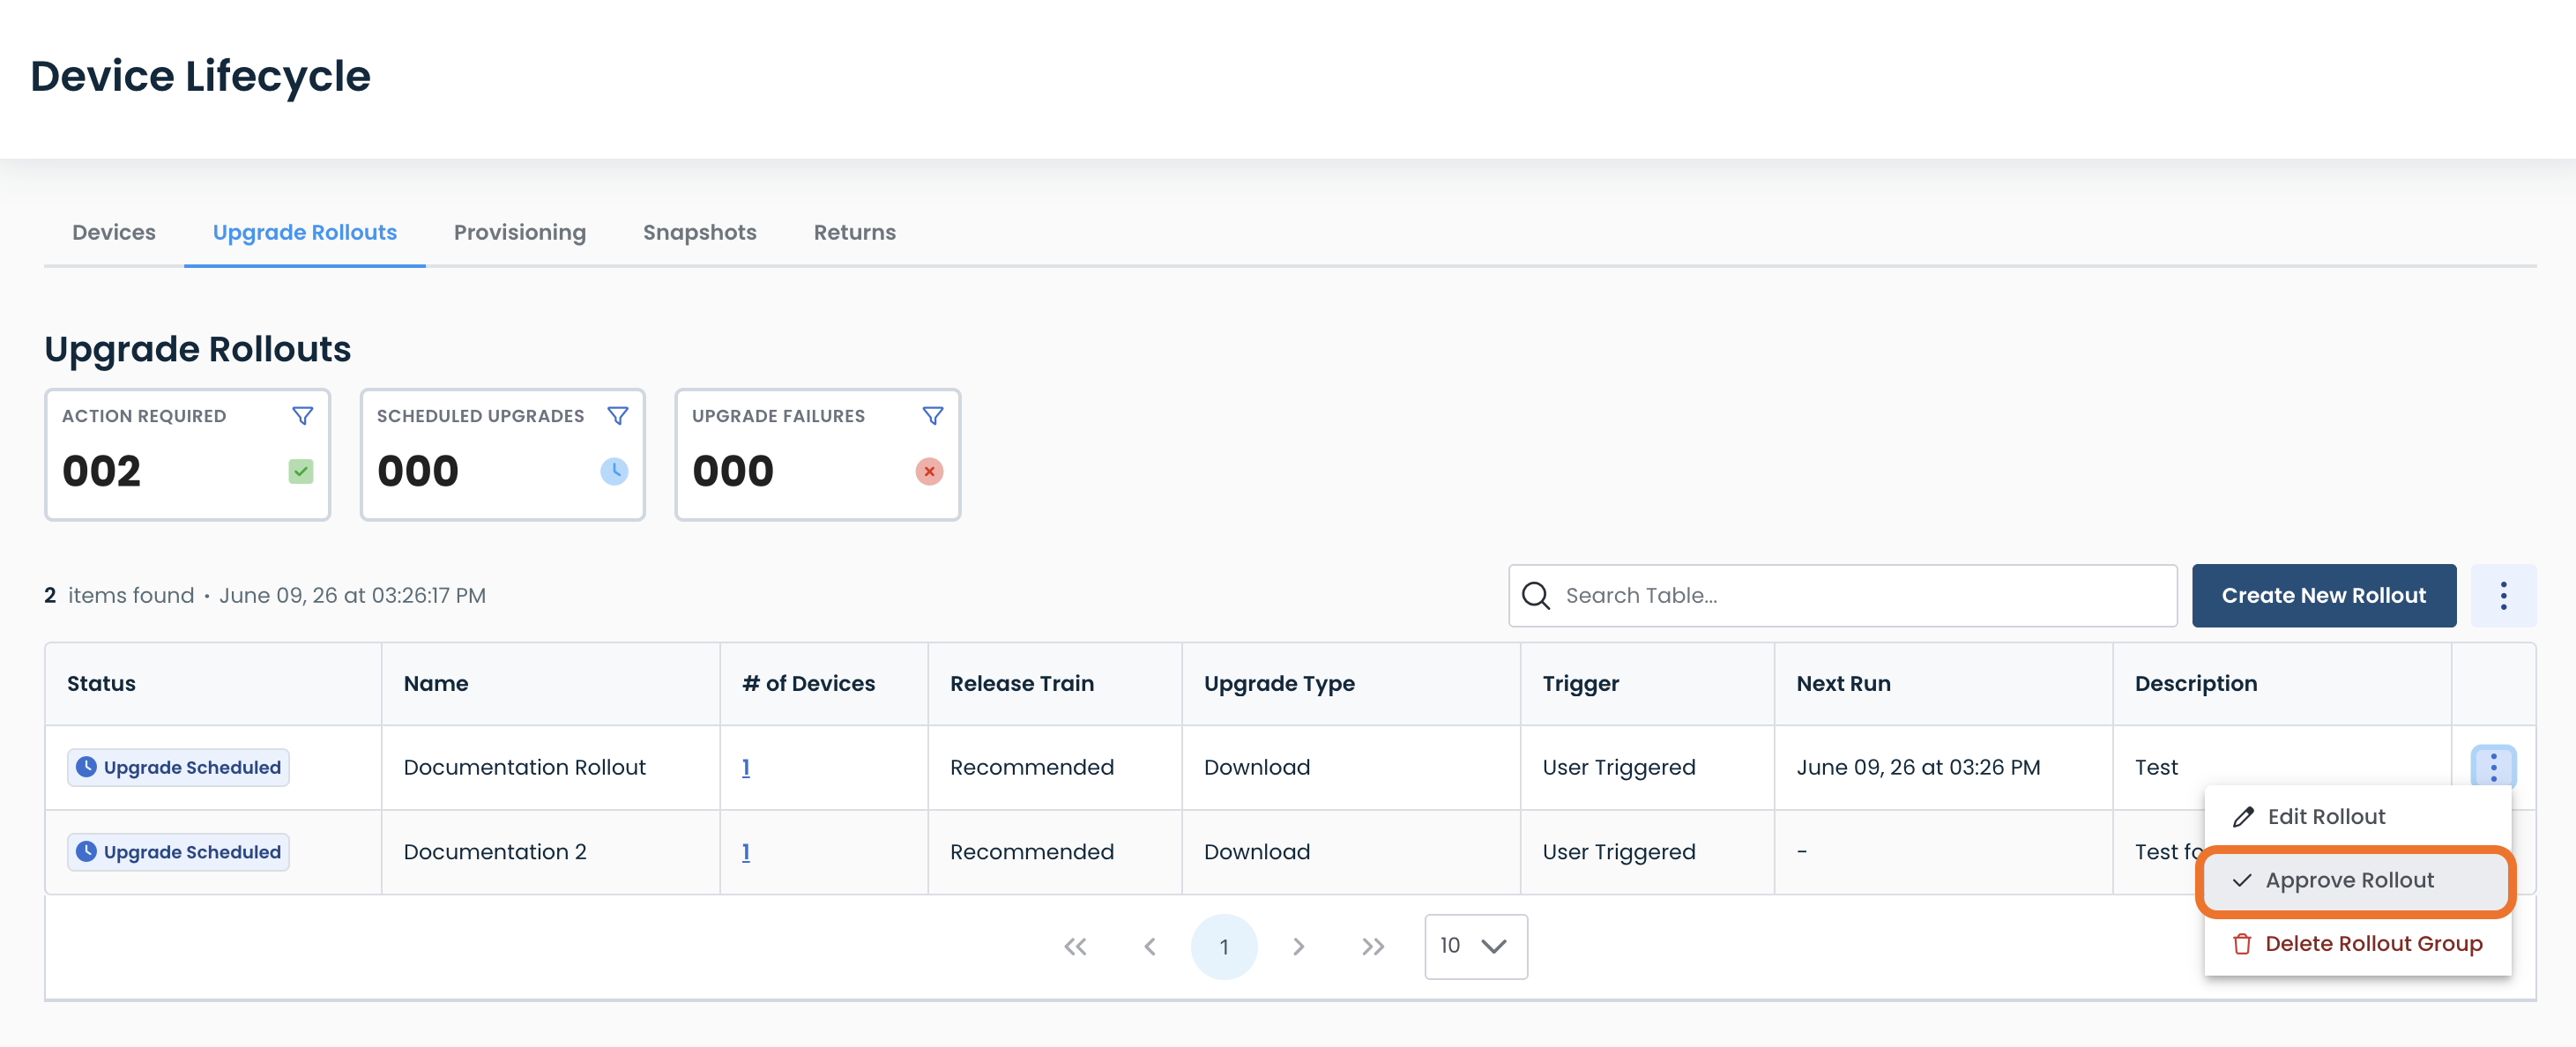
Approving an Upgrade Rollout
To approve an upgrade rollout, click the ellipses and select ‘Approve Rollout’.
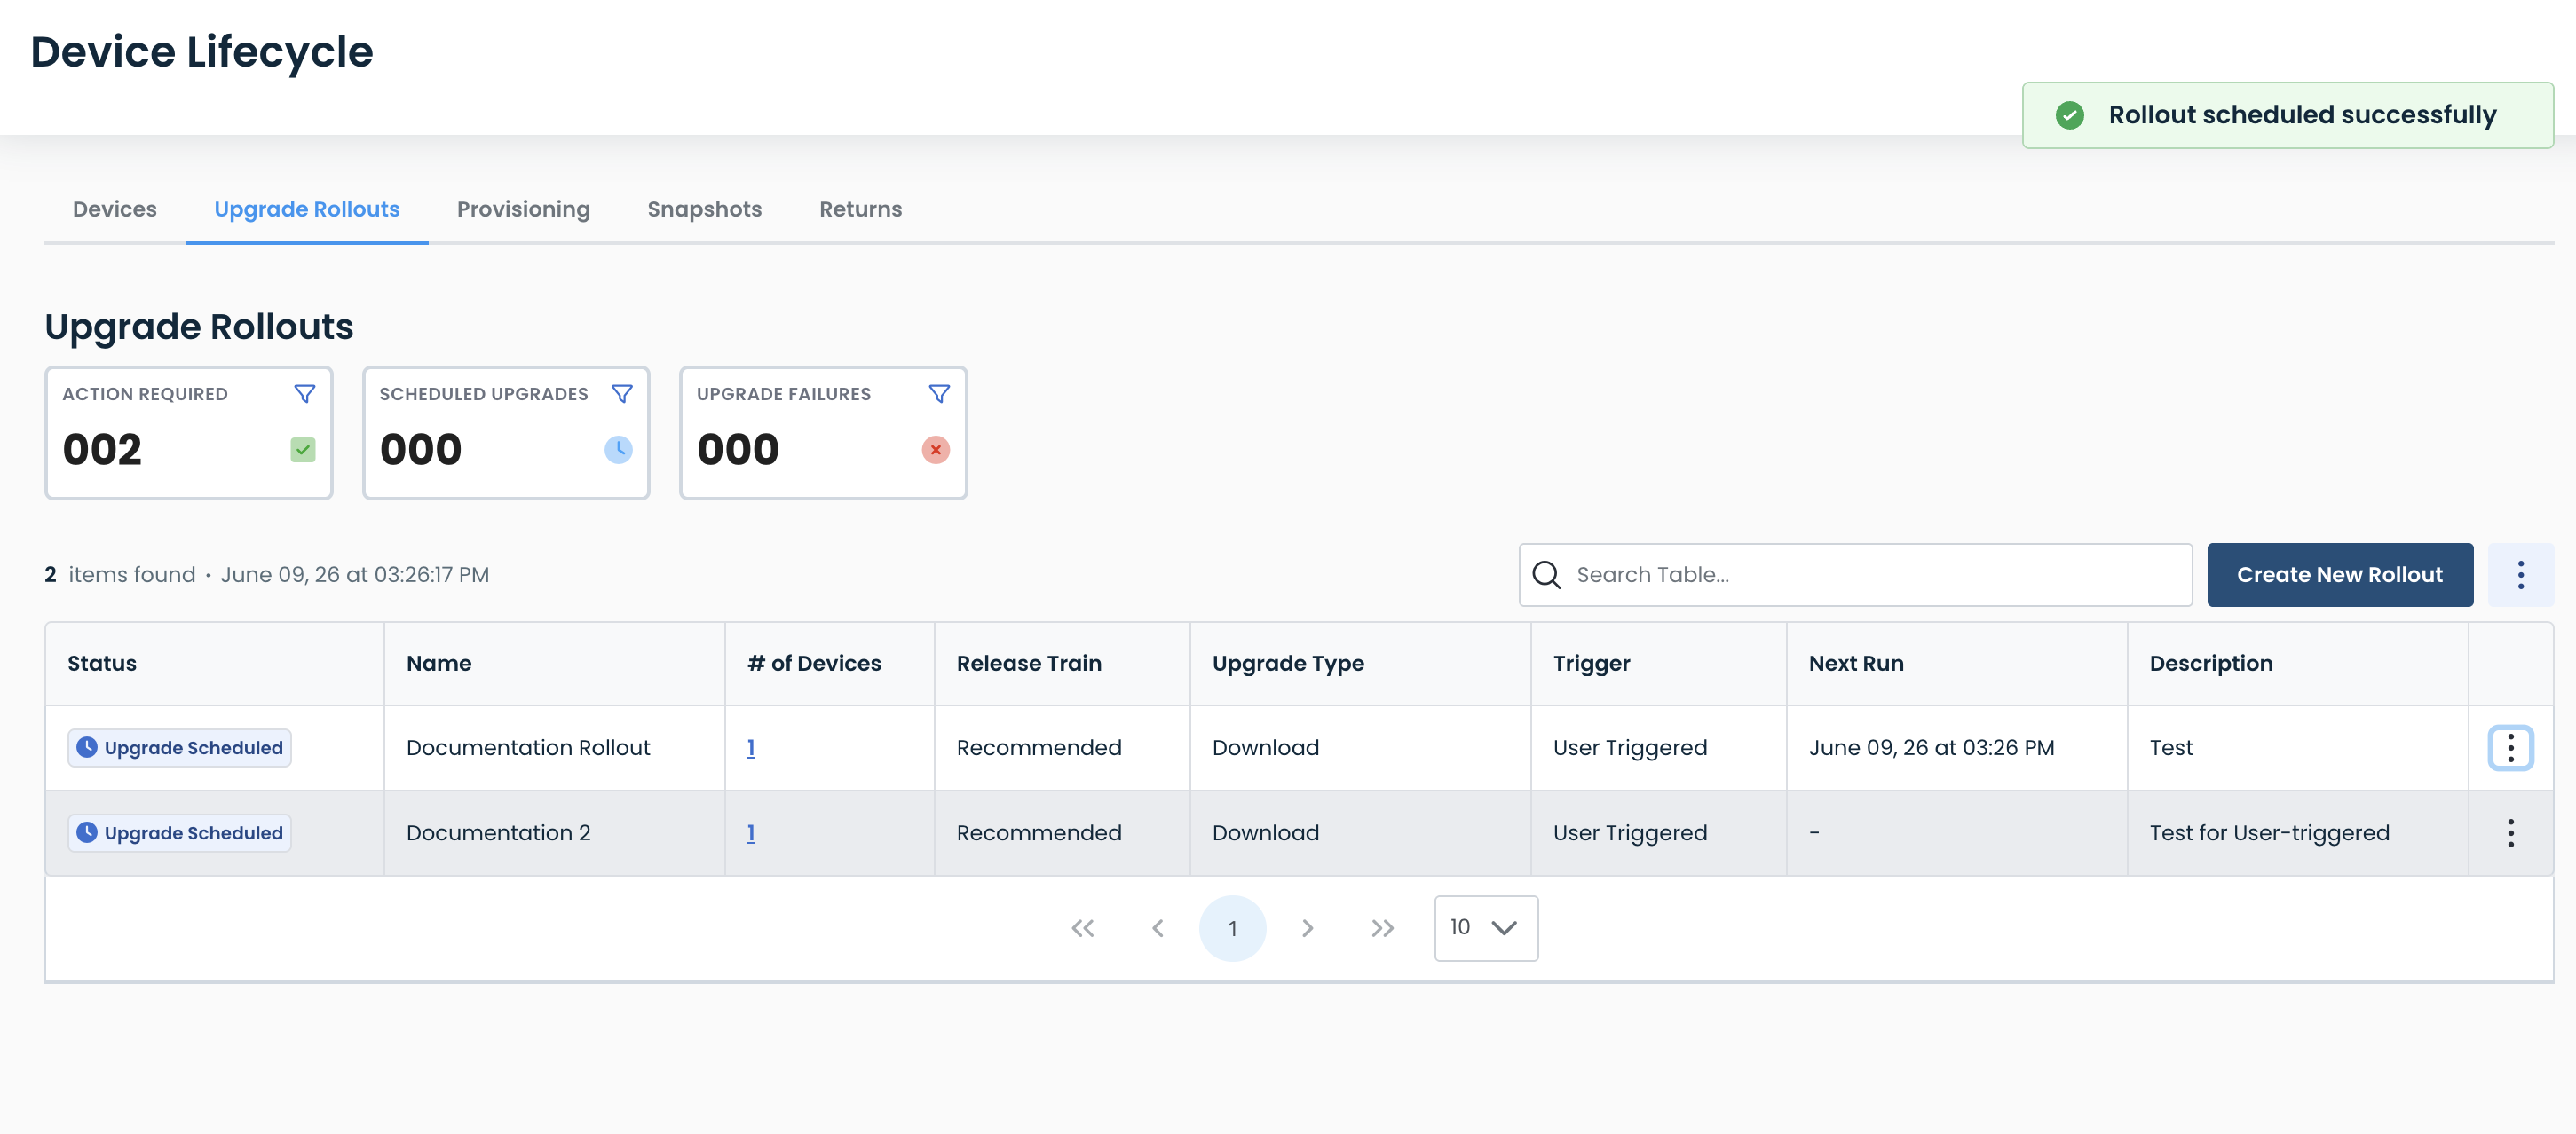
A green banner will appear stating that the rollout was scheduled successfully.
The rollout will now occur as configured.
What To Do If Your Upgrade Rollout Results in a “Failed” Status
If any Edge in the upgrade rollout group failed to upgrade, the rollout will result in a “Failed” status.
You can either attempt the rollout again, or delete that rollout group (see instructions here).
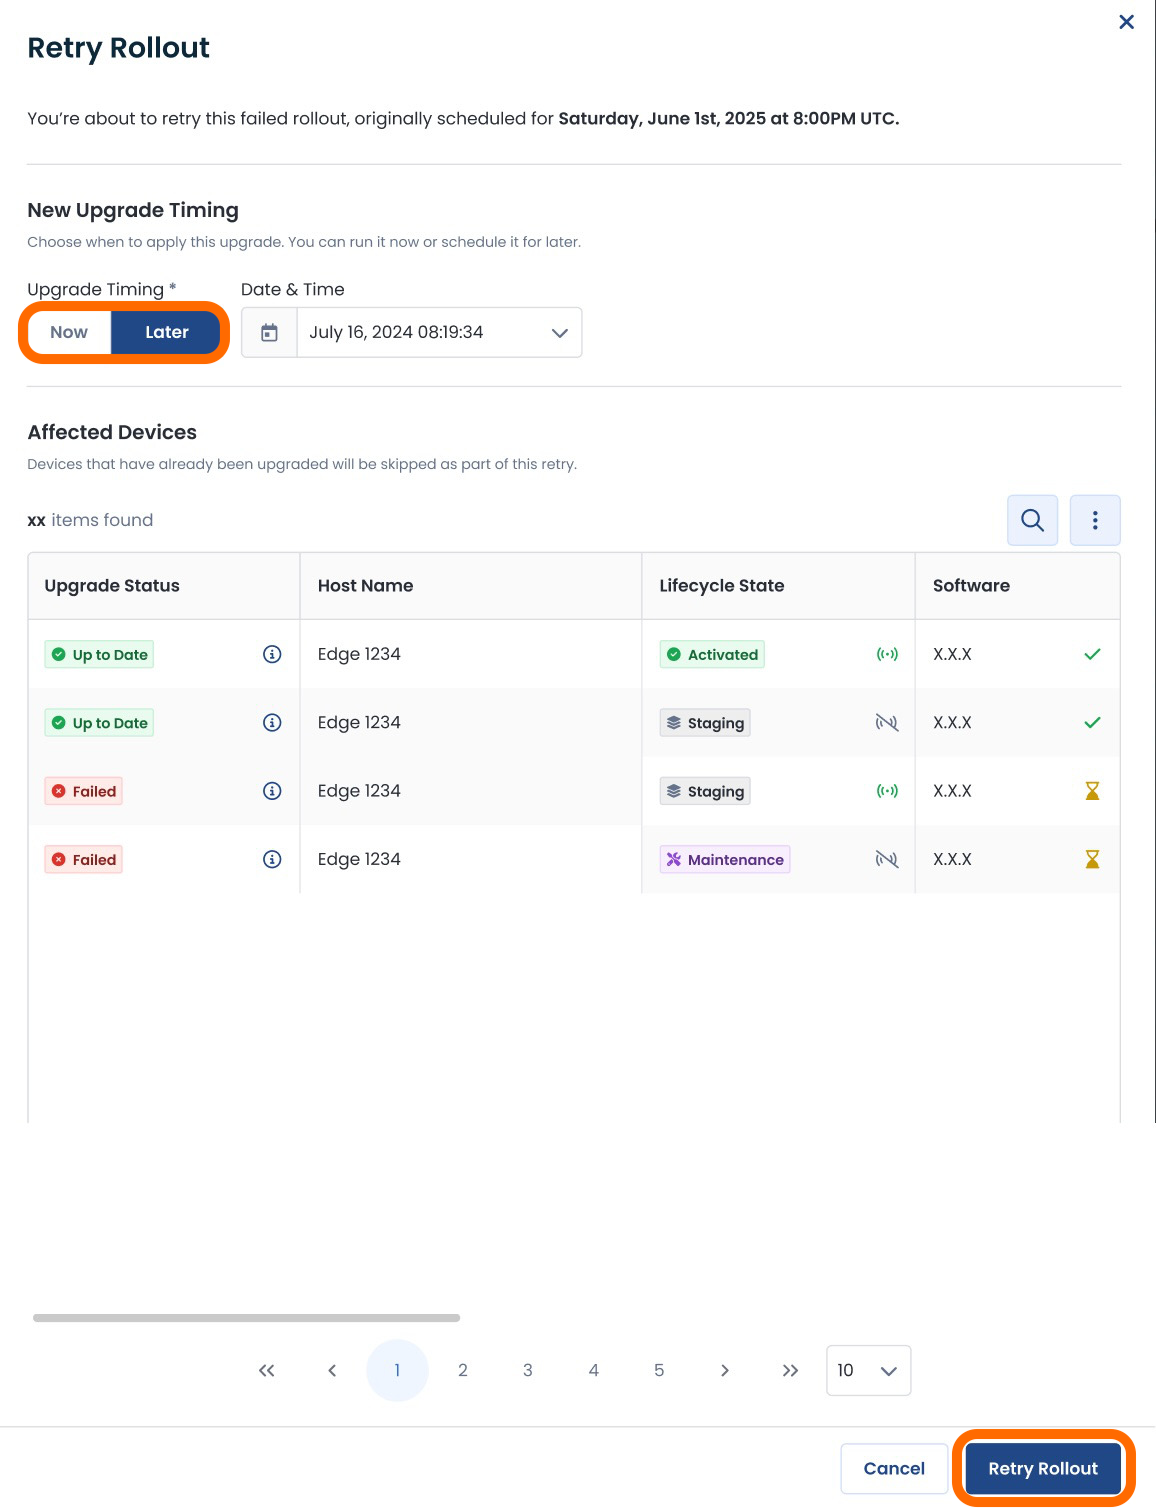
Retrying Your Rollout
To attempt the rollout again, click the ellipses to the right of the rollout; select ‘Retry rollout’.

Choose whether to retry the upgrade “Now” or “Later; if “Later” is chosen, a calendar will be available to select date and time.
Click ‘Retry rollout’.
Only the devices that were unsuccessful in the rollout will be retried;
Devices that were upgraded successfully will not be affected.
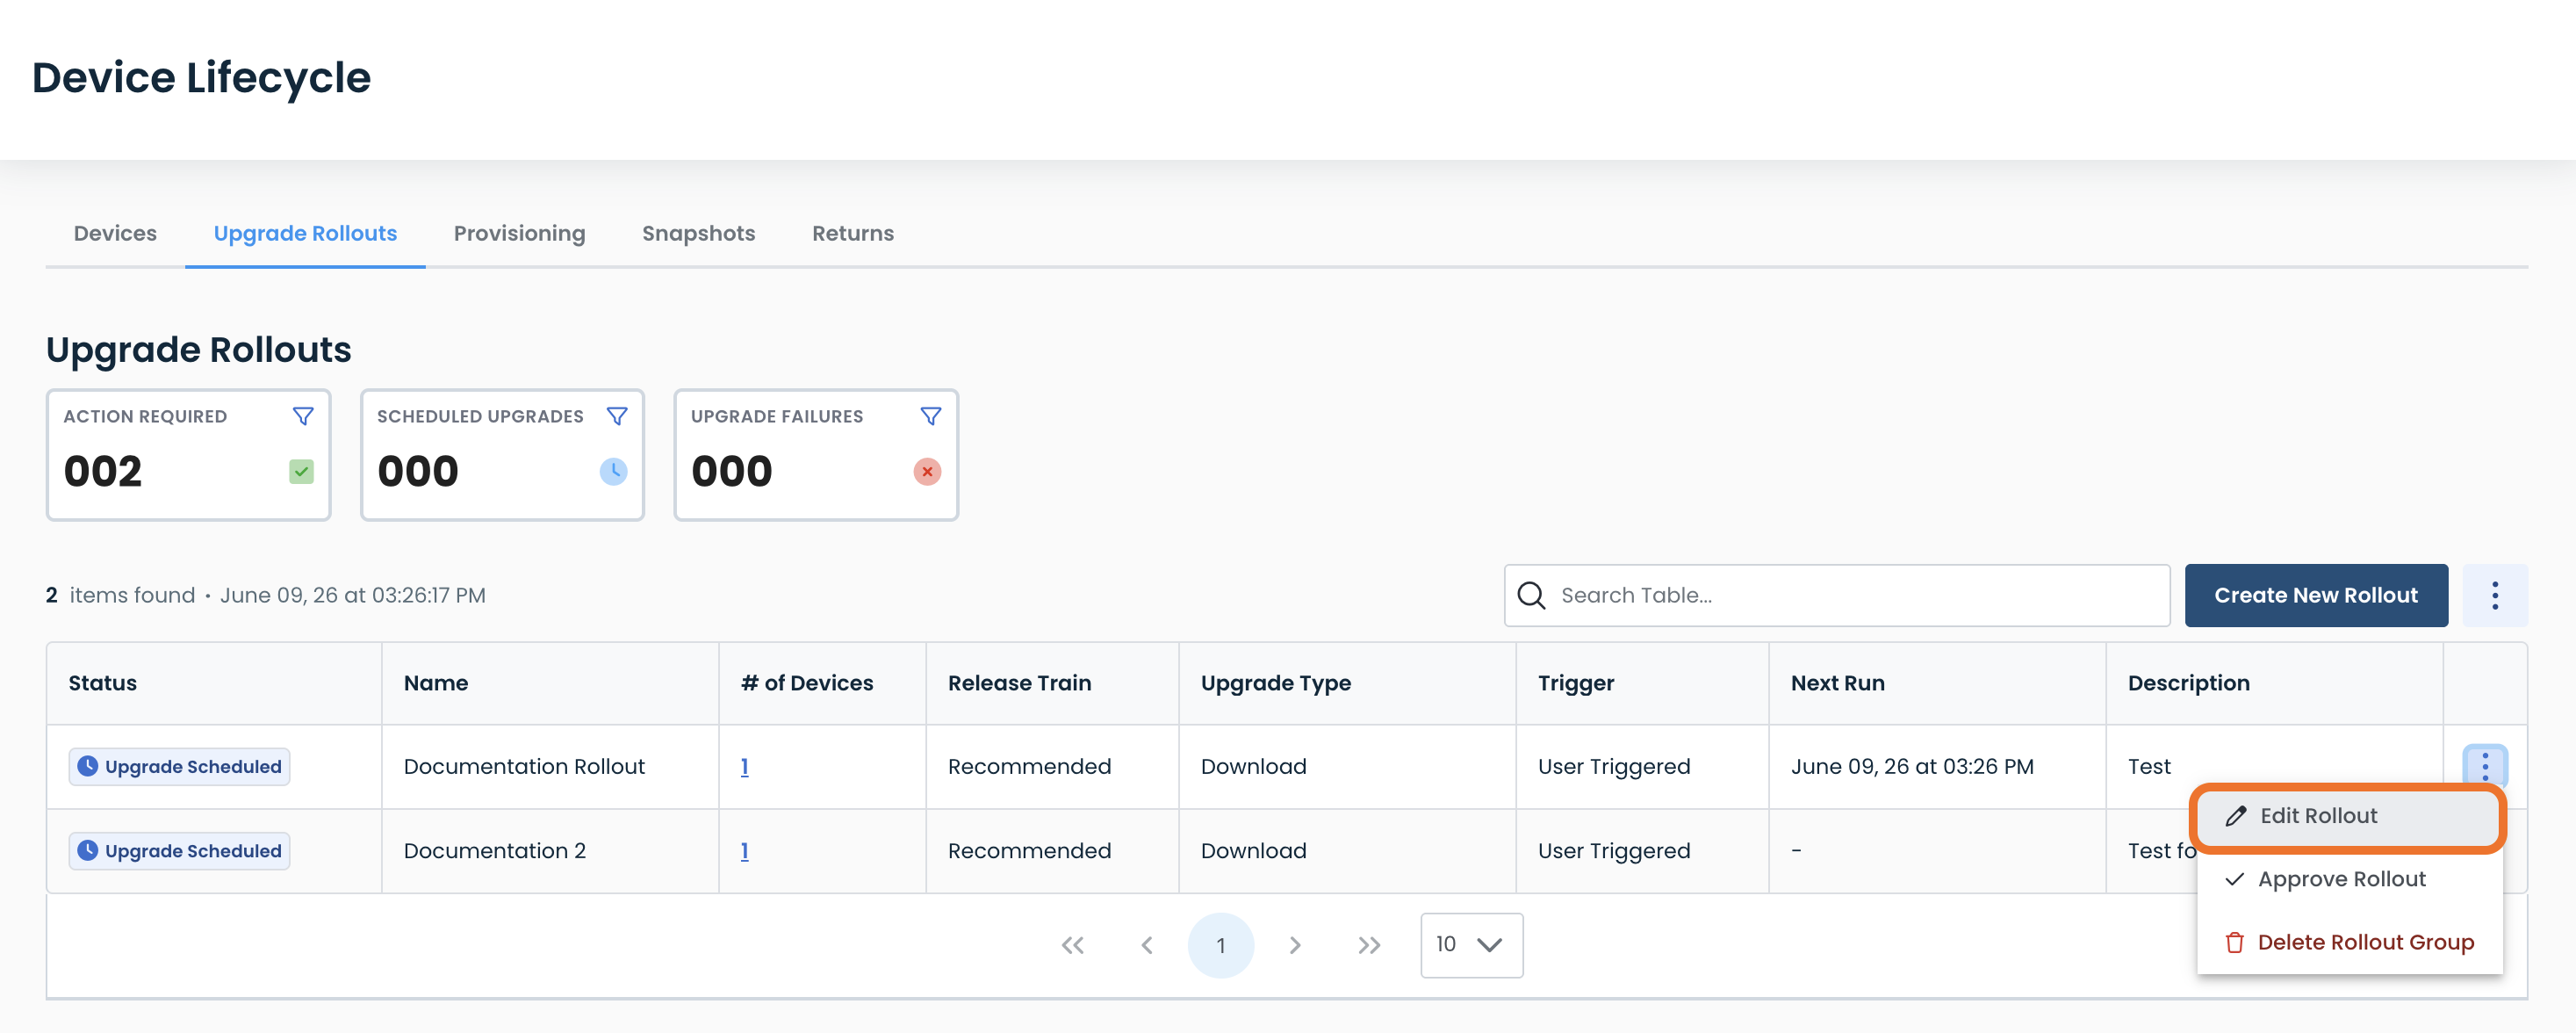
Editing an Upgrade Rollout Group
To edit an upgrade rollout, click the ellipses and select ‘Edit Rollout’.
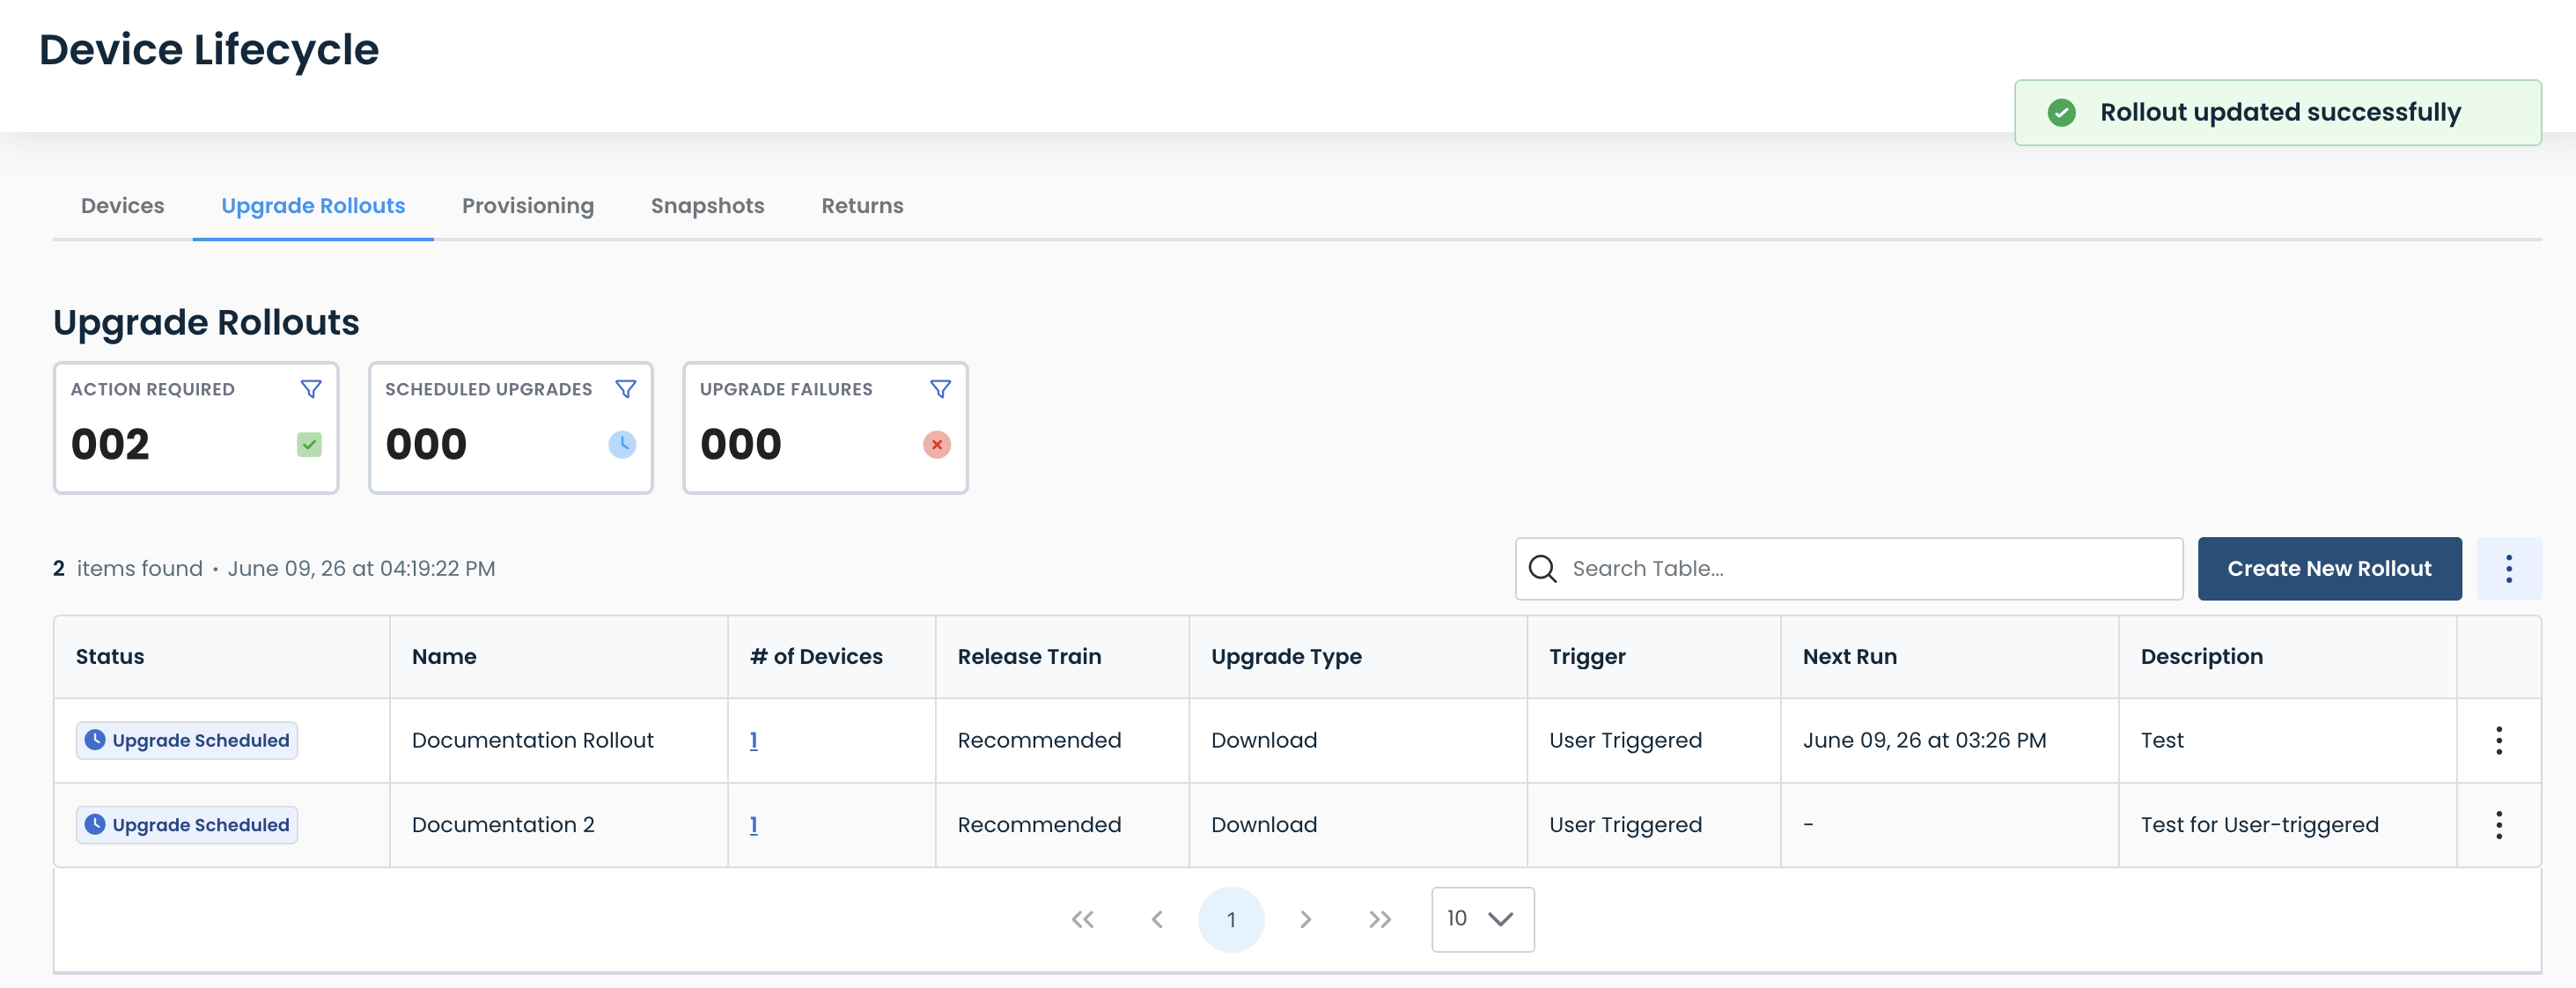
Make any desired edits; click ‘Save Changes’.
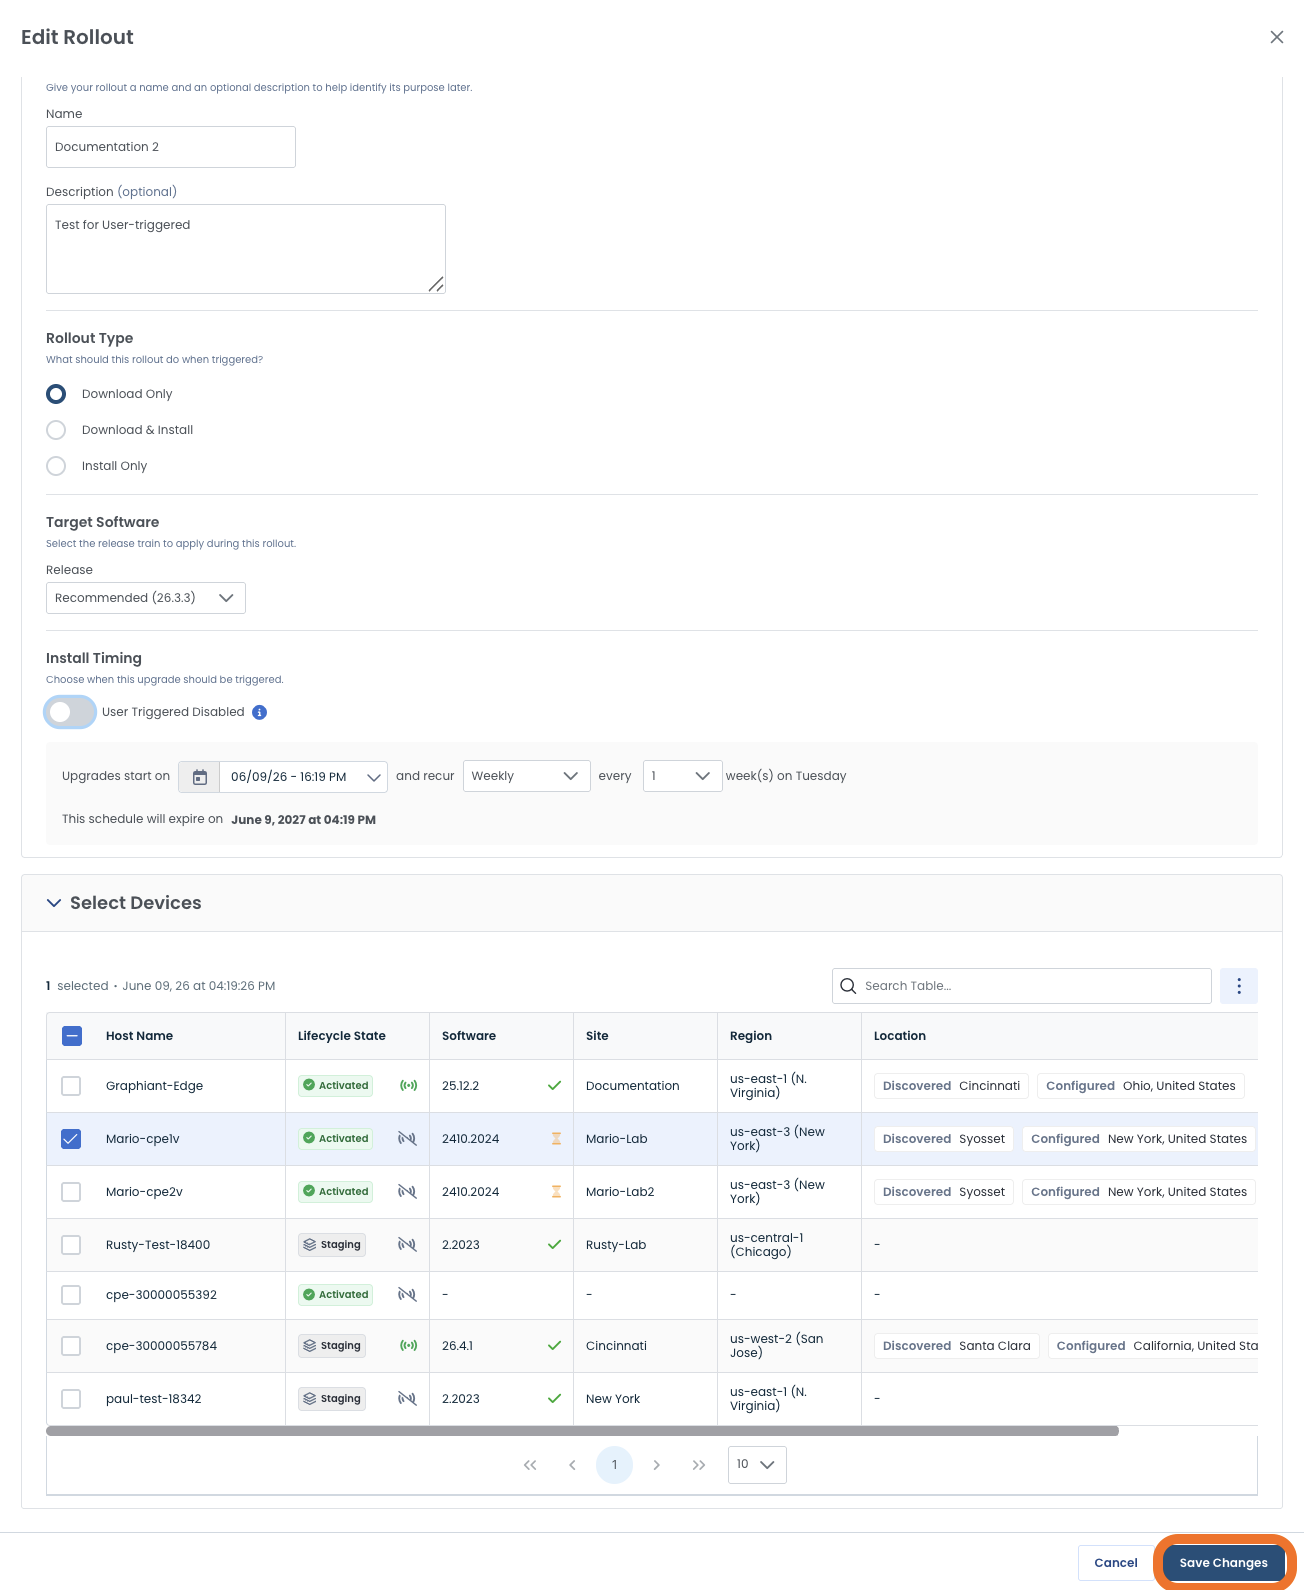
A green banner will appear stating that the rollout was updated successfully.
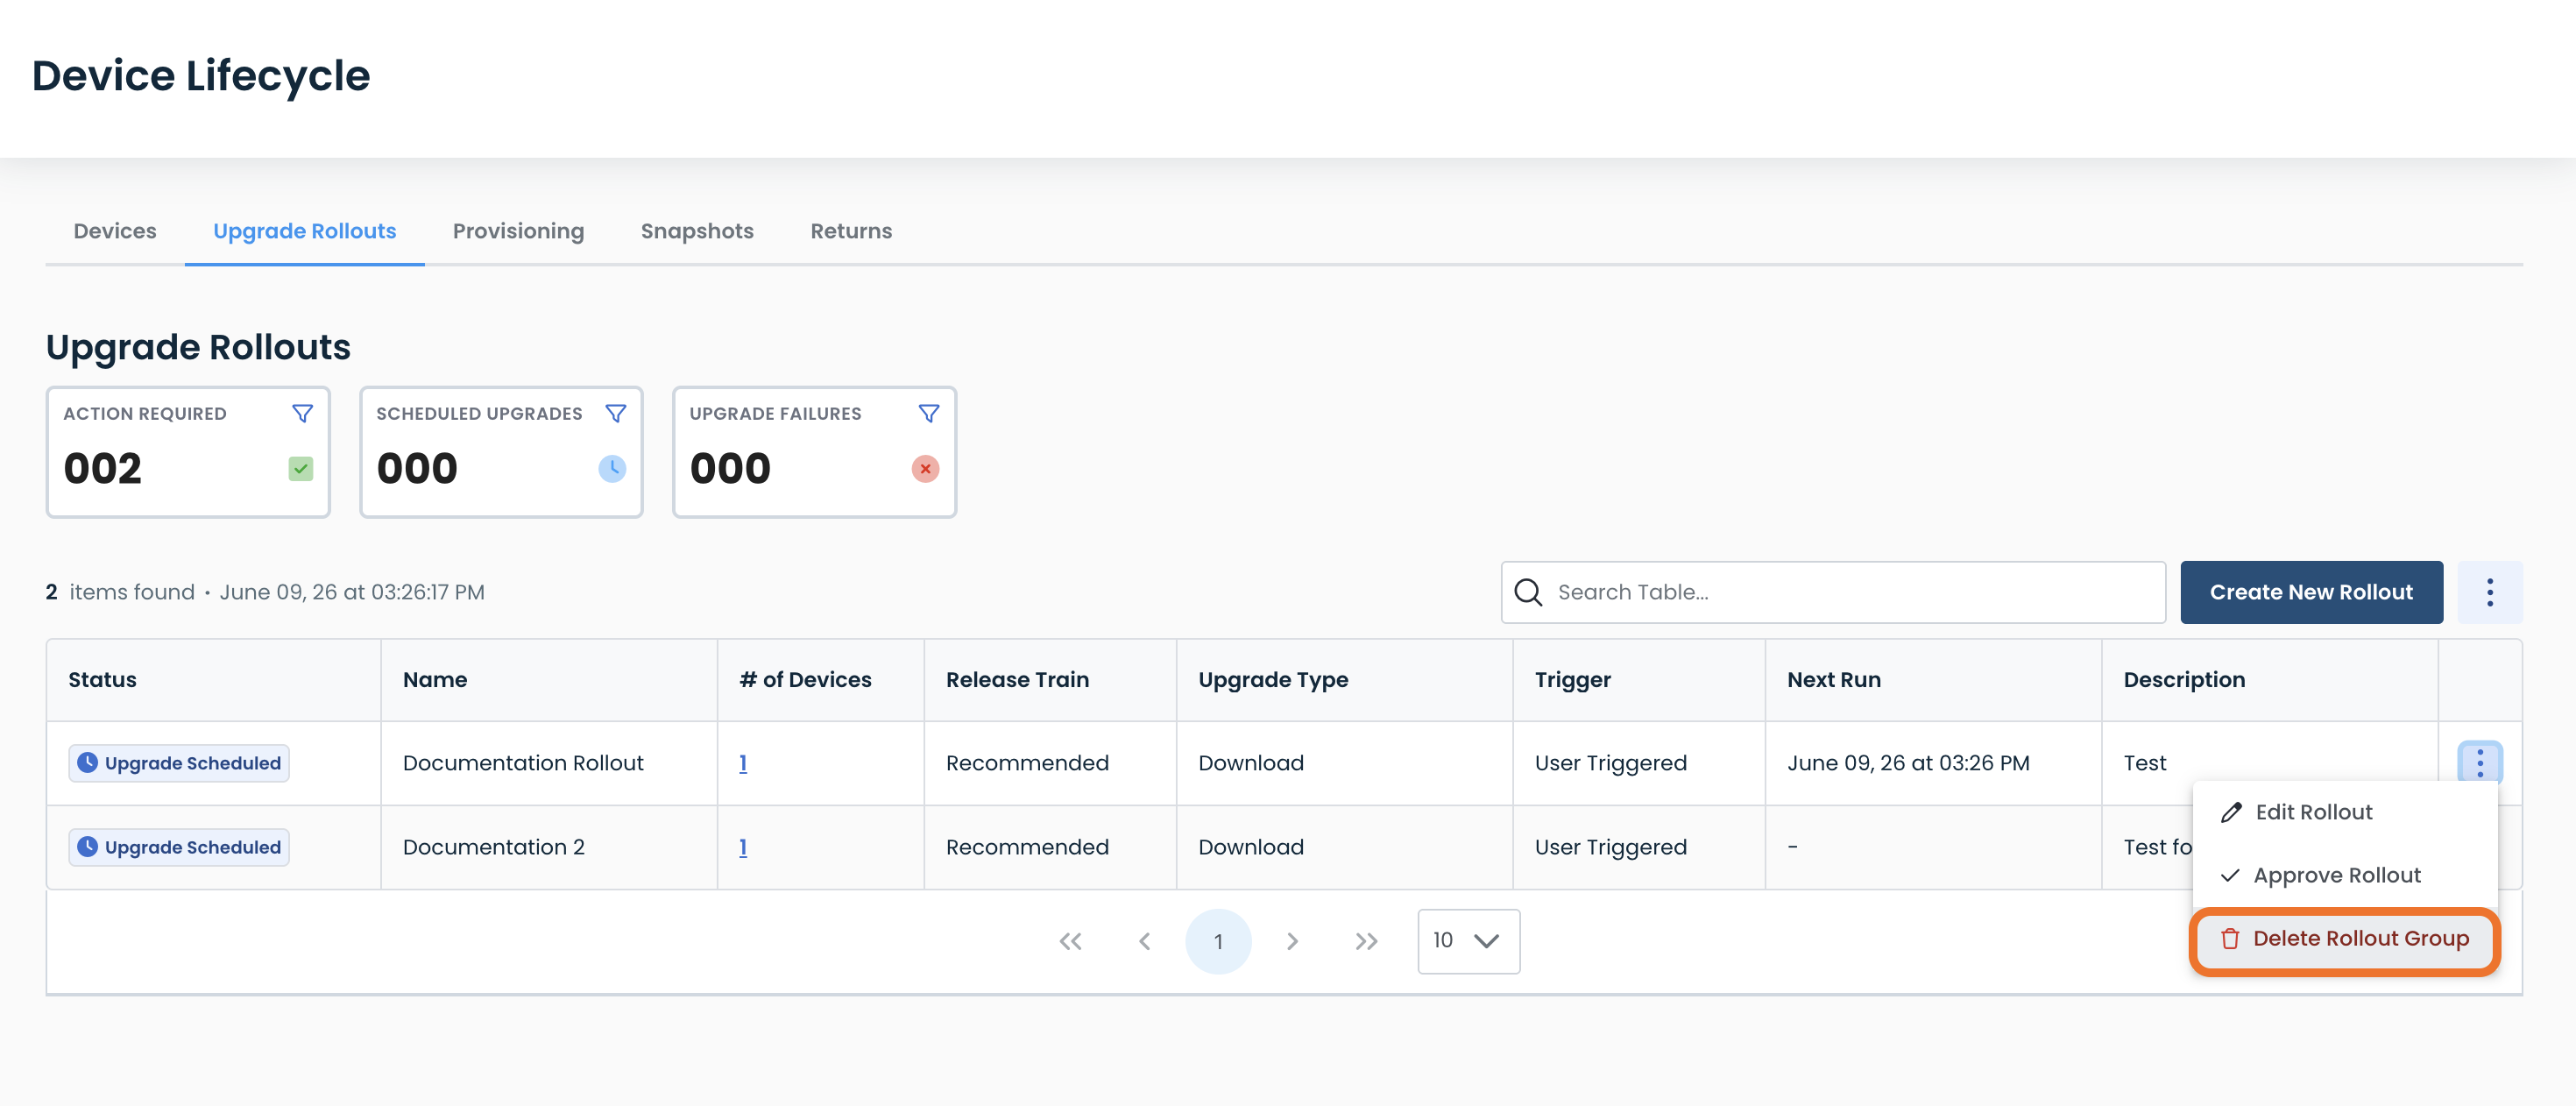
Deleting an Upgrade Rollout
To delete an upgrade rollout, click the ellipses and select ‘Delete Rollout Group’.
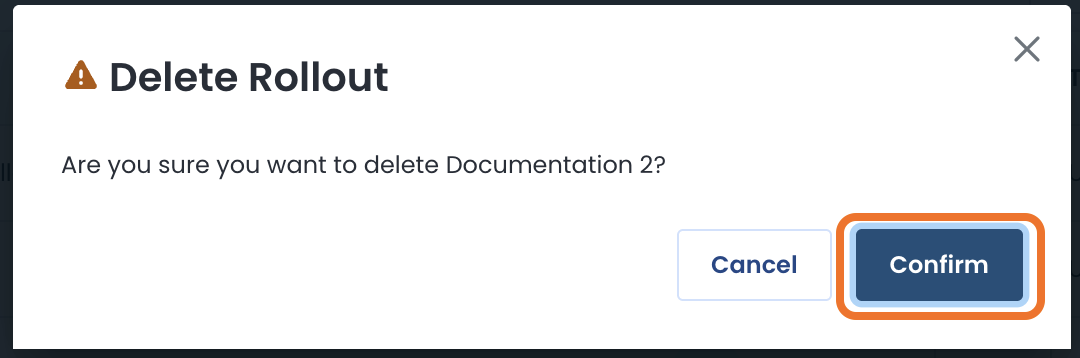
A modal will appear asking if you are sure you want to delete the Rollout Group; click ‘Confirm’.
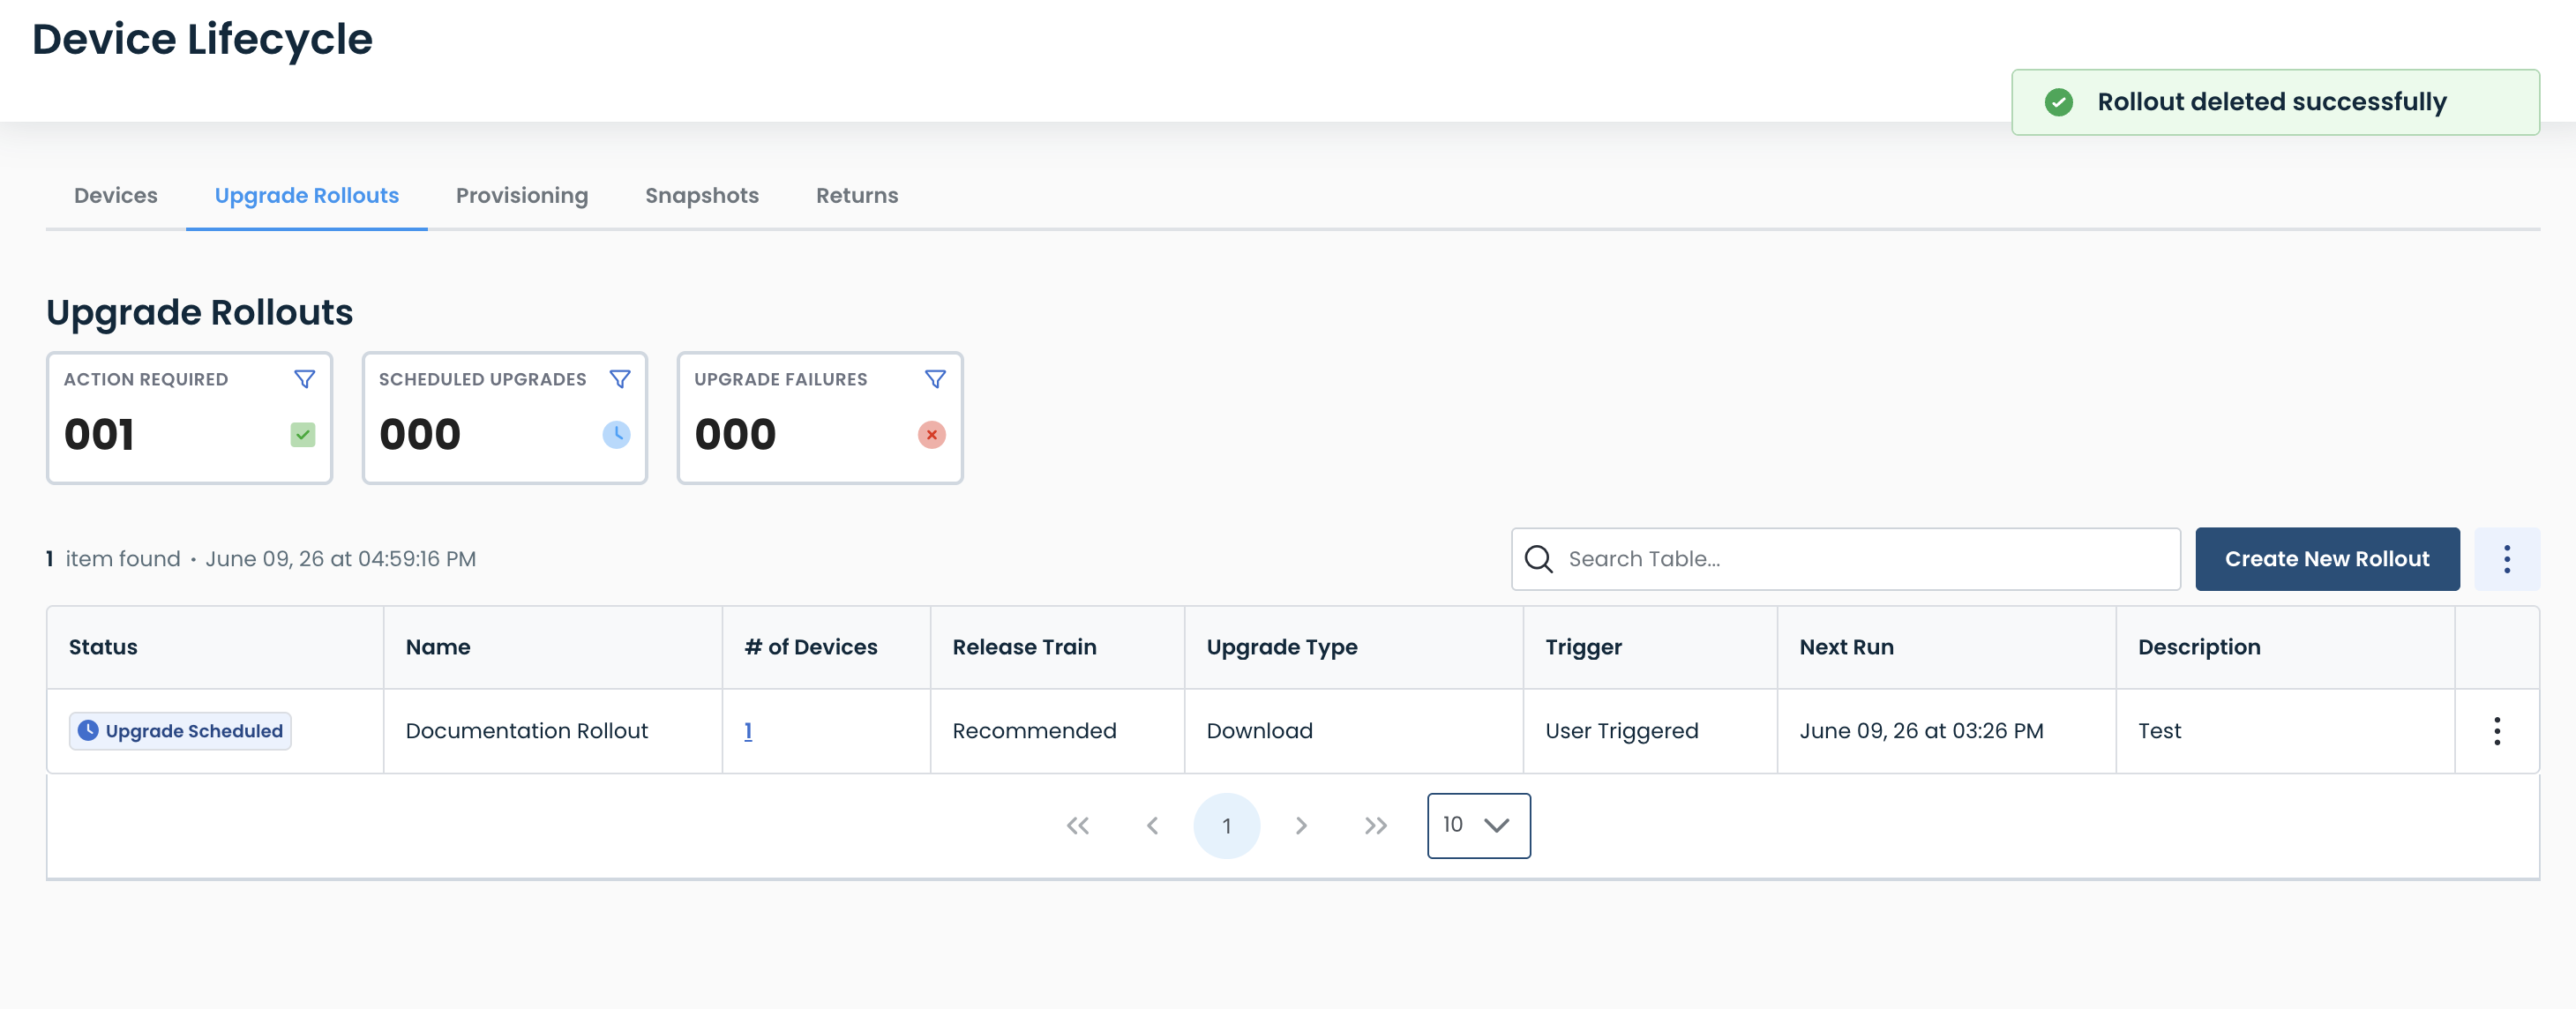
A green banner will appear stating that the Rollout was deleted successfully.
The Upgrade Rollout will no longer appear in the table.
Scheduling a Manual Upgrade of Your Graphiant Device
Should you want to manually upgrade your device at a given future point in time, from the ‘Devices’ tab, click on the ellipses to the right of that device; select ‘Schedule Manual Upgrade’.

Alternatively, if multiple devices are selected, the actions are listed at the top of the table.
Select ‘Schedule Manual Upgrade’.
.jpg)
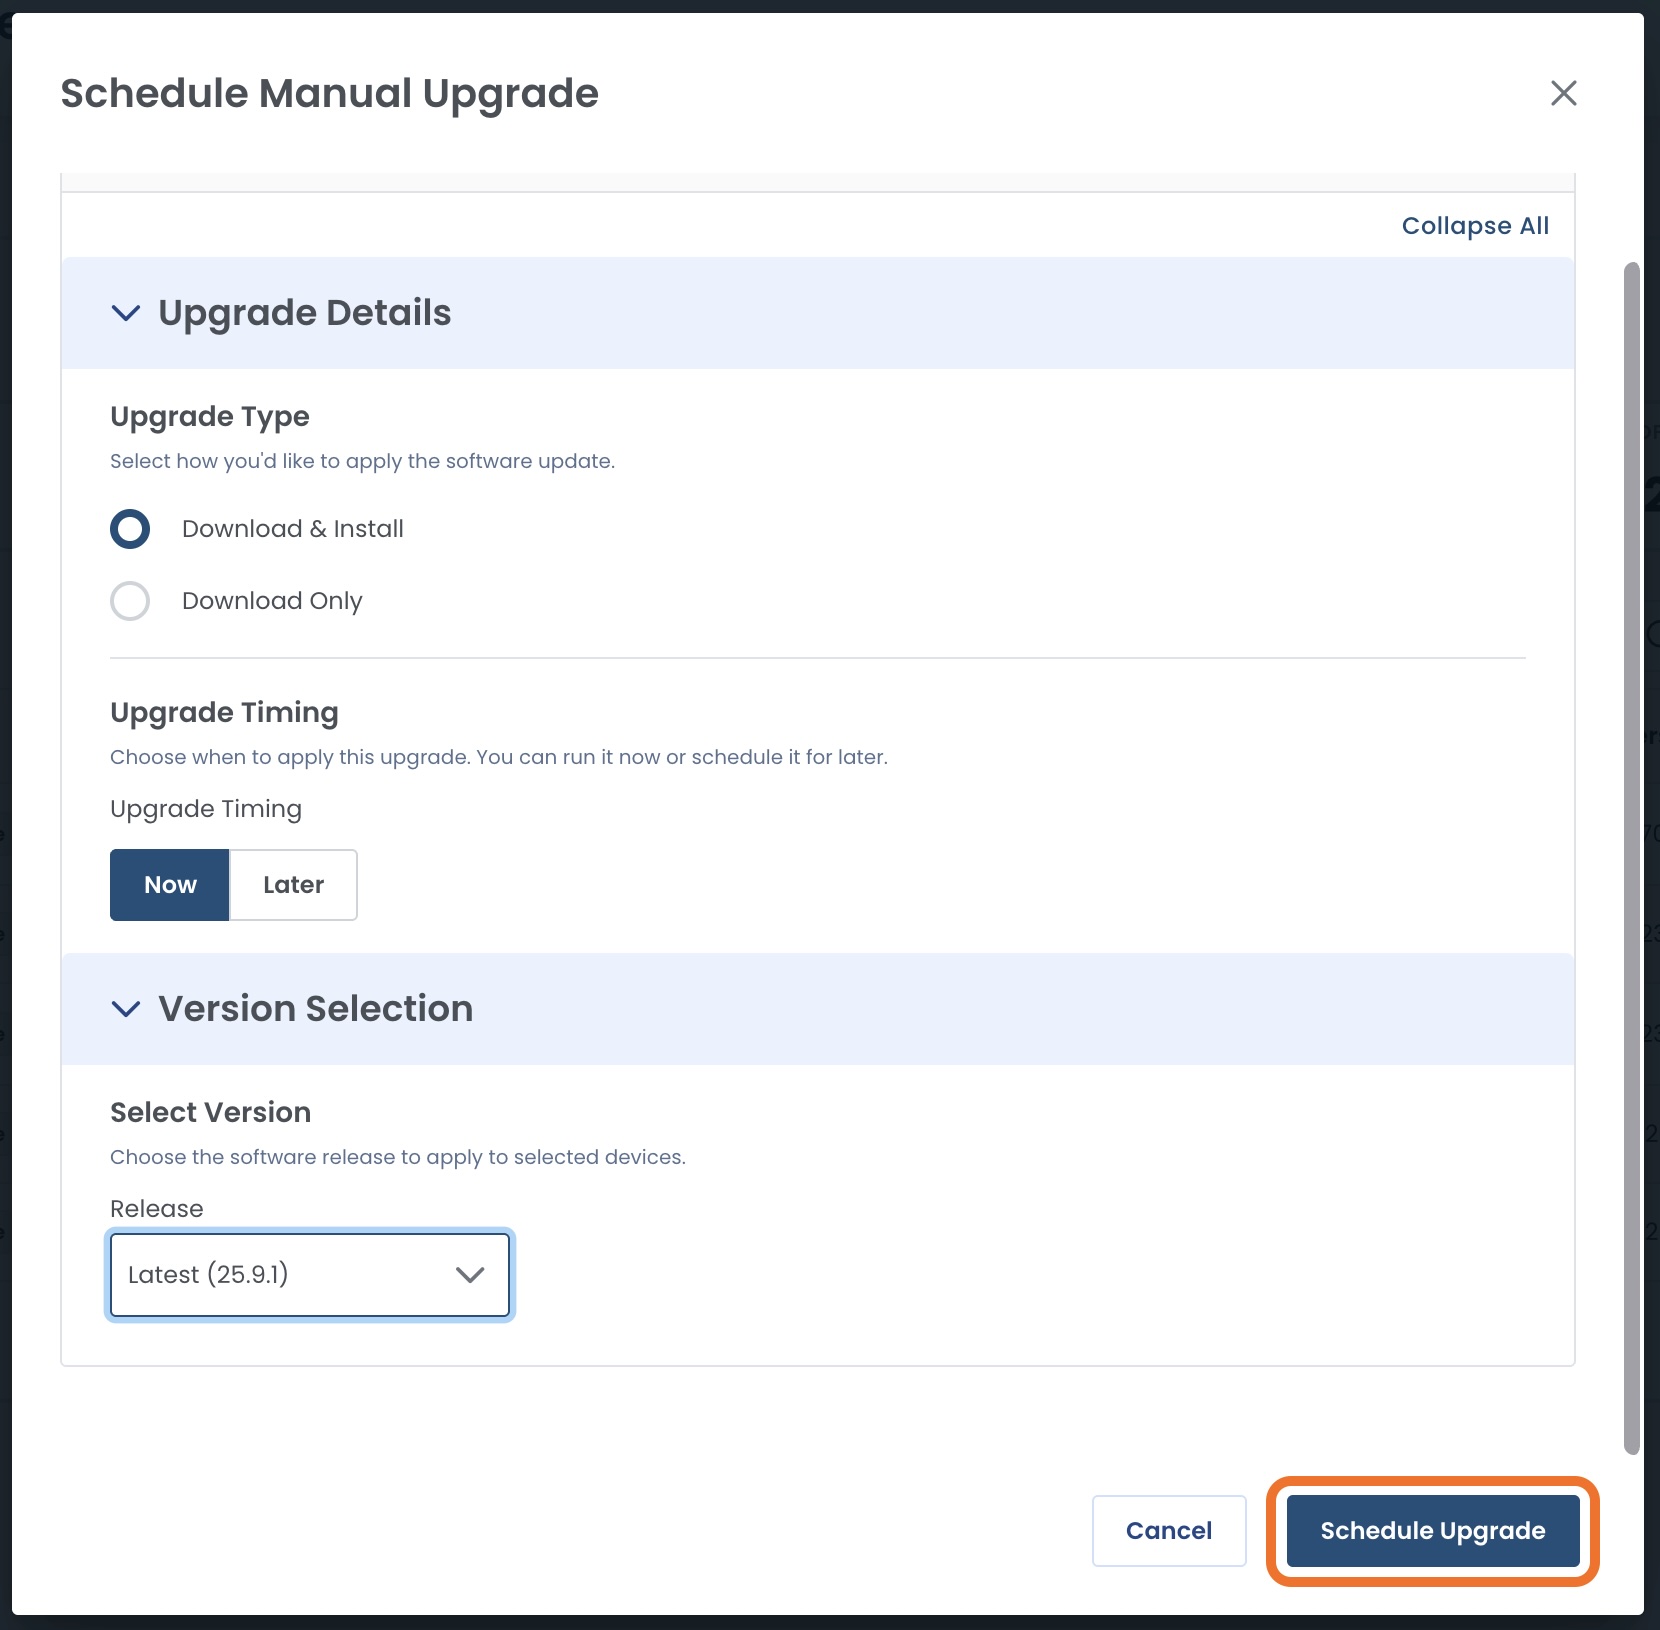
This will open a modal to customize your upgrade.
Fill out the following fields:
Upgrade Type:
Download and Install: Install the software to your device as well as have a copy downloaded
Download Only: Download the software, install at a later date
Upgrade Timing:
Now: The upgrade will happen immediately
Later: The upgrade will be scheduled for a future time and date in a calendar that will appear here
Select Version:
Recommended: The software that is released every 3 months, after having been utilized and tested for three months prior. See more information on Recommended Releases.
Latest: The software version that is released every month with the most recent features. See more information on Latest Releases.
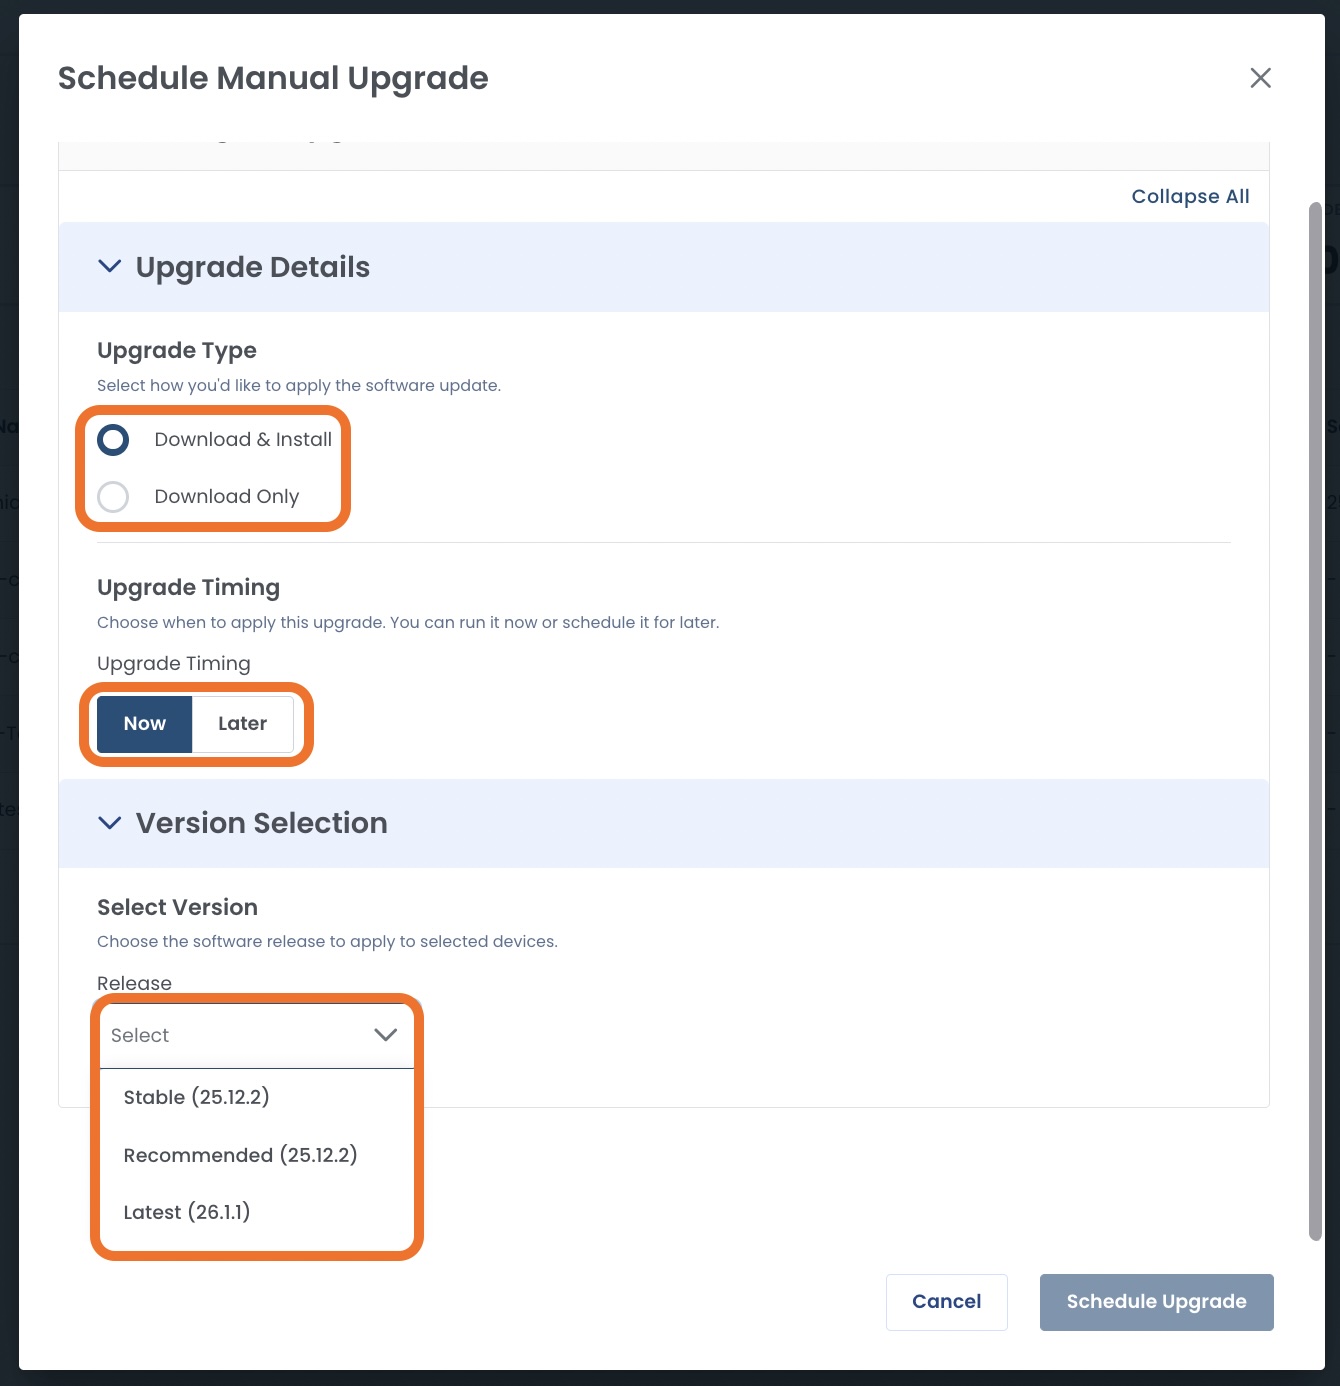
Once you have filled in the desired information, click ‘Schedule Upgrade’.
Software Upgrade Scheduled for “Now”
If you selected “Now” for your upgrade, the device will immediately start the process.
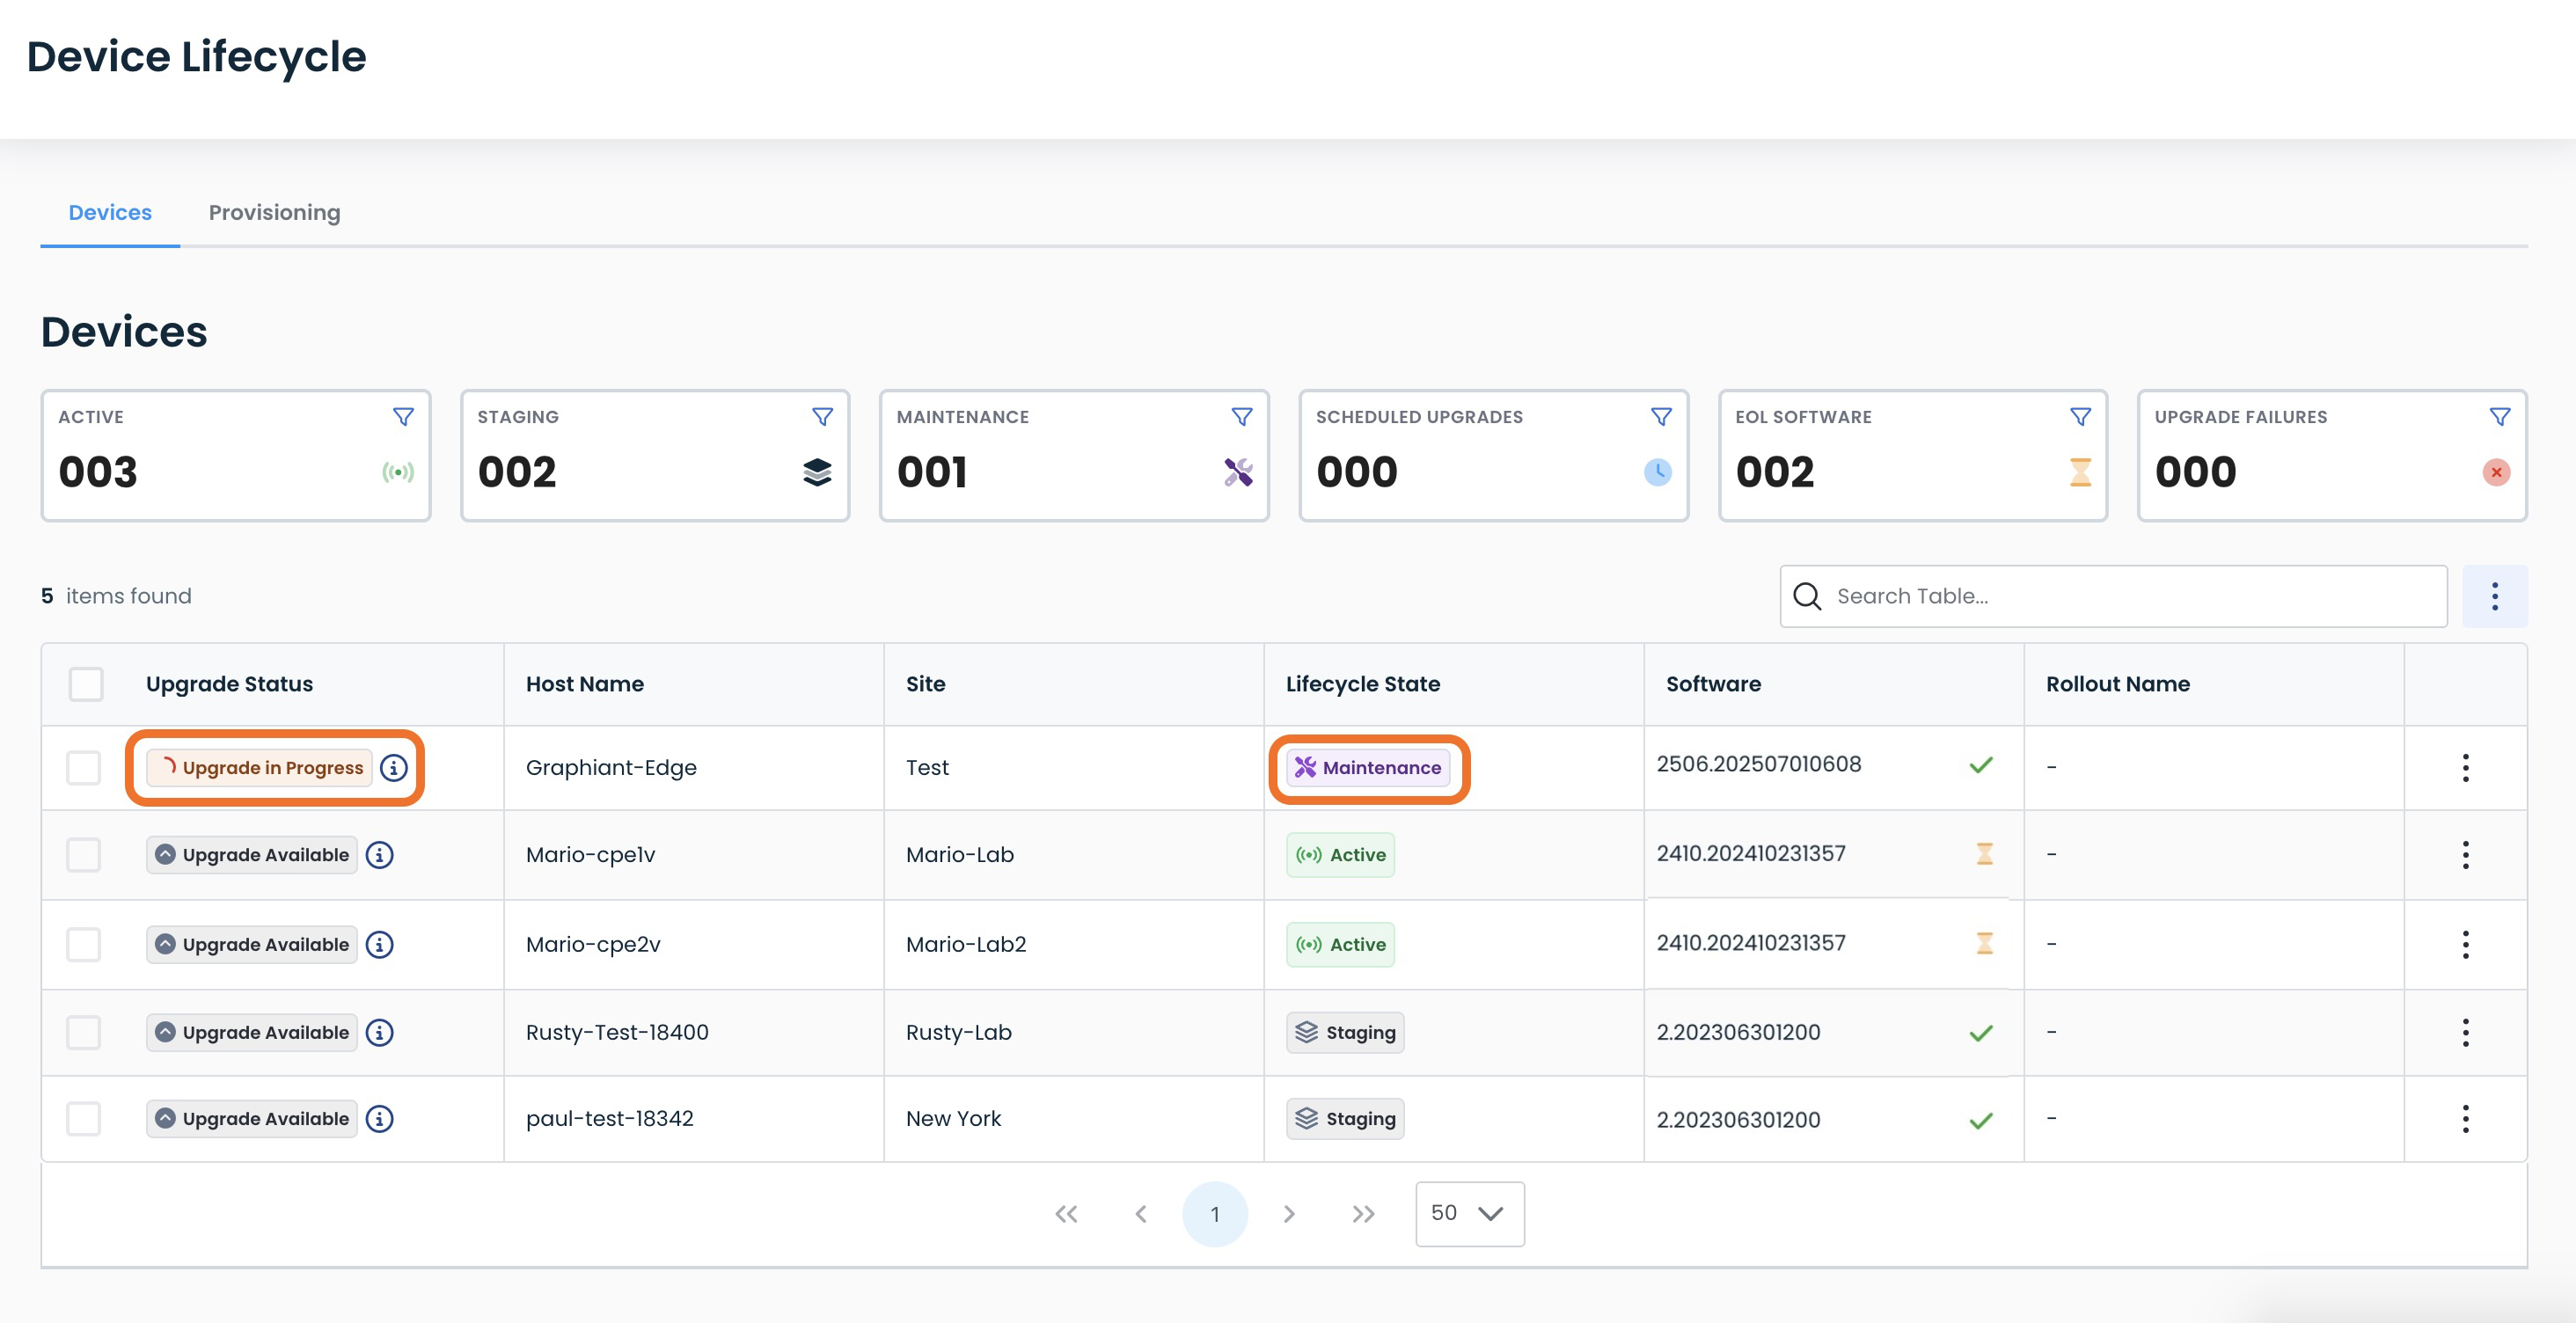
While the software is upgrading, the device will be put in Maintenance Mode, and the status will read “Upgrade in Progress”. Click here for further information on Maintenance Mode.
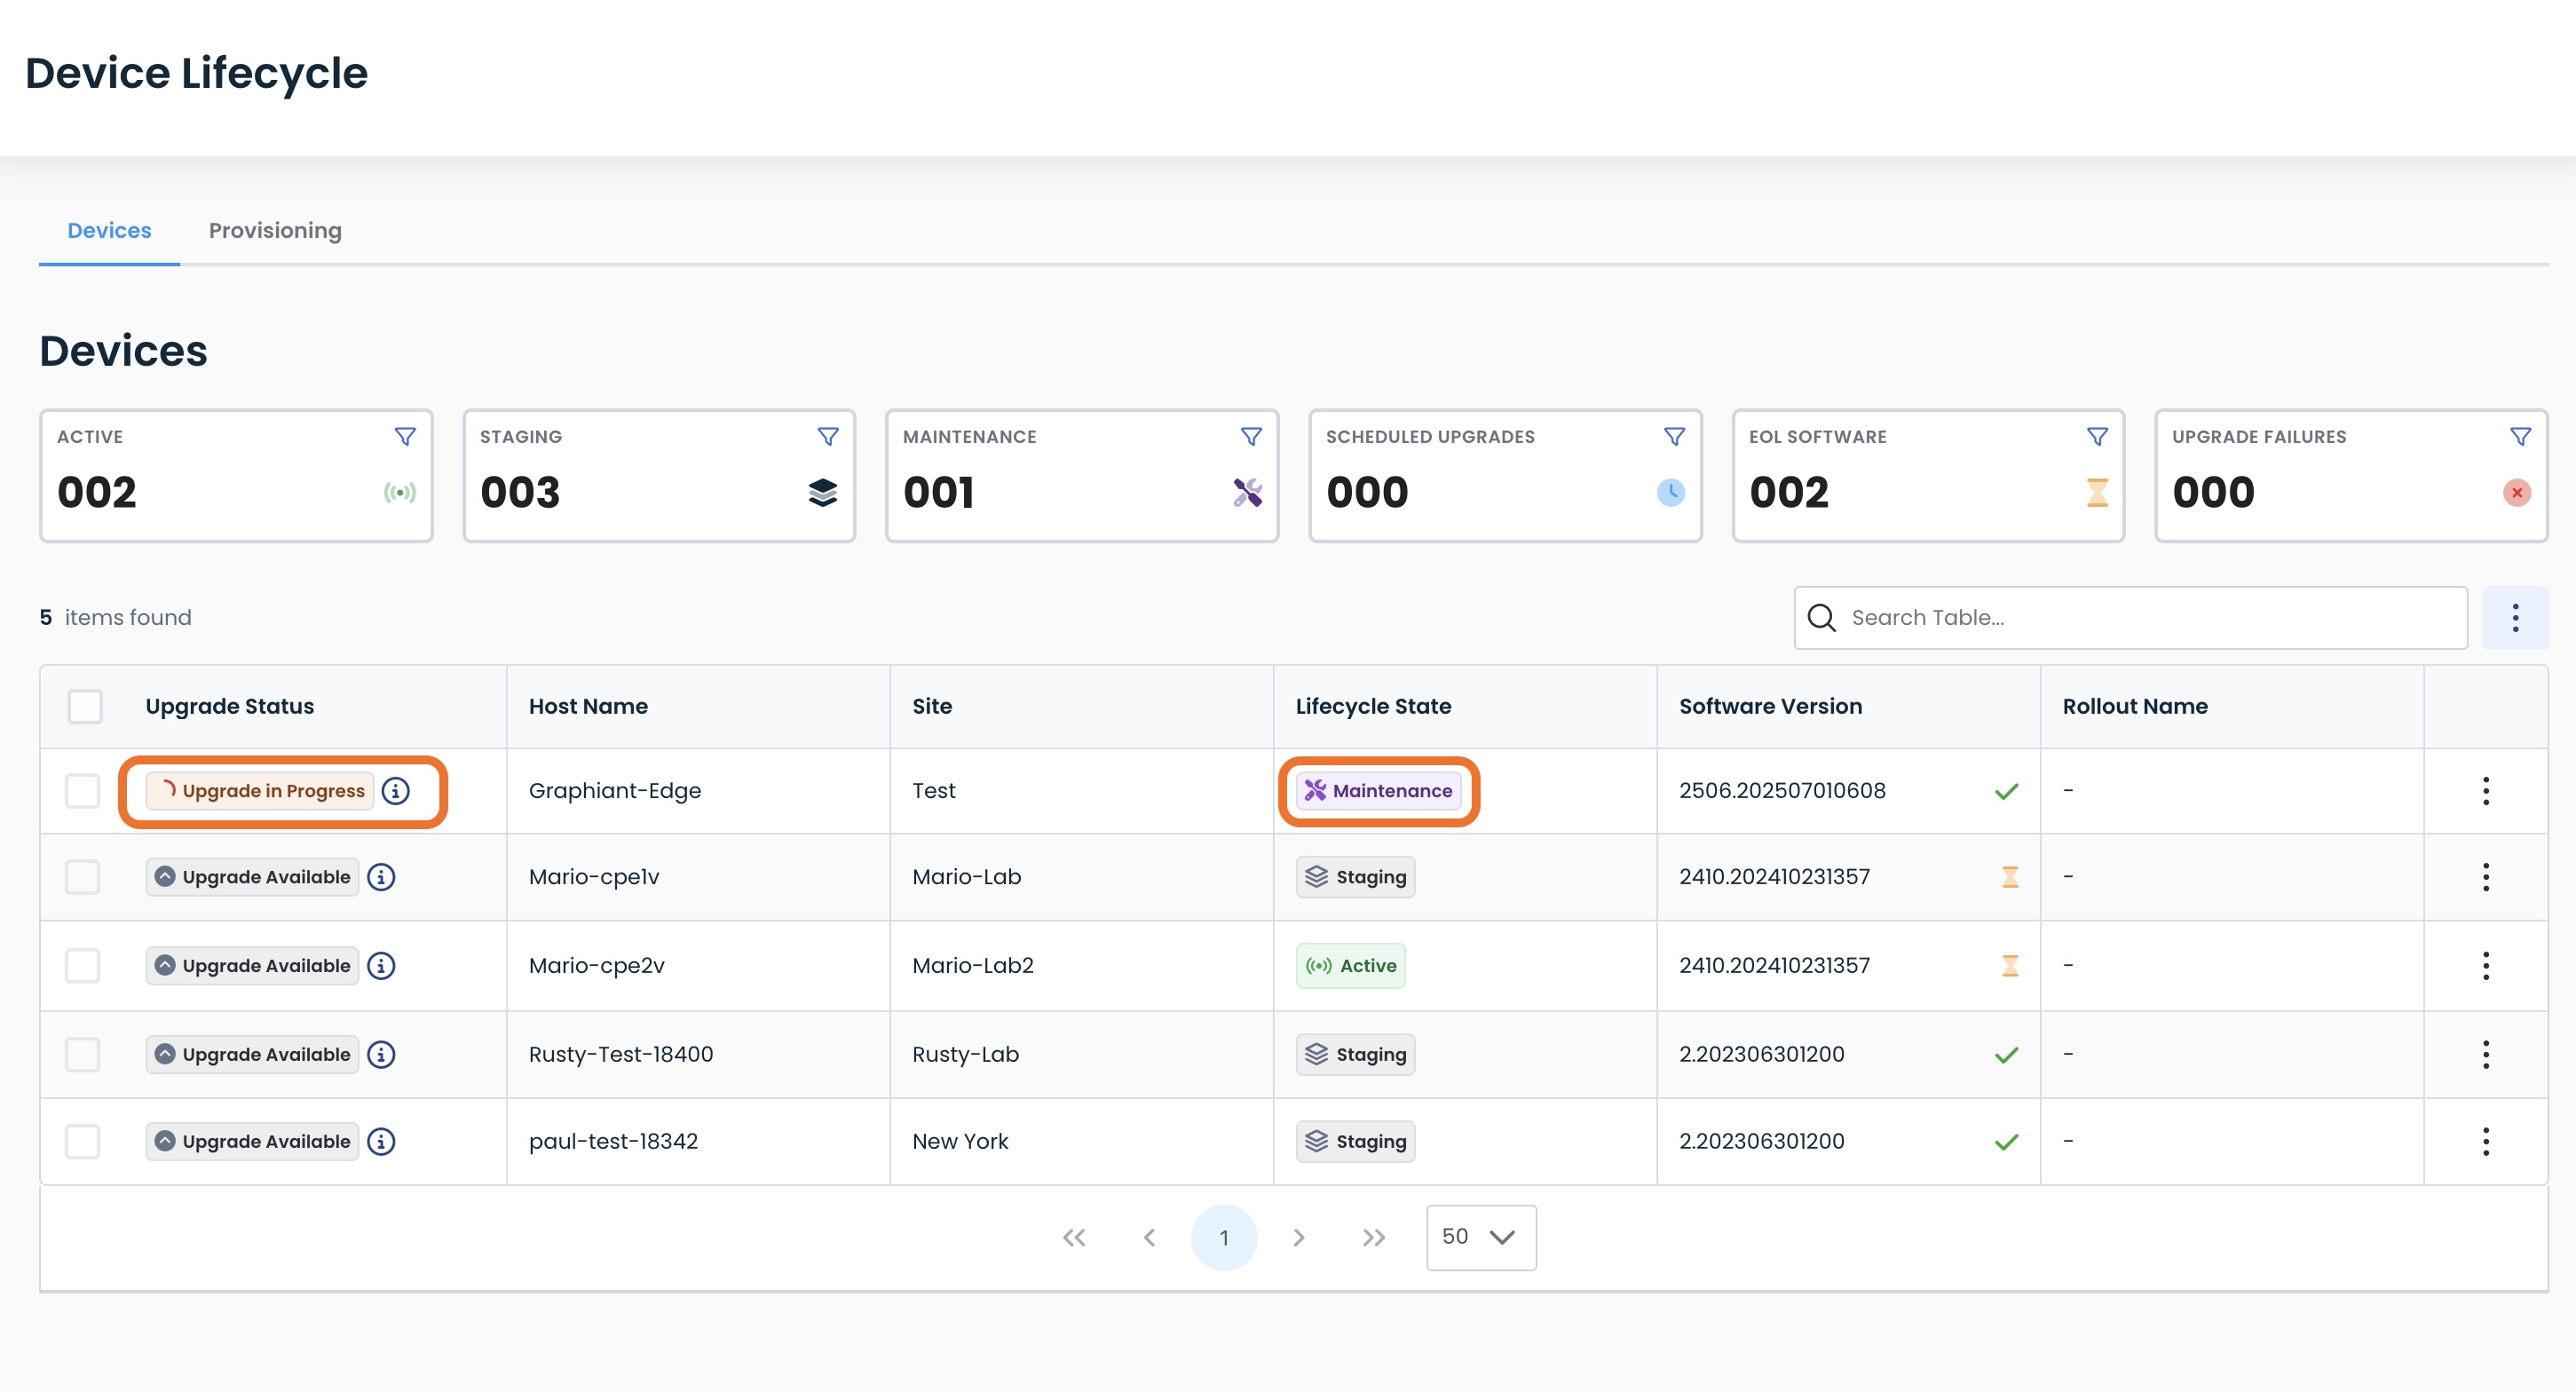
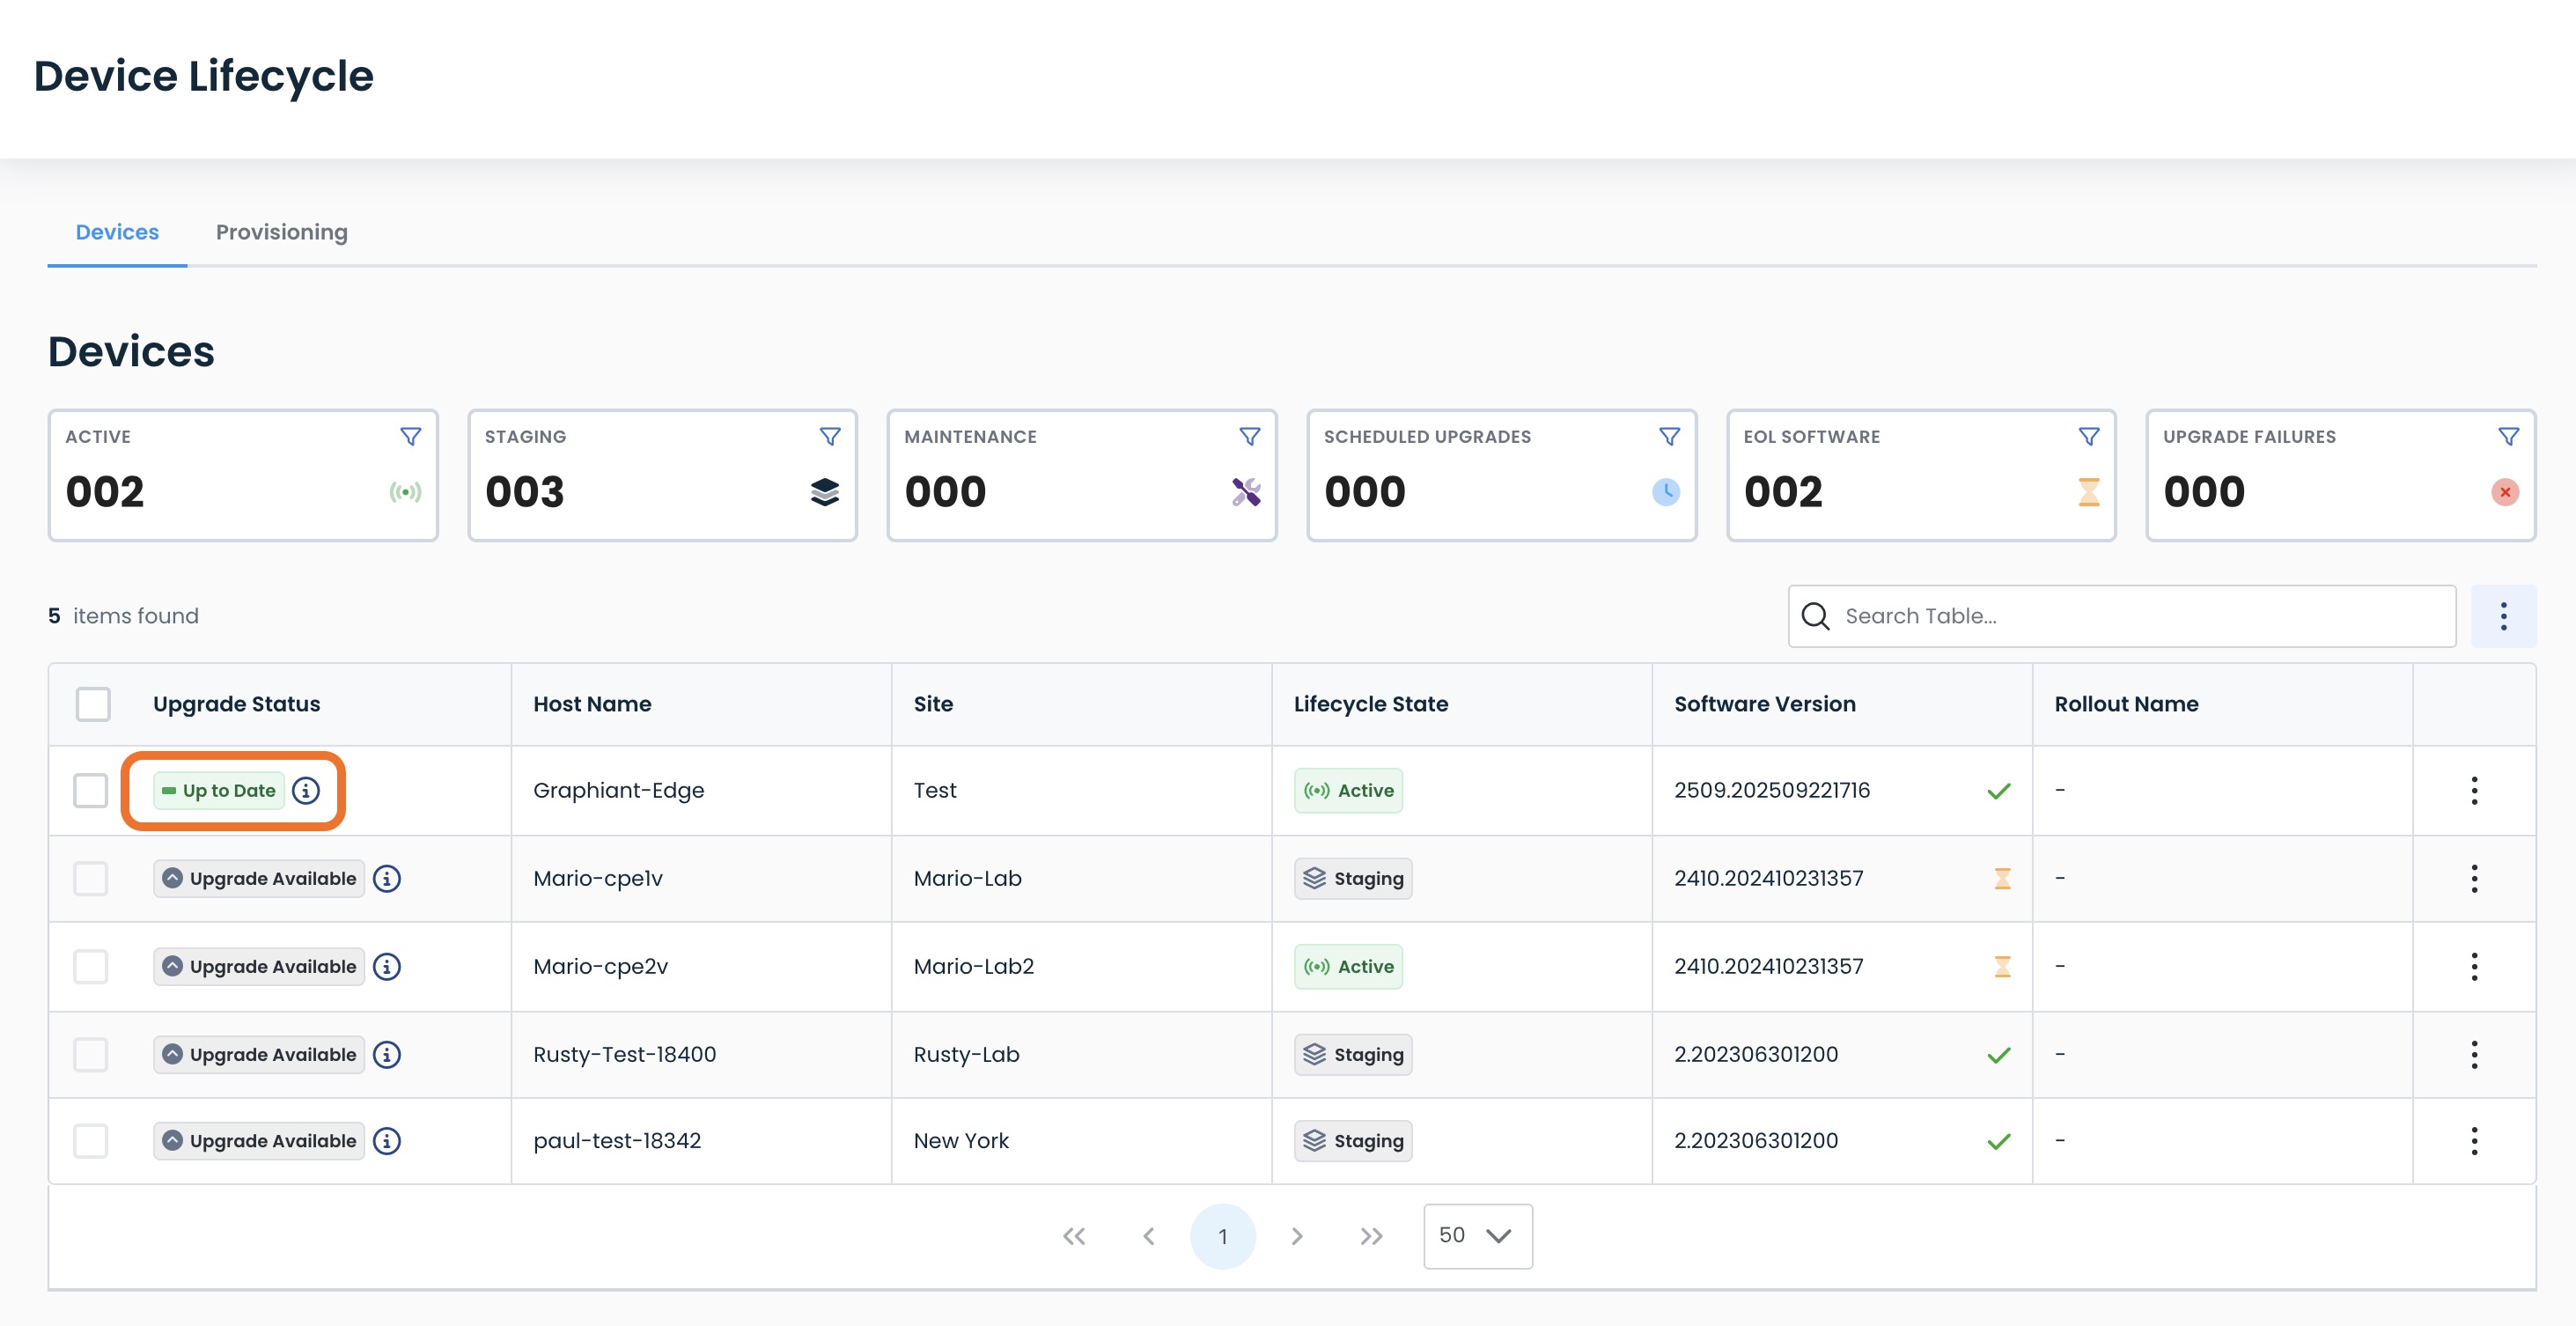
When complete, the device will have a status of “Up to Date” in the Device table.
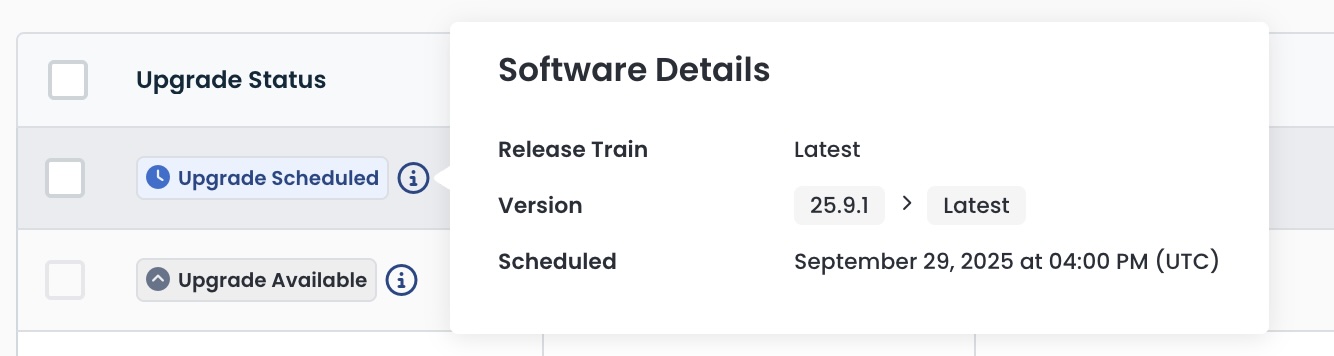
Software Upgrade Scheduled for “Later”
If you selected “Later” for your upgrade, the device will show an Upgrade Status of “Upgrade Scheduled”.
.jpg)
Upon hover, you will see:
The Release Train of the software to be installed upon upgrade
The software Version that will be installed
The date & time that the upgrade will occur
Performing Rollback to the Previous Software Version
If your device has the Status of “Up to Date” you can roll back to the prior version of software.
Note:
You can only roll back to the software version that was immediately prior to the current software.
Devices that have a Status of “Upgrade Available” will not have this option.
Click the ellipses; select ‘Rollback to Previous Version’.
.jpg)
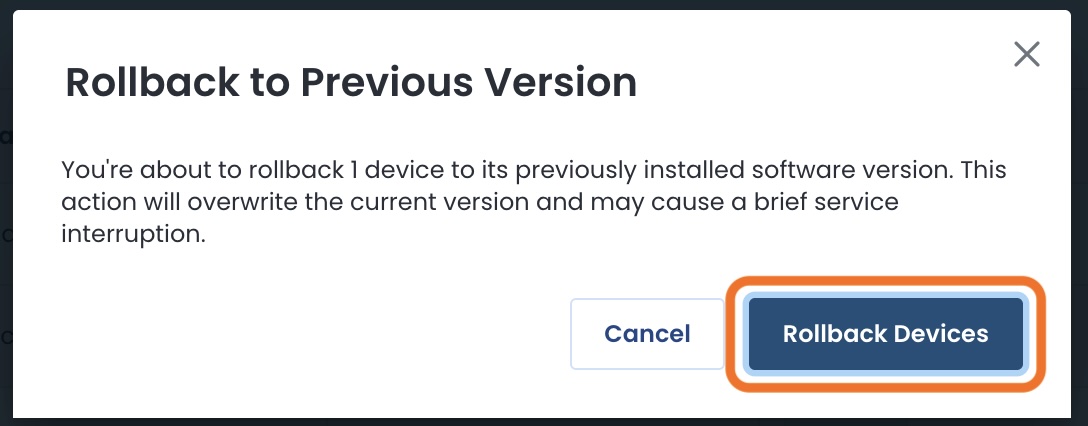
A modal will appear confirming the rollback intention, and that a brief service interruption may be experienced during the process.
Click ‘Rollback Devices’.
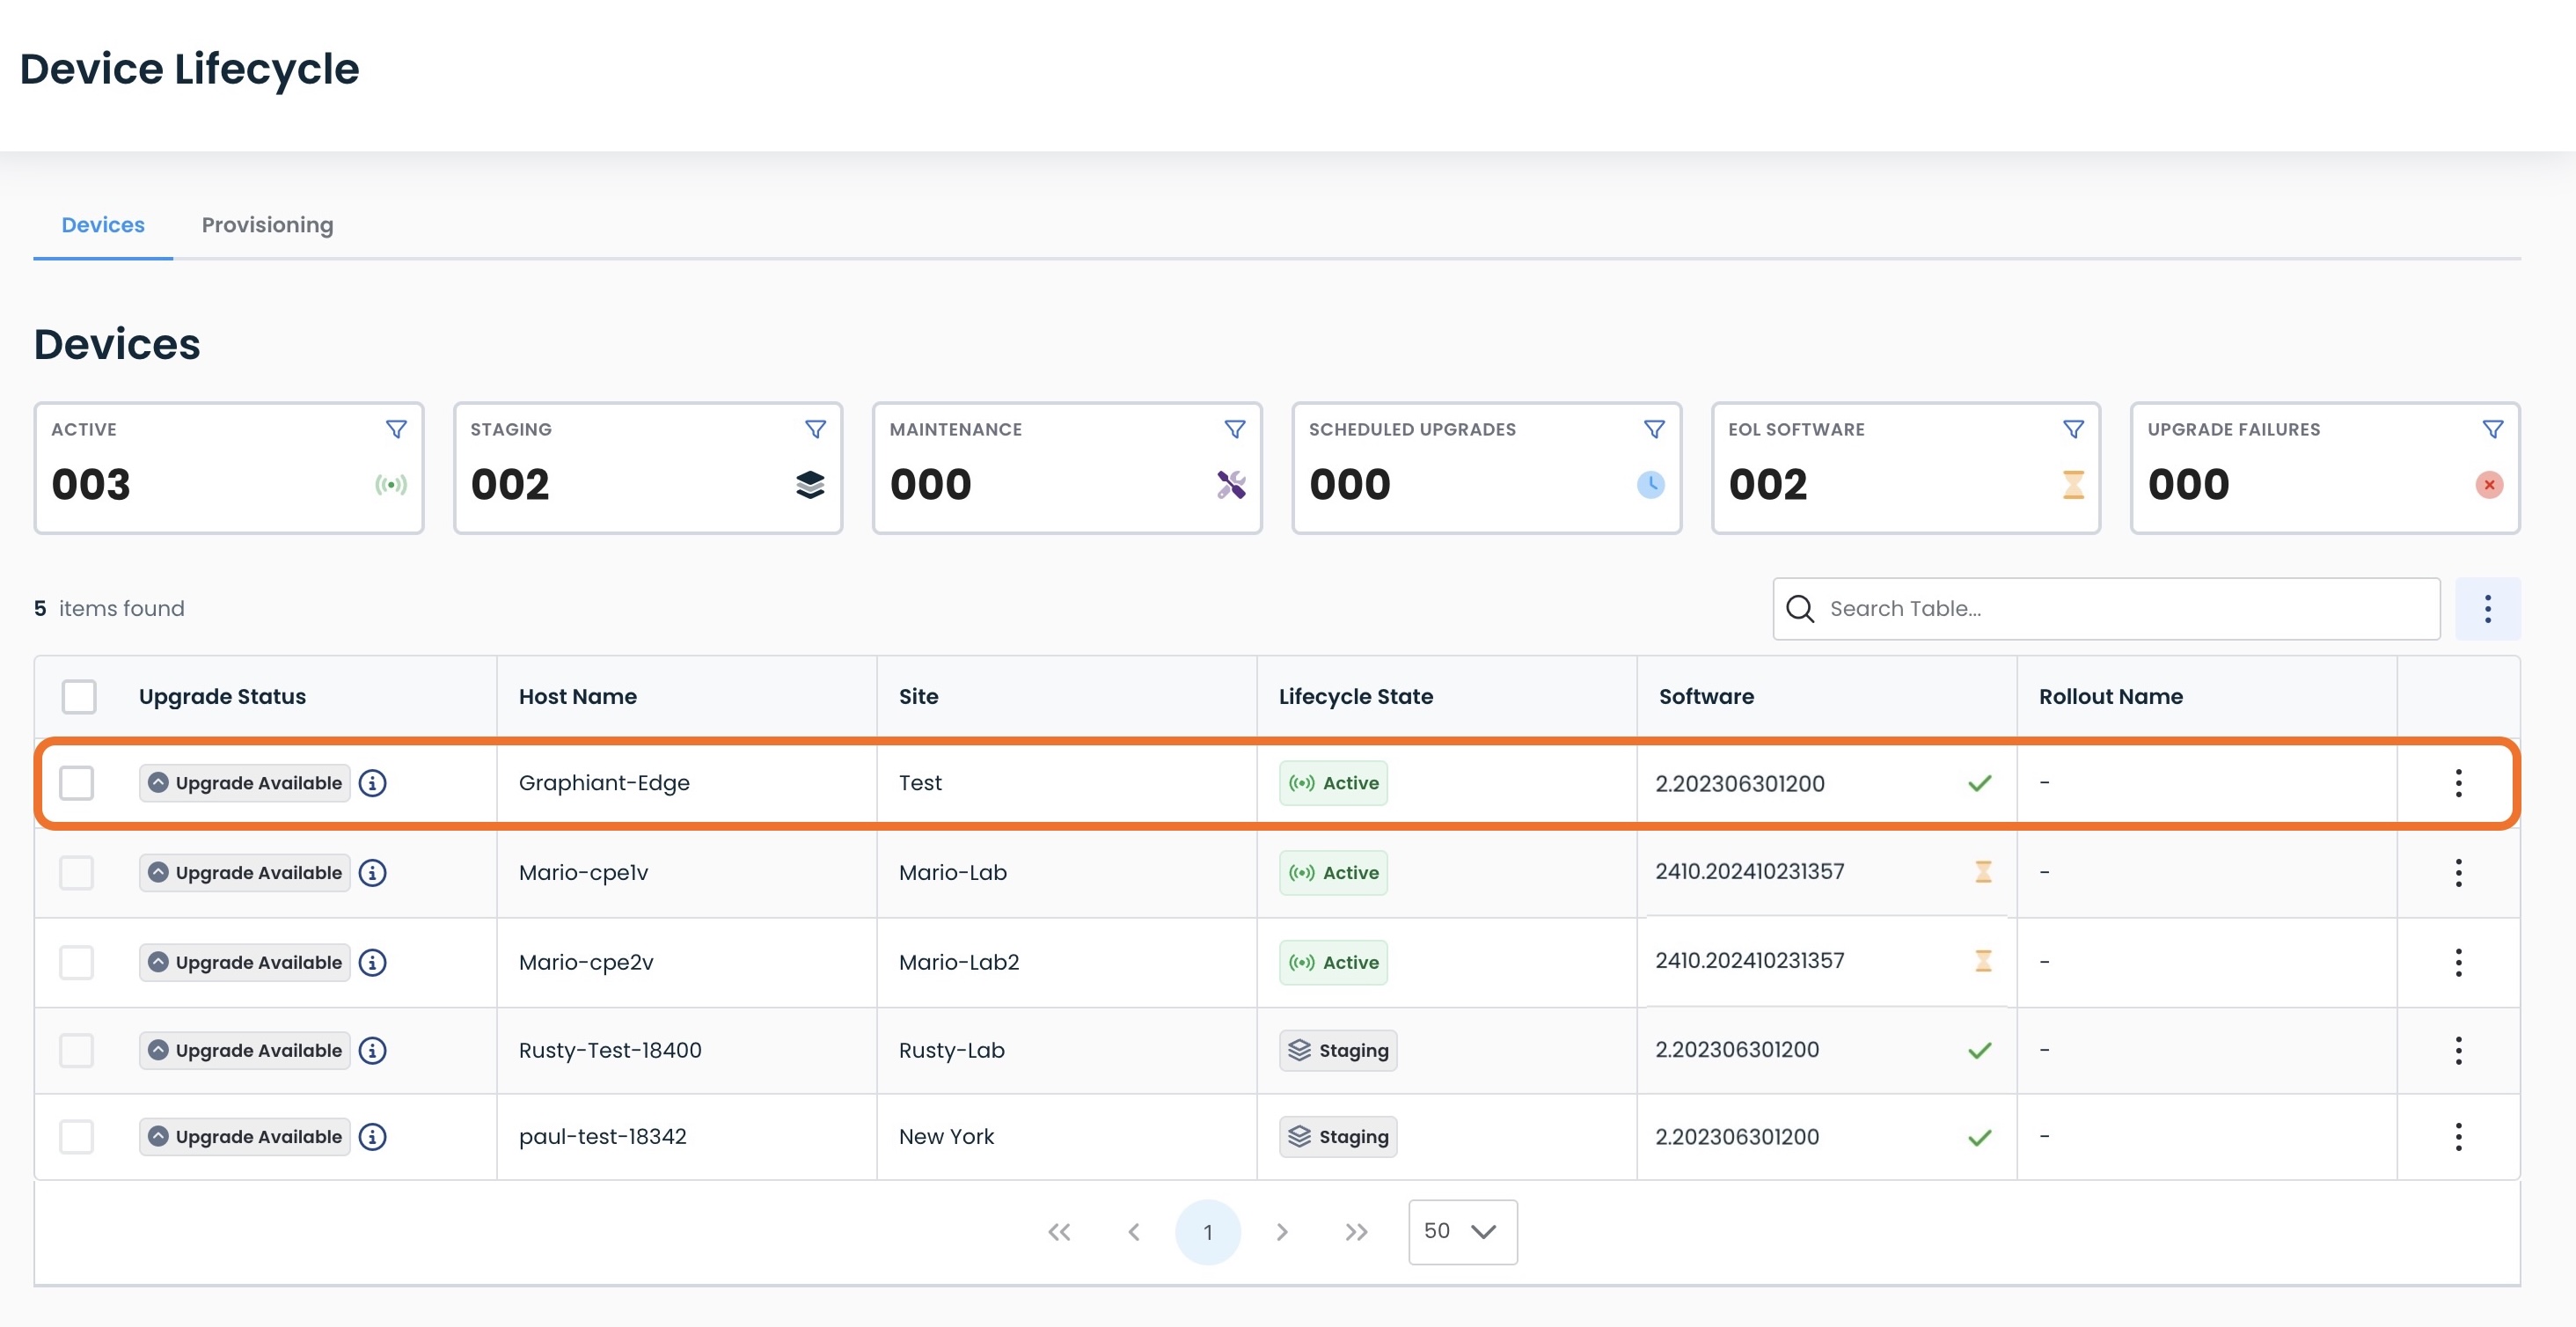
While the rollback is in progress, the device will automatically be put into Maintenance Mode. Click here for further information on Maintenance Mode.
The device will now be back on the prior software version, and out of Maintenance Mode.
Note:
You can upgrade again at any time.
Provisioning Information for Your New Graphiant Device
If you have a new device, the “Provisioning” tab of Device Lifecycle is the place for you to set up your new device.
Here you can:
Download current software versions to load onto a new device
Generate custom, device-specific tokens for use upon initial boot-up
Downloading Up to Date Software to Load onto Your New Graphiant Device
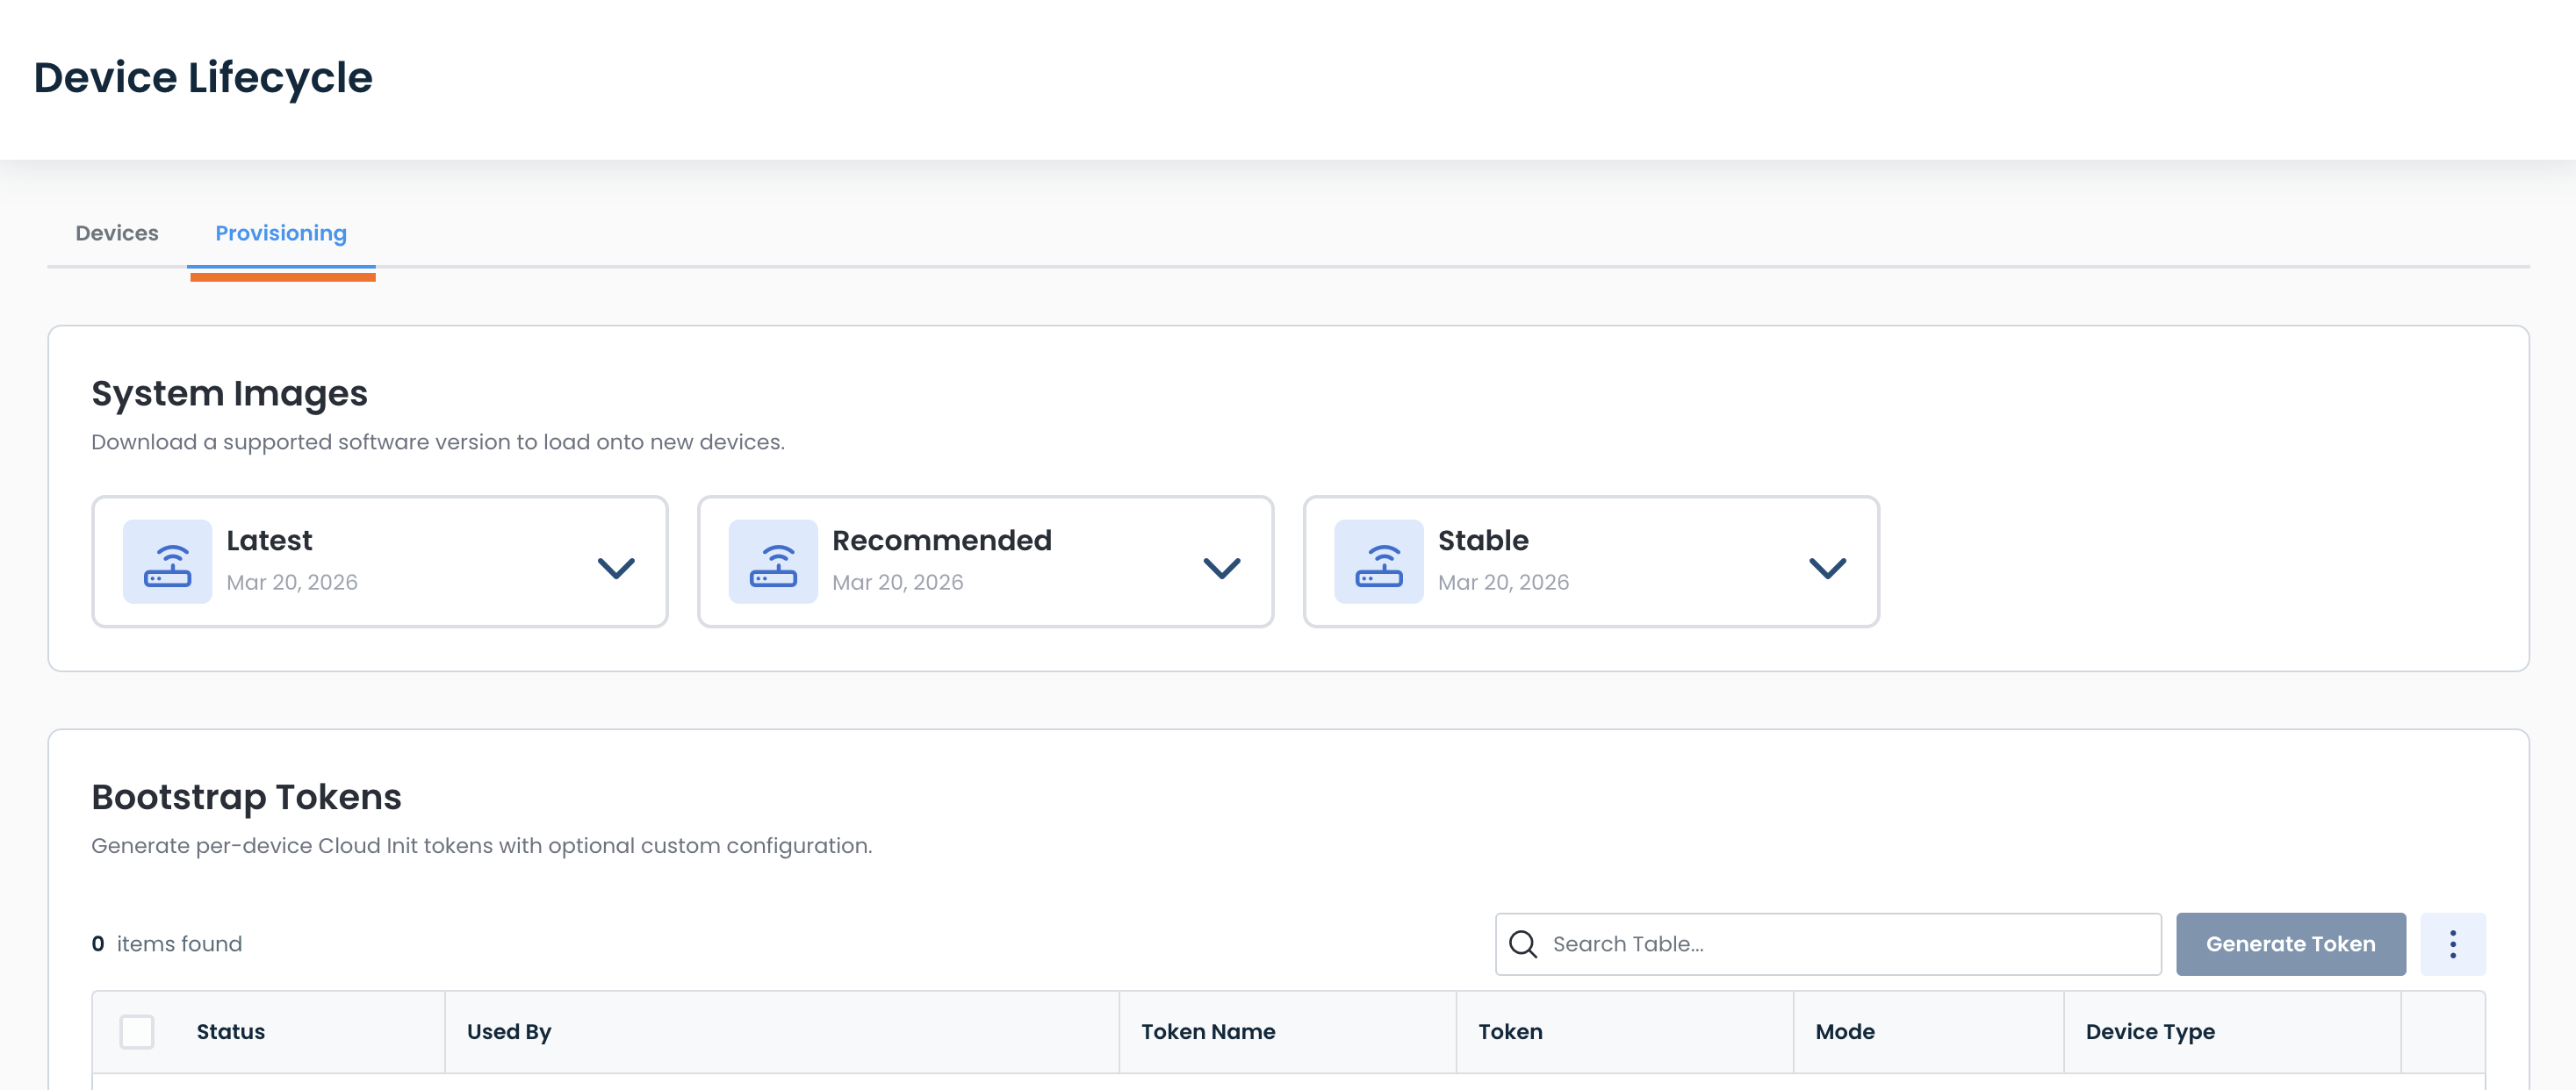
The downloads of current software versions are found under “System Images:”.
The dates within each Release train indicate when it was last updated.
.jpg)
Click the carat to see the format options for the software version of your choice.
.jpg)
Select the download file that works best for your device.
.jpg)
You will receive a green banner stating that the image download has begun.
.jpg)
Bootstrap Tokens
Graphiant offers Bootstrap Tokens, making it quick and easy to have a basic configuration immediately installed upon boot-up, allowing a new device to connect to the Graphiant network.
Whether you have procured your hardware on your own, or have a new virtual machine, you can onboard it to the Graphiant network using Bootstrap Tokens.
Bootstrap Tokens are located at the bottom of the Provisioning Tab within the Device Lifecycle.
Note:
Each Bootstrap Token can be used only once. They are unique and for one-time usage.
The table gives the following information:
Status: Whether the token has been used or not
Used By: If the token has been used, the Name and Serial Number of the device by which it was utilized
Token Name: Assigned name of the token
Token: The unique token ID
Mode:
Simple: The token contains “Name” and “Device Role” assigned only; no advanced configuration
Custom: The token contains advanced configuration options
Device Type (Custom Mode only): What type of device by which the token will be used
.jpg)
Generating a New Bootstrap Token
To create a new Bootstrap Token, click ‘Generate Token’ at the top right of the Bootstrap Tokens table.
.jpg)
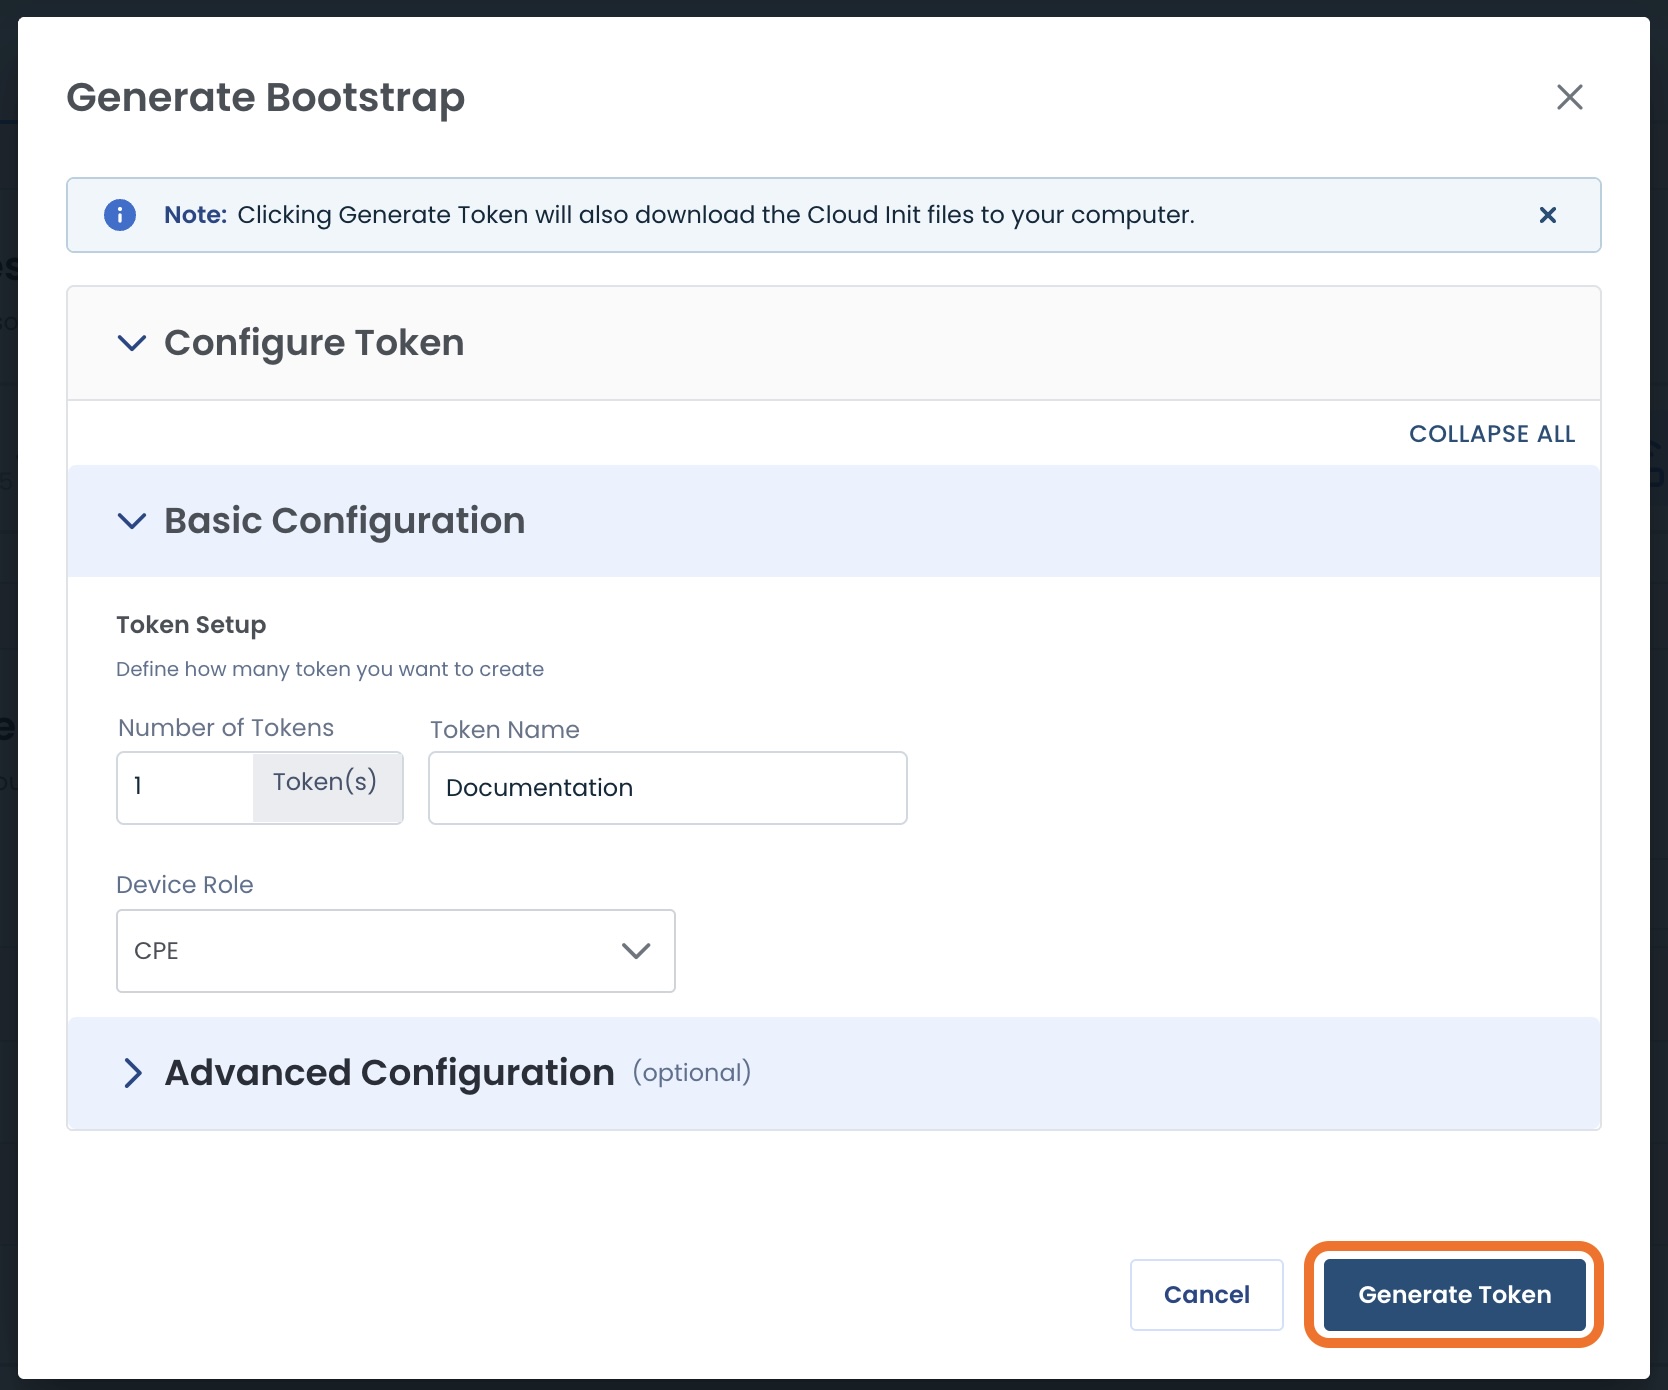
Generating a Single Bootstrap Token
For one Bootstrap Token, in filling out the Basic Configuration, complete the following required fields:
Number of Tokens: Leave as “1”
Token Name: Type the name with which you want to refer to this token
Device Role: Choose from:
CPE: Edge Connectivity to the Graphiant Core
Gateway: Direct cloud connectivity to the Graphiant Core

From here you can either:
Click ‘Generate Token’:
When you click ‘Generate Token’:
It will also download the Cloud Init files to your computer.
OR
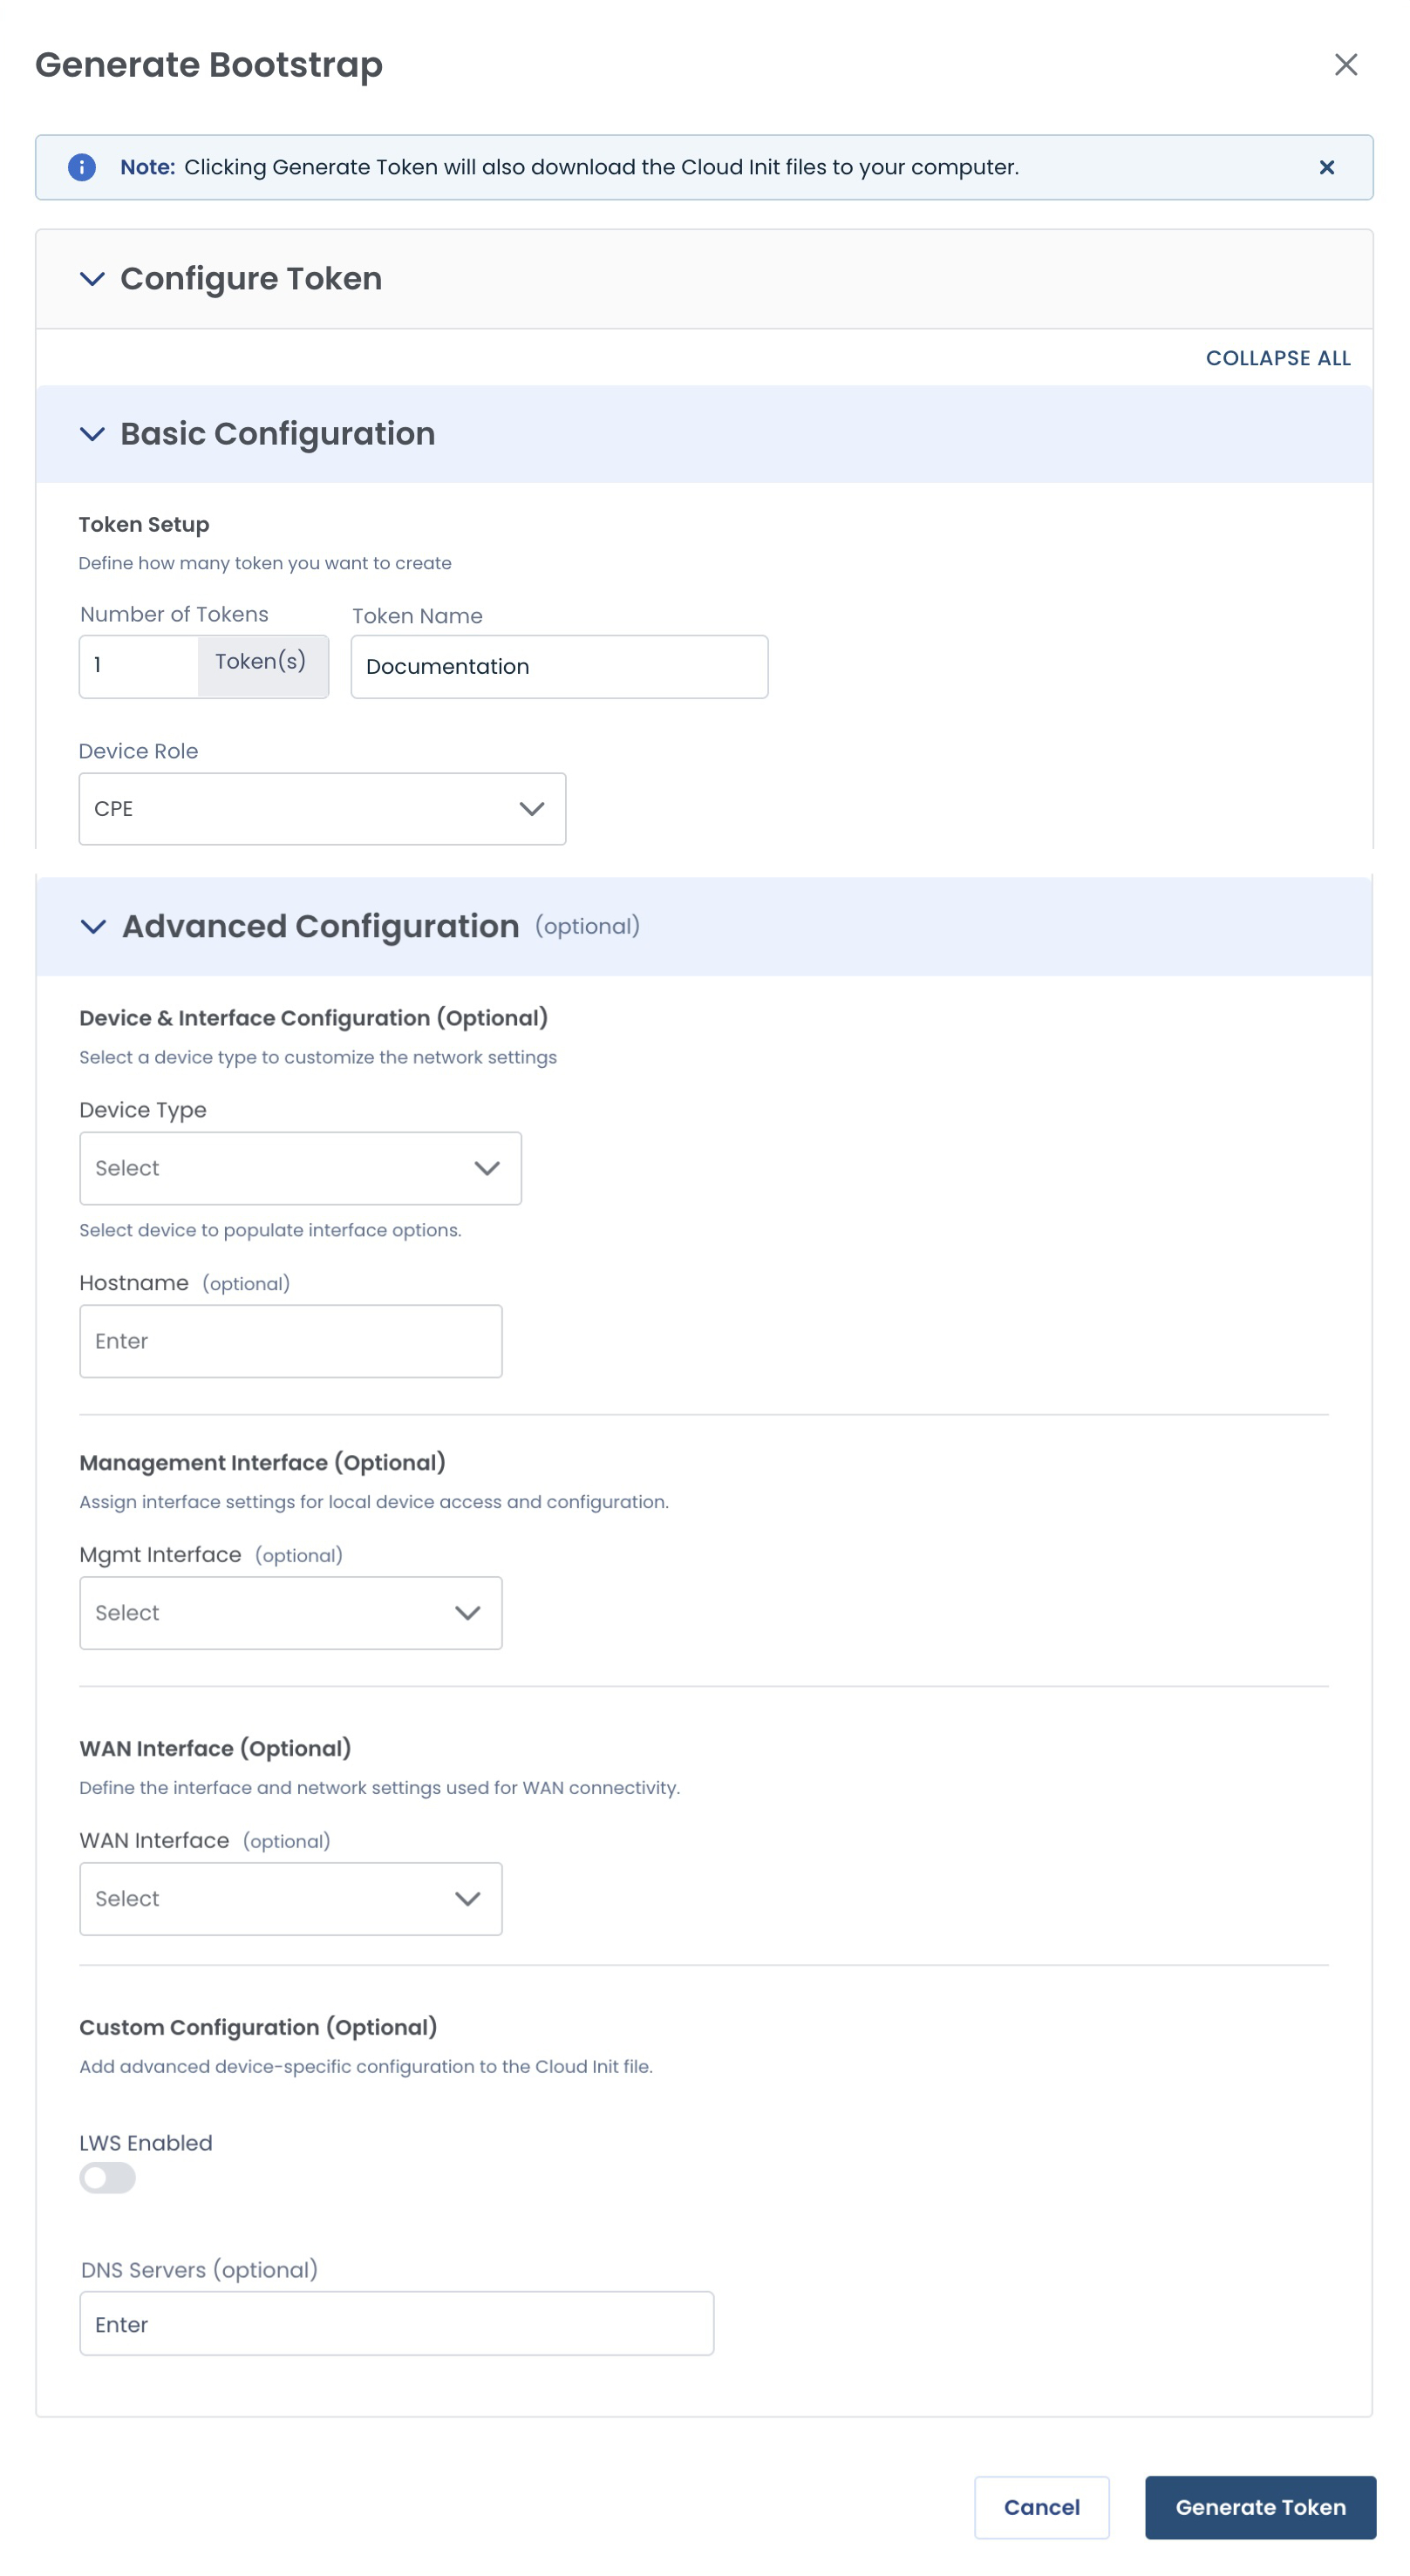
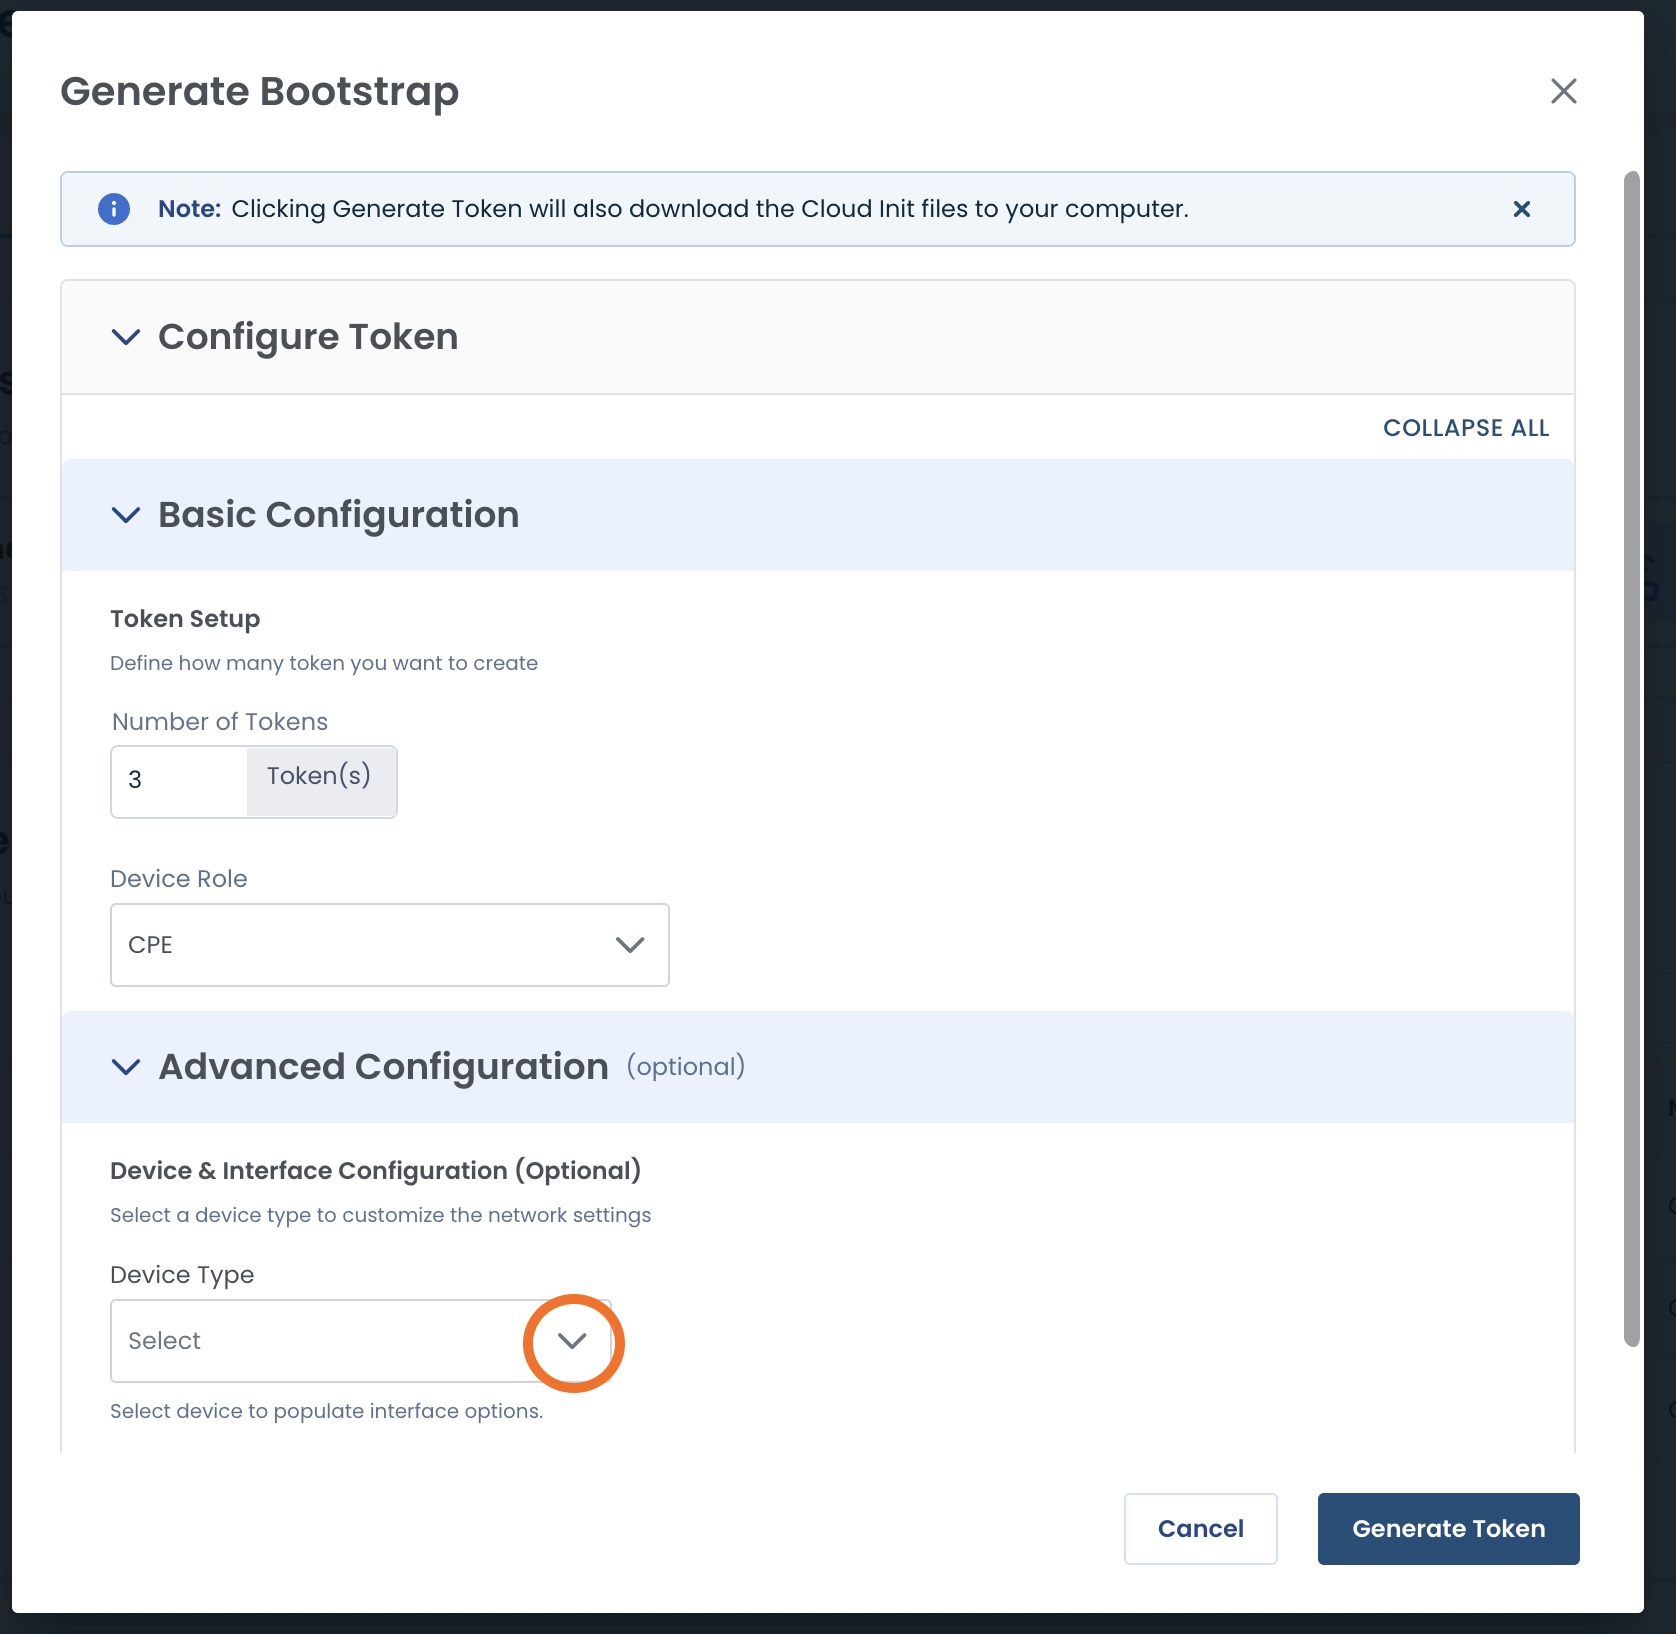
Add Advanced Configuration information (optional):
Advanced Configuration contains the following:
Note:
Each one of these fields is optional.
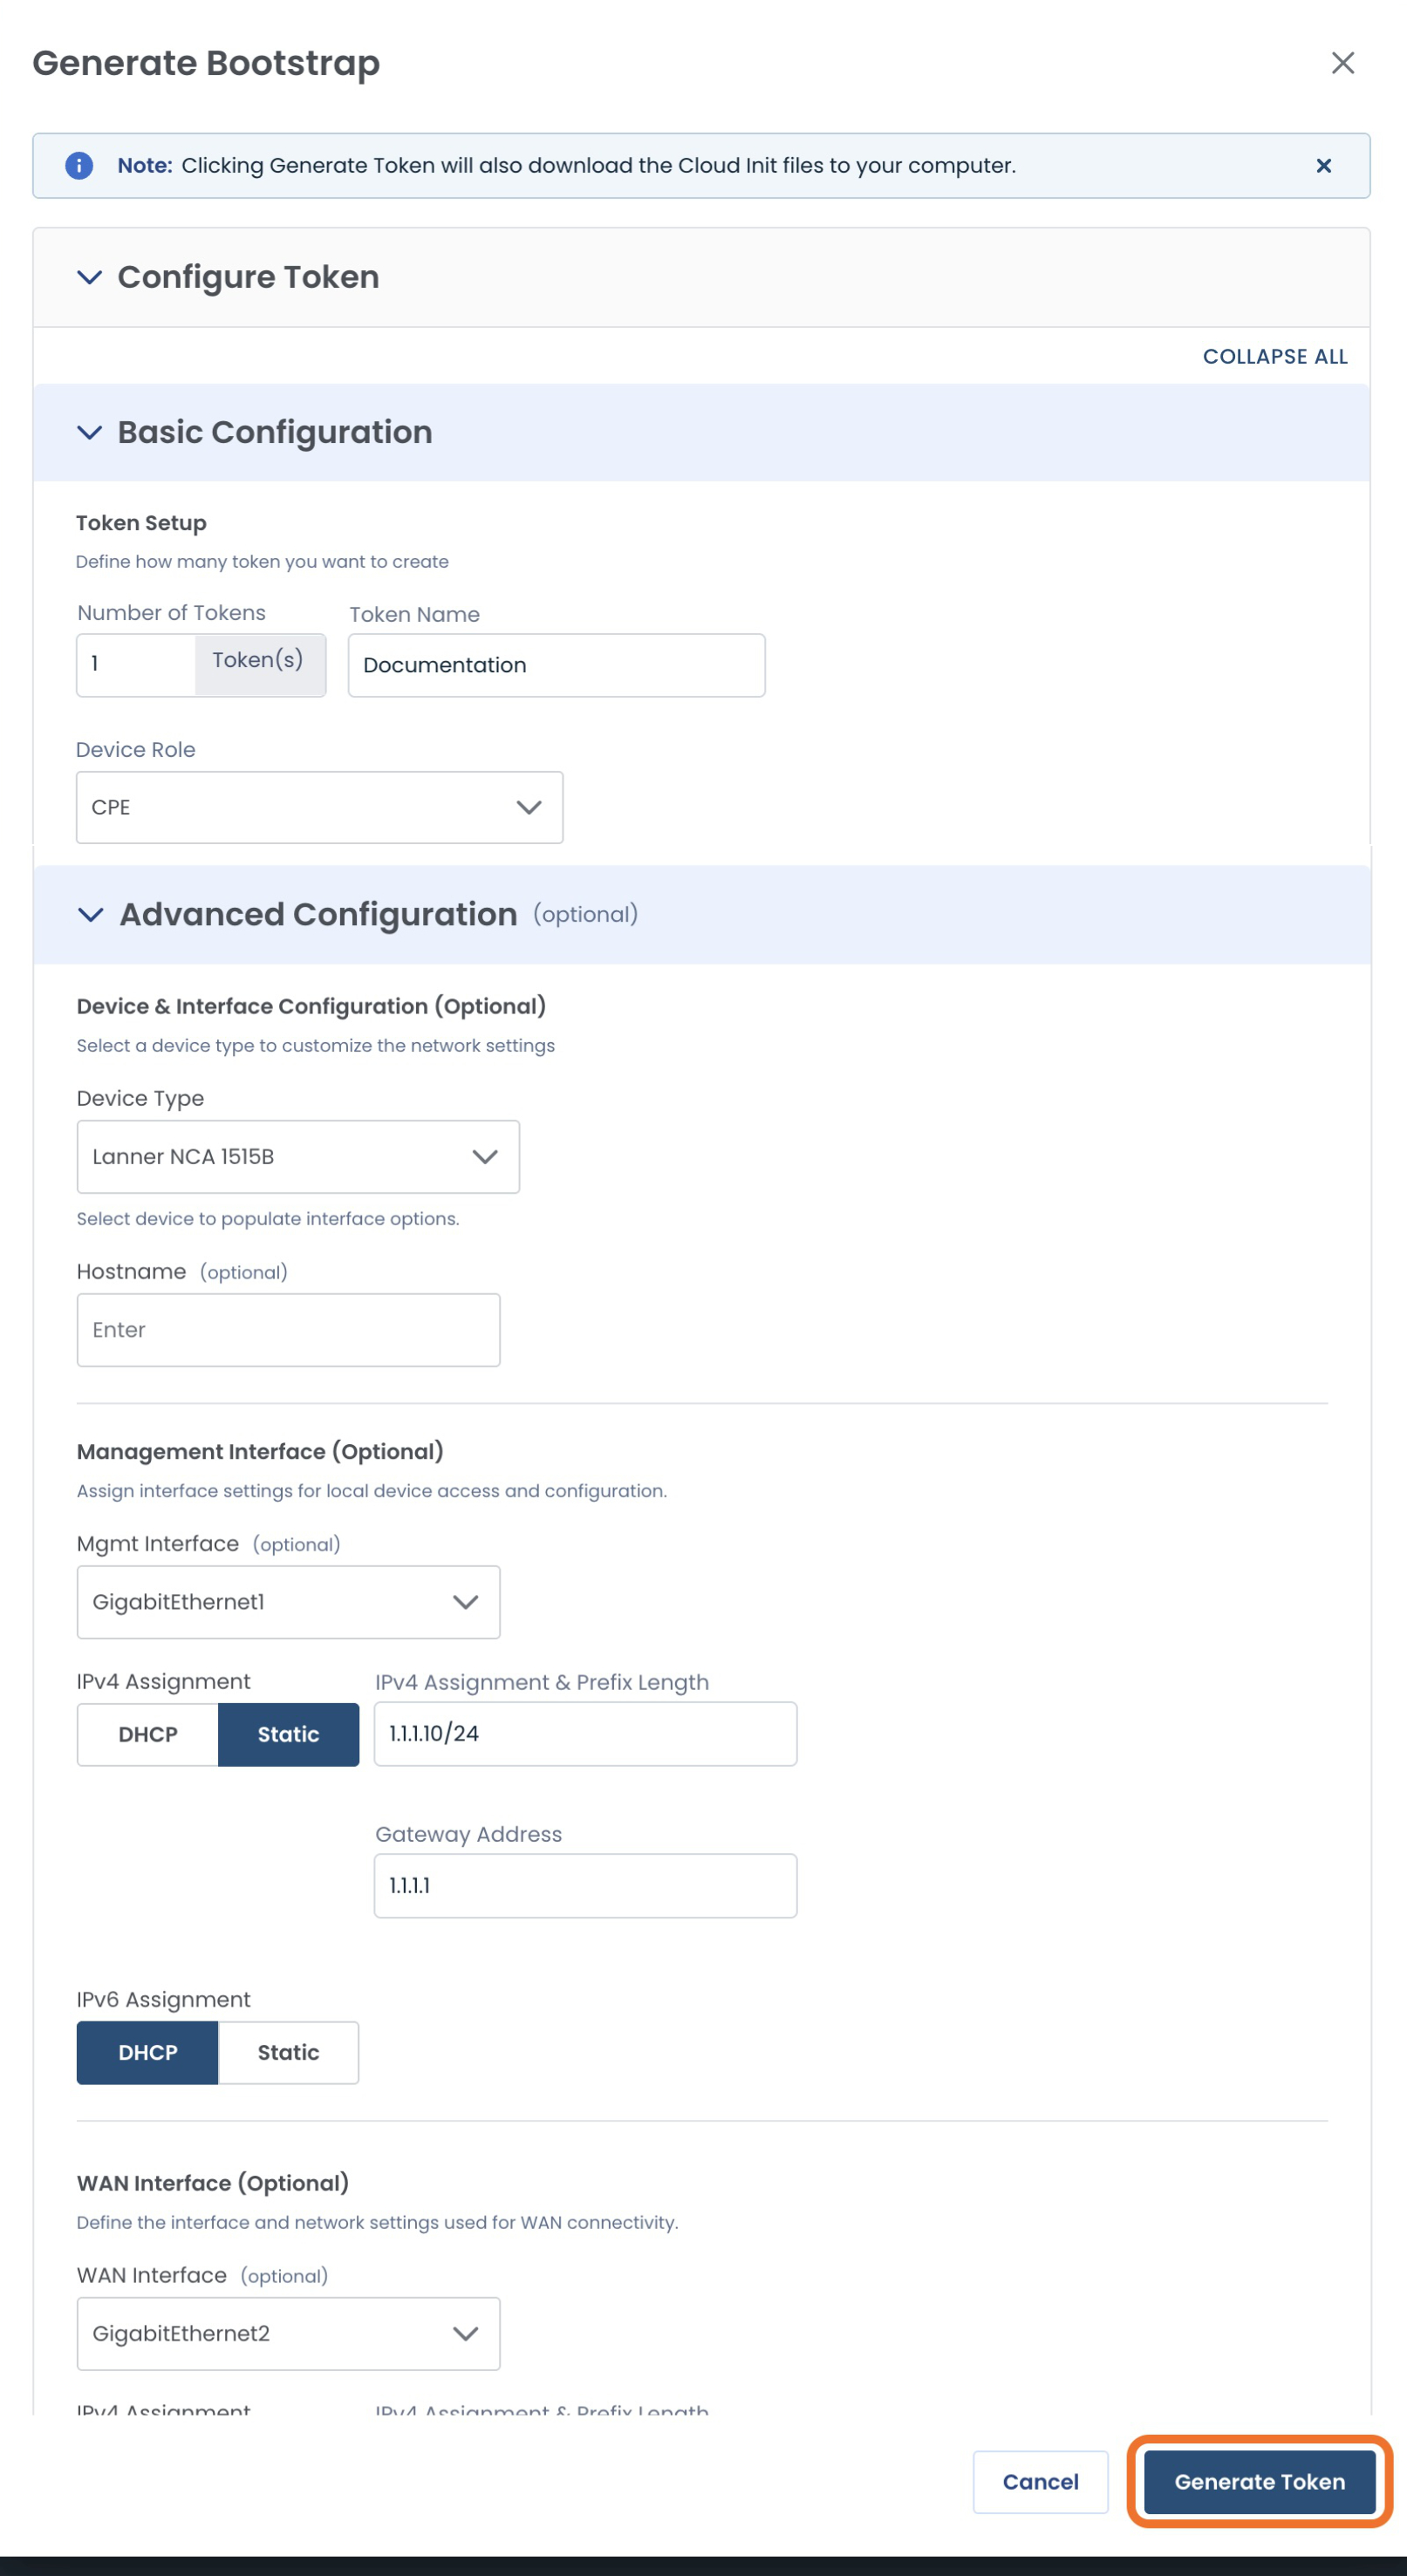
Device and Interface Configuration — customizes the network settings to your device
Device Type: The name / model that matches your device
Hostname: Name assigned to your device
Management Interface — For local device access and configuration; If not specified, this will pre-populate.
Management Interface: Ethernet interface to reach the device
WAN Interface — Defines the interface and network settings used for WAN connectivity; If not specified, this will pre-populate.
WAN Interface: Interface that will connect to the Graphiant Core
Custom Configuration — Advanced device-specific configuration for the Cloud Init file
LWS Toggle: Option to enable the Local Web Server to access locally
If toggled on, a password is required.
DNS Servers: IP address to the DNS server your device will use
Once you have completed the desired fields, click ‘Generate Token’.
When you click ‘Generate Token’:
It will also download the Cloud Init files to your computer.
Once you have generated the token (using Advanced Configuration or not), you will receive a green banner stating that the token has been successfully generated, and the new Bootstrap Token will appear in the table.
.jpg)
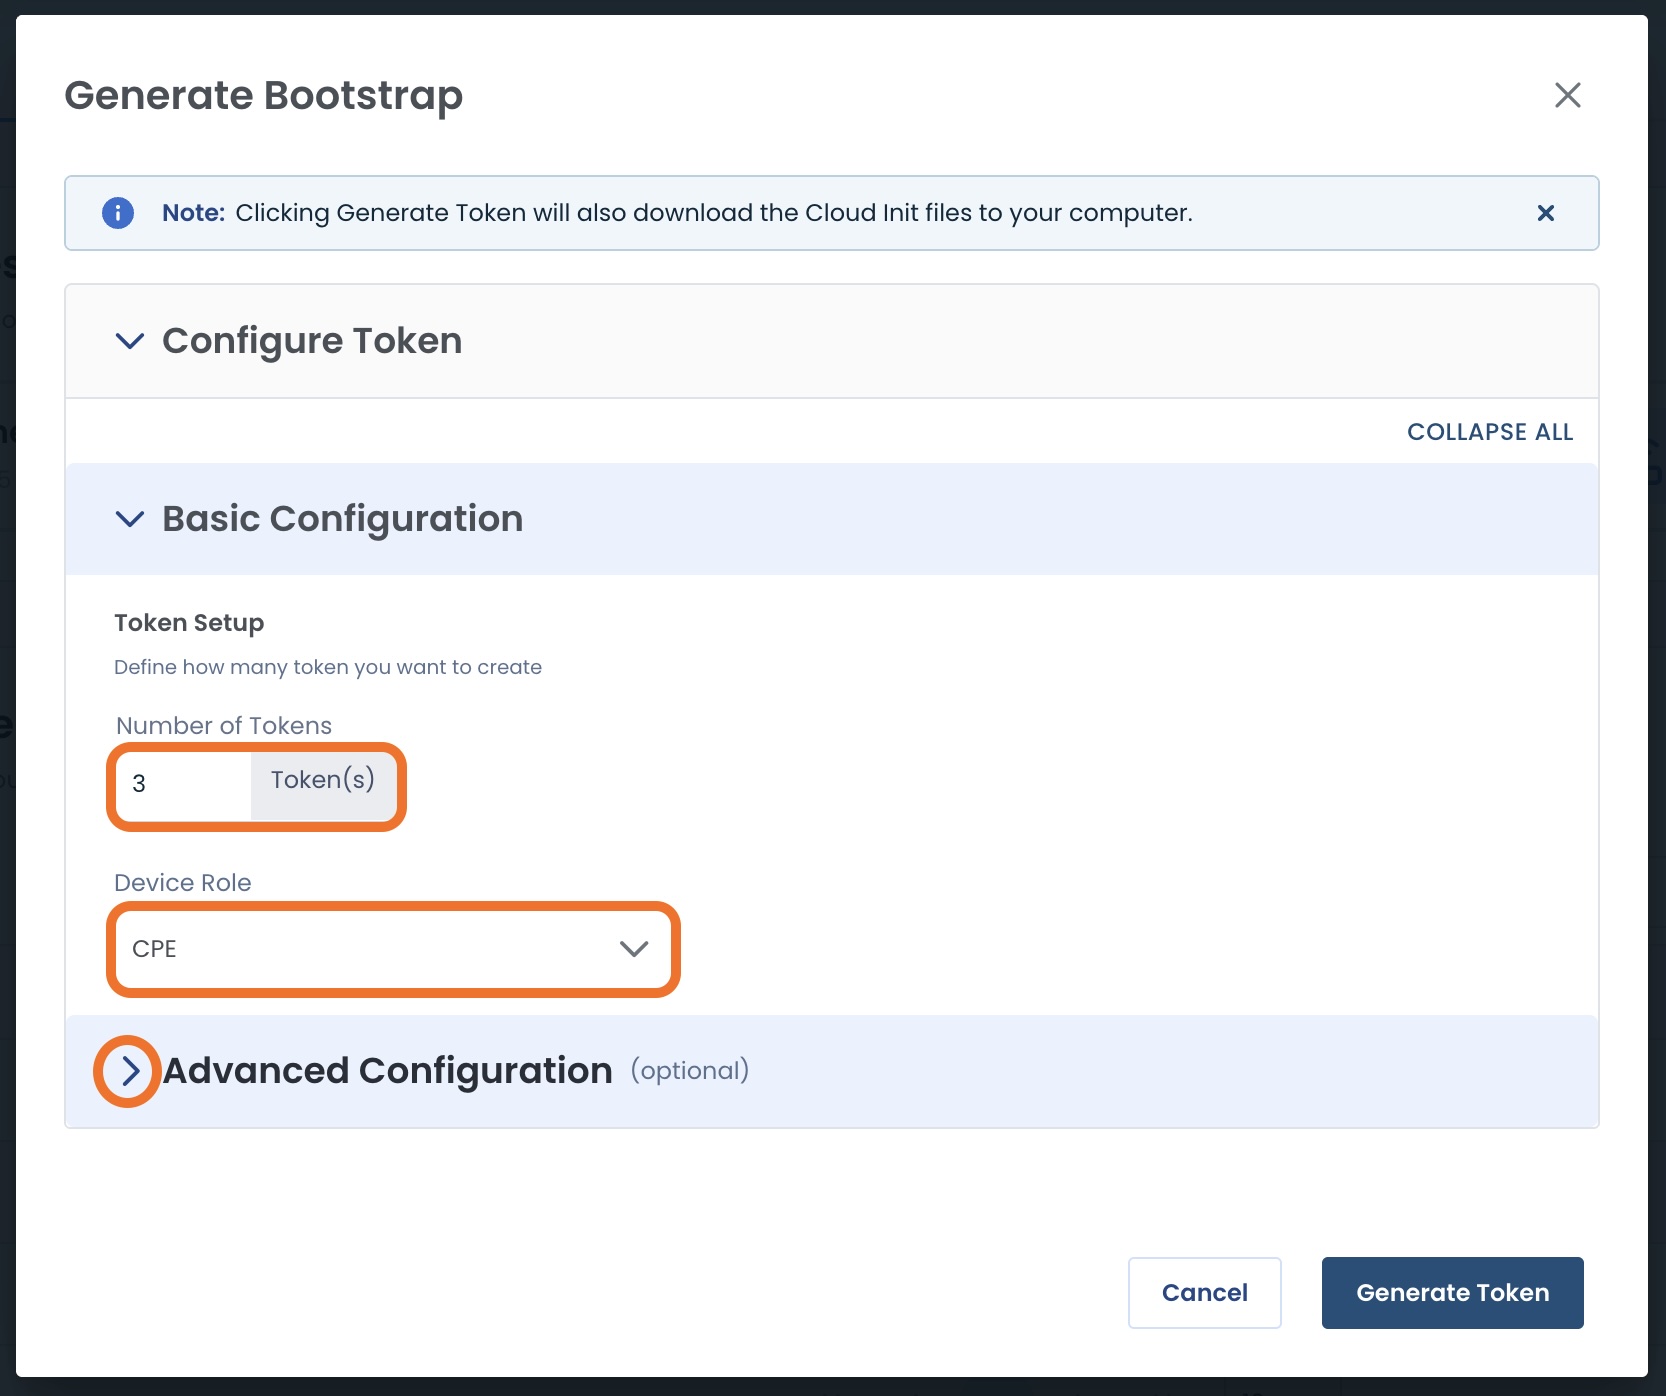
Generating Multiple Bootstrap Tokens
If you need to create multiple Bootstrap Tokens:
Number of Tokens: Enter as many as needed
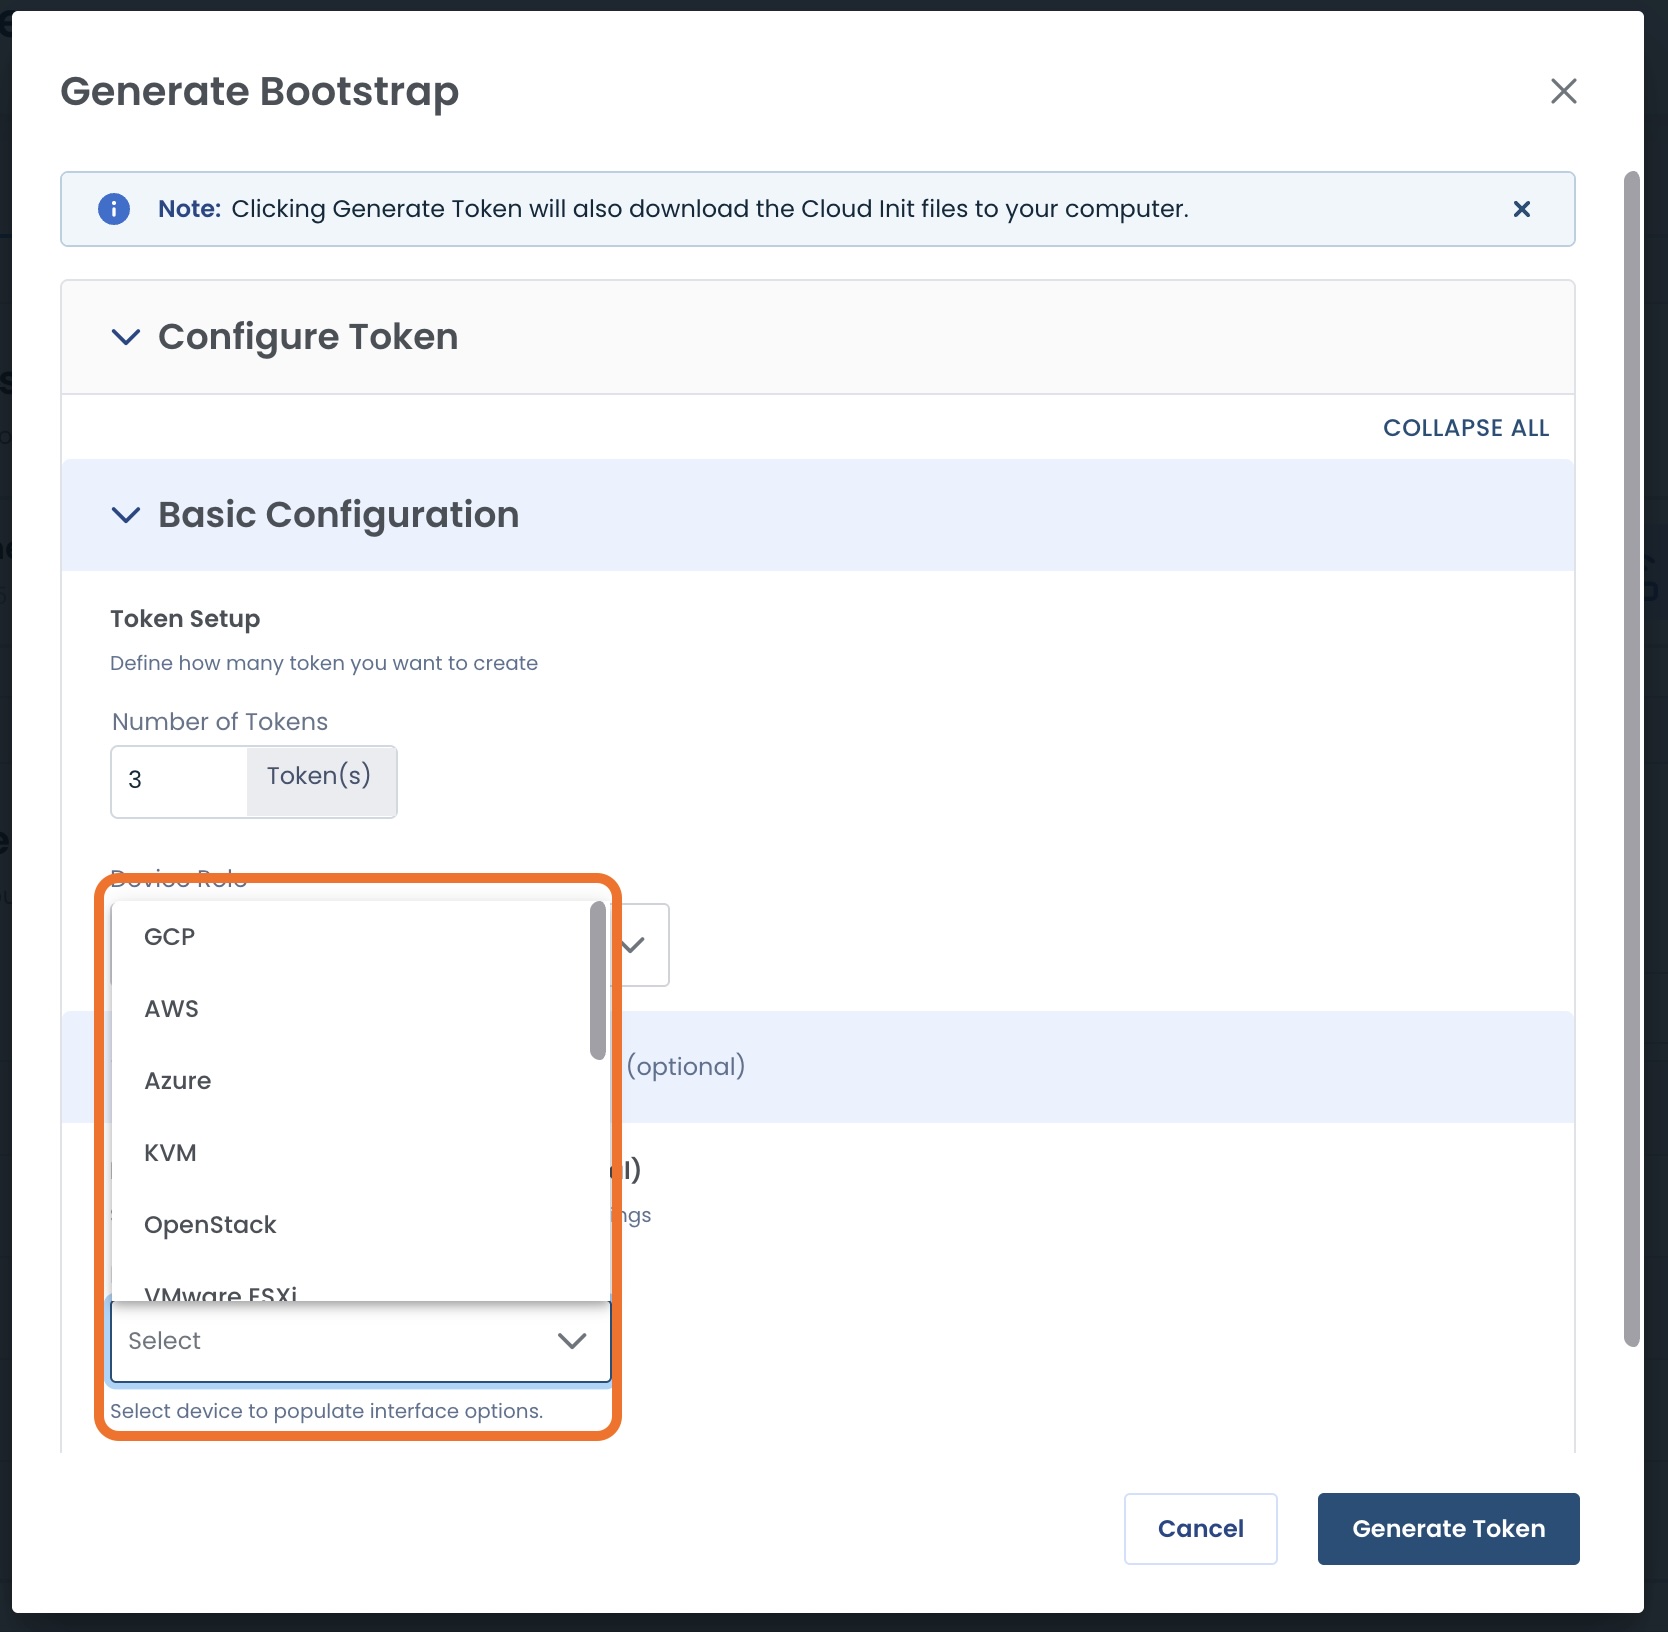
Device Role: Use the dropdown to choose:
CPE: Edge Connectivity to the Graphiant Core
Gateway: Direct cloud connectivity to the Graphiant Core
Note:
The name field is not present here, as this information will be gathered later.
Then click the carat to access Advanced Configuration
Click the carat to open the dropdown for ‘Device Type’.
Select the name / model that matches your device.
Note:
When configuring multiple bootstrap tokens at once, they must all be the same Device Type.
You will see a box that contains a link to a worksheet where you will input the configurations for your tokens.
Click ‘Bulk Import Worksheet’.
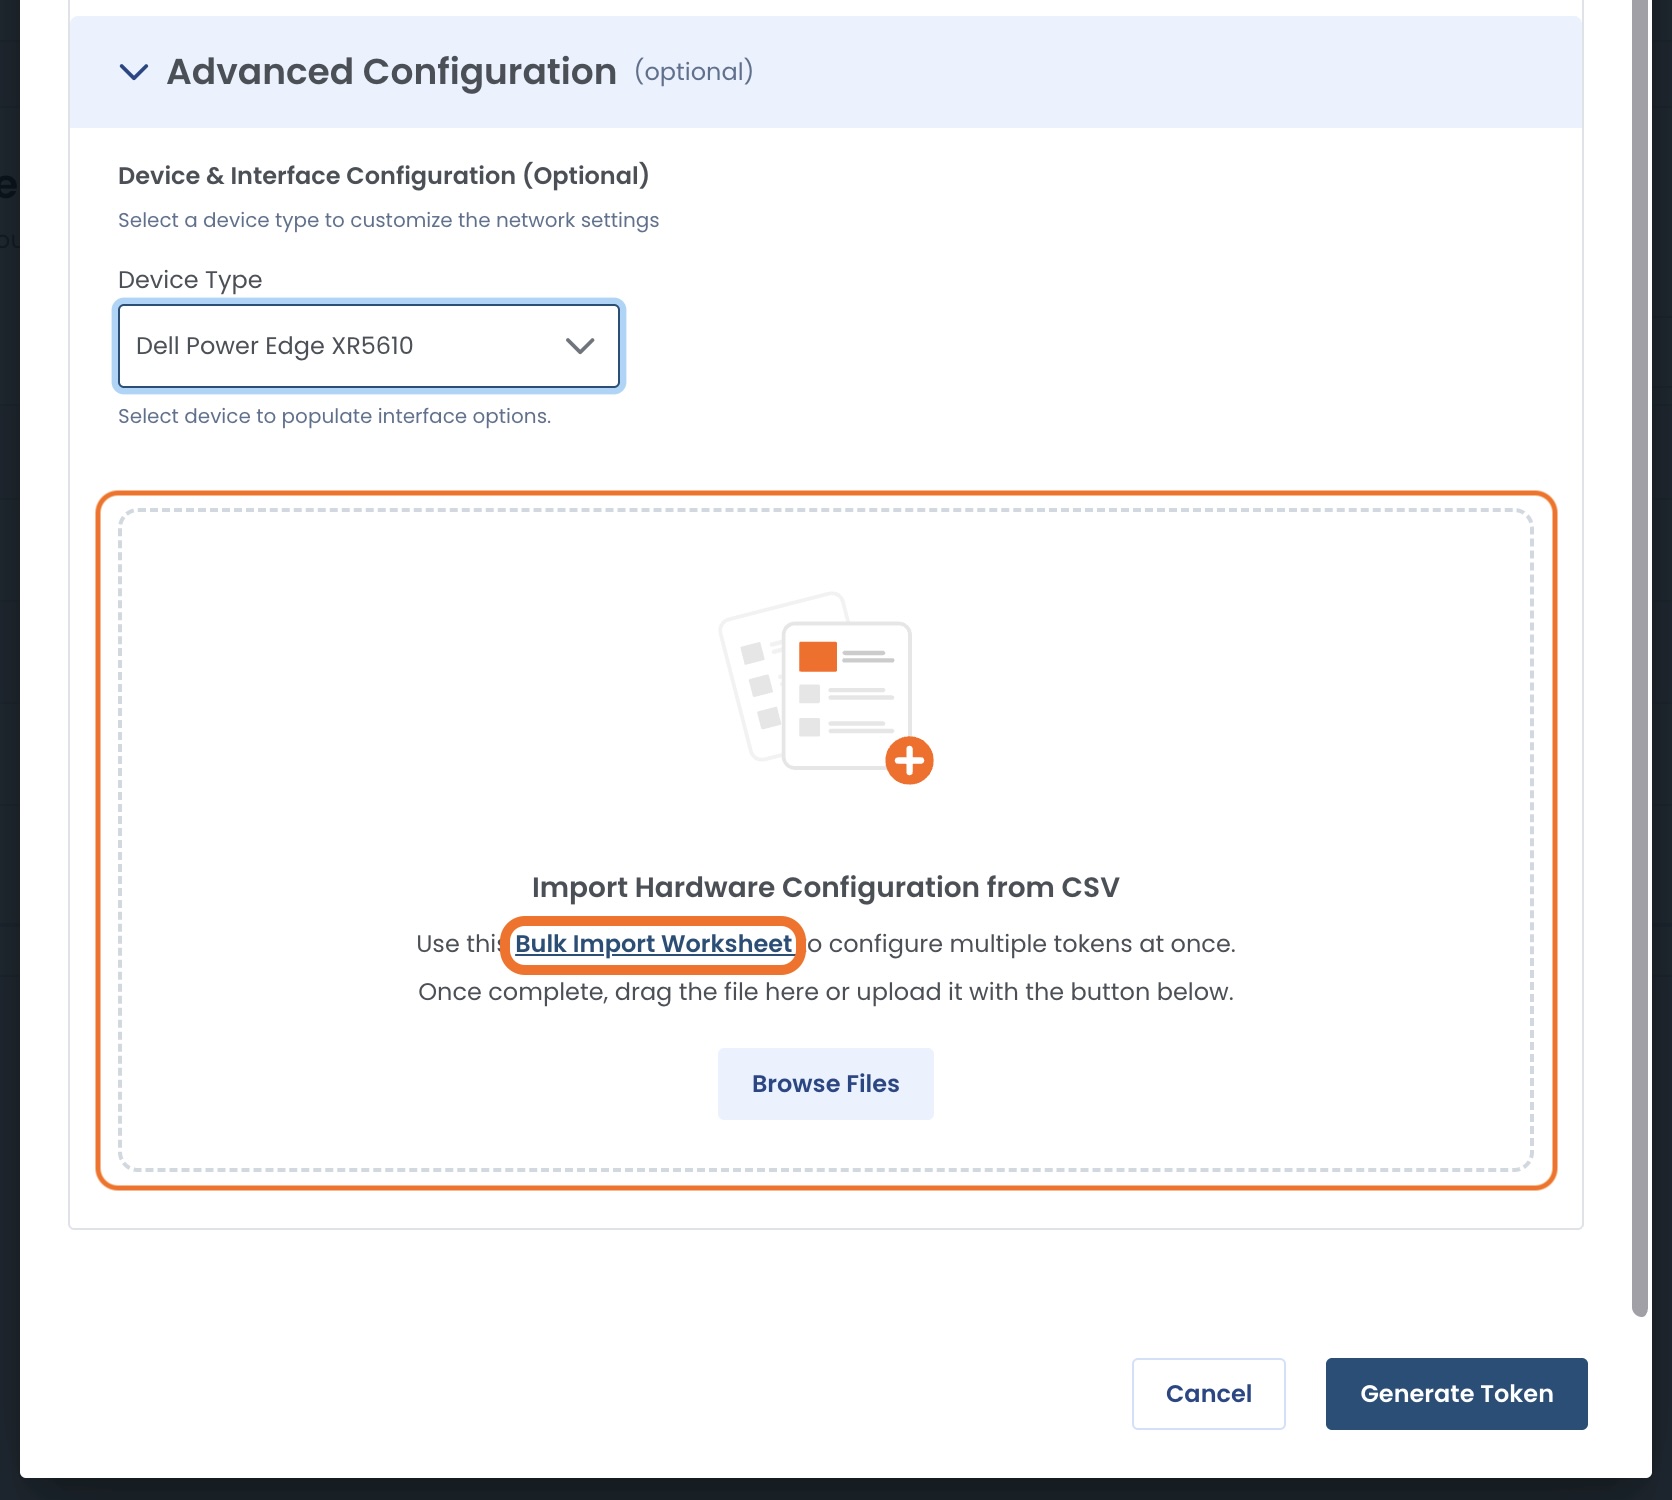
The worksheet will have headers asking for your configuration information.
Fill out the rows beneath the headers with your corresponding configuration data as shown below.
For Local Web Password:
If you fill out this column for any token, the Graphiant Portal will know to enable Local Web Server in your configuration.

Select ‘Browse Files’ to select the completed worksheet.
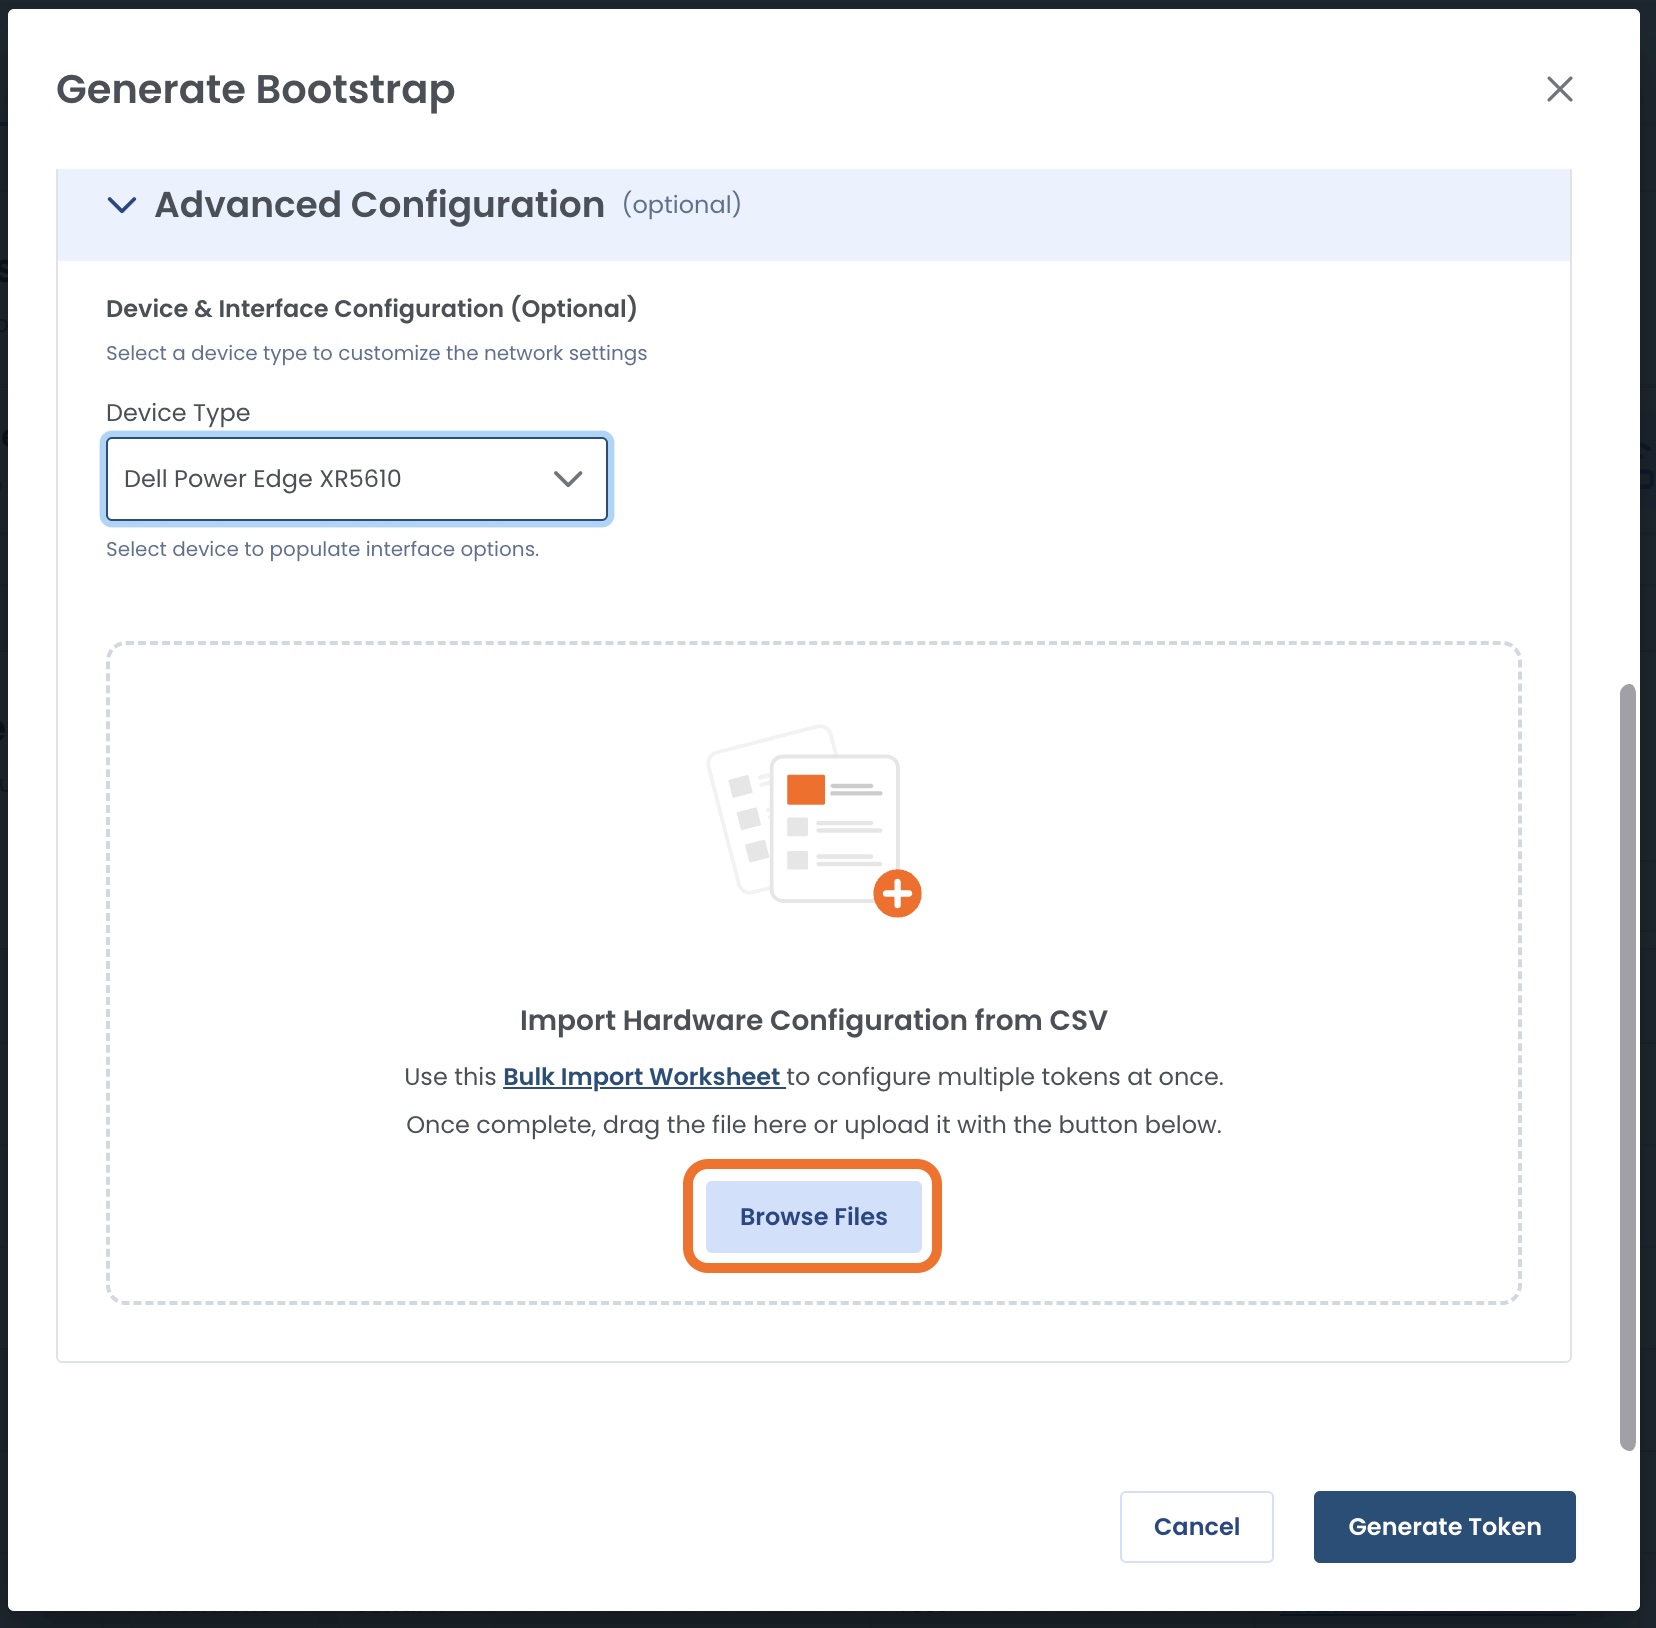
Click ‘Upload file’ to provide the information to the Graphiant Portal.
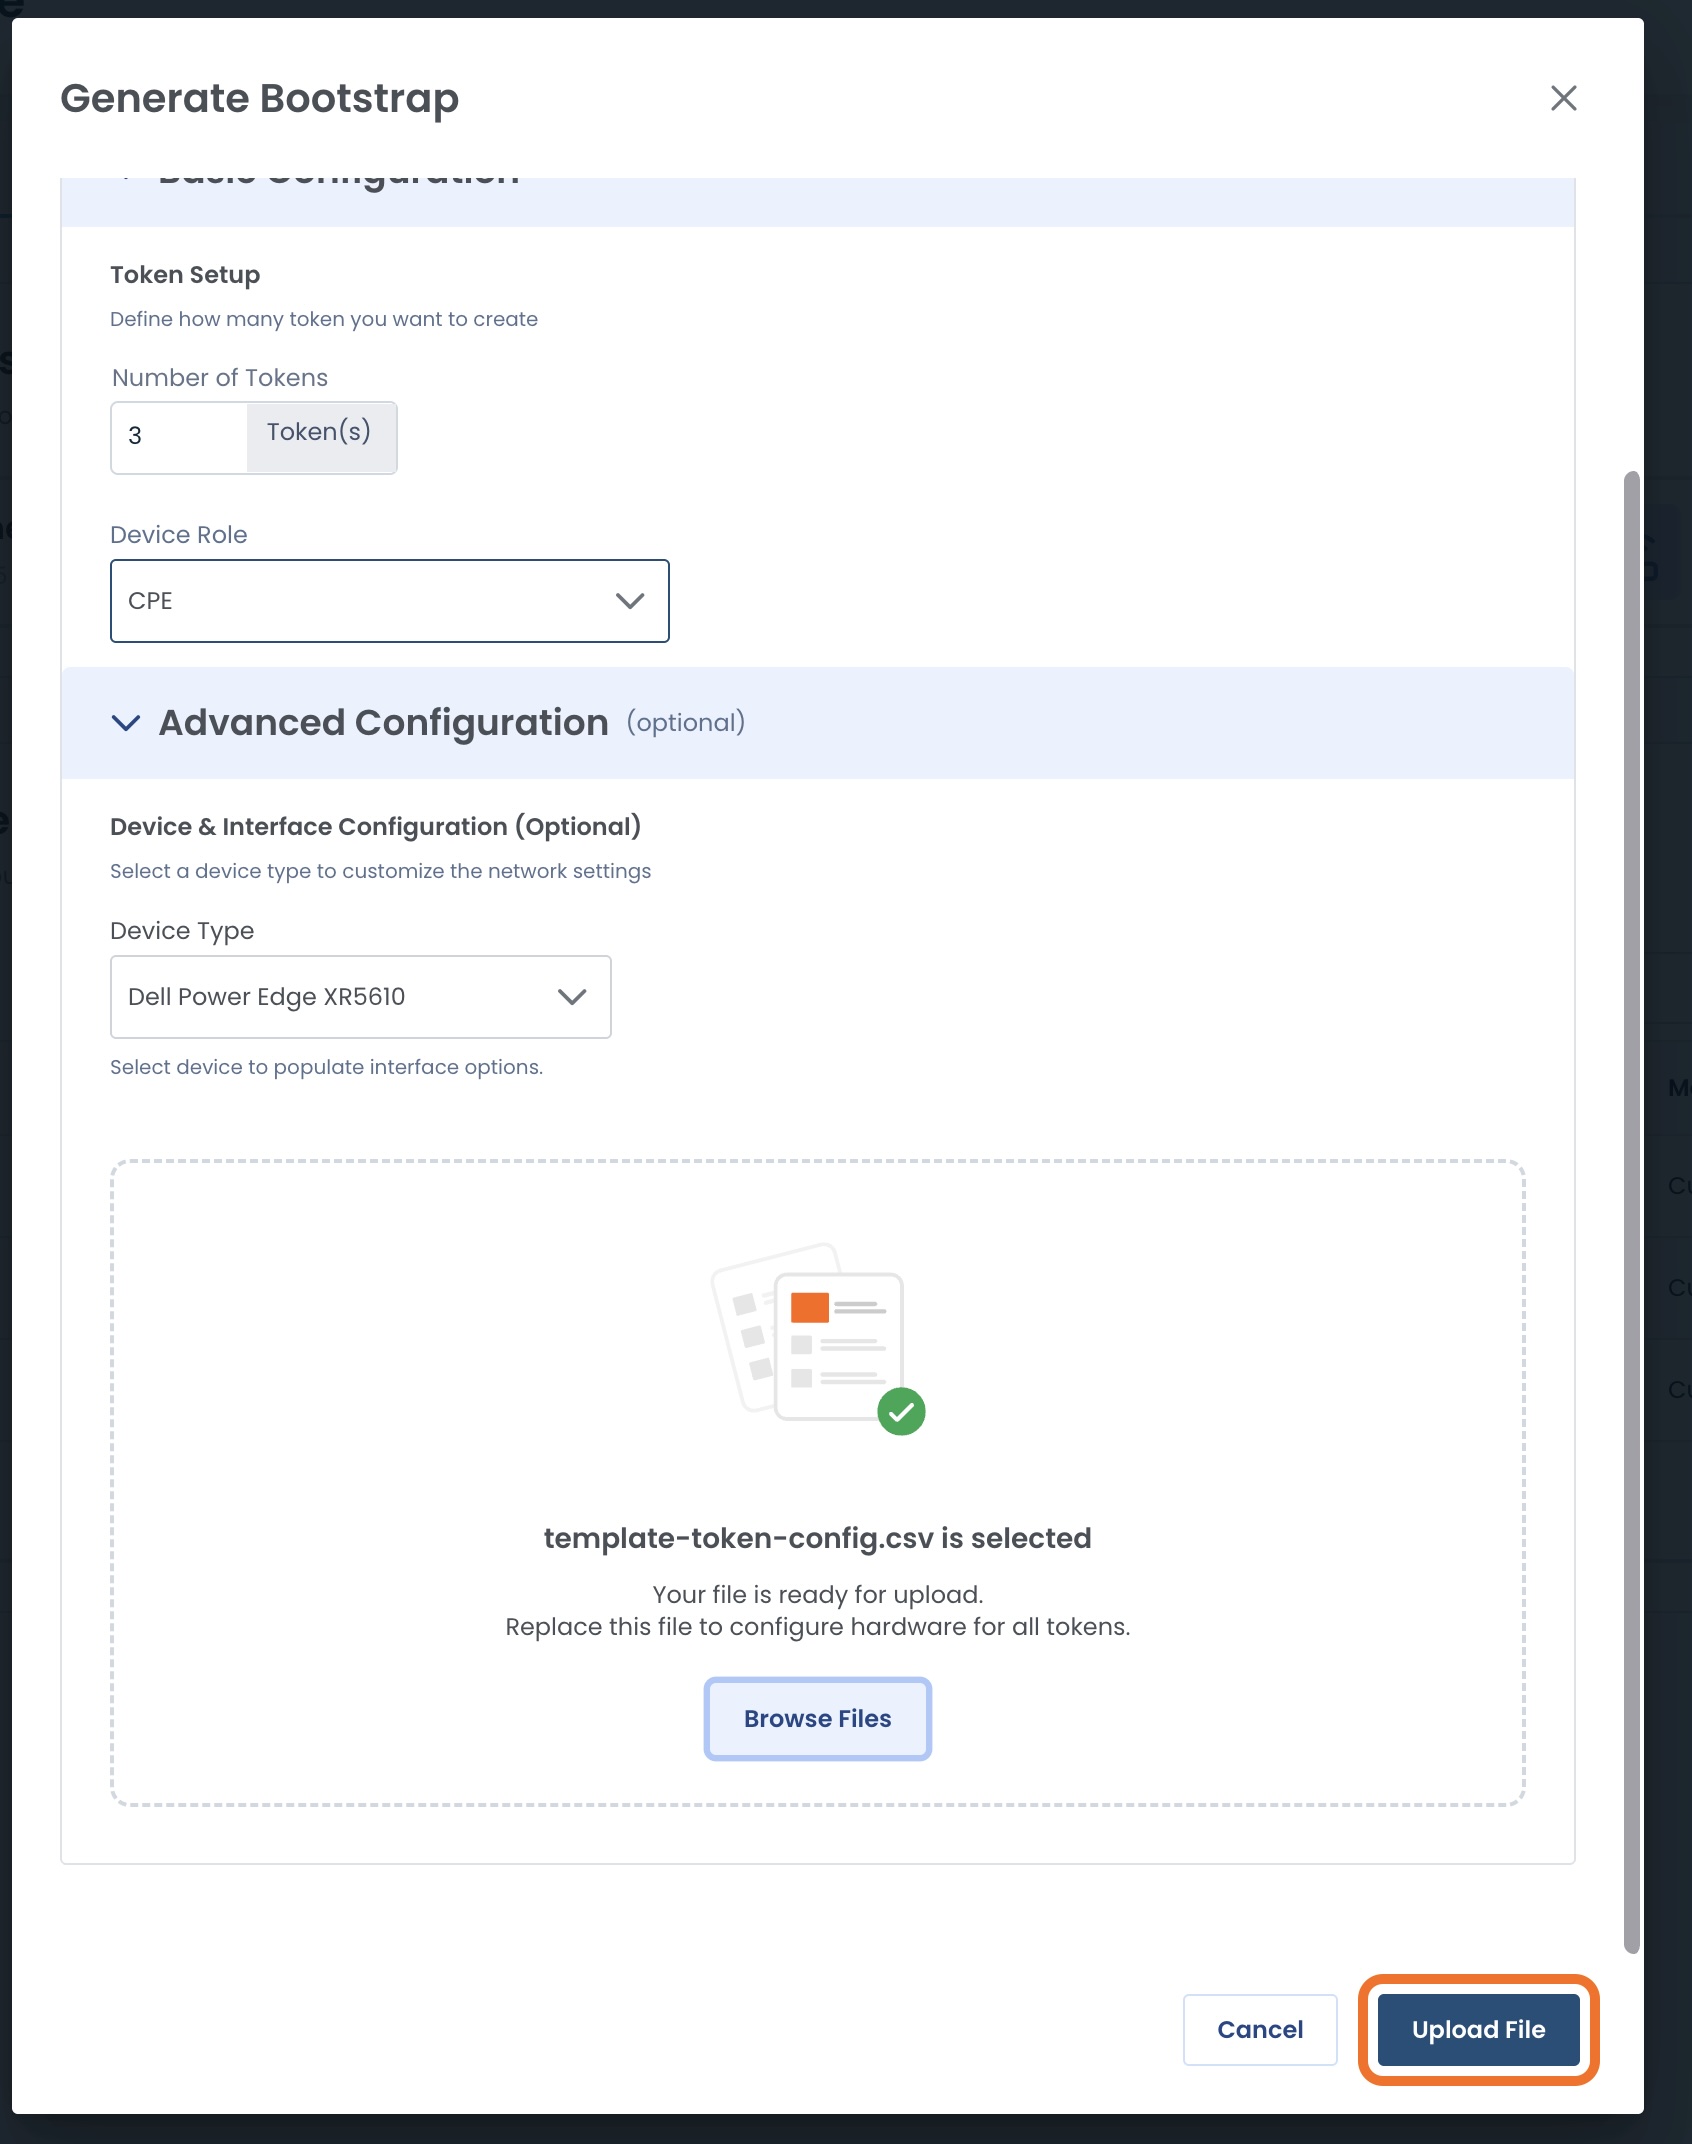
You will now see a green banner stating that your file was uploaded successfully.
You can preview your configuration by scrolling left and right through the information at the bottom of the modal.
Click ‘Generate Token’ once you have confirmed your data.
When you click ‘Generate Token’:
It will also download the Cloud Init files to your computer.

The new Bootstrap Tokens are now complete and in the table.
.jpg)
Copying a Bootstrap Token
To copy a Token value, click the ellipses to the right of that token; select ‘Copy Token’.
.jpg)
You will see a green banner stating that the token is in your clipboard.
.jpg)
Downloading a Bootstrap Token File
Should you need to downloaded another copy of the file, click the ellipses to the right of the desired token; select ‘Download File’.
.jpg)
The configuration will be downloaded on your computer as a .zip file.
Duplicating a Bootstrap Token Configuration
Sometimes you may wish to make token configurations that are either the same as, or so similar to, another token that it’s easier to use a prior configuration and make minor adjustments.
In this case, you can just duplicate the original token configuration and tweak from there.
To duplicate a configuration, click the ellipses to the right of the token whose configuration is to be duplicated; select ‘Duplicate Configuration’.
.jpg)
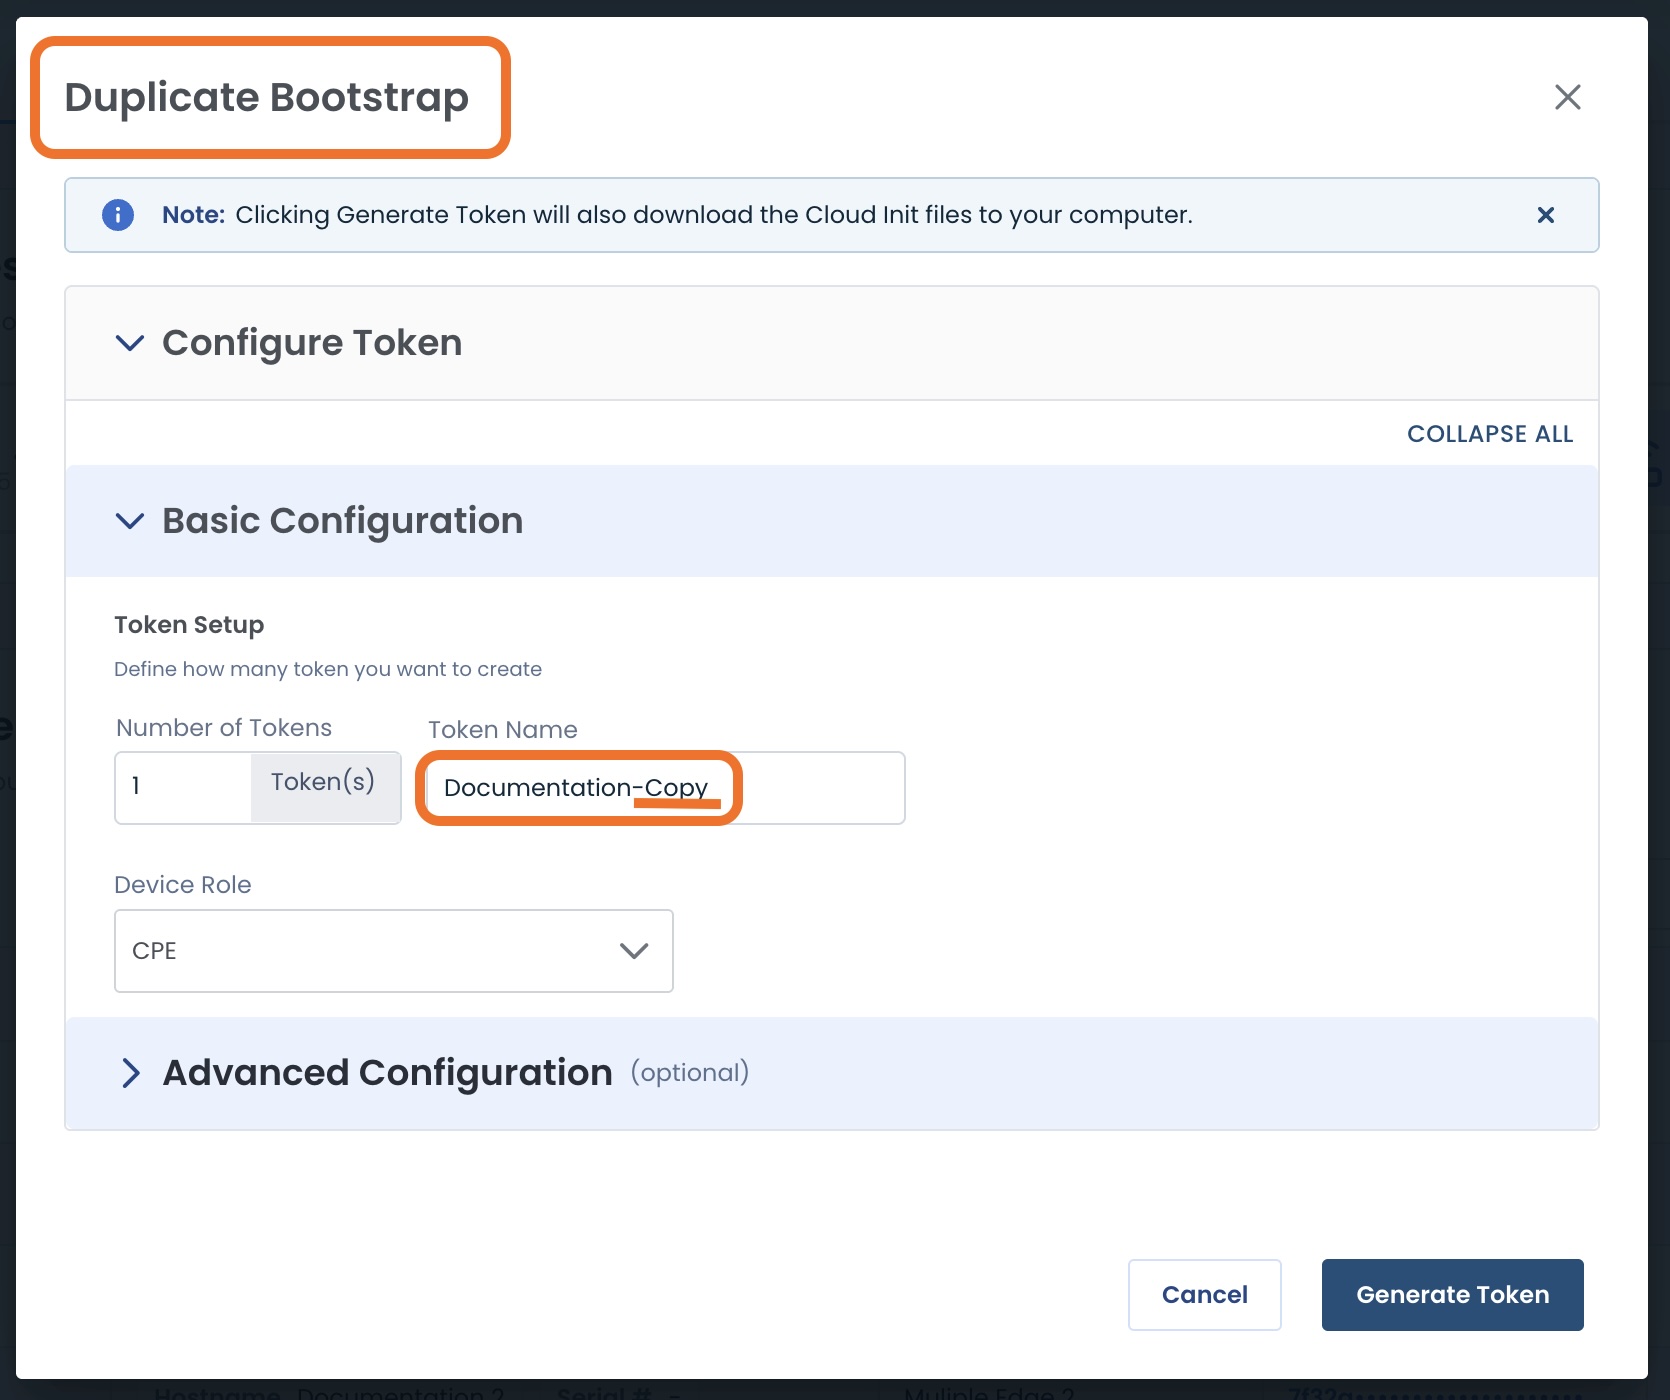
This will open a modal for a Duplicate Bootstrap.
The configuration will be identical, except for the Token Name, which will be “[Original Token Name] - Copy”.
Make any alterations needed, including the name.
You will see a green banner stating that the token was successfully generated and the duplicated token will appear in the table.
.jpg)
Deleting a Bootstrap Token
Should you no longer need a previously-created token, it can be deleted easily.
Click the ellipses to the right of the token to be deleted; select ‘Delete Token’.
.jpg)
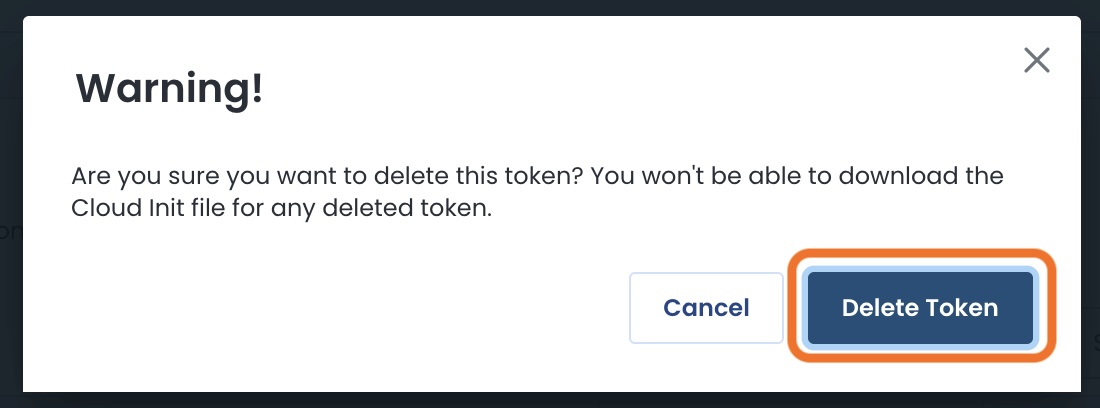
A warning modal will appear:
Warning:
You will no longer be able to download a Cloud Init file for the deleted token.
Click ‘Delete Token’.
You will receive a green banner stating that the token was successfully deleted, and it will no longer appear in the table.
.jpg)
Returning Your Graphiant Edge
Whether you have been provided your Graphiant Edge by Graphiant or a Managed Service Provider, when the time has come to send the device back, you will receive a notification in your Graphiant Portal.
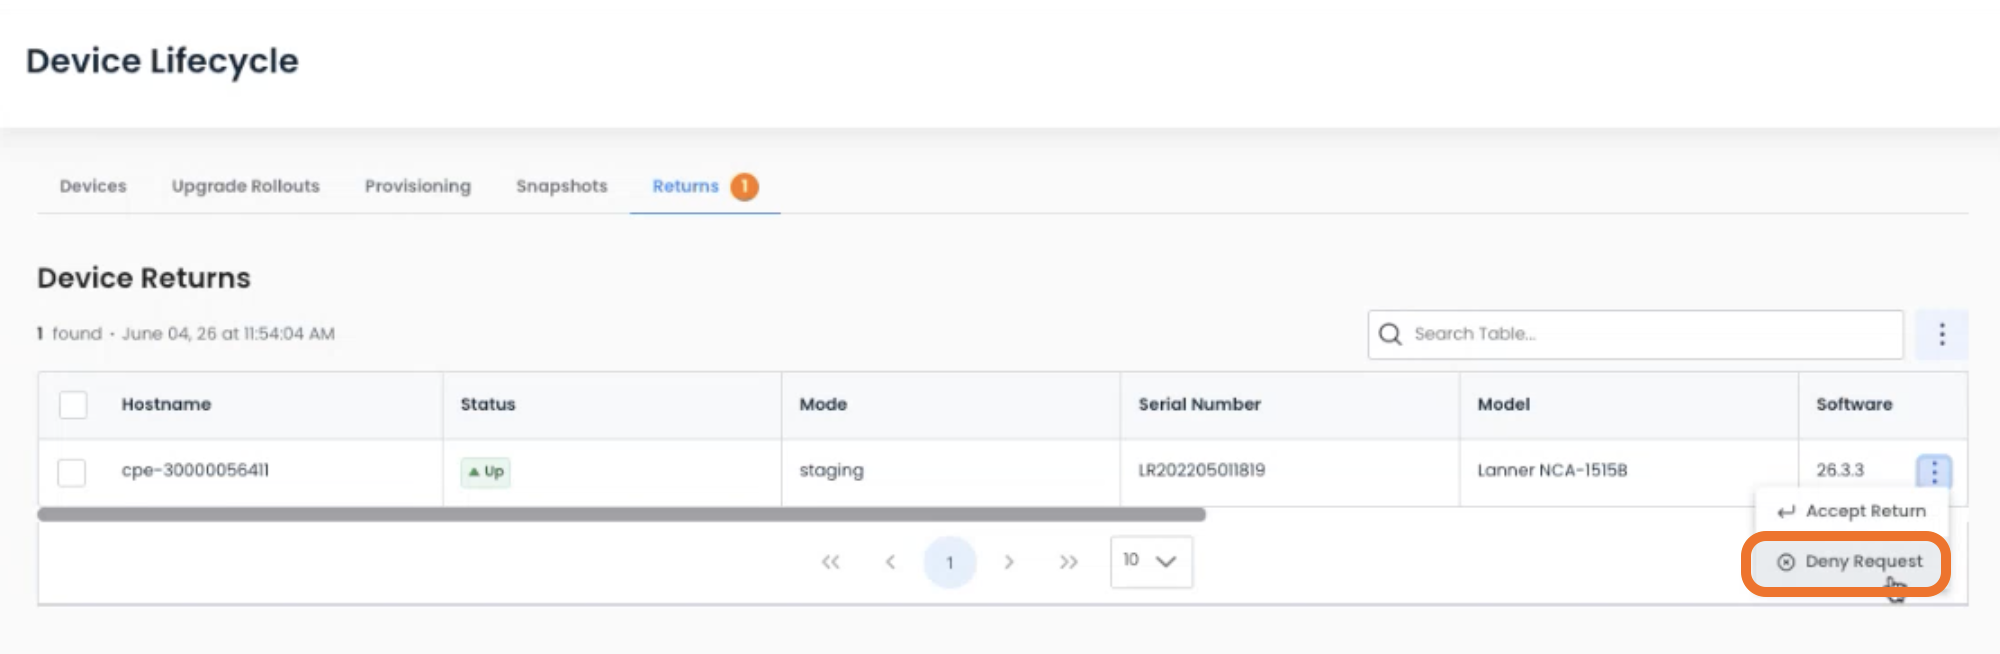
Click the ‘Returns' tab.
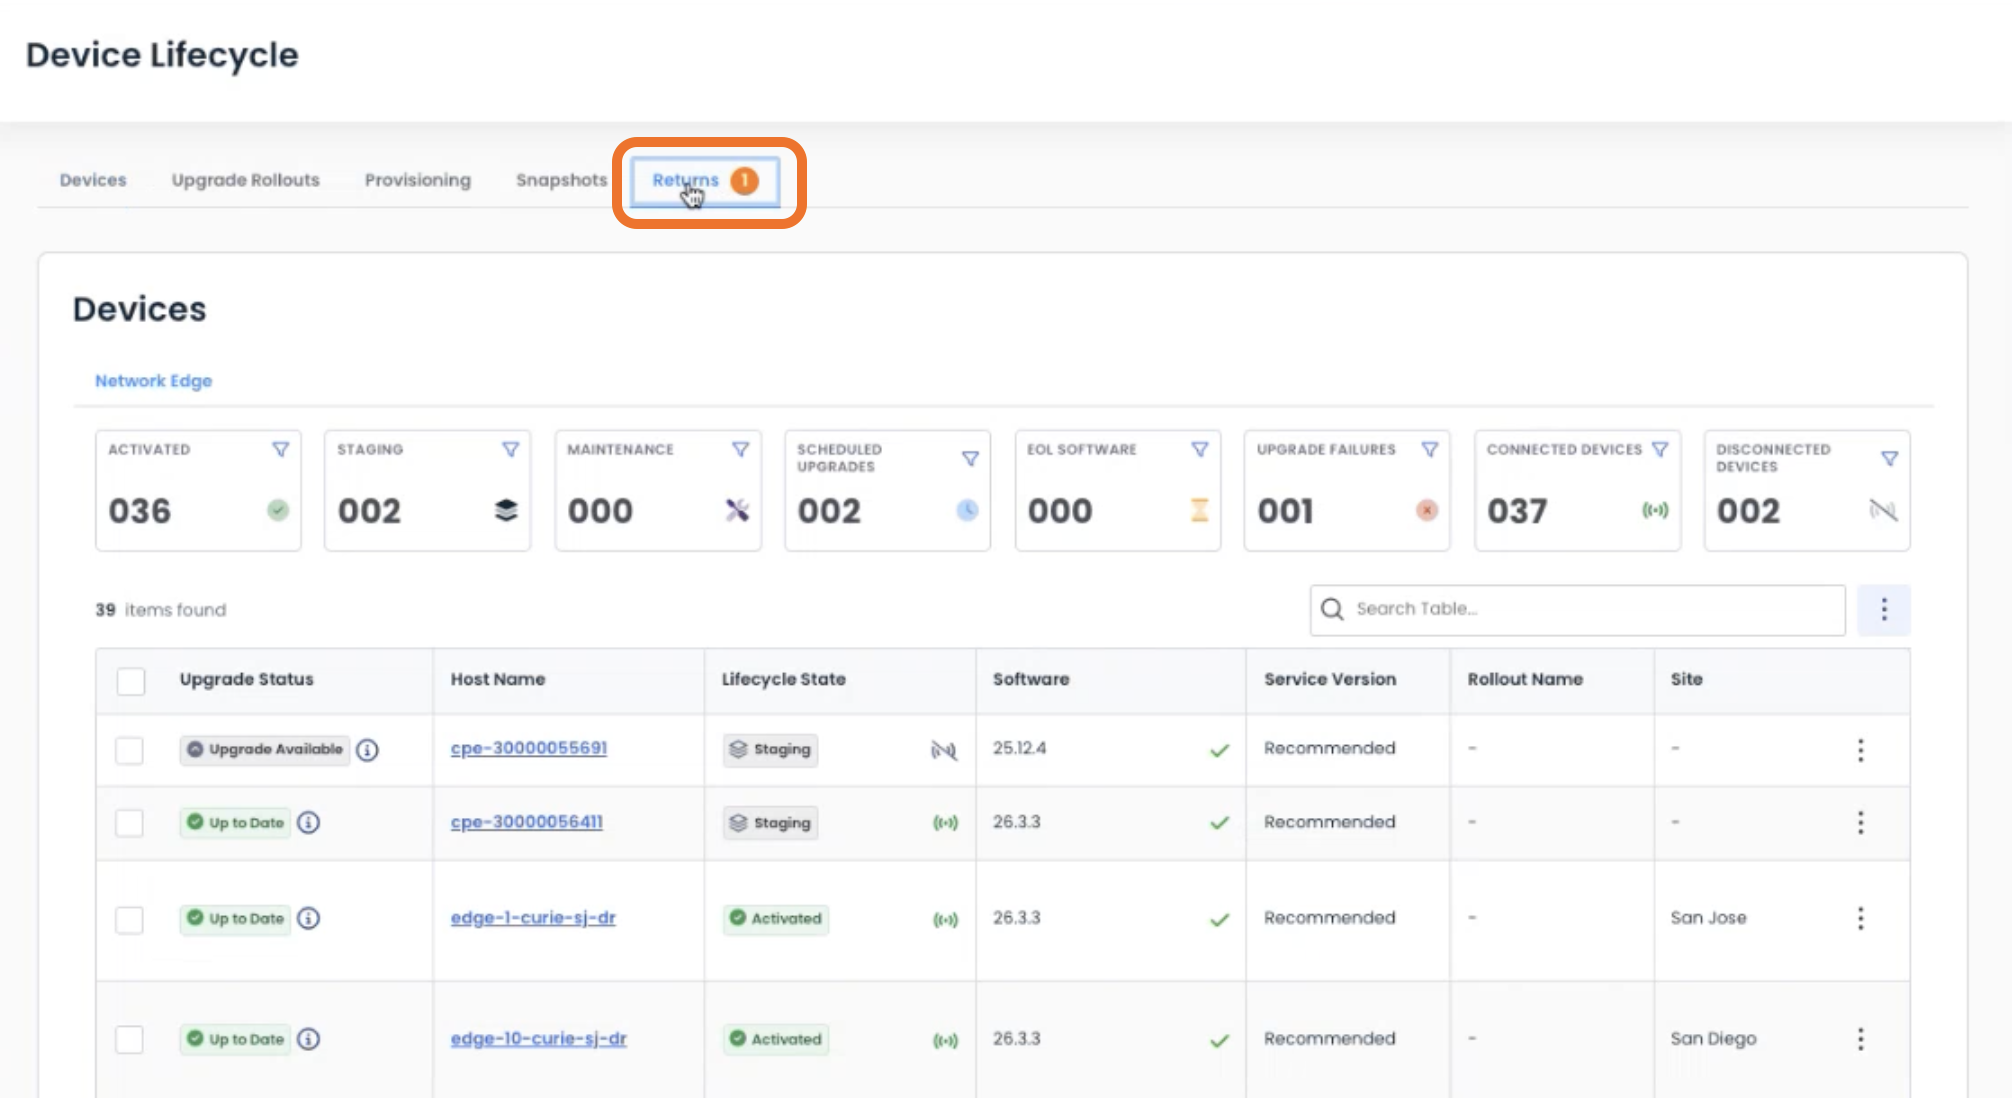
This will take you to the Device Returns table, where you will see the Edge(s) that has been requested to be returned.
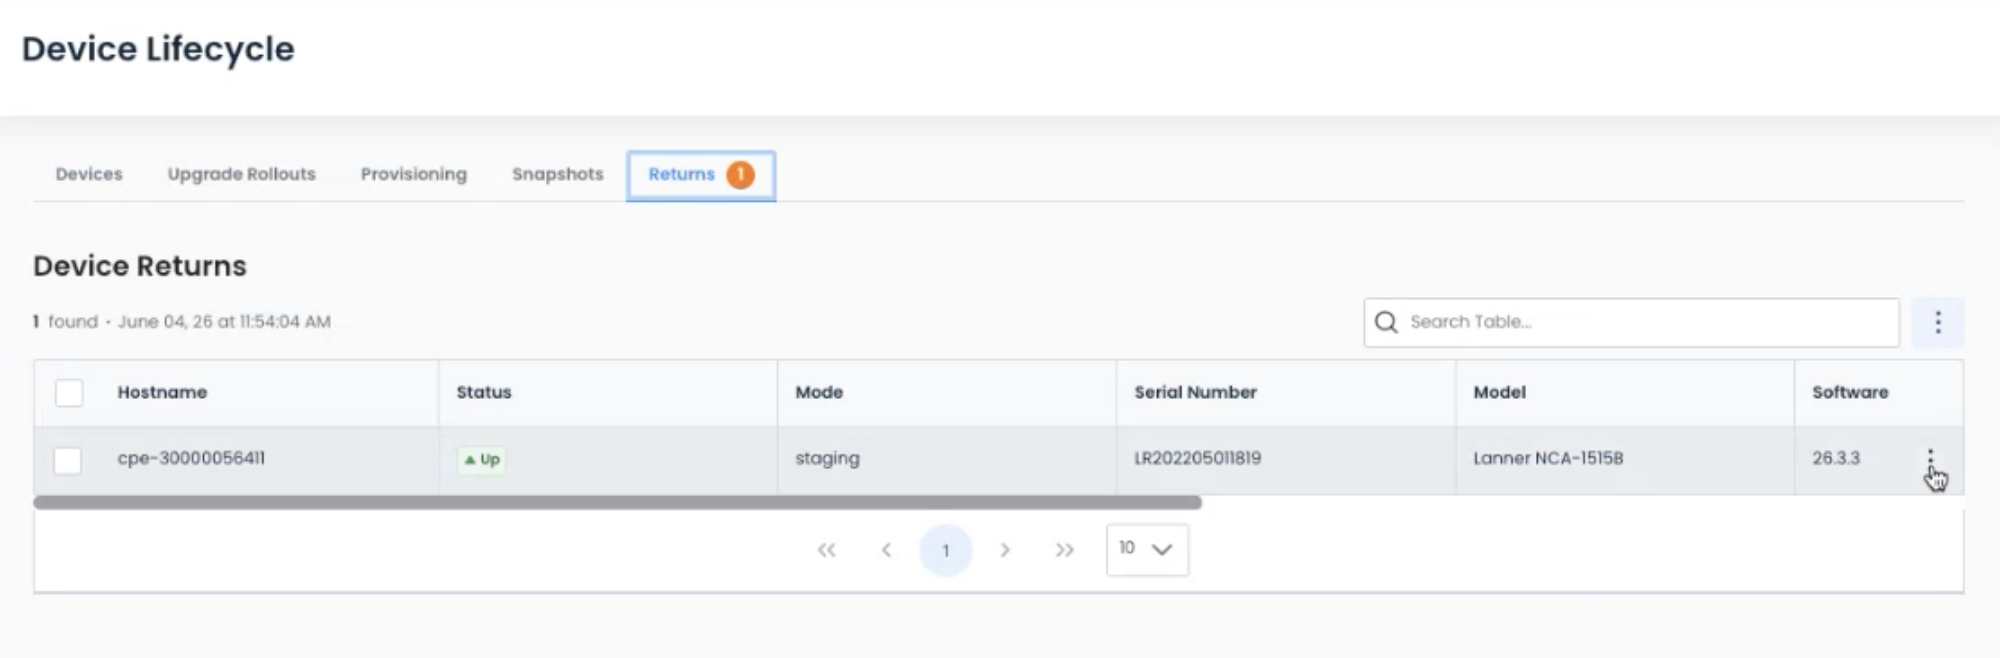
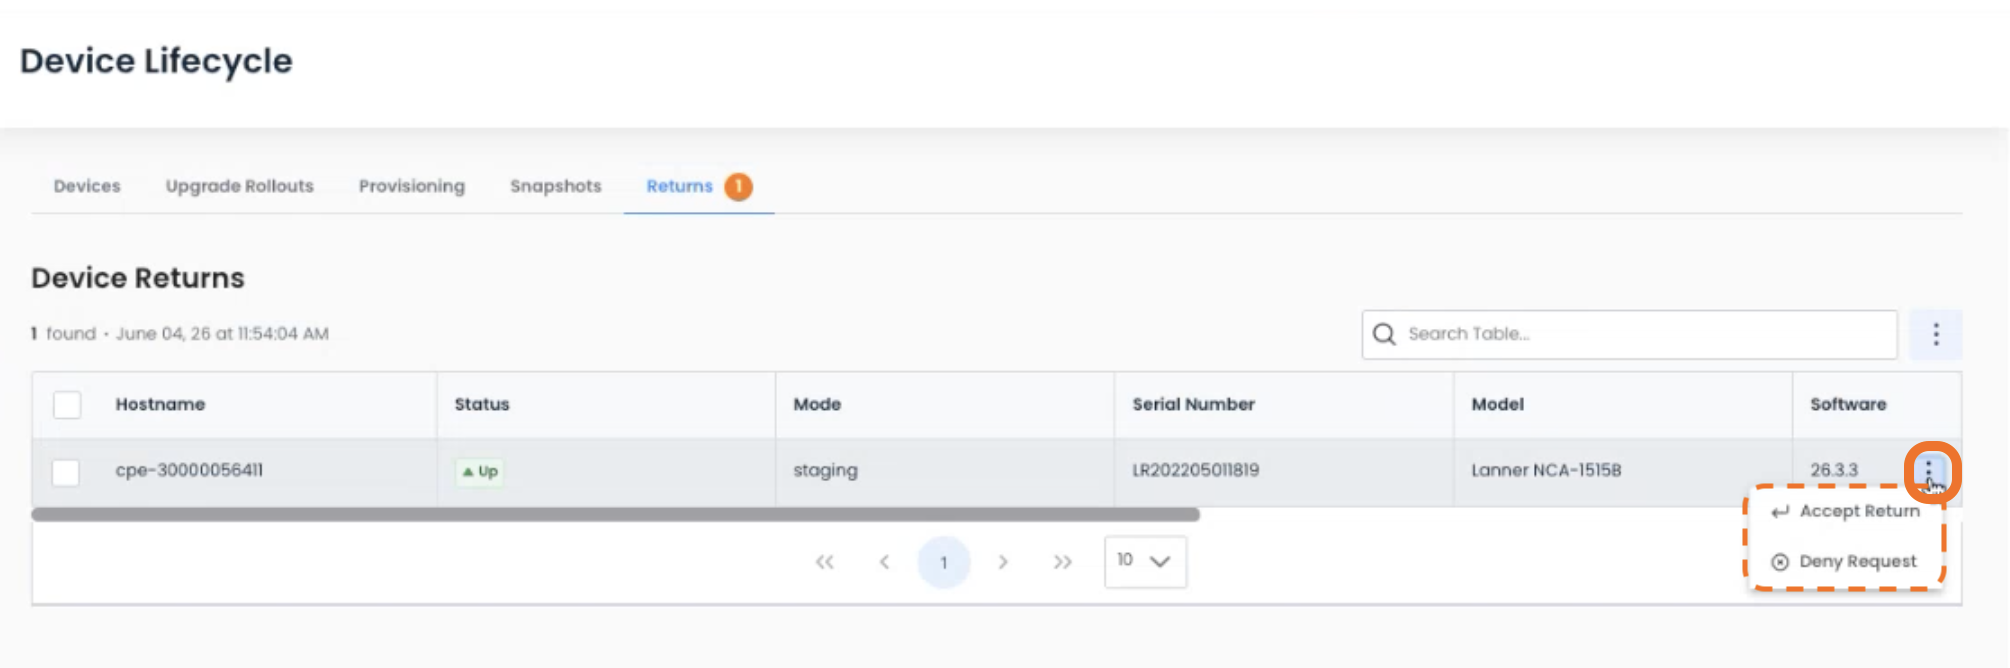
Clicking the ellipses to the right of the device will give two options:
Accept Return: To confirm the return process to your supplier and allow that device to be sent back.
Deny Request: To notify the supplier if you need changes made to the return request. The device will remain in its current state.
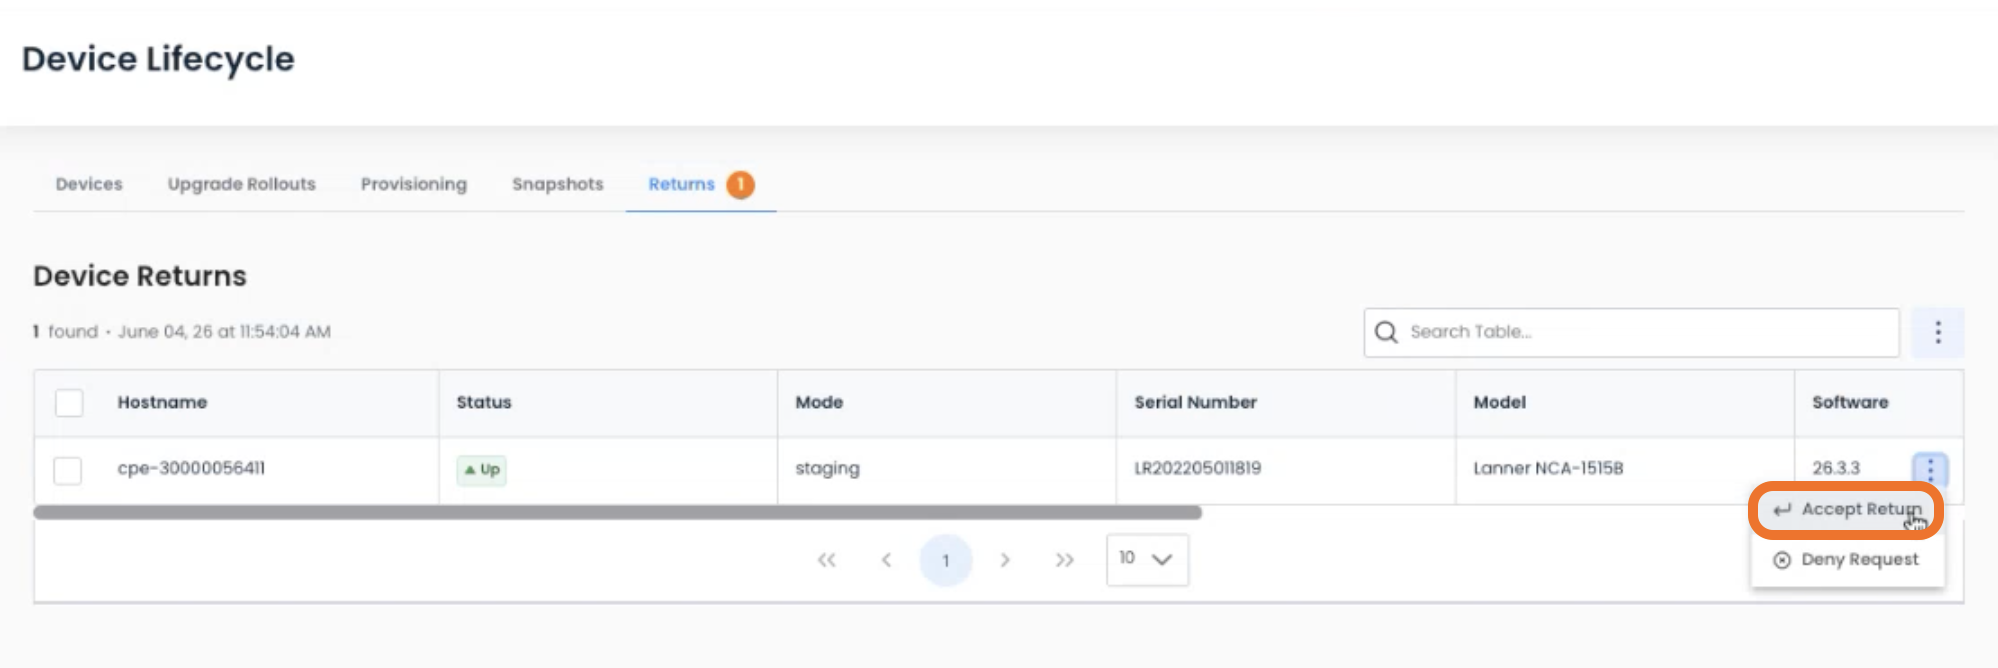
Accepting Your Return Request
To the right of the device that was requested to be returned, click the ellipses; select ‘Accept Return"‘.
Warning:
Accepting the return of your device is final and cannot be undone.
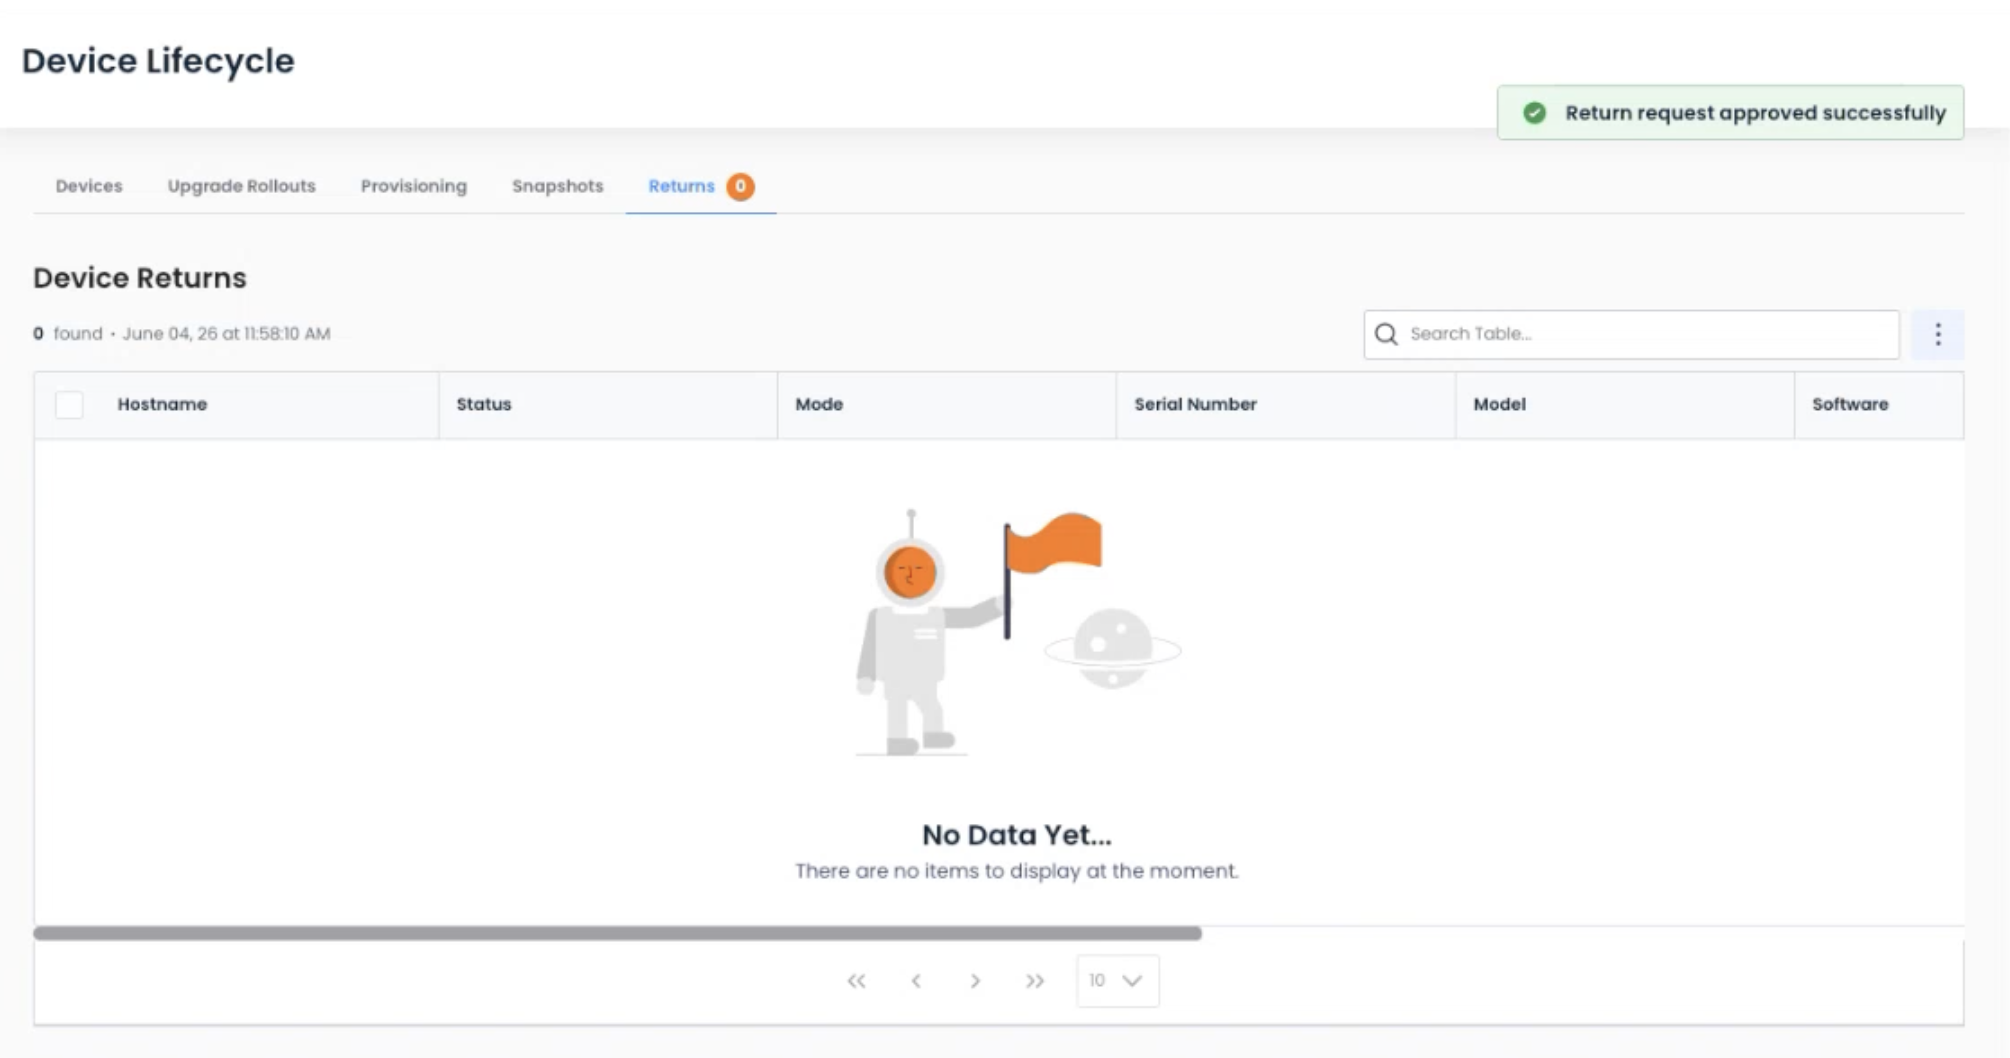
Check the box to acknowledge the action cannot be undone; select ‘Mark as Returned’.
.png)
A green banner will appear stating that the return request was approved successfully, and the returned device will no longer be in your inventory.
Denying Your Return Request
Should you need changes made to the return request you received, you can deny the request and ask for the request to be edited and resent.
To the right of the device that was requested to be returned, click the ellipses; select ‘Deny Request"‘.
Check the box to require a resubmit of the return request; click ‘Deny Request’.
.png)
Your supplier will receive the message that they need to edit and resend the return request.
The device will remain in its current lifecycle state.