Graphiant enables organizations to securely route traffic to the external, third-party security platform Cisco Umbrella, without requiring changes to core network design. By leveraging Graphiant’s flexible routing and traffic steering capabilities, Graphiant gives you the flexibility to use, replace, or combine security services as needed while maintaining a consistent and simplified network architecture.
Configuring the Network Tunnel Within Cisco Umbrella
In Cisco Umbrella, you configure a network tunnel that defines the Graphiant Edge as a remote site, including the tunnel authentication parameters and the private networks behind it, so that Umbrella can apply security policies to traffic from those networks.
In the Cisco Umbrella Portal, go to: Cisco Umbrella => Deployments => Core Identities => Network Tunnels; click ‘Add’ at the top right.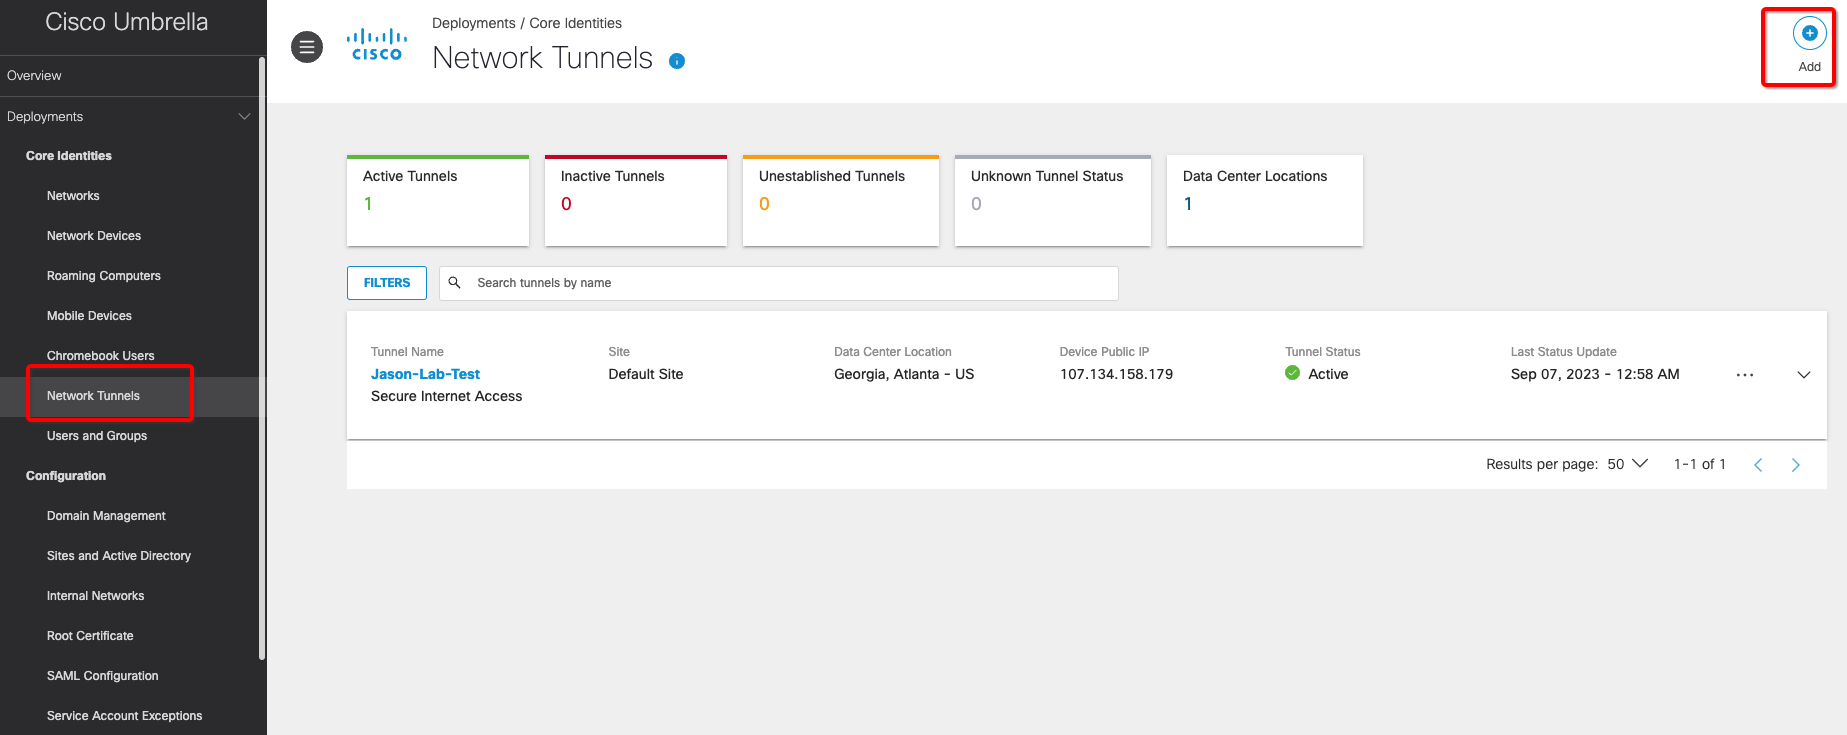
Enter the following information:
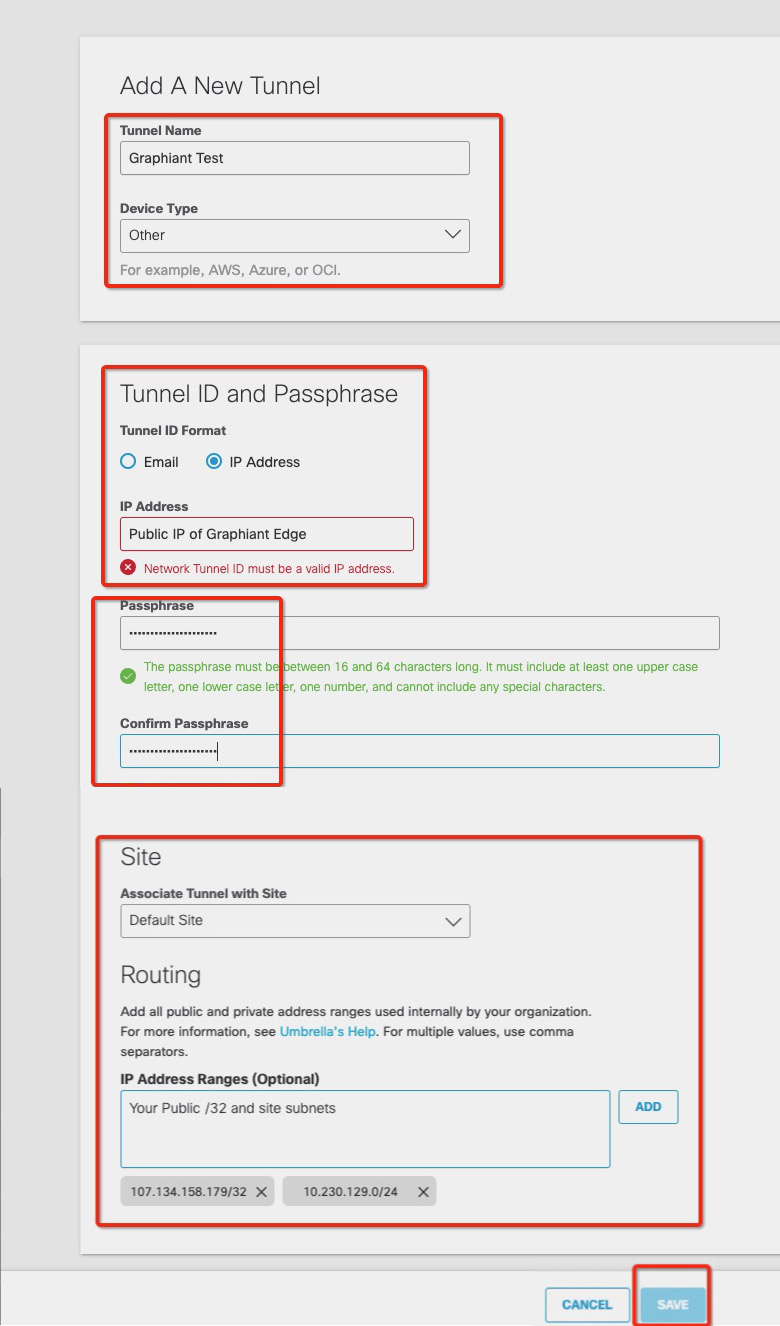
Add A New Tunnel:
Tunnel Name: User-defined label for the tunnel
Device Type: Specifies the type of IPsec device on the other end
Select “Other”.
Tunnel ID and Passphrase:
Tunnel ID: The public IP address of the Graphiant Edge that is connecting to Cisco Umbrella
Select “Public IP of Graphiant Edge”
Passphrase: Pre-Shared Key used to authenticate the tunnel; must match the configuration on the Graphiant side
Site:
Default Site: Location to which the tunnel belongs
Routing:
IP Address Ranges: Defines the set of IP addresses associated with a network tunnel, including:
Public (external) IP address(es): Identifies the tunnel on the internet
Private (internal) IP address(es): Identifies the network behind the Graphiant Edge.
Enter in the format: “<Public IP Address>, <Site Private IP Address>”
Note:
Be sure to separate the Public and Private IP addresses with a comma.
Click ‘Save’.
After creating the network tunnel, configure Web and Firewall policies in Cisco Umbrella.
These policies must be applied to the site associated with the tunnel to allow and control traffic.
Configure IPsec Tunnel and Routing on Your Graphiant Edge
Configuring the IPsec Tunnel to Cisco Umbrella
Now you will configure an IKE-based IPsec tunnel on your Graphiant Edge, to establish a secure connection with Cisco Umbrella.
From the Graphiant Portal Home screen, navigate to the Edge Configuration screen by one of the following:
Locate the "Configurations" section within the “Quickstart” area of the screen; select 'Configure Edges'.
or
Click 'Configure' in the sidebar; select 'Devices'.
.png)
This will take you to the ‘Configuration’ page of the Graphiant Portal where you can view all active, staged, and deactivated Edges. From here you will be able to select among the active Edges which Edge(s) you would like to configure.
On the right hand side, select and click ‘Configure’ in tandem with the Edge you wish to manage.
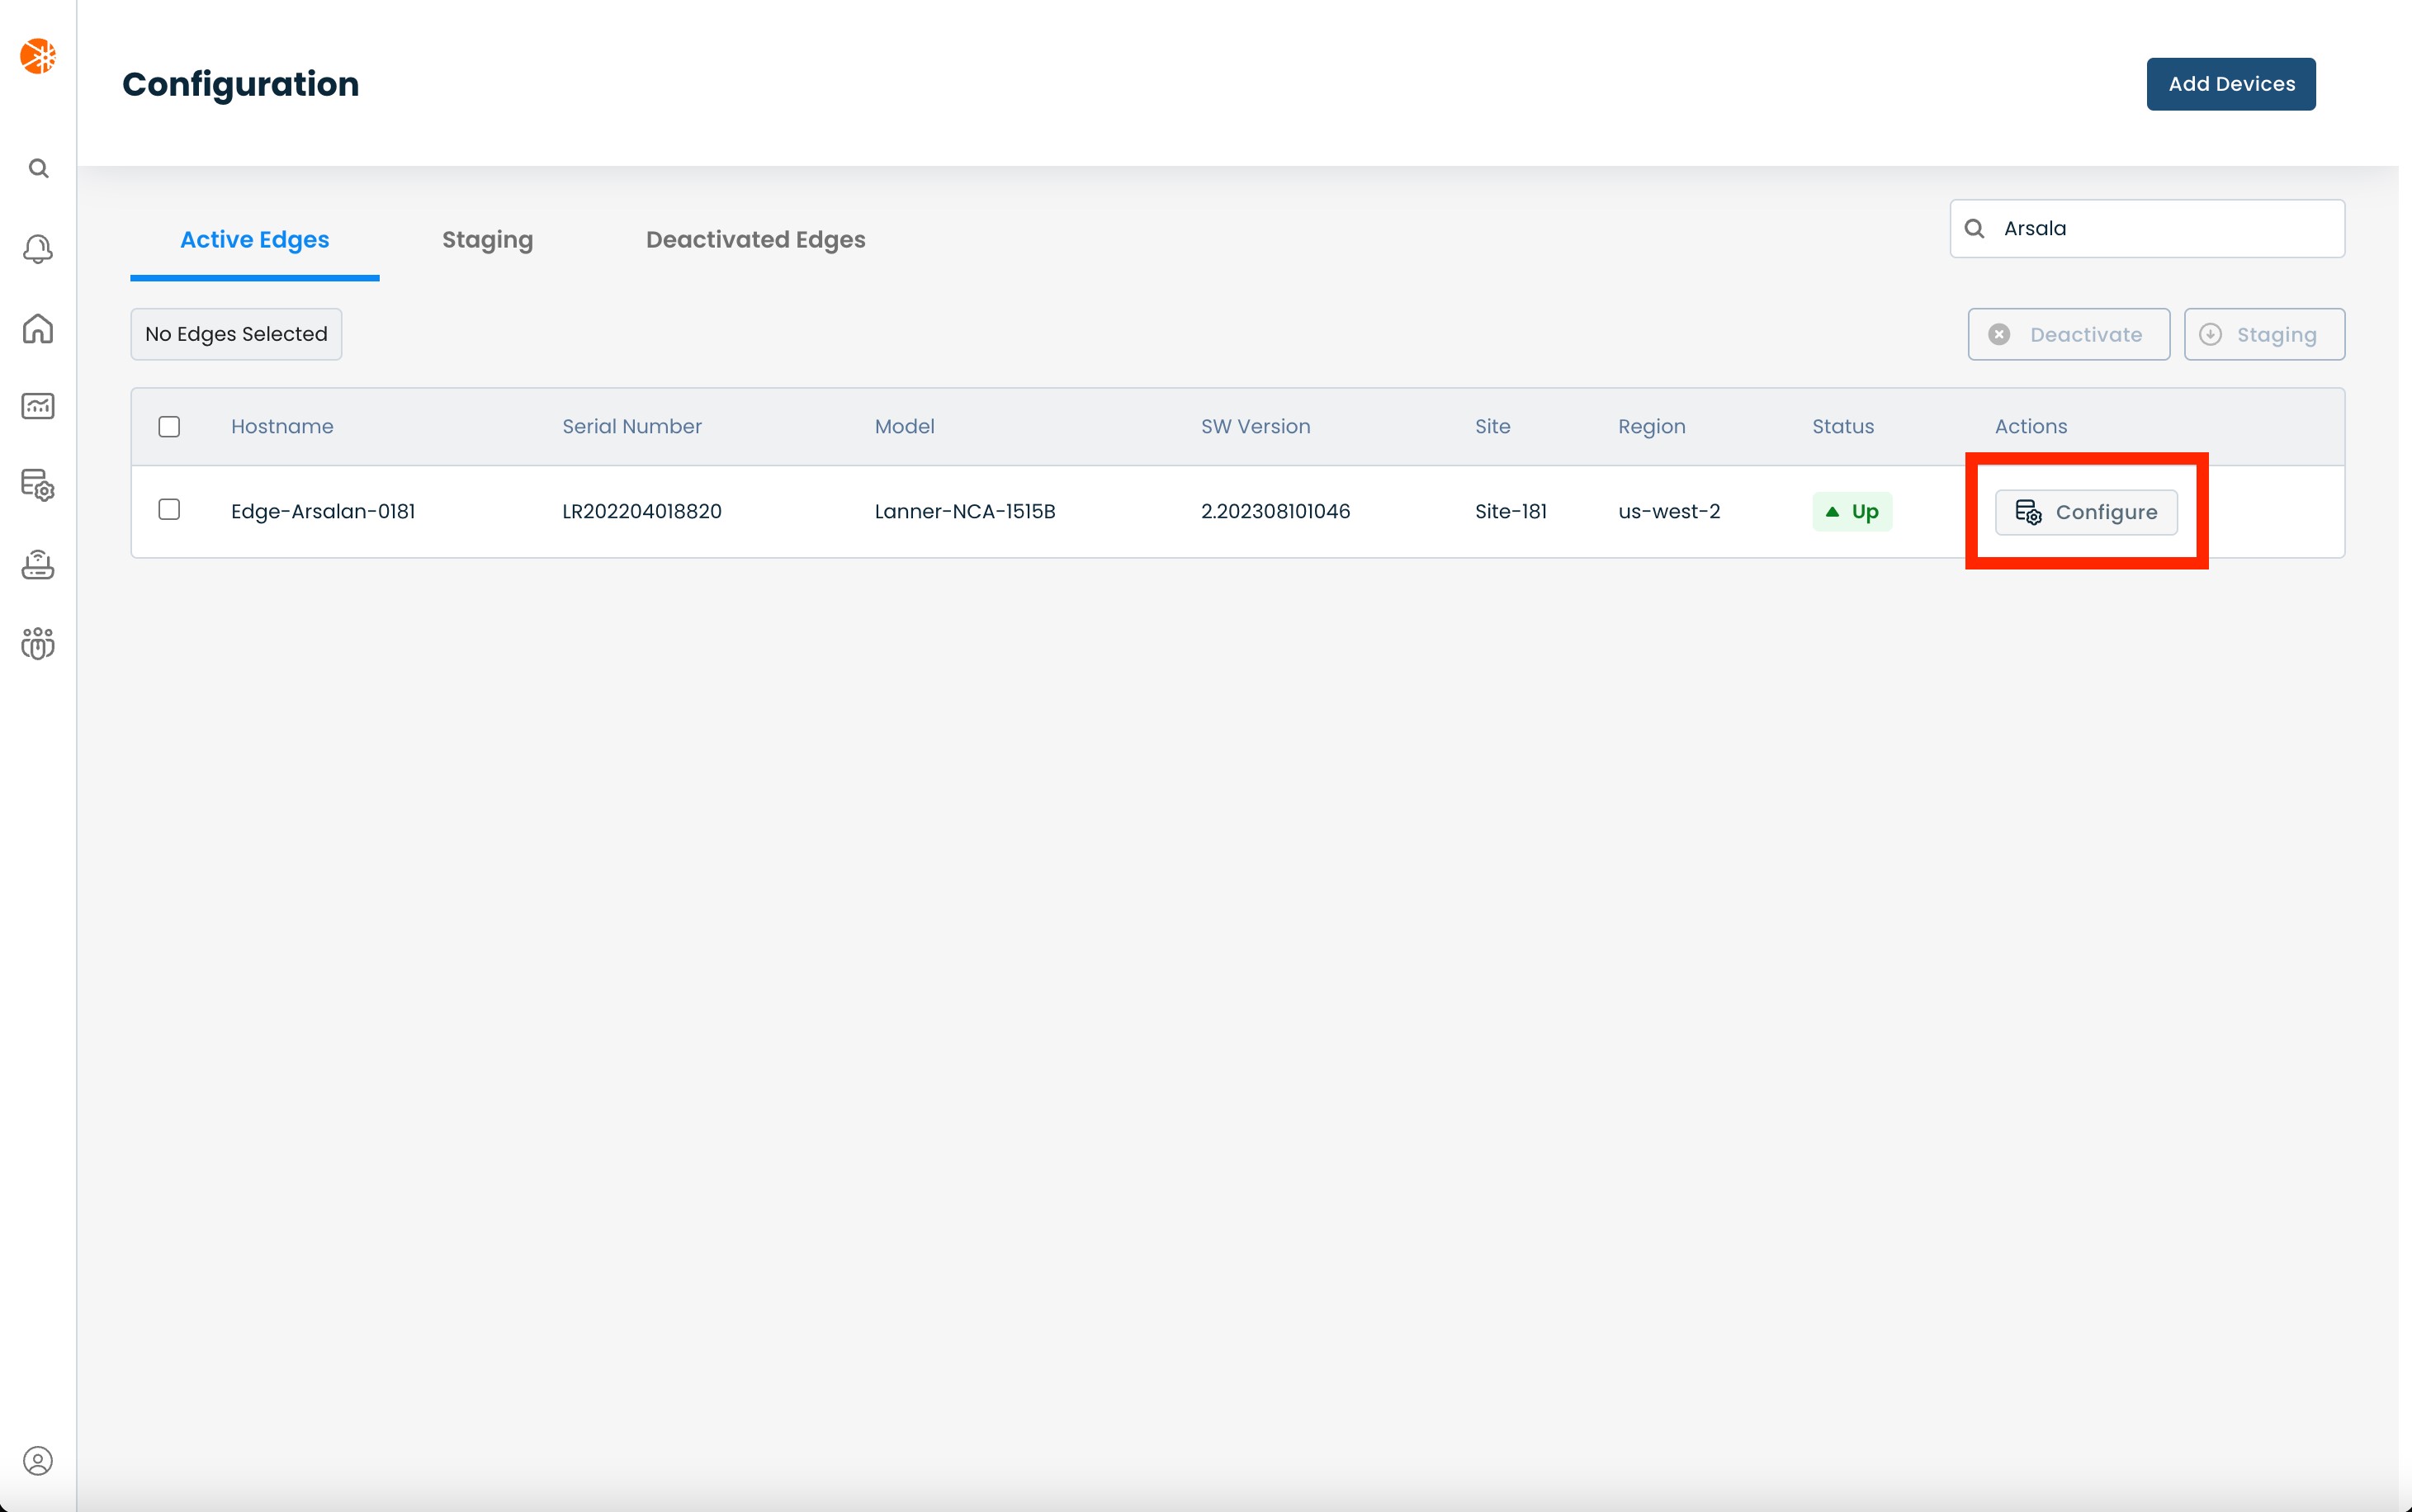
This will take you onto a Configuration page with a focus on the Edge you have just chosen.
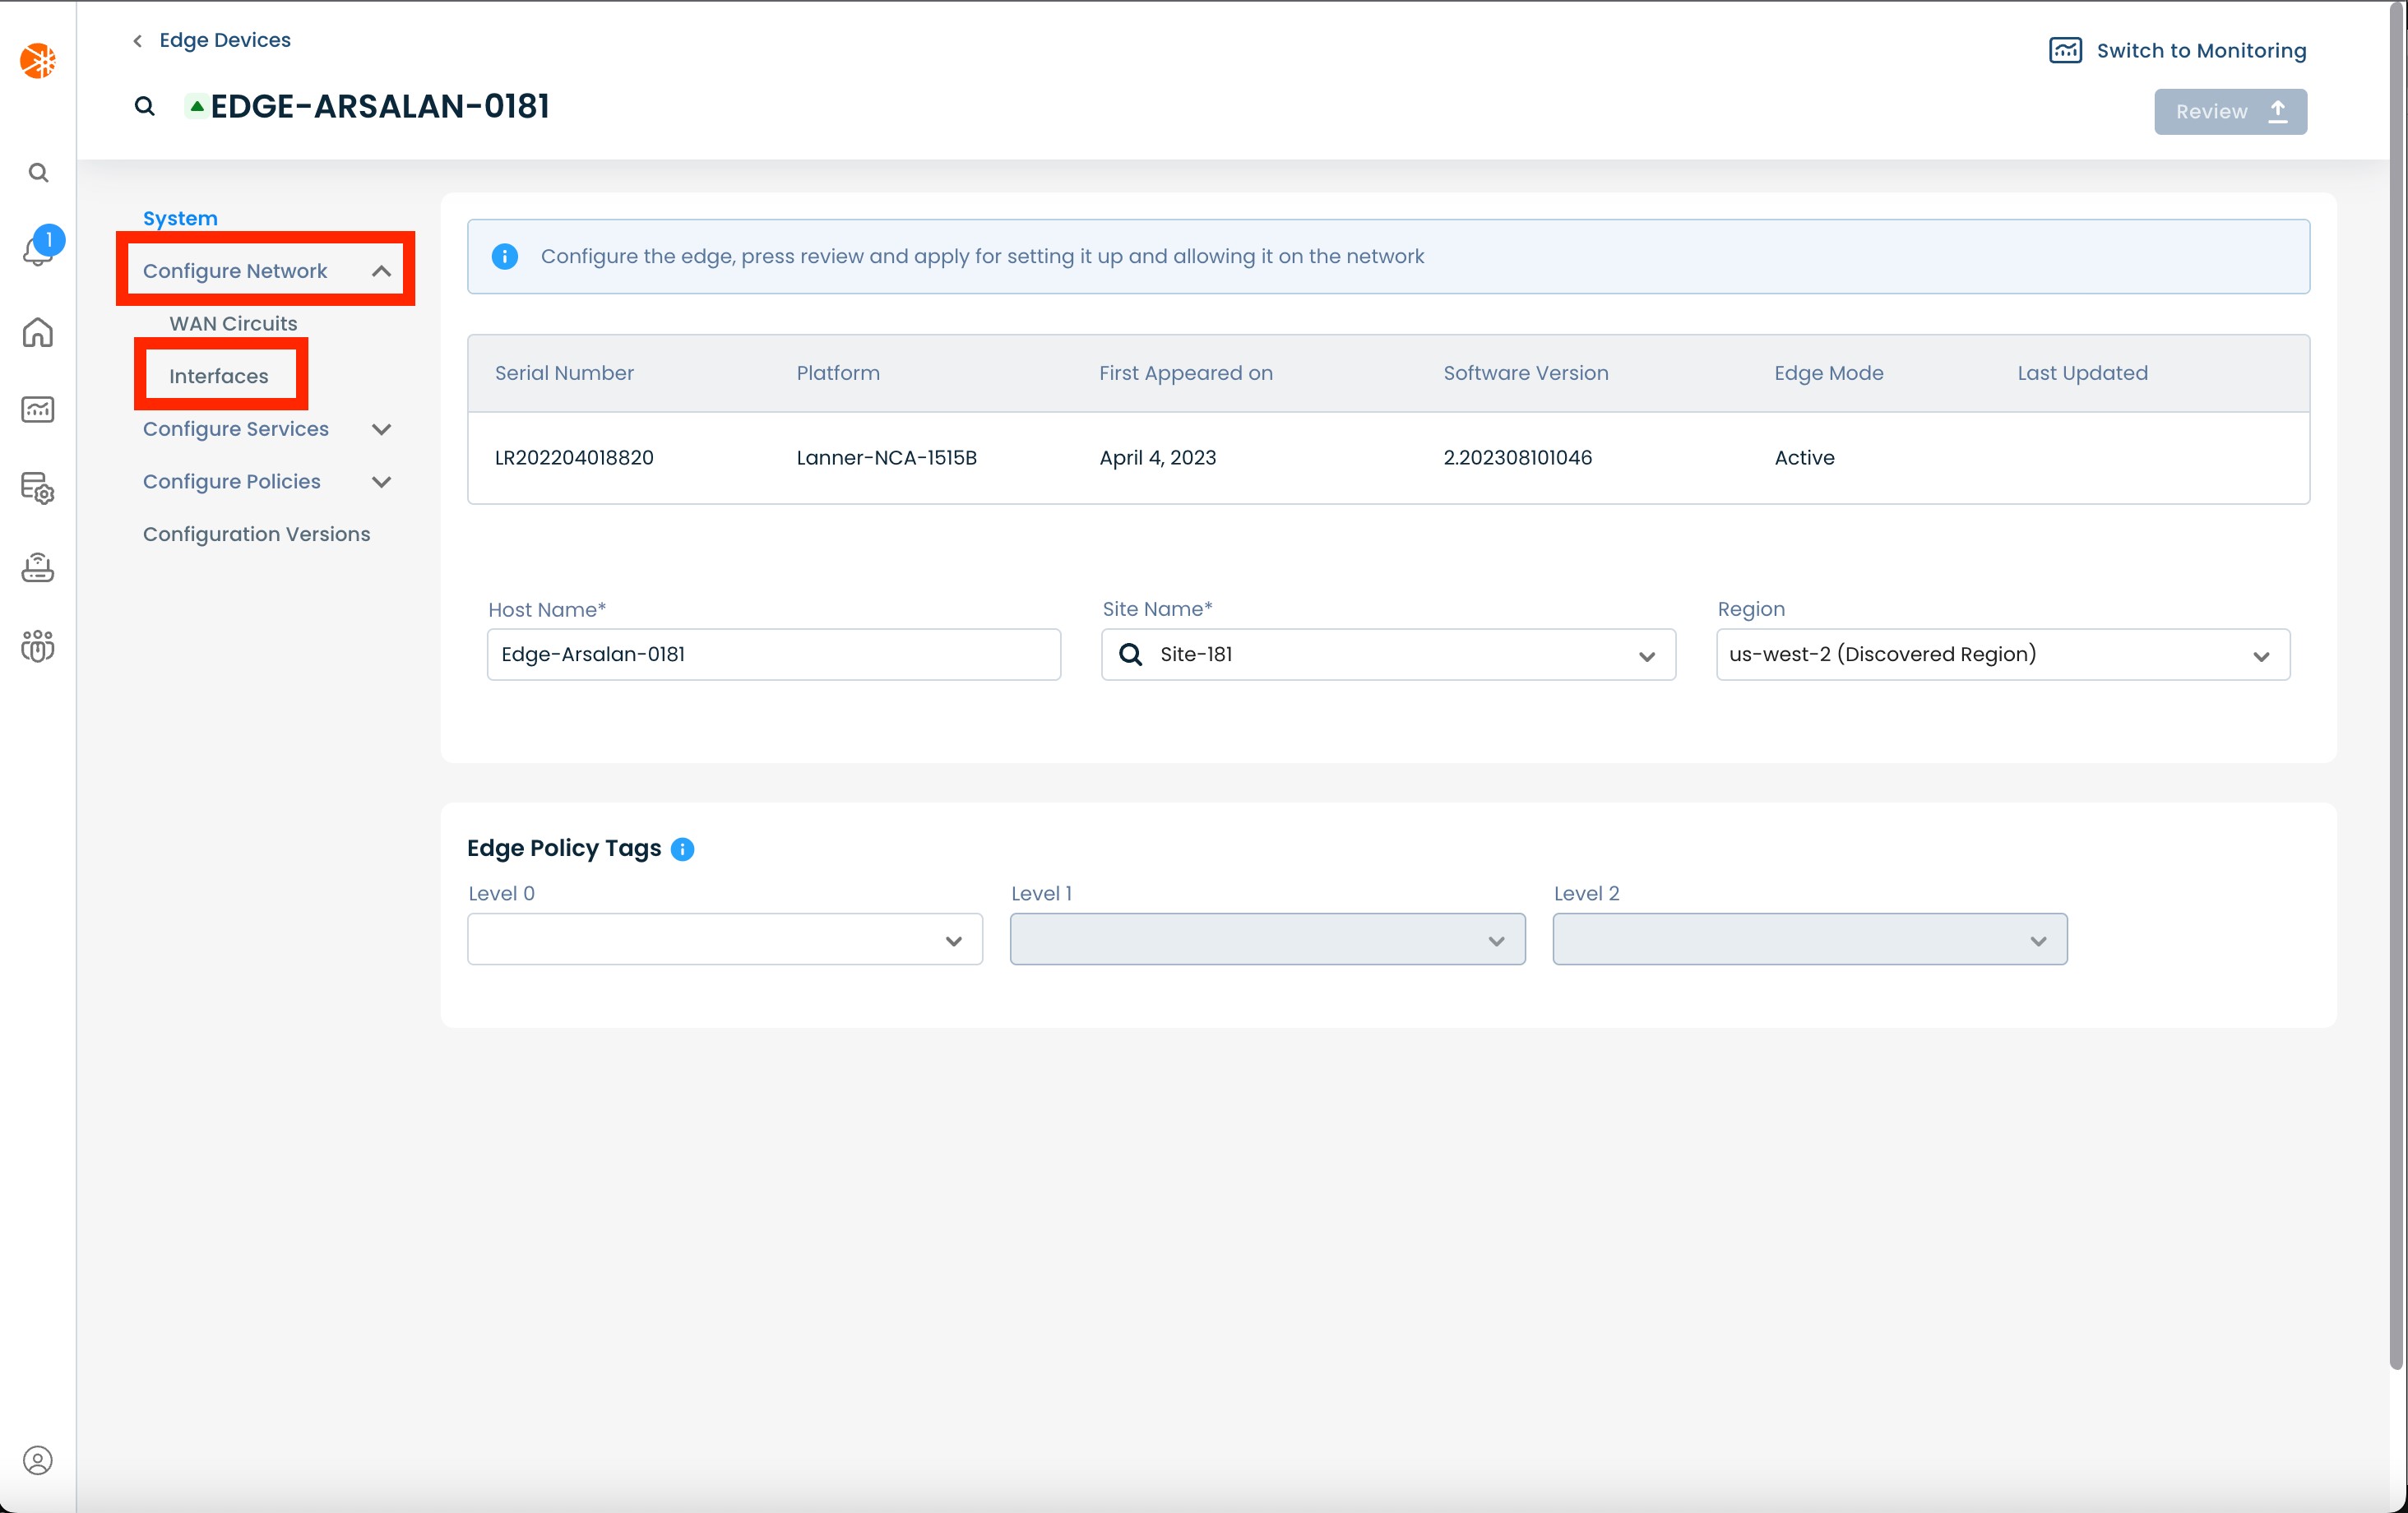
From here, select and click ‘Configure Network’; and from the dropdown menu, select and click ‘Interfaces’.
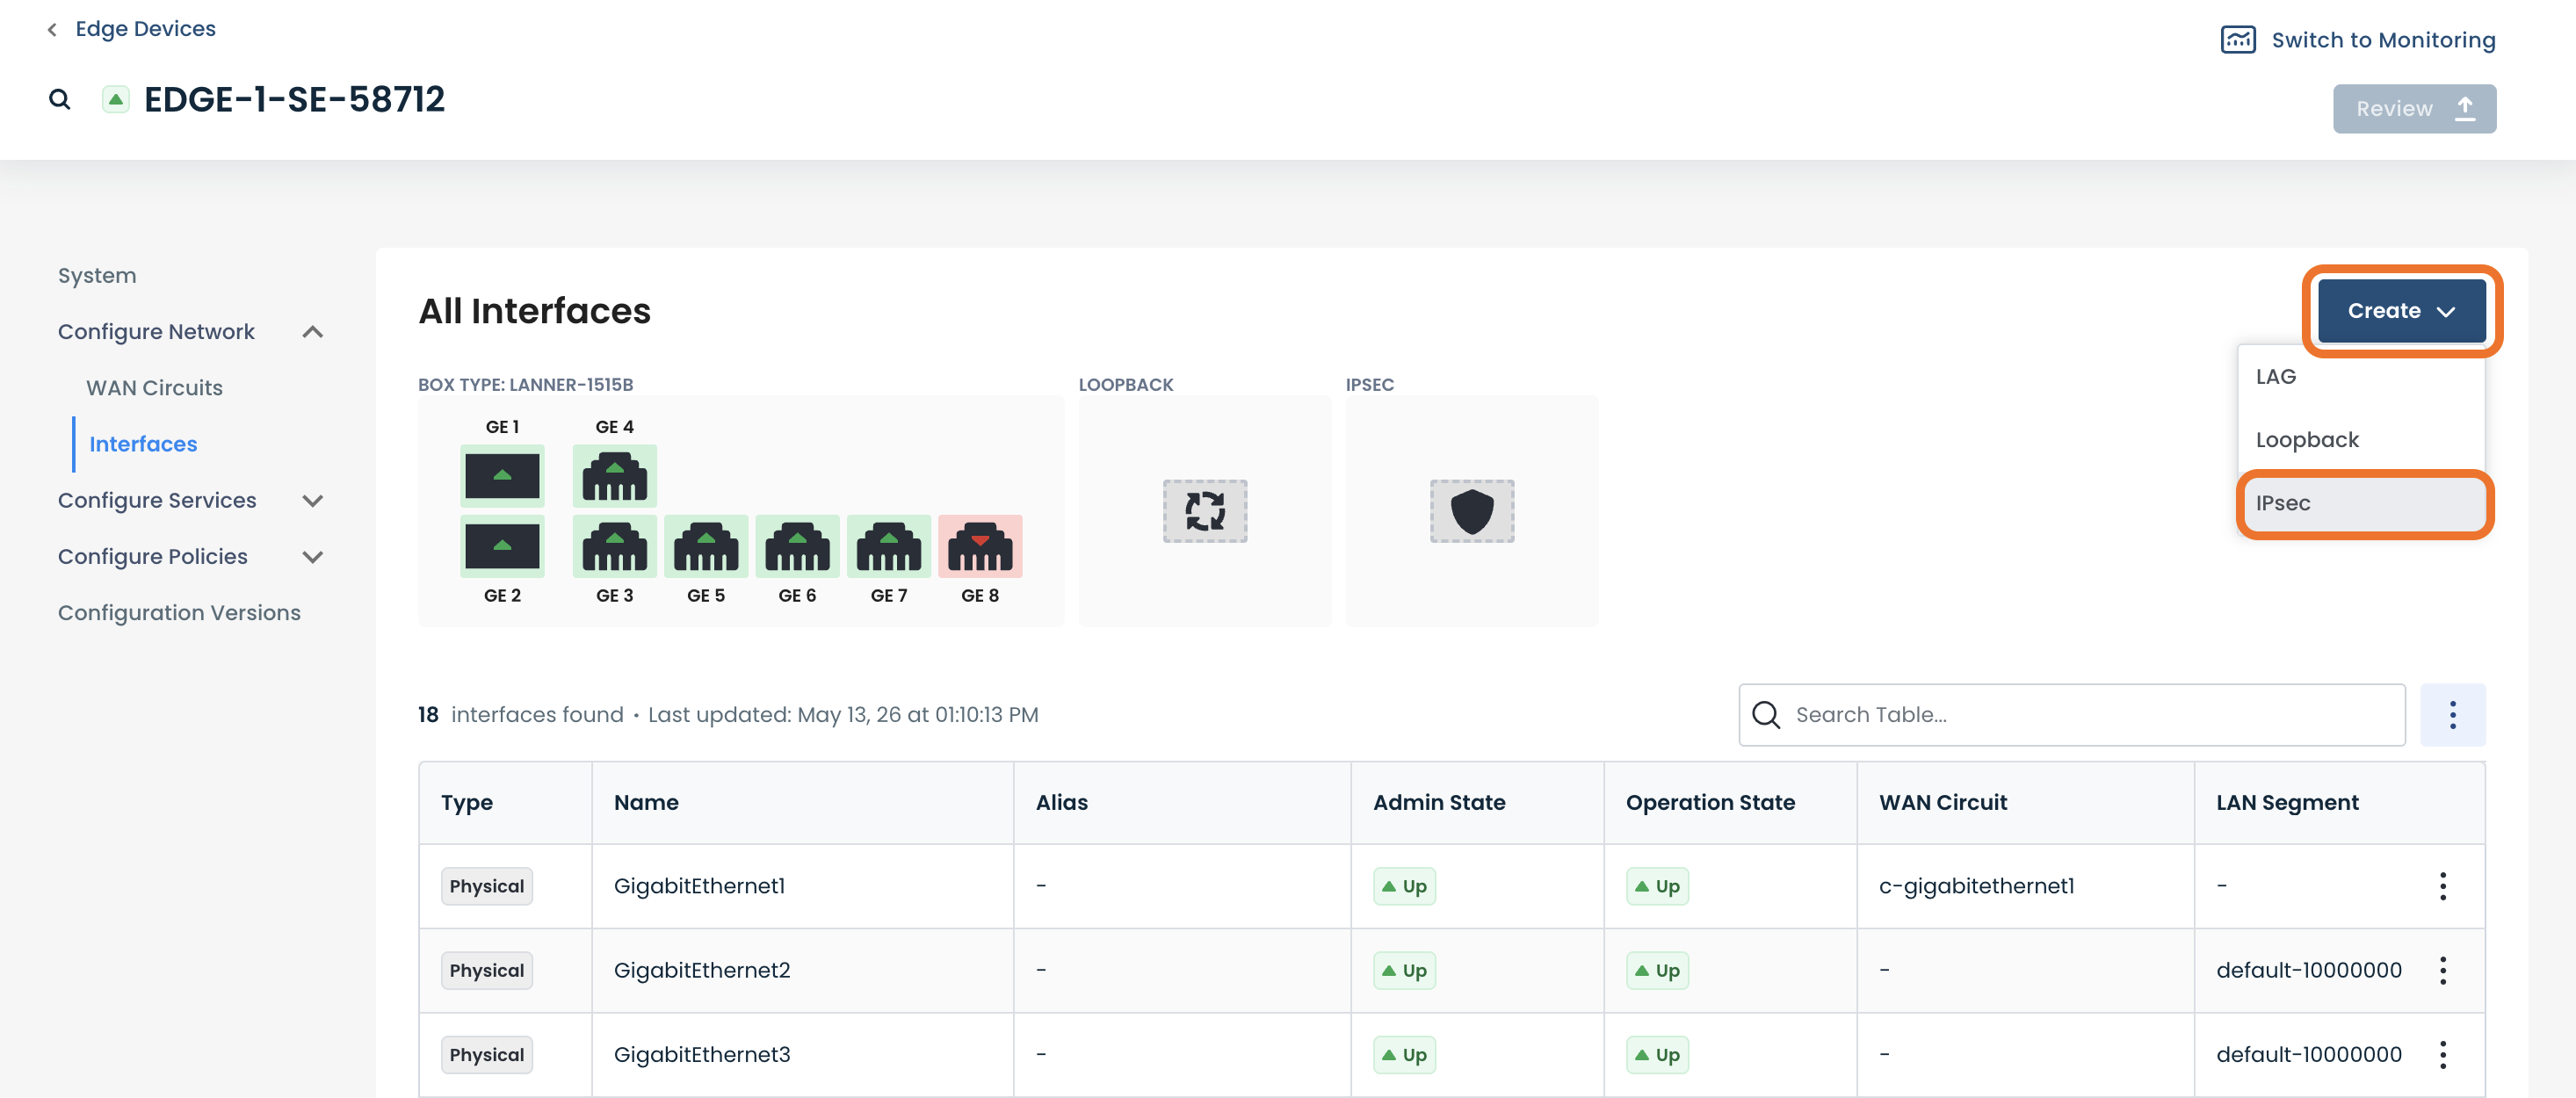
Click ‘Create’ to create a new interface to connect to Cisco Umbrella; select ‘IPsec’.
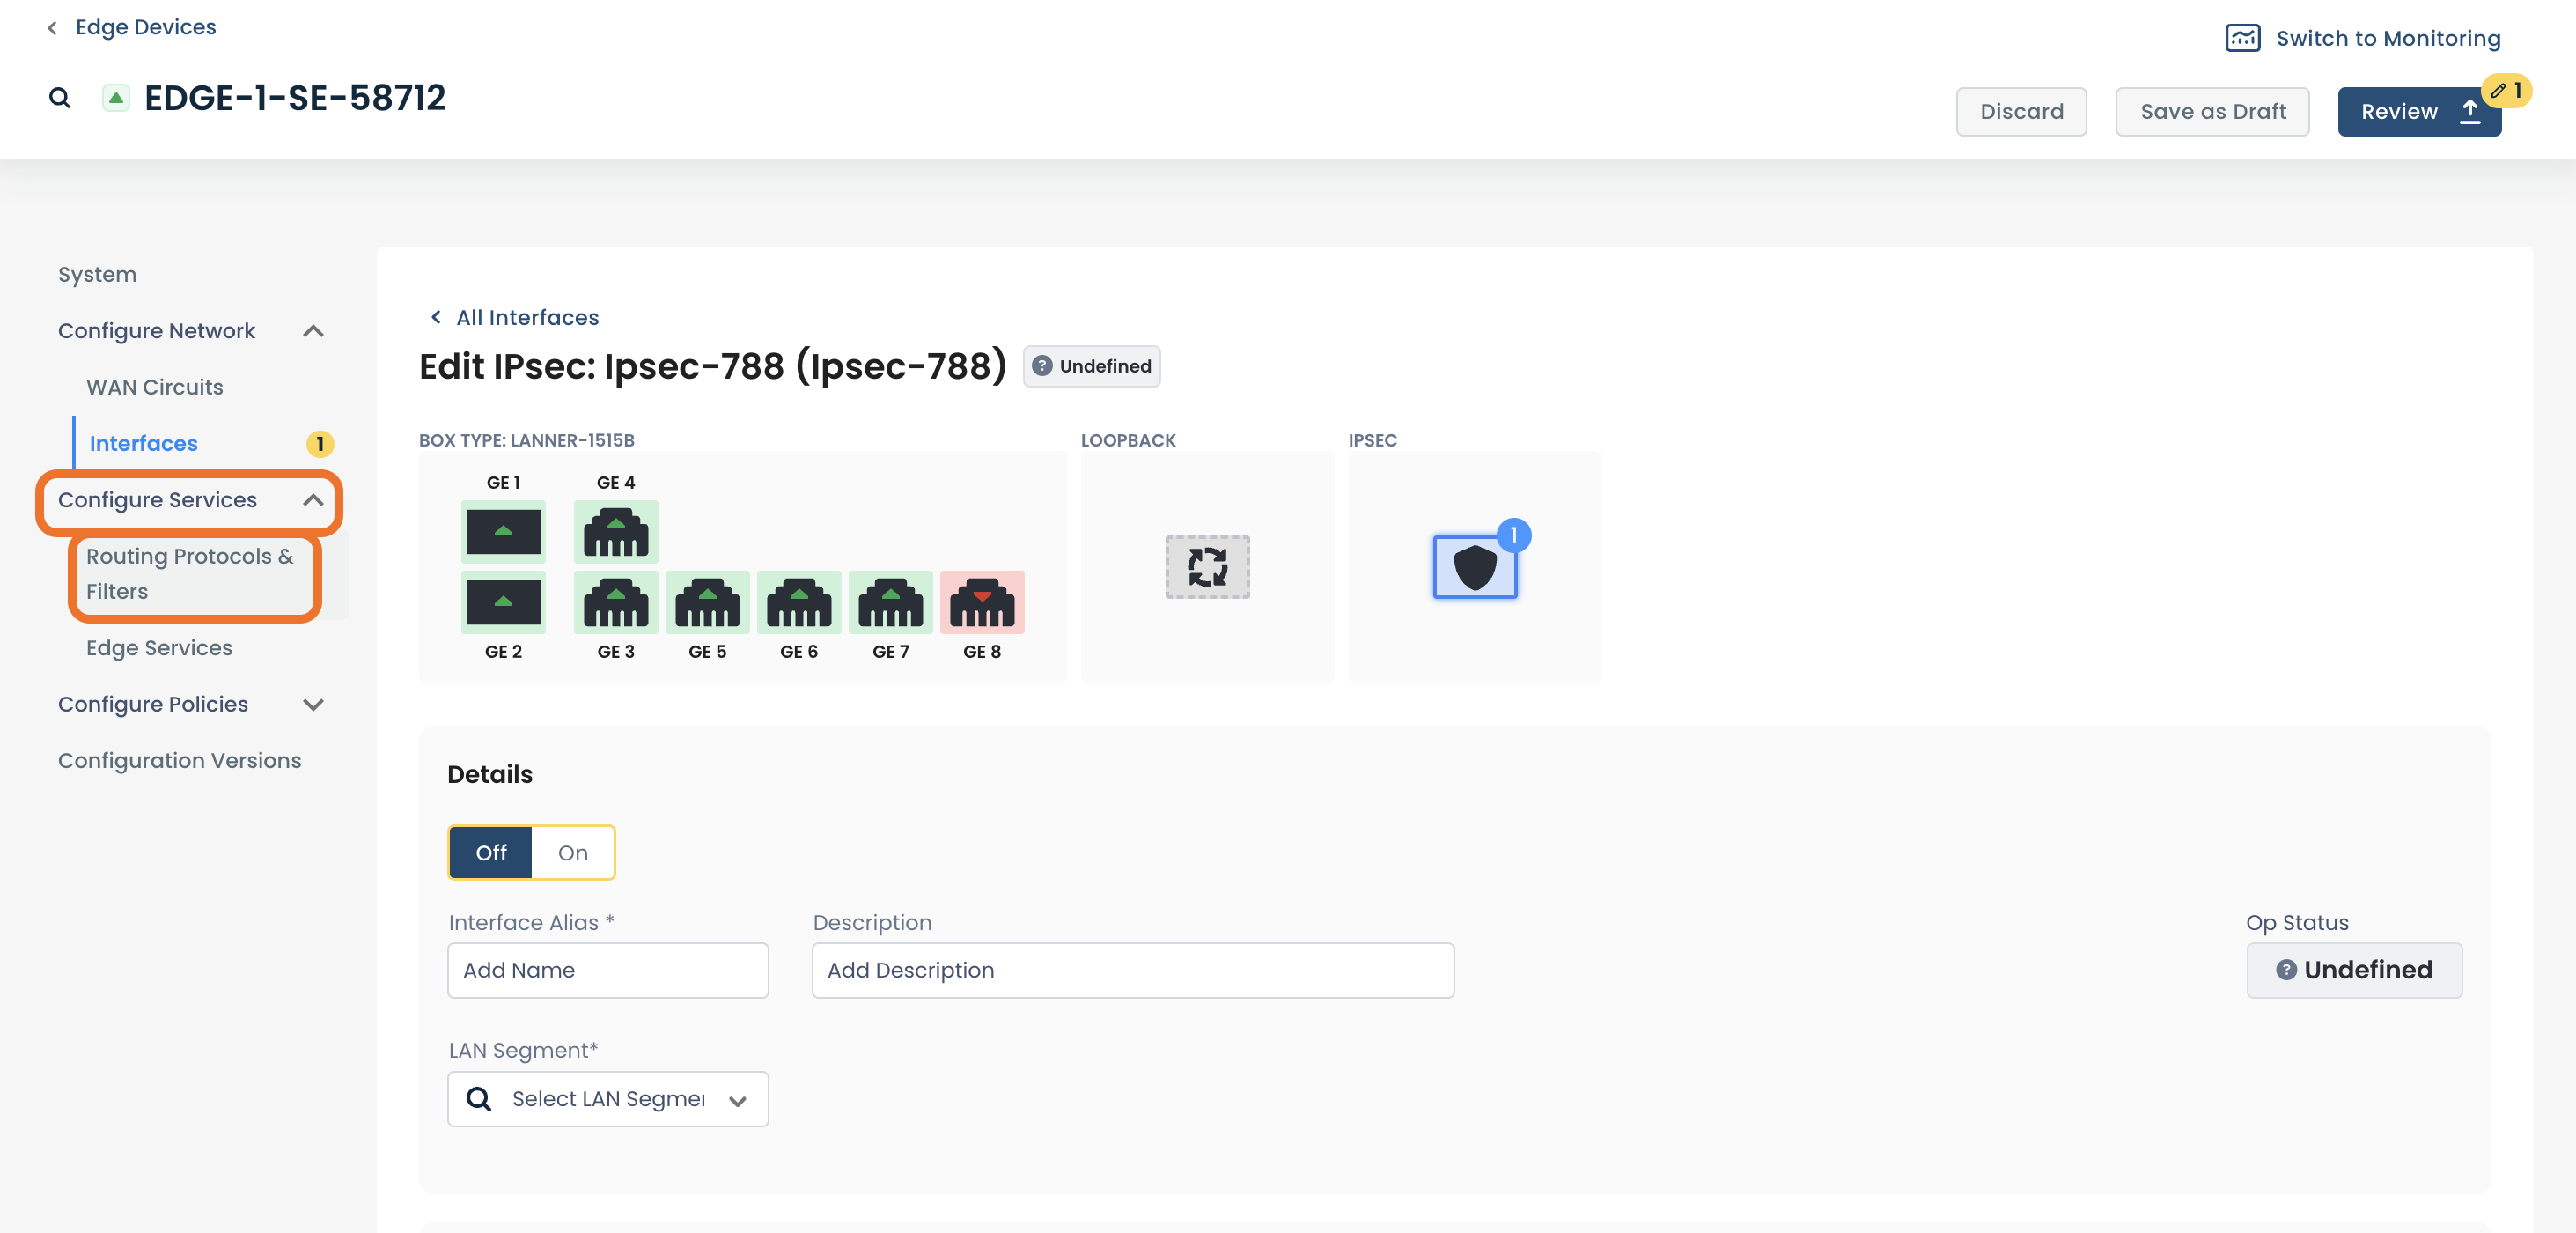
Enter the following information:
Details:
Off/On: Toggle to disable/enable the interface
Interface Name: User defined name to use for the interface; when this name is changed all other configuration and monitoring views are updated to use the new name
Interface Description (Optional): User defined description to assign to this interface
LAN segment: The LAN segment of which this interface should be a part. This field provides a dropdown containing all the existing LAN segments in your network; it also allows you to use a new LAN segment (a LAN segment that doesn't currently exist in the network).
Create a new LAN segment: To create a new LAN segment you need configure an interface to reference a new LAN segment; this will automatically create the LAN segment in our system. To do this, enter the name of the new LAN segment in the “LAN Segment” field and press ‘Enter’. When you apply these changes to the device, the LAN segment will be automatically created; it will then appear in the “LAN Segment” dropdown for all other interfaces of this and other Edges.
Delete a LAN segment: To delete a LAN segment you need to detach every Edge from the LAN segment; this will automatically delete the segment from our system.
IPv4: The IPv4 address configuration to use for this interface
or
IPv6: The IPv6 address configuration to use for this interface
Tunnel:
Source Circuit: Which WAN interface this IPsec tunnel will use to send traffic
Source Circuit: Which WAN interface this IPsec tunnel will use to send traffic
Destination IP Address: Public IP address of the Cisco Umbrella
TCP MSS: The TCP Maximum Segment Size value to use for this interface
IP MTU: The Maximum Transmission Unit value to use for this interface
Dead Peer Detection:
DPD Interval: How often the system checks that the Cisco Umbrella is still reachable
IKE:
Encryption Algorithm: The algorithm used to encrypt messages for key exchange security
Diffie-Hellman Group: The mathematical parameters used for securely exchanging cryptographic keys
Integrity: The hash algorithm used to verify that data hasn’t been altered during IKE
IKE Authentication:
Preshared Key: Shared secret used by both sides to authenticate both ends of the tunnel; must match exactly on both ends.
IKE ID for Local End Point: Identifier for the Graphiant Edge used in IKE authentication
IKE ID for Remote End Point: Identifier for the Cisco Umbrella used during IKE authentication
Reauthentication Interval : How often the IKE session should be reestablished to maintain security
IPsec:
Encryption Algorithm: The cipher used to encrypt VPN traffic (data packets) during IPsec tunnel operation
Perfect Forward Secrecy: Enforces additional key exchange for each session, ensuring that compromise of one session doesn’t affect others
Integrity: The algorithm for verifying the integrity of encrypted data packets during IPsec transmission
Rekey Interval: How frequently new IPsec keys are generated to maintain secure communication
Replay Window: How many packets the system will accept out of order, helping to prevent replay attacks while allowing minor reordering
Extended Sequence Number: Enables 64-bit sequence numbers instead of 32-bit, to prevent rollover in long-lived IPsec sessions
.png)
Configuring Static Routing to the IPsec Tunnel
After creating the IPsec tunnel, configure a static route to direct traffic from the LAN segment to the IPsec tunnel interface.
In the sidebar, next click ‘Configure Services’; select ‘Routing Protocols & Filters’.
Click the (+) icon to add a Static Route.
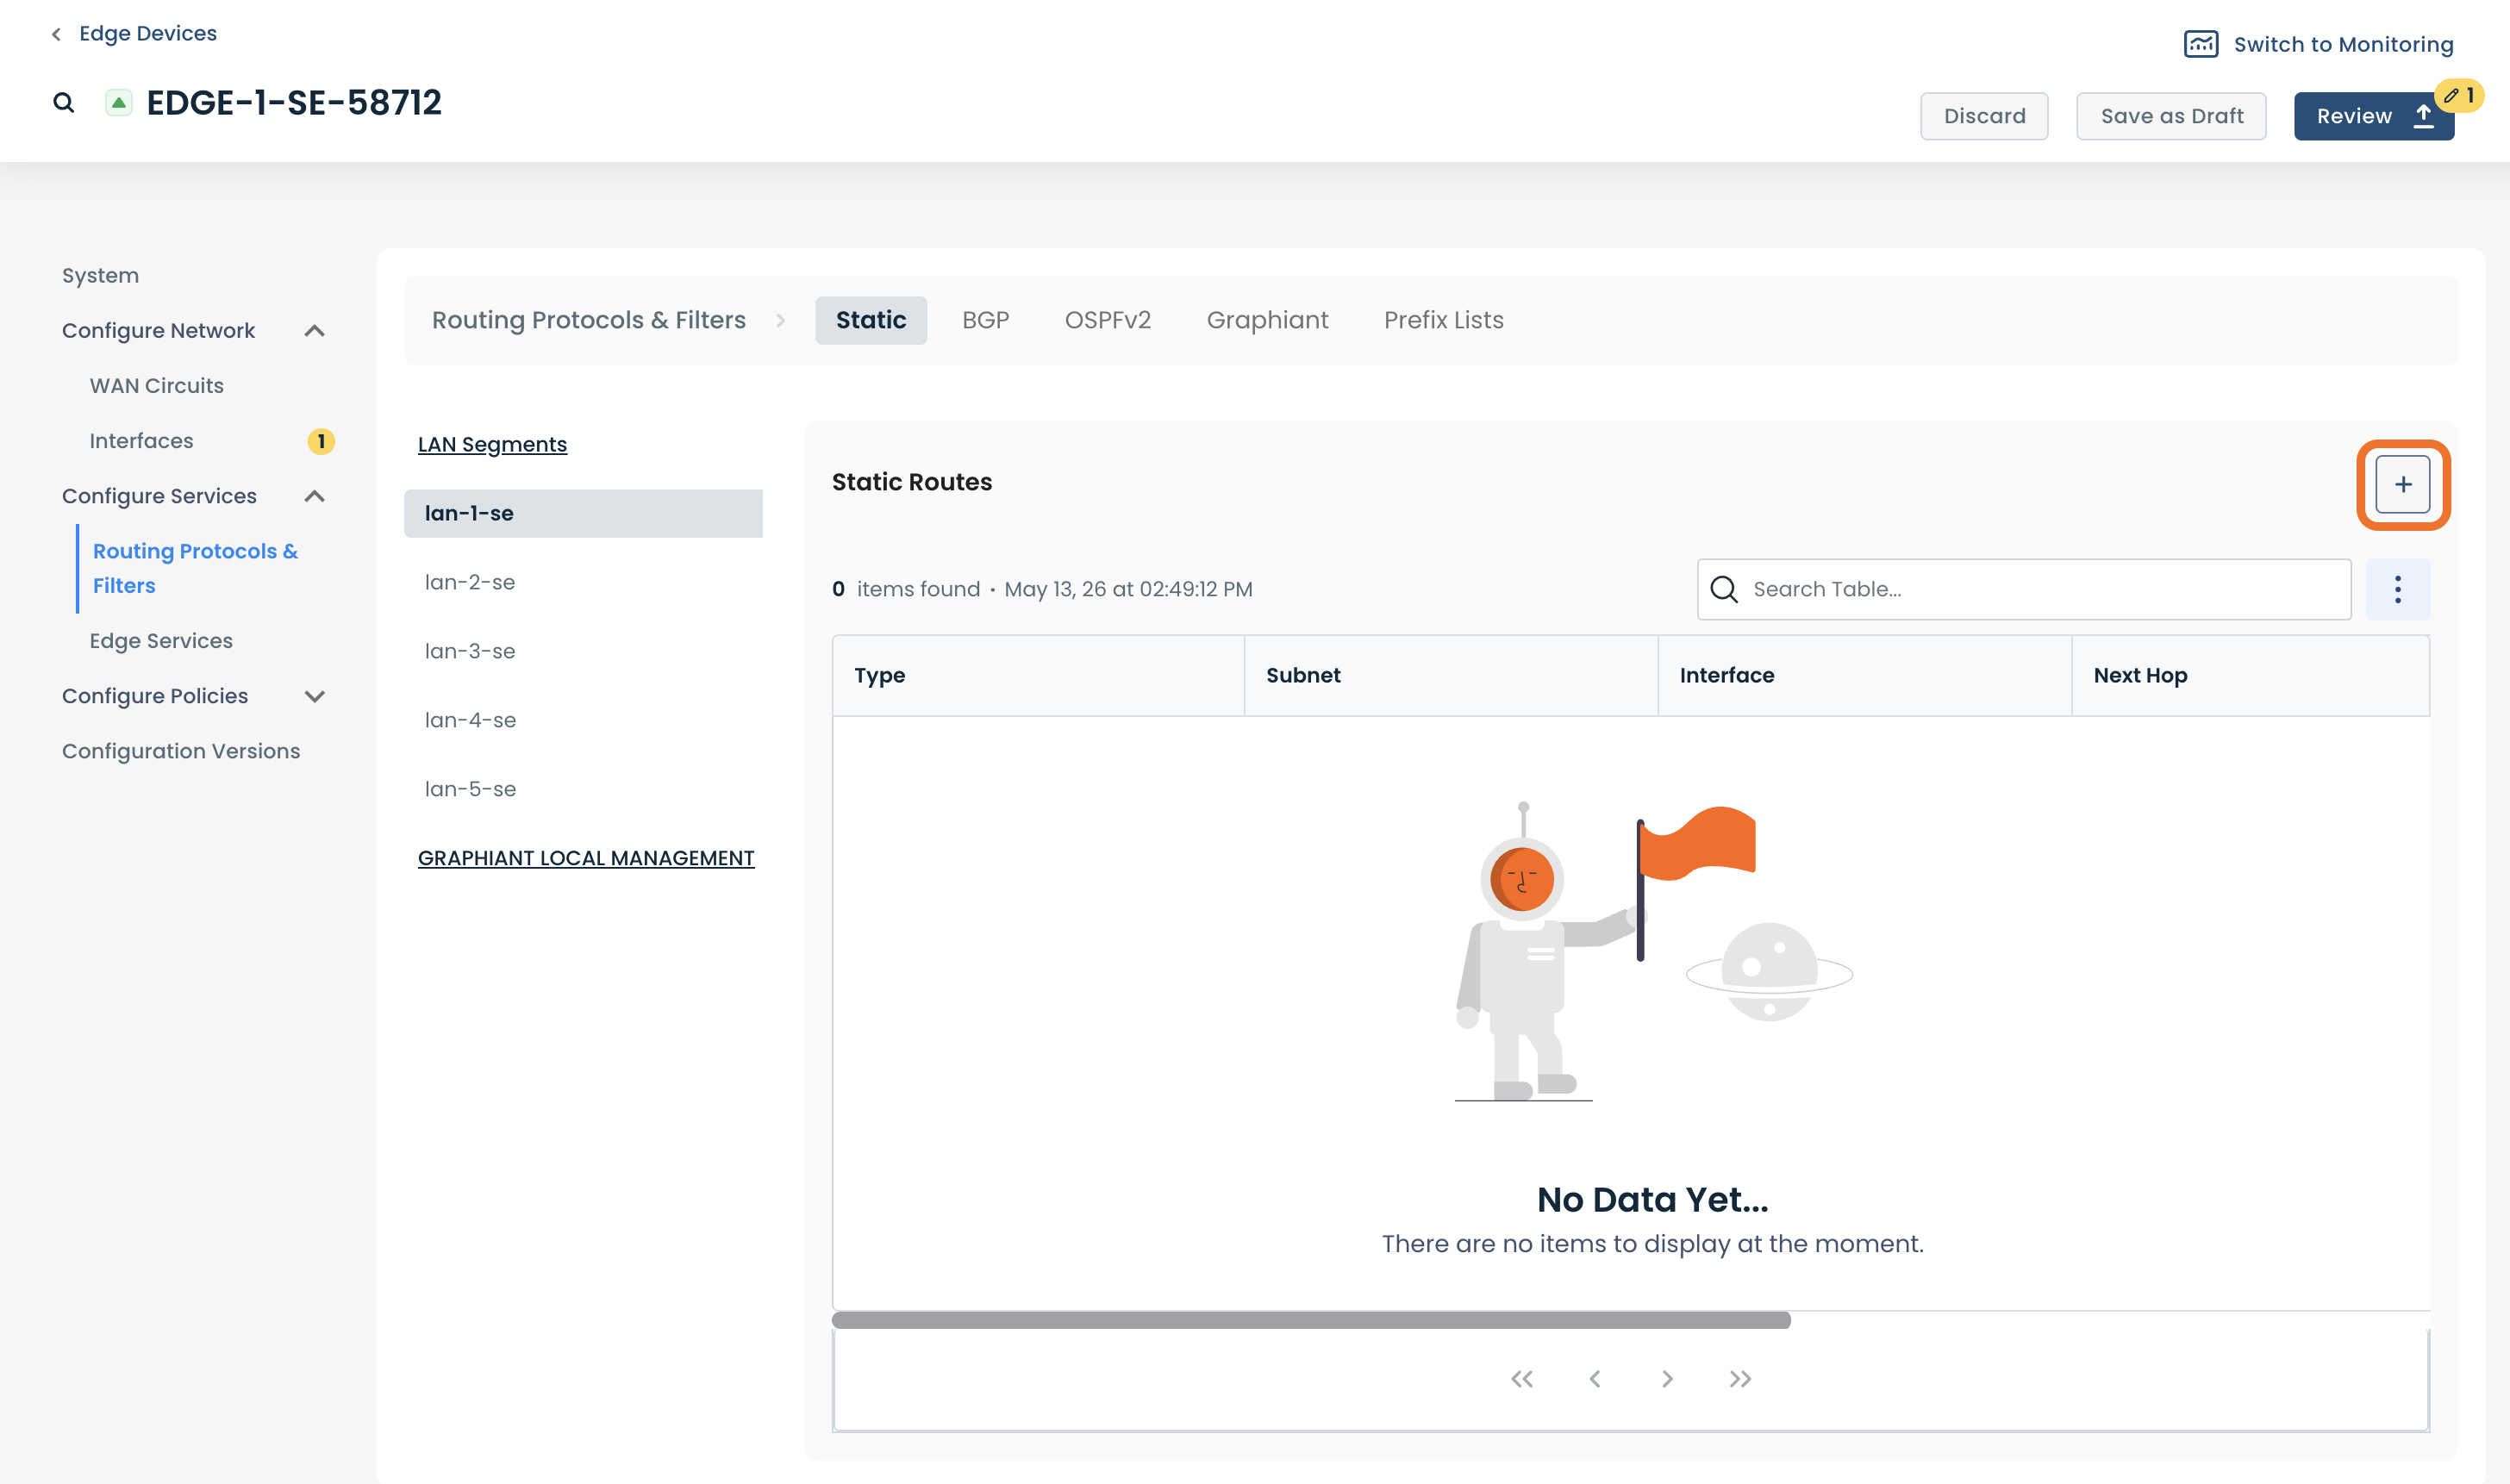
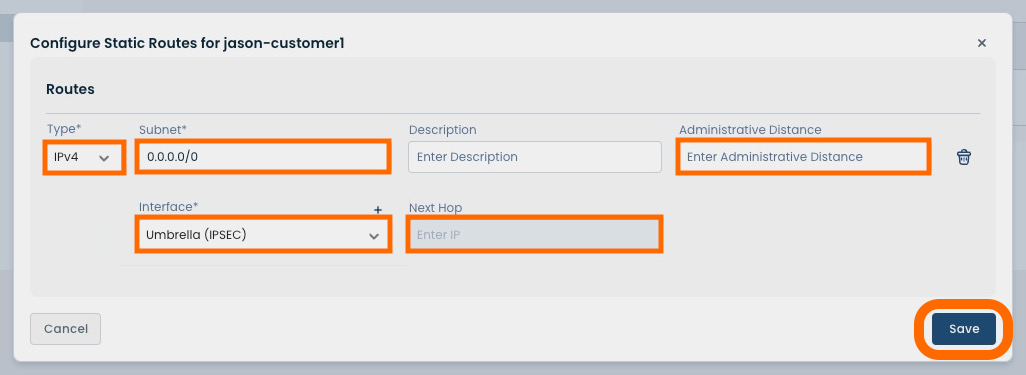
A modal will open allowing you to configure the static route to the IPsec tunnel.
Complete the required fields:
Type: IPv4 or IPv6
Subnet: Remote network to communicate with
Description (Optional): Interface description for ease of reference
Administrative Distance: Priority value where lower numbers take precedence
Interface: The interface that the route will use
Next Hop: IP address of the Cisco Umbrella
Click ‘Save’.
After completing configuration, the IPsec tunnel to Cisco Umbrella is established. Validation testing is recommended to confirm connectivity and policy behavior.
Test and Confirm Connectivity
After completing configuration, perform the following steps to validate connectivity, traffic flow, and policy enforcement between your Graphiant Edge and Cisco Umbrella.
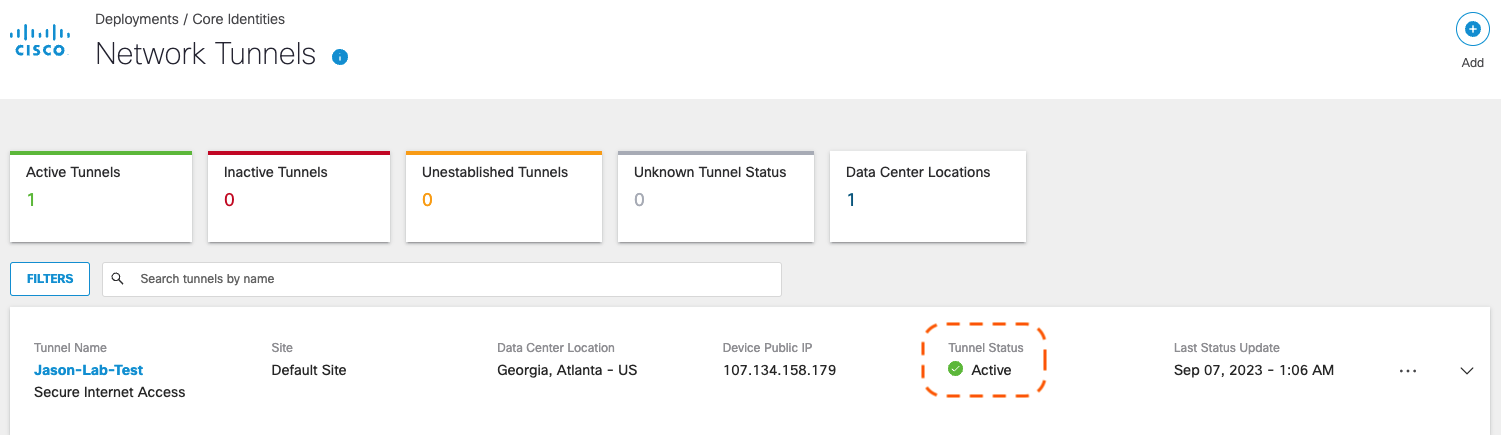
Step 1: Verify Tunnel Status in Cisco Umbrella
Confirm that the tunnel is established and active.
Cisco Deployment overview will show a Tunnel status of ”Active”
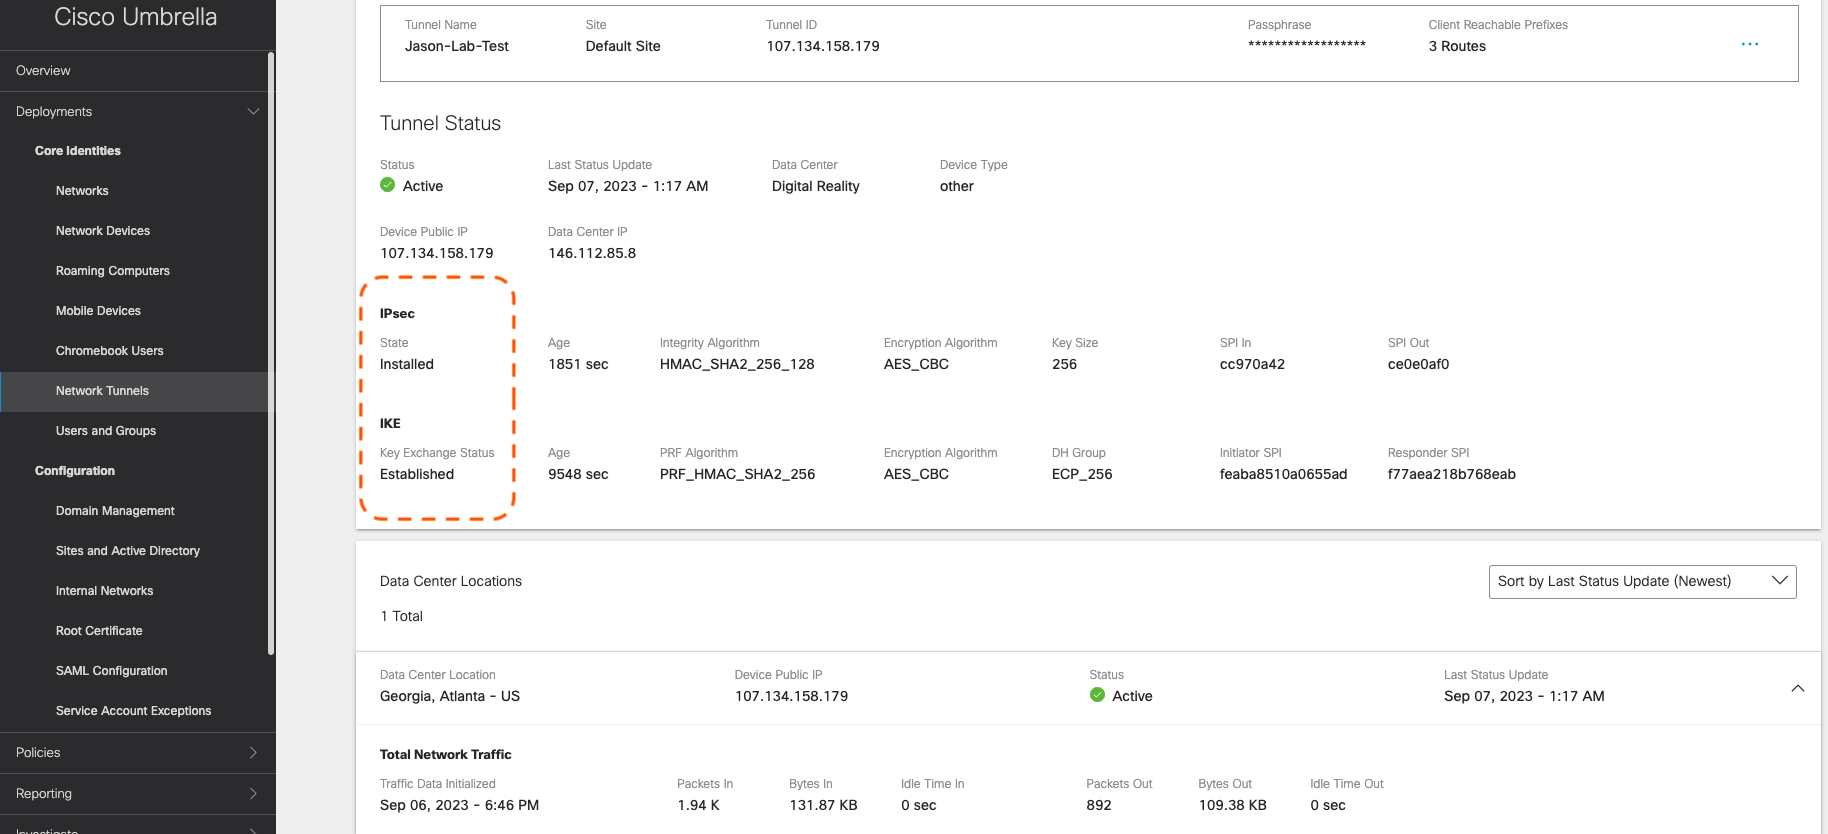
Cisco Umbrella Network Tunnels page will show:
An IKE status of “Established”
An IPsec state of “Installed”
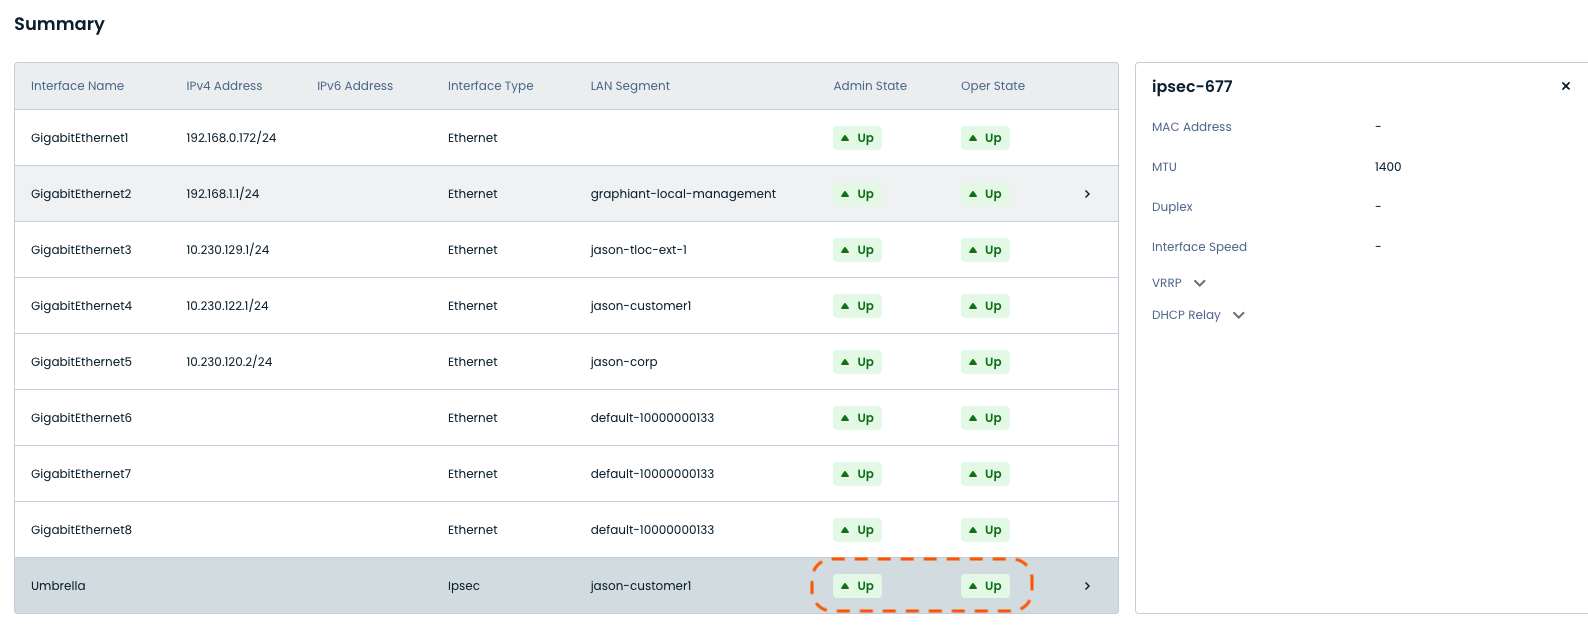
Step 2: Verify Tunnel Interface on Graphiant Edge
Confirm that the IPsec tunnel interface is operational.
The Interface Summary information will show:
Admin State of ”Up"
Operating State of ”Up”
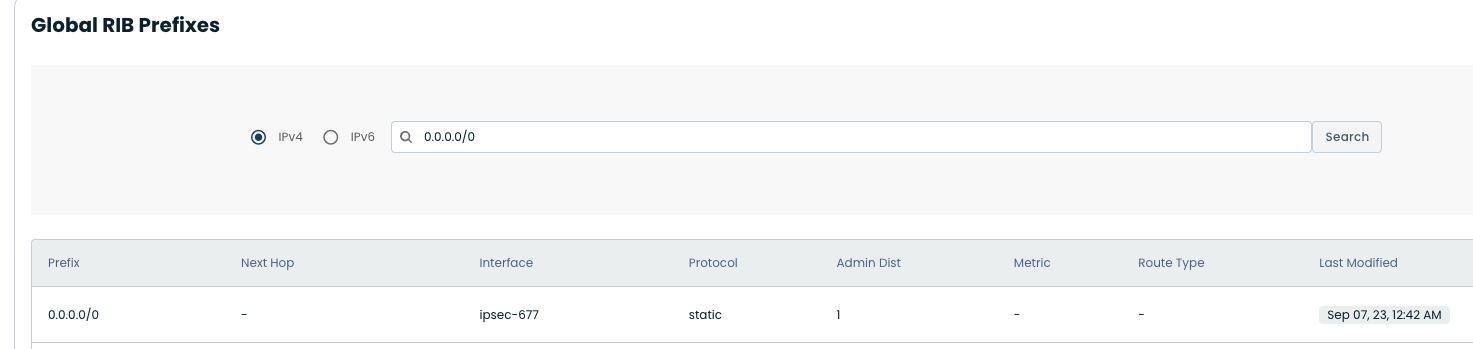
Step 3: Validate Routing to the Tunnel
Confirm that traffic is being directed to the IPsec tunnel.
Static route (here, “0.0.0.0/0”) points to the IPsec tunnel interface
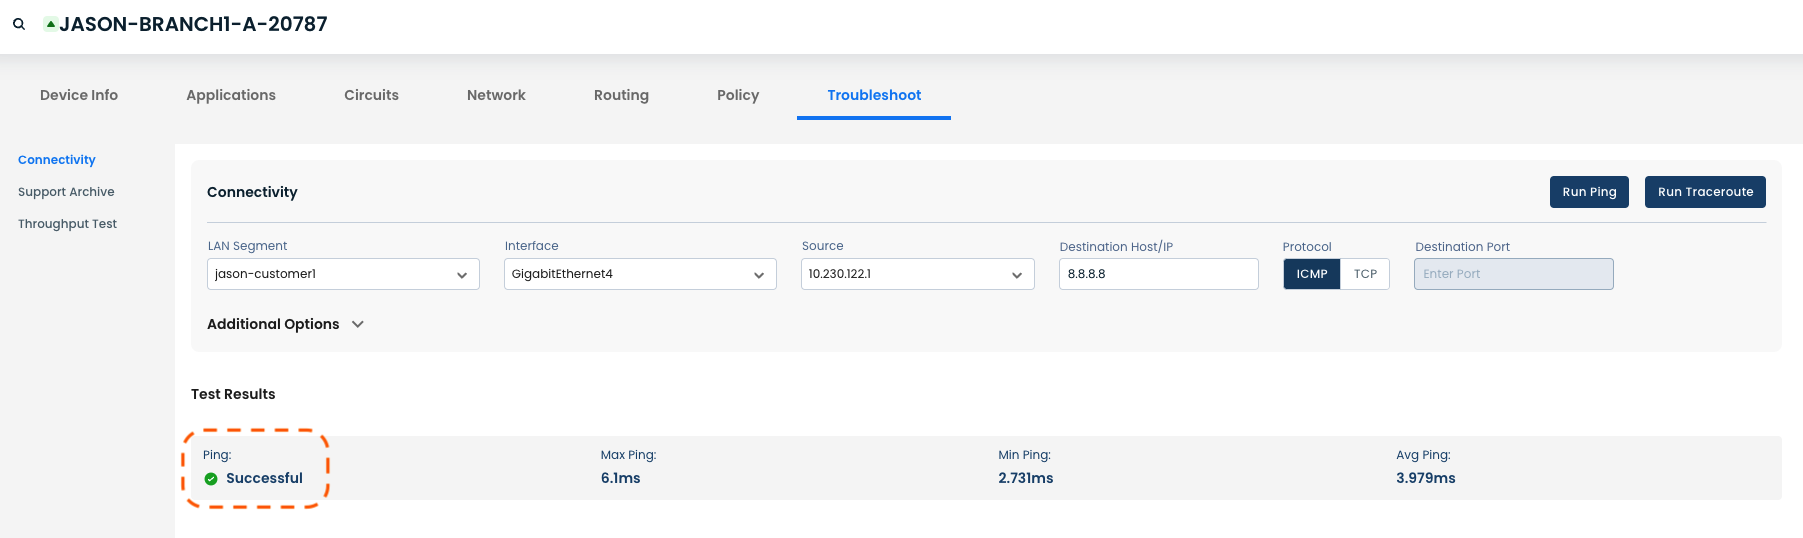
Step 4: Generate Test Traffic from Graphiant Edge
Initiate traffic to validate connectivity through the tunnel.
A Ping to a public IP (e.g., 8.8.8.8) will show “Successful”
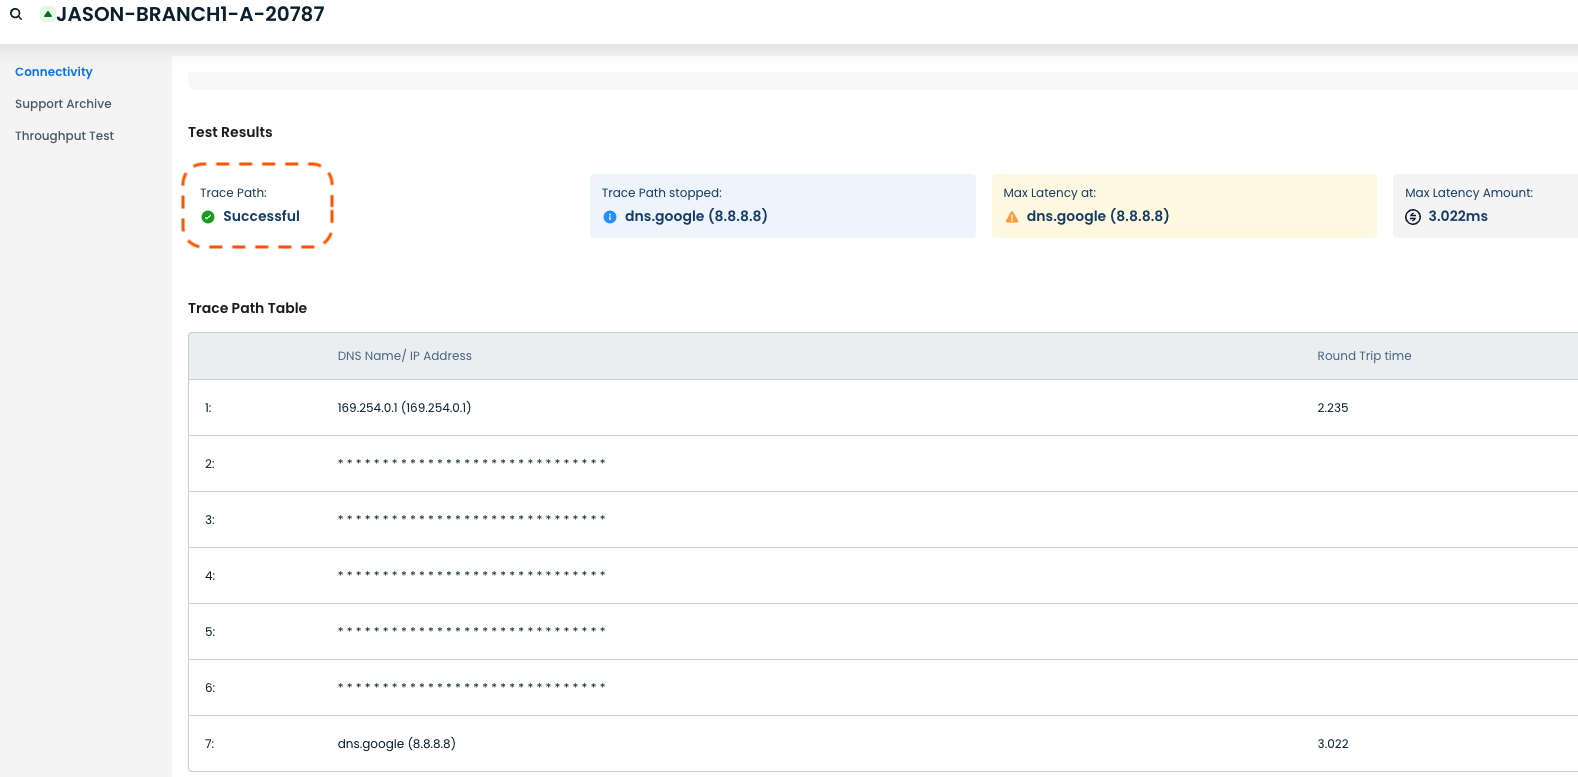
A Traceroute will show “Successful” as the destination was reached.
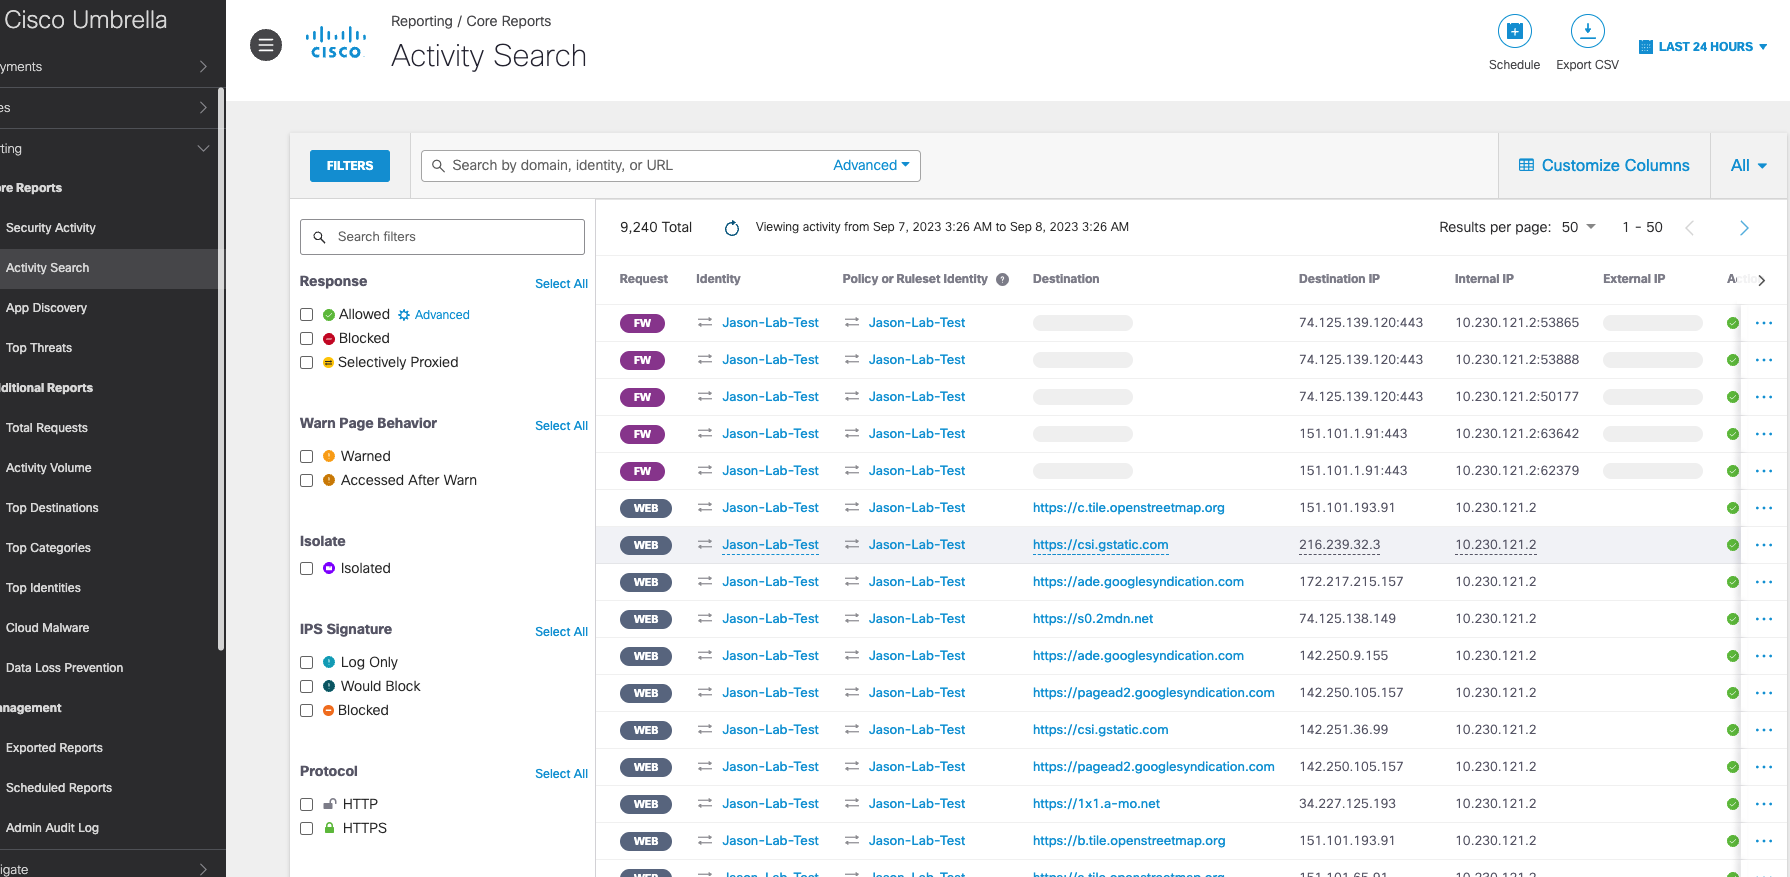
Step 5: Confirm Traffic Activity in Cisco Umbrella
Verify that test traffic is received and processed by Umbrella.
Navigating to Reporting => Activity Search will show traffic is “Allowed” and visible for both:
ICMP / DNS traffic
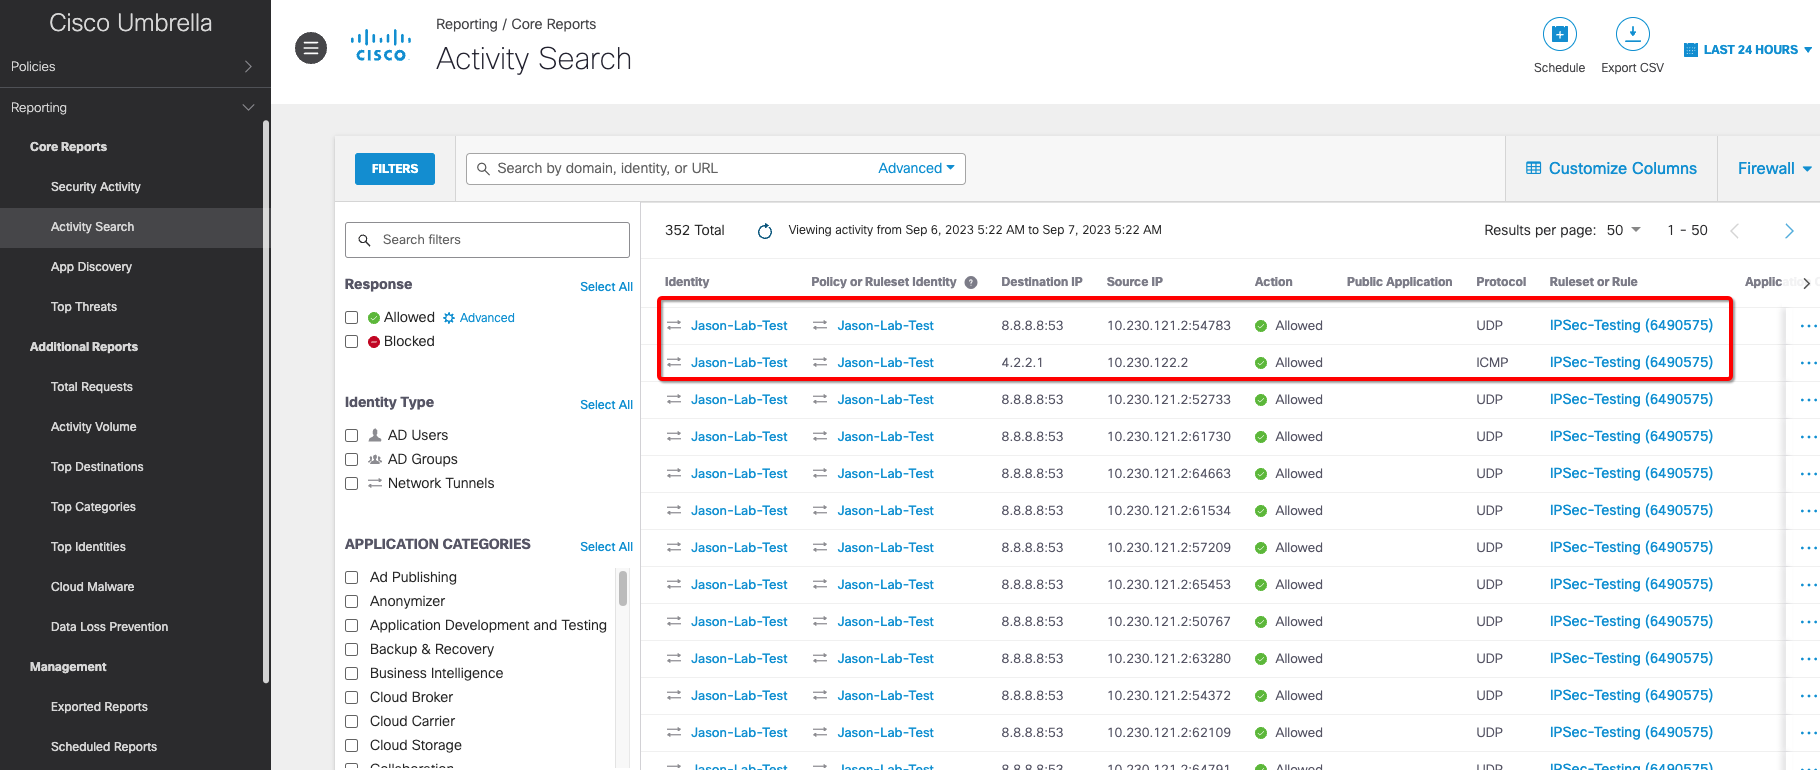
Web / Firewall traffic
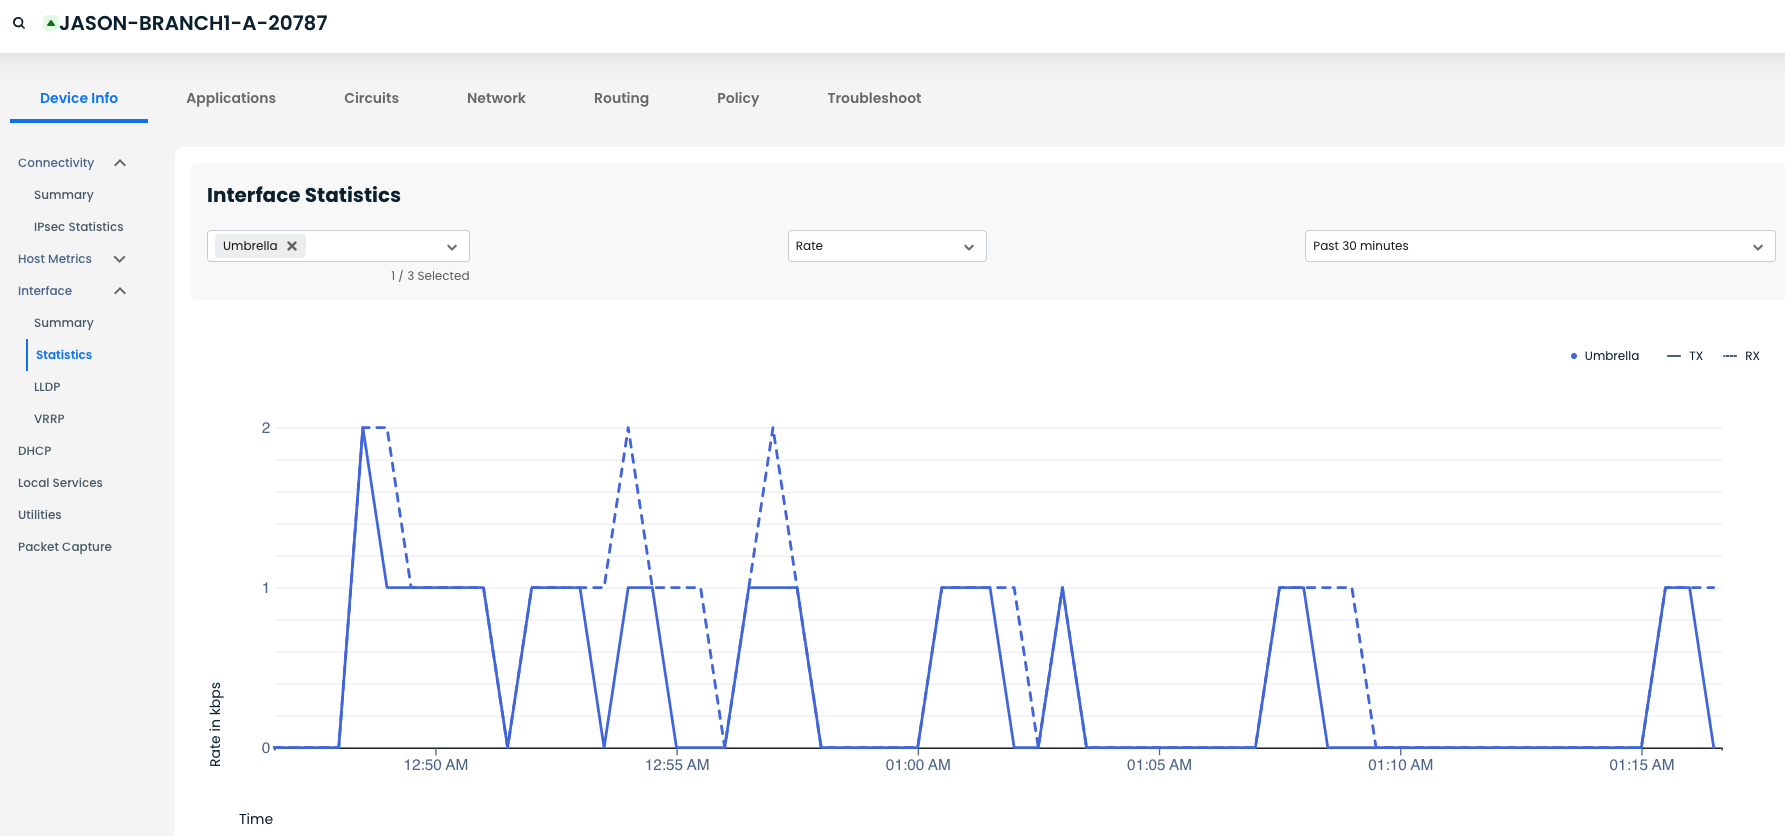
Step 6: Verify Traffic Flow on Graphiant Interface
Confirm that traffic is actively traversing the IPsec tunnel.
TX/RX traffic are both visible in the IPsec Interface Statistics
Step 7: Validate End-User Experience
Confirm that web traffic is being properly inspected and proxied by Umbrella.
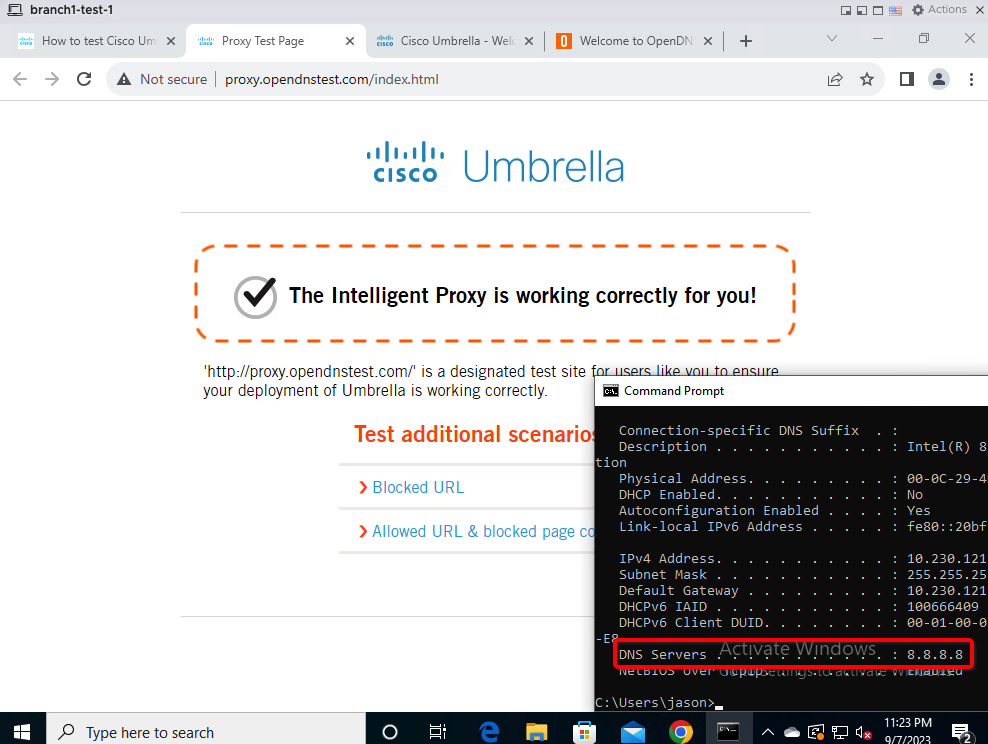
From a client behind Graphiant, open a browser and navigate to:
You should receive a message that “The Intelligent Proxy is working correctly for you!”.